
Свойство Offset объекта Range, возвращающее смещенный диапазон, в том числе отдельную ячейку, в коде VBA Excel. Синтаксис, параметры, примеры.
Offset – это свойство объекта Range, возвращающее диапазон той же размерности, но смещенный относительно указанного диапазона на заданное количество строк и столбцов.
Синтаксис
Синтаксис свойства Range.Offset:
|
Expression.Offset (RowOffset, ColumnOffset) |
Expression – это выражение (переменная), возвращающее исходный объект Range, относительно которого производится смещение.
Параметры
RowOffset – это параметр, задающий смещение диапазона по вертикали относительно исходного на указанное количество строк.
| Значение RowOffset | Направление смещения |
|---|---|
| Отрицательное | вверх |
| Положительное | вниз |
| 0 (по умолчанию) | нет смещения |
ColumnOffset – это параметр, задающий смещение диапазона по горизонтали относительно исходного на указанное число столбцов.
| Значение ColumnOffset | Направление смещения |
|---|---|
| Отрицательное | влево |
| Положительное | вправо |
| 0 (по умолчанию) | нет смещения |
Необходимо следить за тем, чтобы возвращаемый диапазон не вышел за пределы рабочего листа Excel. В противном случае VBA сгенерирует ошибку (Пример 3).
Примеры
Пример 1
Обращение к ячейкам, смещенным относительно ячейки A1:
|
Sub Primer1() Cells(1, 1).Offset(5).Select MsgBox ActiveCell.Address Cells(1, 1).Offset(, 2).Select MsgBox ActiveCell.Address Cells(1, 1).Offset(5, 2).Select MsgBox ActiveCell.Address End Sub |
Пример 2
Обращение к диапазону, смещенному относительно исходного:
|
Sub Primer2() Range(«C8:F12»).Offset(—3, 5).Select MsgBox Selection.Address End Sub |
Пример 3
Пример ошибки при выходе за границы диапазона рабочего листа:
|
Sub Primer3() On Error GoTo ErrorText Cells(1, 1).Offset(—3).Select Exit Sub ErrorText: MsgBox «Ошибка: « & Err.Description End Sub |
Return to VBA Code Examples
The Offset Property is used to return a cell or a range, that is relative to a specified input cell or range.
Using Offset with the Range Object
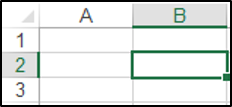
You could use the following code with the Range object and the Offset property to select cell B2, if cell A1 is the input range:
Range("A1").Offset(1, 1).SelectThe result is:
Notice the syntax:
Range.Offset(RowOffset, ColumnOffset)
Positive integers tells Offset to move down and to the right. Negative integers move up and to the left.
The Offset property always starts counting from the top left cell of the input cell or range.
Using Offset with the Cells Object
You could use the following code with the Cells object and the Offset property to select cell C3 if cell D4 is the input range:
Cells(4, 4).Offset(-1, -1).Select
Selecting a Group of Cells
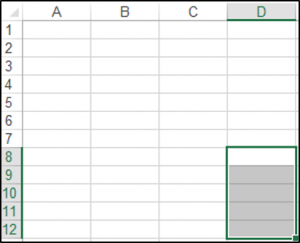
You can also select a group of cells using the Offset property. The following code will select the range which is 7 rows below and 3 columns to the right of input Range(“A1:A5”):
Range("A1:A5").Offset(7, 3).SelectRange(“D8:D12”) is selected:
VBA Coding Made Easy
Stop searching for VBA code online. Learn more about AutoMacro — A VBA Code Builder that allows beginners to code procedures from scratch with minimal coding knowledge and with many time-saving features for all users!

Learn More!
 Excel is the most commonly used spreadsheet management software. VBA , or Visual Basic for Applications, takes it a step further and makes it easy for you to automate just about anything in Excel (check out this tutorial for a quick into to VBA). In today’s tutorial, we’re going to show you how to use the Offset function in VBA, to select a cell or a range of cells. You require basic familiarity with both Excel and VBA.
If you’re new to them, no problem, you can try out our course for VBA with Excel.
What is the Offset Function
The OffSet() returns the value of the cell, at an offset that you’ve specified. The syntax of this function looks like this:
OffSet(Cell reference, rows, columns, height, width)
Here’s what each parameter means
- Cell reference: refers to a single cell or range of cells.
- Rows: specify the number of rows away from the given cell. If the value entered is negative, the given cell shifts to the left.
- Columns: specify the number of columns away from the given cell. If value is negative, the cell shifts up.
Note that height and width are optional. They are used to specify the height and width of the returned range in cells. You can insert the OffSet() formula in any cell in the worksheet, except obviously, the cells from which you want the offset.
Combining Range() with OffSet()
The OffSet property is usually used in tandem with the Range property to specify a new location. Let’s take a look at this example
Range("B1").Offset(RowOffSet:=1, ColumnOffset:=1).Select
This code will select C2. The parameter RowOffSet is used to move 1 row from cell B1. Similarly, the parameter ColumnOffSet is used to move 1 column from cell B1. Note that the parameters have to be separated by a comma.
An easier way to accomplish the same result is to use a shorthand method, like we show below
Range("A1").Offset(1, 1).Select.
Here we only specified the numbers for the row and column offset. VBA will internally “know” that the first one is for the row offset, while the second one is for the column offset. If you’d like to explore the Range() function more, you can take a look at our course on VBA macros. Now, let’s move on to some more examples.
How to Specify Only Rows
It’s possible to specify just the rows and not the columns. Here’s how you can do it.
Range("B1").Offset(1).Select
Here we’ve omitted the column parameter and its comma. This code results in only moving 1 row down from the original cell location. It will select the entire row, not just a single cell.
How to Specify Only Columns
Similarly it’s possible to just specify the columns and omit the rows. The code will look like this:
Range("B1").Offset(, 1 ).Select
The comma is necessary for Excel to know that only column offset has been set.
How to Specify Negative OffSet
Can you guess how to do this? It’s simple enough. Here’s the code
Range("D2").Offset(-1, -1 ).Select
This makes the selection go up 1 row and 1 column from the starting position. That is from cell D2 we move up to cell C1.
How to OffSet a Range of Cells
It is also possible to specify more than one cell for the Range. Say you want to select or get the offset for a range of cells
Range("B1:D4").Offset(1, 1).Select
Here, we start off with the range of cells from B1 to D4. The objective is to offset this complete range of cells by 1 row and 1 column. The new range of cells will be from C2 to E5.
Combining Active Cell with Offset
The active cell refers to the currently selected cell. Let’s check a few examples that involve active cells. Here is the code to move one cell down from the currently selected cells is
ActiveCell.Offset(1,0).Select
Combining Active Cell with Range() and Offset()
The following code selects a cell in addition to four more to the right which are to be copied/pasted in another location.
Range(ActiveCell,ActiveCell.Offset(0,4)).Copy
Take note that there is a comma after the first ActiveCell instance and a double closing parenthesis before the Copy. Let us now move on to cover simple programs that use OffSet functionality to obtain desired results.
Example 1: To Count the Rows in an Excel Worksheet
Sub CountNumRows()
Dim Count1 as Long
Count1 = 0
Do
Count1 = Count1 + 1
ActiveCell.Offset(1, 0).Select
Loop Until IsEmpty(ActiveCell.Offset(0, 1))
MsgBox "There are" Count1 "Rows"
End Sub
In this program, we declared Count1 as a variable of type long. Count is incremented by 1. Then OffSet() is used to loop through the rows. When an empty row is encountered the loop terminates. The variable count1 contains the total number of rows.MsgBox() displays a pop-up box with the total number of rows.
Example 2: Combining Range with OffSet to Fill a Range of Cells with Even Numbers from 1 to 100.
Sub prog1()
Dim Num
Num = 0
For Row = 0 To 9
For Col = 0 To 9
Range(“A1”).Offset(Row, Col).Value = Num
Num = Num + 2
Next Col
Next Row
End Sub
In this program, A1 is the given cell and the resultant range is from A1 to J10. Variable Num is initialized to zero and is incremented by the value 2 each time in the loop. The resultant range of cells contain each and every even number without duplicates from 1 to 100.
Hope you found the offset function useful, and can now use it in your own programs. We have just covered the tip of the iceberg. There’s lots more to it. You can check out more details with this ultimate VBA course, and if you’d like to hop over to advanced Macros we just the right course with Mr Excel!
Sindbad Morehod
Гость
#1
21.04.2008 16:45:40
Подскажите, пожалуйста, можно ли в VBA выделить диапазон со смещением?
Range(«A1:B1»).Select ‘Выделяет диапазон
ActiveCell.Offset(1, 0).Select ‘Смещение относительно активной ячейки вниз
Но, в итоге выделяется только ячейка A2, но не весь диапазон A2:B2.
Может есть какая команда типа ActiveRange.Offset(1, 0).Select (так не работает, проверял), чтобы в итоге был выделен со смещением диапазон а не ячейка? Это нужно для того, чтобы смещенному диапазону присвоить имя, а не только первой его ячейке.
Excel VBA OFFSET Function
VBA Offset function one may use to move or refer to a reference skipping a particular number of rows and columns. The arguments for this function in VBA are the same as those in the worksheet.
For example, assume you have a data set like the one below.
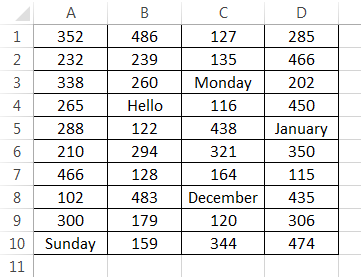
Now from cell A1, you want to move down four cells and select that 5th cell, the A5 cell.
Similarly, if you want to move two rows down from the A1 cell and two columns to the right, select that cell, i.e., the C2 cell.
In these cases, the OFFSET function is very helpful. Especially in VBA OFFSET, the function is just phenomenal.
Table of contents
- Excel VBA OFFSET Function
- OFFSET is Used with Range Object in Excel VBA
- Syntax of OFFSET in VBA Excel
- Examples
- Example #1
- Example #2
- Example #3
- Example #4
- Things to Remember
- Recommended Articles
OFFSET is Used with Range Object in Excel VBA
In VBA, we cannot directly enter the word OFFSET. Instead, we need to use the VBA RANGE objectRange is a property in VBA that helps specify a particular cell, a range of cells, a row, a column, or a three-dimensional range. In the context of the Excel worksheet, the VBA range object includes a single cell or multiple cells spread across various rows and columns.read more first. Then, from that range object, we can use the OFFSET property.
In Excel, the range is nothing but a cell or range of the cell. Since OFFSET refers to cells, we need to use the object RANGE first, and then we can use the OFFSET method.
Syntax of OFFSET in VBA Excel
![]()
- Row Offset: How many rows do you want to offset from the selected cell? Here the selected cell is A1, i.e., Range (“A1”).
- Column Offset: How many columns do you want to offset from the selected cell? Here, the selected cell is A,1, i.e., Range (“A1”).
Examples
You can download this VBA OFFSET Template here – VBA OFFSET Template
Example #1
Consider the below data for demonstration.
Now, we want to select cell A6 from cell A1. But, first, start the macro and reference cell using the Range object.
Code:
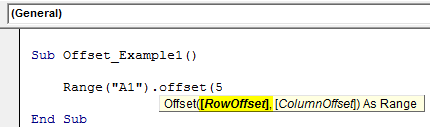
Sub Offset_Example1()

    Range("A1").offset(

End Sub

Now, we want to select cell A6. Then, we want to go down 5 cells. So, enter 5 as the parameter for Row Offset.
Code:
Sub Offset_Example1()

    Range("A1").offset(5

End Sub
Since we are selecting the same column, we leave out the column part. Close the bracket, put a dot (.), and type the method “Select.”
Code:
Sub Offset_Example1()

    Range("A1").Offset(5).Select

End Sub

Now, run this code using the F5 key, or you can run it manually to select cell A6, as shown below.
Output:

Example #2
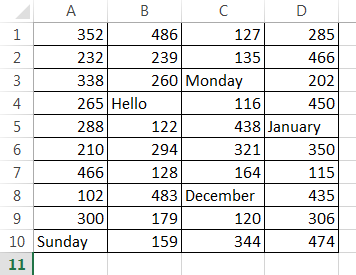
Now, take the same data, but here will also see how to use the column offset argument. Now, we want to select cell C5.
Since we want to select cell C5 firstly, we want to move down four cells and take the right two columns to reach cell C5. The below code would do the job for us.
Code:
Sub Offset_Example2()

    Range("A1").Offset(4, 2).Select

End Sub

We run this code manually or using the F5 key. Then, it will select cell C5, as shown in the below screenshot.
Output:

Example #3
We have seen how to offset rows and columns. We can also select the above cells from the specified cells. For example, if you are in cell A10 and want to select the A1 cell, how do you select it?
In the case of moving down the cell, we can enter a positive number, so here in the case of moving up, we need to enter negative numbers.
From the A9 cell, we need to move up by 8 rows, i.e., -8.
Code:
Sub Offset_Example1()

    Range("A9").Offset(-8).Select

End Sub

If you run this code using the F5 key or manually run it, it will select cell A1 from the A9 cell.

Output:

Example #4
Assume you are in cell C8. From this cell, you want to select cell A10.
From the active cell, i.e., the C8 cell, we need to first move down 2 rows and move to the left by 2 columns to select cell A10.
In case of moving left to select the column, we need to specify the number is negative. So, here we need to come back by -2 columns.
Code:
Sub Offset_Example2()

    Range("C8").Offset(2, -2).Select

End Sub

Now, run this code using the F5 key or run it manually. It will select the A10 cell as shown below:
Output:

Things to Remember
- In moving up rows, we need to specify the number in negatives.
- In case of moving left to select the column, the number should be negative.
- A1 cell is the first row and first column.
- The “Active Cell” means presently selected cells.
- To select the cell using OFFSET, you need to mention “.Select.”
- To copy the cell using OFFSET, you need to mention “.Copy.”
Recommended Articles
This article has been a guide to VBA OFFSET. Here, we learn how to use VBA OFFSET Property to navigate in Excel, practical examples, and a downloadable template. Below are some useful Excel articles related to VBA:-
- Active Cell in VBA
- VBA Set
- What is OFFSET Formula in Excel?
- VBA Cells References
- VBA Format Date