|
hk1209 Пользователь Сообщений: 271 |
#1 15.07.2014 12:20:26 всем доброго времени суток
пишу следующий код, но там ошибка:
пишет: «object doesn’t support this property or method» прошу вашей помощи Изменено: hk1209 — 15.07.2014 13:18:27 |
||||
|
vikttur Пользователь Сообщений: 47199 |
Таблица на листе — не объект. |
|
anvg Пользователь Сообщений: 11878 Excel 2016, 365 |
#3 15.07.2014 13:35:45
Виктор а почему только строки, а не столбцы или и то и другое — дискриминация?
|
||||
|
vikttur Пользователь Сообщений: 47199 |
#4 15.07.2014 13:40:24
Точно. Листы в опале. Исправить!
Или очень-очень Hidden — подарок для неподготовленного |
||||
|
hk1209 Пользователь Сообщений: 271 |
всем спасибо за участие |
|
vikttur Пользователь Сообщений: 47199 |
#6 15.07.2014 14:16:31
…, можно диаграмму поместить на отдельный лист (при создании диаграммы предлагается выбор). |
||
|
hk1209 Пользователь Сообщений: 271 |
#7 15.07.2014 14:26:28 все диаграммы и таблицы на одном листе (Dashboard) |
Как скрыть или отобразить строки и столбцы с помощью свойства Range.Hidden из кода VBA Excel? Примеры скрытия и отображения строк и столбцов.
Range.Hidden — это свойство, которое задает или возвращает логическое значение, указывающее на то, скрыты строки (столбцы) или нет.
Синтаксис
Expression — выражение (переменная), возвращающее объект Range.
- True — диапазон строк или столбцов скрыт;
- False — диапазон строк или столбцов не скрыт.
Примечание
Указанный диапазон (Expression) должен охватывать весь столбец или строку. Это условие распространяется и на группы столбцов и строк.
Свойство Range.Hidden предназначено для чтения и записи.
Примеры кода с Range.Hidden
Пример 1
Варианты скрытия и отображения третьей, пятой и седьмой строк с помощью свойства Range.Hidden:
|
Sub Primer1() ‘Скрытие 3 строки Rows(3).Hidden = True ‘Скрытие 5 строки Range(«D5»).EntireRow.Hidden = True ‘Скрытие 7 строки Cells(7, 250).EntireRow.Hidden = True MsgBox «3, 5 и 7 строки скрыты» ‘Отображение 3 строки Range(«L3»).EntireRow.Hidden = False ‘Скрытие 5 строки Cells(5, 250).EntireRow.Hidden = False ‘Скрытие 7 строки Rows(7).Hidden = False MsgBox «3, 5 и 7 строки отображены» End Sub |
Пример 2
Варианты скрытия и отображения третьего, пятого и седьмого столбцов из кода VBA Excel:
|
Sub Primer2() ‘Скрытие 3 столбца Columns(3).Hidden = True ‘Скрытие 5 столбца Range(«E2»).EntireColumn.Hidden = True ‘Скрытие 7 столбца Cells(25, 7).EntireColumn.Hidden = True MsgBox «3, 5 и 7 столбцы скрыты» ‘Отображение 3 столбца Range(«C10»).EntireColumn.Hidden = False ‘Отображение 5 столбца Cells(125, 5).EntireColumn.Hidden = False ‘Отображение 7 столбца Columns(«G»).Hidden = False MsgBox «3, 5 и 7 столбцы отображены» End Sub |
Пример 3
Варианты скрытия и отображения сразу нескольких строк с помощью свойства Range.Hidden:
|
1 2 3 4 5 6 7 8 9 10 11 12 13 14 15 16 17 |
Sub Primer3() ‘Скрытие одновременно 2, 3 и 4 строк Rows(«2:4»).Hidden = True MsgBox «2, 3 и 4 строки скрыты» ‘Скрытие одновременно 6, 7 и 8 строк Range(«C6:D8»).EntireRow.Hidden = True MsgBox «6, 7 и 8 строки скрыты» ‘Отображение 2, 3 и 4 строк Range(«D2:F4»).EntireRow.Hidden = False MsgBox «2, 3 и 4 строки отображены» ‘Отображение 6, 7 и 8 строк Rows(«6:8»).Hidden = False MsgBox «6, 7 и 8 строки отображены» End Sub |
Пример 4
Варианты скрытия и отображения сразу нескольких столбцов из кода VBA Excel:
|
1 2 3 4 5 6 7 8 9 10 11 12 13 14 15 16 17 |
Sub Primer4() ‘Скрытие одновременно 2, 3 и 4 столбцов Columns(«B:D»).Hidden = True MsgBox «2, 3 и 4 столбцы скрыты» ‘Скрытие одновременно 6, 7 и 8 столбцов Range(«F3:H40»).EntireColumn.Hidden = True MsgBox «6, 7 и 8 столбцы скрыты» ‘Отображение 2, 3 и 4 столбцов Range(«B6:D6»).EntireColumn.Hidden = False MsgBox «2, 3 и 4 столбцы отображены» ‘Отображение 6, 7 и 8 столбцов Columns(«F:H»).Hidden = False MsgBox «6, 7 и 8 столбцы отображены» End Sub |
Т.е. могу ли я скрыть ячейки B2:D4 так, чтобы ячейки B1,C1,D1,A2,A3,A4 остались видны.
Т.е. мне нужно скрыть B2:D4, но так, чтобы это не повлияло на размер, видимость, внешний вид окружающих их ячеейк по вертикали или горизонтали.
Я знаю, звучит немного не так, как таблицы работают, тем не менее.
Суть, на самом деле в том, что у меня есть несколько листов, и на одном из них мне нужно добавлять элементы управления (выпадающие списки, в основном) при нажатии на кнопку ‘Добавить’.
Можно делать это динамически, но это связано с кучей макросов и на эти ячейки ссылаются поля на итоговом листе. Причем при добавлении элементов управления, мне нужно также ‘добавлять’ поля на итоговый лист. При этом под полями на итоговом листе (а еще слева и справа) есть еще другие заполненные ячейки.
Поэтому мне в голову пришла идея: добавить это все сразу, но для начала скрыть, чтобы потом показывать по мере надобности.
Если есть решение получше, с удовольствием приму.
You can use a VBA code to hide or unhide a sheet in Excel. When you right-click on the sheet tab, you can see the option to hide or unhide it, and that same thing you can do with a VBA code.
In this post, we will look at some of the ways and methods that we can use.
Let’s say you want to hide “Sheet1” from the active workbook. In that case, you need to use code like the following.
Sheets("Sheet1").Visible = FalseIn the above code, you have referred to Sheet1, use the visible property, and changed it to false.
Make a Sheet Very Hidden
There’s one more option that you can use to make a sheet very hidden that cannot be un-hide by the user easily.
Hide a Sheet Based on the Value from a Cell
Alright, if you want to use a cell value instead of directly using the sheet name in the code, you can refer to that cell.
Sheets(Range("A1").Value).Visible = TrueThis code refers to cell A1 and uses the value from it to refer to the sheet that you want to hide.
Helpful Links: Run a Macro – Macro Recorder – Visual Basic Editor – Personal Macro Workbook
Check Sheet Before Hiding
You can also use a small code like the following to check the sheet that you want to hide exits or not.
Sub vba_hide_sheet()

Dim sht As Worksheet

For Each sht In ThisWorkbook.Worksheets

    If sht.Name = "Sheet1" Then

        sht.Visible = False
        Exit Sub

    End If

Next sht

MsgBox "Sheet not found", vbCritical, "Error"

End Sub
The above code uses the FOR EACH LOOP + IF STATEMENT to loop through each sheet in the workbook. And check for the sheet that you want to hide.
Hide All the Sheets (Except ActiveSheet)
Now there one thing that you need to understand you can’t hide all the sheets. There must be one sheet visible all the time.
Sub vba_hide_sheet()

Dim ws As Worksheet

For Each ws In ThisWorkbook.Sheets

    If ActiveSheet.Name <> ws.Name Then

        ws.Visible = False

    End If

Next ws

End Sub
The above code loops through all the sheets of the workbook, then match each sheet’s name with the active sheet’s name and hide it if it doesn’t match.
VBA Code to Unhide a Sheet
To unhide a sheet, you need to change the visible property to TRUE.
Sheets("Sheet1").Visible = FalseIf the sheet that you want to unhide it already visible, this code won’t show any error. But if that sheet doesn’t exist, then you’ll get a Run-time error ‘9’.

Use VBA to Unhide All the Hidden Sheets
Imagine you have more than one hidden sheet in a workbook, and if you want to hide them manually, you need to do this one by one.
But here’s the code does this in one go.
Sub vba_unhide_sheet()

Dim ws As Worksheet

For Each ws In ThisWorkbook.Sheets

    If ws.Visible = False Then

        ws.Visible = True

    End If

Next ws

End Sub
It loops through each sheet and un-hides it.
More Tutorials on VBA Worksheets
- Back to VBA Worksheet / VBA Tutorial
Return to VBA Code Examples
In this Article
- Hide Sheet in VBA
- Unhide Sheet
- Very Hidden Sheets
- Unhide Very Hidden Sheets
- Hide / Unhide Sheets in the VBA Editor
- Hide All Worksheet Tabs
- Hide / Unhide Sheets in Protected Workbook
- Unhide All Sheets
- VBA Coding Made Easy
This tutorial will teach you how to hide and unhide Worksheets with VBA.
Hide Sheet in VBA
To hide a Sheet in VBA, use the worksheet Visible property.
Either set the Visible property to FALSE:
Worksheets("Sheet1").visible = Falseor set the Visible property to xlSheetHidden:
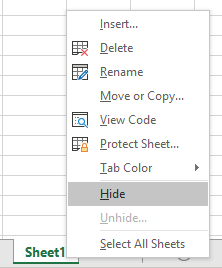
Worksheets("Sheet1").visible = xlSheetHiddenThis is the same as if the user right-clicked the worksheet tab and selected “hide”.
Unhide Sheet
To unhide a Sheet in VBA, use the worksheet Visible property:
Worksheets("Sheet1").Visible = Trueor
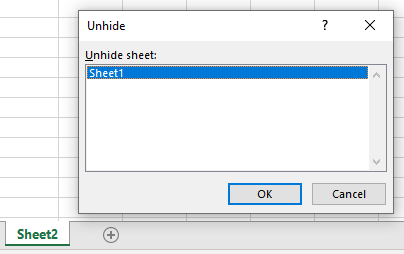
Worksheets("Sheet1").Visible = xlSheetVisibleHidden Sheets can be seen by right-clicking in the Worksheet tab area:
Very Hidden Sheets
The Sheet Visible property has a third option: xlSheetVeryHidden:
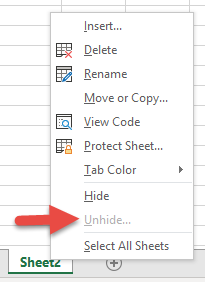
Worksheets("Sheet1").Visible = xlSheetVeryHiddenVery hidden Sheets are hidden when right-clicking in the Worksheet tab area:
This code will prevent the spreadsheet user from seeing the Worksheet tab at the bottom of the screen. It also hides the Worksheet from the user when they right-click the tabs at the bottom. The only way to see that the Worksheet exists (or unhide the Worksheet) is by opening the Visual Basic Editor.
Unhide Very Hidden Sheets
Very hidden Worksheets are made visible just like regular hidden Worksheets:
Worksheets("Sheet1").Visible = Trueor
Worksheets("Sheet1").Visible = xlSheetVisibleHide / Unhide Sheets in the VBA Editor
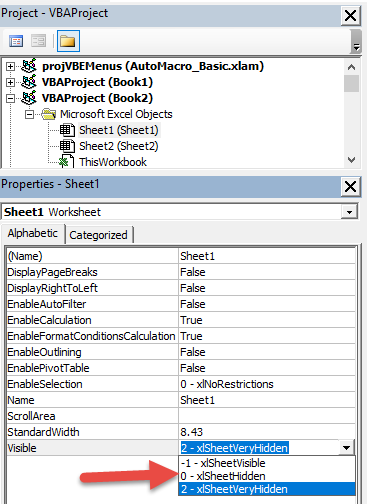
You can also toggle the Worksheet Visible property within the VBA Editor:
Hide All Worksheet Tabs
You might also want to hide the Worksheet Tab area altogether to prevent the user from navigating to different worksheets. Learn more about hiding worksheet tabs.
Hide / Unhide Sheets in Protected Workbook
Your workbook must be unprotected before you can hide or unhide worksheets. To unprotect your workbook structure use the following code:
ActiveWorkbook.UnprotectIf your workbook structure is password-protected you must do this instead:
ThisWorkbook.Unprotect "password"Unhide All Sheets
This procedure will unhide all worksheets in a workbook, using a For Each Loop:
Sub Unhide_All_Sheets()
    Dim ws As Worksheet

    ActiveWorkbook.Unprotect
    For Each ws In Worksheets
        ws.Visible = xlSheetVisible
    Next
End Sub
Notice that we first unprotect the workbook, just in case it was password protected.
VBA Coding Made Easy
Stop searching for VBA code online. Learn more about AutoMacro – A VBA Code Builder that allows beginners to code procedures from scratch with minimal coding knowledge and with many time-saving features for all users!
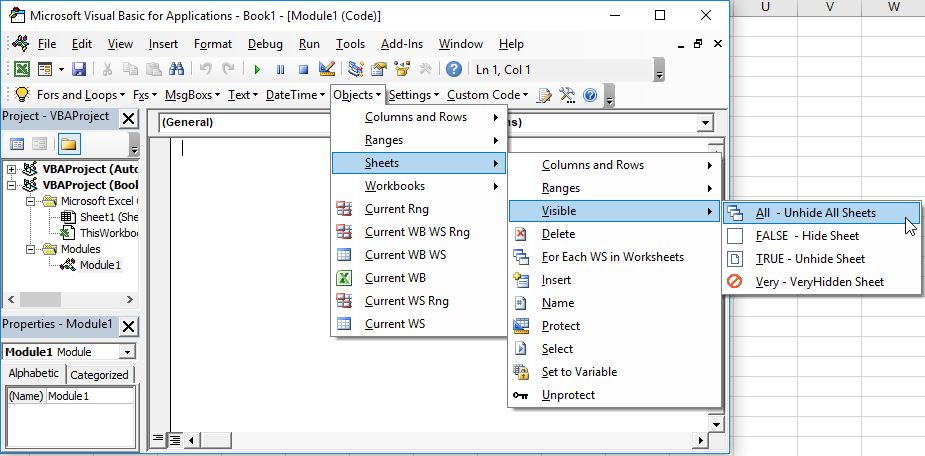
Learn More!

