
A combination of integers, strings of characters, or other symbols is used to verify the identity of a user during the authentication process so, that they can access the system. But a password should always remain in a hidden format to prevent it from shoulder spying. Shoulder spying is a practice where a person collects our personal data by spying over our shoulders in Cyber Cafe or ATM. Let’s learn how to hide the password for that we need to mask the password in Excel Input Box.
Steps to Mask Password in VBA Excel Input Box
Follow the further steps to create a masked password in VBA:
Step 1: Press Alt+F11 in the Excel window to get the VBA window.
Step 2: Select Insert in the Ribbon tab of the VBA code window.

Step 3: Then click on UserForm to get the toolbox and user form.

Step 4: Select CommandButton from Toolbox.

And then drag it to the UserForm1 tab.

Step 5: Select TextBox from the toolbox and then drag it to UserForm1.

Step 6: Press F4 to get the Properties Window.
Step 7: Change the name of the Text Box to “txtPassword”

Step 8: Now, scroll down the Properties tab of txtPassword to assign a value of asterisk(*) in PasswordChar to create a password mask.

Step 9: In the drop-down box select CommandButton1.

Step 10: Change the name of the CommandButton to CmdInput and Caption name to Submit.

Step 11: Change the caption name in the Properties – UserForm1 tab to Password.

Step 11: Double-click on Submit button of the Password form.

Step 12: Write the following code to see the password in the Message Box.

Unload Me is used to close the form and remove its details from the memory. Now, to run the code press F5.
Step 13: Enter the password which will be hidden in the Excel window

Step 14: Click on Submit button so that we can see the password in the message box

IN THIS TASK
-
SUMMARY
-
Create a Dialog Box
-
Code Sample to Use Dialog Box
-
Summary
In Microsoft Excel, you can create a custom dialog box to prompt a user for information by using text boxes, buttons, or other dialog box controls. Typically, when you type text in a text box, the text appears as you type. However, you can use a property of the Microsoft Visual Basic for Applications (VBA) Edition User Form to create the effect of a hidden or «masked» text box. This can be useful for creating a password dialog box, where you do not want the text that is typed in a text box to be «visible». The following information describes how to create this effect.
back to the top
Create a Dialog Box
-
Start Excel.
-
Press Alt+F11 to start the Microsoft Visual Basic Editor.
-
On the Insert Menu, click User Form.
-
Using the Controls Toolbox, add a text box and a command button on to your user form.
-
In the Properties sheet, in the Objectlist, click TextBox1.
-
On the Alphabetic tab, click
PasswordChar. -
Type an asterisk (*).
-
In the Properties sheet, in the Objectlist, click UserForm1.
-
On the Run menu, click Run User Form.
When you type letters, the asterisk appears instead.
back to the top
Code Sample to Use Dialog Box
To retrieve the text string written to the text box, you can use the following sample code:
-
Double-click CommandButton1 on your user form.
-
Type the following code:
Private Sub CommandButton1_Click()
    MsgBox Me.TextBox1
End Sub -
Click Save to save your project.
-
On the Run menu, click Run Sub/User Form.
Type a word in the text box, and then click the
Command button. The text that you typed appears in the message box.
back to the top
Need more help?
Want more options?
Explore subscription benefits, browse training courses, learn how to secure your device, and more.
Communities help you ask and answer questions, give feedback, and hear from experts with rich knowledge.
Above link on comment should solve your problem. Here is like same codes. First copy and past below codes to a module

Option Explicit
Private Declare PtrSafe Function CallNextHookEx Lib "user32" (ByVal hHook As LongPtr, _
    ByVal ncode As LongPtr, ByVal wParam As LongPtr, lParam As Any) As LongPtr

Private Declare PtrSafe Function GetModuleHandle Lib "kernel32" Alias "GetModuleHandleA" (ByVal lpModuleName As String) As LongPtr

Private Declare PtrSafe Function SetWindowsHookEx Lib "user32" Alias "SetWindowsHookExA" _
    (ByVal idHook As LongPtr, ByVal lpfn As LongPtr, ByVal hmod As LongPtr, ByVal dwThreadId As LongPtr) As LongPtr

Private Declare PtrSafe Function UnhookWindowsHookEx Lib "user32" (ByVal hHook As LongPtr) As LongPtr

Private Declare PtrSafe Function SendDlgItemMessage Lib "user32" Alias "SendDlgItemMessageA" _
(ByVal hDlg As LongPtr, ByVal nIDDlgItem As LongPtr, ByVal wMsg As LongPtr, ByVal wParam As LongPtr, ByVal lParam As LongPtr) As LongPtr

Private Declare PtrSafe Function GetClassName Lib "user32" Alias "GetClassNameA" (ByVal hwnd As LongPtr, _
ByVal lpClassName As String, ByVal nMaxCount As LongPtr) As LongPtr

Private Declare PtrSafe Function GetCurrentThreadId Lib "kernel32" () As LongPtr

Private Const EM_SETPASSWORDCHAR = &HCC
Private Const WH_CBT = 5
Private Const HCBT_ACTIVATE = 5
Private Const HC_ACTION = 0

Private hHook As LongPtr


Public Function NewProc(ByVal lngCode As LongPtr, ByVal wParam As LongPtr, ByVal lParam As LongPtr) As LongPtr
    Dim RetVal
    Dim strClassName As String, lngBuffer As LongPtr

    If lngCode < HC_ACTION Then
        NewProc = CallNextHookEx(hHook, lngCode, wParam, lParam)
        Exit Function
    End If

    strClassName = String$(256, " ")
    lngBuffer = 255

    If lngCode = HCBT_ACTIVATE Then
        RetVal = GetClassName(wParam, strClassName, lngBuffer)
        If Left$(strClassName, RetVal) = "#32770" Then
            SendDlgItemMessage wParam, &H1324, EM_SETPASSWORDCHAR, Asc("*"), &H0
        End If
    End If

    CallNextHookEx hHook, lngCode, wParam, lParam
End Function

Public Function PasswordBox(Prompt, Title) As String
    Dim lngModHwnd As LongPtr, lngThreadID As LongPtr

    lngThreadID = GetCurrentThreadId
    lngModHwnd = GetModuleHandle(vbNullString)

    hHook = SetWindowsHookEx(WH_CBT, AddressOf NewProc, lngModHwnd, lngThreadID)

    PasswordBox = InputBox(Prompt, Title)
    UnhookWindowsHookEx hHook
End Function
Then call PasswordBox() function from any where in workbook like.
Sub MaskedPassword()
    Range("A1") = PasswordBox("Enter your password.", "Paasword")
End Sub
October 12, 2015/
Chris Newman
Today, I came across a spreadsheet that allowed a user to connect to a remote database via VBA. The spreadsheet had a nifty little interface allowing you to enter your username and password for access to the database. The thing that caught my eye was the password had masked characters, so no one passing by your desk could see your password.
Since I had never seen this in a spreadsheet before, I naturally had to dig in and see how this was done. It turned out to be very easy to set up and in the following steps, you too will learn how this neat feature can be accomplished.
Adding The Text Box
First, you will need to add the text box where you or your users need to enter their password. For this, you will need to insert an ActiveX Control Text Box (a Form Control version will not work). To do this:
-
Go to the Developer Tab
-
Click Insert inside the Controls group
-
Go down and click the Text Box icon underneath the ActiveX Controls heading
After you click the Text Box icon, you can simply draw your text box on your spreadsheet. Below, I did this process twice, so my users could enter in their Username and Password into Text Boxes.
Adding The Mask
Now for the fun stuff! To get your text box to mask what is being entered into it, you will first need to right-click on the text box while in Design Mode (Developer Tab > Design Mode). From the menu that appears, select Properties.
Next, you will get this form box popping up with an enormous list of settings that you can tweak. We are going to focus on a setting called PasswordChar (about two-thirds of the way down the list). in the PasswordChar field you can enter any character in and the text box will only display that character within your text box. Typically, everyone uses an asterisk (*), but you can use a question mark (?), exclamation mark (!), or whatever your hear desires
The Final Touches
After you are finished tweaking your text box settings, you will need to exit out of Design Mode. Simply click on the Design Mode button in your ribbon so it is no longer highlighted.
By adding a couple personalized tweaks, you can have your very own login screen within Excel!
Security Things To Keep In Mind
While this is a very cool feature, it is important to note even though your password is masked visually, it is still stored within the Excel spreadsheet. You need to be aware of this because someone using VBA could easily pull the password from the text box.
Also, if you simply remove your special character from the PasswordChar field, your password will be revealed within the text box.
To put it simply: this in NOT a secure way to store your login information or any confidential information for that matter.
My Recommendation For Masking Information
I recommend only using this feature for personal spreadsheets that are not shared with anyone else. This feature is really meant to prevent passers-by from catching a glimpse of personal information while displayed on your screen. Excel’s password masking feature is not meant for preventing other spreadsheet users from discovering your password.
About The Author
Hey there! I’m Chris and I run TheSpreadsheetGuru website in my spare time. By day, I’m actually a finance professional who relies on Microsoft Excel quite heavily in the corporate world. I love taking the things I learn in the “real world” and sharing them with everyone here on this site so that you too can become a spreadsheet guru at your company.
Through my years in the corporate world, I’ve been able to pick up on opportunities to make working with Excel better and have built a variety of Excel add-ins, from inserting tickmark symbols to automating copy/pasting from Excel to PowerPoint. If you’d like to keep up to date with the latest Excel news and directly get emailed the most meaningful Excel tips I’ve learned over the years, you can sign up for my free newsletters. I hope I was able to provide you with some value today and I hope to see you back here soon!
— Chris
Founder, TheSpreadsheetGuru.com
Welcome to Logically Proven blog.
This post demonstrates how to hide the password text in a text box control using Excel VBA (Visual Basic for Applications).
First design the user form as shown in the picture below —

This form contains two textbox controls — one for Username and other for password, labels and two buttons.
In the properties window (press F4 in see properties in code window) of password textbox control — change the value of PasswordChar to ‘*’.

This will enforce the application to show all the characters in a password textbox control as «****».
If this property value is empty, the characters are visible to the users.

If you want to display other than ‘*’ you can change the character that you wish. Here changed to ‘$’.
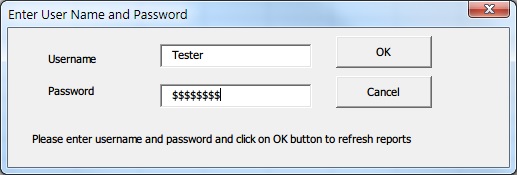
You are restricted to enter only one character in PasswordChar property of a textbox control. Even if you try to enter more than one character, the first character will be taken into account and the remaining characters will be removed automatically from this property box.
Events:
Double-click anywhere on the form to create the form initialize event to set the default values or do you want to perform some tasks before login form open.
Private Sub UserForm_Initialize()

    'perform actions before opening the login form

End Sub
Double click on the buttons to create the respective events of the buttons.
Please find the sample codes of button events.
Sample Ok button code:
Private Sub cmdOK_Click()

'validate the controls
If txtUserName.Value = "" Or txtPassword.Value = "" Then
    MsgBox "Please enter valid username and password"
    Exit Sub
End If

    'do your work

'close the form
Unload frmLogin

End Sub
Sample Cancel button code: To close the form
Private Sub cmdClose_Click()

'close the form
Unload frmLogin

End Sub
Please write your comments if you find anything is incorrect or do you want to share more information about the topic discussed above.
Logically Proven
Learn, Teach, Share

Karthik Byggari
Author & Editor
Computer Science graduate, Techie, Founder of logicallyproven, Love to Share and Read About pprogramming related things.