
The VBA ListBox is a very useful control. If you are creating any kind of UserForm application you will most likely use it.
In this post, I’m going to show you everything you need to know about the VBA ListBox so you can avoid the common pitfalls and get up and running quickly and easily.

What is the VBA ListBox used for?
The ListBox is used to display a list of items to the user so that the user can then select one or more. The ListBox can have multiple columns and so it is useful for tasks like displaying records.
VBA ListBox versus the VBA ComboBox
The ListBox is very similar to the ComboBox which also allows the user to select an item from a list of items. The main differences are:
- The Listbox allows multiple selections. The Combobox only allows one selection.
- Items in the ListBox are always visible. The Combobox items are only visible when you click on the “down” icon.
- The ComboBox has the ability to filter the contents when you type.
The VBA ListBox Properties Quick Guide
| Function | Operation | Example |
|---|---|---|
| AddItem | Add an item | listbox.AddItem «Spain» |
| Clear | Remove all Items | listbox.Clear |
| ColumnCount | Set the number of visible columns | ComboBox1.ColumnCount = 2 |
| ColumnHeads | Make the column row visible | ComboBox1.ColumnHeads = True |
| List | Range to Listbox ListBox to Range |
Listbox.List = Range(«A1:A4»).Value Range(«A1:A4»).Value = Listbox.List |
| List | Update a column value | Listbox.List(1,2) = «New value» |
| ListCount | Get the number of items | cnt = listbox.ListCount |
| ListIndex | Get/set selected item | Idx = listbox.ListIndex combo.ListIndex = 0 |
| RemoveItem | Remove an item | listbox.Remove 1 |
| RowSource | Add a range of values from a worksheet | ComboBox1.RowSource = Sheet1.Range(«A2:B3»).Address |
| Value | Get the value of selected Item | Dim sCountry As String sCountry = listbox.Value |
How to Add Items to the ListBox
There are 3 ways to add items to the VBA Listbox:
- One at a time using the AddItem property.
- Adding an array/range using the List property.
- Adding a Range using the RowSource property.
The List and RowSource properties are the most commonly used. The table below provides a quick comparison of these properties:
| Task | RowSource | List |
|---|---|---|
| Column Headers | Yes | No |
| Update values in ListBox | No | Yes |
| Add new items | No | Yes |
| Data type | Range | Array(including Range.Value) |
| If source data changes | Listbox is automatically updated. | ListBox is not updated. |
VBA ListBox List Property
The List property allows you to add to contents of an array to a ListBox. As Range.Value is an array you can copy the contents of any range to the Listbox.
Here are some examples of using the List property:
' Add the contents of an array
ListBox1.List = Array("Apple", "Orange", "Banana")

' Add the contents of a Range
ListBox1.List = Range("A1:E5").Value
You can also use the List property to write from the ListBox to an array or range:
Range("A1:B3").Value = ListBox1.List
Important Note: If there is only one item in a range then VBA doesn’t covert it to an array. Instead, it converts the range to a string/double/date etc.
Sheet1.Range("A1:A2").Value ' Array
Sheet1.Range("A1").Value ' Single value variable
In this case, you need to use AddItem to add the value to the ListBox:
 If myRange.Count = 1 Then
    ListBox1.AddItem myRange
 Else
    ListBox1.List = myRange.Value
 End If
The List Property and Column Headers
The ListBox only displays column headers if you use RowSource. Otherwise, they are not available. The best way to add column headers(and it’s not a great way) is to add Labels above the ListBox columns. One advantage is that you can use the click event of the Label if you want to implement something like sorting.
Updating Items using the List Property
You can update individual items in the ListBox using the List Property.
Imagine we have a ListBox with data like this:

If we want to change Nelson in row 3, column 2 we do it like this:
ListBox1.List(2, 1) = "SMITH"
The result we get is:

The List property rows and columns are zero-based so this means row 1 is 0, row 2 is 1, row 3 is 2 and so on:

VBA ListBox RowSource
The RowSource property allows us to add a range to the ListBox. This is different from the List Property in that the Range is linked to the ListBox. If data in the Range changes then the data in the ListBox will update automatically.
When we use RowSource the data in the ListBox is read-only. We can change the RowSource range but we cannot change the values in the ListBox.
How to use RowSource
We add the RowSource range as a string like this:
ListBox1.RowSource = "Sheet1!A1:A5"
If you don’t specify the sheet the VBA will use the active sheet
ListBox1.RowSource = "A1:A5"
If you are using the Address of a range object with RowSource then it is important to use the External parameter. This will ensure that RowSource will read from the sheet of the range rather than the active sheet:
 ' Get the range
 Dim rg As Range
 Set rg = Sheet1.Range("A1:A5")

 ' Address will be $A$1:$A$5 which will use the active sheet
 ListBox1.RowSource = rg.Address
 Debug.Print ListBox1.RowSource

 ' Address will be [Book2]Sheet1!$A$1:$A$5 which will use Sheet1
 ListBox1.RowSource = rg.Address(External:=True)
 Debug.Print ListBox1.RowSource
RowSource Column Headers
Column headers are automatically added to the ListBox when you use the RowSource property. The ColumnHeads property must be set to True or the headers will not appear. You can set this property in the code or in the properties window of the ListBox.
ListBox1.ColumnHeads = True
The column headers are taken from the row above the range used for the RowSource. For example, if your range is A2 to C5 then the column header will use the range A1 to C1:
Here is an example: We want to add the data below to our ListBox and we want A1 to C1 to be the header.

We set the RowSource property to A2:C5 and set the ColumnHeads property to true:
With ListBox1
    .RowSource = "sheet1!A2:C5"
    .ColumnHeads = True
    .ColumnWidths = "80;80;80"
End With
The result will look like this:

VBA ListBox AddItem
It is very rare that you would use the AddItem property to fill the ListBox. List and RowSource are much more efficient. AddItem is normally used when the Listbox already has items and you want to add a new item.
The AddItem property is simple to use. You provide the item you want to add as a parameter. The ListBox will automatically add it as the last item:
With ListBox
    .AddItem "Apple"
    .AddItem "Orange"
End With
If you want to Insert the item at a certain position you can use the second parameter. Keep in mind that this is a zero-based position, so if you want the item in position one then the value is 0, position 2 the value is 1, and so on.
With ListBox1
    .AddItem "Apple"
    .AddItem "Orange"

    ' Add "Banana" to position 1(Index 0)
    .AddItem "Banana", 0
End With
The order will be:
Banana
Apple
Orange
If you want to add multiple columns with AddItem then you need to use the List property after you use AddItem:
 With listboxFruit
    .List = myRange.Value
    .AddItem "Banana"

    ' Add to the second column of 'Banana' row
    .List(2, 1) = "$2.99"
 End With
One reason for using AddItem is if you are adding from data that isn’t sequential so you cannot use the List or RowSource properties:
 Dim cell As Range
 ' Fill items with first letter is A
 For Each cell In Sheet1.Range("A1:A50")
    If Left(cell.Value, 1) = "A" Then
        comboBoxFruit.AddItem cell.Value
    End If
 Next
Important Note: If you fill a ListBox with RowSource then you cannot use AddItem to add a new item. If you try you will get a “Runtime Error 70 – Permission Denied”.
VBA ListBox Selected Items
If only one item is selected then you can use ListIndex to get the selected row. Remember that it is zero-based so row 1 in the ListBox is at ListIndex 0, row 2 at ListIndex 1 and so on.
MsgBox "The selected item is " & ListBox1.ListIndex
If the ListBox has multiple columns then you can use the ListIndex and List properties together to return a value in the selected row:
  ' Display the value from the second column of the selected row
  MsgBox ListBox1.List(ListBox1.ListIndex, 2)
If multiple items are selected then you can use the GetSelectedRows function which returns a collection of selected rows:
 Sub Example()

    ' Store the row numbers of selected items to a collection
    Dim selectedRows As Collection
    Set selectedRows = GetSelectedRows()

    ' Print the selected rows numbers to the Immediate Window
    Dim row As Long
    For Each row In selectedRows
        ' Print to the Immediate Window Ctrl + G
        Debug.Print row
    Next row

 End Sub

 ' Returns a collection of all the selected items
 Function GetSelectedRows() As Collection

    ' Create the collection
    Dim coll As New Collection

    ' Read through each item in the listbox
    Dim i As Long
    For i = 0 To listboxFruit.ListCount - 1

        ' Check if item at position i is selected
        If listboxFruit.Selected(i) Then
            coll.Add i
        End If
    Next i

    Set GetSelectedRows = coll

End Function
Reading Data from the VBA Listbox
To read data from the ListBox we can use the ListBox.Value property. This only works when the ListBox is set to only select one item i.e. MultiSelect is set to frmMultiSelectSingle(see the section VBA ListBox MultiSelect below for more about this).
Single selection only with one column
When only one item is selected we can use the Value property to get the currently selected item:
 Dim fruit As String
 fruit = ListBox1.Value
Keep in mind that if there are multiple columns, Value will only return the value in the first column.
Single selection only with multiple columns
If the ListBox has Multiple columns you can use the Value property to get the value in the first column. You need to read through the List property to get the values in the other column(s). The List property is essentially an array so you can treat it like one.
In the example below we read through the columns of row 1(the index of row 1 is 0):
 With ListBox1

     For j = LBound(.List, 2) To UBound(.List, 2)
         ' Print the columns of the first row to the Immediate Window
         Debug.Print .List(0, j)
     Next j

 End With
Normally you want to print the values in the selected row. You can use the ListIndex property to get the selected item(Note that ListIndex returns the last selected items so it won’t work where there are multiple items selected):
 ' ExcelMacroMastery.com
 Sub ReadValuesFromSelectedRow()

    ' Write contents of the row to the Immediate Window(Ctrl G)
    With ListBox1
        For j = LBound(.List, 2) To UBound(.List, 2)
            ' Print the columns of the selected row to the Immediate Window
            Debug.Print .List(.ListIndex, j) Next j
    End With
 End Sub
Multiple selections
If the ListBox has multiple selections and you want to get all the data from each then you can use the GetSelectedRows() sub from the section VBA ListBox Selected Items. This will get a collection of all selected rows. You can use this to print the data from the selected rows:
Sub PrintMultiSelectedRows()

    ' Get all the selected rows
    Dim selectedRows As Collection
    Set selectedRows = GetSelectedRows(Me.ListBox1)

    Dim i As Long, j As Long, currentRow As Long
    ' Read through the selected rows
    For i = 1 To selectedRows.Count
        With ListBox1

            ' Get the current row
            currentRow = selectedRows(i)

            ' Print row header
            Debug.Print vbNewLine & "Row : " & currentRow

            ' Read items in the current row
            For j = LBound(.List, 2) To UBound(ListBox1.List, 2)
                ' Print the columns of the first row to the Immediate Window
                Debug.Print .List(currentRow, j)
            Next j

        End With
    Next i

End Sub

Function GetSelectedRows(currentListbox As MSForms.ListBox) As Collection

    ' Create the collection
    Dim coll As New Collection

    ' Read through each item in the listbox
    Dim i As Long
    For i = 0 To currentListbox.ListCount - 1

        ' Check if item at position i is selected
        If currentListbox.Selected(i) Then
            coll.Add i
        End If
    Next i

    Set GetSelectedRows = coll

End Function
VBA ListBox MultiSelect
We can use the MultiSelect property of the ListBox to allow the user to select either a single item or multiple items:

There are 3 selections:
- 0 = frmMultiSelectSingle – [Default]Multiple selection isn’t allowed.
- 1 = frmMultiSelectMulti – Multiple items are selected or deselected by choosing them with the mouse or by pressing the Spacebar.
- 2 = frmMultiSelectExtended – Multiple items are selected by holding down Shift and choosing them with the mouse, or by holding down Shift and pressing an arrow key to extend the selection from the previously selected item to the current item. You can also select items by dragging with the mouse. Holding down Ctrl and choosing an item selects or deselects that item.
VBA ListBox Columns
You can have multiple columns in a ListBox. For example, you can load a Range or two-dimensional array to a ListBox using List or RowSource.
Often when you load data with multiple columns only one column appears. This can be very confusing when you are using the Listbox. To get the columns to appear you have to set the ColumnCount property to the number of Columns.
You should also make sure that the ColumnWidths property is correct or one of the columns may not appear.
You can do it like this:
With listboxFruit
    .RowSource = "Sheet1!A2:B4"
    .ColumnCount = 2
    .ColumnWidths = "100,100"
End With
In a real-world application, you could set the RowSource and ColumnCount properties like this:
With listboxFruit
    .RowSource = myRange.Address(External:=True)
    .ColumnCount = myRange.Columns.Count
End With
See the AddItem section for how to add data to the other columns when you are using the AddItem property.
VBA ListBox Column Headers
Column Headers are another confusing element of the ListBox. If you use the RowSource property to add data to the ListBox then the line above the Range will be automatically used as the header.
For the Column headers to appear the ColumnHeads property must be set to true. You can do this in the properties window of the ListBox or in the code list this:
ListBox1.ColumnHeads = True
If you use the List or AddItem property to fill the ListBox then the column headers are not available. The best solution, albeit a frustrating one, is to use labels above the ListBox. I know it sounds crazy but that unfortunately is the reality. The one advantage is that you can use the Label click event which is useful if you plan to sort the data by a column.
Creating a ListBox Dynamically
Controls are normally created at design time but you can also create them dynamically at run time:
    Dim myListbox As MSForms.ListBox
    Set myListbox = Controls.Add("Forms.ListBox.1")
If you want to add an event to a dynamic control you can do it like this:
- First of all create a Class like this:
Public WithEvents myListBox As MSForms.ListBox

Private Sub myListBox_Change()
  MsgBox "Selection changed"
End Sub
- Name the class clsListBoxEvents. Create a variable of this class object in the UserForm like this:
Private listBoxEvents As New clsListBoxEvents
- Attach the events to the ListBox:
Sub CreateDynamicListBox()

    ' Create the ListBox
    Dim newListBox As MSForms.ListBox
    Set newListBox = Controls.Add("Forms.ListBox.1")

    ' Add some items
    newListBox.List = Array("Apple", "Orange", "Pear")

    ' Connect the ListBox to the ListBox events class
    Set listBoxEvents.myListBox = newListBox

End Sub
Note that you can attach events to any ListBox. It doesn’t have to be created dynamically to do this.
Loop through ListBoxes
If you want to loop through all the ListBoxes on a UserForm you can do it like this:
 Dim ctrl As Variant
 For Each ctrl In Me.Controls
    If TypeName(ctrl) = "ListBox" Then
        Debug.Print ctrl.Name
    End If
 Next ctrl
YouTube Video
Check out this video where I use the ListBox. The source code for the video is available from here
What’s Next?
Free VBA Tutorial If you are new to VBA or you want to sharpen your existing VBA skills then why not try out this Free VBA Tutorial.
Related Training: Get full access to the Excel VBA training webinars and all the tutorials.
(NOTE: Planning to build or manage a VBA Application? Learn how to build 10 Excel VBA applications from scratch.)
In this Article
- Create List Box in a VBA Form
- Add Values to the List Box
- Select Values from the List Box
- Work with the Selected Values in VBA
- Assigning the Value to a Variable
- Use a Command Button to Return the Value to Excel
- Select Multiple Values
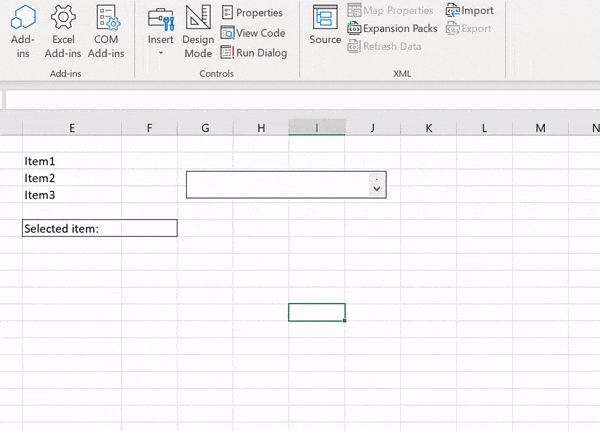
This article will demonstrate how to work with the selected item in a List Box in Excel VBA.
List Boxes show a list of options to users, allowing them to select one or more of the items. They are largely used in VBA forms but can also be used within your Excel worksheet.
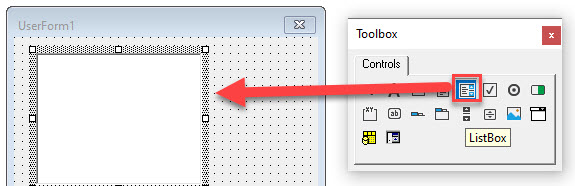
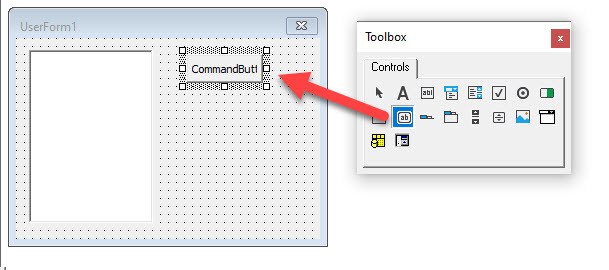
Create List Box in a VBA Form
To create a list box in a VBA form, we first need to create the UserForm.
Once you have created your form, select the List Box control in the toolbox and then drag to create a list box on your form.
Add Values to the List Box
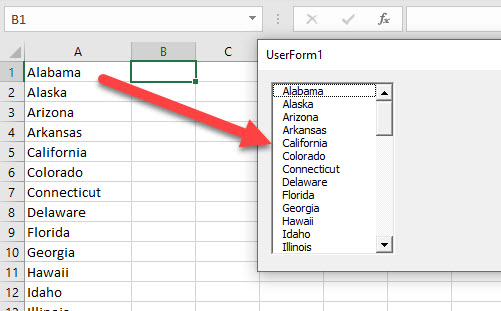
In the Initialize event of the form, type the following code. The List Box will pick up values that are stored in a Range of Cells in your Excel Worksheet.
Private Sub UserForm_Initialize()
Dim rng As Range
For Each rng In Range("A1:A50")
Me.lstState.AddItem rng.Value
Next rng
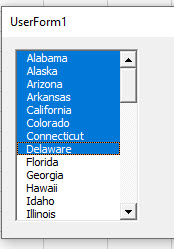
End SubWhen we run the form, the list box will be shown as demonstrated in the image below:
Select Values from the List Box
By default, a single value can be selected in a List Box in a user form. However this can be amended by changing the Multi-Select property of the list box.
Click on the list box to select it, and then in the Properties window, change the Multi-Select Property from 0-frmMultiSelectSingle to 1-frmMultiSelectMulti.
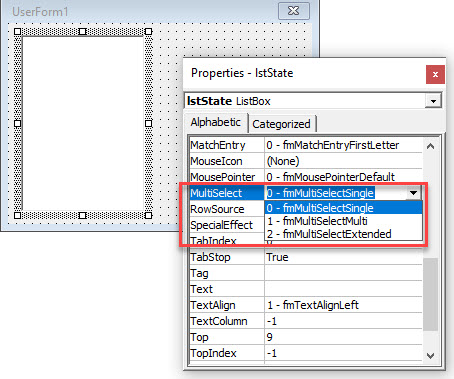
Now when we run the form, we can select more than one option in the List Box.
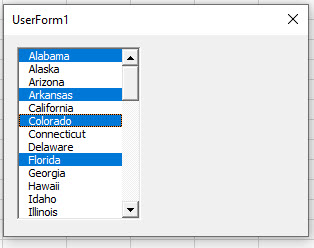
If we change the option to be 2-frmMultiSelectExtended, it means that we can select one of the values, and then, holding down the SHIFT key, select another value further down the list, and all the items between the 2 values selected will also be selected.
Work with the Selected Values in VBA
Depending on the type of option we have used for the Multi-Select property in the List Box, there are a number of ways we can use the value or values selected in the list box in VBA Code.
Assigning the Value to a Variable
We can use the After_Update event of the list box to assign the value selected to a variable.
Firstly, let us create a module level variable at the top of the form module.
Underneath the words, Option Explicit, create the following string variable.
Dim strState as String.Once we have created this variable, we can double-click on the List box to go to the code behind the form, or we can click on the code button in the VBE Editor.
The Click Event of the list box will be automatically created. Select the After_Update Event form the list of Procedures available.
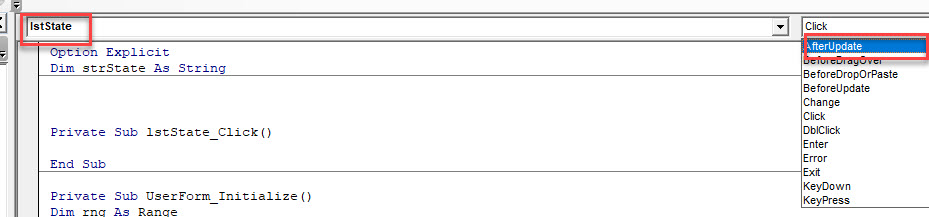
In the After_Update event, type the following code:
Private Sub lstState_AfterUpdate()
  strState = Me.lstState
End Sub
NOTE: You can delete the Click event as it is not required.
Now, if we run the form and click on the list box, the selected value will be store in the variable. To test this, we can put a BREAK point in the code.
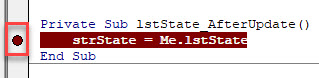
Now when we run the form, if we click on the list box, the code will go into DEBUG mode and stop at our break point. If we then press F8 on the keyboard to move a step further in the code, the variable will be populated with the selected item in the list.
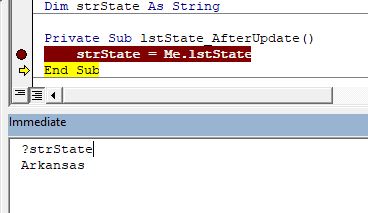
We can view this value by resting the mouse on the variable.

OR
We can view the value in the Immediate Window.
VBA Coding Made Easy
Stop searching for VBA code online. Learn more about AutoMacro — A VBA Code Builder that allows beginners to code procedures from scratch with minimal coding knowledge and with many time-saving features for all users!

Learn More
Use a Command Button to Return the Value to Excel
Firstly, we create a command button on the form in order to have an OK button to return the value or values selected in the list box to Excel.
Select the Command Button control, and then click and drag in your form to create the button.
In the Properties window, change the name of the button to cmdOK, and change the Caption and Accelerator of the button.
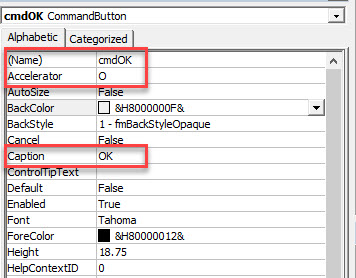
The purpose of the Accelerator is for the user to use the keyboard to activate the button, in this case Alt+O would activate the button.
![]()
For the command button to work, we need to add code behind it so that when the button is clicked, the code runs. This is called the Click event of the button.
To get to the click event, double-click on the button in the design view of the form. The click event will be automatically created as this is the event that is most commonly used for Command buttons.
Type the following code into the click event of the command button.
Private Sub cmdOK_Click()
  Range("E1") = strState
End Sub
The code will pick up the variable we declared in the After_Update event of the ListBox and return the value to the Range in Excel.
Alternatively, we can pick up the value directly from the List Box without using a variable.
Private Sub cmdOK_Click()
  Range("E1") = me.lstState
End Sub
When we run the form, the selected value will be returned to Excel when we click the OK button.
Select Multiple Values
If we have set the multi-select property of the list box to 1 or 2 which allows us to select multiple values in the list, then the code to select these values is slightly different.
The After_Update event is no longer fired when selecting the values in the list box – we therefore cannot use this event.
We can still use the command button click event, but we need to loop through the values selected in the list box in order to return them to Excel.
In the command button Click event, type the following code.
Private Sub cmdOK_Click()
  Dim x As Integer
  Range("E1").Select
  For x = 0 To Me.lstState.ListCount - 1
     If Me.lstState.Selected(x) = True Then
        ActiveCell = Me.lstState.List(x)
        ActiveCell.Offset(1, 0).Select
     End If
  Next x
End Sub
Now when we run the form, only the values that are selected will be returned to the Excel sheet.
Элемент управления пользовательской формы ListBox для выбора и ввода информации в VBA Excel. Свойства списка, его заполнение, извлечение данных, примеры кода.

UserForm.ListBox – это элемент управления пользовательской формы, предназначенный для передачи в код VBA информации, выбранной пользователем из одностолбцового или многостолбцового списка.
Список используется в тех случаях, когда необходимо добавить в форму информацию, которая заранее известна, а ее отдельные позиции можно сгруппировать в список. Элемент управления ListBox оправдывает себя при небольших списках, так как большой список будет занимать много места на форме.
Использование полос прокрутки уменьшает преимущество ListBox перед элементом управления ComboBox, которое заключается в том, что при открытии формы все позиции для выбора на виду без дополнительных действий со стороны пользователя. При выборе информации из большого списка удобнее использовать ComboBox.
Элемент управления ListBox позволяет выбрать несколько позиций из списка, но эта возможность не имеет практического смысла. Ввести информацию в ListBox с помощью клавиатуры или вставить из буфера обмена невозможно.
Свойства списка
| Свойство | Описание |
|---|---|
| ColumnCount | Указывает количество столбцов в списке. Значение по умолчанию = 1. |
| ColumnHeads | Добавляет строку заголовков в ListBox. True – заголовки столбцов включены, False – заголовки столбцов выключены. Значение по умолчанию = False. |
| ColumnWidths | Ширина столбцов. Значения для нескольких столбцов указываются в одну строку через точку с запятой (;). |
| ControlSource | Ссылка на ячейку для ее привязки к элементу управления ListBox. |
| ControlTipText | Текст всплывающей подсказки при наведении курсора на ListBox. |
| Enabled | Возможность выбора элементов списка. True – выбор включен, False – выключен*. Значение по умолчанию = True. |
| Font | Шрифт, начертание и размер текста в списке. |
| Height | Высота элемента управления ListBox. |
| Left | Расстояние от левого края внутренней границы пользовательской формы до левого края элемента управления ListBox. |
| List | Позволяет заполнить список данными из одномерного или двухмерного массива, а также обращаться к отдельным элементам списка по индексам для записи и чтения. |
| ListIndex | Номер выбранной пользователем строки. Нумерация начинается с нуля. Если ничего не выбрано, ListIndex = -1. |
| Locked | Запрет возможности выбора элементов списка. True – выбор запрещен**, False – выбор разрешен. Значение по умолчанию = False. |
| MultiSelect*** | Определяет возможность однострочного или многострочного выбора. 0 (fmMultiSelectSingle) – однострочный выбор, 1 (fmMultiSelectMulti) и 2 (fmMultiSelectExtended) – многострочный выбор. |
| RowSource | Источник строк для элемента управления ListBox (адрес диапазона на рабочем листе Excel). |
| TabIndex | Целое число, определяющее позицию элемента управления в очереди на получение фокуса при табуляции. Отсчет начинается с 0. |
| Text | Текстовое содержимое выбранной строки списка (из первого столбца при ColumnCount > 1). Тип данных String, значение по умолчанию = пустая строка. |
| TextAlign | Выравнивание текста: 1 (fmTextAlignLeft) – по левому краю, 2 (fmTextAlignCenter) – по центру, 3 (fmTextAlignRight) – по правому краю. |
| Top | Расстояние от верхнего края внутренней границы пользовательской формы до верхнего края элемента управления ListBox. |
| Value | Значение выбранной строки списка (из первого столбца при ColumnCount > 1). Value – свойство списка по умолчанию. Тип данных Variant, значение по умолчанию = Null. |
| Visible | Видимость списка. True – ListBox отображается на пользовательской форме, False – ListBox скрыт. |
| Width | Ширина элемента управления. |
* При Enabled в значении False возможен только вывод информации в список для просмотра.
** Для элемента управления ListBox действие свойства Locked в значении True аналогично действию свойства Enabled в значении False.
*** Если включен многострочный выбор, свойства Text и Value всегда возвращают значения по умолчанию (пустая строка и Null).
В таблице перечислены только основные, часто используемые свойства списка. Еще больше доступных свойств отображено в окне Properties элемента управления ListBox, а все методы, события и свойства – в окне Object Browser.
Вызывается Object Browser нажатием клавиши «F2». Слева выберите объект ListBox, а справа смотрите его методы, события и свойства.
Свойства BackColor, BorderColor, BorderStyle отвечают за внешнее оформление списка и его границ. Попробуйте выбирать доступные значения этих свойств в окне Properties, наблюдая за изменениями внешнего вида элемента управления ListBox на проекте пользовательской формы.
Способы заполнения ListBox
Используйте метод AddItem для загрузки элементов в список по одному:
|
With UserForm1.ListBox1 .AddItem «Значение 1» .AddItem «Значение 2» .AddItem «Значение 3» End With |
Используйте свойство List, чтобы скопировать одномерный массив значений в элемент управления ListBox.
|
UserForm1.ListBox1.List = Array(«Текст 1», _ «Текст 2», «Текст 3», «Текст 4», «Текст 5») |
Вместо функции Array можно использовать переменные одномерных и двухмерных массивов. При загрузке значений из двухмерного массива, требуется предварительно указать количество столбцов в списке.
Используйте свойство RowSource, чтобы загрузить в список значения из диапазона ячеек рабочего листа:
|
UserForm1.ListBox1.RowSource = «Лист1!A1:A6» |
При загрузке данных из диапазона, содержащего более одного столбца, требуется предварительно указать количество столбцов в списке:
|
With UserForm1.ListBox1 ‘Указываем количество столбцов .ColumnCount = 5 .RowSource = «‘Лист со списком’!A1:E10» End With |
В качестве имени листа используется имя ярлыка. Если имя листа содержит пробелы, оно заключается в одинарные кавычки.
Подробнее о заполнении элемента управления ListBox вы можете ознакомиться в отдельной статье с наглядными примерами.
Привязка списка к ячейке
Для привязки списка к ячейке на рабочем листе используется свойство ControlSource. Суть привязки заключается в том, что при выборе строки в элементе управления, значение свойства Value копируется в привязанную ячейку.
Если привязанная к списку ячейка содержит значение одной из строк элемента управления ListBox, то при запуске пользовательской формы список откроется с выделенной строкой, содержащей это значение. Если привязанная ячейка при загрузке формы пустая, то список откроется без выделения какой-либо строки.
В случае, когда при открытии формы в привязанной к списку ячейке содержится значение, которого нет ни в одной из строк элемента управления ListBox, будет сгенерирована ошибка.
Привязать ячейку к списку можно, указав адрес ячейки в поле свойства ControlSource в окне Properties элемента управления ListBox. Или присвоить адрес ячейки свойству ControlSource в коде VBA Excel:
|
UserForm1.ListBox1.ControlSource = «Лист1!A2» |
Теперь значение выбранной строки в списке автоматически копируется в ячейку «A2» на листе «Лист1»:

В окне Properties адрес указывается без двойных кавычек. Если имя листа содержит пробелы, оно заключается в одинарные кавычки.
Извлечение информации из списка
Первоначально элемент управления ListBox открывается со строками, ни одна из которых не выбрана. При выборе (выделении) строки, ее значение записывается в свойства Value и Text.
Из этих свойств мы с помощью кода VBA Excel извлекаем информацию, выбранную в списке пользователем:
|
Dim myVar as Variant, myTxt As String myVar = UserForm1.ListBox1.Value ‘или myTxt = UserForm1.ListBox1.Text |
Вторую строку кода можно записать myVar = UserForm1.ListBox1, так как Value является свойством списка по умолчанию.
Если ни одна позиция в списке не выбрана, свойство Value возвращает значение Null, а свойство Text – пустую строку. Если выбрана строка в многостолбцовом списке, в свойства Value и Text будет записана информация из первого столбца.
Что делать, если понадобятся данные из других столбцов многостолбцового списка, кроме первого?
Для получения данных из любого столбца элемента управления ListBox используется свойство List, а для определения выбранной пользователем строки – ListIndex.
Для тестирования приведенного ниже кода скопируйте таблицу и вставьте ее в диапазон «A1:D4» на листе с ярлыком «Лист1»:
| Звери | Лев | Тапир | Вивера |
| Птицы | Грач | Сорока | Филин |
| Рыбы | Карась | Налим | Парусник |
| Насекомые | Оса | Жук | Муравей |
Создайте в редакторе VBA Excel пользовательскую форму и добавьте на нее список с именем ListBox1. Откройте модуль формы и вставьте в него следующие процедуры:
|
Private Sub UserForm_Initialize() With Me.ListBox1 ‘Указываем, что у нас 4 столбца .ColumnCount = 4 ‘Задаем размеры столбцов .ColumnWidths = «50;50;50;50» ‘Импортируем данные .RowSource = «Лист1!A1:D4» ‘Привязываем список к ячейке «F1» .ControlSource = «F1» End With End Sub Private Sub UserForm_Click() MsgBox Me.ListBox1.List(Me.ListBox1.ListIndex, 2) End Sub |
В процедуре UserForm_Initialize() присваиваем значения некоторым свойствам элемента управления ListBox1 перед открытием пользовательской формы. Процедура UserForm_Click() при однократном клике по форме выводит в MsgBox значение из третьего столбца выделенной пользователем строки.

Теперь при выборе строки в списке, значение свойства Value будет записываться в ячейку «F1», а при клике по форме функция MsgBox выведет значение третьего столбца выделенной строки.
Обратите внимание, что при первом запуске формы, когда ячейка «F1» пуста и ни одна строка в ListBox не выбрана, клик по форме приведет к ошибке. Это произойдет из-за того, что свойство ListIndex возвратит значение -1, а это недопустимый номер строки для свойства List.
Если для списка разрешен многострочный выбор (MultiSelect = fmMultiSelectMulti или MultiSelect = fmMultiSelectExtended), тогда, независимо от количества выбранных строк, свойство Value будет возвращать значение Null, а свойство Text – пустую строку. Свойство ListIndex будет возвращать номер строки, которую кликнули последней, независимо от того, что это было – выбор или отмена выбора.
Иногда перед загрузкой в ListBox требуется отобрать уникальные элементы из имеющегося списка. Смотрите, как это сделать с помощью объектов Collection и Dictionary.
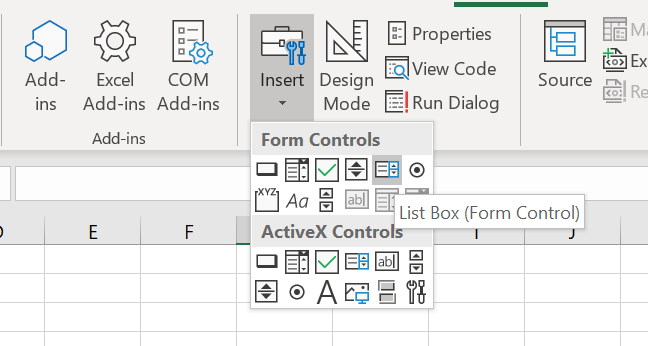
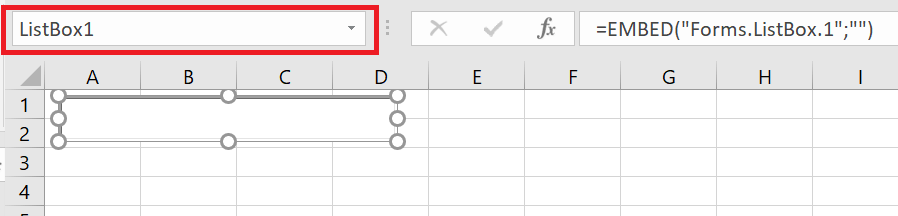
The Excel VBA ListBox is a list control that allows you to select (or deselect) one or more items at time. This is compared to the VBA ComboBox which only allows you to select a single items from a drop down list. Let us explore how to create, clear and make a VBA ListBox let you select multiple items.
Create a Excel Form ListBox (Form Control)
To create an Excel Form ListBox you need to first make sure you can see the Developer Tab. Next go to Controls and select the ListBox. Place the ListBox on the Worksheet. You can right click on it to set the properties.
Using the Form ListBox
To add items to set items in a From ListBox is easiest by providing an Excel Range on your Worksheet that contain values for options.
Select Excel Range as ListBox Items
To add an Excel Range as Items for a ListBox right-click on the object and go to Format Control. Next go to the Control tab.
As you can see we managed to:
- Set the Input range for the items in the Form ListBox
- Set the Cell Link range for the selected item
The Excel Form ListBox is an option to use if you need a simple way to limit input options for your users in an spreadsheet.
Using Form ListBox does not make much sense as just as well we have Data Validation allowing you to set a drop down list to any Excel cell. See my post on Excel Cascading Drop-downs if you want to see how powerful this can be.
Beware in below examples I am using the ActiveX ListBox instead!
Create a VBA ListBox (ActiveX)
Now let us explore the adding Items to a Listbox using VBA. For this purpose it is easier and more convenient to use an ActiveX ListBox control (which I call the VBA ListBox) instead of the previously used Form ListBox:
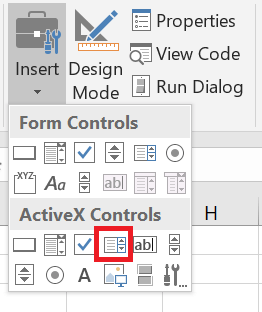
In examples below I will be adding code to the Worksheet module in which I added a ActiveX ListBox control named ListBox1.
Add Items to ListBox
To add VBA Add Items to the VBA ListBox use the AddItem function.
'Syntax
AddItem ( itemValue, itemOrder )
'itemValue - the value you want to add to your list
'itemOrder - the position in the VBA ListBox at which you want to insert your item (first is 0)
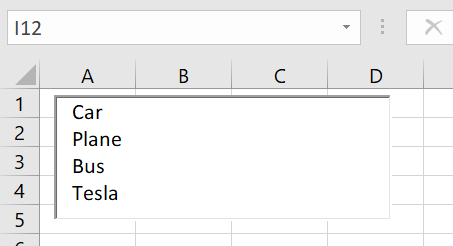
Examples of adding items to a ActiveX ListBox with VBA:
'Add Item Car
ListBox1.AddItem "Car"
'Add Item Bus
ListBox1.AddItem "Bus"
'Add Item Plane as second
ListBox1.AddItem "Plane", 1
'Add Item Plane
ListBox1.AddItem "Tesla"
The resulting VBA ListBox. Notice that Plane is second in the list:
This list will work identically to the Excel Form ListBox.
Clear items in ListBox
To Clear/Empty items in a VBA ListBox simply use the Clear function:
'Add Item Car
ListBox1.AddItem "Car"

'Remove all items in the ListBox
ListBox1.Clear
Remove item from ListBox
To remove an item at a specific index or position in a VBA ListBox you need to use the RemoveItem function. Remember that the index of the first element is 0:
ListBox1.AddItem "Car"
ListBox1.AddItem "Plane"
ListBox1.AddItem "Bus"

'Remove the item "Plane"
ListBox1.RemoveItem(1)
Count items in ListBox
Counting items in a ListBox can be done using the Count function:
ListBox1.AddItem "Car"
ListBox1.AddItem "Plane"
ListBox1.AddItem "Bus"

'Count items
Debug.Print ListBox1.ListCount 'Result: 3
To enable multiselection on your VBA ListBox (ActiveX) use the MultiSelect property. The property can have one of the following values:
- fmMultiSelectSingle – default property. You can only select 1 item
- fmMultiSelectMulti – you can select multiple items. Clicking on an item will select (include it in the existing selected items) or deselect it (remove it from the existing selected items)
- fmMultiSelectExtended – you can select multiple items. However, when you click on any item it will only select the current item. To select multiple items you need to click and hold and move the mouse up/down to select more items
By setting the MultiSelect option:
ListBox1.MultiSelect = fmMultiSelectExtended
I am able now to select more items on my ListBox.
Select / Deselect items in ListBox
First we will try to understand how to check if an item on our ListBox is selected or not. For this we will use the Selected property.
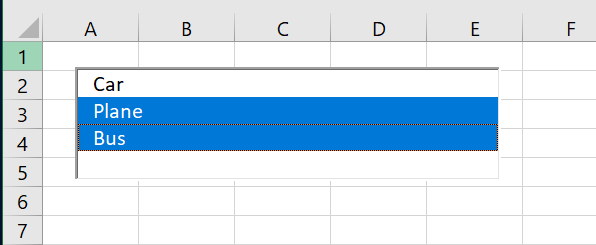
ListBox1.AddItem "Car"
ListBox1.AddItem "Plane"
ListBox1.AddItem "Bus"

'...Click on Plane...

'Check which is selected
Debug.Print ListBox1.Selection(0) 'Result: False - Car is not selected
Debug.Print ListBox1.Selection(1) 'Result: True - Car is not selected
Debug.Print ListBox1.Selection(2) 'Result: False - Bus is not selected
To Select or Delect an item simply set the property to True (Selected) or False (Deselected):
ListBox1.AddItem "Car"
ListBox1.AddItem "Plane"
ListBox1.AddItem "Bus"

'Select Car
ListBox1.Selection(0) = True

'Check which is selected
Debug.Print ListBox1.Selection(0) 'Result: True - Car is not selected
Debug.Print ListBox1.Selection(1) 'Result: False - Car is not selected
Debug.Print ListBox1.Selection(2) 'Result: False - Bus is not selected
UserForm Controls — ComboBox and ListBox
———————————————————-
Contents:
Difference between ListBox and ComboBox
Key Properties of ComboBox and ListBox
Add Items/Data to (Populate) a ListBox or ComboBox
Extract ListBox & ComboBox Items, with VBA
Delete ListBox rows using the RemoveItem Method
———————————————————-
UserForm acts as a container in which you add multiple ActiveX controls, each of which has a specific use and associated properties. By itself, a UserForm will not be of much use unless ActiveX controls are added to it which are the actual user-interactive objects. Using ActiveX Controls on a Worksheet have been illustrated in detail, in the separate section of «Excel VBA: ActiveX Controls, Form Controls & AutoShapes on a Worksheet».
An Excel VBA ListBox or ComboBox is a list of items from which a user can select. They facilitate in accepting data from users and making entries in an Excel worksheet.
Difference between ListBox and ComboBox:
1. The ComboBox is a drop-down list (the user-entered item or the list-selected item is visible in the text area, whereas list values are visible by using the drop-down), while a ListBox shows a certain number of values with or without a scroll bar. In a ComboBox, only one row of items is visible at a given time (without using the drop-down) whereas in a ListBox one or more can be visible at a time.
2. In a ComboBox you can select ony one option from the list, while in a ListBox you can select multiple options from the list.
3. The user can enter his own item (in text area) in a ComboBox if it is not included in the list, which is not possible to do in a ListBox. In this sense, ComboBox is a combination of TextBox and ListBox.
4. CheckBox can be used within ListBox, but not within ComboBox. ListBox allows you to display a check box next to each item in the list, to enable user to select items (this might be easier for the user than using the multiple selection methods). To use CheckBoxes in a ListBox, set ListStyle property (in Properties Window) to fmListStyleOption (vba code: ListBox1.ListStyle = fmListStyleOption). This setting is best used with a multiselect ListBox.
——————————————————————————————————————-
Key Properties of ComboBox and ListBox
Note1: All properties and methods given below are common to both ListBox and ComboBox, unless mentioned otherwise. Also refer «2. UserForm and Controls — Properties.» for properties common to the UserForm and most Controls.
Note 2: In below given examples, vba codes are required to be entered in the Code Module of the UserForm, unless specified otherwise.
AddItem Method:
Adds an item to the list, in a single-column ListBox or ComboBox. Adds a row to the list (ie. an item for each row), in a multi-column ListBox or ComboBox. Syntax: Control.AddItem(Item, Index). Item specifies the item or row to add. Index is an Integer which specifies the position where the new item or row is placed within the list, and if omitted, the item or row is added at the end. The item or row numbers begin with zero, and the first item or row is numbered 0, and so on. The value of Index cannot be greater than the total number of rows (ie. value of ListCount property). AddItem method will not work if ComboBox or ListBox is bound to data, hence RowSource data should be cleared before use. AddItem method can only be used with a macro or vba code. Note: AddItem method adds an item to the first column in a multi-column ListBox or ComboBox, and to add an item further to the first column, use the List or Column property specifying the item’s row and column number. More than one row can also be added at a time to a ListBox or ComboBox by using the List or Column properties (AddItem adds one row at a time). This means that you can copy a two-dimensional array of values to a ListBox or ComboBox, using List or Column properties rather than adding each individual element using the AddItem method. Note: Using the Column property to copy a two-dimensional array of values to a ListBox or ComboBox, transposes the array contents and equates myArray(iRow, iColumn) to ListBox1.Column(iCol, iRow). List property copies an array without transposing it and myArray(iRow, iColumn) equates to ListBox1.List(iRow, iColumn). Refer Image 13 for example.
BoundColumn Property:
Specifies the column from which value is to be stored in a multicolumn ComboBox or ListBox, when a row is selected by the user. First column has a BoundColumn value of 1, second column has a value of 2, and so on. Setting the BoundColumn value to 1 will assign the value from column 1 to the ComboBox or ListBox, and so on. BoundColumn property lets the user to store a different set of values per specified column while TextColumn property displays one set of values, viz. use the Text property to return the value from the first column (specified in the TextColumn property) containing the names and the BoundColumn property can specify another column containing height wherein on selecting a particular person’s name in the ListBox, his height will get returned or stored (refer Image 10). The ColumnWidths property of a column can be set to zero to not display it in the ListBox. Setting the BoundColumn value to 0 assigns the value of the ListIndex property (which is the number of the selected row) as the value of the control (ComboBox or ListBox). This setting is useful if you want to determine the row of the selected item in a ComboBox or ListBox. BoundColumn Property can be set in the Properties window and can also be used with a macro or vba code. Note: Where the ControlSource mentions =Sheet3!D2 (vba code: .ControlSource = «=Sheet3!D2»), the value in the BoundColumn of the selected row will get stored in cell D2, Sheet3.

Example 1: Setting the BoundColumn value to 0 assigns the value of the ListIndex property (which is the number of the selected row) as the value of the control (in a Single Selection ListBox) — refer Image 7
Private Sub UserForm_Initialize()
‘set ListBox properties on initialization of UserForm
With ListBox1
.ColumnHeads = True
.ColumnCount = 2
‘ColumnWidths property of the second column is set to zero to not display it in the ListBox.
.ColumnWidths = «50;0»
.RowSource = «=Sheet3!A2:B6»
.MultiSelect = fmMultiSelectSingle
.BoundColumn = 0
End With
End Sub
Private Sub CommandButton1_Click()
‘BoundColumn value is set as 0 which assigns the value of the ListIndex property (which is the number of the selected row) as the value of the control. Note: MultiSelect Property is set to fmMultiSelectSingle which allows only single selection.
If ListBox1.Value <> «» Then
TextBox1.Value = ListBox1.Value + 2
End If
End Sub
Clear Method:
Removes all items in a ComboBox or ListBox. Syntax: Control.Clear. Clear method will not work if ComboBox or ListBox is bound to data, hence RowSource data should be cleared before use. Clear method can only be used with a macro or vba code.
Column Property:
Refers to a specific column, or column and row combination, in a multiple-column ComboBox or ListBox. Syntax: Control.Column(iColumn, iRow). Column property can only be used with a macro or vba code and is not available at design time. iColumn specifies the column number wherein iColumn = 0 means the first column in the List. iRow specifies the row number wherein iRow = 0 means the first row in the List. Both iColumn and iRow are integer values ranging from 0 to number of columns and rows (respectively) in the list minus 1. Specifying both column and row numbers will refer to a specific item, and specifying only the column number will refer to a specific column in the current row viz. ListBox1.Column(1) refers the second column. You can copy a two-dimensional array of values to a ListBox or ComboBox, using Column (or List) property rather than adding each individual element using the AddItem method. Column property can be used to assign the contents of a ComboBox or ListBox to another control, viz. TextBox (refer Image 8). Note: Using the Column property to copy a two-dimensional array of values to a ListBox or ComboBox, transposes the array contents and equates myArray(iRow, iColumn) to ListBox1.Column(iCol, iRow). List property copies an array without transposing it and myArray(iRow, iColumn) equates to ListBox1.List(iRow, iColumn). Refer Image 13 for example.

Example 2: Load ListBox using AddItem method and List & Column properties; and use Column property to assign the contents of ListBox to TextBox — refer Image 8
Private Sub UserForm_Initialize()
‘set ListBox properties on initialization of UserForm
With ListBox1
.ColumnCount = 3
.ColumnWidths = «50;50;50»
.ColumnHeads = False
.RowSource = «=Sheet2!A2:B6»
.MultiSelect = fmMultiSelectMulti
End With
‘clearing the TextBox if it is not empty
TextBox1 = «»
End Sub
Private Sub CommandButton1_Click()
‘Add items in ListBox using AddItem method to add new rows; use List & Column properties to add items in columns beyond the first column; and use Column property to assign the contents of ListBox to TextBox
‘AddItem method will not work if ListBox is bound to data, hence RowSource is cleared if it had been set
ListBox1.RowSource = «»
‘Create a new row with AddItem
ListBox1.AddItem «banana»
‘add item in second column of this first row, using List property
ListBox1.List(0, 1) = «tuesday»
‘adding items in the 3 columns of the first row — this will become the second row in the end
ListBox1.List(0, 2) = «day 2»
ListBox1.AddItem «orange»
‘add item in second column of this second row, using Column property
ListBox1.Column(1, 1) = «wednesday»
‘adding items in the 3 columns of the second row — this will become the third row in the end
ListBox1.Column(2, 1) = «day 3»
‘Create a new row with AddItem and position as row number 1
ListBox1.AddItem «apple», 0
ListBox1.List(0, 1) = «monday»
‘adding items in the 3 columns and positioning this row as the first row — this will push down the above two rows
ListBox1.List(0, 2) = «day 1»
‘item in column number 3 and row number 2 of ListBox
TextBox1.Value = ListBox1.Column(2, 1)
End Sub
ColumnCount Property:
Specifies the number of columns to be displayed in a ComboBox or ListBox. A ColumnCount value of 0 does not display any column and a setting of -1 displays all columns. ColumnCount property can be set in the Properties window and can also be used with a macro or vba code.
ColumnHeads Property:
A Boolean value (True/False) which determines display of column headings (in a single row) for ComboBox or ListBox. ColumnHeads property can be set in the Properties window and can also be used with a macro or vba code. Column Headings can be displayed only if ColumnHeads is set to True in Properties window (VBA code: ListBox1.ColumnHeads = True) and if you bind the ListBox to a range (ie. set RowSource to a range that includes headings). Note: AddItem method will not work if ListBox or ComboBox is bound to data, hence RowSource property should be cleared for using AddItem.
List Property:
List Property is used in conjunction with the ListCount and ListIndex properties to return items in a ListBox or ComboBox control. Syntax -> Control.List(iRow,iCol). Each item in a list has a row number and a column number, wherein row and column numbers start with zero. iRow specifies the row number wherein iRow = 2 means the third row in the List. iColumn specifies the column number wherein iColumn = 0 means the first column in the List. Omitting to specify the iColumn will retrieve the first column. Specify iColumn only for a multi-column ListBox or ComboBox. List Property can only be used with a macro or vba code and is not available at design time. Note: To copy a two-dimensional array of values to a ListBox or ComboBox, use List or Column properties. To add a one-dimensional array or to add an individual element, use the AddItem method. Items can be removed from a List using the RemoveItem method. List property is available only by using a macro or VBA.

Example 3: Use Selected & List properties to display multiple-selected ListBox items (choose any column to display) in TextBox, and link a worksheet cell with TextBox using ControlSource property — refer Image 9.
Private Sub UserForm_Initialize()
‘set ListBox properties on initialization of UserForm
With ListBox1
.ColumnHeads = True
.ColumnCount = 2
‘ColumnWidths property of the second column is set to zero to not display it in the ListBox.
.ColumnWidths = «50;0»
.RowSource = «=Sheet3!A2:B6»
.MultiSelect = fmMultiSelectMulti
.TextColumn = 1
End With
With TextBox1
.MultiLine = True
‘the text or value in the TextBox will get stored in the worksheet cell — Sheet3!F2
.ControlSource = «=Sheet3!F2»
‘if the cell Sheet3!F2 contains any text, this will not appear in the TextBox on initialization of UserForm
.Value = «»
End With
End Sub
Private Sub CommandButton1_Click()
‘Use Selected & List properties to display multiple-selected ListBox items (choose any column to display) in TextBox, and link a worksheet cell with TextBox using ControlSource property
TextBox1.Value = «»
‘check all items in a ListBox
For n = 0 To ListBox1.ListCount — 1
‘if a ListBox item is selected, it will display in TextBox
If ListBox1.Selected(n) = True Then
If TextBox1.Value = «» Then
‘ListBox1.List(n, 0) or ListBox1.List(n)displays the first column in TextBox, ListBox1.List(n, 1) displays the second column and so on
‘alternate code which displays the second column in TextBox: TextBox1.Value = Range(ListBox1.RowSource).Offset(n, 1).Resize(1, 1).Value
TextBox1.Value = ListBox1.List(n, 1)
Else
‘alternate code which displays the second column in TextBox: TextBox1.Value = TextBox1.Value & vbCrLf & Range(ListBox1.RowSource).Offset(n, 1).Resize(1, 1).Value
TextBox1.Value = TextBox1.Value & vbCrLf & ListBox1.List(n, 1)
End If
End If
Next n
End Sub
ListCount Property:
Determines the total number of rows in a ListBox or ComboBox. This property can only be used with a macro or vba code and is not available at design time. Note: The column headings row is also counted, if ColumnHeads are displayed. The ListCount property can be used with the ListRows property to specify the number of rows to display in a ComboBox.
ListIndex Property:
Determines which item is selected in a ComboBox or ListBox. The first item in a list has a ListIndex value of 0, the second item has a value of 1, and so on. Hence, it is an integer value ranging from 0 to the total number of items in a ComboBox or ListBox minus 1. ListIndex returns -1 when no rows are selected. This property can only be used with a macro or vba code and is not available at design time. Note: In a Multiple Selection enabled ListBox, ListIndex returns the index of the row that has focus, irrespective of whether that row is selected or not. Hence the Selected property of the ListBox (and not the ListIndex property) shoud be used here to return and set a selection. In a Single Selection enabled ListBox (viz. MultiSelect property setting of fmMultiSelectSingle), ListIndex returns the index of the selected item and hence ListIndex property should be used here to return and set a selection.
ListRows Property:
Specifies the maximum number of rows which will display in the list box portion of a ComboBox. The default value is 8. Note: If the actual number of list items exceed this maximum value of the ListRows property, a vertical scroll bar will appear in the list box portion of the ComboBox (and the excess list items can be viewed by scrolling down). The ListCount property can be used with the ListRows property to specify the number of rows to display in a ComboBox. ListRows property can be set in the Properties window and can also be used with a macro or vba code. ListRows Property is valid for ComboBox and not for ListBox.
Example 4: Using the ListCount property with the ListRows property, to set number of rows to display in ComboBox
Private Sub UserForm_Initialize()
‘this macro sets the ListRow value, on initialization of the UserForm
With ComboBox1
If .ListCount > 5 Then
.ListRows = 5
Else
.ListRows = .ListCount
End If
End With
End Sub
MultiSelect Property:
Specifies whether multiple selections are allowed. There are 3 settings: (i) fmMultiSelectSingle (value 0), the default setting, wherein only a single item can be selected; (ii) fmMultiSelectMulti (value 1) which allows multiple selections wherein an item can be selected or deselected by clicking mouse or pressing SPACEBAR; and (iii) fmMultiSelectExtended (value 2) which allows multiple selections, wherein by pressing SHIFT and simultaneously moving the up or down arrows (or pressing SHIFT and clicking mouse) continues selection from the previously selected item to the current selection (ie. a continuous selection); this option also allows to select or deselect an item by pressing CTRL and clicking mouse. MultiSelect property can be set in the Properties window and can also be used with a macro or vba code. Note: MultiSelect Property is valid for ListBox and not for ComboBox. When multiple selections are made (viz. fmMultiSelectMulti or fmMultiSelectExtended), the selected items can be determined only by using the Selected property (Selected property is available by using macro) of the ListBox. The Selected property will have values ranging from 0 to ListCount minus 1 and will be True if the item is selected and False if not selected. The Selected property determines the items you chose, and the List property returns the items.
Example 5: Determining selected item in a Single Selection ListBox, in VBA:
Private Sub CommandButton1_Click()
‘determine and display selected item in a ListBox which allows only a single selection (viz. MultiSelect Property is set to fmMultiSelectSingle)
‘you can also determine selected item in a ListBox which allows only a single selection, by using the Selected Property (as used in a Multiple Selection enabled ListBox)
‘alternatively: If ListBox1.ListIndex >= 0 Then
If ListBox1.Value <> «» Then
MsgBox ListBox1.Value
End If
End Sub
RemoveItem Method:
A specified row is removed from the list in a ComboBox or ListBox. Syntax: Control.RemoveItem(Row_Index). Row_Index is the row number which is specified to be removed, wherein the first row is numbered 0, and so on. RemoveItem method will not work if ComboBox or ListBox is bound to data, hence RowSource data should be cleared before use. RemoveItem method can only be used with a macro or vba code.
RowSource Property:
Specifies the source of a list (which could be a worksheet range in Excel), for a ComboBox or ListBox. RowSource property can be set in the Properties window and can also be used with a macro or vba code. To set RowSource property in Properties window, enter without inverted commas: «=Sheet2!A2:A6» which populates ComboBox or ListBox with values in cells A2:A6 in Sheet2. VBA code for this is: ListBox1.RowSource = «=Sheet2!A2:A6». It is not necessary to use the equal mark in «=Sheet2!A2:A6» while setting the property and ListBox1.RowSource = «Sheet2!A2:A6» will have the same effect.
Selected Property:
Specifies whether an item is selected in a ListBox control. Syntax: Control.Selected(Item_Index). Returns True/False if the item is Selected/NotSelected; Set to True/False to select the item or remove selection [viz. Control.Selected(ItemIndex) = True/False]. Item_Index is an integer value ranging from 0 to number of items in the list minus 1, indicating its relative position in the list, viz. ListBox.Selected(2) = True selects the third item in the list. Selected property is particularly useful when working with multiple selections. Selected Property can only be used with a macro or vba code and is not available at design time. Note1: In a Multiple Selection enabled ListBox, ListIndex returns the index of the row that has focus, irrespective of whether that row is selected or not. Hence the Selected property of the ListBox (and not the ListIndex property) shoud be used here to return and set a selection. In a Single Selection enabled ListBox (viz. MultiSelect property setting of fmMultiSelectSingle), ListIndex returns the index of the selected item and hence ListIndex property should be used here to return and set a selection. Note2: Selected Property is valid for ListBox and not for ComboBox.
Example 6: Determining selected items in a multiple-selection enabled ListBox using Selected & List properties:
Private Sub CommandButton1_Click()
‘display all selected items in a ListBox using the Selected property (valid for a ListBox with MultiSelect Property setting of either single-selection or multiple-selection)
‘check all items in a ListBox
For n = 0 To ListBox1.ListCount — 1
‘if a ListBox item is selected, it will display in MsgBox
If ListBox1.Selected(n) = True Then
‘display a selected item
MsgBox ListBox1.List(n)
End If
Next n
End Sub
Style Property:
Valid for ComboBox only, not for ListBox. This property determines choosing or setting the value of ComboBox. There are 2 settings: (i) fmStyleDropDownCombo (value 0). The user has both options of typing a custom value in the text area or select from the drop-down list. This is the default value.; (ii) fmStyleDropDownList (value 2). The user can only select from the drop-down list, like in ListBox. Style Property can be set in the Properties window and can also be used with a macro or vba code.
TextColumn Property:
Specifies the column of data in a ListBox that supplies data for its Text property — the TextColumn property determines the column whose value the Text property will return whereas the BoundColumn property determines the column whose value the Value property returns. The Text property returns the same as Value property if the TextColumn property is not set. First column has a TextColumn value of 1, second column has a value of 2, and so on. Setting the TextColumn value to -1 indicates that the first column with a ColumnWidths value greater than 0 will be displayed. TextColumn property enables display of one set of values to the user but store a different set of values (per column specified in the BoundColumn property) viz. use the Text property to return the value from the first column (specified in the TextColumn property) containing the names and the BoundColumn property can specify another column containing height wherein on selecting a particular person’s name in the ListBox, his name & height will be returned. The ColumnWidths property of any column can be set to zero to not display it in the ListBox. Setting the TextColumn value to 0 displays the ListIndex value (which is the number of the selected row) in TextColumn Property — this setting is useful if you want to determine the row of the selected item. TextColumn property can be set in the Properties window and can also be used with a macro or vba code. Note: In a ComboBox, when a user selects an item, the column specified in the TextColumn property will be displayed in the ComboBox’s text box portion.

Example 7: Display first column in the List and use the TextColumn & BoundColumn Properties to return values from first & third columns (in a Single Selection ListBox) — refer Image 10
Private Sub UserForm_Initialize()
‘set ListBox properties on initialization of UserForm
With ListBox1
.ColumnHeads = True
.ColumnCount = 3
‘set the ColumnWidths property of second & third columns to zero to not display them in the ListBox
.ColumnWidths = «40;0:0»
.RowSource = «=Sheet2!A2:C6»
.MultiSelect = fmMultiSelectSingle
‘specifies the column of data in a ListBox that supplies data for its Text property
.TextColumn = 1
.BoundColumn = 3
End With
End Sub
Private Sub CommandButton1_Click()
‘TextColumn value is set as 1 and BoundColumn value is set as 3.
‘works only if MultiSelect Property of ListBox is set to fmMultiSelectSingle which allows single selection.
If ListBox1.Value <> «» Then
‘use the ListBox Text property to return the value from the column specified in the TextColumn column, whereas the ListBox Value property returns the value from the column specified in the BoundColumn property
TextBox1.Value = ListBox1.Text & » — » & ListBox1.Value & » cms»
End If
End Sub
———————————————————————————————————————
Add Items/Data to (Populate) a ListBox or ComboBox
1. Setting the RowSource property of a ListBox or ComboBox in a UserForm
VBA code — if the list is static:
Me.ListBox1.RowSource = «Sheet1!A1:B6»
or
Me.ListBox1.RowSource = «=Sheet1!A1:B6»
VBA code — if the list is dynamic:
Me.ListBox1.RowSource = «Sheet1!A1:B» & Sheet1.Cells(Rows.Count, «B»).End(xlUp).Row
Note: You can set the RowSource property of a ListBox or ComboBox in the Properties Window (without using vba code), by entering -> Sheet1!A1:B6

Example 8: Populate ComboBox by setting the RowSource property to a named list — refer Image 11
Private Sub UserForm_Initialize()
‘populate ComboBox by setting the RowSource property to a named list
With ComboBox1
.ColumnCount = 2
.ColumnWidths = «50;50»
.ColumnHeads = True
‘For a named list (viz. “HeightList” in Range A2:B6), the RowSource property can be set to Sheet1!HeightList
.RowSource = «Sheet1!HeightList»
End With
End Sub
2. Populate a ComboBox or ListBox from an Array:
VBA code — populate single column in ListBox:
ListBox1.List = Array(«RowOne», «RowTwo», «RowThree», «RowFour»)
VBA code — populate single column in ComboBox:
ComboBox1.List = Array(«Apples», «Bananas», «Oranges», «Pears»)
VBA code — populate ListBox from array named myArray:
Dim myArray As Variant
myArray = Array(«Adidas», «Nike», «Reebok»)
Me.ListBox1.List = myArray
VBA code — Populate single column ComboBox:
Dim i As Integer
Dim myArray As Variant
myArray = Array(«Adidas», «Nike», «Reebok», «Puma», «Polo»)
For i = LBound(myArray) To UBound(myArray)
Me.ComboBox1.AddItem myArray(i)
Next
Example 9 — Populate a multi-column Listbox directly with Worksheet Range — multiple rows added at one time using the List property:
Private Sub UserForm_Initialize()
‘set ListBox properties on initialization of UserForm
With ListBox1
.ColumnCount = 3
.ColumnWidths = «50;50;50»
.ColumnHeads = False
End With
‘Load Worksheet Range directly to a ListBox
Dim rng As Range
Set rng = Sheet1.Range(«A1:C6»)
Me.ListBox1.List = rng.Cells.Value
End Sub
Example 10 — Populate a multi-column Listbox directly with Worksheet Range — multiple rows added at one time using the List property:
Private Sub UserForm_Initialize()
‘set ListBox properties on initialization of UserForm
With ListBox1
.ColumnCount = 3
.ColumnWidths = «50;50;50»
.ColumnHeads = False
End With
‘Load Worksheet Range directly to a ListBox:
Dim var As Variant
var = Sheet1.Range(«A1:C6»)
Me.ListBox1.List = var
End Sub

Example 11: Load Worksheet Range to a multi-column ListBox, after placing Range data in a 2-dimensional Array — refer Image 12
Option Base 1
——————————————
Private Sub UserForm_Initialize()
‘Load Worksheet Range to a ListBox, after placing data in an Array
Dim rng As Range
Dim cell As Range
Dim totalRows As Integer, totalColumns As Integer
Dim iRow As Integer, iCol As Integer
Dim myArray() As Variant
Set rng = Sheet1.Range(«A1:C6»)
totalRows = Sheet1.Range(«A1:C6»).Rows.Count
totalColumns = Sheet1.Range(«A1:C6»).Columns.Count
‘if Option Base 1 was not set, this line of code should be: ReDim myArray(1 To totalRows, 1 To totalColumns)
ReDim myArray(totalRows, totalColumns)
‘place worksheet range data in an Array:
For Each cell In rng
For iRow = 1 To totalRows
For iCol = 1 To totalColumns
myArray(iRow, iCol) = rng.Cells(iRow, iCol)
Next iCol
Next iRow
Next
‘set ListBox properties and load Array to ListBox
With ListBox1
.ColumnCount = 3
.ColumnWidths = «50;50;50»
.ColumnHeads = False
.List = myArray
End With
End Sub

Example 12: Load a 2-dimensional array to ListBox using the List property (copies an array without transposing it) and Column property (which transposes the contents of the array) — refer Image 13
Private Sub UserForm_Initialize()
‘set ListBox properties on initialization of UserForm
With ListBox1
.ColumnCount = 3
.ColumnWidths = «50;50;50»
.ColumnHeads = False
End With
With ListBox2
.ColumnCount = 3
.ColumnWidths = «50;50;50»
.ColumnHeads = False
End With
End Sub
Private Sub CommandButton1_Click()
‘create a 2-dimensional array and load to ListBox using the List property (copies an array without transposing it) and Column property (which transposes the contents of the array)
‘Declaring the array and its dimensions. The array has been named myArray, of size 3 by 3 (three rows by three columns). Note: When you populate an array with data, the array will start at zero, and if you include Option Base 1 the array will start at 1.
Dim myArray(3, 3)
‘populate column 1 of myArray, with numbers
For n = 0 To 2
myArray(n, 0) = n + 1
Next n
‘populate column 2 of myArray
myArray(0, 1) = «R1C2»
myArray(1, 1) = «R2C2»
myArray(2, 1) = «R3C2»
‘populate column 3 of myArray
myArray(0, 2) = «R1C3»
myArray(1, 2) = «R2C3»
myArray(2, 2) = «R3C3»
‘copy data to ListBox1 (using List property) and ListBox2 (using Column property):
‘copies an array without transposing it
ListBox1.List() = myArray
‘transposes the contents of the array
ListBox2.Column() = myArray
End Sub
3. Populate a ComboBox or ListBox with AddItem method
Example 13: Populate a single-column ListBox from worksheet range
Private Sub UserForm_Initialize()
‘set ListBox properties on initialization of UserForm
With ListBox1
.ColumnCount = 1
.ColumnWidths = «50»
.ColumnHeads = False
‘AddItem method will not work if ListBox is bound to data, hence RowSource is cleared if it had been set
.RowSource = «»
End With
‘populating a single-column ListBox with AddItem method
Dim cell As Range
Dim rng As Range
Set rng = Sheet1.Range(«A1:A6»)
For Each cell In rng.Cells
Me.ListBox1.AddItem cell.Value
Next cell
End Sub
Example 14: Populate a single-column ListBox with values from 1 to 500
Private Sub UserForm_Initialize()
‘set ListBox properties on activation of UserForm
With ListBox1
.ColumnCount = 1
.ColumnWidths = «50»
‘AddItem method will not work if ListBox is bound to data, hence RowSource is cleared if it had been set
.RowSource = «»
End With
‘populate a single-column ListBox with values from 1 to 500, and «N/A»
With ListBox1
.AddItem «N/A»
For i = 1 To 500
.AddItem i
Next i
End With
End Sub

Example 15: Create a new row with AddItem and specify its row number — refer Image 14
Private Sub UserForm_Initialize()
‘set ListBox properties on initialization of UserForm
With ListBox1
.ColumnCount = 1
.ColumnWidths = «50»
.ColumnHeads = False
‘AddItem method will not work if ListBox is bound to data, hence RowSource is cleared if it had been set
.RowSource = «»
End With
‘using AddItem method to populate single-column ListBox:
ListBox1.AddItem «banana»
ListBox1.AddItem «orange»
‘Create a new row with AddItem and position as row number 1 — this will push down the above two rows
ListBox1.AddItem «apple», 0
‘Create a new row with AddItem and position as row number 2 — this will push down the above two rows to no. 3 and 4
ListBox1.AddItem «pears», 1
End Sub

Example 16: Populate a ComboBox with the 12 months in a year — Refer Image 15
Private Sub UserForm_Initialize()
‘set ComboBox properties on initialization of UserForm
With ComboBox1
.ColumnCount = 1
.ColumnWidths = «50»
.ColumnHeads = False
‘AddItem method will not work if ComboBox is bound to data, hence RowSource is cleared if it had been set
.RowSource = «»
End With
‘populates ComboBox with the 12 months in a year
For n = 1 To 12
ComboBox1.AddItem Format(DateSerial(2011, n, 1), «mmmm»)
Next n
End Sub
4. Populate a multi-column ComboBox or ListBox using AddItem method and List & Column properties

Example 17: refer Image 16
Private Sub UserForm_Initialize()
‘set ComboBox properties on initialization of UserForm
With ComboBox1
.ColumnCount = 3
.ColumnWidths = «50;50;50»
.ColumnHeads = False
‘AddItem method will not work if ComboBox is bound to data, hence RowSource is cleared if it had been set
.RowSource = «»
End With
‘Populating a multi-column ListBox using AddItem method and List & Column properties:
‘Create a new row with Additem
ComboBox1.AddItem «banana»
‘add item in second column of this first row, using List property
ComboBox1.List(0, 1) = «tuesday»
‘adding items in the 3 columns of the first row — this will become the second row in the end
ComboBox1.List(0, 2) = «day 2»
ComboBox1.AddItem «orange»
‘add item in second column of this second row, using Column property
ComboBox1.Column(1, 1) = «wednesday»
‘adding items in the 3 columns of the second row — this will become the third row in the end
ComboBox1.Column(2, 1) = «day 3»
‘Create a new row with Additem and position as row number 1
ComboBox1.AddItem «apple», 0
ComboBox1.List(0, 1) = «monday»
‘adding items in the 3 columns and positioning this row as the first row — this will push down the above two rows
ComboBox1.List(0, 2) = «day 1»
End Sub
5. Populate a multi-column ListBox from a worskheet range, using AddItem method and List property

Example 18: refer Image 17
Private Sub UserForm_Initialize()
‘set ListBox properties on initialization of UserForm
With ListBox1
.ColumnCount = 3
.ColumnWidths = «50;50;50»
‘AddItem method will not work if ListBox is bound to data, hence RowSource is cleared if it had been set
.RowSource = «»
End With
End Sub
Private Sub CommandButton1_Click()
‘populate a multi-column ListBox from a worskheet range, using AddItem method and List property
Dim counter As Long
Dim totalRows As Long
‘determine total number of rows in column A
totalRows = Sheet4.Cells(Rows.Count, «A»).End(xlUp).Row
counter = 0
‘ListBox gets populated with all rows in column A:
Do
With Me.ListBox1
counter = counter + 1
‘create a new row with Additem
.AddItem Sheet4.Cells(counter, 1).Value
‘add item in second column of a row
.List(.ListCount — 1, 1) = Sheet4.Cells(counter, 1).Offset(0, 1).Value
‘add item in third column of a row
.List(.ListCount — 1, 2) = Sheet4.Cells(counter, 1).Offset(0, 2).Value
End With
Loop Until counter = totalRows
End Sub
6. Add a new item/row to the list if ComboBox is bound to data in a worksheet.


Example 19: refer Images 18a & 18b
Private Sub UserForm_Initialize()
‘set ComboBox properties on initialization of UserForm
With ComboBox1
.ColumnCount = 3
.ColumnWidths = «50;50;50»
.ColumnHeads = True
.BoundColumn = 1
‘a named-range (name: «cbRange») has been created in Sheet3 of the workbook, using the Name Manager: «=Sheet3!$A$2:$C$6»
.RowSource = «cbRange»
End With
End Sub
Private Sub CommandButton1_Click()
‘add a new item/row to the list if ComboBox is bound to data in a worksheet
Dim colNo As Long
‘determine first column of the named-range «cbRange»
colNo = Range(«cbRange»).Column
‘create a new single-column named-range (name: «cbRangeTemp»), populated with only the first column of the named-range «cbRange».
Range(«cbRange»).Resize(Range(«cbRange»).Rows.Count, 1).Name = «cbRangeTemp»
‘checks if ComboBox1.Value is already existing in column 1 of named-range «cbRange»
If Application.CountIf(Range(«cbRangeTemp»), ComboBox1.Value) = 0 Then
‘resizing the named-range «cbRange», to add another worksheet row at the end, wherein the ComboBox1.Value will get posted:
Range(«cbRange»).Resize(Range(«cbRange»).Rows.Count + 1).Name = «cbRange»
ComboBox1.RowSource = «cbRange»
‘posting columns of the new row with values from ComboBox1, TextBox1 & TextBox2:
Sheet3.Cells(Range(«cbRange»).Rows.Count + 1, colNo) = ComboBox1.Value
Sheet3.Cells(Range(«cbRange»).Rows.Count + 1, colNo).Offset(0, 1) = TextBox1.Text
Sheet3.Cells(Range(«cbRange»).Rows.Count + 1, colNo).Offset(0, 2) = TextBox2.Text
Else
MsgBox «Item already in List»
End If
ComboBox1.Value = «»
TextBox1.Text = «»
TextBox2.Text = «»
End Sub
——————————————————————————————————————————————-
Extract ListBox & ComboBox Items, with VBA
VBA code — Display selected ComboBox item in TextBox:
‘the text area of ComboBox shows the item entered by user of his own choice or that selected from list items, and this item gets displayed in TextBox
TextBox1.Value = ComboBox1.Value
Note: VBA code-> TextBox1.Value = ListBox1.Value, or TextBox1.Text = ListBox1.Value, will work only in case MultiSelect property of ListBox is set to fmMultiSelectSingle, ie. in case of a single-selection enabled ListBox. It will copy the selected item (value in BoundColumn) from the list.
VBA code — Copy selected ComboBox item to a worksheet range:
‘the text area of ComboBox shows the item entered by user of his own choice or that selected from list items, and this item is copied to the worksheet range
Sheet1.Range(«G4»).Value = ComboBox1.Value
Note: VBA code-> Sheet4.Range(«G4»).Value = ListBox1.Value, will work only in case MultiSelect property of ListBox is set to fmMultiSelectSingle, ie. in case of a single-selection enabled ListBox. It will copy the selected item (value in BoundColumn) from the list.
VBA code — Copy ComboBox item determined by its position, to a worksheet range:
‘an existing ComboBox item, determined by its position (row 4, column 1), posted to a worksheet cell
Sheet1.Range(«F2»).Value = ComboBox1.List(3, 0)
Note: VBA code for ListBox -> Sheet1.Range(«F2»).Value = ListBox1.List(3, 0)

Example 20: Extracting ListBox items (of multi-column ListBox) to a worksheet range — refer Image 19
Private Sub UserForm_Initialize()
‘set ListBox properties on initialization of UserForm
With ListBox1
.ColumnCount = 3
.ColumnWidths = «50;50;50»
.ColumnHeads = True
.RowSource = «Sheet2!A2:C6»
.MultiSelect = fmMultiSelectMulti
End With
End Sub
Private Sub CommandButton1_Click()
‘Use Selected & List properties to copy multiple-selected ListBox items (of multi-column ListBox) to a worksheet range
‘check all items/rows in a ListBox
For r = 0 To ListBox1.ListCount — 1
‘if a ListBox row is selected, it will get copied to the worksheet range
If ListBox1.Selected(r) = True Then
‘copying multi-column ListBox rows to corresponding/matching worksheet rows & columns:
For c = 1 To ListBox1.ColumnCount
Sheet1.Cells(r + 1, c).Value = ListBox1.List(r, c — 1)
Next c
End If
Next r
End Sub

Example 21: Extract multiple items in a row from a single-selection enabled & multi-column ListBox, and copy to worksheet range — refer Image 20
Private Sub UserForm_Initialize()
‘set ListBoxBox properties on initialization of UserForm
With ListBox1
.ColumnCount = 3
.ColumnWidths = «50;50;50»
.ColumnHeads = True
.BoundColumn = 1
.MultiSelect = fmMultiSelectSingle
.RowSource = «Sheet3!A2:C6»
End With
End Sub
Private Sub CommandButton1_Click()
‘extract multiple items in a row from a single-selection enabled & multi-column ListBox, and copy to worksheet range
‘ListIndex property is used to return and set a selection in a single-selection ListBox, but not in a multi-selection ListBox
‘ListBox1.Value will work only in case of a single-selection ListBox. It will copy the selected item (value in BoundColumn) from the list.
Dim rng As Range
Set rng = Sheet3.Cells(9, 1)
If ListBox1.Value <> «» Then
rng.Value = ListBox1.Value
rng.Offset(0, 1).Value = ListBox1.List(ListBox1.ListIndex, 1)
rng.Offset(0, 2).Value = ListBox1.List(ListBox1.ListIndex, 2)
End If
End Sub

Example 22: Select or enter name in ComboBox, and lookup its corresponding Grade in a worksheet range — refer Image 21
Private Sub UserForm_Initialize()
‘set comboBox properties on initialization of UserForm
With ComboBox1
.ColumnCount = 1
.ColumnWidths = «50»
.ColumnHeads = True
.RowSource = «Sheet3!A2:B6»
End With
‘disallow manual entry in TextBox
With TextBox1
.Enabled = False
End With
End Sub
Private Sub CommandButton1_Click()
‘select or enter name in ComboBox, and lookup its corresponding Grade in a worksheet range — use ComboBox, TextBox & CheckBox properties and worksheet functions Vlookup and Countif
Dim totalRows As Long
‘determine total number of rows in column B
totalRows = Sheet3.Cells(Rows.Count, «B»).End(xlUp).Row
Me.ComboBox1.ControlTipText = «Select Name»
Me.CommandButton1.ControlTipText = «Click to get Grade»
‘Name selected in ComboBox is posted to TextBox
TextBox1.Text = ComboBox1.Value
‘Grade will be searched only if a name is selected and the CheckBox is selected:
If CheckBox1 = True And TextBox1.Text <> «» Then
‘check if name selected or entered in ComboBox is present in the lookup range:
If Application.CountIf(Sheet3.Range(«A1:A» & totalRows), TextBox1.Text) > 0 Then
‘lookup Grade of selected Name, in the worksheet range
Sheet3.Cells(1, 4).Value = TextBox1.Text & «‘s grade is » & Application.VLookup(TextBox1.Text, Sheet3.Range(«A1:B» & totalRows), 2, False)
Else
MsgBox «Name not found!»
End If
End If
End Sub
——————————————————————————————————————————————-
Delete ListBox rows using the RemoveItem Method


Example 23: Use RemoveItem method to delete a ListBox row. The below code deletes the row from the ListBox and also deletes the row items (or rows) in the worksheet — refer Images 22a and 22b.
Private Sub UserForm_Initialize()
‘set ListBox properties on initialization of UserForm
With ListBox1
.ColumnCount = 3
.ColumnWidths = «50;50;50»
.ColumnHeads = False
.MultiSelect = fmMultiSelectMulti
End With
Dim totalRows As Long
‘determine total number of rows in column A
totalRows = Sheet3.Cells(Rows.Count, «A»).End(xlUp).Row
‘load a dynamic worksheet range to a ListBox
Dim rng As Range
Set rng = Sheet3.Range(«A2:C» & totalRows)
Me.ListBox1.List = rng.Cells.Value
‘removes all items in ListBox
‘ListBox1.Clear
End Sub
Private Sub CommandButton1_Click()
‘use RemoveItem method to delete a ListBox row. The below code deletes the row from the ListBox and also deletes the row items (or rows) in the worksheet
Dim n As Long, i As Long
Dim var As Variant
‘deleting row from ListBox using RemoveItem method:
‘check all items in a ListBox; reverse order (Step -1) is used because rows are being deleted from ListBox.
For n = ListBox1.ListCount — 1 To 0 Step -1
If ListBox1.Selected(n) = True Then
‘item to be deleted is stored in the variable named var
var = ListBox1.List(n, 0)
ListBox1.RemoveItem (n)
‘determine row number in which items are to be deleted; Note: value of variable named var is derived from first column, hence Range(«A:A») is searched in the Match formula.
i = Application.Match(var, Sheet3.Range(«A:A»), 0)
‘delete all 3 columns of the determined row in the worksheet:
Sheet3.Cells(i, 1) = «»
Sheet3.Cells(i, 1).Offset(0, 1) = «»
Sheet3.Cells(i, 1).Offset(0, 2) = «»
‘use this code instead of the preceding 3-lines, to delete the determined row in the worksheet
‘Sheet3.Rows(i).Delete
End If
Next n
End Sub
Example 24: Delete all rows in ListBox, using RemoveItem method
Private Sub UserForm_Initialize()
‘set ListBoxBox properties on initialization of UserForm
With ListBox1
.ColumnCount = 3
.ColumnWidths = «50;50;50»
.BoundColumn = 1
.MultiSelect = fmMultiSelectMulti
‘RemoveItem method will not work if ListBox is bound to data, hence RowSource is cleared if it had been set
ListBox1.RowSource = «»
End With
For n = 2 To 6
With Me.ListBox1
‘create a new row with Additem
.AddItem Sheet3.Cells(n, 1).Value
‘add item in second column of a row
.List(.ListCount — 1, 1) = Sheet3.Cells(n, 1).Offset(0, 1).Value
‘add item in third column of a row
.List(.ListCount — 1, 2) = Sheet3.Cells(n, 1).Offset(0, 2).Value
End With
Next n
End Sub
Private Sub CommandButton1_Click()
‘delete all rows in ListBox, using RemoveItem method
Dim n As Integer
For n = 1 To ListBox1.ListCount
‘Note: «ListBox1.RemoveItem 0» is the same as «ListBox1.RemoveItem (0)»
‘alternate code: ListBox1.RemoveItem 0
ListBox1.RemoveItem ListBox1.ListCount — 1
Next n
End Sub
January 22, 2019/
Chris Newman
What Are ListBox Controls?
ListBoxes are a great way to manage tables within your userform. I have used them in the past to allow users to manage rows of information without necessary displaying all that information within the userform itself. There are a lot of neat things you can do with a userform so I’ve collected some of the more popular tasks you may want to know how to write within your VBA code.
For all the example VBA code snippets, the name of the listbox with be called “ListBox1”. I also have a downloadable example file that you can get for free if you want to see a lot of this code in action.
Enjoy!
Add An Item to The ListBox
To The End
To A Specific Position
Remember ListBoxes are zero based, so the first item is really at position 0. So if you want to add an item to the 5th position, you need to reference number 4 in the AddItem function.
‘Add to the 2nd Position (subtract 1 from desired)
ListBox1.AddItem «Apple», 1
Add Multiple Items To The ListBox
Individually Written
Sub ListBox_Load()
ListBox1.AddItem «Apple»
ListBox1.AddItem «Orange»
ListBox1.AddItem «Pear»
End Sub
From An Array List
Sub ListBox_LoadArray()
Dim myArray As Variant
myArray = Array(«Apple», «Orange», «Pear»)
ListBox1.List = myArray
End Sub
From A Cell Range
Sub ListBox_LoadRange()
Dim cell As Range
‘Load to ListBox
For Each cell In Worksheets(«Sheet1»).Range(«A1:A6»)
ListBox1.AddItem cell.Value
Next cell
End Sub
From A Table Object (ListObject)
Sub ListBox_LoadTable()
Dim tbl As ListObject
Dim cell As Range
‘Store Table Object to a variable
Set tbl = Sheet1.ListObjects(«Table1»)
‘Load List Box
For Each cell In tbl.DataBodyRange.Columns(1).Cells
ListBox1.AddItem cell.Value
Next cell
End Sub
Delete ListBox Items
Remove An Item From The ListBox
‘Remove 4th item in ListBox (subtract 1 from desired row)
ListBox1.RemoveItem 3
Remove Selected Item(s) From The ListBox
Private Sub DeleteSelection()
‘PURPOSE: Remove any selected items from the ListBox
Dim x As Long
Dim OriginalCount As Long
‘Store original ListBox count
OriginalCount = ListBox1.ListCount
‘Temporarily hide ListBox (runs faster)
ListBox1.Visible = False
‘Delete selected line items
For x = OriginalCount — 1 To 0 Step -1
If ListBox1.Selected(x) = True Then ListBox1.RemoveItem x
Next x
‘Unhide ListBox
ListBox1.Visible = True
End Sub
Remove All Items From The ListBox
Listbox Selected Items
Select A Specific Item In The ListBox
‘Select the 5th item in the ListBox (subtract 1 from desired row)
ListBox1.Selected(4) = True
Deselect All Items
Unfortunately, the “ListIndex = -1” method does not work when a ListBox allows for multiple selections. Hence, the below code tests for the ListBox’s selection mode.
If ListBox1.MultiSelect = fmMultiSelectSingle Then
ListBox1.ListIndex = -1
Else
For x = 0 To ListBox1.ListCount — 1
If ListBox1.Selected(x) Then ListBox1.Selected(x) = False
Next x
End If
Count How Many Items Are Selected (Function)
Function ListBoxSelectionCount(LB As ListBox) As Long
‘PURPOSE: Count how many items are selected in a give Listbox
Dim x As Long
Dim Count As Long
For x = 0 To LB.ListCount — 1
If LB.Selected(x) Then Count = Count + 1
Next x
ListBoxSelectionCount = Count
End Function
Count How Many Items Are In The ListBox
‘Return how many items are in the ListBox
MsgBox ListBox1.ListCount
Move Selected Item Up/Down
Move Selection Up One Position
Sub MoveUp()
‘PURPOSE: Move the selected item up one position in the list
Dim x As Long
Dim Count As Long
Dim Position As Long
‘Is there an item selected?
If ListBox1.ListIndex = -1 Then Exit Sub
‘Which Item is selected?
For x = 0 To ListBox1.ListCount — 1
If ListBox1.Selected(x) = True Then
Position = x
Count = Count + 1
If Count > 1 Then Exit Sub ‘More than 1 item selected
End If
Next x
‘Selected item already at the top?
If Position = 0 Then Exit Sub
‘Add an item above the current selection
ListBox1.AddItem ListBox1.List(Position), Position — 1
‘Remove Original Selection
ListBox1.RemoveItem Position + 1
‘Re-select the item that got moved
ListBox1.Selected(Position — 1) = True
End Sub
Move Selection Down One Position
Sub MoveDown()
‘PURPOSE: Move the selected item down one position in the list
Dim x As Long
Dim Count As Long
Dim Position As Long
‘Is A ValidSelection Made?
If ListBox1.ListIndex = -1 Then Exit Sub ‘No Selection made
‘Which Item is selected?
For x = 0 To ListBox1.ListCount — 1
If ListBox1.Selected(x) = True Then
Position = x
Count = Count + 1
If Count > 1 Then Exit Sub ‘More than 1 item selected
End If
Next x
‘Move selected item down if not already at the bottom
If Position < ListBox1.ListCount — 1 Then
‘Add an item below the current selection
ListBox1.AddItem ListBox1.List(Position), Position + 2
‘Remove Original Selection
ListBox1.RemoveItem Position
‘Re-select the item that got moved
ListBox1.Selected(Position + 1) = True
End If
End Sub
Additional Resources
-
Excel VBA UserForm Listbox (AnalysisTabs.com)
-
The Complete Guide to Excel VBA Form Control ListBoxes (wellsr.com)
Anything To Add?
I know there are a TON of things you can do with ListBoxes and if there are actions you are stuck trying to figure out, leave a comment below and I will try to add them to the guide. Please only ask for generic tasks and not super-specific ones. Also, if there is a more simplistic way to carry out some of these tasks, let me know!
Download The Excel Example File
If you would like to get a copy of the Excel file I used throughout this article, feel free to directly download the spreadsheet by clicking the download button below.
About The Author
Hey there! I’m Chris and I run TheSpreadsheetGuru website in my spare time. By day, I’m actually a finance professional who relies on Microsoft Excel quite heavily in the corporate world. I love taking the things I learn in the “real world” and sharing them with everyone here on this site so that you too can become a spreadsheet guru at your company.
Through my years in the corporate world, I’ve been able to pick up on opportunities to make working with Excel better and have built a variety of Excel add-ins, from inserting tickmark symbols to automating copy/pasting from Excel to PowerPoint. If you’d like to keep up to date with the latest Excel news and directly get emailed the most meaningful Excel tips I’ve learned over the years, you can sign up for my free newsletters. I hope I was able to provide you with some value today and I hope to see you back here soon!
— Chris
Founder, TheSpreadsheetGuru.com
Содержание
- VBA Listbox
- Create a Listbox
- Populate a Listbox in VBA code
- Populate a Listbox From a Cells Range
- Get a Selected Item of a Listbox in VBA
- Clear a Listbox
- Use a Listbox in a UserForm
- VBA Code Examples Add-in
- The Complete Guide to Excel VBA Form Control ListBoxes
- The VBA Tutorials Blog
- Table of Contents
- Introduction
- Change ListBox Selection Type
- VBA Excel. Элемент управления ListBox (список)
- Элемент управления ListBox
- Свойства списка
- Способы заполнения ListBox
VBA Listbox
In this Article
This tutorial will demonstrate how to work with Listboxes using VBA.
In VBA, you can create a Listbox where a user can choose one of the listed options. Listboxes are often used in UserForms, but can also be used in a Worksheet. In this tutorial, you will learn how to create, populate and delete a Listbox. You will also see how to get a user choice in VBA and use it in code.
If you want to learn how to create a ComboBox, click here: VBA ComboBox
If you want to learn how to create a Checkbox, click here: VBA Checkbox
Create a Listbox
In order to insert a Listbox in the Worksheet, you need to go to the Developer tab, click Insert and under ActiveX Controls choose List Box:
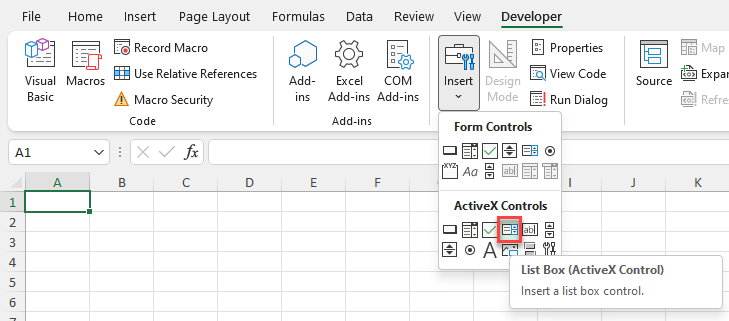
Image 1. Insert a Listbox in the Worksheet
When you select the Listbox which you inserted, you can click on Properties under the Developer tab:
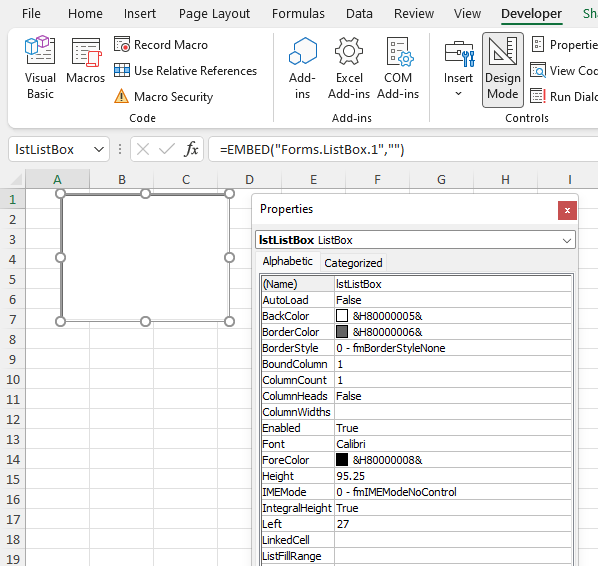
Image 2. Change Listbox Properties
Here you can set different properties of the Listbox. For the beginning, we changed the attribute Name to lstListBox. Now, we can use the Listbox with this name in VBA code.
Populate a Listbox in VBA code
First, we need to populate the Listbox with values. In most cases, a Listbox needs to be populated when the Workbook is opened. Because of this, we need to put a code for populating the Listbox in object Workbook, procedure Open. This procedure is executed every time a user opens the Workbook. Here is the code:
As you can see in Image 3, we populated our Listbox with 5 names (John, Michael, Jennifer, Lilly and Robert):
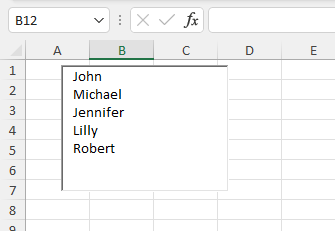
Image 3. Populate the Listbox in VBA
Populate a Listbox From a Cells Range
Another possible way to populate a Listbox is to let a user do it. A Listbox can be linked to a range of cells. Therefore, every time a user enters a new value in the cells range, the Listbox will update with that value.
If you want to enable this, you have to go to the Properties of the ListBox and set the attribute ListFillRange:
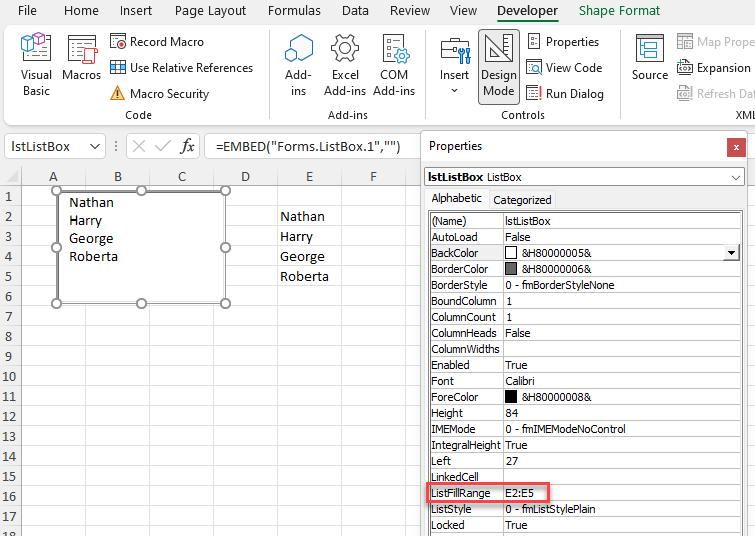
Image 4. Populate the Listbox from the cells range
We linked our Listbox with the range E2:E5, where we put names we want (Nathan, Harry, George, Roberta). As a result, the Listbox is now populated with these names.
Get a Selected Item of a Listbox in VBA
The purpose of a Listbox is to get a users choice. In order to retrieve a value that is selected by a user, you need to use this code:
The users selection is in the attribute Value of Sheet1.lstListbox object. This value is assigned to the variable strSelectedItem:
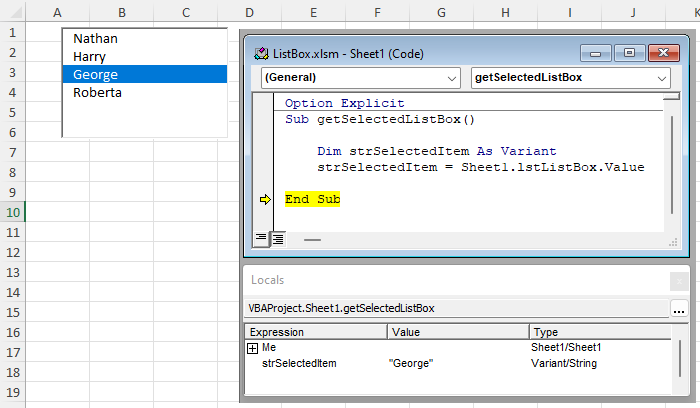
Image 5. Get a selected value from the Listbox in VBA
We selected George in the Listbox and executed the procedure. As you can see in Image 5, the value of the strSelectedItem is George, which is the value we selected. Furthermore, you can process this variable in the code.
Clear a Listbox
In order to clear a Listbox in VBA, you need to use Clear method of Sheet1.lstListBox object. It will delete all the items from the Listbox. Here is the code:
(Note: If the attribute ListFillRange is set, the above code will produce an error.
You have to clear the attribute ListFillRange first.)
When we execute the code, we get the empty Listbox:
![]()
Image 6. Clear the Listbox
Use a Listbox in a UserForm
As we mentioned, Listbox is most often used in UserForms. To explain how you can do it, we will first insert an Userform. In VBA Editor, right-click on Module name, click on Insert and choose UserForm:
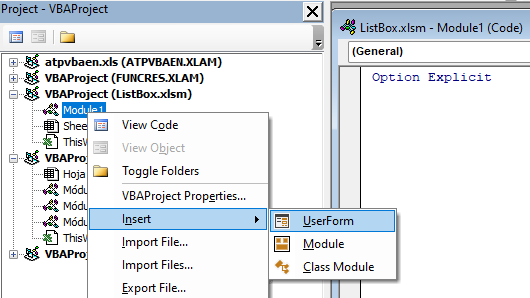
Image 7. Insert a Userform
To display controls for inserting, you need to enable the Toolbox. To do this, click on the Toolbox icon in the toolbar. After that, you will get the windows with all the controls available. You can click on ListBox to create it in the Userform.
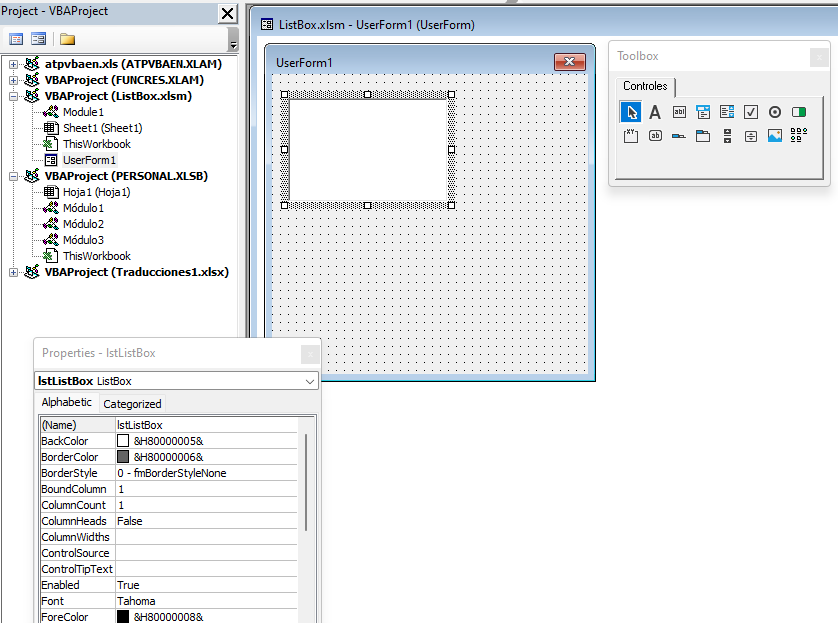
Image 8. Insert a Listbox in the Userform
We will name the ListBox lstListBox. In order to populate it with values, we need to put the following code into the method Initialize of the object UserForm:
This code triggers every time a user runs the Userform and populates the Listbox with these 5 names:
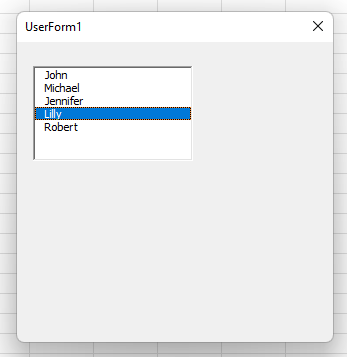
Image 9. The Listbox with values in the Userform
If you want to get selected value from the ListBox, you need to use the same logic for the Listbox in a Worksheet, which is explained earlier in the article.

VBA Code Examples Add-in
Easily access all of the code examples found on our site.
Simply navigate to the menu, click, and the code will be inserted directly into your module. .xlam add-in.
Источник
The Complete Guide to Excel VBA Form Control ListBoxes
The VBA Tutorials Blog
Table of Contents
Introduction
This VBA Guide will teach you everything you could possibly want to know about handling Excel Form Control Listboxes using VBA. When I say “Form Control” ListBox, I’m talking about this little guy located under “Form Controls” on the Developer Tab > Insert menu:

Form Control ListBox
If you want to read more complete guides to Form Control or ActiveX Controls, visit my ActiveX and Form Control Guides page.
Before I get criticized, yes, I know the formal term is the two-word phrase List Box but I’m partial to referring to it like you would when writing a VBA macro: ListBox. You’ll find I use them interchangeably throughout this guide.
I made a calendar form using Excel Form Control ListBoxes, which I’ll reference throughout this guide as we learn how to manipulate our listboxes with VBA macros.
Excel ListBox Form
In the form control world, a listbox contains all the items in your list with an up and down scroll bar on the right side. If it’s a dropdown list your after, you need to try a combobox.
In this tutorial, I’ll show you how to select items, enable multiple selections, return the value of your listbox, link your listbox to a range, assign a macro to your listbox and loop through all the listboxes in your form — all using VBA!
Change ListBox Selection Type
How you control the selected values in a listbox using VBA depends largely on what you’ve chosen for your Selection Type. That’s why we’re starting here, first. The selection type can be changed by right clicking your ListBox, selecting Format Control and clicking the Control tab. Your choices are:
- Single — allows only one selection (xlNone).
- Multi — allows multiple selections (xlSimple).
- Extend — allows multiple selections and allows you to select a range of items in the list by shift-clicking (xlExtended).
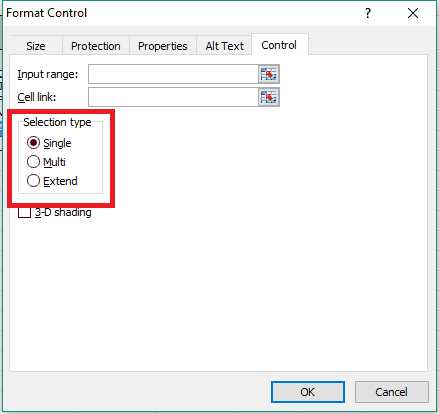
Selection Type
Let’s change the selection type of our listboxes using VBA. Remember, the listbox name can be found in the upper left of Excel when you have your listbox selected:
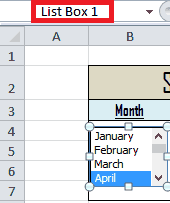
List Box 1
Each of the three methods below can be used to change the MultiSelect property to any of the three acceptable values (xlNone, xlSimple and xlExtended).
Источник
VBA Excel. Элемент управления ListBox (список)
Элемент управления пользовательской формы ListBox для выбора и ввода информации в VBA Excel. Свойства списка, его заполнение, извлечение данных, примеры кода.
Элемент управления ListBox
Список используется в тех случаях, когда необходимо добавить в форму информацию, которая заранее известна, а ее отдельные позиции можно сгруппировать в список. Элемент управления ListBox оправдывает себя при небольших списках, так как большой список будет занимать много места на форме.
Использование полос прокрутки уменьшает преимущество ListBox перед элементом управления ComboBox, которое заключается в том, что при открытии формы все позиции для выбора на виду без дополнительных действий со стороны пользователя. При выборе информации из большого списка удобнее использовать ComboBox.
Элемент управления ListBox позволяет выбрать несколько позиций из списка, но эта возможность не имеет практического смысла. Ввести информацию в ListBox с помощью клавиатуры или вставить из буфера обмена невозможно.
Свойства списка
| Свойство | Описание |
|---|---|
| ColumnCount | Указывает количество столбцов в списке. Значение по умолчанию = 1. |
| ColumnHeads | Добавляет строку заголовков в ListBox. True – заголовки столбцов включены, False – заголовки столбцов выключены. Значение по умолчанию = False. |
| ColumnWidths | Ширина столбцов. Значения для нескольких столбцов указываются в одну строку через точку с запятой (;). |
| ControlSource | Ссылка на ячейку для ее привязки к элементу управления ListBox. |
| ControlTipText | Текст всплывающей подсказки при наведении курсора на ListBox. |
| Enabled | Возможность выбора элементов списка. True – выбор включен, False – выключен*. Значение по умолчанию = True. |
| Font | Шрифт, начертание и размер текста в списке. |
| Height | Высота элемента управления ListBox. |
| Left | Расстояние от левого края внутренней границы пользовательской формы до левого края элемента управления ListBox. |
| List | Позволяет заполнить список данными из одномерного или двухмерного массива, а также обращаться к отдельным элементам списка по индексам для записи и чтения. |
| ListIndex | Номер выбранной пользователем строки. Нумерация начинается с нуля. Если ничего не выбрано, ListIndex = -1. |
| Locked | Запрет возможности выбора элементов списка. True – выбор запрещен**, False – выбор разрешен. Значение по умолчанию = False. |
| MultiSelect*** | Определяет возможность однострочного или многострочного выбора. 0 (fmMultiSelectSingle) – однострочный выбор, 1 (fmMultiSelectMulti) и 2 (fmMultiSelectExtended) – многострочный выбор. |
| RowSource | Источник строк для элемента управления ListBox (адрес диапазона на рабочем листе Excel). |
| TabIndex | Целое число, определяющее позицию элемента управления в очереди на получение фокуса при табуляции. Отсчет начинается с 0. |
| Text | Текстовое содержимое выбранной строки списка (из первого столбца при ColumnCount > 1). Тип данных String, значение по умолчанию = пустая строка. |
| TextAlign | Выравнивание текста: 1 (fmTextAlignLeft) – по левому краю, 2 (fmTextAlignCenter) – по центру, 3 (fmTextAlignRight) – по правому краю. |
| Top | Расстояние от верхнего края внутренней границы пользовательской формы до верхнего края элемента управления ListBox. |
| Value | Значение выбранной строки списка (из первого столбца при ColumnCount > 1). Value – свойство списка по умолчанию. Тип данных Variant, значение по умолчанию = Null. |
| Visible | Видимость списка. True – ListBox отображается на пользовательской форме, False – ListBox скрыт. |
| Width | Ширина элемента управления. |
* При Enabled в значении False возможен только вывод информации в список для просмотра.
** Для элемента управления ListBox действие свойства Locked в значении True аналогично действию свойства Enabled в значении False.
*** Если включен многострочный выбор, свойства Text и Value всегда возвращают значения по умолчанию (пустая строка и Null).
В таблице перечислены только основные, часто используемые свойства списка. Еще больше доступных свойств отображено в окне Properties элемента управления ListBox, а все методы, события и свойства – в окне Object Browser.
Вызывается Object Browser нажатием клавиши «F2». Слева выберите объект ListBox, а справа смотрите его методы, события и свойства.
Свойства BackColor, BorderColor, BorderStyle отвечают за внешнее оформление списка и его границ. Попробуйте выбирать доступные значения этих свойств в окне Properties, наблюдая за изменениями внешнего вида элемента управления ListBox на проекте пользовательской формы.
Способы заполнения ListBox
Используйте метод AddItem для загрузки элементов в список по одному:
Источник