
Checkboxes can be useful controls to toggle on/off specific settings in your add-in. They have a couple of unique properties in comparison to your typical button control, but we’ll explain those nuances in this article.
In this example, I am going to create a single checkbox control on a Ribbon tab called “My Cool Addin”. The checkbox will toggle on/off the spreadsheet gridlines for the ActiveSheet. Because each Excel tab may have a different gridline state (ie gridlines showing or not showing), we will need to analyze each sheet when it is activated and reset the checkbox to align with the current state of the gridlines.
Example File: Ribbon Checkbox Control Example
NOTE: If your checkbox won’t have any instances where the control might need to automatically change on its own, you can ignore any references to the onLoad properties in the example.
– XML Code –
There are three different events to account for while using checkboxes:
- onLoad – This is the macro that stores the RibbonUI object (allows us to refresh the Ribbon anytime we want)
- getPressed – This is the macro that will trigger when the checkbox is loaded/refreshed
- onAction – This is the macro that will trigger whenever the checkbox is clicked
<customUI onLoad="RibbonLoaded_myAddin" xmlns="http://schemas.microsoft.com/office/2006/01/customui">
  <ribbon>
    <tabs>
      <tab id="MyCoolAddin" label="My Cool Addin">
        <group id="GroupA" label="Checkbox Example">
          <checkBox
            id="Checkbox01"
            label="Display Gridlines"
            getPressed="checkbox01_startup"
            onAction="checkbox01_clicked"/>
        </group>
      </tab>
    </tabs>
  </ribbon>
</customUI>
– VBA Code –
Now for the VBA code. First, we will start by creating a macro that will run when the Ribbon UI is initially loaded. This will get our checkbox to be checked/unchecked depending on the current state of the spreadsheet. I’m calling this macro my checkbox01_startup macro since it will run whenever the checkbox is loaded (but you can name it anything you want as long as it matches what was used in your XML code).
Whatever your code does, it should result by providing the returnedVal variable either a true (for checked) or false (for unchecked) value.
Sub checkbox01_startup(control As IRibbonControl, ByRef returnedVal)
'PURPOSE: Set the value of the Checkbox when the Ribbon tab is first activated

'True/False value to send to the Checkbox
  If ActiveWindow.DisplayGridlines = True then
    returnedVal = True
  Else
    returnedVal = False
  End If
End Sub
Next, we will write a macro that will fire when the checkbox is actually clicked by the user. The macro I’m using simply determines if the user checked or unchecked the checkbox control (this value is captured by the pressed variable). If the checkbox is checked (or pressed = True) then I carry out an action. If the checkbox is unchecked then I carry out a separate action.
Sub checkbox01_clicked(control As IRibbonControl, pressed As Boolean)
'PURPOSE:Carryout an action after user clicks the checkbox

Select Case pressed
  Case True
    ActiveWindow.DisplayGridlines = True
  Case False
    ActiveWindow.DisplayGridlines = False
End Select

End Sub
Reloading The Checkbox
As I mentioned near the beginning of this article, my example is using a checkbox that is unique to individual spreadsheets. This means whenever a new spreadsheet tab is selected, I need to reset my checkbox based on if the gridlines are showing or not. For more context on what we will be doing, you may want to visit the article covering How To Refresh The Ribbon On Command.
First, we will need to add this little macro (I recommend adding it to the very top of your VBA code). This VBA macro will essentially store the Ribbon object to a variable that we can call whenever we want upon the initial load of your add-in. Notice how the name of the macro (RibbonLoaded_myAddin) matches the XML code used with the onLoad property in the CustomUI node.
Public myRibbon As IRibbonUI

Sub RibbonLoaded_myAddin(ribbon As IRibbonUI)
'PURPOSE: Store ribbon instance to a variable upon loading

Set myRibbon = ribbon

End Sub
Next, we will need to code something to trigger a reset of our Checkbox control whenever a new Worksheet is selected. To do this, we will need to trigger a reset of our Checkbox control via the SheetActivate spreadsheet event.
The below code will need to be inserted into the ThisWorkbook code module. You can get to this module by double-clicking the ThisWorkbook object within the Microsoft Excel Objects folder in your VBA Project Pane.
</pre>
Private Sub Workbook_SheetActivate(ByVal Sh As Object)
'PURPOSE: Refresh Checkbox after a new sheet is selected

On Error GoTo RestartExcel
  myRibbon.InvalidateControl ("Checkbox01")
On Error GoTo 0

Exit Sub

RestartExcel:
  MsgBox "Please restart Excel for Ribbon UI changes to take effect", _
    vbCritical, "Ribbon UI Refresh Failed"

End Sub
-
#2
Seems my Custom UI Editor text got cut off. In the code I had:
<checkBox id = «checkboxShowMessage» label = «Show Message»>
-
#3
Third time is the charm… I think posting doesn’t like the open close carrots
checkBox id = «checkboxShowMessage» label = «Show Message»
-
#4
Unfortunately, the board is interpreting what you posted as code, so we can’t really see what you have.Try something like this…
XML Code
Note: Remove the space after «>» and the space before «>».
Code:
< checkBox
                        id="checkboxShowMessage"
                        label="Checkbox1"
                        onAction="onAction"/ >
VBA Code
Code:
[COLOR=darkblue]Public[/COLOR] [COLOR=darkblue]Sub[/COLOR] onAction(control [COLOR=darkblue]As[/COLOR] IRibbonControl, pressed [COLOR=darkblue]As[/COLOR] [COLOR=darkblue]Boolean[/COLOR])
[COLOR=green]'[/COLOR]
' Code for onAction callback. Ribbon control checkBox
[COLOR=green]'[/COLOR]
    [COLOR=darkblue]If[/COLOR] control.ID = "checkboxShowMessage" [COLOR=darkblue]Then[/COLOR]
        MsgBox "You " & IIf(pressed, "checked", "unchecked") & " " & control.ID & ".", vbInformation
    [COLOR=darkblue]End[/COLOR] [COLOR=darkblue]If[/COLOR]

[COLOR=darkblue]End[/COLOR] [COLOR=darkblue]Sub[/COLOR]
Hope this helps!
-
#5
Hi Domenic,
So yes thanks, I see how the code you supplied would work. But in your case you are executing a sub onAction of checking the box. What I really need is the following. I have a huge sub already coded…. and about half way through, I just want to check to see if the box is checked or not, and if it is checked, execute XYZ. So really I don’t want to execute a new sub on check… I just want the user to be able to check the box if they want, and be able to «read» if that box is checked or not whenever I want in another sub.
So I need something like….in the middle of an already running sub…. if checkboxShowMessage is checked then …. XYZ…. end if. How would I code that?
Code:
Public Sub alreadyCodedSub()

'Dummy stuff already doing stuff
Test1 = 1 + 2
Test2 = Test1+7
Test3 = Test2 + Test1

If checkboxShowMessage = True then
     MsgBox ("The answer is" & Test3)
end if

End Sub
Thanks so much!
-
#6
In that case, I think we can do it this way. We can designate a cell within a worksheet to keep track of the checkbox status. So the cell would contain True if checked, and False if unchecked. This way, when we open/re-open the workbook, we’ll know the status of the checkbox when it was last saved, and change the state of the checkbox accordingly. And this cell will change as the checkbox is checked/unchecked, so that we can reference it at any time in any other code. So if we designate cell A1 in Sheet1 as our cell, we can do the following…
XML Code
Note: A space has been added after each occurrence of «<» so that the Board doesn’t interpret it as code. A space has also been added between both occurrences of «on» and «Load» for the same reason. Therefore, make sure that you get rid of these spaces before running the macro.
Code:
< customUI
    xmlns="http://schemas.microsoft.com/office/2006/01/customui"
    on Load="on Load">
    < ribbon >
        < tabs >
            < tab
                id="Tab1"
                label="Tab1">
                < group
                    id="Group1"
                    label="Group1">
                    < checkBox
                        id="checkboxShowMessage"
                        label="Checkbox1"
                        getPressed="getPressed"
                        onAction="onAction"/>
                    < checkBox
                        id="checkboxShowMessage2"
                        label="Checkbox2"
                        getPressed="getPressed"
                        onAction="onAction"/>
                < /group >
            < /tab >
        < /tabs >
    < /ribbon >
< /customUI >
VBA Code
In the code module for ThisWorkbook…
Code:
[COLOR=darkblue]Option[/COLOR] [COLOR=darkblue]Explicit[/COLOR]

[COLOR=darkblue]Private[/COLOR] [COLOR=darkblue]Sub[/COLOR] Workbook_Open()
    [COLOR=darkblue]With[/COLOR] Worksheets("Sheet1").Range("A1")
        [COLOR=darkblue]If[/COLOR] .Value = [COLOR=darkblue]True[/COLOR] [COLOR=darkblue]Then[/COLOR]
            b_checkboxShowMessage = [COLOR=darkblue]True[/COLOR]
        [COLOR=darkblue]Else[/COLOR]
            b_checkboxShowMessage = [COLOR=darkblue]False[/COLOR]
        [COLOR=darkblue]End[/COLOR] [COLOR=darkblue]If[/COLOR]
    [COLOR=darkblue]End[/COLOR] [COLOR=darkblue]With[/COLOR]
[COLOR=darkblue]End[/COLOR] [COLOR=darkblue]Sub[/COLOR]
In a regular module…
Code:
[COLOR=darkblue]Public[/COLOR] b_checkboxShowMessage [COLOR=darkblue]As[/COLOR] [COLOR=darkblue]Boolean[/COLOR]

[COLOR=darkblue]Dim[/COLOR] MyRibbon [COLOR=darkblue]As[/COLOR] IRibbonUI

[COLOR=darkblue]Public[/COLOR] [COLOR=darkblue]Sub[/COLOR] ******(ribbon [COLOR=darkblue]As[/COLOR] IRibbonUI)
[COLOR=green]'[/COLOR]
' Code for ****** callback. Ribbon control customUI
[COLOR=green]'[/COLOR]
    [COLOR=darkblue]Set[/COLOR] MyRibbon = ribbon
[COLOR=darkblue]End[/COLOR] [COLOR=darkblue]Sub[/COLOR]

[COLOR=darkblue]Public[/COLOR] [COLOR=darkblue]Sub[/COLOR] getPressed(control [COLOR=darkblue]As[/COLOR] IRibbonControl, [COLOR=darkblue]ByRef[/COLOR] returnedVal)
[COLOR=green]'[/COLOR]
' Code for getPressed callback. Ribbon control checkBox
[COLOR=green]'[/COLOR]
    [COLOR=darkblue]If[/COLOR] control.ID = "checkboxShowMessage" [COLOR=darkblue]Then[/COLOR]
        returnedVal = b_checkboxShowMessage
    [COLOR=darkblue]End[/COLOR] [COLOR=darkblue]If[/COLOR]
[COLOR=darkblue]End[/COLOR] [COLOR=darkblue]Sub[/COLOR]

[COLOR=darkblue]Public[/COLOR] [COLOR=darkblue]Sub[/COLOR] onAction(control [COLOR=darkblue]As[/COLOR] IRibbonControl, pressed [COLOR=darkblue]As[/COLOR] [COLOR=darkblue]Boolean[/COLOR])
[COLOR=green]'[/COLOR]
' Code for onAction callback. Ribbon control checkBox
[COLOR=green]'[/COLOR]
    [COLOR=darkblue]If[/COLOR] control.ID = "checkboxShowMessage" [COLOR=darkblue]Then[/COLOR]
        b_checkboxShowMessage = pressed
        Worksheets("Sheet1").Range("A1").Value = pressed
    End [COLOR=darkblue]If[/COLOR]
End [COLOR=darkblue]Sub[/COLOR]
Then you can check on the status of the checkbox as follows…
Code:
[COLOR=darkblue]Public[/COLOR] [COLOR=darkblue]Sub[/COLOR] alreadyCodedSub()
    [COLOR=darkblue]If[/COLOR] b_checkboxShowMessage = [COLOR=darkblue]True[/COLOR] [COLOR=darkblue]Then[/COLOR]
         MsgBox ("The answer is" & Test3)
    [COLOR=darkblue]End[/COLOR] [COLOR=darkblue]If[/COLOR]
End [COLOR=darkblue]Sub[/COLOR]
Hope this helps!
-
#7
Awesome Domenic, this would definitely work. Let me ask though how would I directly check the state of the checkbox. Say if I didn’t use a cell to store the value… cut down on the complexity maybe. Thanks so much!

RoryA
MrExcel MVP, Moderator
-
#8
You have to store it somewhere — be it a cell, name, or variable. You can’t simply read it directly.
-
#9
I see that when I posted the VBA code for «on Load», I missed putting a space between «on» and «Load» so that the Board wouldn’t interpret it as code. And so it got messed up. In any case, the «on Load» callback isn’t needed. So you can omit it from both the XML and VBA code.
-
#10
At what time we comme in the macro getpressed

- Remove From My Forums
-
Question
-
Hi,
I would like to add to Excel 2010 ribbon a checkbox that by default is checked.
For example by pressing the check box the refrence style is changing to R1C1, By
unchecking it the reference style is A1C1.By default, the checkbox should be checked (means reference style is A1C1).
Thanks,
Guy Zommer
All replies
-
You want to do that from ExcelVBA or in VSTO .Net?
I’m asking because any modification on the ribbon from VBA, you can make in Menuaddin only
Oskar Shon, Office System
MVPPress
 if Helpful; Answer when a problem solved
 -
Hello,
From VBA.
Thanks
Guy Zommer
-
If you want your control to be part of the ribbon, rather than a commandbar in the add-ins tab, then you need to use a combination on ribbon xml and VBA.
ribbon xml in file. To be available for all workbooks this will need to be an addin file.
<customUI  xmlns="http://schemas.microsoft.com/office/2009/07/customui" >
	<ribbon >
		<tabs >
			<tab
				id="Tab1"
				label="Tab1">
				<group
					id="Group1"
					label="Group1">
					<checkBox
						id="Checkbox1"
						label="Reference Style R1C1"
						getPressed="Checkbox1_getPressed"
						onAction="Checkbox1_onAction"/>
				</group >
			</tab >
		</tabs >
	</ribbon >
</customUI >
Thisworkbook object code.
Private Sub Workbook_Open()

    g_blnCheckboxState = True
    Application.ReferenceStyle = xlR1C1

End Sub
Standard code module code
Public g_blnCheckboxState As Boolean
Public Sub Checkbox1_getPressed(control As IRibbonControl, ByRef returnedVal)
'
' Code for getPressed callback. Ribbon control checkBox
'
    returnedVal = Application.ReferenceStyle

End Sub
Public Sub Checkbox1_onAction(control As IRibbonControl, pressed As Boolean)
'
' Code for onAction callback. Ribbon control checkBox
'
    If pressed Then
        Application.ReferenceStyle = xlR1C1
        g_blnCheckboxState = True
    Else
        Application.ReferenceStyle = xlA1
        g_blnCheckboxState = False
    End If

End Sub
Cheers,
Andy
www.andypope.info-
Proposed as answer by
Monday, September 24, 2012 9:14 AM
-
Proposed as answer by
-
Andy is showing you a way, works only with file, where you extract Ziped XLSx/m code
If you want to do it from VBA code pressed button is seems to be only way.With Application.CommandBars("MenuBarName").Controls("Caption") If .State = msoButtonUp Then .State = msoButtonDown Else .State = msoButtonUp End If End With '...check If Application.CommandBars("MenuBarName").Controls("Caption") _ .State = msoButtonDown Then MsgBox "Pressed", vbInformation, APPNAMEAlso you can modyf caption after pressing and use normal button.
Oskar Shon, Office System
MVPPress
if Helpful; Answer when a problem solved -
Hi,
I checked the code, what I need is by default the reference style will be XlA1, means when you add a new sheet the check box is checked (selected) and the reference style is xlA1. I tried to change the code to do the opposite but when I add a new worksheet
the checkbox is unchecked.Private Sub Workbook_SheetActivate(ByVal Sh As Object)
g_blnCheckboxState = True
Application.ReferenceStyle = xlA1End Sub
Public g_blnCheckboxState As Boolean
Public Sub Checkbox1_getPressed(control As IRibbonControl, ByRef returnedVal)
‘
‘ Code for getPressed callback. Ribbon control checkBox
‘
returnedVal = Application.ReferenceStyleEnd Sub
Public Sub Checkbox1_onAction(control As IRibbonControl, pressed As Boolean)
‘
‘ Code for onAction callback. Ribbon control checkBox
‘
If pressed Then
Application.ReferenceStyle = xlA1
g_blnCheckboxState = True
Else
Application.ReferenceStyle = xlR1C1
g_blnCheckboxState = False
End If
End Sub
Guy Zommer
-
Not 100% sure I understand how you want this to work as the setting will apply to all sheets in the workbook. So if the setting xlR1C1 is applied it will apply to the new sheet.
Anyway if you need to alter the state, other than at the Workbook_Open event, you will need to invalidate the control.
Extra code in Thisworkbook object
Private Sub Workbook_NewSheet(ByVal Sh As Object)

    g_blnCheckboxState = True
    Application.ReferenceStyle = xlR1C1
    g_rbxUI.InvalidateControl "Checkbox1"

End Sub
Extra code in standard code module
Public g_rbxUI As IRibbonUI

Public Sub rbx_onLoad(ribbon As IRibbonUI)
'
' Code for onLoad callback. Ribbon control customUI
'
    Set g_rbxUI = ribbon
End Sub
Change to ribbon xml
<customUI
	xmlns="http://schemas.microsoft.com/office/2009/07/customui"
	onLoad="rbx_onLoad">
Cheers,
Andy
www.andypope.info -
Thanks I will test it
Guy Zommer
-
thanks, this really helped me
-
Thanks. Does anyone know the signature for getPressed in c#, please?
VB: Public Sub Checkbox1_getPressed(control As IRibbonControl, ByRef returnedVal)
What is the C# equivalent?
I have tried the following 4 with no joy:
public bool checkBoxIsOnline_getPressed(Office.IRibbonControl control, ref bool pressed)
public void checkBoxIsOnline_getPressed(Office.IRibbonControl control, ref bool pressed)
public bool checkBoxIsOnline_getPressed(Office.IRibbonControl control)
public void checkBoxIsOnline_getPressed(Office.IRibbonControl control)
Any ideas? Thanks

Callbacks 2: How to Create Checkboxes and Use the Unique ID
You can have a unique name to all your callbacks if you want for each button. However, sometimes it might make sense to keep the name of the callback the same. This example shows how you can have the same callback name but execute different macros. This can be done because each button has a unique ID and Office knows which button was clicked, which was not possible with Microsoft Word 2003 Toolbars.
Displaying a Unique Supertip
In the previous example, we saw the code for the getSupertip callback:
<button id="getDayofWeek" imageMso="PlayMacro" size="large" label="Day of Week" screentip="Day of Week Formula" getSupertip="getSupertip" onAction="RibbonXOnAction" tag="getDayofWeek" />
<button id="getAge" imageMso="PlayMacro" size="large" label="Age Formula"  screentip="Calculate Age from Date" getSupertip="getSupertip" onAction="RibbonXOnAction" tag="getAge" />
<button id="getExactAge" imageMso="PlayMacro" size="large" label="Exact Age Formula" screentip="Exact Age Formula" getSupertip="getSupertip" onAction="RibbonXOnAction" tag="getExactAge" />
How can we get each button to display a unique supertip? This is accomplished by the Select Case statements. The following code makes use of this statement to get the supertip.
Sub GetSupertip(control As IRibbonControl, ByRef supertip)
    Select Case control.ID
        Case "FooterTabAndPageNumber"
            supertip = "Insert file name and sheet name in left footer and page number in right footer."
        Case "getAge"
            supertip = "Inserts formula in selected cell to calculate age from date in cell to the left of selected cell."
        Case "getExactAge"
            supertip = "Inserts formula in selected cell to calculate exact age (years, months, days) from date in cell to left of selected cell."
        Case "getDayofWeek"
            supertip = "Inserts formula in selected cell to get day of week from date in cell to the left of selected cell."
        Case "FitTo1PageWidth"
            supertip = "Fit content to 1 page width so it prints as 1 page wide while length is not affected."
        Case "AgeCalc"
            supertip = "Enter date in ""Date"" field. Then click here to calculate age and insert into currently selected cell."
        End Select
End Sub
The second line, Select Case control.ID, gives the criteria for fetching the supertip. The supertip is fetched based on the ID of the control by matching the case with the control ID.
This one Sub contains all my supertips, including the three buttons above. This way, I can keep the supertips together in one place. This can be done with any type of callback, not just getSupertip. Another advantage is that if you want to modify your supertips, then you can simply modify the VBA code instead of the XML code, which you will find to be easier than the latter.
Callbacks for Checkboxes
Not all controls have the same callbacks. Depending on type and function, some controls have specific callbacks. The checkBox control, for example, does not allow icons. A «checkbox» replaces the icon. Not only that, but when the Office application is started, it must be determined if the checkbox is to be checked or unchecked. This means that there are more callbacks for a checkbox than just the onAction callback. The following table lists all the callbacks for each control: Controls and their Callbacks.

The Print Settings group contains checkboxes for which I have written macros. The functions of the three checkboxes are as follows:
- Center Horizontally: When checked, this checkbox will center content horizontally for printing. When unchecked, content will not be centered.
- Center Vertically: When checked, this checkbox will center content vertically for printing. When unchecked, content will not be centered.
- Fit to 1 Page Width: When checked, this checkbox will fit content to 1 page wide by X pages long. This one is particularly useful when your last column runs off on the second page.
The XML code for these checkboxes are as follows:
<group id="GroupPageSetup" label="Print Settings">
  <checkBox id="CenterHorizontally"  enabled="true" getPressed="GetPressed"
            label="Center Horizontally" screentip="Center Content Horizontally" onAction="PageSetupOnAction" tag="CenterHorizontally" />
  <checkBox id="CenterVertically"  enabled="true" getPressed="GetPressed"
            label="Center Vertically" screentip="Center Content Vertically" onAction="PageSetupOnAction" tag="CenterVertically" />
  <checkBox id="FitTo1PageWidth"  enabled="true" getPressed="GetPressed"
            label="Fit to 1 Page Width" screentip="Center Content Vertically" onAction="PageSetupOnAction" tag="FitTo1PageWidth" getSupertip="getSupertip" />
</group>
Checkboxes have getPressed and onAction callbacks. The getPressed determined whether the checkbox is checked or not when the application is launched. The onAction performs the action when the state of the checkbox is changed, either from checked to unchecked or unchecked to checked, whichever is the case. First, let’s look at the getPressed callback.
Dim pressedState As Boolean
Sub GetPressed(control As IRibbonControl, ByRef pressedState)
    Select Case control.ID
    Case "CenterHorizontally"
        If ActiveSheet.PageSetup.CenterHorizontally = True Then
            pressedState = True
        End If
    Case "CenterVertically"
        If ActiveSheet.PageSetup.CenterVertically = True Then
            pressedState = True
        End If
    Case "FitTo1PageWidth"
        If ActiveSheet.PageSetup.FitToPagesWide = 1 Then
            pressedState = True
        End If
    End Select
End Sub
The getPressed call back is set to getPressed=»GetPressed» in the XML code. Hence, in VBA editor, I have set my macro to Sub GetPressed(control as IRibbonControl, ByRef pressedState). The ByRef pressedState has Boolean values (True or False) and this is the variable that «calls back» to Office the state of the checkbox. For example, if in Page Setup the checkbox to center horizontally is already checked, then pressedState = True. This variable gets communicated or passed to Office telling it the checkbox is checked. Note that the pressedState variable doesn’t change. If it’s true on launch then it stays true. Now, the onAction callback, which I have grouped as PageSetupOnAction and used the Select Case statement.
Sub PageSetupOnAction(control As IRibbonControl, pressed As Boolean)
    Select Case control.ID
    Case "CenterHorizontally"
        If pressed = True Then
            ActiveSheet.PageSetup.CenterHorizontally = True
        End If
        If pressed = False Then
            ActiveSheet.PageSetup.CenterHorizontally = False
        End If
    Case "CenterVertically"
        If pressed = True Then
            ActiveSheet.PageSetup.CenterVertically = True
        End If
        If pressed = False Then
            ActiveSheet.PageSetup.CenterVertically = False
        End If
    Case "FitTo1PageWidth"
        If pressed = True Then
            With ActiveSheet.PageSetup
                .FitToPagesWide = 1
                .FitToPagesTall = False
            End With
        End If
        If pressed = False Then
            With ActiveSheet.PageSetup
                .FitToPagesWide = False
                .FitToPagesTall = False
            End With
        End If
    End Select
End Sub
Note:The ByRef variables do not have to be declared as public. Their use is limited to the subroutine. If you want a ByRef variable passed on to another subroutine, you will have to set another publicly-declared variable equal to the ByRef variable. You will see examples of this with checkBoxes and dropDowns in the following pages.
For onAction, the variable we’re using is pressed. This variable is also boolean (True or False) but its value changes based on the current state of the checkbox. Hence, the macro that runs is dependent on its checked state. That’s why we’re using If.. Then statements for the action.
In conclusion, we learned how to use the checkbox control for the RibbonUI along with the Select Case statement in VBA.
Custom Excel Ribbon
The Excel Ribbon can be customized to provide a user-friendly way to use commands and VBA macros. There are different ways to customize the ribbon that provide different levels of customization and functionality.
XML Components
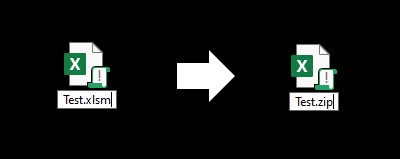
The Excel ribbon can be customized using Office Open XML formats files. An Excel file is essentially a zip file containing the underlying components of the Excel file. Changing the file extension to .zip allows access to the underlying files of the Excel file and makes it possible to add XML components representing ribbon tabs, groups, and controls.
Process to Customize UI
1. Backup File
First make a backup of the original file you are going to customize. Files could be corrupted if the process is not done correctly.
2. Show File Extensions
In the Windows File Explorer check File Name Extensions to show file name extensions.

3. Change File Extension
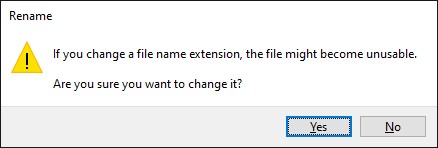
Change the file extension of the file to zip. Right-click the file and select rename to edit the file extension. You will be prompted with a warning. Click yes.
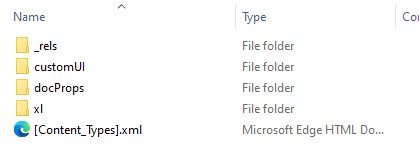
4. Add Custom UI Folder and File
Create a folder on the Desktop called customUI and inside the folder create a file called customUI.xml. Add XML to the file, save, and copy the folder into the zip folder.
<customUI xmlns="http://schemas.microsoft.com/office/2006/01/customui">
  <ribbon>
    <tabs>
      <tab id="MyCustomTab" label="Custom Tab">
        <group id="MyGroup" label="Custom Group">
          <button id="MyButton" imageMSO="HappyFace" label="Hello World" size="large" onAction="HelloWorld"/>
        </group>
      </tab>
    </tabs>
  </ribbon>
</customUI>
The zip folder should like something like the image below:
5. Add a Relationship to rels file
Open the _rels folder and copy the .rels file to the Desktop. Inside the .rels file add a Relationship tag for the custom UI as the last tag inside the Relationships tag. Copy the .rels file back to the zip file and overwrite it.
<Relationship Id="MyCustomUI" Type="http://schemas.microsoft.com/office/2006/relationships/ui/extensibility" Target="customUI/customUI.xml" />6. Change Extension Back
Change the file extension back. If you recieve an error message saying the file was corrupted check that your XML is correct and the steps were followed correctly. If everything was done correctly you should be able to see your custom tab on the ribbon.

7. Add VBA to Handle Custom UI Controls
Add the procedures specified by callbacks and onAction attributes. To find the correct procedure signatures to use for a given type of control see here.
Option Explicit

Public Sub HelloWorld(ByVal Button As IRibbonControl)

    MsgBox "Hello, World!"

End Sub
Custom UI XML and VBA
To create the custom UI, XML elements must be added to the customUI.xml file. The root element is the customUI element. Inside the customUI element, there is a ribbon element which contains tabs which contain groups which contain controls. Elements can have certain attributes such as id, label, onAction, etc. Certain types of elements can be given specific attributes that use callback functions. For information about specific elements see the Elements section of the Microsoft Custom UI XML Specification. For more information about using these Elements, their attributes, and how to write VBA code to handle callbacks see this 3-part article: Part 1, Part 2, Part 3.
button

<customUI xmlns="http://schemas.microsoft.com/office/2006/01/customui">
  <ribbon>
    <tabs>
      <tab id="MyCustomTab" label="Custom Tab">
        <group id="MyGroup" label="Custom Group">
          <button id="MyButton" imageMso="HappyFace" label="Hello World" size="large" onAction="HelloWorld"/>
        </group>
      </tab>
    </tabs>
  </ribbon>
</customUI>
Option Explicit
Public Sub HelloWorld(ByVal Button As IRibbonControl)
MsgBox "Hello, World!"
End SubcheckBox

<customUI xmlns="http://schemas.microsoft.com/office/2006/01/customui">
   <ribbon>
     <tabs>
       <tab id="MyCustomTab" label="Custom Tab">
         <group id="MyGroup" label="Custom Group">
           <button id="MyButton" imageMso="HappyFace" label="Hello World" size="normal" onAction="HelloWorld" />
           <checkBox id="checkBox" label="Check This" getPressed="CaptureState" onAction="CaptureState"/>
         </group >
       </tab>
     </tabs>
   </ribbon>
</customUI>
Option Explicit
Private CheckBoxValue As Boolean
Public Sub HelloWorld(ByVal Button As IRibbonControl)
MsgBox "Checkbox Value is: " & CheckBoxValue
End Sub
Public Sub CaptureState(CheckBox As IRibbonControl, ByRef ReturnValue)
CheckBoxValue = ReturnValue
End SubcomboBox
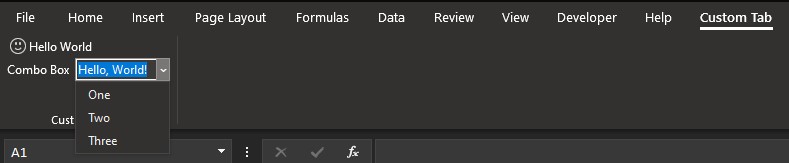
Comboboxes can be given static items by adding them directly into the XML or they can be filled dynamically using the combobox’s callbacks.
<customUI xmlns="http://schemas.microsoft.com/office/2006/01/customui">
   <ribbon>
     <tabs>
       <tab id="MyCustomTab" label="Custom Tab">
         <group id="MyGroup" label="Custom Group">
           <button id="MyButton" imageMso="HappyFace" label="Hello World" size="normal" onAction="HelloWorld" />
           <comboBox id="MyCombobox" label="Combo Box" getText="GetText" onChange="GetText">
             <item id="Item1" label="1" />
             <item id="Item2" label="2" />
             <item id="Item3" label="3" />
           </comboBox>
         </group >
       </tab>
     </tabs>
   </ribbon>
</customUI>
Option Explicit
Private ComboBoxText As String
Public Sub HelloWorld(ByVal Button As IRibbonControl)
MsgBox "Combobox contains: " & ComboBoxText
End Sub
Public Sub GetText(ComboBox As IRibbonControl, Text)
ComboBoxText = Text
End Sub<customUI xmlns="http://schemas.microsoft.com/office/2006/01/customui" onLoad="Init">
<ribbon>
<tabs>
<tab id="MyCustomTab" label="Custom Tab">
<group id="MyGroup" label="Custom Group">
<button id="MyButton" imageMso="HappyFace" label="Hello World" size="normal" onAction="HelloWorld" />
<comboBox id="MyCombobox" label="Combo Box" getText="GetText" getItemCount="GetItemCount" getItemID="GetItemID" getItemLabel="GetItemLabel" onChange="GetText"></comboBox>
</group >
</tab>
</tabs>
</ribbon>
</customUI>Option Explicit
Private pRibbon As IRibbonUI
Private ComboBoxItems() As String
Private ComboBoxText As String
Public Sub Init(Ribbon As IRibbonUI)
Set pRibbon = Ribbon
ReDim ComboBoxItems(0 To 2)
ComboBoxItems(0) = "One"
ComboBoxItems(1) = "Two"
ComboBoxItems(2) = "Three"
End Sub
Public Sub HelloWorld(ByVal Button As IRibbonControl)
MsgBox "Combobox contains: " & ComboBoxText
End Sub
Public Sub GetText(ComboBox As IRibbonControl, Text)
ComboBoxText = Text
End Sub
Public Sub GetItemCount(ComboBox As IRibbonControl, Count)
Count = UBound(ComboBoxItems) - LBound(ComboBoxItems) + 1
End Sub
Public Sub GetItemID(ComboBox As IRibbonControl, Index As Integer, ID)
ID = "ComboBoxItem" & Index + 1
End Sub
Public Sub GetItemLabel(ComboBox As IRibbonControl, Index As Integer, Label)
Dim Arr(0 To 2) As String
Arr(0) = "One"
Arr(1) = "Two"
Arr(2) = "Three"
Label = ComboBoxItems(Index)
End SubdropDown
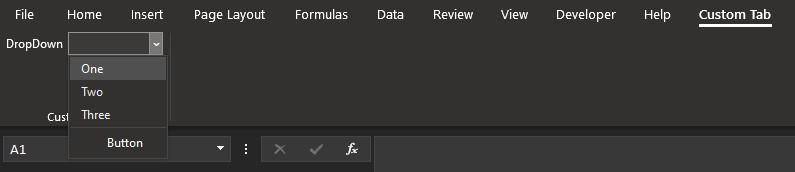
<customUI xmlns="http://schemas.microsoft.com/office/2006/01/customui" onLoad="OnLoad">
    <ribbon>
        <tabs>
            <tab id="MyCustomTab" label="Custom Tab">
                <group id="MyGroup" label="Custom Group">
                    <dropDown id="dropDown" label="DropDown" getItemCount="GetItemCount" getItemID="GetItemID" getItemLabel="GetItemLabel" onAction="OnAction">
                    <button id="MyButton" label="Button" onAction="ButtonOnAction" />
                    </dropDown>
                </group >
            </tab>
        </tabs>
    </ribbon>
 </customUI>
Option Explicit
Private pRibbon As IRibbonUI
Private pDropDownItems() As String
Private pSelectedID As String
Private pSelectedIndex As String
Public Sub OnLoad(Ribbon As IRibbonUI)
Set pRibbon = Ribbon
ReDim pDropDownItems(0 To 2)
pDropDownItems(0) = "One"
pDropDownItems(1) = "Two"
pDropDownItems(2) = "Three"
End Sub
Public Sub GetItemCount(DropDown As IRibbonControl, Count)
Count = UBound(pDropDownItems) - LBound(pDropDownItems) + 1
End Sub
Public Sub GetItemID(DropDown As IRibbonControl, Index As Integer, ID)
ID = "Item" & Index + 1
End Sub
Public Sub GetItemLabel(DropDown As IRibbonControl, Index As Integer, Label)
Label = pDropDownItems(Index)
End Sub
Public Sub OnAction(DropDown As IRibbonControl, SelectedID As String, SelectedIndex As Integer)
pSelectedID = SelectedID
pSelectedIndex = SelectedIndex
End Sub
Public Sub ButtonOnAction(Button As IRibbonControl)
If pSelectedIndex = vbNullString Then
MsgBox "No Item Selected"
Else
MsgBox "Selected Item: " & pSelectedIndex & ", " & pSelectedID & ", " & pDropDownItems(pSelectedIndex)
End If
End SubeditBox

<customUI xmlns="http://schemas.microsoft.com/office/2006/01/customui">
    <ribbon>
        <tabs>
        <tab id="MyCustomTab" label="Custom Tab">
            <group id="MyGroup" label="Custom Group">
                <editBox id="MyEditBox" label="Edit Box" getText="CaptureText" onChange="CaptureText" />
                <button id="MyButton" label="Button" imageMso="HappyFace" onAction="ButtonClick" />
            </group >
        </tab>
        </tabs>
    </ribbon>
</customUI>
Option Explicit
Private EditBoxText As String
Public Sub CaptureText(EditBox As IRibbonControl, Text As String)
EditBoxText = Text
End Sub
Public Sub ButtonClick(Button As IRibbonControl)
MsgBox EditBoxText
End SubMenu
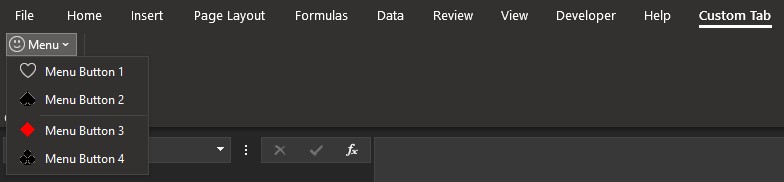
<customUI xmlns="http://schemas.microsoft.com/office/2006/01/customui">
    <ribbon>
        <tabs>
            <tab id="MyCustomTab" label="Custom Tab">
                <group id="MyGroup" label="Custom Group">
                    <menu id="MyMenu" label="Menu" imageMso="HappyFace" >
                        <button id="MyMenuButton1" label="Menu Button 1" imageMso="Heart" onAction="Heart"/>
                        <button id="MyMenuButton2" label="Menu Button 2" imageMso="Spade" onAction="Spade" />
                        <menuSeparator id="MyMenuSeparator" />
                        <button id="MyMenuButton3" label="Menu Button 3" imageMso="Diamond" onAction="Diamond" />
                        <button id="MyMenuButton4" label="Menu Button 4" imageMso="Club" onAction="Club" />
                    </menu>
                </group >
            </tab>
        </tabs>
    </ribbon>
 </customUI>
Option Explicit
Public Sub Heart(Button As IRibbonControl)
MsgBox "Heart"
End Sub
Public Sub Spade(Button As IRibbonControl)
MsgBox "Spade"
End Sub
Public Sub Diamond(Button As IRibbonControl)
MsgBox "Diamond"
End Sub
Public Sub Club(Button As IRibbonControl)
MsgBox "Club"
End SubsplitButton

<customUI xmlns="http://schemas.microsoft.com/office/2006/01/customui">
    <ribbon>
        <tabs>
        <tab id="MyCustomTab" label="Custom Tab">
            <group id="MyGroup" label="Custom Group">
                <splitButton id="MySplitButton" size="large" >
                    <button id="MyButton" imageMso="HappyFace" label="Split Button" onAction="MyButtonClick" />
                    <menu id="MyMenu">
                        <button id="MyMenuButton1" label="Menu Button 1" onAction="MyMenuButtonClick1" />
                        <button id="MyMenuButton2" label="Menu Button 2" onAction="MyMenuButtonClick2" />
                    </menu>
                </splitButton>
            </group >
        </tab>
        </tabs>
    </ribbon>
</customUI>
Option Explicit
Public Sub MyButtonClick(Button As IRibbonControl)
MsgBox "My Button Clicked"
End Sub
Public Sub MyMenuButtonClick1(Button As IRibbonControl)
MsgBox "My First Menu Button Clicked"
End Sub
Public Sub MyMenuButtonClick2(Button As IRibbonControl)
MsgBox "My Second Menu Button Clicked"
End SubtoggleButton

<customUI xmlns="http://schemas.microsoft.com/office/2006/01/customui">
    <ribbon>
        <tabs>
        <tab id="MyCustomTab" label="Custom Tab">
            <group id="MyGroup" label="Custom Group">
                <toggleButton id="MyToggleButton" label="Toggle Button" getPressed="CaptureState" onAction="CaptureState" />
            </group >
        </tab>
        </tabs>
    </ribbon>
 </customUI>
Option Explicit
Private ToggleState As Boolean
Public Sub CaptureState(ToggleButton As IRibbonControl, State)
ToggleState = State
MsgBox ToggleState
End SubVSTO
Visual Studio Tools for Office or VSTO are tools that can be installed and used with Visual Studio to develop solutions that work with Microsoft Office. VSTO can be used to customize the Excel ribbon either as an Add-In which works with any Excel Workbook or as a standalone Excel Workbook. VSTO solutions can be created using C# or VB.
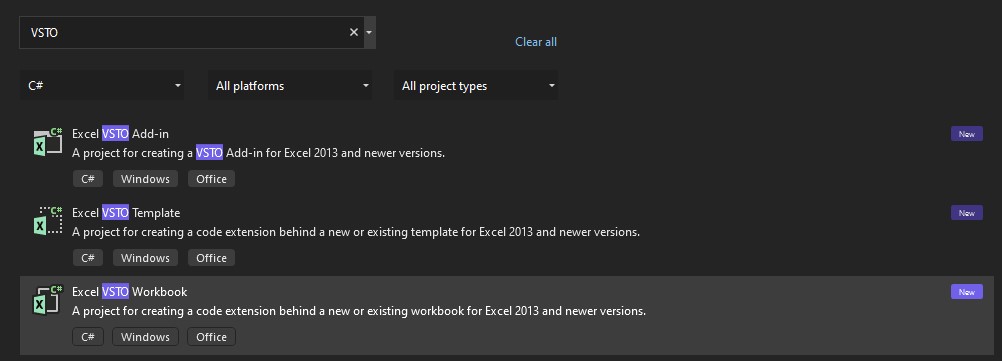
Add a new item to a VSTO project and select Ribbon (XML or Visual Designer).
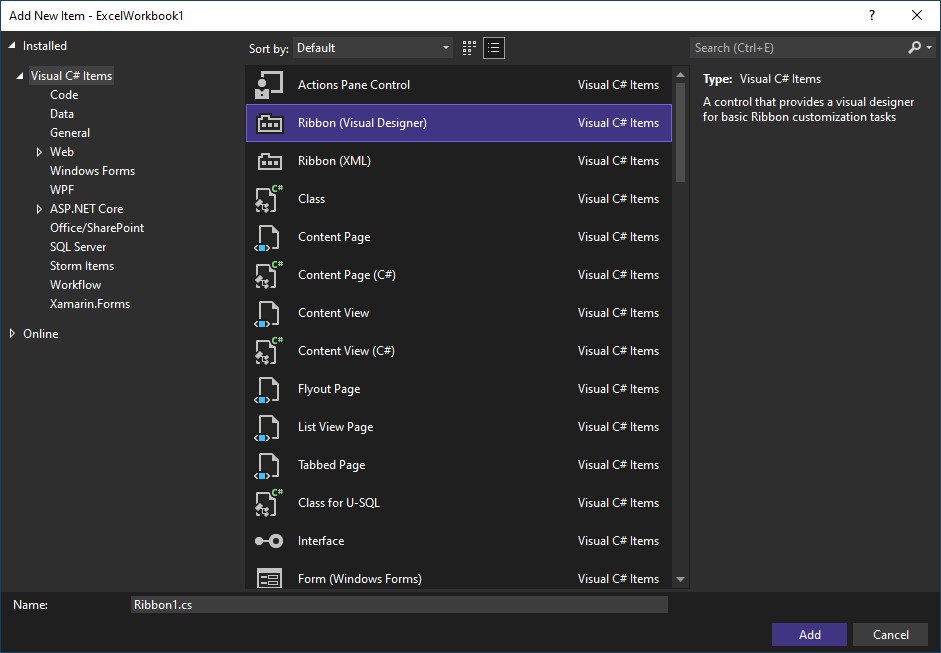
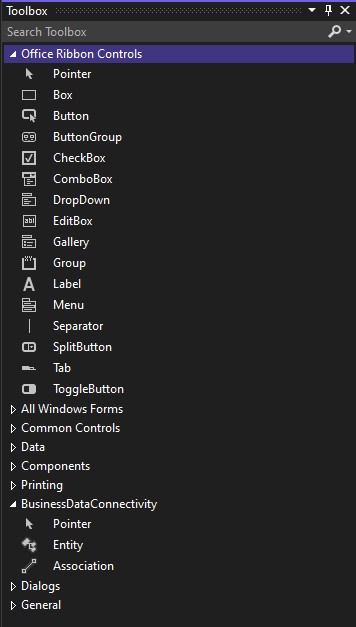
When using the Visual Designer add controls using the Toolbox. Open the toolbox by pressing Ctrl + Alt + X or by selecting it from the View dropdown.
Drag controls from the Toolbox to the ribbon and then add code to the controls.
Office Add-Ins
Office Add-Ins can be used to customize the UI. To customize the ribbon use Add-In Commands. See the Microsoft documentation for:
- Creating add-in commands
- Creating custom contextual tabs
- Enabling and disabling add-in commands
- Integrating built-in Office buttons into custom tabs
- Positioning tabs
Manually Edit the Ribbon
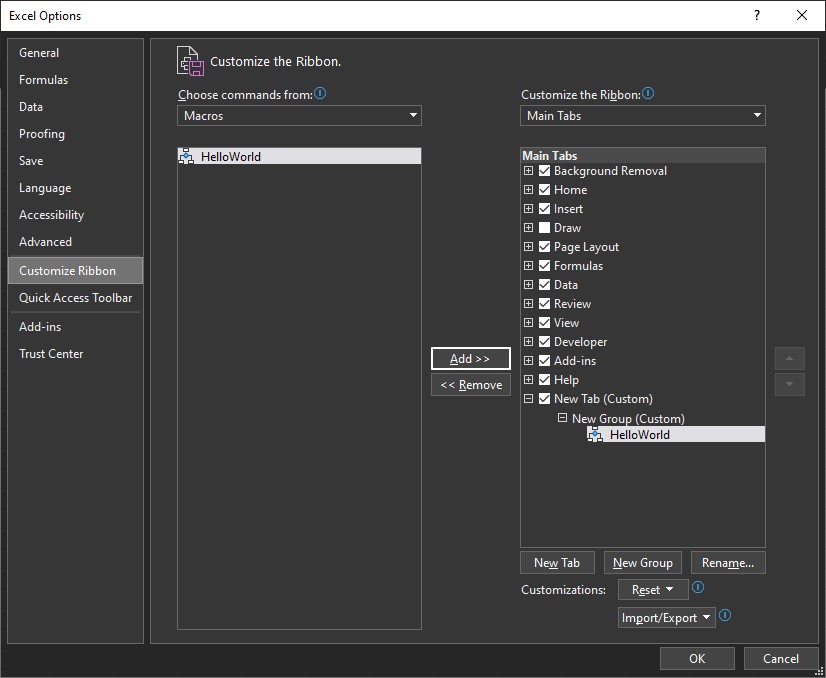
Ribbon tabs can be added manually by navigating to File → Options → Customize Ribbon and then clicking the New Tab button. Groups can be added to a tab by clicking New Group. Macros and built-in commands can be added to the custom tab to provide functionality. Commands added to a custom tab can be renamed and assigned a new icon by highlighting the command and clicking rename. Customizations can be exported to customization files and then imported again later. To reset an individual ribbon or all ribbons, select from the Customizations drop down.


Add-Ins Tab
Adding a custom CommandBar will cause the Add-Ins tab to appear on the ribbon. To add a CommandBar use the Application.CommandBars property to retrieve the CommandBars collection and call the CommandBars.Add method. To add controls to the CommandBar, use the CommandBar.Controls property to get the CommandBarControls collection and use the CommandBarControls.Add method.
When using the CommandBarControls.Add method only certain types of controls can be created. Pass a valid member of the MsoControlType enumeration to the Type argument of the Add method to create a specific control.
| Type | Description |
|---|---|
| msoControlButton | Creates a button. |
| msoControlEdit | Creates a Text Box. |
| msoControlDropdown | Creates a Dropdown. |
| msoControlComboBox | Creates a combo box. |
| msoControlPopup | Creates a button which opens a popup. |
Some types of controls have a dedicated class that can be declared and others do not.
| Class | Description |
|---|---|
| CommandBarControl | A generic control class that can be used to represent various types of controls. |
| CommandBarButton | Represents a button on the CommandBar. |
| CommandBarComboBox | Represents a combo box on the CommandBar. |
| CommandBarPopup | Represents a popup control on the CommandBar. |
'ThisWorkbook

Option Explicit

Private Const COMMAND_BAR_NAME As String = "CustomCommandBar"

Public CustomCommandBar As CommandBar

Private Sub Workbook_AddinInstall()

    Dim CBColl As CommandBars
    Set CBColl = Application.CommandBars

    'https://docs.microsoft.com/en-us/office/vba/api/office.commandbars.add
    Set CustomCommandBar = _
    CBColl.Add(Name:=COMMAND_BAR_NAME, Position:=msoBarTop, MenuBar:=False, Temporary:=True)
    CustomCommandBar.Visible = True

    'https://docs.microsoft.com/en-us/office/vba/api/office.commandbarcontrols.add

    'Button
    With CustomCommandBar.Controls.Add(Type:=msoControlButton, Temporary:=True)
        .Style = msoButtonCaption
        .Caption = "Button"
        .OnAction = "HelloWorld"
    End With

    'Combobox
    With CustomCommandBar.Controls.Add(Type:=msoControlComboBox, Temporary:=True)
        .AddItem "A"
        .AddItem "B"
        .AddItem "C"
        .Caption = "Combobox:"
    End With

    'Popup
    With CustomCommandBar.Controls.Add(Type:=msoControlPopup, Temporary:=True)
        .Caption = "Popup"
        'PopupButton
        With .Controls.Add(Type:=msoControlButton, Temporary:=True)
           .Style = msoButtonCaption
           .Caption = "Popup Button!"
           .OnAction = "HelloWorld"
        End With
    End With

    'TextEdit
    With CustomCommandBar.Controls.Add(Type:=msoControlEdit, Temporary:=True)
        .Caption = "TextEdit:"
    End With

    'Dropdown
    With CustomCommandBar.Controls.Add(Type:=msoControlDropdown, Temporary:=True)
        .AddItem "A"
        .AddItem "B"
        .AddItem "C"
        .Caption = "Dropdown:"
    End With

End Sub

Private Sub Workbook_AddinUninstall()

    'Delete Custom CommandBar

    If Not CustomCommandBar Is Nothing Then
        CustomCommandBar.Delete
        Set CustomCommandBar = Nothing
    End If

End Sub
'Module1
Option Explicit
Public Sub AlertMessage()
MsgBox "Hello, World!"
End Sub 