
Использование функции Split в VBA Excel, ее синтаксис и параметры. Значения, возвращаемые функцией Split. Примеры использования.
Функция Split предназначена в VBA Excel для разделения строки на подстроки по специальным меткам — разделителям. Разделителем может быть как отдельный символ, так и строка из нескольких символов. Функция Split по своему действию является обратной функции Join, которая создает одну строку из массива подстрок.
Синтаксис функции
|
Split (Expression,[Delimiter],[Limit],[Compare]) |
Обязательным параметром функции Split является Expression. Если остальные параметры явно не указаны, используются их значения по умолчанию.
Параметры функции
| Параметр | Описание | Значение по умолчанию |
|---|---|---|
| Expression | Строка, содержащая подстроки и разделители | Нет |
| Delimiter | Разделитель, представляющий один или более символов | Пробел |
| Limit | Максимальное число подстрок, на которые должна быть разделена входная строка | -1 |
| Compare* | Определяет, какое используется сравнение, двоичное — CompareMethod.Binary (0) или текстовое — CompareMethod.Text (1) | 0 |
*Если используется двоичное сравнение (0 или CompareMethod.Binary), функция чувствительна к регистру букв. Если используется текстовое сравнение (1 или CompareMethod.Text), функция не чувствительна к регистру букв.
Возвращаемые значения
Функция Split возвращает одномерный массив с индексацией от нуля, который содержит указанное параметром Limit число подстрок. Чаще всего, функция Split используется со значением параметра Limit по-умолчанию, равному -1, когда возвращаются все найденные в исходной строке подстроки.
Пример 1
|
Sub Test1() Dim a() As String a = Split(«vremya ne zhdet») MsgBox a(0) & vbNewLine & a(1) & vbNewLine & a(2) End Sub |
Результат в MsgBox:
vremya
ne
zhdet
В первом примере используются Delimiter и Limit по-умолчанию.
Пример 2
|
Sub Test2() Dim a() As String a = Split(«vremya-ne-zhdet»,«-«, 2) MsgBox a(0) & vbNewLine & a(1) End Sub |
Результат в MsgBox:
vremya
ne-zhdet
Во втором примере Delimiter = «-«, а Limit = 2.
Для присваивания результатов функции Split используется предварительно объявленный текстовый динамический массив, который можно использовать в строке присваивания с пустыми скобками или без них. В представленных выше примерах массив указан без скобок.
Вы можете скопировать коды из приведенных примеров в модуль VBA своей рабочей книги Excel, посмотреть, как они работают. Поэкспериментируйте, подставляя свои данные, чтобы на практике ознакомиться с возможностями функции Split.
In this Article
- VBA Split Function
- Using the Split Function with a Delimiter Character
- Using a Limit Parameter in a Split Function
- Using the Compare Parameter in a Split Function
- Using Non-Printable Characters as the Delimiter Character
- Using the Join Function to Reverse a Split
- Using the Split Function to do a Word Count
- Splitting an Address into Worksheet Cells
- Split String into Worksheet Cells
- Creating a New Function to Allow Splitting from a Given Point
VBA Split Function
The VBA Split function splits a string of text into substrings based on a specific delimiter character (e.g. a comma, space, or a colon). It is easier to use than writing code to search for the delimiters in the string and then extracting the values.
It could be used if you are reading in a line from a Comma-Separated Value (CSV file) or you have a mailing address that is all on one line, but you want to see it as multiple lines.
The syntax is:
Split expression, delimiter[optional], limit[optional], compare[optional]The VBA Split function has four parameters:
- Expression – The string of text that you wish to split into different parts.
- Delimiter (optional)– string or non-printable character – Defines the delimiter character that is going to be used for the split. If no delimiter character is provided then the default of a space is used.
- Limit (optional) – number – Defines how many splits will be made. If blank, all available splits will be made within the string. If it is set to 1, then no splits will be made. Basically, it enables you to separate out a specific number of values starting at the beginning of the string e.g. where the string is very long and you only need the first three splits.
- Compare (optional) – If your delimiter is a text character then this is used to toggle whether the delimiter is case-sensitive or not. Values are vbBinaryCompare ( case-senstiive) and vbTextCompare (not-case sensitive).
The split function always returns an array.
Simple Example of the Split Function
Sub SplitExample()
'Define variables
Dim MyArray() As String, MyString As String, I As Variant
'Sample string with space delimiters
MyString = "One Two Three Four"
'Use Split function to divide up the component parts of the string
MyArray = Split(MyString)
'iterate through the array created to show each value
For Each I In MyArray
    MsgBox I
Next I
End Sub
In this example, no delimiter is specified because all the words have a space in between them, so the default delimiter (space) can be used.
The array has no dimensions, and is set as a string. The variable I, which is used in the For…Next loop must be dimensioned as a variant.
When this code is run, it will show four message boxes, one for each of the splits e.g. One, Two, Three. Four.
Note that if there is a double space between the words in the string, this will be evaluated as a split, although with nothing in it. This may not be the result that you want to see.
You can fix this problem by using the Replace function to replace any double spaces with a single space:
MyString = Replace(MyString, " ", " ")A trailing or leading space can also cause problems by producing an empty split. These are often very difficult to see. You can remove these extraneous spaces by using the Trim Function:
MyString = Trim(MyString)Using the Split Function with a Delimiter Character
We can use a delimiter of a semi-colon (;). This is frequently found in email address strings to separate the addresses. You may have an email sent to you which is shared with a number of colleagues and you want to see a list in your worksheet of who it has gone to. You can easily copy the email addresses from the email ‘To’ or ‘Copy’ boxes and into your code.
Sub SplitBySemicolonExample()
'Define variables
Dim MyArray() As String, MyString As String, I As Variant, N As Integer
'Sample string with semi colon delimiters
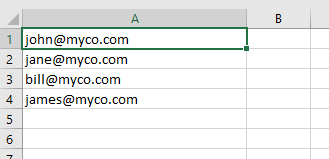
MyString = "john@myco.com;jane@myco.com;bill@myco.com;james@myco.com"
'Use Split function to divide up the component parts of the string
MyArray = Split(MyString, ";")
'Clear the worksheet
ActiveSheet.UsedRange.Clear
'iterate through the array
For N = 0 To UBound(MyArray)
'Place each email address into the first column of the worksheet
Range("A" & N + 1).Value = MyArray(N)
Next N
End Sub
Note that a For…Next loop is used to iterate through the array. The first element in the array always starts at zero, and the Upper Bound Function is used to get the maximum number of elements.
After running this code, your worksheet will look like this:
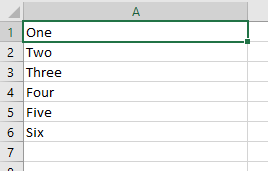
Using a Limit Parameter in a Split Function
The limit parameter allows a specific number of splits to be done from the start of the string. Unfortunately, you cannot provide a start position or a range of splits to be done, so it is fairly basic. You can build your own VBA code to create a function to do this, and this will be explained later in this article.
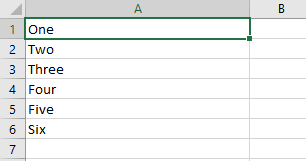
Sub SplitWithLimitExample()
'Create variables
Dim MyArray() As String, MyString As String, I As Variant, N As Integer
'Sample string with comma delimiters
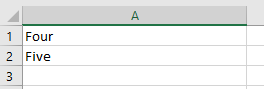
MyString = "One,Two,Three,Four,Five,Six"
'Use Split function to divide up the component parts of the string
MyArray = Split(MyString, ",", 4)
'Clear the worksheet
ActiveSheet.UsedRange.Clear
'Iterate through the array
For N = 0 To UBound(MyArray)
'Place each split into the first column of the worksheet
Range("A" & N + 1).Value = MyArray(N)
Next N
End Sub
After you run this code, your worksheet will look like this:
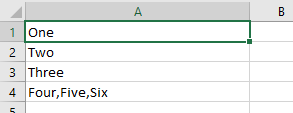
Only the first three split values are shown separately. The later three values are shown as one long string and do not get split.
If you choose a limit value that is greater than the number of delimiters within a string, this will not produce an error. The string will be split into all its component parts as if the limit value had not been provided.
Using the Compare Parameter in a Split Function
The Compare parameter determines if the delimiter is case-sensitive or not. This is not applicable if the delimiters are commas, semi-colons, or colons.
Note: Instead, you can always place Option Compare Text at the top of your module to eliminate case-sensitivity for the entire module.
Sub SplitByCompareExample()
'Create variables
Dim MyArray() As String, MyString As String, I As Variant, N As Integer
'Sample string with X delimiters
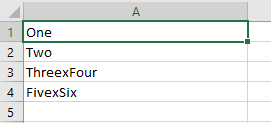
MyString = "OneXTwoXThreexFourXFivexSix"
'Use Split function to divide up the component parts of the string
MyArray = Split(MyString, "X", , vbBinaryCompare)
'Clear the worksheet
ActiveSheet.UsedRange.Clear
'iterate through the array
For N = 0 To UBound(MyArray)
'Place each split into the first column of the worksheet
Range("A" & N + 1).Value = MyArray(N)
Next N
End Sub
In this example, the string to be split uses the ‘X’ character as a delimiter. However, in this string, there is a mixture of upper and lower case ‘X’ characters. The Compare parameter in the Split function uses an upper case ‘X’ character.
If the Compare parameter is set to vbBinaryCompare, then the lower case ‘x’ characters will be ignored and your worksheet will look like this:
If the Compare parameter is set to vbTextCompare, then the lower case ‘x’ characters will be used in the split and your worksheet will look like this:
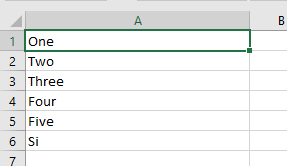
Note that the value at cell A6 is truncated because it contains a lower case ‘x’ character. Because the split is not case sensitive, any delimiter which forms part of a sub string will cause a split to happen.
This is an important point to bear in mind when using a text delimiter and vbTextCompare. You can easily end up with the wrong result.
Using Non-Printable Characters as the Delimiter Character
You can use non printable characters as the delimiter, such as a carriage return (a line break).
Here we use the vbCr to specify a carriage return.
Sub SplitByNonPrintableExample()
'Create variables
Dim MyArray() As String, MyString As String, I As Variant, N As Integer
'Sample string with carriage return delimiters
MyString = "One" & vbCr & "Two" & vbCr & "Three" & vbCr & "Four" & vbCr & "Five" & vbCr & "Six"
'Use Split function to divide up the component parts of the string
MyArray = Split(MyString, vbCr, , vbTextCompare)
'Clear the worksheet
ActiveSheet.UsedRange.Clear
'Iterate through the array
For N = 0 To UBound(MyArray)
    'Place each split into the first column of the worksheet
    Range("A" & N + 1).Value = MyArray(N)
Next N
End Sub
In this example, a string is built up using vbCr (carriage return character) as the delimiter.
When this code is run, your worksheet will look like this:
VBA Coding Made Easy
Stop searching for VBA code online. Learn more about AutoMacro — A VBA Code Builder that allows beginners to code procedures from scratch with minimal coding knowledge and with many time-saving features for all users!

Learn More
Using the Join Function to Reverse a Split
The Join function will re-join all the elements of an array, but using a specified delimiter. If no delimiter character is specified then a space will be used.
Sub JoinExample()
'Create variables
Dim MyArray() As String, MyString As String, I As Variant, N As Integer
Dim Target As String
'Sample string with comma delimiters
MyString = "One,Two,Three,Four,Five,Six"
'Place MyString at cell A1
Range("A1").Value = MyString
'Use Split function to divide up the component parts of the string
MyArray = Split(MyString, ",")
'Use Join function to re-create the original string using a semi colon delimiter
Target = Join(MyArray,”;”)
'Place the result string at cell A2
Range("A2").Value = Target
End Sub
This code splits a string with comma delimiters into an array, and joins it back together using semi-colon delimiters.
After running this code your worksheet will look like this:
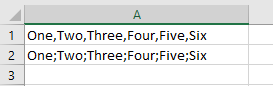
Cell A1 has the original string with comma delimiters, and cell A2 has the new joined string with semi-colon delimiters.
Using the Split Function to do a Word Count
Bearing in mind that a string variable in Excel VBA can be up to 2Gb long, you can use the split function to do word count in a piece of text. Obviously, Microsoft Word does it automatically, but this could be useful for a simple text file or text copied from another application.
Sub NumberOfWordsExample()
'Create variables
Dim MyArray() As String, MyString As String
'Sample string with space delimiters
MyString = "One Two Three Four Five Six"
'Remove any double spaces
MyString = Replace(MyString, "  ", " ")
'Remove any leading or trailing spaces
MyString = Trim(MyString)
'Use Split function to divide up the component parts of the string
MyArray = Split(MyString)
'Show number of words using the UBound function
MsgBox "Number of Words " & UBound(MyArray) + 1
End Sub
One of the dangers of this word count code is that it will be thrown by double spaces and leading and trailing spaces. If these are present, they will be counted as extra words, and the word count will end up as inaccurate.
The code uses the Replace and Trim functions to remove these extra spaces.
The final code line displays the number of words found by using the UBound function to get the maximum element number of the array and then incrementing it by 1. This is because the first array element begins at zero.
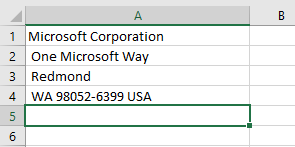
Splitting an Address into Worksheet Cells
Mail addresses are often long strings of text with comma delimiters. You may well want to split each part of the address into a separate cell.
Sub AddressExample()
'Create variables
Dim MyArray() As String, MyString As String, N As Integer
'Set up string with Microsoft Corporation Address
MyString = "Microsoft Corporation, One Microsoft Way, Redmond, WA 98052-6399 USA"
'Use the split function to divide the string using a comma delimiter
MyArray = Split(MyString, ",")
'Clear the worksheet
ActiveSheet.UsedRange.Clear
'iterate through the array
For N = 0 To UBound(MyArray)
     'Place each split into the first column of the worksheet
    Range("A" & N + 1).Value = MyArray(N)
Next N
End Sub
Running this code will use the comma delimiter to put each line of the address into a separate cell:
If you only wanted to return the zip code (last array element), then you could use the code:
Sub AddressZipCodeExample()
'Create variables
Dim MyArray() As String, MyString As String, N As Integer, Temp As String
'Set up string with Microsoft Corporation Address
MyString = "Microsoft Corporation, One Microsoft Way, Redmond, WA 98052-6399 USA"
'Use the split function to divide the string using a comma delimiter
MyArray = Split(MyString, ",")
'Clear the worksheet
ActiveSheet.UsedRange.Clear
'Put the Zip Code at cell A1
Range("A1").Value = MyArray(UBound(MyArray))
End Sub
This will only use the last element in the array, which is found by using the UBound function.
On the other hand, you may wish to see all the lines in one cell so that they can be printed onto an address label:
Sub AddressExample()
'Create variables
Dim MyArray() As String, MyString As String, N As Integer, Temp As String
'Set up string with Microsoft Corporation Address
MyString = "Microsoft Corporation, One Microsoft Way, Redmond, WA 98052-6399 USA"
'Use the split function to divide the string using a comma delimiter
MyArray = Split(MyString, ",")
'Clear the worksheet
ActiveSheet.UsedRange.Clear
'iterate through the array
For N = 0 To UBound(MyArray)
     'place each array element plus a line feed character into a string
    Temp = Temp & MyArray(N) & vbLf
Next N
'Put the string onto the worksheet
Range("A1") = Temp
End Sub
This example works the same way as the earlier one, except that it creates a temporary string of all the array elements, but inserting a line feed character after each element.
The worksheet will look like this after the code has been run:

VBA Programming | Code Generator does work for you!
Split String into Worksheet Cells
You can copy the Split array into worksheet cells with just one command:
Sub CopyToRange()
'Create variables
Dim MyArray() As String, MyString As String
'Sample string with space delimiters
MyString = "One,Two,Three,Four,Five,Six"
'Use Split function to divide up the component parts of the string
MyArray = Split(MyString, ",")
'Copy the array into the worksheet
Range("A1:A" & UBound(MyArray) + 1).Value = WorksheetFunction.Transpose(MyArray)
End Sub
When this code has been run, your worksheet will look like this:
Creating a New Function to Allow Splitting from a Given Point
The Limit parameter in the Split function only allows you to specify an upper limit where you want the splitting to stop. It always commences from the start of the string.
It would be very useful to have a similar function where you can specify the start point of the split within the string, and the number of splits that you want to see from that point onwards. It will also only extract the splits that you have specified into the array, rather than having an enormous string value as the last element in the array.
You can easily build a function (called SplitSlicer) yourself in VBA to do this:
Function SplitSlicer(Target As String, Del As String, Start As Integer, N As Integer)
'Create array variable
Dim MyArray() As String
'Capture the split using the start variable using the delimiter character
MyArray = Split(Target, Del, Start)
‘Check if the start parameter is greater than the number of splits – this can cause problems
If Start > UBound(MyArray) + 1 Then
	‘Display error and exit the function
    MsgBox "Start parameter is greater than number of splits available"
    SplitSlicer = MyArray
    Exit Function
End If
'Put the last array element into the string
Target = MyArray(UBound(MyArray))
    'Split the string using N as the limit
 MyArray = Split(Target, Del, N)
‘Check that the top limit is greater than zero as the code removes the last element
If UBound(MyArray) > 0 Then
'Use ReDim to remove the final element of the array
ReDim Preserve MyArray(UBound(MyArray) - 1)
End If
'Return the new array
SplitSlicer = MyArray
End Function
This function is built with four parameters:
- Target – string – this is the input string that you want to split
- Del – string or non-printable character – this is the delimiter character that you use e.g. comma, colon
- Start – number – this is the start split for your slice
- N – number – this is the number of splits that you want to do within your slice
None of these parameters are optional or have default values, but you can work that into the code for the function if you wish to extend it further.
The function uses the Split function to create an array using the Start parameter as the Limit. This means that the array elements will hold the splits up to the start parameter, but the remainder of the string will be the last element, and will not be split.
The last element in the array is transferred back to a string using the UBound function to determine which element this is.
The string is then split again into the array, using N as the limit variable. This means that splits will be done for the string up to position N, after which the rest of the string will form the last element in the array.
The ReDim statement is used to remove the last element as we only want the specific elements left in the array. Note that the Preserve parameter is used, otherwise all data in the array will be lost.
The new array is then returned to the code that it was called from.
Note that the code is ‘error proofed’. Users will often do strange things that you did not consider. For example, if they try using the function with the Start or N parameter greater than the available number of splits in the string, this is likely to cause the function to fail.
Code is included to check the Start value, and also to make sure that there is an element that can be removed when the ReDim statement is used on the array.
Here is the code to test the function:
Sub TestSplitSlicer()
'Create variables
Dim MyArray() As String, MyString As String
'Define sample string with comma delimiters
MyString = "One,Two,Three,Four,Five,Six,Seven,Eight,Nine,Ten"
'Use the Splitslicer function to define new array
MyArray = SplitSlicer(MyString, ",", 4, 3)
'Clear the active sheet
ActiveSheet.UsedRange.Clear
'Copy the array into the worksheet
Range("A1:A" & UBound(MyArray) + 1).Value = WorksheetFunction.Transpose(MyArray)
End Sub
Run this code and your worksheet will look like this:
Introduction
The VBA Split Function is used is to split a string of text into an array. The text is split based on a given delimiter – e.g. a comma, space, colon etc.
For example, imagine we have the following string:
“Apple:Orange:Pear:Plum”
You can see that each item separated by the colon sign. We call the colon sign the delimiter.
We can split this string into an array:
' https://excelmacromastery.com/
Sub SplitBasic()

    Dim arr() As String
    arr = Split("John:Jane:Paul:Sophie", ":")

End Sub
Once it is in an array it is easy to access each item:

Glossary
Array – a structure for storing a group of similar variables.
Ubound – this function gives the last position of an array.
Lbound – this function gives the first position of an array. For an array, returned by the Split function, the first position is zero.
Instr – this function is used to search for a string within a string and return the position.
InStrRev – the same as Instr but searches a string from the end.
Split Syntax
Split expression, delimiter[optional], limit[optional], compare[optional]
Split Return Value
The Split function returns an array.
Split Function Parameters
expression – this is the text string that is to be split.
delimiter [optional] – the character delimiter used in the string to separate each item. If you don’t use this parameter then VBA uses space as the delimiter.
limit [optional] – this allows us to set the number of items in the result. If we use 1 as the limit then no split takes place and the full string is returned.
compare [optional] – if we are using letters as the delimiter then this determines if we take the case of letters into consideration.
VBA Split – Simple Example
The following code shows an example of using the Split function and printing the result to the Immediate Window:
' https://excelmacromastery.com/
Sub VBA_Split_Print()

    Dim arr() As String
    ' Split the string to an array
    arr = Split("John:Jane:Paul:Sophie", ":")

    ' Print each item in the array to the Immediate Window(Ctrl + G)
    Dim name As Variant
    For Each name In arr
        Debug.Print name
    Next

End Sub
Output
John
Jane
Paul
Sophie
When we split the string into an array we have an item in each position in the array. This means we can easily access any item using the array position:
' https://excelmacromastery.com/
Sub VBA_Split_PrintArr()

    Dim arr() As String
    ' Split the string to an array
    arr = Split("John:Jane:Paul:Sophie", ":")

    Debug.Print arr(0) ' Print John
    Debug.Print arr(1) ' Print Jane
    Debug.Print arr(2) ' Print Paul
    Debug.Print arr(3) ' Print Sophie

End Sub
Split returns an array that starts at position zero. If we want to use a For statement to read through the array we can use LBound and UBound to give us the first and last positions of the array:
' https://excelmacromastery.com/
Sub VBA_Split_Print()

    Dim arr() As String
    ' Split the string to an array
    arr = Split("John:Jane:Paul:Sophie", ":")

    ' Print each item in the array to the Immediate Window(Ctrl + G)
    Dim i As Long
    For i = LBound(arr) To UBound(arr)
        Debug.Print arr(i)
    Next

End Sub
Split Limit Parameter
The Limit parameter is used to determine how items are placed in the array. In other words, how many items is the original string split into.
The table below shows the results of using different limits this sample string:
| String | Limit | Result |
|---|---|---|
| «John:Jane:Paul:Sophie» | 1 | John:Jane:Paul:Sophie |
| «John:Jane:Paul:Sophie» | 2 | John Jane:Paul:Sophie |
| «John:Jane:Paul:Sophie» | 3 | John Jane Paul:Sophie |
| «John:Jane:Paul:Sophie» | 4 | John Jane Paul Sophie |
You can try out the code for yourself:
' https://excelmacromastery.com/
Sub VBA_Split_Limit()

    Dim arr() As String
    ' Split the string to an array
    arr = Split("John:Jane:Paul:Sophie", ":", 1)

    ' Print each item in the array to the Immediate Window(Ctrl + G)
    Dim name As Variant
    For Each name In arr
        Debug.Print name
    Next

End Sub
Split Compare Parameter
The Compare parameter is used for delimiters that are made up of one or letters.
For example, imagine we want to use the letter x as a delimiter in the following string:
“12x34X45x”
- If we want to split by x when lower case only – then we use vbBinaryCompare.
- If we want to split by upper or lower case x – then we use vbTextCompare.
- vbUseCompareOption is the default and tells split to use the module Compare settings. Read more about the module compare settings here.
The following code shows how we use the Compare parameter:
' https://excelmacromastery.com/
Sub VBA_Split_Compare()

    Dim arr() As String
    ' Split the string to an array - not case sensitive
    arr = Split("12x34X45", "x", , vbTextCompare)

    ' Print each item in the array to the Immediate Window(Ctrl + G)
    Dim name As Variant
    For Each name In arr
        Debug.Print name
    Next

End Sub
The following table shows the results from the different Compare arguments:
| String | Delimiter | Compare Type | Result |
|---|---|---|---|
| «12x34X45» | x | vbCompareText | 12 34 45 |
| «12x34X45» | x | vbCompareBinary | 12 34X45 |
Reversing Split
We can use the Join function to do the opposite of what the split function does. Join converts an array into a string and adds a given delimiter.
This can be useful as sometimes we may want to split a string, update one or more values in the array and then convert the array to a string.
This example shows how to use Join:
' https://excelmacromastery.com/
Sub UsingJoin()

    Dim arr As Variant

    ' create an array using the array function
    arr = Array("Apple", "Orange", "Pear")

    Dim s As String
    ' Covert the array to a string using the colon delimiter
    s = Join(arr, ":")

    ' Print the string to the Immediate Window(Ctrl + G)
    Debug.Print s

End Sub
See the section “Split Example – Using Join” for an example of using the Join function with the Split function.
Split Example – Names
A really great example of Split is when dealing with names.
Imagine we have the name “John Henry Smith” and we want to extract each name.
We can use Left and Instr to get the first name:
' https://excelmacromastery.com/
Sub Instr_Firstname()

    Dim s As String
    s = "John Henry Smith"

    ' Get the position of the first space
    Dim position As Long
    position = InStr(s, " ") - 1

    ' Prints John
    Debug.Print Left(s, position)

End Sub
To get the last name is a bit trickier:
' https://excelmacromastery.com/
Sub Instr_Lastname()

    Dim s As String
    s = "John Henry Smith"

    ' Get the position of the last space
    Dim position As Long, length As Long
    position = InStrRev(s, " ") - 1
    length = Len(s)

    ' Prints Smith
    Debug.Print Right(s, length - position)

End Sub
Getting names that are not in the first or last position gets very messy indeed. However, using Split we can simplify the whole process:
' https://excelmacromastery.com/
Sub SplitName()

    Dim s As String: s = "John Henry Smith"

    Dim arr() As String

    arr = Split(s, " ")
    Debug.Print arr(0) ' John
    Debug.Print arr(1) ' Henry
    Debug.Print arr(2) ' Smith

End Sub
We actually don’t need to use an array as we can see in the next example. It is not efficient to call the Split function 3 times instead of 1 but it does look nice in this example:
' https://excelmacromastery.com/
Sub SplitName()

    Dim s As String: s = "John Henry Smith"

    Debug.Print Split(s, " ")(0) ' John
    Debug.Print Split(s, " ")(1) ' Henry
    Debug.Print Split(s, " ")(2) ' Smith

End Sub
Split Example – Filenames
In the next example we use Split to get the extension part of a filename:
' https://excelmacromastery.com/
Sub GetFileExt()

    ' Create an array of filenames for our test
    Dim myFiles As Variant
    myFiles = Array("my resume.xlsx", "myresume2.doc", "my resume latest ver.pdf")

    Dim file As Variant, arr() As String
    ' Read through the filenames
    For Each file In myFiles
        ' Split by the period
        arr = Split(file, ".")
        ' Use Ubound to get the last position in the array
        Debug.Print arr(UBound(arr))
    Next file

End Sub
Here is an interesting one you can try for yourself. Given a full file name, try to write code to extract the filename without the extension or folder.
For example for “C:MyDocsJanMyResume.Doc” we want to extract MyResume.
' https://excelmacromastery.com/
Sub GetFilenamePart()

    ' Create an array of filenames for our test
    Dim myFiles As Variant
    myFiles = Array("C:MyDocsJanMyResume.Doc" _
                , "C:MyMusicSongslovesong.mp3" _
                , "D:MyGamesGamesSavedsavedbattle.sav")

    Dim file As Variant, arr() As String
    ' Read through the filenames
    For Each file In myFiles

        ' Split by the period
        arr = Split(file, ".")

        ' Split by the folder separator /
        arr = Split(arr(0), Application.PathSeparator)

        Debug.Print arr(UBound(arr))

    Next file

End Sub
Output
MyResume
lovesong
savedbattle
Split Example – Copy to a Range
Because the result of Split is an array, we easily copy it to a range.
' https://excelmacromastery.com/
Sub VBA_Split_Range()

    Dim s As String
    s = "001,John Smith,New York,067435334"

    ' write the values to cells A1 to D1
    Sheet1.Range("A1:D1").Value = Split(s, ",")

    ' write the values to cells A1 to A4
    Sheet1.Range("A1:A4").Value = WorksheetFunction.Transpose(Split(s, ","))

End Sub
Split Example – Count Items
If we want to count the number of items in a delimited string we can use Split to do this for us.
We simply split the string and then use the Ubound function to give us back the number of items. We saw already that UBound is used to give us back the last position in an array. Because, the array start at zero, we need to add one to get the number of items.
' https://excelmacromastery.com/
Sub Split_Count()

    Dim s As String
    s = "Apple,Orange,Mango,Peach,Plum,Banana,Pear"

    Debug.Print "number of items:" & UBound(Split(s, ",")) + 1

End Sub
Split Example – Using Join
This is an interesting one that you may want to try yourself. Take the three strings below:
123.3456.96.345
1234.1156.7.345
1273.9998.123.345
We want to add one to the third number in each string. For example, the first string should become 123.3456.97.345.
Before you try yourself, I will give one hint. You can use the Join function to reverse the Split operation. It takes a array and delimiter and creates a string.
You can start with this code:
' https://excelmacromastery.com/
Sub UpdateNumber()

    ' Create an array of number for our test
    Dim myNums As Variant
    myNums = Array("123.3456.99.345" _
                , "1234.1156.7.98" _
                , "1273.9998.123.3235")

    ' Read through the strings
    Dim i As Long, arr() As String
    For i = LBound(myNums) To UBound(myNums)

        ' add your code here

    Next i

    ' Print the updated array to the Immediate Window(Ctrl+G)
    Debug.Print vbNewLine & "Printing new array"
    For i = LBound(myNums) To UBound(myNums)
        Debug.Print myNums(i)
    Next i

End Sub
This is how to do it:
' https://excelmacromastery.com/
Sub UpdateNumber()

    ' Create an array for our test
    Dim myNums As Variant
    myNums = Array("123.3456.99.345" _
                , "1234.1156.7.98" _
                , "1273.9998.123.3235")

    ' Read through the strings
    Dim i As Long, arr() As String
    For i = LBound(myNums) To UBound(myNums)

        ' Split the string to an array
        arr = Split(myNums(i), ".")

        ' Add one to the number
        arr(2) = arr(2) + 1

        ' convert the array back to a string
        myNums(i) = Join(arr, ".")

    Next i

    ' Print the updated array to the Immediate Window(Ctrl+G)
    Debug.Print vbNewLine & "Printing new array"
    For i = LBound(myNums) To UBound(myNums)
        Debug.Print myNums(i)
    Next i

End Sub
Output
123.3456.100.345
1234.1156.8.345
1273.9998.124.345
Further Reading
The Ultimate Guide to VBA String Functions
Extracting using the Split function
VBA Arrays
VBA For Loop
Microsoft Docs – Split function
If you would like to see some real-world examples of using Split, you will find them in the post How to Easily Extract From Any String Without Using VBA InStr.
What’s Next?
Free VBA Tutorial If you are new to VBA or you want to sharpen your existing VBA skills then why not try out the The Ultimate VBA Tutorial.
Related Training: Get full access to the Excel VBA training webinars and all the tutorials.
(NOTE: Planning to build or manage a VBA Application? Learn how to build 10 Excel VBA applications from scratch.)
Содержание
- Split function
- Syntax
- Settings
- Example
- See also
- Support and feedback
- Функция Split
- Синтаксис
- Параметры
- Пример
- См. также
- Поддержка и обратная связь
- VBA Split Function – Split String of Text into Array
- VBA Split Function
- Using the Split Function with a Delimiter Character
- Using a Limit Parameter in a Split Function
- Using the Compare Parameter in a Split Function
- Using Non-Printable Characters as the Delimiter Character
- VBA Coding Made Easy
- Using the Join Function to Reverse a Split
- Using the Split Function to do a Word Count
- Splitting an Address into Worksheet Cells
- Split String into Worksheet Cells
- Creating a New Function to Allow Splitting from a Given Point
- VBA Code Examples Add-in
Split function
Returns a zero-based, one-dimensional array containing a specified number of substrings.
Syntax
Split(expression, [ delimiter, [ limit, [ compare ]]])
The Split function syntax has these named arguments:
| Part | Description |
|---|---|
| expression | Required. String expression containing substrings and delimiters. If expression is a zero-length string(«»), Split returns an empty array, that is, an array with no elements and no data. |
| delimiter | Optional. String character used to identify substring limits. If omitted, the space character (» «) is assumed to be the delimiter. If delimiter is a zero-length string, a single-element array containing the entire expression string is returned. |
| limit | Optional. Number of substrings to be returned; -1 indicates that all substrings are returned. |
| compare | Optional. Numeric value indicating the kind of comparison to use when evaluating substrings. See Settings section for values. |
Settings
The compare argument can have the following values:
| Constant | Value | Description |
|---|---|---|
| vbUseCompareOption | -1 | Performs a comparison by using the setting of the Option Compare statement. |
| vbBinaryCompare | 0 | Performs a binary comparison. |
| vbTextCompare | 1 | Performs a textual comparison. |
| vbDatabaseCompare | 2 | Microsoft Access only. Performs a comparison based on information in your database. |
Example
This example shows how to use the Split function.
See also
Support and feedback
Have questions or feedback about Office VBA or this documentation? Please see Office VBA support and feedback for guidance about the ways you can receive support and provide feedback.
Источник
Функция Split
Возвращает одномерный массив с основанием 0, содержащий указанное число подстрок.
Синтаксис
Split(expression, [ разделитель, [ limit, [ compare ]]])
Синтаксис функции Split включает следующие именованные аргументы:
| Part | Описание |
|---|---|
| выражение | Обязательно. Строковое выражение, содержащее подстроки и разделители. Если аргумент expression является строкой нулевой длины («»), функция Split возвращает пустой массив — без элементов и данных. |
| Разделитель | Необязательный параметр. Строковый символ, используемый для разделения подстрок. Если этот аргумент не указан, в качестве разделителя используется знак пробела (» «). Если аргумент delimiter является строкой нулевой длины, возвращается массив с одним элементом, содержащим всю строку из аргумента expression. |
| Предел | Необязательный параметр. Количество возвращаемых подстрок; -1 указывает, что возвращаются все подстроки. |
| compare | Необязательно. Числовое значение, указывающее тип сравнения, который будет использоваться при оценке подстрок. Значения см. в разделе «Параметры». |
Параметры
Аргумент compare может принимать следующие значения:
| Константа | Значение | Описание |
|---|---|---|
| vbUseCompareOption | –1 | Выполняет сравнение, используя параметр оператора Option Compare. |
| vbBinaryCompare | 0 | Выполняется двоичное сравнение. |
| vbTextCompare | 1 | Выполняется текстовое сравнение. |
| vbDatabaseCompare | 2 | Только Microsoft Access. Выполняется сравнение на основе сведений из базы данных. |
Пример
В этом примере показано, как использовать функцию Split .
См. также
Поддержка и обратная связь
Есть вопросы или отзывы, касающиеся Office VBA или этой статьи? Руководство по другим способам получения поддержки и отправки отзывов см. в статье Поддержка Office VBA и обратная связь.
Источник
VBA Split Function – Split String of Text into Array
In this Article
VBA Split Function
The VBA Split function splits a string of text into substrings based on a specific delimiter character (e.g. a comma, space, or a colon). It is easier to use than writing code to search for the delimiters in the string and then extracting the values.
It could be used if you are reading in a line from a Comma-Separated Value (CSV file) or you have a mailing address that is all on one line, but you want to see it as multiple lines.
The VBA Split function has four parameters:
- Expression – The string of text that you wish to split into different parts.
- Delimiter(optional)– string or non-printable character – Defines the delimiter character that is going to be used for the split. If no delimiter character is provided then the default of a space is used.
- Limit(optional) – number – Defines how many splits will be made. If blank, all available splits will be made within the string. If it is set to 1, then no splits will be made. Basically, it enables you to separate out a specific number of values starting at the beginning of the string e.g. where the string is very long and you only need the first three splits.
- Compare(optional) – If your delimiter is a text character then this is used to toggle whether the delimiter is case-sensitive or not. Values are vbBinaryCompare ( case-senstiive) and vbTextCompare (not-case sensitive).
The split function always returns an array.
Simple Example of the Split Function
In this example, no delimiter is specified because all the words have a space in between them, so the default delimiter (space) can be used.
The array has no dimensions, and is set as a string. The variable I, which is used in the For…Next loop must be dimensioned as a variant.
When this code is run, it will show four message boxes, one for each of the splits e.g. One, Two, Three. Four.
Note that if there is a double space between the words in the string, this will be evaluated as a split, although with nothing in it. This may not be the result that you want to see.
You can fix this problem by using the Replace function to replace any double spaces with a single space:
A trailing or leading space can also cause problems by producing an empty split. These are often very difficult to see. You can remove these extraneous spaces by using the Trim Function:
Using the Split Function with a Delimiter Character
We can use a delimiter of a semi-colon (;). This is frequently found in email address strings to separate the addresses. You may have an email sent to you which is shared with a number of colleagues and you want to see a list in your worksheet of who it has gone to. You can easily copy the email addresses from the email ‘To’ or ‘Copy’ boxes and into your code.
Note that a For…Next loop is used to iterate through the array. The first element in the array always starts at zero, and the Upper Bound Function is used to get the maximum number of elements.
After running this code, your worksheet will look like this:
Using a Limit Parameter in a Split Function
The limit parameter allows a specific number of splits to be done from the start of the string. Unfortunately, you cannot provide a start position or a range of splits to be done, so it is fairly basic. You can build your own VBA code to create a function to do this, and this will be explained later in this article.
After you run this code, your worksheet will look like this:
Only the first three split values are shown separately. The later three values are shown as one long string and do not get split.
If you choose a limit value that is greater than the number of delimiters within a string, this will not produce an error. The string will be split into all its component parts as if the limit value had not been provided.
Using the Compare Parameter in a Split Function
The Compare parameter determines if the delimiter is case-sensitive or not. This is not applicable if the delimiters are commas, semi-colons, or colons.
Note: Instead, you can always place Option Compare Text at the top of your module to eliminate case-sensitivity for the entire module.
In this example, the string to be split uses the ‘X’ character as a delimiter. However, in this string, there is a mixture of upper and lower case ‘X’ characters. The Compare parameter in the Split function uses an upper case ‘X’ character.
If the Compare parameter is set to vbBinaryCompare, then the lower case ‘x’ characters will be ignored and your worksheet will look like this:
If the Compare parameter is set to vbTextCompare, then the lower case ‘x’ characters will be used in the split and your worksheet will look like this:
Note that the value at cell A6 is truncated because it contains a lower case ‘x’ character. Because the split is not case sensitive, any delimiter which forms part of a sub string will cause a split to happen.
This is an important point to bear in mind when using a text delimiter and vbTextCompare. You can easily end up with the wrong result.
Using Non-Printable Characters as the Delimiter Character
You can use non printable characters as the delimiter, such as a carriage return (a line break).
Here we use the vbCr to specify a carriage return.
In this example, a string is built up using vbCr (carriage return character) as the delimiter.
When this code is run, your worksheet will look like this:
VBA Coding Made Easy
Stop searching for VBA code online. Learn more about AutoMacro — A VBA Code Builder that allows beginners to code procedures from scratch with minimal coding knowledge and with many time-saving features for all users!
Using the Join Function to Reverse a Split
The Join function will re-join all the elements of an array, but using a specified delimiter. If no delimiter character is specified then a space will be used.
This code splits a string with comma delimiters into an array, and joins it back together using semi-colon delimiters.
After running this code your worksheet will look like this:
Cell A1 has the original string with comma delimiters, and cell A2 has the new joined string with semi-colon delimiters.
Using the Split Function to do a Word Count
Bearing in mind that a string variable in Excel VBA can be up to 2Gb long, you can use the split function to do word count in a piece of text. Obviously, Microsoft Word does it automatically, but this could be useful for a simple text file or text copied from another application.
One of the dangers of this word count code is that it will be thrown by double spaces and leading and trailing spaces. If these are present, they will be counted as extra words, and the word count will end up as inaccurate.
The code uses the Replace and Trim functions to remove these extra spaces.
The final code line displays the number of words found by using the UBound function to get the maximum element number of the array and then incrementing it by 1. This is because the first array element begins at zero.
Splitting an Address into Worksheet Cells
Mail addresses are often long strings of text with comma delimiters. You may well want to split each part of the address into a separate cell.
Running this code will use the comma delimiter to put each line of the address into a separate cell:
If you only wanted to return the zip code (last array element), then you could use the code:
This will only use the last element in the array, which is found by using the UBound function.
On the other hand, you may wish to see all the lines in one cell so that they can be printed onto an address label:
This example works the same way as the earlier one, except that it creates a temporary string of all the array elements, but inserting a line feed character after each element.
The worksheet will look like this after the code has been run:
Split String into Worksheet Cells
When this code has been run, your worksheet will look like this:
Creating a New Function to Allow Splitting from a Given Point
The Limit parameter in the Split function only allows you to specify an upper limit where you want the splitting to stop. It always commences from the start of the string.
It would be very useful to have a similar function where you can specify the start point of the split within the string, and the number of splits that you want to see from that point onwards. It will also only extract the splits that you have specified into the array, rather than having an enormous string value as the last element in the array.
You can easily build a function (called SplitSlicer) yourself in VBA to do this:
This function is built with four parameters:
- Target – string – this is the input string that you want to split
- Del – string or non-printable character – this is the delimiter character that you use e.g. comma, colon
- Start – number – this is the start split for your slice
- N – number – this is the number of splits that you want to do within your slice
None of these parameters are optional or have default values, but you can work that into the code for the function if you wish to extend it further.
The function uses the Split function to create an array using the Start parameter as the Limit. This means that the array elements will hold the splits up to the start parameter, but the remainder of the string will be the last element, and will not be split.
The last element in the array is transferred back to a string using the UBound function to determine which element this is.
The string is then split again into the array, using N as the limit variable. This means that splits will be done for the string up to position N, after which the rest of the string will form the last element in the array.
The ReDim statement is used to remove the last element as we only want the specific elements left in the array. Note that the Preserve parameter is used, otherwise all data in the array will be lost.
The new array is then returned to the code that it was called from.
Note that the code is ‘error proofed’. Users will often do strange things that you did not consider. For example, if they try using the function with the Start or N parameter greater than the available number of splits in the string, this is likely to cause the function to fail.
Code is included to check the Start value, and also to make sure that there is an element that can be removed when the ReDim statement is used on the array.
Here is the code to test the function:
Run this code and your worksheet will look like this:

VBA Code Examples Add-in
Easily access all of the code examples found on our site.
Simply navigate to the menu, click, and the code will be inserted directly into your module. .xlam add-in.
Источник
 You can use Visual Basic for Applications (VBA), Microsoft’s programming language for the MS Office suite software, to greatly enhance the capability of Excel. You can write macros, or programs that can help you repeat previously performed tasks, using VBA. Macros can really improve your productivity and cut down on the time you spend doing things manually. This VBA tutorial gives some good examples of how you can use VBA to help automate things.
VBA is prebuilt into Microsoft Excel (and other office suite applications). To access VBA, you need to enable the developer tab first, if you haven’t already. Click on a spot on your ribbon (at the top) and choose the Customize the Ribbon option. By default, the Developer tab is unchecked. Enable it and click on Ok. A new tab should appear next to the View tab on top of your screen. This is the Developer tab, through which you can access VBA and Macros in general. The Developer tab lets you add VBA objects to your spreadsheet (you can check out this course to learn more about using VBA and Macros with Excel).
Like other programming languages, VBA lets you play around with strings and perform various operations on them. The split function is the function that lets you work with lengthy strings in Excel.If you’re new to VBA, or programming languages in general, and don’t know what strings are, we recommend you sign up for our Excel VBA beginner course for an introduction to the language.
The Excel VBA Split function was introduced in the year 2000, in response to a growing need to have a function that could handle large strings (for example, “John Harry David Smith” or “welcome to this tutorial”). The split function is used to split, or break, a string into manageable chunks.
If you’re familiar with Excel spreadsheets (if not, you can take a basic Excel course here), you know that sometimes parts of a long name get hidden – they can’t fit in the confines of a single cell. With the split function, what you can do is split the string into smaller parts and get them to occupy separate cells. For example, if you had a name “John Harry David Smith” and it was occupying cell A1, you can use the split function to separate the name and get it to occupy cells A1, B1, C1 and D1. Sounds useful, doesn’t it? Of course, this is just one of the uses of a split function.
VBA Split Syntax
What the split function does is split a string into an array and then returning that array. This array is one-dimensional. So how do you write a split function? The syntax for the split function is:
Split (string, delimiter, limit, compare)
Here, the string is the text you want to split. The “delimiter” will decide how the text will be split into parts. Usually, the space character “ “ occupies this part of the code. If you don’t define a delimiter, a space character “ “ will be used by default. The limit defines the number of the strings is allowed to divide into. By default, the limit is linked to the delimiter (default value of -1). This means that the delimiter part of the code will decide the number of parts the string gets divided into. The compare method lets you specify the method of comparison: binary (0) or text (1). You don’t have to specify the compare parameter either. By default, it will revert to binary (0).
Example 1
Let’s take a couple of examples to help you understand how the string function works. In the first example, let’s split the string “welcome to this tutorial” and print the words of the string separately (on a new line). The code for that is as follows:
Sub Example()
Dim text As String
Dim message As Variant
Dim a As Long
text = "welcome to this tutorial"
message = Split(text, " ")
For a = 0 To UBound(message)
Debug.Printmessage(a)
Next a
End Sub
Try running this code and see what happens. You will get the message “welcome to this tutorial” printed on 4 different lines.
So how does the code work exactly? First, we initialized text as a string variable, message as a variant variable and a as long variable. A variant variable is a necessity if you are working with the split function. It allows the string text to be treated as split-able. We followed the syntax and used the default delimiter “ “. Finally, we used a for loop to get the array printed on separate lines. 0 defines the starting position of the array and UBound defines the maximum (ending) position of the array.
Example 2
Now let’s write a program to separate a big name (John Harry David Smith) written on a single cell in Excel and get it printed on 4 different cells. Let’s write the name on cell A1 as in the image:

The code for that is as follows:
Sub example()
Dim text As String
Dim a As Integer
Dim name As Variant
text = ActiveCell.Value
name = Split(text, " ")
For a = 0 To UBound(name)
Cells(1, a + 1).Value = name(a)
Next a
End Sub
The code in this example is similar to the code in the previous example. The ActiveCell.Value tells the computer to look for the active cell (A1) and get the string value written there. The split function is used exactly like we have in the previous example. The Cells(1, a + 1).Value part of the code accesses the first row (1) of the spreadsheet. The loop is used to run through the parts of the array and get the string separated and printed into different cells. The final result should look like this, once your run your code:

You can see how useful the split function is. You can also use the split function to omit unnecessary words or symbols (like the “.” character) from your string.
We recommend that you practice with the code we’ve given above to find out how to do that. Try to change the text entered and change the value of the delimiter, limit and compare parts of the split function syntax. Alternatively, you can sign up for our advanced Excel VBA course, where we teach you how to do that, and about using VBA efficiently in general.
Text to Columns feature can help you split text strings in Excel. Using VBA, you can make this process even faster. In this guide, we’re going to show you how to split text with VBA in Excel.
Download Workbook
Data
In this example, we have rows of data containing data separated by “|” characters. Each part represents an individual column.
Splitting text with VBA
If you are unfamiliar with VBA (Visual Basic for Applications), you can check out our beginner’s guide here: How to create a macro in Excel
Split Method
VBA has a function named Split which can return an array of sub-strings from a given string. The function parameters are the string to be split and a delimiter character which separates the sub-strings. In our example, the original strings are in cells in B6:B12 and there are “|” characters between the sub-strings.
The following code loops through each cell in the selected range, uses the Split function to create array of substrings, and uses another loop to distribute the sub-strings into adjacent cells in the same row.
Sub SplitText()
Dim StringArray() As String, Cell As Range, i As Integer
For Each Cell In Selection ‘To work on a static range replace Selection via Range object, e.g., Range(“B6:B12”)
StringArray = Split(Cell, «|») ‘Change the delimiter with a character suits your data
For i = 0 To UBound(StringArray)
Cell.Offset(, i + 1) = StringArray(i)
Cell.Offset(, i + 1).EntireColumn.AutoFit ‘This is for column width and optional.
Next i
Next
End Sub
You can copy paste the code above to use it in your workbook. However, make sure to update it depending on your data (i.e. change the delimiter or remove the Cell.Offset(, i + 1).EntireColumn.AutoFit if you do not want to change the column widths).
Text to Columns Method to split text with VBA
In VBA, you can call the Text to Columns feature of Excel. The method can be called for a range. Since we want to split cells by a delimiter, the argument DataType should be xlDelimited. The Destination argument determines the top-left cell for the split substrings. Each delimiter type has its own argument. Since the “|” character is not supported natively, our sample code sets Other as True and OtherChar as “|”.
Sub VBATextToColumns_Other()
Dim MyRange As Range
Set MyRange = Selection ‘To work on a static range replace Selection via Range object, e.g., Range(«B6:B12»)
MyRange.TextToColumns Destination:=MyRange(1, 1).Offset(, 1), DataType:=xlDelimited, Other:=True, OtherChar:=»|»
End Sub
Text to Columns Method with multiple delimiters
Text to Columns method allows using multiple built-in delimiters at once. These are Tab, Semicolon, Comma and Space. Set any corresponding argument to True to enable the delimiter. The argument names are same with the character.
The following code can split the sample text by semicolon, comma, and space characters.
Sub VBATextToColumns_Multiple()
Dim MyRange As Range
Set MyRange = Selection ‘To work on a static range replace Selection via Range object, e.g., Range(«B6:B12»)
MyRange.TextToColumns _
Destination:=MyRange(1, 1).Offset(, 1), _
TextQualifier:=xlTextQualifierDoubleQuote, _
DataType:=xlDelimited, _
SemiColon:=True, _
Comma:=True, _
Space:=True
End Sub
При работе с VBA в Excel вам может потребоваться разделить строку на разные части на основе разделителя.
Например, если у вас есть адрес, вы можете использовать функцию VBA Split, чтобы получить разные части адреса, разделенные запятой (которая в данном случае будет разделителем).
SPLIT — это встроенная строковая функция в Excel VBA, которую можно использовать для разделения текстовой строки на основе разделителя.
Функция Excel VBA SPLIT — синтаксис
Разделить (Выражение, [Разделитель], [Предел], [Сравнить])
- Выражение: Это строка, которую вы хотите разделить на основе разделителя. Например, в примере с адресом весь адрес будет выражением «выражение». В случае, если это строка нулевой длины («»), функция SPLIT вернет пустой массив.
- Разделитель: Это необязательный аргумент. Это разделитель, который используется для разделения аргумента «Выражение». В нашем примере с адресом запятая является разделителем, который используется для разделения адреса на разные части. Если вы не укажете этот аргумент, разделителем по умолчанию будет считаться пробел. Если вы указываете строку нулевой длины («»), функция возвращает всю строку «Expression».
- Лимит: Это необязательный аргумент. Здесь вы указываете общее количество подстрок, которые хотите вернуть. Например, если вы хотите вернуть только первые три подстроки из аргумента «Выражение», это будет 3. Если вы не укажете этот аргумент, по умолчанию будет -1, что возвращает все подстроки.
- Сравнивать: Это необязательный аргумент. Здесь вы указываете тип сравнения, которое вы хотите, чтобы функция SPLIT выполняла при оценке подстрок. Доступны следующие варианты:
- Когда сравнение равно 0: Это двоичное сравнение. Это означает, что если ваш разделитель представляет собой текстовую строку (скажем, ABC), то это будет чувствительно к регистру. «ABC» не будет равно «abc».
- Когда сравнение равно 1: Это текстовое сравнение. Это означает, что если вашим разделителем является текстовая строка (скажем, ABC), то даже если у вас есть «abc» в строке «Expression», она будет считаться разделителем.
Теперь, когда мы рассмотрели основы функции SPLIT, давайте рассмотрим несколько практических примеров.
Пример 1 — Разделение слов в предложении
Предположим, у меня есть текст — «Быстрая коричневая лисица перепрыгивает через ленивую собаку».
Я могу использовать функцию SPLIT, чтобы выделить каждое слово этого предложения как отдельный элемент в массиве.
Приведенный ниже код будет к этому:
Sub SplitWords () Dim TextStrng As String Dim Result () As String TextStrng = «Быстрая коричневая лисица перепрыгивает через ленивую собаку» Результат () = Split (TextStrng) End Sub
Хотя код не делает ничего полезного, он поможет вам понять, что делает функция Split в VBA.
Функция Split разбивает текстовую строку и присваивает каждое слово массиву Result.
Итак, в этом случае:
- Результат (0) сохраняет значение «The».
- Результат (1) сохраняет значение «Быстрый».
- Результат (2) сохраняет значение «Коричневый» и так далее.
В этом примере мы указали только первый аргумент — текст, который нужно разделить. Поскольку разделитель не указан, в качестве разделителя по умолчанию используется пробел.
Важная заметка:
- Функция VBA SPLIT возвращает массив, который начинается с базы 0.
- Когда результат функции SPLIT присваивается массиву, этот массив должен быть объявлен как тип данных String. Если вы объявите его как тип данных Variant, он покажет ошибку несоответствия типа). Обратите внимание, что в приведенном выше примере я объявил Result () как тип данных String.
Пример 2 — Подсчет количества слов в предложении
Вы можете использовать функцию SPLIT, чтобы получить общее количество слов в предложении. Хитрость здесь в том, чтобы подсчитать количество элементов в массиве, которое вы получите при разделении текста.
В приведенном ниже коде будет отображаться окно сообщения с количеством слов:
Sub WordCount () Dim TextStrng As String Dim WordCount As Integer Dim Result () As String TextStrng = "Быстрая коричневая лиса перепрыгивает через ленивую собаку" Результат = Split (TextStrng) WordCount = UBound (Result ()) + 1 MsgBox " Количество слов: "& WordCount End Sub

В этом случае функция UBound сообщает нам верхнюю границу массива (т.е. максимальное количество элементов в массиве). Поскольку база массива равна 0, добавляется 1, чтобы получить общее количество слов.
Вы можете использовать аналогичный код для создания пользовательской функции в VBA, которая будет принимать текст в качестве входных данных и возвращать количество слов.
Приведенный ниже код создаст эту функцию:
Функция WordCount (CellRef As Range) Dim TextStrng As String Dim Result () As String Result = Split (WorksheetFunction.Trim (CellRef.Text), "") WordCount = UBound (Result ()) + 1 End Function
После создания вы можете использовать функцию WordCount, как любую другую обычную функцию.

Эта функция также обрабатывает начальные, конечные и двойные пробелы между словами. Это стало возможным благодаря использованию функции TRIM в коде VBA.
Если вы хотите узнать больше о том, как эта формула работает для подсчета количества слов в предложении, или хотите узнать о способе вычисления количества слов с помощью формулы, отличной от VBA, ознакомьтесь с этим руководством.
Пример 3 — Использование разделителя, отличного от пробела
В предыдущих двух примерах мы использовали только один аргумент в функции SPLIT, а остальные были аргументами по умолчанию.
Когда вы используете какой-либо другой разделитель, вам необходимо указать это в формуле SPLIT.
В приведенном ниже коде функция SPLIT возвращает массив, основанный на запятой в качестве разделителя, а затем показывает сообщение с каждым словом в отдельной строке.
Sub CommaSeparator () Dim TextStrng As String Dim Result () As String Dim DisplayText As String TextStrng = "The, Quick, Brown, Fox, Jump, Over, The, Lazy, Dog" Result = Split (TextStrng, ",") Для i = LBound (Result ()) To UBound (Result ()) DisplayText = DisplayText & Result (i) & vbNewLine Далее i MsgBox DisplayText End Sub

В приведенном выше коде я использовал цикл For Next, чтобы просмотреть каждый элемент массива «Result», назначив его переменной «DisplayText».
Пример 4 — Разделите адрес на три части
С помощью функции SPLIT вы можете указать, сколько чисел разделений вы хотите получить. Например, если я ничего не укажу, каждый экземпляр разделителя будет использоваться для разделения строки.
Но если я укажу 3 как предел, то строка будет разделена только на три части.
Например, если у меня есть следующий адрес:
2703 Winifred Way, Индианаполис, Индиана, 46204
Я могу использовать функцию Split в VBA, чтобы разделить этот адрес на три части.

Он разделяет первые два на основе разделителя запятой, а оставшаяся часть становится третьим элементом массива.
В приведенном ниже коде адрес будет отображаться в трех разных строках в окне сообщения:
Sub CommaSeparator () Dim TextStrng As String Dim Result () As String Dim DisplayText As String TextStrng = "2703 Winifred Way, Indianapolis, Indiana, 46204" Result = Split (TextStrng, ",", 3) For i = LBound (Result ( )) To UBound (Result ()) DisplayText = DisplayText & Result (i) & vbNewLine Далее i MsgBox DisplayText End Sub

Одно из практических применений этого может быть, когда вы хотите разделить однострочный адрес в формате, показанном в окне сообщения. Затем вы можете создать настраиваемую функцию, которая возвращает адрес, разделенный на три части (каждая часть в новой строке).
Следующий код сделает это:
Функция ThreePartAddress (cellRef As Range) Dim TextStrng As String Dim Result () As String Dim DisplayText As String Result = Split (cellRef, ",", 3) For i = LBound (Result ()) To UBound (Result ()) DisplayText = DisplayText & Trim (Результат (i)) & vbNewLine Next i ThreePartAddress = Mid (DisplayText, 1, Len (DisplayText) - 1) Функция завершения
Если у вас есть этот код в модуле, вы можете использовать функцию (ThreePartAddress) в книге так же, как любую другую функцию Excel.

Эта функция принимает один аргумент — ссылку на ячейку с адресом.
Обратите внимание: чтобы полученный адрес отображался в трех разных строках, вам необходимо применить формат переноса текста к ячейкам (он находится на вкладке «Главная» в группе «Выравнивание»). Если формат «Перенос текста» не включен, вы увидите весь адрес как одну строку.
Пример 5 — Получение названия города из адреса
С помощью функции Split в VBA вы можете указать, какую часть результирующего массива вы хотите использовать.
Например, предположим, что я разделяю следующий адрес на основе запятой в качестве разделителя:
2703 Winifred Way, Индианаполис, Индиана, 46204
Результирующий массив будет выглядеть примерно так, как показано ниже:
{"2703 Winifred Way", "Indianapolis", "Indiana", "46204"}
Поскольку это массив, я могу выбрать отображение или возврат определенной части этого массива.
Ниже приведен код пользовательской функции, где вы можете указать число, и она вернет этот элемент из массива. Например, если мне нужно название состояния, я могу указать 3 (поскольку это третий элемент в массиве).
Функция ReturnNthElement (CellRef как диапазон, ElementNumber как целое число) Dim Result () As String Result = Split (CellRef, ",") ReturnNthElement = Result (ElementNumber - 1) End Function
Вышеупомянутая функция принимает два аргумента: ссылку на ячейку с адресом и номер элемента, который вы хотите вернуть. Функция Split разделяет элементы адреса и присваивает их переменной Result.
Затем он возвращает номер элемента, который вы указали в качестве второго аргумента. Обратите внимание, что, поскольку база равна 0, ElementNumber-1 используется для возврата правильной части адреса.

Эта настраиваемая формула лучше всего подходит, когда у вас есть согласованный формат для всего адреса, т. Е. Город всегда упоминается после двух запятых. Если данные несовместимы, вы не получите желаемого результата.
Если вам нужно название города, вы можете использовать 2 в качестве второго аргумента. Если вы используете число, превышающее общее количество элементов, оно вернет #VALUE! ошибка.
Вы можете еще больше упростить код, как показано ниже:
Функция ReturnNthElement (CellRef как диапазон, ElementNumber как целое число) ReturnNthElement = Split (CellRef, ",") (ElementNumber - 1) Конечная функция
В приведенном выше коде вместо использования переменной Result возвращается только указанный номер элемента.
Итак, если у вас есть Split («Доброе утро») (0), он вернет только первый элемент, который является «Хорошим».
Точно так же в приведенном выше коде он возвращает только указанный номер элемента.
Обычно вы можете использовать функцию «Текст в столбец», чтобы разделить содержимое ячейки на несколько столбцов с помощью определенного разделителя, такого как запятая, точка, точка с запятой, косая черта и т. д. Но иногда вам может потребоваться разделить содержимое ячейки с разделителями на несколько строк. и повторите данные из других столбцов, как показано ниже. Есть ли у вас хорошие способы решения этой задачи в Excel? В этом руководстве будут представлены некоторые эффективные методы выполнения этой работы в Excel.

Видео: разделение текстовых строк по разделителю на несколько строк
Метод A: разделить текст с разделителями на несколько строк с помощью кода VBA
В этом разделе я представлю два кода VBA, которые помогут разделить содержимое ячеек, разделенных определенным разделителем.
Разделить текст, разделенный запятой, пробелом, точкой с запятой и т. д.
Чтобы разделить текстовые строки, разделенные каким-либо обычным разделителем, таким как запятая, пробел, точка с запятой, косая черта и т. д., следующий код может оказать вам услугу. Пожалуйста, выполните следующие действия:
Внимание: этот код не поддержка расстегивать, вам лучше сделать резервную копию данных перед применением этого кода.
Шаг 1. Откройте редактор модулей VBA и скопируйте код.
1. Активируйте лист, который хотите использовать. А затем нажмите Alt + F11 , чтобы открыть Microsoft Visual Basic для приложений окно.
2. В открывшемся окне нажмите Вставить > Модули для создания нового пустого модуля.
3. Затем скопируйте и вставьте приведенный ниже код в пустой модуль.
Код VBA: разделить текст по определенному разделителю (запятая, точка, пробел и т. д.)
Sub SplitTextIntoRows()
'UpdatebyExtendoffice
Dim xSRg, xIptRg, xCrRg, xRg As Range
Dim xSplitChar As String
Dim xArr As Variant
Dim xFNum, xFFNum, xRow, xColumn, xNum As Integer
Dim xWSh As Worksheet
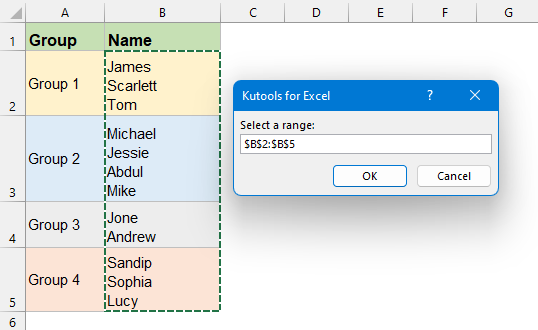
Set xSRg = Application.InputBox("Select a range:", "Kutools for Excel", , , , , , 8)
If xSRg Is Nothing Then Exit Sub
xSplitChar = Application.InputBox("Type delimiter:", "Kutools for Excel", , , , , , 2)
If xSplitChar = "" Then Exit Sub
Application.ScreenUpdating = False
xRow = xSRg.Row
xColumn = xSRg.Column
Set xWSh = xSRg.Worksheet
For xFNum = xSRg.Rows.Count To 1 Step -1
Set xRg = xWSh.Cells.Item(xRow + xFNum - 1, xColumn)
xArr = Split(xRg, xSplitChar)
xIndex = UBound(xArr)
For xFFNum = LBound(xArr) To UBound(xArr)
xRg.EntireRow.Copy
xRg.Offset(1, 0).EntireRow.Insert Shift:=xlShiftDown
xRg.Worksheet.Cells(xRow + xFNum, xColumn) = xArr(xIndex)
xIndex = xIndex - 1
Next
xRg.EntireRow.Delete
Next
Application.CutCopyMode = False
Application.ScreenUpdating = True
End Sub
Шаг 2: Выполните код, чтобы получить результат
1. После вставки кода нажмите F5 ключ для запуска этого кода. Затем появится всплывающее окно, чтобы напомнить вам о выборе ячеек, содержащих текст с разделителями, который вы хотите разделить, см. снимок экрана:
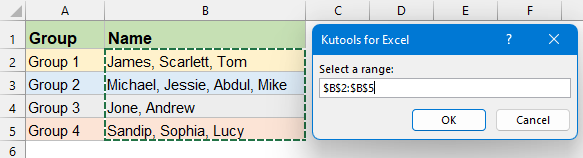
2. Затем щелкните OK, появится еще одно окно подсказки, чтобы напомнить вам о вводе разделителя, на основе которого вы хотите разделить данные. Здесь я набираю запятую и пробел (, ), см. снимок экрана:
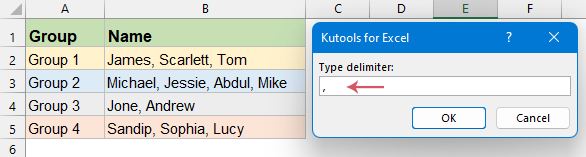
3. Наконец, нажмите OK кнопка. Теперь вы увидите, что выбранные текстовые строки разбиты на строки на основе запятой, а данные других относительных столбцов повторяются, как показано ниже:
Разделить текст, разделенный разрывом строки
Если содержимое вашей ячейки разделено разрывами строк, чтобы разделить их на несколько строк, вот еще один код VBA, который может вам помочь.
Внимание: этот код не поддержка расстегивать вам лучше сделать резервную копию данных перед применением этого кода.
Шаг 1. Откройте редактор модулей VBA и скопируйте код.
1. Нажмите Alt + F11 , чтобы открыть Microsoft Visual Basic для приложений окно.
2. В открывшемся окне нажмите Вставить > Модули для создания нового пустого модуля.
3. Затем скопируйте и вставьте приведенный ниже код в пустой модуль.
Код VBA: разделить текст по разрыву строки
Sub SplitTextIntoRows()
'UpdatebyExtendoffice
    Dim xSRg, xIptRg, xCrRg, xRg As Range
    Dim xSplitChar As String
    Dim xArr As Variant
    Dim xFNum, xFFNum, xRow, xColumn, xNum As Integer
    Dim xWSh As Worksheet
    Set xSRg = Application.InputBox("Select a range:", "Kutools for Excel", , , , , , 8)
    If xSRg Is Nothing Then Exit Sub
    xSplitChar = Chr(10)
    Application.ScreenUpdating = False
    xRow = xSRg.Row
    xColumn = xSRg.Column
    Set xWSh = xSRg.Worksheet
    For xFNum = xSRg.Rows.Count To 1 Step -1
        Set xRg = xWSh.Cells.Item(xRow + xFNum - 1, xColumn)
        xArr = Split(xRg, xSplitChar)
        xIndex = UBound(xArr)
        For xFFNum = LBound(xArr) To UBound(xArr)
            xRg.EntireRow.Copy
            xRg.Offset(1, 0).EntireRow.Insert Shift:=xlShiftDown
            xRg.Worksheet.Cells(xRow + xFNum, xColumn) = xArr(xIndex)
            xIndex = xIndex - 1
        Next
        xRg.EntireRow.Delete
    Next
    Application.CutCopyMode = False
    Application.ScreenUpdating = True
End Sub
Шаг 2: Выполните код, чтобы получить результат
1. После вставки кода нажмите F5 ключ для запуска этого кода. В появившемся окне выберите ячейки, которые вы хотите разделить, см. снимок экрана:
2. Затем щелкните OK Кнопка, данные в выбранных ячейках разбиваются на строки, как показано ниже:

Метод C: разделить текст с разделителями на несколько строк с помощью Power Query
Если вы используете Office 365 или Excel 2016 и более поздние версии, Power Query это мощный инструмент, который может помочь вам разделить текст с разделителями на несколько строк или столбцов. Это полезно, если вы хотите, чтобы разделенные данные обновлялись при изменении исходных данных. Пожалуйста, выполните следующие действия, чтобы закончить его:
Шаг 1. Загрузите таблицу данных в Power Query.
1. Выберите диапазон данных, который вы хотите использовать, затем нажмите Данные > Из таблицы, см. снимок экрана:
Tips: в Excel 2019 и Office 365 нажмите Данные > Из таблицы/диапазона.

2. В выдвинутом Создать таблицу диалоговое окно, нажмите OK кнопка для создания таблицы, см. скриншот:

3. Сейчас Power Query редактор отображается окно с данными, см. скриншот:

Шаг 2. Выполните преобразования в Power Query.
1. Выберите столбец, который вы хотите разделить. Затем нажмите Главная > Разделить столбец > По разделителю, см. снимок экрана:
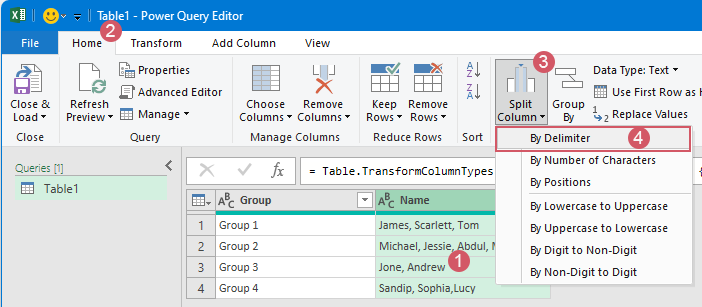
2. в Разделить столбец по разделителю диалоговое окно:
Чтобы разделить текстовые строки запятой, пробелом, точкой с запятой и т. д., сделайте следующее:
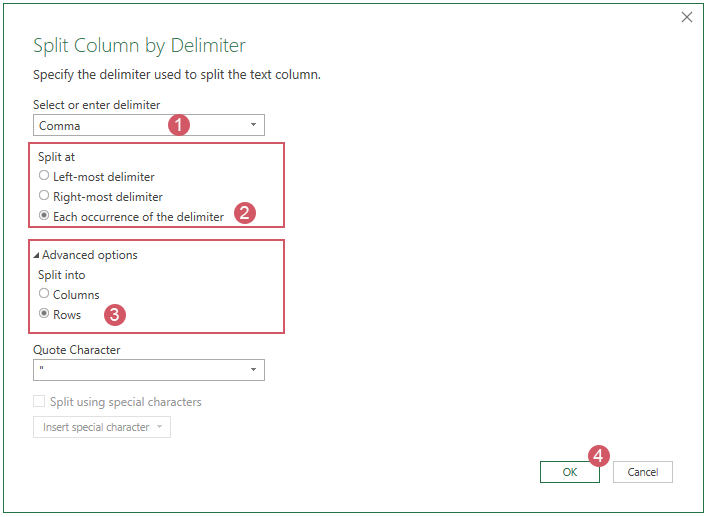
- 1). Выберите разделитель, которым ваши данные отделяются от Выберите или введите разделитель раскрывающийся список;
- 2). Выбрать Каждое появление разделителя из Разделить на раздел;
- 3). Затем нажмите Дополнительные параметры чтобы развернуть раздел, и выберите Ряды под Разделить на;
- 4). Наконец, нажмите OK чтобы закрыть это диалоговое окно.
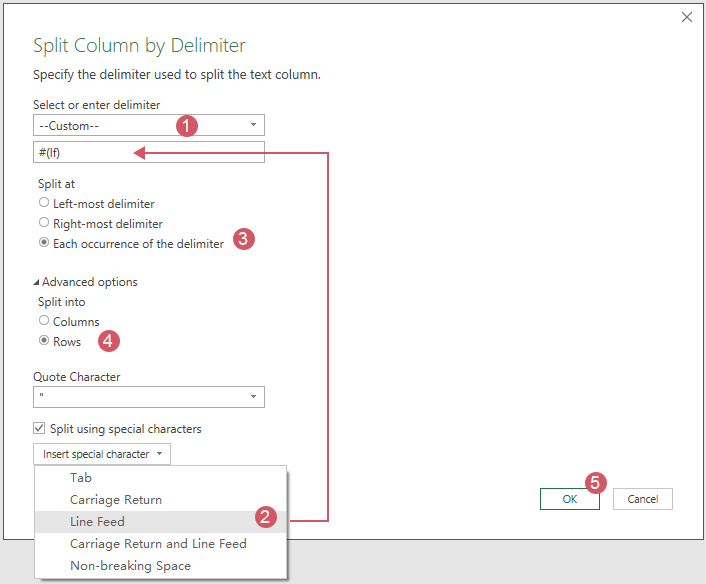
Чтобы разделить текстовые строки на несколько строк с помощью разрыва ссылки, сделайте следующее:
- 1). выберите На заказ из Выберите или введите разделитель раскрывающийся список;
- 2). Из Вставить специальные символы выпадающий, нажмите Перевод строки, и персонажи #(лф) будет вставлен в текстовое поле под На заказ автоматически;
- 3). Выбрать Каждое появление разделителя из секции Сплит ат;
- 4). Затем нажмите Дополнительные параметры чтобы развернуть раздел, и выберите Ряды под Разделить на;
- 5). Наконец, нажмите OK чтобы закрыть это диалоговое окно.
3. Теперь выбранные данные были разделены на несколько строк, как показано ниже:

Шаг 3. Вывод Power Query в таблицу Excel
1. Затем вы должны вывести данные на свой рабочий лист. Пожалуйста, нажмите Главная > Закрыть и загрузить > Закрыть и загрузить / Закрыть и загрузить в, (вот, я нажму Закрыть и загрузить), см. снимок экрана:

Tips: Нажмите Закрыть и загрузить выведет данные на новый рабочий лист; Нажмите Закрыть и загрузить в вариант, данные будут выводиться на любой другой лист, который вам нужен.
2. Наконец, данные будут загружены на новый лист, см. снимок экрана:

Tips: Если вам нужно часто обновлять данные в исходной таблице, не волнуйтесь, вам просто нужно щелкнуть правой кнопкой мыши таблицу результатов и нажать обновление чтобы получить новый результат динамически.
Статьи по теме:
- Разбить значения ячеек на несколько столбцов
- В Excel, когда вы хотите разделить список значений ячеек на несколько столбцов с помощью определенных разделителей, таких как запятая, пробел, точка, новая строка и т. Д., Как правило, встроенная функция «Текст в столбцы» может помочь вам завершить этот шаг задания. шаг за шагом. В этой статье я расскажу о некоторых хороших приемах, которые помогут вам легко и быстро разделить значения ячеек на несколько столбцов или строк.
- Разделить ячейку на несколько строк или столбцов
- Предположим, у вас есть одна ячейка, которая содержит несколько содержимого, разделенное определенным символом, например точкой с запятой, а затем вы хотите разбить эту длинную ячейку на несколько строк или столбцов на основе точки с запятой, в этом случае есть ли у вас какие-либо быстрые способы решить это в Excel?
- Разделить текстовую строку по регистру
- В Excel мы обычно разделяем текст по фиксированной ширине или разделителю с помощью функции «Текст в столбцы», но пробовали ли вы когда-нибудь разделить текст на верхний и нижний регистры? Например, у вас есть список данных, и вам нужно разделить их на два столбца в зависимости от регистра: один столбец содержит строку в нижнем регистре, а другой — строку в верхнем регистре, как показано ниже. Функция Text to Columns не поддерживает эту операцию, однако я могу предложить уловки для быстрого разделения текстовой строки по регистру в Excel.
- Разбить номер на отдельные цифры
- Предположим, вам нужно разбить номер на отдельные цифры, как показано на скриншоте ниже, что вы можете сделать для этого? Эта статья предоставит вам два метода.
Лучшие инструменты для работы в офисе
Kutools for Excel Решит большинство ваших проблем и повысит вашу производительность на 80%
- Снова использовать: Быстро вставить сложные формулы, диаграммы и все, что вы использовали раньше; Зашифровать ячейки с паролем; Создать список рассылки и отправлять электронные письма …
- Бар Супер Формулы (легко редактировать несколько строк текста и формул); Макет для чтения (легко читать и редактировать большое количество ячеек); Вставить в отфильтрованный диапазон…
- Объединить ячейки / строки / столбцы без потери данных; Разделить содержимое ячеек; Объединить повторяющиеся строки / столбцы… Предотвращение дублирования ячеек; Сравнить диапазоны…
- Выберите Дубликат или Уникальный Ряды; Выбрать пустые строки (все ячейки пустые); Супер находка и нечеткая находка во многих рабочих тетрадях; Случайный выбор …
- Точная копия Несколько ячеек без изменения ссылки на формулу; Автоматическое создание ссылок на несколько листов; Вставить пули, Флажки и многое другое …
- Извлечь текст, Добавить текст, Удалить по позиции, Удалить пробел; Создание и печать промежуточных итогов по страницам; Преобразование содержимого ячеек в комментарии…
- Суперфильтр (сохранять и применять схемы фильтров к другим листам); Расширенная сортировка по месяцам / неделям / дням, периодичности и др .; Специальный фильтр жирным, курсивом …
- Комбинируйте книги и рабочие листы; Объединить таблицы на основе ключевых столбцов; Разделить данные на несколько листов; Пакетное преобразование xls, xlsx и PDF…
- Более 300 мощных функций. Поддерживает Office/Excel 2007-2021 и 365. Поддерживает все языки. Простое развертывание на вашем предприятии или в организации. Полнофункциональная 30-дневная бесплатная пробная версия. 60-дневная гарантия возврата денег.
")
Вкладка Office: интерфейс с вкладками в Office и упрощение работы
- Включение редактирования и чтения с вкладками в Word, Excel, PowerPoint, Издатель, доступ, Visio и проект.
- Открывайте и создавайте несколько документов на новых вкладках одного окна, а не в новых окнах.
- Повышает вашу продуктивность на 50% и сокращает количество щелчков мышью на сотни каждый день!
")