
Обращение к ячейке на листе Excel из кода VBA по адресу, индексу и имени. Чтение информации из ячейки. Очистка значения ячейки. Метод ClearContents объекта Range.
Обращение к ячейке по адресу
Допустим, у нас есть два открытых файла: «Книга1» и «Книга2», причем, файл «Книга1» активен и в нем находится исполняемый код VBA.
В общем случае при обращении к ячейке неактивной рабочей книги «Книга2» из кода файла «Книга1» прописывается полный путь:
|
Workbooks(«Книга2.xlsm»).Sheets(«Лист2»).Range(«C5») Workbooks(«Книга2.xlsm»).Sheets(«Лист2»).Cells(5, 3) Workbooks(«Книга2.xlsm»).Sheets(«Лист2»).Cells(5, «C») Workbooks(«Книга2.xlsm»).Sheets(«Лист2»).[C5] |
Удобнее обращаться к ячейке через свойство рабочего листа Cells(номер строки, номер столбца), так как вместо номеров строк и столбцов можно использовать переменные. Обратите внимание, что при обращении к любой рабочей книге, она должна быть открыта, иначе произойдет ошибка. Закрытую книгу перед обращением к ней необходимо открыть.
Теперь предположим, что у нас в активной книге «Книга1» активны «Лист1» и ячейка на нем «A1». Тогда обращение к ячейке «A1» можно записать следующим образом:
|
ActiveCell Range(«A1») Cells(1, 1) Cells(1, «A») [A1] |
Точно также можно обращаться и к другим ячейкам активного рабочего листа, кроме обращения ActiveCell, так как активной может быть только одна ячейка, в нашем примере – это ячейка «A1».
Если мы обращаемся к ячейке на неактивном листе активной рабочей книги, тогда необходимо указать этот лист:
|
‘по основному имени листа Лист2.Cells(2, 7) ‘по имени ярлыка Sheets(«Имя ярлыка»).Cells(3, 8) |
Имя ярлыка может совпадать с основным именем листа. Увидеть эти имена можно в окне редактора VBA в проводнике проекта. Без скобок отображается основное имя листа, в скобках – имя ярлыка.
Обращение к ячейке по индексу
К ячейке на рабочем листе можно обращаться по ее индексу (порядковому номеру), который считается по расположению ячейки на листе слева-направо и сверху-вниз.
Например, индекс ячеек в первой строке равен номеру столбца. Индекс ячеек во второй строке равен количеству ячеек в первой строке (которое равно общему количеству столбцов на листе, зависящему от версии Excel) плюс номер столбца. Индекс ячеек в третьей строке равен количеству ячеек в двух первых строках плюс номер столбца. И так далее.
Для примера, Cells(4) та же ячейка, что и Cells(1, 4). Используется такое обозначение редко, тем более, что у разных версий Excel может быть разным количество столбцов и строк на рабочем листе.
По индексу можно обращаться к ячейке не только на всем рабочем листе, но и в отдельном диапазоне. Нумерация ячеек осуществляется в пределах заданного диапазона по тому же правилу: слева-направо и сверху-вниз. Вот индексы ячеек диапазона Range(«A1:C3»):

Обращение к ячейке Range("A1:C3").Cells(5) соответствует выражению Range("B2").
Обращение к ячейке по имени
Если ячейке на рабочем листе Excel присвоено имя (Формулы –> Присвоить имя), то обращаться к ней можно по присвоенному имени.
Допустим одной из ячеек присвоено имя – «Итого», тогда обратиться к ней можно – Range("Итого").
Запись информации в ячейку
Содержание ячейки определяется ее свойством «Value», которое в VBA Excel является свойством по умолчанию и его можно явно не указывать. Записывается информация в ячейку при помощи оператора присваивания «=»:
|
Cells(2, 4).Value = 15 Cells(2, 4) = 15 Range(«A1») = «Этот текст записываем в ячейку» ActiveCell = 28 + 10*36 |
Вместе с числами и текстом можно использовать переменные. Примеры здесь и ниже приведены для активного листа. Для неактивных листов дополнительно необходимо указывать имя листа, как в разделе «Обращение к ячейке».
Чтение информации из ячейки
Считать информацию из ячейки в переменную можно также при помощи оператора присваивания «=»:
|
Sub Test() Dim a1 As Integer, a2 As Integer, a3 As Integer Range(«A3») = 6 Cells(2, 5) = 15 a1 = Range(«A3») a2 = Cells(2, 5) a3 = a1 * a2 MsgBox a3 End Sub |
Точно также можно обмениваться информацией между ячейками:
|
Cells(2, 2) = Range(«A4») |
Очистка значения ячейки
Очищается ячейка от значения с помощью метода ClearContents. Кроме того, можно присвоить ячейке значение нуля. пустой строки или Empty:
|
Cells(10, 2).ClearContents Range(«D23») = 0 ActiveCell = «» Cells(5, «D») = Empty |
Содержание
- Чтение и запись значения ячейки в VBA
- Обращение к конкретной ячейке
- Чтение значения из ячейки
- Запись значения в ячейку
- Range.Address property (Excel)
- Syntax
- Parameters
- Remarks
- Example
- Support and feedback
- VBA Excel. Ячейки (обращение, запись, чтение, очистка)
- Обращение к ячейке по адресу
- Обращение к ячейке по индексу
- Обращение к ячейке по имени
- Запись информации в ячейку
Чтение и запись значения ячейки в VBA
В приложении Excel все данные как правило находятся в ячейках на листах, с которыми макросы работают как с базой данных. Поэтому, начинающему программисту VBA важно понимать как читать значения из ячейки Excel в переменные или массивы и, наоборот, записывать какие-либо значения на лист в ячейки.
Обращение к конкретной ячейке
Прежде чем читать или записывать значение в ячейке, нужно определиться с тем, как можно указать какая именно ячейка нам необходима.
Полный путь к ячейке A1 в Книге1 на Листе1 можно записать двумя вариантами:
- С помощью Range
- С помощью Cells
Пример 1: Обратиться к ячейке A3 находящейся в Книге1 на Листе1
Однако, как правило, полный путь редко используется, т.к. макрос работает с Книгой, в которой он записан и часто на активном листе. Поэтому путь к ячейке можно сократить и написать просто:
Пример 2: Обратиться к ячейке A1 в текущей книге на активном листе
Если всё же путь к книге или листу необходим, но не хочется его писать при каждом обращении к ячейкам, можно использовать конструкцию With End With. При этом, обращаясь к ячейкам, необходимо использовать в начале «.» (точку).
Пример 3: Обратиться к ячейке A1 и B1 в Книге1 на Листе2.
Так же, можно обратиться и к активной (выбранной в данный момент времени) ячейке.
Пример 4: Обратиться к активной ячейке на Листе3 текущей книги.
Чтение значения из ячейки
Есть 3 способа получения значения ячейки, каждый из которых имеет свои особенности:
- Value2 — базовое значение ячейки, т.е. как оно хранится в самом Excel-е. В связи с чем, например, дата будет прочтена как число от 1 до 2958466, а время будет прочитано как дробное число. Value2 — самый быстрый способ чтения значения, т.к. не происходит никаких преобразований.
- Value — значение ячейки, приведенное к типу ячейки. Если ячейка хранит дату, будет приведено к типу Date. Если ячейка отформатирована как валюта, будет преобразована к типу Currency (в связи с чем, знаки с 5-го и далее будут усечены).
- Text — визуальное отображение значения ячейки. Например, если ячейка, содержит дату в виде «число месяц прописью год», то Text (в отличие от Value и Value2) именно в таком виде и вернет значение. Использовать Text нужно осторожно, т.к., если, например, значение не входит в ячейку и отображается в виде «#####» то Text вернет вам не само значение, а эти самые «решетки».
По-умолчанию, если при обращении к ячейке не указывать способ чтения значения, то используется способ Value.
Пример 5: В ячейке A1 активного листа находится дата 01.03.2018. Для ячейки выбран формат «14 марта 2001 г.». Необходимо прочитать значение ячейки всеми перечисленными выше способами и отобразить в диалоговом окне.
Пример 6: В ячейке С1 активного листа находится значение 123,456789. Для ячейки выбран формат «Денежный» с 3 десятичными знаками. Необходимо прочитать значение ячейки всеми перечисленными выше способами и отобразить в диалоговом окне.
При присвоении значения переменной или элементу массива, необходимо учитывать тип переменной. Например, если оператором Dim задан тип Integer, а в ячейке находится текст, при выполнении произойдет ошибка «Type mismatch». Как определить тип значения в ячейке, рассказано в следующей статье.
Пример 7: В ячейке B1 активного листа находится текст. Прочитать значение ячейки в переменную.
Таким образом, разница между Text, Value и Value2 в способе получения значения. Очевидно, что Value2 наиболее предпочтителен, но при преобразовании даты в текст (например, чтобы показать значение пользователю), нужно использовать функцию Format.
Запись значения в ячейку
Осуществить запись значения в ячейку можно 2 способами: с помощью Value и Value2. Использование Text для записи значения не возможно, т.к. это свойство только для чтения.
Пример 8: Записать в ячейку A1 активного листа значение 123,45
Все три строки запишут в A1 одно и то же значение.
Пример 9: Записать в ячейку A2 активного листа дату 1 марта 2018 года
В данном примере тоже запишется одно и то же значение в ячейку A2 активного листа.
Визуальное отображение значения на экране будет зависеть от того, какой формат ячейки выбран на листе.
Источник
Range.Address property (Excel)
Returns a String value that represents the range reference in the language of the macro.
Syntax
expression.Address (RowAbsolute, ColumnAbsolute, ReferenceStyle, External, RelativeTo)
expression A variable that represents a Range object.
Parameters
| Name | Required/Optional | Data type | Description |
|---|---|---|---|
| RowAbsolute | Optional | Variant | True to return the row part of the reference as an absolute reference. The default value is True. |
| ColumnAbsolute | Optional | Variant | True to return the column part of the reference as an absolute reference. The default value is True. |
| ReferenceStyle | Optional | XlReferenceStyle | The reference style. The default value is xlA1. |
| External | Optional | Variant | True to return an external reference. False to return a local reference. The default value is False. |
| RelativeTo | Optional | Variant | If RowAbsolute and ColumnAbsolute are False, and ReferenceStyle is xlR1C1, you must include a starting point for the relative reference. This argument is a Range object that defines the starting point. |
NOTE: Testing with Excel VBA 7.1 shows that an explicit starting point is not mandatory. There appears to be a default reference of $A$1.
If the reference contains more than one cell, RowAbsolute and ColumnAbsolute apply to all rows and columns.
Example
The following example displays four different representations of the same cell address on Sheet1. The comments in the example are the addresses that will be displayed in the message boxes.
Support and feedback
Have questions or feedback about Office VBA or this documentation? Please see Office VBA support and feedback for guidance about the ways you can receive support and provide feedback.
Источник
VBA Excel. Ячейки (обращение, запись, чтение, очистка)
Обращение к ячейке на листе Excel из кода VBA по адресу, индексу и имени. Чтение информации из ячейки. Очистка значения ячейки. Метод ClearContents объекта Range.
Обращение к ячейке по адресу
Допустим, у нас есть два открытых файла: «Книга1» и «Книга2», причем, файл «Книга1» активен и в нем находится исполняемый код VBA.
В общем случае при обращении к ячейке неактивной рабочей книги «Книга2» из кода файла «Книга1» прописывается полный путь:
Удобнее обращаться к ячейке через свойство рабочего листа Cells(номер строки, номер столбца), так как вместо номеров строк и столбцов можно использовать переменные. Обратите внимание, что при обращении к любой рабочей книге, она должна быть открыта, иначе произойдет ошибка. Закрытую книгу перед обращением к ней необходимо открыть.
Теперь предположим, что у нас в активной книге «Книга1» активны «Лист1» и ячейка на нем «A1». Тогда обращение к ячейке «A1» можно записать следующим образом:
Точно также можно обращаться и к другим ячейкам активного рабочего листа, кроме обращения ActiveCell, так как активной может быть только одна ячейка, в нашем примере – это ячейка «A1».
Если мы обращаемся к ячейке на неактивном листе активной рабочей книги, тогда необходимо указать этот лист:
Имя ярлыка может совпадать с основным именем листа. Увидеть эти имена можно в окне редактора VBA в проводнике проекта. Без скобок отображается основное имя листа, в скобках – имя ярлыка.
Обращение к ячейке по индексу
К ячейке на рабочем листе можно обращаться по ее индексу (порядковому номеру), который считается по расположению ячейки на листе слева-направо и сверху-вниз.
Например, индекс ячеек в первой строке равен номеру столбца. Индекс ячеек во второй строке равен количеству ячеек в первой строке (которое равно общему количеству столбцов на листе, зависящему от версии Excel) плюс номер столбца. Индекс ячеек в третьей строке равен количеству ячеек в двух первых строках плюс номер столбца. И так далее.
Для примера, Cells(4) та же ячейка, что и Cells(1, 4). Используется такое обозначение редко, тем более, что у разных версий Excel может быть разным количество столбцов и строк на рабочем листе.
По индексу можно обращаться к ячейке не только на всем рабочем листе, но и в отдельном диапазоне. Нумерация ячеек осуществляется в пределах заданного диапазона по тому же правилу: слева-направо и сверху-вниз. Вот индексы ячеек диапазона Range(«A1:C3»):
Обращение к ячейке Range(«A1:C3»).Cells(5) соответствует выражению Range(«B2») .
Обращение к ячейке по имени
Если ячейке на рабочем листе Excel присвоено имя (Формулы –> Присвоить имя), то обращаться к ней можно по присвоенному имени.
Допустим одной из ячеек присвоено имя – «Итого», тогда обратиться к ней можно – Range(«Итого») .
Запись информации в ячейку
Содержание ячейки определяется ее свойством «Value», которое в VBA Excel является свойством по умолчанию и его можно явно не указывать. Записывается информация в ячейку при помощи оператора присваивания «=»:
Источник
В приложении Excel все данные как правило находятся в ячейках на листах, с которыми макросы работают как с базой данных. Поэтому, начинающему программисту VBA важно понимать как читать значения из ячейки Excel в переменные или массивы и, наоборот, записывать какие-либо значения на лист в ячейки.
Обращение к конкретной ячейке
Прежде чем читать или записывать значение в ячейке, нужно определиться с тем, как можно указать какая именно ячейка нам необходима.
Полный путь к ячейке A1 в Книге1 на Листе1 можно записать двумя вариантами:
- С помощью Range
- С помощью Cells
Пример 1: Обратиться к ячейке A3 находящейся в Книге1 на Листе1
Workbooks("Книга1.xls").Sheets("Лист1").Range("A3") ' Обратиться к ячейке A3
Workbooks("Книга1.xls").Sheets("Лист1").Cells(3, 1) ' Обратиться к ячейке в 3-й строке и 1-й колонке (A3)
Однако, как правило, полный путь редко используется, т.к. макрос работает с Книгой, в которой он записан и часто на активном листе. Поэтому путь к ячейке можно сократить и написать просто:
Пример 2: Обратиться к ячейке A1 в текущей книге на активном листе
Range("A1")
Cells(1, 1)
Если всё же путь к книге или листу необходим, но не хочется его писать при каждом обращении к ячейкам, можно использовать конструкцию With End With. При этом, обращаясь к ячейкам, необходимо использовать в начале «.» (точку).
Пример 3: Обратиться к ячейке A1 и B1 в Книге1 на Листе2.
With Workbooks("Книга1").Sheets("Лист2")
  ' Вывести значение ячейки A1, которая находится на Листе2
  MsgBox .Range("A1")
  ' Вывести значение ячейки B1, которая находится на Листе2
  MsgBox .Range("B1")
End With
Так же, можно обратиться и к активной (выбранной в данный момент времени) ячейке.
Пример 4: Обратиться к активной ячейке на Листе3 текущей книги.
Application.ActiveCell ' полная запись
ActiveCell ' краткая запись
Чтение значения из ячейки
Есть 3 способа получения значения ячейки, каждый из которых имеет свои особенности:
- Value2 — базовое значение ячейки, т.е. как оно хранится в самом Excel-е. В связи с чем, например, дата будет прочтена как число от 1 до 2958466, а время будет прочитано как дробное число. Value2 — самый быстрый способ чтения значения, т.к. не происходит никаких преобразований.
- Value — значение ячейки, приведенное к типу ячейки. Если ячейка хранит дату, будет приведено к типу Date. Если ячейка отформатирована как валюта, будет преобразована к типу Currency (в связи с чем, знаки с 5-го и далее будут усечены).
- Text — визуальное отображение значения ячейки. Например, если ячейка, содержит дату в виде «число месяц прописью год», то Text (в отличие от Value и Value2) именно в таком виде и вернет значение. Использовать Text нужно осторожно, т.к., если, например, значение не входит в ячейку и отображается в виде «#####» то Text вернет вам не само значение, а эти самые «решетки».
По-умолчанию, если при обращении к ячейке не указывать способ чтения значения, то используется способ Value.
Пример 5: В ячейке A1 активного листа находится дата 01.03.2018. Для ячейки выбран формат «14 марта 2001 г.». Необходимо прочитать значение ячейки всеми перечисленными выше способами и отобразить в диалоговом окне.
MsgBox Cells(1, 1)        ' выведет 01.03.2018
MsgBox Cells(1, 1).Value  ' выведет 01.03.2018
MsgBox Cells(1, 1).Value2 ' выведет 43160
MsgBox Cells(1, 1).Text   ' выведет 01 марта 2018 г.

Dim d As Date
d = Cells(1, 1).Value2    ' числовое представление даты преобразуется в тип Date
MsgBox d                  ' выведет 01.03.2018
Пример 6: В ячейке С1 активного листа находится значение 123,456789. Для ячейки выбран формат «Денежный» с 3 десятичными знаками. Необходимо прочитать значение ячейки всеми перечисленными выше способами и отобразить в диалоговом окне.
MsgBox Range("C1")        ' выведет 123,4568
MsgBox Range("C1").Value  ' выведет 123,4568
MsgBox Range("C1").Value2 ' выведет 123,456789
MsgBox Range("C1").Text   ' выведет 123,457р.

Dim c As Currency
c = Range("C1").Value2    ' значение преобразуется в тип Currency
MsgBox c                  ' выведет 123,4568

Dim d As Double
d = Range("C1").Value2    ' значение преобразуется в тип Double
MsgBox d                  ' выведет 123,456789
При присвоении значения переменной или элементу массива, необходимо учитывать тип переменной. Например, если оператором Dim задан тип Integer, а в ячейке находится текст, при выполнении произойдет ошибка «Type mismatch». Как определить тип значения в ячейке, рассказано в следующей статье.
Пример 7: В ячейке B1 активного листа находится текст. Прочитать значение ячейки в переменную.
Dim s As String
Dim i As Integer
s = Range("B1").Value2 ' успех
i = Range("B1").Value2 ' ошибка
Таким образом, разница между Text, Value и Value2 в способе получения значения. Очевидно, что Value2 наиболее предпочтителен, но при преобразовании даты в текст (например, чтобы показать значение пользователю), нужно использовать функцию Format.
Запись значения в ячейку
Осуществить запись значения в ячейку можно 2 способами: с помощью Value и Value2. Использование Text для записи значения не возможно, т.к. это свойство только для чтения.
Пример 8: Записать в ячейку A1 активного листа значение 123,45
Range("A1") = 123.45
Range("A1").Value = 123.45
Range("A1").Value2 = 123.45
Все три строки запишут в A1 одно и то же значение.
Пример 9: Записать в ячейку A2 активного листа дату 1 марта 2018 года
Cells(2, 1) = #3/1/2018#
Cells(2, 1).Value = #3/1/2018#
Cells(2, 1).Value2 = #3/1/2018#
В данном примере тоже запишется одно и то же значение в ячейку A2 активного листа.
Визуальное отображение значения на экране будет зависеть от того, какой формат ячейки выбран на листе.
In this guide, we’re going to show you how to refer a range or a cell in Excel VBA.
VBA Basics
Before diving into the code, let’s start with a cell or a range means in VBA. First, VBA is an object-based programming language, which means that the language refers each element as objects. Objects have properties that define them, and they can encapsulate other objects, or codes. Thus, a single cell, a range of cells, a worksheet, or Excel software as a whole is an object for VBA. You can think this as a hierarchical model.
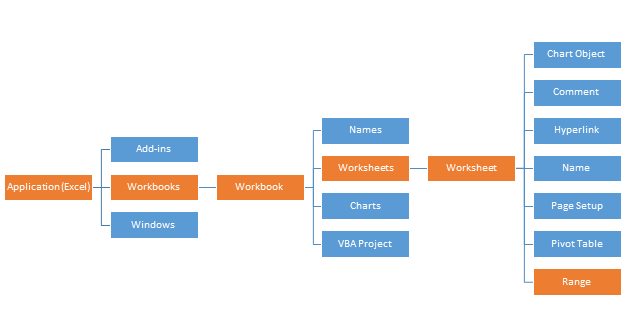
The image illustrates only a small portion of Excel objects in VBA. An Excel instance contains a Workbooks collection. A collection is a group of related objects. For example, if you open two workbooks, the Workbooks collection has two Workbook object. Each Workbook object has its own worksheets under a Worksheets collection. This structure applies to all.
VBA envelops all cell and cell-based references in an object called Range. In theory, when a particular object is referenced, you also need to specify its parents. In VBA syntax, a dot (.) operator is used to move through object hierarchy. For example, to access the Range object, the code should be:
Application.Workbooks.Worksheets.Range
However, this reference is ambiguous when it comes to specify which Excel workbook or worksheet you are referring to. In order to do this, you must supply the name or the index number (starting with 1) of the particular object you are referring. This approach is like in Excel formulas — the argument is given in parentheses. For example to refer the range object in the worksheet “Sheet1” of the workbook “Book1.xlsm”:
Application.Workbooks("Book1.xlsm").Worksheets("Sheet1").Range
or
Application.Workbooks(1).Worksheets(1).Range
You do not have to specify all parents for Range object every time. If your intention is to work on the active sheet of the active workbook, you can simply use Range.
Range Object
The Range object allows you to refer a cell or cells just like in any Excel formula. For example,
Range("A1") 'Refers the cell A1
Range("A2:D11") 'Refers the range of cells between A2:D11
Range("A3,B4:E6,F12") 'Refers all cells in the cells A3, F12 and the range B4:E6
Range("2:2") 'Entire 2nd row
Range("E:E") 'Entire column E
Range("Input") 'Named range "Input"
Using square brackets to refer a range or a cell
You can use square brackets ([]) instead of the “Range” keyword and double quotes (“). This approach as essentially a shortcut, and the outcome is the same.
[A1] 'Refers the cell A1
[A2:D11] 'Refers the range of cells between A2:D11
[A3,B4:E6,F12] 'Refers all cells in the cells A3, F12 and the range B4:E6
[2:2] 'Entire 2nd row
[E:E] 'Entire column E
[Input] 'Named range "Input"
Cells property to refer a range or a cell
Cells is the name of a property of both Worksheet and Range objects. It is neither a collection nor an object. Thus, there are no objects named Cell.
In other words, the Cells property returns a Range object as well. Each Cells property in Worksheet and Range objects work in its parent’s context only. This behavior might make more sense within examples.
Syntax
The Cells property can be used in two ways:
With row and column index numbers:
Cells(row number,column number)
With index number of the cell:
Cells(cell number) ‘refers the 23rd cell in the range
Examples
Worksheet.Cells
Cells property of a Worksheet object returns the cell in a specific location in the worksheet.
With row and column index numbers:
Cells(3,2) 'refers the cell at third row and second column in the active sheet (B3)

With index number of the cell:
Cells(5) 'refers the 5th cell in the range (E1)
The numbering of cells starts from 1, and increases from left to right and from top to bottom. This means that A1 is the first cell.
Range.Cells
On the other hand, the Cells property of a Range object returns the cell in specified location in the range.
With row and column index numbers:
Range("C4:F9").Cells(3,2) 'refers the cell at third row and second column in the active range (D6)

With index number of the cell:
Range("C4:F9").Cells(5) ‘refers the 5th cell in the range (C5)

Active objects to refer a range or a cell
There are keywords in VBA to reference active(selected) objects when the code is running.
ActiveCell 'Refers the selected cell
Selection 'Refers any selected object. This can be cells or a chart
ActiveSheet 'Refers the active worksheet
ActiveWorkbook 'Refers the active worksheet
In this Article
- Ranges and Cells in VBA
- Cell Address
- Range of Cells
- Writing to Cells
- Reading from Cells
- Non Contiguous Cells
- Intersection of Cells
- Offset from a Cell or Range
- Setting Reference to a Range
- Resize a Range
- OFFSET vs Resize
- All Cells in Sheet
- UsedRange
- CurrentRegion
- Range Properties
- Last Cell in Sheet
- Last Used Row Number in a Column
- Last Used Column Number in a Row
- Cell Properties
- Copy and Paste
- AutoFit Contents
- More Range Examples
- For Each
- Sort
- Find
- Range Address
- Range to Array
- Array to Range
- Sum Range
- Count Range
Ranges and Cells in VBA
Excel spreadsheets store data in Cells. Cells are arranged into Rows and Columns. Each cell can be identified by the intersection point of it’s row and column (Exs. B3 or R3C2).
An Excel Range refers to one or more cells (ex. A3:B4)
Cell Address
A1 Notation
In A1 notation, a cell is referred to by it’s column letter (from A to XFD) followed by it’s row number(from 1 to 1,048,576). This is called a cell address.
In VBA you can refer to any cell using the Range Object.
' Refer to cell B4 on the currently active sheet
MsgBox Range("B4")

' Refer to cell B4 on the sheet named 'Data'
MsgBox Worksheets("Data").Range("B4")

' Refer to cell B4 on the sheet named 'Data' in another OPEN workbook
' named 'My Data'
MsgBox Workbooks("My Data").Worksheets("Data").Range("B4")
R1C1 Notation
In R1C1 Notation a cell is referred by R followed by Row Number then letter ‘C’ followed by the Column Number. eg B4 in R1C1 notation will be referred by R4C2. In VBA you use the Cells Object to use R1C1 notation:
' Refer to cell R[6]C[4] i.e D6
Cells(6, 4) = "D6"
Range of Cells
A1 Notation
To refer to a more than one cell use a “:” between the starting cell address and last cell address. The following will refer to all the cells from A1 to D10:
Range("A1:D10")
R1C1 Notation
To refer to a more than one cell use a “,” between the starting cell address and last cell address. The following will refer to all the cells from A1 to D10:
Range(Cells(1, 1), Cells(10, 4))Writing to Cells
To write values to a cell or contiguous group of cells, simple refer to the range, put an = sign and then write the value to be stored:
' Store F5 in cell with Address F6
Range("F6") = "F6"

' Store E6 in cell with Address R[6]C[5] i.e E6
Cells(6, 5) = "E6"

' Store A1:D10 in the range A1:D10
Range("A1:D10") = "A1:D10"
' or
Range(Cells(1, 1), Cells(10, 4)) = "A1:D10"
Reading from Cells
To read values from cells, simple refer to the variable to store the values, put an = sign and then refer to the range to be read:
Dim val1
Dim val2

' Read from cell F6
val1 = Range("F6")

' Read from cell E6
val2 = Cells(6, 5)

MsgBox val1
Msgbox val2
Note: To store values from a range of cells, you need to use an Array instead of a simple variable.
Non Contiguous Cells
To refer to non contiguous cells use a comma between the cell addresses:
' Store 10 in cells A1, A3, and A5
Range("A1,A3,A5") = 10


' Store 10 in cells A1:A3 and D1:D3)
Range("A1:A3, D1:D3") = 10
VBA Coding Made Easy
Stop searching for VBA code online. Learn more about AutoMacro — A VBA Code Builder that allows beginners to code procedures from scratch with minimal coding knowledge and with many time-saving features for all users!

Learn More
Intersection of Cells
To refer to non contiguous cells use a space between the cell addresses:
' Store 'Col D' in D1:D10
' which is Common between A1:D10 and D1:F10
Range("A1:D10 D1:G10") = "Col D"
Offset from a Cell or Range
Using the Offset function, you can move the reference from a given Range (cell or group of cells) by the specified number_of_rows, and number_of_columns.
Offset Syntax
Range.Offset(number_of_rows, number_of_columns)
Offset from a cell
' OFFSET from a cell A1
' Refer to cell itself
' Move 0 rows and 0 columns
Range("A1").Offset(0, 0) = "A1"

' Move 1 rows and 0 columns
Range("A1").Offset(1, 0) = "A2"

' Move 0 rows and 1 columns
Range("A1").Offset(0, 1) = "B1"

' Move 1 rows and 1 columns
Range("A1").Offset(1, 1) = "B2"

' Move 10 rows and 5 columns
Range("A1").Offset(10, 5) = "F11"
Offset from a Range
' Move Reference to Range A1:D4 by 4 rows and 4 columns
' New Reference is E5:H8
Range("A1:D4").Offset(4,4) = "E5:H8"
Setting Reference to a Range
To assign a range to a range variable: declare a variable of type Range then use the Set command to set it to a range. Please note that you must use the SET command as RANGE is an object:
' Declare a Range variable
Dim myRange as Range

' Set the variable to the range A1:D4
Set myRange = Range("A1:D4")

' Prints $A$1:$D$4
MsgBox myRange.Address
VBA Programming | Code Generator does work for you!
Resize a Range
Resize method of Range object changes the dimension of the reference range:
Dim myRange As Range

' Range to Resize
Set myRange = Range("A1:F4")

' Prints $A$1:$E$10
Debug.Print myRange.Resize(10, 5).Address
Top-left cell of the Resized range is same as the top-left cell of the original range
Resize Syntax
Range.Resize(number_of_rows, number_of_columns)
OFFSET vs Resize
Offset does not change the dimensions of the range but moves it by the specified number of rows and columns. Resize does not change the position of the original range but changes the dimensions to the specified number of rows and columns.
All Cells in Sheet
The Cells object refers to all the cells in the sheet (1048576 rows and 16384 columns).
' Clear All Cells in Worksheets
Cells.Clear
UsedRange
UsedRange property gives you the rectangular range from the top-left cell used cell to the right-bottom used cell of the active sheet.
Dim ws As Worksheet
Set ws = ActiveSheet

' $B$2:$L$14 if L2 is the first cell with any value
' and L14 is the last cell with any value on the
' active sheet
Debug.Print ws.UsedRange.Address
CurrentRegion
CurrentRegion property gives you the contiguous rectangular range from the top-left cell to the right-bottom used cell containing the referenced cell/range.
Dim myRange As Range

Set myRange = Range("D4:F6")

' Prints $B$2:$L$14
' If there is a filled path from D4:F16 to B2 AND L14
Debug.Print myRange.CurrentRegion.Address

' You can refer to a single starting cell also

Set myRange = Range("D4") ' Prints $B$2:$L$14
AutoMacro | Ultimate VBA Add-in | Click for Free Trial!
Range Properties
You can get Address, row/column number of a cell, and number of rows/columns in a range as given below:
Dim myRange As Range

Set myRange = Range("A1:F10")

' Prints $A$1:$F$10
Debug.Print myRange.Address

Set myRange = Range("F10")

' Prints 10 for Row 10
Debug.Print myRange.Row

' Prints 6 for Column F
Debug.Print myRange.Column

Set myRange = Range("E1:F5")
' Prints 5 for number of Rows in range
Debug.Print myRange.Rows.Count

' Prints 2 for number of Columns in range
Debug.Print myRange.Columns.Count
Last Cell in Sheet
You can use Rows.Count and Columns.Count properties with Cells object to get the last cell on the sheet:
' Print the last row number
' Prints 1048576
Debug.Print "Rows in the sheet: " & Rows.Count

' Print the last column number
' Prints 16384
Debug.Print "Columns in the sheet: " & Columns.Count

' Print the address of the last cell
' Prints $XFD$1048576
Debug.Print "Address of Last Cell in the sheet: " & Cells(Rows.Count, Columns.Count)
Last Used Row Number in a Column
END property takes you the last cell in the range, and End(xlUp) takes you up to the first used cell from that cell.
Dim lastRow As Long

lastRow = Cells(Rows.Count, "A").End(xlUp).Row
Last Used Column Number in a Row
Dim lastCol As Long

lastCol = Cells(1, Columns.Count).End(xlToLeft).Column
END property takes you the last cell in the range, and End(xlToLeft) takes you left to the first used cell from that cell.
You can also use xlDown and xlToRight properties to navigate to the first bottom or right used cells of the current cell.
AutoMacro | Ultimate VBA Add-in | Click for Free Trial!
Cell Properties
Common Properties
Here is code to display commonly used Cell Properties
Dim cell As Range
Set cell = Range("A1")

cell.Activate
Debug.Print cell.Address
' Print $A$1

Debug.Print cell.Value
' Prints 456
' Address

Debug.Print cell.Formula
' Prints =SUM(C2:C3)

' Comment
Debug.Print cell.Comment.Text

' Style
Debug.Print cell.Style

' Cell Format
Debug.Print cell.DisplayFormat.NumberFormat
Cell Font
Cell.Font object contains properties of the Cell Font:
Dim cell As Range

Set cell = Range("A1")

' Regular, Italic, Bold, and Bold Italic
cell.Font.FontStyle = "Bold Italic"
' Same as
cell.Font.Bold = True
cell.Font.Italic = True

' Set font to Courier
cell.Font.FontStyle = "Courier"

' Set Font Color
cell.Font.Color = vbBlue
' or
cell.Font.Color = RGB(255, 0, 0)

' Set Font Size
cell.Font.Size = 20
Copy and Paste
Paste All
Ranges/Cells can be copied and pasted from one location to another. The following code copies all the properties of source range to destination range (equivalent to CTRL-C and CTRL-V)
'Simple Copy
Range("A1:D20").Copy
Worksheets("Sheet2").Range("B10").Paste

'or
' Copy from Current Sheet to sheet named 'Sheet2'
Range("A1:D20").Copy destination:=Worksheets("Sheet2").Range("B10")
Paste Special
Selected properties of the source range can be copied to the destination by using PASTESPECIAL option:
' Paste the range as Values only
Range("A1:D20").Copy
Worksheets("Sheet2").Range("B10").PasteSpecial Paste:=xlPasteValues
Here are the possible options for the Paste option:
' Paste Special Types
xlPasteAll
xlPasteAllExceptBorders
xlPasteAllMergingConditionalFormats
xlPasteAllUsingSourceTheme
xlPasteColumnWidths
xlPasteComments
xlPasteFormats
xlPasteFormulas
xlPasteFormulasAndNumberFormats
xlPasteValidation
xlPasteValues
xlPasteValuesAndNumberFormats
AutoFit Contents
Size of rows and columns can be changed to fit the contents using AutoFit:
' Change size of rows 1 to 5 to fit contents
Rows("1:5").AutoFit

' Change size of Columns A to B to fit contents
Columns("A:B").AutoFit
More Range Examples
It is recommended that you use Macro Recorder while performing the required action through the GUI. It will help you understand the various options available and how to use them.
AutoMacro | Ultimate VBA Add-in | Click for Free Trial!
For Each
It is easy to loop through a range using For Each construct as show below:
For Each cell In Range("A1:B100")
    ' Do something with the cell
Next cell
At each iteration of the loop one cell in the range is assigned to the variable cell and statements in the For loop are executed for that cell. Loop exits when all the cells are processed.
Sort
Sort is a method of Range object. You can sort a range by specifying options for sorting to Range.Sort. The code below will sort the columns A:C based on key in cell C2. Sort Order can be xlAscending or xlDescending. Header:= xlYes should be used if first row is the header row.
   Columns("A:C").Sort key1:=Range("C2"), _
      order1:=xlAscending, Header:=xlYes
Find
Find is also a method of Range Object. It find the first cell having content matching the search criteria and returns the cell as a Range object. It return Nothing if there is no match.
Use FindNext method (or FindPrevious) to find next(previous) occurrence.
Following code will change the font to “Arial Black” for all cells in the range which start with “John”:
For Each c In Range("A1:A100")
    If c Like "John*" Then
        c.Font.Name = "Arial Black"
    End If
Next c
Following code will replace all occurrences of “To Test” to “Passed” in the range specified:
With Range("a1:a500")
    Set c = .Find("To Test", LookIn:=xlValues)
    If Not c Is Nothing Then
        firstaddress = c.Address
        Do
            c.Value = "Passed"
            Set c = .FindNext(c)
        Loop While Not c Is Nothing And c.Address <> firstaddress
    End If
End With
It is important to note that you must specify a range to use FindNext. Also you must provide a stopping condition otherwise the loop will execute forever. Normally address of the first cell which is found is stored in a variable and loop is stopped when you reach that cell again. You must also check for the case when nothing is found to stop the loop.
Range Address
Use Range.Address to get the address in A1 Style
MsgBox Range("A1:D10").Address
' or
Debug.Print Range("A1:D10").Address
Use xlReferenceStyle (default is xlA1) to get addres in R1C1 style
MsgBox Range("A1:D10").Address(ReferenceStyle:=xlR1C1)
' or
Debug.Print Range("A1:D10").Address(ReferenceStyle:=xlR1C1)
This is useful when you deal with ranges stored in variables and want to process for certain addresses only.
AutoMacro | Ultimate VBA Add-in | Click for Free Trial!
Range to Array
It is faster and easier to transfer a range to an array and then process the values. You should declare the array as Variant to avoid calculating the size required to populate the range in the array. Array’s dimensions are set to match number of values in the range.
Dim DirArray As Variant
' Store the values in the range to the Array

DirArray = Range("a1:a5").Value

' Loop to process the values
For Each c In DirArray
    Debug.Print c
Next
Array to Range
After processing you can write the Array back to a Range. To write the Array in the example above to a Range you must specify a Range whose size matches the number of elements in the Array.
Use the code below to write the Array to the range D1:D5:
Range("D1:D5").Value = DirArray

Range("D1:H1").Value = Application.Transpose(DirArray)
Please note that you must Transpose the Array if you write it to a row.
Sum Range
SumOfRange = Application.WorksheetFunction.Sum(Range("A1:A10"))
Debug.Print SumOfRange
You can use many functions available in Excel in your VBA code by specifying Application.WorkSheetFunction. before the Function Name as in the example above.
Count Range
' Count Number of Cells with Numbers in the Range
CountOfCells = Application.WorksheetFunction.Count(Range("A1:A10"))
Debug.Print CountOfCells

' Count Number of Non Blank Cells in the Range
CountOfNonBlankCells = Application.WorksheetFunction.CountA(Range("A1:A10"))
Debug.Print CountOfNonBlankCells
Written by: Vinamra Chandra