
You can modify a sheet via code by taking these actions
- Unprotect
- Modify
- Protect
In code this would be:
Sub UnProtect_Modify_Protect()

  ThisWorkbook.Worksheets("Sheet1").Unprotect Password:="Password"
'Unprotect

  ThisWorkbook.ActiveSheet.Range("A1").FormulaR1C1 = "Changed"
'Modify

  ThisWorkbook.Worksheets("Sheet1").Protect Password:="Password"
'Protect

End Sub
The weakness of this method is that if the code is interrupted and error handling does not capture it, the worksheet could be left in an unprotected state.
The code could be improved by taking these actions
- Re-protect
- Modify
The code to do this would be:
Sub Re-Protect_Modify()

ThisWorkbook.Worksheets("Sheet1").Protect Password:="Password", _
 UserInterfaceOnly:=True
'Protect, even if already protected

  ThisWorkbook.ActiveSheet.Range("A1").FormulaR1C1 = "Changed"
'Modify

End Sub
This code renews the protection on the worksheet, but with the ‘UserInterfaceOnly’ set to true. This allows VBA code to modify the worksheet, while keeping the worksheet protected from user input via the UI, even if execution is interrupted.
This setting is lost when the workbook is closed and re-opened. The worksheet protection is still maintained.
So the ‘Re-protection’ code needs to be included at the start of any procedure that attempts to modify the worksheet or can just be run once when the workbook is opened.
Protecting and unprotecting sheets is a common action for an Excel user. There is nothing worse than when somebody, who doesn’t know what they’re doing, overtypes essential formulas and cell values. It’s even worse when that person happens to be us; all it takes is one accidental keypress, and suddenly the entire worksheet is filled with errors. In this post, we explore using VBA to protect and unprotect sheets.
Protection is not foolproof but prevents accidental alteration by an unknowing user.
Sheet protection is particularly frustrating as it has to be applied one sheet at a time. If we only need to protect a single sheet, that’s fine. But if we have more than 5 sheets, it is going to take a while. This is why so many people turn to a VBA solution.
The VBA Code Snippets below show how to do most activities related to protecting and unprotecting sheets.
Download the example file: Click the link below to download the example file used for this post:
Adapting the code for your purposes
Unless stated otherwise, every example below is based on one specific worksheet. Each code includes Sheets(“Sheet1”)., this means the action will be applied to that specific sheet. For example, the following protects Sheet1.
Sheets("Sheet1").ProtectBut there are lots of ways to reference sheets for protecting or unprotecting. Therefore we can change the syntax to use one of the methods shown below.
Using the active sheet
The active sheet is whichever sheet is currently being used within the Excel window.
ActiveSheet.ProtectApplying a sheet to a variable
If we want to apply protection to a sheet stored as a variable, we could use the following.
Dim ws As Worksheet

Set ws = Sheets("Sheet1")

ws.Protect
Later in the post, we look at code examples to loop through each sheet and apply protection quickly.
Let’s begin with some simple examples to protect and unprotect sheets in Excel.
Protect a sheet without a password
Sub ProtectSheet()

'Protect a worksheet
Sheets("Sheet1").Protect

End Sub
Unprotect a sheet (no password)
Sub UnProtectSheet()

'Unprotect a worksheet
Sheets("Sheet1").Unprotect

End Sub
Protecting and unprotecting with a password
Adding a password to give an extra layer of protection is easy enough with VBA. The password in these examples is hardcoded into the macro; this may not be the best for your scenario. It may be better to apply using a string variable, or capturing user passwords with an InputBox.
VBA Protect sheet with password
Sub ProtectSheetWithPassword()

'Protect worksheet with a password
Sheets("Sheet1").Protect Password:="myPassword"

End Sub
VBA Unprotect sheet with a password
Sub UnProtectSheetWithPassword()

'Unprotect a worksheet with a password
Sheets("Sheet1").Unprotect Password:="myPassword"

End Sub
NOTE – It is not necessary to unprotect, then re-protect a sheet to change the settings. Instead, just protect again with the new settings.
Using a password based on user input
Using a password that is included in the code may partly defeat the benefit of having a password. Therefore, the codes in this section provide examples of using VBA to protect and unprotect based on user input. In both scenarios, clicking Cancel is equivalent to entering no password.
Protect with a user-input password
Sub ProtectSheetWithPasswordFromUser()

'Protect worksheet with a password
Sheets("Sheet1").Protect Password:=InputBox("Enter a protection password:")

End Sub
Unprotect with a user-input password
Sub UnProtectSheetWithPasswordFromUser()

'Protect worksheet with a password
Sheets("Sheet1").Unprotect _
    Password:=InputBox("Enter a protection password:")

End Sub
Catching errors when incorrect password entered
If an incorrect password is provided, the following error message displays.
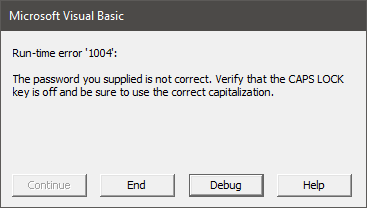
The code below catches the error and provides a custom message.
Sub CatchErrorForWrongPassword()

'Keep going even if error found
On Error Resume Next

'Apply the wrong password
Sheets("Sheet1").Unprotect Password:="incorrectPassword"

'Check if an error has occured
If Err.Number <> 0 Then
    MsgBox "The Password Provided is incorrect"
    Exit Sub
End If

'Reset to show normal error messages
On Error GoTo 0

End Sub
If you forget a password, don’t worry, the protection is easy to remove.
Applying protection to different parts of the worksheet
VBA provides the ability to protect 3 aspects of the worksheet:
- Contents – what you see on the grid
- Objects – the shapes and charts which are on the face of the grid
- Scenarios – the scenarios contained in the What If Analysis section of the Ribbon
By default, the standard protect feature will apply all three types of protection at the same time. However, we can be specific about which elements of the worksheet are protected.
Protect contents
Sub ProtectSheetContents()

'Apply worksheet contents protection only
Sheets("Sheet1").Protect Password:="myPassword", _
    DrawingObjects:=False, _
    Contents:=True, _
    Scenarios:=False

End Sub
Protect objects
Sub ProtectSheetObjects()

'Apply worksheet objects protection only
Sheets("Sheet1").Protect Password:="myPassword", _
    DrawingObjects:=True, _
    Contents:=False, _
    Scenarios:=False

End Sub
Protect scenarios
Sub ProtectSheetScenarios()

'Apply worksheet scenario protection only
Sheets("Sheet1").Protect Password:="myPassword", _
    DrawingObjects:=False, _
    Contents:=False, _
    Scenarios:=True

End Sub
Protect contents, objects and scenarios
Sub ProtectSheetAll()

'Apply worksheet protection to contents, objects and scenarios
Sheets("Sheet1").Protect Password:="myPassword", _
    DrawingObjects:=True, _
    Contents:=True, _
    Scenarios:=True

End Sub
Applying protection to multiple sheets
As we have seen, protection is applied one sheet at a time. Therefore, looping is an excellent way to apply settings to a lot of sheets quickly. The examples in this section don’t just apply to Sheet1, as the previous examples have, but include all worksheets or all selected worksheets.
Protect all worksheets in the active workbook
Sub ProtectAllWorksheets()

'Create a variable to hold worksheets
Dim ws As Worksheet

'Loop through each worksheet in the active workbook
For Each ws In ActiveWorkbook.Worksheets

    'Protect each worksheet
    ws.Protect Password:="myPassword"

Next ws

End Sub
Protect the selected sheets in the active workbook
Sub ProtectSelectedWorksheets()

Dim ws As Worksheet
Dim sheetArray As Variant

'Capture the selected sheets
Set sheetArray = ActiveWindow.SelectedSheets

'Loop through each worksheet in the active workbook
For Each ws In sheetArray

    On Error Resume Next

    'Select the worksheet
    ws.Select

    'Protect each worksheet
    ws.Protect Password:="myPassword"

    On Error GoTo 0

Next ws

sheetArray.Select

End Sub
Unprotect all sheets in active workbook
Sub UnprotectAllWorksheets()

'Create a variable to hold worksheets
Dim ws As Worksheet

'Loop through each worksheet in the active workbook
For Each ws In ActiveWorkbook.Worksheets

'Unprotect each worksheet
ws.Unprotect Password:="myPassword"

Next ws

End Sub
Checking if a worksheet is protected
The codes in this section check if each type of protection has been applied.
Check if Sheet contents is protected
Sub CheckIfSheetContentsProtected()

'Check if worksheets contents is protected
If Sheets("Sheet1").ProtectContents Then MsgBox "Protected Contents"

End Sub
Check if Sheet objects are protected
Sub CheckIfSheetObjectsProtected()

'Check if worksheet objects are protected
If Sheets("Sheet1").ProtectDrawingObjects Then MsgBox "Protected Objects"

End Sub
Check if Sheet scenarios are protected
Sub CheckIfSheetScenariosProtected()

'Check if worksheet scenarios are protected
If Sheets("Sheet1").ProtectScenarios Then MsgBox "Protected Scenarios"

End Sub
Changing the locked or unlocked status of cells, objects and scenarios
When a sheet is protected, unlocked items can still be edited. The following codes demonstrate how to lock and unlock ranges, cells, charts, shapes and scenarios.
When the sheet is unprotected, the lock setting has no impact. Each object becomes locked on protection.
All the examples in this section set each object/item to lock when protected. To set as unlocked, change the value to False.
Lock a cell
Sub LockACell()

'Changing the options to lock or unlock cells
Sheets("Sheet1").Range("A1").Locked = True

End Sub
Lock all cells
Sub LockAllCells()

'Changing the options to lock or unlock cells all cells
Sheets("Sheet1").Cells.Locked = True

End Sub
Lock a chart
Sub LockAChart()

'Changing the options to lock or unlock charts
Sheets("Sheet1").ChartObjects("Chart 1").Locked = True

End Sub
Lock a shape
Sub LockAShape()

'Changing the option to lock or unlock shapes
Sheets("Sheet1").Shapes("Rectangle 1").Locked = True

End Sub
Lock a Scenario
Sub LockAScenario()

'Changing the option to lock or unlock a scenario
Sheets("Sheet1").Scenarios("scenarioName").Locked = True

End Sub
Allowing actions to be performed even when protected
Even when protected, we can allow specific operations, such as inserting rows, formatting cells, sorting, etc. These are the same options as found when manually protecting the sheet.
Allow sheet actions when protected
Sub AllowSheetActionsWhenProtected()

'Allowing certain actions even if the worksheet is protected
Sheets("Sheet1").Protect Password:="myPassword", _
    DrawingObjects:=False, _
    Contents:=True, _
    Scenarios:=False, _
    AllowFormattingCells:=True, _
    AllowFormattingColumns:=True, _
    AllowFormattingRows:=True, _
    AllowInsertingColumns:=False, _
    AllowInsertingRows:=False, _
    AllowInsertingHyperlinks:=False, _
    AllowDeletingColumns:=True, _
    AllowDeletingRows:=True, _
    AllowSorting:=False, _
    AllowFiltering:=False, _
    AllowUsingPivotTables:=False

End Sub
Allow selection of any cells
Sub AllowSelectionAnyCells()

'Allowing selection of locked or unlocked cells
Sheets("Sheet1").EnableSelection = xlNoRestrictions

End Sub
Allow selection of unlocked cells
Sub AllowSelectionUnlockedCells()

'Allowing selection of unlocked cells only
Sheets("Sheet1").EnableSelection = xlUnlockedCells

End Sub
Don’t allow selection of any cells
Sub NoSelectionAllowed()

'Do not allow selection of any cells
Sheets("Sheet1").EnableSelection = xlNoSelection

End Sub
Allowing VBA code to make changes, even when protected
Even when protected, we still want our macros to make changes to the sheet. The following VBA code changes the setting to allow macros to make changes to a protected sheet.
Sub AllowVBAChangesOnProtectedSheet()

'Enable changes to worksheet by VBA code, even if protected
Sheets("Sheet1").Protect Password:="myPassword", _
    UserInterfaceOnly:=True

End Sub
Unfortunately, this setting is not saved within the workbook. It needs to be run every time the workbook opens. Therefore, calling the code in the Workbook_Open event of the Workbook module is probably the best option.
Allowing the use of the Group and Ungroup feature
To enable users to make use of the Group and Ungroup feature of protected sheets, we need to allow changes to the user interface and enable outlining.
Sub AllowGroupingAndUngroupOnProtectedSheet()

'Allow user to group and ungroup whilst protected
Sheets("Sheet1").Protect Password:="myPassword", _
    UserInterfaceOnly:=True

Sheets("Sheets1").EnableOutlining = True

End Sub
As noted above the UserInterfaceOnly setting is not stored in the workbook; therefore, it needs to be run every time the workbook opens.
Conclusion
Wow! That was a lot of code examples; hopefully, this covers everything you would ever need for using VBA to protect and unprotect sheets.
Related posts:
- Office Scripts – Workbook & worksheet protection
- VBA Code to Password Protect an Excel file
- VBA code to Protect and Unprotect Workbooks

About the author
Hey, I’m Mark, and I run Excel Off The Grid.
My parents tell me that at the age of 7 I declared I was going to become a qualified accountant. I was either psychic or had no imagination, as that is exactly what happened. However, it wasn’t until I was 35 that my journey really began.
In 2015, I started a new job, for which I was regularly working after 10pm. As a result, I rarely saw my children during the week. So, I started searching for the secrets to automating Excel. I discovered that by building a small number of simple tools, I could combine them together in different ways to automate nearly all my regular tasks. This meant I could work less hours (and I got pay raises!). Today, I teach these techniques to other professionals in our training program so they too can spend less time at work (and more time with their children and doing the things they love).
Do you need help adapting this post to your needs?
I’m guessing the examples in this post don’t exactly match your situation. We all use Excel differently, so it’s impossible to write a post that will meet everybody’s needs. By taking the time to understand the techniques and principles in this post (and elsewhere on this site), you should be able to adapt it to your needs.
But, if you’re still struggling you should:
- Read other blogs, or watch YouTube videos on the same topic. You will benefit much more by discovering your own solutions.
- Ask the ‘Excel Ninja’ in your office. It’s amazing what things other people know.
- Ask a question in a forum like Mr Excel, or the Microsoft Answers Community. Remember, the people on these forums are generally giving their time for free. So take care to craft your question, make sure it’s clear and concise. List all the things you’ve tried, and provide screenshots, code segments and example workbooks.
- Use Excel Rescue, who are my consultancy partner. They help by providing solutions to smaller Excel problems.
What next?
Don’t go yet, there is plenty more to learn on Excel Off The Grid. Check out the latest posts:
Содержание
- Метод Worksheet.Protect (Excel)
- Синтаксис
- Параметры
- Замечания
- Поддержка и обратная связь
- How to lock a cell in Excel formula using VBA
- Protection
- Lock Cells
- Detect Cells with Formulas
- Lock cells and protect a worksheet
- Protecting cells in Excel but allow these to be modified by VBA script
- 6 Answers 6
- VBA protect and unprotect Sheets (25+ examples)
- Adapting the code for your purposes
- Protect and unprotect: basic examples
- Protect a sheet without a password
- Unprotect a sheet (no password)
- Protecting and unprotecting with a password
- VBA Protect sheet with password
- VBA Unprotect sheet with a password
- Using a password based on user input
- Catching errors when incorrect password entered
- Applying protection to different parts of the worksheet
- Protect contents
- Protect objects
- Protect scenarios
- Protect contents, objects and scenarios
- Applying protection to multiple sheets
- Protect all worksheets in the active workbook
- Protect the selected sheets in the active workbook
- Unprotect all sheets in active workbook
- Checking if a worksheet is protected
- Check if Sheet contents is protected
- Check if Sheet objects are protected
- Check if Sheet scenarios are protected
- Changing the locked or unlocked status of cells, objects and scenarios
- Lock a cell
- Lock all cells
- Lock a chart
- Lock a shape
- Lock a Scenario
- Allowing actions to be performed even when protected
- Allow sheet actions when protected
- Allow selection of any cells
- Allow selection of unlocked cells
- Don’t allow selection of any cells
- Allowing VBA code to make changes, even when protected
- Allowing the use of the Group and Ungroup feature
- Conclusion
Метод Worksheet.Protect (Excel)
Защищает лист, чтобы его нельзя было изменить.
Синтаксис
expression. Защита (Password, DrawingObjects, Contents, Scenarios, UserInterfaceOnly, AllowFormattingCells, AllowFormattingColumns, AllowFormattingRows, AllowInsertingColumns, AllowInsertingRows, AllowInsertingHyperlinks, AllowDeletingColumns, AllowDeletingRows, AllowSorting, AllowFiltering, AllowUsingPivotTables )
Выражение Переменная, представляющая объект Worksheet .
Параметры
| Имя | Обязательный или необязательный | Тип данных | Описание |
|---|---|---|---|
| Password | Необязательный | Variant | Строка, указывающая пароль для листа или книги с учетом регистра. Если этот аргумент опущен, можно снять защиту листа или книги, не используя пароль. В противном случае необходимо указать пароль для отмены защиты листа или книги. Если вы забыли пароль, вы не сможете снять защиту листа или книги. |
Используйте надежные пароли, содержащие строчные и прописные буквы, цифры и знаки. В слабых паролях эти элементы не комбинируются. Надежный пароль: Y6dh!et5. Слабый пароль: House27. Длина паролей должна быть не меньше 8 символов. В парольной фразе лучше использовать 14 или более символов.
Очень важно запомнить пароль. Если вы его забудете, корпорация Майкрософт не сможет его восстановить. Храните пароли, записанные на бумаге, в безопасном месте вдали от информации, которую они защищают. DrawingObjects Необязательный Variant Значение true для защиты фигур. Значение по умолчанию — True. Contents Необязательный Variant Значение true для защиты содержимого. Для диаграммы это защищает всю диаграмму. Для листа это защищает заблокированные ячейки. Значение по умолчанию — True. Scenarios Необязательный Variant Значение true для защиты сценариев. Этот аргумент действителен только для листов. Значение по умолчанию — True. UserInterfaceOnly Необязательный Variant Значение true для защиты пользовательского интерфейса, но не макросов. Если этот аргумент опущен, защита применяется как к макросам, так и к пользовательскому интерфейсу. AllowFormattingCells Необязательный Variant Значение True позволяет пользователю форматировать любую ячейку на защищенном листе. Значение по умолчанию — False. AllowFormattingColumns Необязательный Variant Значение True позволяет пользователю форматировать любой столбец на защищенном листе. Значение по умолчанию — False. AllowFormattingRows Необязательный Variant Значение True позволяет пользователю форматировать любую строку на защищенном листе. Значение по умолчанию — False. AllowInsertingColumns Необязательный Variant Значение True позволяет пользователю вставлять столбцы на защищенный лист. Значение по умолчанию — False. AllowInsertingRows Необязательный Variant Значение True позволяет пользователю вставлять строки на защищенный лист. Значение по умолчанию — False. AllowInsertingHyperlinks Необязательный Variant Значение True позволяет пользователю вставлять гиперссылки на защищенный лист. Значение по умолчанию — False. AllowDeletingColumns Необязательный Variant Значение True позволяет пользователю удалять столбцы на защищенном листе, где каждая ячейка удаляемого столбца разблокирована. Значение по умолчанию — False. AllowDeletingRows Необязательный Variant Значение True позволяет пользователю удалять строки на защищенном листе, где каждая ячейка в удаляемой строке разблокирована. Значение по умолчанию — False. AllowSorting Необязательный Variant Значение True позволяет пользователю выполнять сортировку на защищенном листе. Каждая ячейка в диапазоне сортировки должна быть разблокирована или не защищена. Значение по умолчанию — False. AllowFiltering Необязательный Variant Значение True позволяет пользователю задавать фильтры на защищенном листе. Пользователи могут изменять условия фильтра, но не могут включать или отключать автоматический фильтр. Пользователи могут задавать фильтры для существующего автофильтра. Значение по умолчанию — False. AllowUsingPivotTables Необязательный Variant Значение True позволяет пользователю использовать отчеты сводной таблицы на защищенном листе. Значение по умолчанию — False.
Замечания
В предыдущих версиях, если применить этот метод с аргументом UserInterfaceOnly , равным True , а затем сохранить книгу, при повторном открытии книги будет полностью защищен весь лист (а не только интерфейс). Чтобы повторно включить защиту пользовательского интерфейса после открытия книги, необходимо снова применить этот метод, если параметр UserInterfaceOnly имеет значение True.
Если вы хотите внести изменения в защищенный лист, можно использовать метод Protect на защищенном листе, если указан пароль. Кроме того, другой метод — снять защиту листа, внести необходимые изменения, а затем снова защитить лист.
Незащищено означает, что ячейка может быть заблокирована (диалоговое окно Форматирование ячеек ), но включена в диапазон, определенный в диалоговом окне Разрешить пользователям изменять диапазоны , и пользователь отключил защиту диапазона паролем или был проверен с помощью разрешений NT.
Поддержка и обратная связь
Есть вопросы или отзывы, касающиеся Office VBA или этой статьи? Руководство по другим способам получения поддержки и отправки отзывов см. в статье Поддержка Office VBA и обратная связь.
Источник
How to lock a cell in Excel formula using VBA

Users entering data into the wrong cells or changing existing formulas can make data collection a tedious process. However, you can prevent users from going outside the intended boundaries by disabling certain sections of your workbook. In this article, we’re going to show you how to lock a cell in Excel formula using VBA.
Protection
Worksheets are objects in a workbook’s worksheet collection and they have Protect and Unprotect methods. These methods determine the protected status of a worksheet as the name suggests. Both methods can get accept other optional arguments. The first is the password argument. By setting a string for the parameter argument, you can lock your worksheets with a password. Below is a breakdown.

Lock Cells
Important note: Protecting a sheet does not lock individual cells! The cells you want to lock should be marked as Locked too. A cell can be marked as Locked, and/or Hidden, in two ways:
The User Interface method requires using the Format Cells dialog. Select a cell or a range of cells, and press Ctrl + 1 to open this menu and go to the Protection tab. Use the corresponding checkboxes to activate properties.

The second method is doing this via VBA code. Every cell and range can be made Locked and FormulaHidden properties. Set these two as True or False to change their status.
You can use the Hidden status to hide your formulas as well.
Detect Cells with Formulas
If you just need to lock only cells with formulas, you need to first identify cells that have formulas. The cells and ranges have a HasFormula property, which makes them read only. It returns a Boolean value based on whether the cell or range has a formula. A simple loop can be used to detect cells in a given range that contain formula.
To run this code, you need to add a module into the workbook or the add-in file. Copy and paste the code into the module to run it. The main advantage of the module method is that it allows saving the code in the file, so that it can be used again later. Furthermore, the subroutines in modules can be used by icons in the menu ribbons or keyboard shortcuts. Remember to save your file in either XLSM or XLAM format to save your VBA code.
Lock cells and protect a worksheet
The code example below checks every cell in the range «B4:C9» from the active worksheet. If a cell has a formula, it locks the cell. Otherwise, the cell becomes or remains unlocked.
Источник
Protecting cells in Excel but allow these to be modified by VBA script
I am using Excel where certain fields are allowed for user input and other cells are to be protected. I have used Tools Protect sheet, however after doing this I am not able to change the values in the VBA script. I need to restrict the sheet to stop user input, at the same time allow the VBA code to change the cell values based on certain computations.

6 Answers 6
If the UserInterfaceOnly parameter is set to true, VBA code can modify protected cells.
Note however that this parameter does not stick. It needs to be reapplied each time the file is opened.
You can modify a sheet via code by taking these actions
In code this would be:
The weakness of this method is that if the code is interrupted and error handling does not capture it, the worksheet could be left in an unprotected state.
The code could be improved by taking these actions
The code to do this would be:
This code renews the protection on the worksheet, but with the ‘UserInterfaceOnly’ set to true. This allows VBA code to modify the worksheet, while keeping the worksheet protected from user input via the UI, even if execution is interrupted.
This setting is lost when the workbook is closed and re-opened. The worksheet protection is still maintained.
So the ‘Re-protection’ code needs to be included at the start of any procedure that attempts to modify the worksheet or can just be run once when the workbook is opened.
Источник
VBA protect and unprotect Sheets (25+ examples)

Protecting and unprotecting sheets is a common action for an Excel user. There is nothing worse than when somebody, who doesn’t know what they’re doing, overtypes essential formulas and cell values. It’s even worse when that person happens to be us; all it takes is one accidental keypress, and suddenly the entire worksheet is filled with errors. In this post, we explore using VBA to protect and unprotect sheets.
Protection is not foolproof but prevents accidental alteration by an unknowing user.
Sheet protection is particularly frustrating as it has to be applied one sheet at a time. If we only need to protect a single sheet, that’s fine. But if we have more than 5 sheets, it is going to take a while. This is why so many people turn to a VBA solution.
The VBA Code Snippets below show how to do most activities related to protecting and unprotecting sheets.
Download the example file: Click the link below to download the example file used for this post:
Adapting the code for your purposes
Unless stated otherwise, every example below is based on one specific worksheet. Each code includes Sheets(“Sheet1”)., this means the action will be applied to that specific sheet. For example, the following protects Sheet1.
But there are lots of ways to reference sheets for protecting or unprotecting. Therefore we can change the syntax to use one of the methods shown below.
Using the active sheet
The active sheet is whichever sheet is currently being used within the Excel window.
Applying a sheet to a variable
If we want to apply protection to a sheet stored as a variable, we could use the following.
Later in the post, we look at code examples to loop through each sheet and apply protection quickly.
Protect and unprotect: basic examples
Let’s begin with some simple examples to protect and unprotect sheets in Excel.
Protect a sheet without a password
Unprotect a sheet (no password)
Protecting and unprotecting with a password
Adding a password to give an extra layer of protection is easy enough with VBA. The password in these examples is hardcoded into the macro; this may not be the best for your scenario. It may be better to apply using a string variable, or capturing user passwords with an InputBox.
VBA Protect sheet with password
VBA Unprotect sheet with a password
NOTE – It is not necessary to unprotect, then re-protect a sheet to change the settings. Instead, just protect again with the new settings.
Using a password based on user input
Using a password that is included in the code may partly defeat the benefit of having a password. Therefore, the codes in this section provide examples of using VBA to protect and unprotect based on user input. In both scenarios, clicking Cancel is equivalent to entering no password.
Protect with a user-input password
Unprotect with a user-input password
Catching errors when incorrect password entered
If an incorrect password is provided, the following error message displays.
The code below catches the error and provides a custom message.
If you forget a password, don’t worry, the protection is easy to remove.
Applying protection to different parts of the worksheet
VBA provides the ability to protect 3 aspects of the worksheet:
- Contents – what you see on the grid
- Objects – the shapes and charts which are on the face of the grid
- Scenarios – the scenarios contained in the What If Analysis section of the Ribbon
By default, the standard protect feature will apply all three types of protection at the same time. However, we can be specific about which elements of the worksheet are protected.
Protect contents
Protect objects
Protect scenarios
Protect contents, objects and scenarios
Applying protection to multiple sheets
As we have seen, protection is applied one sheet at a time. Therefore, looping is an excellent way to apply settings to a lot of sheets quickly. The examples in this section don’t just apply to Sheet1, as the previous examples have, but include all worksheets or all selected worksheets.
Protect all worksheets in the active workbook
Protect the selected sheets in the active workbook
Unprotect all sheets in active workbook
Checking if a worksheet is protected
The codes in this section check if each type of protection has been applied.
Check if Sheet contents is protected
Check if Sheet objects are protected
Check if Sheet scenarios are protected
Changing the locked or unlocked status of cells, objects and scenarios
When a sheet is protected, unlocked items can still be edited. The following codes demonstrate how to lock and unlock ranges, cells, charts, shapes and scenarios.
When the sheet is unprotected, the lock setting has no impact. Each object becomes locked on protection.
All the examples in this section set each object/item to lock when protected. To set as unlocked, change the value to False.
Lock a cell
Lock all cells
Lock a chart
Lock a shape
Lock a Scenario
Allowing actions to be performed even when protected
Even when protected, we can allow specific operations, such as inserting rows, formatting cells, sorting, etc. These are the same options as found when manually protecting the sheet.
Allow sheet actions when protected
Allow selection of any cells
Allow selection of unlocked cells
Don’t allow selection of any cells
Allowing VBA code to make changes, even when protected
Even when protected, we still want our macros to make changes to the sheet. The following VBA code changes the setting to allow macros to make changes to a protected sheet.
Unfortunately, this setting is not saved within the workbook. It needs to be run every time the workbook opens. Therefore, calling the code in the Workbook_Open event of the Workbook module is probably the best option.
Allowing the use of the Group and Ungroup feature
To enable users to make use of the Group and Ungroup feature of protected sheets, we need to allow changes to the user interface and enable outlining.
As noted above the UserInterfaceOnly setting is not stored in the workbook; therefore, it needs to be run every time the workbook opens.
Conclusion
Wow! That was a lot of code examples; hopefully, this covers everything you would ever need for using VBA to protect and unprotect sheets.
Related posts:
About the author
Hey, I’m Mark, and I run Excel Off The Grid.
My parents tell me that at the age of 7 I declared I was going to become a qualified accountant. I was either psychic or had no imagination, as that is exactly what happened. However, it wasn’t until I was 35 that my journey really began.
In 2015, I started a new job, for which I was regularly working after 10pm. As a result, I rarely saw my children during the week. So, I started searching for the secrets to automating Excel. I discovered that by building a small number of simple tools, I could combine them together in different ways to automate nearly all my regular tasks. This meant I could work less hours (and I got pay raises!). Today, I teach these techniques to other professionals in our training program so they too can spend less time at work (and more time with their children and doing the things they love).
Do you need help adapting this post to your needs?
I’m guessing the examples in this post don’t exactly match your situation. We all use Excel differently, so it’s impossible to write a post that will meet everybody’s needs. By taking the time to understand the techniques and principles in this post (and elsewhere on this site), you should be able to adapt it to your needs.
But, if you’re still struggling you should:
- Read other blogs, or watch YouTube videos on the same topic. You will benefit much more by discovering your own solutions.
- Ask the ‘Excel Ninja’ in your office. It’s amazing what things other people know.
- Ask a question in a forum like Mr Excel, or the Microsoft Answers Community. Remember, the people on these forums are generally giving their time for free. So take care to craft your question, make sure it’s clear and concise. List all the things you’ve tried, and provide screenshots, code segments and example workbooks.
- Use Excel Rescue, who are my consultancy partner. They help by providing solutions to smaller Excel problems.
What next?
Don’t go yet, there is plenty more to learn on Excel Off The Grid. Check out the latest posts:
Источник
Users entering data into the wrong cells or changing existing formulas can make data collection a tedious process. However, you can prevent users from going outside the intended boundaries by disabling certain sections of your workbook. In this article, we’re going to show you how to lock a cell in Excel formula using VBA.
Protection
Worksheets are objects in a workbook’s worksheet collection and they have Protect and Unprotect methods. These methods determine the protected status of a worksheet as the name suggests. Both methods can get accept other optional arguments. The first is the password argument. By setting a string for the parameter argument, you can lock your worksheets with a password. Below is a breakdown.
Lock Cells
Important note: Protecting a sheet does not lock individual cells! The cells you want to lock should be marked as Locked too. A cell can be marked as Locked, and/or Hidden, in two ways:
- Via user interface
- Via VBA
The User Interface method requires using the Format Cells dialog. Select a cell or a range of cells, and press Ctrl + 1 to open this menu and go to the Protection tab. Use the corresponding checkboxes to activate properties.
The second method is doing this via VBA code. Every cell and range can be made Locked and FormulaHidden properties. Set these two as True or False to change their status.
Activecell.Locked = True

Activecell.FormulaHidden = True
You can use the Hidden status to hide your formulas as well.
Detect Cells with Formulas
If you just need to lock only cells with formulas, you need to first identify cells that have formulas. The cells and ranges have a HasFormula property, which makes them read only. It returns a Boolean value based on whether the cell or range has a formula. A simple loop can be used to detect cells in a given range that contain formula.
    For Each rng In ActiveSheet.Range("B4:C9")

        If rng.HasFormula Then

            rng.Locked = True

        Else

            rng.Locked = False

        End If

    Next rng
To run this code, you need to add a module into the workbook or the add-in file. Copy and paste the code into the module to run it. The main advantage of the module method is that it allows saving the code in the file, so that it can be used again later. Furthermore, the subroutines in modules can be used by icons in the menu ribbons or keyboard shortcuts. Remember to save your file in either XLSM or XLAM format to save your VBA code.
Lock cells and protect a worksheet
The code example below checks every cell in the range «B4:C9» from the active worksheet. If a cell has a formula, it locks the cell. Otherwise, the cell becomes or remains unlocked.
Sub ProtectCellsWithFormulas()

      For Each rng In ActiveSheet.Range("B4:C9")

          If rng.HasFormula Then

              rng.Locked = True

          Else

              rng.Locked = False

          End If

      Next rng

ActiveSheet.Protect "pass"

End Sub
- Remove From My Forums
-
Question
-
I want to allow users to modify inputs in some Unlocked cells and have the other cells update accordingly. I also want to prevent users from clobbering those other cells, so those are Locked.
Protect Sheet allows ordinary formulas in Locked cells to execute but, by default, prevents VBA functions from executing when their input cells are modified. So, after consulting the
Excel 2013 developer reference’s descriptions of the Worksheet.Protect method and
Worksheet object, I added these statements to my initialization routine:
Worksheets(1).Activate
ActiveSheet.Protect "", UserInterfaceOnly = True
The 2nd statement enables Protect Sheet with a null password successfully, but the UserInterfaceOnly setting isn’t having the effect I expected, i.e., allowing the VBA functions to execute when their input cells are changed. (I’ve noticed it seems to enable
the Allow Users to Edit Objects protection option.)I also tried := True, but that doesn’t help.
-
Edited by
Thursday, December 25, 2014 5:36 PM
-
Edited by
Answers
-
It should actually be
ActiveSheet.Protect
UserInterfaceOnly:=Truebut if that doesn’t help, you can unprotect the sheet at the beginning of your macros and protect it again at the end:
Sub MyMacro()
    ' Unprotect the sheet
    ActiveSheet.Unprotect
    ' Code to manipulate cells goes here
    ...
    ' Protect the sheet
    ActiveSheet.Protect
End Sub
Regards, Hans Vogelaar (http://www.eileenslounge.com)
-
Marked as answer by
therealdp
Tuesday, December 30, 2014 12:34 AM
-
Marked as answer by