
Protecting and unprotecting sheets is a common action for an Excel user. There is nothing worse than when somebody, who doesn’t know what they’re doing, overtypes essential formulas and cell values. It’s even worse when that person happens to be us; all it takes is one accidental keypress, and suddenly the entire worksheet is filled with errors. In this post, we explore using VBA to protect and unprotect sheets.
Protection is not foolproof but prevents accidental alteration by an unknowing user.
Sheet protection is particularly frustrating as it has to be applied one sheet at a time. If we only need to protect a single sheet, that’s fine. But if we have more than 5 sheets, it is going to take a while. This is why so many people turn to a VBA solution.
The VBA Code Snippets below show how to do most activities related to protecting and unprotecting sheets.
Download the example file: Click the link below to download the example file used for this post:
Adapting the code for your purposes
Unless stated otherwise, every example below is based on one specific worksheet. Each code includes Sheets(“Sheet1”)., this means the action will be applied to that specific sheet. For example, the following protects Sheet1.
Sheets("Sheet1").ProtectBut there are lots of ways to reference sheets for protecting or unprotecting. Therefore we can change the syntax to use one of the methods shown below.
Using the active sheet
The active sheet is whichever sheet is currently being used within the Excel window.
ActiveSheet.ProtectApplying a sheet to a variable
If we want to apply protection to a sheet stored as a variable, we could use the following.
Dim ws As Worksheet

Set ws = Sheets("Sheet1")

ws.Protect
Later in the post, we look at code examples to loop through each sheet and apply protection quickly.
Let’s begin with some simple examples to protect and unprotect sheets in Excel.
Protect a sheet without a password
Sub ProtectSheet()

'Protect a worksheet
Sheets("Sheet1").Protect

End Sub
Unprotect a sheet (no password)
Sub UnProtectSheet()

'Unprotect a worksheet
Sheets("Sheet1").Unprotect

End Sub
Protecting and unprotecting with a password
Adding a password to give an extra layer of protection is easy enough with VBA. The password in these examples is hardcoded into the macro; this may not be the best for your scenario. It may be better to apply using a string variable, or capturing user passwords with an InputBox.
VBA Protect sheet with password
Sub ProtectSheetWithPassword()

'Protect worksheet with a password
Sheets("Sheet1").Protect Password:="myPassword"

End Sub
VBA Unprotect sheet with a password
Sub UnProtectSheetWithPassword()

'Unprotect a worksheet with a password
Sheets("Sheet1").Unprotect Password:="myPassword"

End Sub
NOTE – It is not necessary to unprotect, then re-protect a sheet to change the settings. Instead, just protect again with the new settings.
Using a password based on user input
Using a password that is included in the code may partly defeat the benefit of having a password. Therefore, the codes in this section provide examples of using VBA to protect and unprotect based on user input. In both scenarios, clicking Cancel is equivalent to entering no password.
Protect with a user-input password
Sub ProtectSheetWithPasswordFromUser()

'Protect worksheet with a password
Sheets("Sheet1").Protect Password:=InputBox("Enter a protection password:")

End Sub
Unprotect with a user-input password
Sub UnProtectSheetWithPasswordFromUser()

'Protect worksheet with a password
Sheets("Sheet1").Unprotect _
    Password:=InputBox("Enter a protection password:")

End Sub
Catching errors when incorrect password entered
If an incorrect password is provided, the following error message displays.
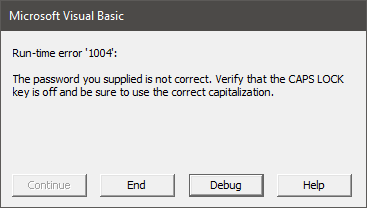
The code below catches the error and provides a custom message.
Sub CatchErrorForWrongPassword()

'Keep going even if error found
On Error Resume Next

'Apply the wrong password
Sheets("Sheet1").Unprotect Password:="incorrectPassword"

'Check if an error has occured
If Err.Number <> 0 Then
    MsgBox "The Password Provided is incorrect"
    Exit Sub
End If

'Reset to show normal error messages
On Error GoTo 0

End Sub
If you forget a password, don’t worry, the protection is easy to remove.
Applying protection to different parts of the worksheet
VBA provides the ability to protect 3 aspects of the worksheet:
- Contents – what you see on the grid
- Objects – the shapes and charts which are on the face of the grid
- Scenarios – the scenarios contained in the What If Analysis section of the Ribbon
By default, the standard protect feature will apply all three types of protection at the same time. However, we can be specific about which elements of the worksheet are protected.
Protect contents
Sub ProtectSheetContents()

'Apply worksheet contents protection only
Sheets("Sheet1").Protect Password:="myPassword", _
    DrawingObjects:=False, _
    Contents:=True, _
    Scenarios:=False

End Sub
Protect objects
Sub ProtectSheetObjects()

'Apply worksheet objects protection only
Sheets("Sheet1").Protect Password:="myPassword", _
    DrawingObjects:=True, _
    Contents:=False, _
    Scenarios:=False

End Sub
Protect scenarios
Sub ProtectSheetScenarios()

'Apply worksheet scenario protection only
Sheets("Sheet1").Protect Password:="myPassword", _
    DrawingObjects:=False, _
    Contents:=False, _
    Scenarios:=True

End Sub
Protect contents, objects and scenarios
Sub ProtectSheetAll()

'Apply worksheet protection to contents, objects and scenarios
Sheets("Sheet1").Protect Password:="myPassword", _
    DrawingObjects:=True, _
    Contents:=True, _
    Scenarios:=True

End Sub
Applying protection to multiple sheets
As we have seen, protection is applied one sheet at a time. Therefore, looping is an excellent way to apply settings to a lot of sheets quickly. The examples in this section don’t just apply to Sheet1, as the previous examples have, but include all worksheets or all selected worksheets.
Protect all worksheets in the active workbook
Sub ProtectAllWorksheets()

'Create a variable to hold worksheets
Dim ws As Worksheet

'Loop through each worksheet in the active workbook
For Each ws In ActiveWorkbook.Worksheets

    'Protect each worksheet
    ws.Protect Password:="myPassword"

Next ws

End Sub
Protect the selected sheets in the active workbook
Sub ProtectSelectedWorksheets()

Dim ws As Worksheet
Dim sheetArray As Variant

'Capture the selected sheets
Set sheetArray = ActiveWindow.SelectedSheets

'Loop through each worksheet in the active workbook
For Each ws In sheetArray

    On Error Resume Next

    'Select the worksheet
    ws.Select

    'Protect each worksheet
    ws.Protect Password:="myPassword"

    On Error GoTo 0

Next ws

sheetArray.Select

End Sub
Unprotect all sheets in active workbook
Sub UnprotectAllWorksheets()

'Create a variable to hold worksheets
Dim ws As Worksheet

'Loop through each worksheet in the active workbook
For Each ws In ActiveWorkbook.Worksheets

'Unprotect each worksheet
ws.Unprotect Password:="myPassword"

Next ws

End Sub
Checking if a worksheet is protected
The codes in this section check if each type of protection has been applied.
Check if Sheet contents is protected
Sub CheckIfSheetContentsProtected()

'Check if worksheets contents is protected
If Sheets("Sheet1").ProtectContents Then MsgBox "Protected Contents"

End Sub
Check if Sheet objects are protected
Sub CheckIfSheetObjectsProtected()

'Check if worksheet objects are protected
If Sheets("Sheet1").ProtectDrawingObjects Then MsgBox "Protected Objects"

End Sub
Check if Sheet scenarios are protected
Sub CheckIfSheetScenariosProtected()

'Check if worksheet scenarios are protected
If Sheets("Sheet1").ProtectScenarios Then MsgBox "Protected Scenarios"

End Sub
Changing the locked or unlocked status of cells, objects and scenarios
When a sheet is protected, unlocked items can still be edited. The following codes demonstrate how to lock and unlock ranges, cells, charts, shapes and scenarios.
When the sheet is unprotected, the lock setting has no impact. Each object becomes locked on protection.
All the examples in this section set each object/item to lock when protected. To set as unlocked, change the value to False.
Lock a cell
Sub LockACell()

'Changing the options to lock or unlock cells
Sheets("Sheet1").Range("A1").Locked = True

End Sub
Lock all cells
Sub LockAllCells()

'Changing the options to lock or unlock cells all cells
Sheets("Sheet1").Cells.Locked = True

End Sub
Lock a chart
Sub LockAChart()

'Changing the options to lock or unlock charts
Sheets("Sheet1").ChartObjects("Chart 1").Locked = True

End Sub
Lock a shape
Sub LockAShape()

'Changing the option to lock or unlock shapes
Sheets("Sheet1").Shapes("Rectangle 1").Locked = True

End Sub
Lock a Scenario
Sub LockAScenario()

'Changing the option to lock or unlock a scenario
Sheets("Sheet1").Scenarios("scenarioName").Locked = True

End Sub
Allowing actions to be performed even when protected
Even when protected, we can allow specific operations, such as inserting rows, formatting cells, sorting, etc. These are the same options as found when manually protecting the sheet.
Allow sheet actions when protected
Sub AllowSheetActionsWhenProtected()

'Allowing certain actions even if the worksheet is protected
Sheets("Sheet1").Protect Password:="myPassword", _
    DrawingObjects:=False, _
    Contents:=True, _
    Scenarios:=False, _
    AllowFormattingCells:=True, _
    AllowFormattingColumns:=True, _
    AllowFormattingRows:=True, _
    AllowInsertingColumns:=False, _
    AllowInsertingRows:=False, _
    AllowInsertingHyperlinks:=False, _
    AllowDeletingColumns:=True, _
    AllowDeletingRows:=True, _
    AllowSorting:=False, _
    AllowFiltering:=False, _
    AllowUsingPivotTables:=False

End Sub
Allow selection of any cells
Sub AllowSelectionAnyCells()

'Allowing selection of locked or unlocked cells
Sheets("Sheet1").EnableSelection = xlNoRestrictions

End Sub
Allow selection of unlocked cells
Sub AllowSelectionUnlockedCells()

'Allowing selection of unlocked cells only
Sheets("Sheet1").EnableSelection = xlUnlockedCells

End Sub
Don’t allow selection of any cells
Sub NoSelectionAllowed()

'Do not allow selection of any cells
Sheets("Sheet1").EnableSelection = xlNoSelection

End Sub
Allowing VBA code to make changes, even when protected
Even when protected, we still want our macros to make changes to the sheet. The following VBA code changes the setting to allow macros to make changes to a protected sheet.
Sub AllowVBAChangesOnProtectedSheet()

'Enable changes to worksheet by VBA code, even if protected
Sheets("Sheet1").Protect Password:="myPassword", _
    UserInterfaceOnly:=True

End Sub
Unfortunately, this setting is not saved within the workbook. It needs to be run every time the workbook opens. Therefore, calling the code in the Workbook_Open event of the Workbook module is probably the best option.
Allowing the use of the Group and Ungroup feature
To enable users to make use of the Group and Ungroup feature of protected sheets, we need to allow changes to the user interface and enable outlining.
Sub AllowGroupingAndUngroupOnProtectedSheet()

'Allow user to group and ungroup whilst protected
Sheets("Sheet1").Protect Password:="myPassword", _
    UserInterfaceOnly:=True

Sheets("Sheets1").EnableOutlining = True

End Sub
As noted above the UserInterfaceOnly setting is not stored in the workbook; therefore, it needs to be run every time the workbook opens.
Conclusion
Wow! That was a lot of code examples; hopefully, this covers everything you would ever need for using VBA to protect and unprotect sheets.
Related posts:
- Office Scripts – Workbook & worksheet protection
- VBA Code to Password Protect an Excel file
- VBA code to Protect and Unprotect Workbooks

About the author
Hey, I’m Mark, and I run Excel Off The Grid.
My parents tell me that at the age of 7 I declared I was going to become a qualified accountant. I was either psychic or had no imagination, as that is exactly what happened. However, it wasn’t until I was 35 that my journey really began.
In 2015, I started a new job, for which I was regularly working after 10pm. As a result, I rarely saw my children during the week. So, I started searching for the secrets to automating Excel. I discovered that by building a small number of simple tools, I could combine them together in different ways to automate nearly all my regular tasks. This meant I could work less hours (and I got pay raises!). Today, I teach these techniques to other professionals in our training program so they too can spend less time at work (and more time with their children and doing the things they love).
Do you need help adapting this post to your needs?
I’m guessing the examples in this post don’t exactly match your situation. We all use Excel differently, so it’s impossible to write a post that will meet everybody’s needs. By taking the time to understand the techniques and principles in this post (and elsewhere on this site), you should be able to adapt it to your needs.
But, if you’re still struggling you should:
- Read other blogs, or watch YouTube videos on the same topic. You will benefit much more by discovering your own solutions.
- Ask the ‘Excel Ninja’ in your office. It’s amazing what things other people know.
- Ask a question in a forum like Mr Excel, or the Microsoft Answers Community. Remember, the people on these forums are generally giving their time for free. So take care to craft your question, make sure it’s clear and concise. List all the things you’ve tried, and provide screenshots, code segments and example workbooks.
- Use Excel Rescue, who are my consultancy partner. They help by providing solutions to smaller Excel problems.
What next?
Don’t go yet, there is plenty more to learn on Excel Off The Grid. Check out the latest posts:
In this Article
- Unprotect Excel Worksheet Without Password
- Unprotect Excel Worksheet With Password
- Unprotect Sheet – Lost Password
- Protect Worksheets
- Protect Worksheet – Without Password
- Protect Worksheet – Password Protect
- Protect Worksheet Settings
- Protect Sheet – Allow VBA to Make Changes
- Unprotect All Sheets Macro
- Protect All Sheets Macro
This tutorial will teach you everything about Excel Worksheet protection in VBA – How to Protect or Unprotect Worksheets in Excel.
Unprotect Excel Worksheet Without Password
To unprotect a Worksheet that isn’t password-protected use this simple line of code:
Worksheets("Sheet1").UnprotectUnprotect Excel Worksheet With Password
To unprotect a Worksheet that’s password-protected, you must also enter the password:
Worksheets("Sheet1").Unprotect "Password"Unprotect Sheet – Lost Password
To unprotect a Worksheet without knowing the password, you must use a password recovery add-in.
Protect Worksheets
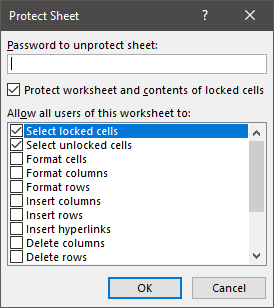
Worksheet Protection allows you to lock certain aspects of the sheet from editing.
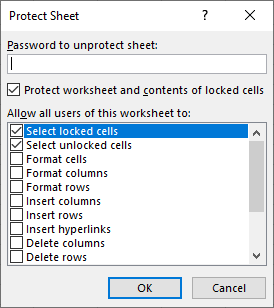
This menu is found in Home > Format > Protect sheet or by right-clicking on the Sheet tab name:
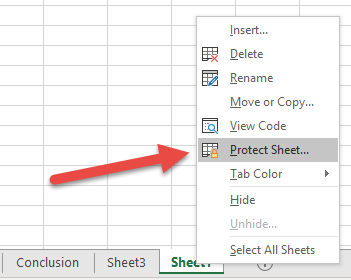
Most commonly this is used to protect “Locked” cells from editing, only allowing the end-user to edit certain cells.
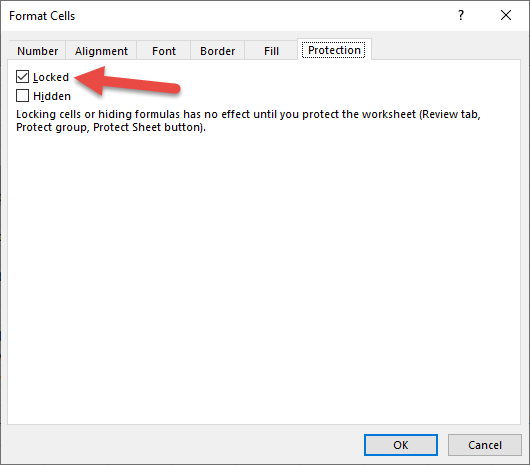
You can lock cells by selecting them, and opening the Protection tab of the Cell Formatting Menu (CTRL + 1).
You can also prevent the user from changing the worksheet structure (inserting, deleting, or resizing Rows & Columns), or from interacting with AutoFilters, and much more.
Protect Worksheet – Without Password
You might want to protect a Worksheet without entering a password. This will prevent accidental changes to the worksheet, while giving the user access to make changes if desired.
Worksheets("Sheet1").ProtectProtect Worksheet – Password Protect
Worksheets("Sheet1").Protect "Password"VBA Coding Made Easy
Stop searching for VBA code online. Learn more about AutoMacro — A VBA Code Builder that allows beginners to code procedures from scratch with minimal coding knowledge and with many time-saving features for all users!

Learn More
Protect Worksheet Settings
The above examples will protect Worksheets with the standard protection settings. Instead you might want to customize what is protected:
Worksheets("Sheet1").Protect Password:=strPassword, DrawingObjects:=True, Contents:=True, Scenarios:=True, _
UserInterfaceOnly:=True, AllowFormattingCells:=False, AllowFormattingColumns:=False, _
AllowFormattingRows:=False, AllowInsertingColumns:=False, AllowInsertingRows:=False, _
AllowInsertingHyperlinks:=False, AllowDeletingColumns:=False, AllowDeletingRows:=False, _
AllowSorting:=False, AllowFiltering:=False, AllowUsingPivotTables:=False
Instead of using the syntax above, I recommend recording a Macro with your desired settings (chosen with the Worksheet Protection menu above) and copying + pasting the recorded code into your procedure.
Protect Sheet – Allow VBA to Make Changes
By default, when you protect a sheet, the protection applies to VBA operations in addition to user actions. If VBA attempts to modify a locked cell, you will see a runtime error 1004. To avoid this, you could unprotect and re-protect your worksheets whenever VBA needs to interact with them:
Sub Edit_Sheet1()
    'Unprotect Sheet1
    Worksheets("Sheet1").Unprotect

    'Do Something to Sheet1

    'Reprotect Sheet1
    Worksheets("Sheet1").Protect
End Sub
However, it’s easy to forget to unprotect and/or re-protect your worksheets. This can can increase the probability of a coding error.
Instead, you can use the UserInterFaceOnly setting. When TRUE, worksheets will ONLY be protected from users, NOT from VBA. Your VBA code will be free to edit the worksheet just like if it was unlocked.
Two important points about UserInterFaceOnly:
- This setting is not available from the Worksheet Protection menu (shown above). It’s a setting that must be defined in VBA.
- The setting is not saved when you close a workbook. It must be re-defined each time a workbook is opened.
So in order to set the UserInterFaceOnly property, you should place the following Workbook_Open event procedure in ThisWorkbook module:
Private Sub Workbook_Open()
    Dim ws As Worksheet

    For Each ws In ThisWorkbook.Worksheets
        ws.Protect UserInterfaceOnly:=True
    Next ws
End Sub
Workbook_Open is a special event procedure that will run each time the workbook is open. It must be placed in the ThisWorkbook module. Alternatively, you could use the Auto_Open event procedure (not covered here).
Unprotect All Sheets Macro
This Macro will unprotect all Sheets in a workbook:
' UnProtect All Worksheets
Sub UnProtectAllSheets()
    Dim ws As Worksheet

    For Each ws In Worksheets
        ws.Unprotect "password"
    Next ws

End Sub
VBA Programming | Code Generator does work for you!
Protect All Sheets Macro
This Macro will protect all Sheets in a Workbook:
' Protect All Worksheets
Sub ProtectAllSheets()
    Dim ws As Worksheet

    For Each ws In Worksheets
        ws.Protect "password"
    Next ws

End Sub
This tutorial is going to take a look at how to protect all worksheets in a workbook. So rather than having to protect each worksheet individually using the Protect Worksheet command we are going to create a macro that protects all the sheets in one go. We will also create a macro that unprotects the sheets. This will work for any workbook you open in Excel.
5 FREE EXCEL TEMPLATES
Plus Get 30% off any Purchase in the Simple Sheets Catalogue!
To start with you need to display the Developers tab on the Ribbon. Right-click on any Ribbon tab and select Customize the Ribbon. Now make sure the Develop option is ticked in the Excel Options dialog – see below. Click OK to confirm.

On the Developer tab click the Visual Basic button to open the Visual Basic Editor or use the shortcut ALT F11.

The Personal Macro Workbook
We are going to save our Macros in the Personal Macro Workbook – any macros saved here are made available to all workbooks. You will see this workbook listed as PERSONAL.XLSB in the Project Window. If this workbook isn’t listed here it has not been created – you will need to save a recorded macro to the Personal Macro Workbook within Excel first – just something simple.

You can either store your macro in an existing module within the Personal Macro Workbook or create a new one. To create a new Module right-click on the Personal Macro Workbook and select Insert > Module
5 FREE EXCEL TEMPLATES
Plus Get 30% off any Purchase in the Simple Sheets Catalogue!
Select the Module you want to use and then in the Code window start to type your macro.
Writing the Macro
Start by naming your macro
Sub ProtectSheets()
Then declare your variable. A variable is a container that stores information. We have named our variable wsheet. To declare a variable you enter Dim (Dimension), the name of the variable and the type of variable.
Dim wsheet As Worksheet
We are going to ask Excel to apply the protection to each sheet in a workbook. We can use a type of looping for this that loops through each object in a collection: our Workbook has a collection of worksheets. Here is the code that performs the loop: notice how we use our variable wsheet in the code.
For Each wsheet In ActiveWorkbook.Worksheets
wsheet.Protect Password:=”password”
Next wsheet
The macro ends with End Sub – this line of code is probably already present.
The final code:
Sub ProtectSheets()
Dim wsheet As Worksheet
For Each wsheet In ActiveWorkbook.Worksheets
wsheet.Protect Password:="password"
Next wsheet
End Sub
Creating the Macro to Unprotect Sheets
The macro for unprotecting sheets is very similar – I’ve highlighted the changes in bold.
Sub unprotectsheets()
Dim wsheet As Worksheet
For Each wsheet In ActiveWorkbook.Worksheets
wsheet.Unprotect Password:="password"
Next wsheet
End Sub
5 FREE EXCEL TEMPLATES
Plus Get 30% off any Purchase in the Simple Sheets Catalogue!
Assigning the Macro to Quick Access Tool Buttons
The next step is to assign the macros to buttons on Excel’s Quick Access Toolbar. Close down the Visual Basic Editor – don’t worry about saving at this stage. In Excel click on the customize button at the end of the Quick Access Toolbar and select More Commands.

The Excel Options dialog opens. In the Choose commands from menu select Macros.

Your macros should be listed here. You can now add them to your Quick Access Toolbar. Use the modify button if you need to change the appearance of your buttons. Click OK to confirm and you are done.

When you close Excel you will be asked if you want to save changes to the Personal Macro Workbook – make sure you click Save.

Home / VBA / How to PROTECT and UNPROTECT a Sheet using VBA in Excel
In VBA, there’s the PROTECT method that you can use with a sheet. In this method, you have the option to protect a sheet, with or without a password. And you can also protect an object from the sheet. We will see all these in detail in this tutorial.
In the tutorial, we will look at how to protect and unprotect a single sheet or multiple sheets using a VBA code.
Write a VBA Code to Protect a Sheet
To protect a sheet, you need to specify the sheet first and then use the protect method. Here are the steps.
- Use the sheets object to specify the sheet.
- Enter the name of the sheet that you want to protect.
- Type a dot to get the list of the methods and properties.
- Select the project method or type it.

Sheets("Sheet1").ProtectHelpful Links: Run a Macro – Macro Recorder – Visual Basic Editor – Personal Macro Workbook
Write a VBA Code to Unprotect a Sheet
To protect a sheet, you need to specify the sheet first and then use the unprotect method. Here are the steps.
- Specify the sheet using the sheet object.
- And then, enter the name of the sheet that you want to protect.
- Enter a dot to get the list of the methods and properties.
- Select the “Unprotect” method or type it.

Sheets("Sheet1").UnprotectProtect a Sheet with Password
If you want to set a password while protecting a sheet, in that case, you need to use the password argument to specify a password. Let’s say if you want to set a password “test123” to the sheet for protecting it, the code would be like the below.

Sheets("Sheet1").Protect Password:="test123"Unprotect a Sheet with Password
In the same way, if you want to unprotect a sheet, you need to mention the password in the password argument. Let’s say the password that you have used to protect the sheet is “ADSBP” so the code to unprotect it would be like below.
Sheets("Sheet1").Unprotect Password:="ADSBP"There’s one thing that you need to take care, take care of capital letter as VBA differentiate between capital and small letters.
Other Things to Know
As I said, we are using VBA’s “Protect” method, and there are arguments other than “Password” with this method that you can use.
expression.Protect (Password, DrawingObjects, Contents, Scenarios, UserInterfaceOnly, AllowFormattingCells, AllowFormattingColumns, AllowFormattingRows, AllowInsertingColumns, AllowInsertingRows, AllowInsertingHyperlinks, AllowDeletingColumns, AllowDeletingRows, AllowSorting, AllowFiltering, AllowUsingPivotTables)- DrawingObjects: To protect and unprotect shapes.
- Contents: TO protect cells that are locked and the entire chart.
- Scenarios: To protect scenarios in the worksheet.
- UserInterfaceOnly: To only protect the user interface not macros.
- AllowFormattingCells: To allow the user to apply formatting to cells.
- AllowFormattingColumns: To allow the user to apply formatting to columns.
- AllowFormattingRows: To allow the user to apply formatting to rows.
- AllowInsertingColumns: To allow the user to insert new columns.
- AllowInsertingRows: To allow the user to insert new rows.
- AllowInsertingHyperlinks: To allow the user to create hyperlinks.
- AllowDeletingColumns: To allow the user to delete columns.
- AllowDeletingRows: To allow the user to delete rows.
- Allow Sorting: To allow the user to sort rows, columns, and tables.
- AllowFiltering: To allow filtering columns.
- AllowUsingPivotTables: To let the user use a pivot table.
Notes
- Make sure to use strong passwords that combine uppercase and lowercase letters, numbers, and symbols.
- If you forget your password, Microsoft cannot retrieve it. So, make sure to write down your password somewhere in a safe place.
- If a sheet protected without a password, and now you want to protect it with a password, you need to unprotect it first. And then reprotect it with a password using the code you have seen above.
More Tutorials on VBA Worksheets
- Back to VBA Worksheet / VBA Tutorial
I have around 25 worksheets in my workbook (Excel spreadsheet).
Is there a way I can protect all the 25 worksheets in single click ? or this feature is not available and I will have to write a VBA code to accomplish this. I need very often to protect all sheets and unprotect all sheets and doing individually is time consuming
![]()
asked Oct 10, 2008 at 13:58
![]()
I don’t believe there’s a way to do it without using VBA. If you are interested in a VBA solution, here is the code:
Dim ws as Worksheet
Dim pwd as String

pwd = "" ' Put your password here
For Each ws In Worksheets
    ws.Protect Password:=pwd
Next ws
Unprotecting is virtually the same:
Dim ws as Worksheet
Dim pwd as String

pwd = "" ' Put your password here
For Each ws In Worksheets
    ws.Unprotect Password:=pwd
Next ws
answered Oct 10, 2008 at 14:02
![]()
Ben HoffsteinBen Hoffstein
102k8 gold badges104 silver badges120 bronze badges
Don’t think there’s a button to do it, but it’s simple enough code:
For Each protSheet In Worksheets
protSheet.Protect Password := «boo»
Next protSheet
answered Oct 10, 2008 at 14:05
![]()
Steven RobbinsSteven Robbins
26.4k7 gold badges76 silver badges90 bronze badges
You can protect all worksheets from user changes but still allow VBA scripts to make changes with the «UserInterfaceOnly» option. This workaround lets you run any VBA script on the worksheets without having to protect and unprotect each time:
Dim ws as Worksheet
Dim pwd as String

pwd = "" ' Put your password here
or Each ws In Worksheets
   ws.Protect Password:=pwd, UserInterfaceOnly:=True
Next ws
Unprotecting is the same as the solution offered by Ben Hoffstein:
Dim ws as Worksheet
Dim pwd as String

pwd = "" ' Put your password here
For Each ws In Worksheets
    ws.Unprotect Password:=pwd
Next ws
You can access this macro with a button/shortcut. In Excel 2010 you right-click on the Quick Access toolbar and select «Customize Quick Access Toolbar». In the drop down menu to choose commands, select «Macros». Then click the VBA script you created to protect (or unprotect). Finally click the «Add > >» button and then «OK» to save it.
answered Dec 10, 2015 at 16:50
![]()
ChrisBChrisB
2,8845 gold badges31 silver badges58 bronze badges
You can protect the workbook rather than each sheet and this will stop changes being made across the entire workbook
answered Dec 30, 2008 at 12:24
1