Сортировка данных в таблице на рабочем листе Excel средствами VBA. Sort и SortField, объекты и методы. Примеры сортировки данных в диапазоне.
Синтаксис сортировки
Синтаксис полного кода VBA Excel, применяемого для сортировки данных в таблицах и диапазонах:
|
With Expression.Sort .SortFields.Clear .SortFields.Add Key, SortOn, Order, DataOption .SetRange [Range] .Header = [xlGuess, xlYes, xlNo] .MatchCase = [True, False] .Orientation = [xlTopToBottom, xlLeftToRight] .Apply End With |
Синтаксис сокращенного кода VBA Excel, применяемого для сортировки данных с параметрами по умолчанию:
|
With Expression.Sort .SortFields.Clear .SortFields.Add Key .SetRange [Range] .Apply End With |
Expression – выражение, возвращающее объект Worksheet, например:
|
ActiveSheet Worksheets («Лист1») ActiveWorkbook.Worksheets («Лист1») Workbooks(«Книга1.xlsm»).Worksheets («Лист1») |
Расшифровка кода
1. Expression.Sort – метод Sort объекта Worksheet возвращает объект Sort.
Объект Sort – это объект, представляющий сортировку диапазона данных.
2. .SortFields.Clear – метод SortFields объекта Sort возвращает коллекцию объектов SortFields. Метод Clear объекта SortFields удаляет все существующие объекты SortField.
Объект SortField содержит все сведения о параметрах сортировки для заданного рабочего листа.
3. .SortFields.Add Key, SortOn, Order, DataOption – метод Add объекта SortFields создает и возвращает новый экземпляр объекта SortField с заданными параметрами.
Параметры метода Add объекта SortFields:
Key – обязательный параметр, который задает значение ключа для сортировки. Тип данных – Range. Обычно указывается первая ячейка столбца при сортировке по строкам или первая ячейка строки при сортировке по столбцам. Сортировка диапазона будет осуществлена по данным столбца (строки), первая ячейка которого указана в качестве ключа.
SortOn – необязательный параметр, который задает критерий сортировки (по какому свойству ячеек производится сортировка).
Значения, которые может принимать SortOn:
| Константа | Значение | Описание |
|---|---|---|
| SortOnValues | 0 | сортировка по значению (значение по умолчанию) |
| SortOnCellColor | 1 | сортировка по цвету ячейки |
| SortOnFontColor | 2 | сортировка по цвету шрифта |
| SortOnIcon | 3 | сортировка по иконке* |
* Иконки (значки) могут быть заданы ячейкам при условном форматировании диапазона.
Order – необязательный параметр, задающий порядок сортировки (по возрастанию или по убыванию).
Значения, которые может принимать Order:
| Константа | Значение | Описание |
|---|---|---|
| xlAscending | 1 | сортировка по возрастанию (значение по умолчанию) |
| xlDescending | 2 | сортировка по убыванию |
DataOption – необязательный параметр, который задает способ сортировки текста.
Значения, которые может принимать DataOption:
| Константа | Значение | Описание |
|---|---|---|
| xlSortNormal | 0 | числовые и текстовые данные сортируются отдельно (значение по умолчанию) |
| xlSortTextAsNumbers | 1 | текстовые данные рассматриваются для сортировки как числовые |
4. .SetRange [Range] – метод SetRange объекта Sort задает диапазон (таблицу), в котором выполняется сортировка.
5. .Header = [xlGuess, xlYes, xlNo] – свойство Header объекта Sort указывает, является ли первая строка таблицы строкой заголовков (шапкой).
Значения, которые может принимать свойство Header:
| Константа | Значение | Описание |
|---|---|---|
| xlGuess | 0 | Excel сам определяет, есть ли строка заголовков |
| xlYes | 1 | строка заголовков есть, сортировка ее не затрагивает |
| xlNo | 2 | строки заголовков нет (значение по умолчанию) |
6. .MatchCase = [True, False] – свойство MatchCase объекта Sort указывает, как учитывать регистр при сортировке.
Значения, которые может принимать свойство MatchCase:
| Константа | Значение | Описание |
|---|---|---|
| False | 0 | регистр не учитывается (значение по умолчанию) |
| True | 1 | сортировка с учетом регистра |
7. .Orientation = [xlTopToBottom, xlLeftToRight] – свойство Orientation объекта Sort задает ориентацию для сортировки.
Значения, которые может принимать свойство Orientation:
| Константа | Значение | Описание |
|---|---|---|
| xlTopToBottom | 1 | сортировка по стокам (значение по умолчанию) |
| xlLeftToRight | 2 | сортировка по столбцам |
8. .Apply – метод Apply объекта Sort выполняет сортировку диапазона в соответствии с примененными параметрами.
Примеры сортировки
Таблица для примеров
Сортировка по одному столбцу
Краткая запись кода VBA Excel для сортировки диапазона по первому столбцу с параметрами по умолчанию:
|
Sub Primer1() With ActiveSheet.Sort .SortFields.Clear .SortFields.Add Key:=Range(«A2») .SetRange Range(«A2:C7») .Apply End With End Sub |
Полная запись, но тоже с параметрами по умолчанию:
|
Sub Primer2() With ActiveSheet.Sort .SortFields.Clear .SortFields.Add Key:=Range(«A2»), SortOn:=xlSortOnValues, Order:=xlAscending, DataOption:=xlSortNormal .SetRange Range(«A2:C7») .Header = xlNo .MatchCase = False .Orientation = xlTopToBottom .Apply End With End Sub |
Результат сортировки:
Сортировка по двум столбцам
Код VBA Excel для сортировки исходной таблицы по первому и второму столбцам с параметрами по умолчанию:
|
Sub Primer3() With ActiveSheet.Sort .SortFields.Clear .SortFields.Add Key:=Range(«A2») .SortFields.Add Key:=Range(«B2») .SetRange Range(«A2:C7») .Apply End With End Sub |
Результат сортировки:
Применение сортировки ко второму столбцу (добавление еще одного объекта SortField) не нарушает сортировку первого – в первом столбце меняются местами только ячейки с одинаковыми значениями.
In this Article
- Sort Data with Excel VBA
- Practical Use of the Sort Method in VBA
- Sample Data to Demonstrate Excel Sorting with VBA
- Recording a Macro for a VBA Sort
- VBA Code to do a Single Level Sort
- VBA Code to do a Multi-Level Sort
- Sorting by Cell Color
- Sorting by Font Color
- Using Other Parameters in VBA Sorting
- Extending the Sorting Function Using VBA
Sort Data with Excel VBA
Excel has an excellent means of sorting a range of tabular data using the ribbon on the Excel front end, and at some point, you will probably want to use this functionality within your VBA code. Fortunately, this is very easy to do.
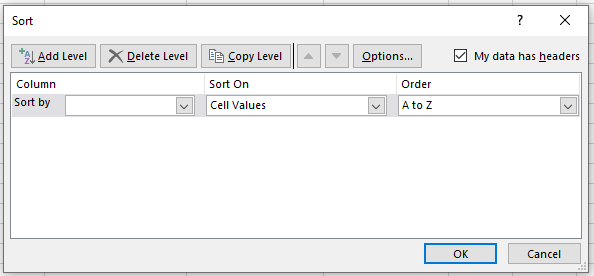
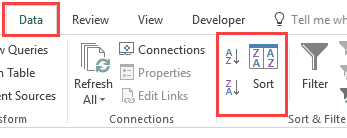
The front-end dialog box is found by clicking the ‘Sort’ icon in the ‘Sort & Filter’ group of the ‘Data’ tab on the Excel ribbon. You need to select a range of tabular data first.
You can also use Alt-A-S-S to show the dialog box for a custom sort.
The sort method has been greatly improved in later versions of Excel. The sort used to be restricted to three levels, but you can now enter as many levels as your need, and this also applies within VBA.
You can incorporate all the sort functions on offer in the Excel Sort dialog into your VBA code. The sort function in Excel is fast, and quicker than anything that you could write yourself in VBA, so take advantage of the functionality.
Note that when you do a sort in VBA, the sort parameters remain the same in the front-end sort dialog box. They also are saved when the workbook is saved.
If a user selects the same range of tabular data and clicks on the Sort icon, they will see all your parameters that have been entered by your VBA code. If they want to do a sort of their own design, then they will have to delete all your sort levels first, which will be very annoying for them.
Also, if you do not change the parameters within your code, and rely on default values, you may find that the user has made changes which will reflect through into your VBA sort, and may give unexpected results, which may be very difficult to debug.
Fortunately, there is a Clear method in VBA to re-set all the sort parameters so that the user will see a clean sort dialog box
Worksheets("Sheet1").Sort.SortFields.ClearIt is good practice to clear the sort parameters in VBA before and after the sort has been completed.
Practical Use of the Sort Method in VBA
When tabular data is imported into Excel, it is often in a very random order. It could be imported from a CSV (comma separated values) file or it could come from a link to a database or web page. You cannot rely on it being in a set order from one import to another.
If you are presenting this data to a user within your worksheet, the user may well find it difficult to look at and understand a huge amount of data which in terms of order is all over the place. They may want to group the data, or cut and paste certain sections of it into another application.
They may also want to see, for example, the highest paid employee, or the employee with the longest service.
Using the Sort method in VBA, you can offer options to allow easy sorting for the user.
Sample Data to Demonstrate Excel Sorting with VBA
We first need some sample data to be entered into a worksheet, so that the code can demonstrate all the facilities available within VBA.
Copy this data into a worksheet (called ‘Sheet1’) exactly as shown.
Note that different cell background colors and font colors have been used, as these can also be used as sorting parameters. Sorting using cell and font colors will be demonstrated later in the article. Also note that on cell E3, the department name is all lower case.
You do not need the cell interior and font colors if you do not wish to use the examples of sorting by cell and font color.
Recording a Macro for a VBA Sort
VBA code for sorting can get quite complicated, and it can sometimes be a good idea to do the sort on the front end of Excel and record a macro to show you how the code works.
Unfortunately, the recording function can generate a huge amount of code because it sets virtually every parameter available, even though the default values for many parameters are acceptable to your sort operation.
However, it does give you a very good idea of what is involved in writing VBA sort code, and one advantage is that the recorded code will always work for you. Your own code may need testing and debugging to make it work properly.
Remember that for an operation done in VBA, there is no undo feature, so it is a good idea to make a copy of the tabular data onto another worksheet before you start writing your sorting code.
As an example, if you did a simple sort on the sample data above, sorting by Employee, the recording would generate the following code:
Sub Macro1()

Range("A1:E6").Select

ActiveWorkbook.Worksheets("Sheet1").Sort.SortFields.Clear
ActiveWorkbook.Worksheets("Sheet1").Sort.SortFields.Add2 Key:=Range("A2:A6"), _
    SortOn:=xlSortOnValues, Order:=xlAscending, DataOption:=xlSortNormal

With ActiveWorkbook.Worksheets("Sheet1").Sort
    .SetRange Range("A1:E6")
    .Header = xlYes
    .MatchCase = False
    .Orientation = xlTopToBottom
    .SortMethod = xlPinYin
    .Apply
End With

End Sub
This is quite a large chunk of code, and a lot of it is unnecessary because of default parameters being used. However, if you are under time pressure to complete a project and you need some code quickly that works, you can easily paste this into your own VBA code.
However, if you want to make your code understandable and more elegant, then there are other options available.
VBA Code to do a Single Level Sort
If you want to sort the sample code based on Employee only as before when recording a macro, the code is very simple:
Sub SingleLevelSort()

Worksheets("Sheet1").Sort.SortFields.Clear

Range("A1:E6").Sort Key1:=Range("A1"), Header:=xlYes

End Sub
This is far easier to understand than the recorded code because it accepts the defaults, e.g., sort ascending, so there is no need to set the parameters to default values. This assumes that you have used a ‘Clear’ statement beforehand.
The ‘Clear’ method is used initially to ensure that every sort parameter for that worksheet is set back to the default values. A user may have previously set the parameters to different values, or an earlier sort in VBA may have changed them. It is important to start from a default position when sorting, otherwise you could easily end up with incorrect results.
The Clear method does not reset the Header parameter, and it is advisable to include this in your code, otherwise Excel may try and guess whether a header row is present or not.
Run this code against the sample data and your worksheet will look like this:
VBA Code to do a Multi-Level Sort
You can add in as many sorting levels as required within your code. Suppose that you wished to sort first by department and then by start date but in ascending order for the department and descending order for start date:
Sub MultiLevelSort()

Worksheets("Sheet1").Sort.SortFields.Clear

Range("A1:E6").Sort Key1:=Range("E1"), Key2:=Range("C1"), Header:=xlYes, _
    Order1:=xlAscending, Order2:=xlDescending

End Sub
Note that there are now two keys in the sort statement (Key1 and Key2). Key1 (Department column E) is sorted first of all and then Key2 (Start Date column C) is sorted based on the first sort.
There are also two order parameters. Order1 associates with Key1 (Department) and Order2 associates with Key2 (Start Date). It is important to ensure that keys and orders are kept in step with each other.
Run this code against the sample data and your worksheet will look like this:
The Department column (E) is in ascending order, and the Start Date column (C) is in descending order.
The effect of this sort is most noticeable when looking at Jane Halfacre (row 3) and John Sutherland (row 4). They are both in Finance but Jane Halfacre started before John Sutherland and the dates are shown in descending order.
If the range of tabular data could be of any length, you can use the UsedRange object to define the sort range. This will only work if there is only the tabular data on the worksheet as any values outside of the data will give incorrect results for the number of rows and columns.
Sub MultiLevelSort()

Worksheets("Sheet1").Sort.SortFields.Clear
Worksheets("Sheet1").UsedRange.Sort Key1:=Range("E1"), Key2:=Range("C1"), Header:=xlYes, _
    Order1:=xlAscending, Order2:=xlDescending

End Sub
This prevents the problem if you use the method ‘End(xlDown)’ to define the sort range. If there is a blank cell in the middle of the data, then anything after the blank cell will not be included, whereas UsedRange goes down to the last active cell in the worksheet.
VBA Coding Made Easy
Stop searching for VBA code online. Learn more about AutoMacro — A VBA Code Builder that allows beginners to code procedures from scratch with minimal coding knowledge and with many time-saving features for all users!
Learn More
Sorting by Cell Color
Since Excel 2007, sorting by the background color of a cell is now possible, which provides enormous flexibility when designing your sort code in VBA.
Sub SingleLevelSortByCellColor()

Worksheets("Sheet1").Sort.SortFields.Clear
ActiveWorkbook.Worksheets("Sheet1").Sort.SortFields.Add2 Key:=Range("A2:A6"), _
    SortOn:=xlSortOnCellColor, Order:=xlAscending, DataOption:=xlSortNormal

With ActiveWorkbook.Worksheets("Sheet1").Sort
    .SetRange Range("A2:E6")
    .Apply
End With

End Sub
This code will sort the sample data range (A2:A6) based on the cell background color. Note that there is now an additional parameter called ‘SortOn’ which has the value of ‘xlSortOnCellColor’.
Note that the ‘SortOn’ parameter can only be used by a worksheet object and not by a range object.
Because of this the code is more complicated than for a sort using cell values.
This code uses a key value for the sort which covers the whole range of data but you can specify individual columns as the key for the background color sort, and use multiple levels as shown earlier.
After running this code, your worksheet will now look like this:
Sorting by Font Color
The sort function in Excel VBA offers even more flexibility in that you can sort by font colors:
Sub SingleLevelSortByFontColor()

Worksheets("Sheet1").Sort.SortFields.Clear
ActiveWorkbook.Worksheets("Sheet1").Sort.SortFields.Add(Range("A2:A6"), _
    xlSortOnFontColor, xlAscending, xlSortNormal).SortOnValue.Color = RGB(0, 0, 0)

With ActiveWorkbook.Worksheets("Sheet1").Sort
    .SetRange Range("A1:E6")
    .Header = xlYes
    .Orientation = xlTopToBottom
    .Apply
End With

End Sub
The code for sorting by font color is far more complicated than for the cell background color. The ‘SortOn’ parameter now holds the value of ‘xlSortOnFontColor’.
Note that you must specify orientation as ‘xlTopToBottom’ and you must specify a color to sort on. This is specified in RGB terms (Red, Green, Black) with values going from 0 to 255.
After running this code against the sample data, your worksheet will now look like this:
Sorting using colors in VBA is far more complicated than a multi-level sort, but if your sort code will not work (which can happen if a parameter is missing or you have not entered the code correctly) then you can always fall back on recording a macro and integrating the recorded code into your VBA.
Using Other Parameters in VBA Sorting
There are a number of optional parameters that you can use in your VBA code to customize your sort.
SortOn
SortOn chooses whether the sort will use cell values, cell background colors, or cell font colors. The default setting is Cell Values.
SortOn = xlSortOnValuesOrder
Order chooses whether the sort will be done in ascending or descending order. The default is Ascending.
Order = xlAscendingDataOption
DataOption chooses how text and numbers are sorted. The parameter xlSortNormal sorts numeric and text data separately. The parameter xlSortTextAsNumbers treats text as numeric data for the sort. The default is xlSortNormal.
DataOption = xlSortNormalHeader
Header chooses whether the tabular data range has a header row or not. If there is a header row, you do not want this included in the sort.
Parameter values are xlYes, xlNo, and xlYesNoGuess. xlYesNoGuess leaves it to Excel to determine if there is a header row, which could easily lead to inconsistent results. Use of this value is not recommended.
The default value is XNo (no header row within the data). With imported data, there is usually a header row, so make sure that you set this parameter to xlYes.
Header = xlYesMatchCase
This parameter determines whether the sort is case-sensitive or not. Option values are True or False. If the value is False, then lower case values are considered the same as upper case values. If the value is True, then the sort will show the difference between upper and lower case values within the sort. The default value is False.
MatchCase = FalseOrientation
This parameter determines whether the sort will take place downwards through the rows, or across all the columns. The default value is xlTopToBottom (sort through rows). You can use xlLeftToRight if you wish to sort horizonally. Values such as xlRows and xlColumns do not work for this parameter.
Orientation = xlTopToBottomSortMethod
This parameter is only used for sorting Chinese languages. It has two values, xlPinYin and xlStroke. xlPinYin is the default value.
xlPinYin sorts using the phonetic Chinese sort order for characters. xlStroke sorts by the quantity of strokes in each character.
If you record a sort macro, this parameter will always be included in the code, and you may well have wondered what it meant. However, unless you are dealing with data in Chinese, it is of little use.
SortMethod = xlPinYinUsing a Double-Click Event to Sort Tabular Data
In all the functionality that Microsoft included in the sort methods for VBA, it did not include a simple means to double-click on a column header and sort the whole of the tabular data based on that particular column.
This is a really useful feature to have, and it is easy to write the code to do it.
Private Sub Worksheet_BeforeDoubleClick(ByVal Target As Range, Cancel As Boolean)
'Assumption is made that data begins at cell A1

'Create three variables to capture the target column selected and the maximum column and row of _
'   the tabular data
Dim Col As Integer, RCol As Long, RRow As Long

'Check that the user has double-clicked on the header row – row 1 otherwise exit sub
If Target.Row <> 1 Then Exit Sub

'Capture the maximum rows in the tabular data range using the ‘UsedRange’ object
RCol = ActiveSheet.UsedRange.Columns.Count

'Capture the maximum columns in the tabular data range using the 'UsedRange' object
RRow = ActiveSheet.UsedRange.Rows.Count

'Check that the user has not double-clicked on a column outside of the tabular data range
If Target.Column > RCol Then Exit Sub

'Capture the column that the user has double-clicked on
Col = Target.Column

'Clear away previous sort parameters
ActiveSheet.Sort.SortFields.Clear

'Sort the tabular range as defined by maximum rows and columns from the 'UsedRange' object
'Sort the tabular data using the column double-clicked by the user as the sort key
ActiveSheet.Range(Cells(1, 1), Cells(RRow, RCol)).Sort Key1:=Cells(1, Col), Header:=xlYes

'Select cell A1 – this is to ensure that the user is not left in edit mode after the sort is _
'   completed
ActiveSheet.Range("A1").Select

End Sub
This code needs to be placed on the double-click event on the sheet containing the tabular data. You do this by clicking on the worksheet name in the Project Explorer window (top-left hand corner of the VBE screen), and then selecting ‘Worksheet’ in the first drop down on the code window. Select ‘BeforeDoubleClick’ in the second drop down, and you can then enter your code.
Note that no names, ranges, or cell references are hardcoded into this code except for moving the cursor to cell A1 at the end of the code. The code is designed to get all the information required from the cell coordinates that the user has double-clicked on and the size of the tabular data range.
It does not matter how large the tabular data range is. The code will still pick up all the required information and it can be used on data held anywhere within your workbook without having to hardcode in values.
The only assumption made is that there is a header row in the tabular data, and that the data range starts at cell A1, but the starting position for the data range can be easily changed within the code.
Any user will be suitably impressed with this new sorting functionality!
VBA Programming | Code Generator does work for you!
Extending the Sorting Function Using VBA
Microsoft has allowed tremendous flexibility in sorting using a wide range of parameters. However, within VBA, you can take this further.
Suppose that you wanted to sort any values with a bold font to the top of your data. There is no way to do this in Excel, but you can write the VBA code to do it:
Sub SortByBold()

'Create variables to hold the number of rows and columns for the tabular data
Dim RRow As Long, RCol As Long, N As Long

'Turn off screen updating so that the user cannot see what is happening – they may see _
'   values being altered and wonder why
Application.ScreenUpdating = False

'Capture the number of columns in the tabular data range
RCol = ActiveSheet.UsedRange.Columns.Count

'Capture the number of rows within the tabular data range
RRow = ActiveSheet.UsedRange.Rows.Count

'Iterate through all the rows in the tabular data range ignoring the header row
For N = 2 To RRow
    'If a cell has a bold font then place a leading 0 value against the cell value
    If ActiveSheet.Cells(N, 1).Font.Bold = True Then
        ActiveSheet.Cells(N, 1).Value = "0" & ActiveSheet.Cells(N, 1).Value
    End If
Next N

'Clear any previous sort parameters
ActiveSheet.Sort.SortFields.Clear

'Sort the tabular data range. All the values with a leading 0 value will move to the top
ActiveSheet.Range(Cells(1, 1), Cells(RRow, RCol)).Sort Key1:=Cells(1, 1), Header:=xlYes

'Iterate through all the rows in the tabular data range ignoring the header row
For N = 2 To RRow
    'If a cell has a bold font then remove the leading 0 value from the cell value to _
    '   restore the original values
    If ActiveSheet.Cells(N, 1).Font.Bold = True Then
        ActiveSheet.Cells(N, 1).Value = Mid(ActiveSheet.Cells(N, 1).Value, 2)
    End If
Next N

'Turn screen updating back on
Application.ScreenUpdating = True

End Sub
The code works out the size of the tabular data range using the ‘UsedRange’ object and then iterates through all the rows within it. When a bold font is found, a leading zero is placed in front of the cell value.
A sort then takes place. As the sort is in ascending order, anything with a zero in front will go to the top of the list.
The code then iterates through all the rows and removes the leading zeroes, restoring the data to its original values.
This code sorts using bold fonts as a criterion, but you could easily use other cell characteristics in the same way, e.g., italic font, point size of text, underscore font, font name, etc.
Excel already has a couple of ways to sort data quickly.
You can easily sort a data set by using the sort icons in the ribbon or the sort dialog box.
Then why do you need to know how to do this using VBA?
Knowing how to sort data using VBA can be helpful when included as a part of your code. For example, suppose you get a data set daily/weekly that you need to format and sort in a specific order.
You can create a macro to do all this for you with a single click. That will save you a lot of time and effort every time you do it.
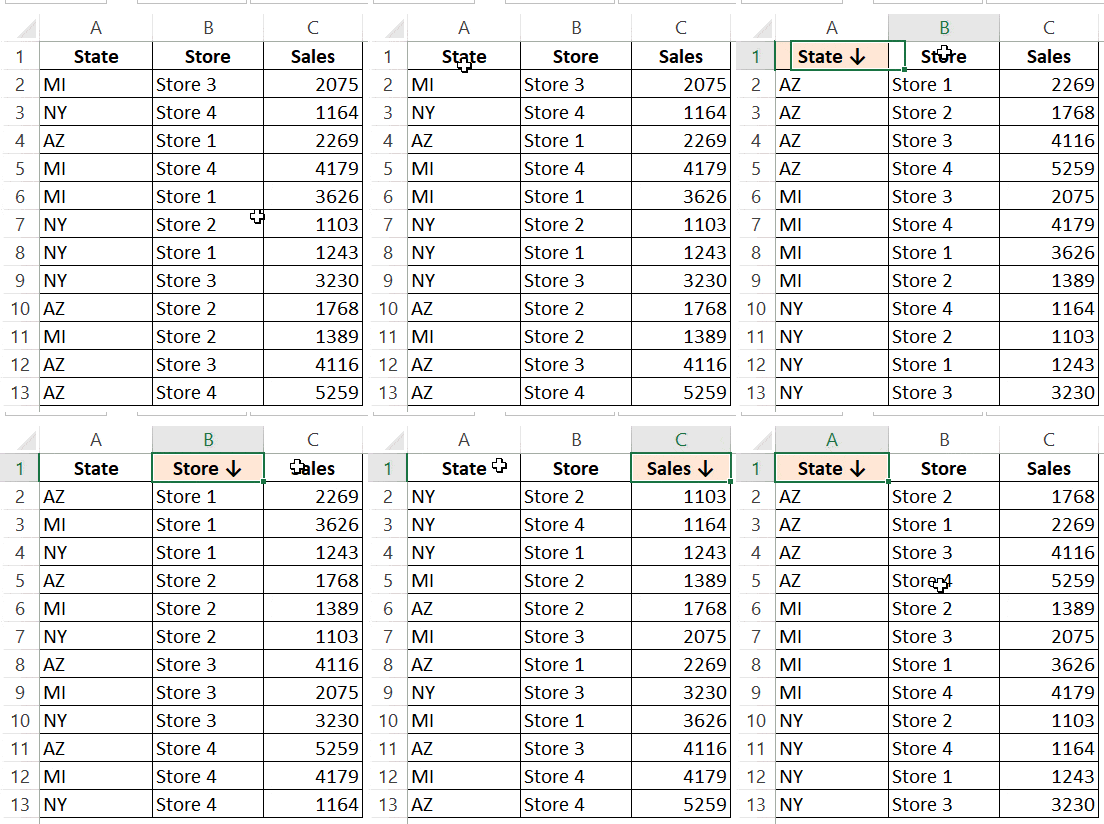
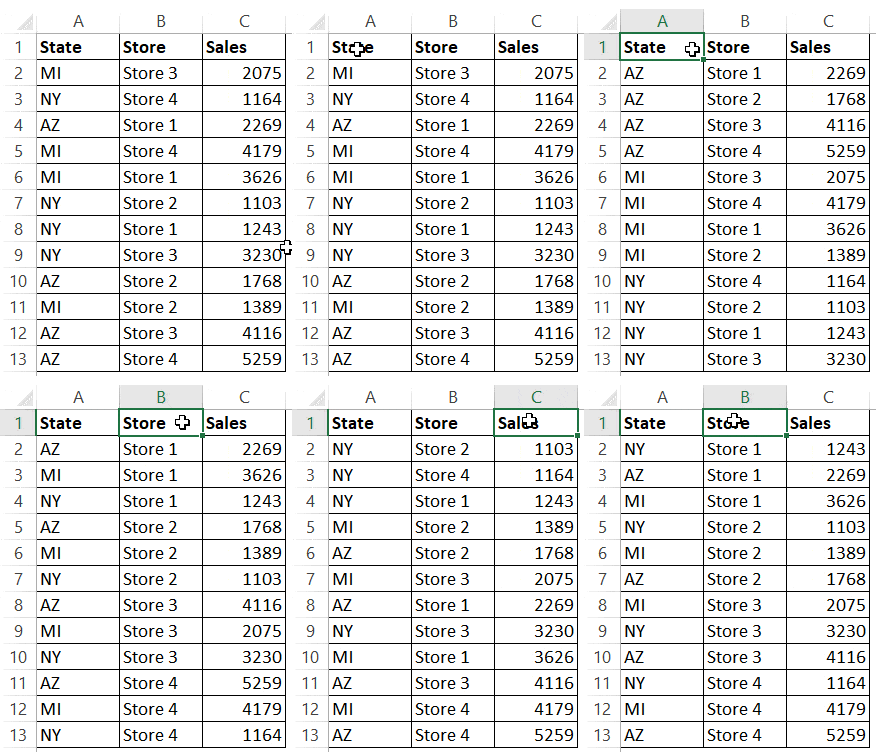
Also, if you create Excel dashboards, you can take Excel sorting capability to a new level by allowing the user to sort the data just by double-clicking on the header (as shown below).
I will cover how to create this later in this tutorial. Let’s first quickly get the basics straight.
Understanding the Range.Sort Method in Excel VBA
When sorting using VBA, you need to use the Range.Sort method in your code.
The ‘Range’ would be the data that you’re trying to sort. For example, if you’re sorting the data in A1:A10, then ‘Range’ would be Range(“A1:A10”).
You can also create a named range and use it instead of the cell references. For example, if I create a named range ‘DataRange’ for the cells A1:A10, then I can also use Range(“DataRange”)
With the sort method, you need to provide some additional information through parameters. Below are the key parameters you need to know:
- Key – here you need to specify the column that you want to sort. For example, if you want to sort column A, you need to use key:=Range(“A1”)
- Order – here you specify whether you want the sorting in an ascending order or the descending order. For example, if you want the sorting in ascending order, you will use Order:=xlAscending
- Header – here you specify whether your data set has headers or not. If it has headers, the sorting starts from the second row of the data set, else it starts from the first row. To specify that your data has headers, you will use Header:=xlYes
While these three suffices in most of the cases, you can read more about the parameters in this article.
Now let’s see how to use the Range.Sort method in VBA to sort data in Excel.
Sorting a Single Column Without Header
Suppose you have a single column without header (as shown below).
You can use the below code to sort it in ascending order.
Sub SortDataWithoutHeader()
Range("A1:A12").Sort Key1:=Range("A1"), Order1:=xlAscending, Header:=xlNo
End Sub
Note that I have specified the data range manually as Range(“A1:A12”).
In case there might be changes in the data and values might be added/deleted, you can use the below code that automatically adjusts based on the filled cells in the dataset.
Sub SortDataWithoutHeader()
Range("A1", Range("A1").End(xlDown)).Sort Key1:=Range("A1"), Order1:=xlAscending, Header:=xlNo
End Sub
Note that instead of Range(“A1:A12”), I have used, Range(“A1”, Range(“A1”).End(xlDown)).
This will check the last consecutively filled cell in the column and include it in sorting. In case there are blanks, it will only consider data till the first blank cell.
You can also create a named range and use that named range instead of the cell references. For example, if the named range is DataSet, your code would now be as shown below.
Sub SortDataWithoutHeader()
Range("DataRange").Sort Key1:=Range("A1"), Order1:=xlAscending, Header:=xlNo
End Sub
Now let me quickly explain the parameters used in the above examples:
- Key1:=Range(“A1”) – Specified A1 so that the code would know which column to sort.
- Order1:=xlAscending – Specified the order as xlAscending. If you want it to be in the descending order, use xlDescending.
- Header:= xlNo – Specified that there are no headers. This is also the default value. So even if you omit this, your data will be sorted considering it has no headers.
Wondering where to put this VBA code and how to run the macro? Read this tutorial!
Sorting a Single Column With Header
In the previous example, the data set did not have a header.
When your data has headers, you need to specify that in the code so that the sorting can start from the second row of the dataset.
Suppose you have a dataset as shown below:
Below is the code that will sort the data in descending order based on the sales of the stores.
Sub SortDataWithHeader()
Range("DataRange").Sort Key1:=Range("C1"), Order1:=xlDescending
End Sub
Note that I have created a named range – ‘DataRange’, and used this named range in the code.
Sorting Multiple Columns With Headers
So far in this tutorial, we have seen how to sort a single column (with and without headers).
Now, what if you want to sort based on multiple columns.
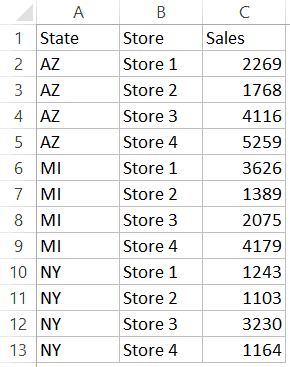
For example, in the below data set, what if I want to first sort by the state code, and then by the store.
Here is the code that will sort multiple columns at one go.
Sub SortMultipleColumns()
With ActiveSheet.Sort
     .SortFields.Add Key:=Range("A1"), Order:=xlAscending
     .SortFields.Add Key:=Range("B1"), Order:=xlAscending
     .SetRange Range("A1:C13")
     .Header = xlYes
     .Apply
End With
End Sub
Below is the result that you will get.
In the above example, the data is first sorted by the state code (column A). Then within the state code data, it is again sorted by the Store (Column B). This order is determined by the code in which you mention it.
Sorting Data Using Double Click on Header
If you’re creating a dashboard or want more ease of use in your reports, you can write a VBA code that will sort the data when you double click on the headers.
Something as shown below:
Below is the code that will allow you to do this:
Private Sub Worksheet_BeforeDoubleClick(ByVal Target As Range, Cancel As Boolean)
Dim KeyRange As Range
Dim ColumnCount As Integer
ColumnCount = Range("DataRange").Columns.Count
Cancel = False
If Target.Row = 1 And Target.Column <= ColumnCount Then
Cancel = True
Set KeyRange = Range(Target.Address)
Range("DataRange").Sort Key1:=KeyRange, Header:=xlYes
End If
End Sub
Note that I have created a named range (“DataRange”) and have used it in the code instead of using the cell references.
As soon as you double-click on any of the headers, the code disables the usual double-click functionality (which is to get into the edit mode) and uses that cell as the key while sorting the data.
Also note that as of now, this code will sort all the columns in ascending order only.
Note that double-click is a trigger allows Excel to run the specified code. These triggers such as double-click, opening a workbook, adding a new worksheet, changing a cell, etc. are called events and can be used to run macros in Excel. You can read more about Excel VBA events here.
Where to put this code?
You need to paste this code into the code window of the sheet in which you want this double click sort functionality.
To do this:
- Right-click on the sheet tab.
- Click on View Code.
- Paste the code in the code window of the sheet in which your data resides.
Now what if you want to sort the first two columns (‘State’ and ‘Store’) in ascending order, but ‘Sales’ column in descending order.
Here is the code that will do it:
Private Sub Worksheet_BeforeDoubleClick(ByVal Target As Range, Cancel As Boolean)
Dim KeyRange As Range
Dim ColumnCount As Integer
ColumnCount = Range("DataRange").Columns.Count
Cancel = False
If Target.Row = 1 And Target.Column <= ColumnCount Then
Cancel = True
Set KeyRange = Range(Target.Address)
If Target.Value = "Sales" Then
SortOrder = xlDescending
Else
SortOrder = xlAscending
End If
Range("DataRange").Sort Key1:=KeyRange, Header:=xlYes, Order1:=SortOrder
End If
End Sub
In the above code, it checks if the cell that is double-clicked is the Sales header or not. If yes, then it assigns the xlDescending value to the variable SortOrder, else it makes it xlAscending.
Now let’s take this a notch further and show a visual Marker (arrow and colored cell) in the header when it is sorted.
Something as shown below:
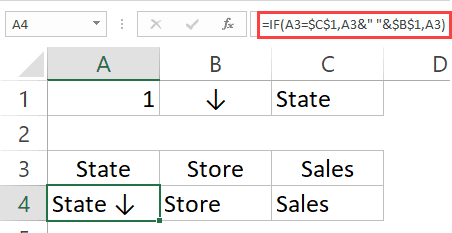
To get this, I have added a new worksheet and made the following changes in it (you can download the example file and follow along):
- Changed the name of the new sheet to ‘BackEnd’.
- In cell B2, entered an arrow symbol (to do this, go to Insert and click on ‘Symbol’ option).
- Copy and paste the headers from the data set to cell A3:C3 in the ‘Backend’ sheet.
- Use the following function in cell A4:AC4:
=IF(A3=$C$1,A3&" "&$B$1,A3)
- Rest of the cells will automatically get filled by the VBA code when you double click on the headers to sort the column.
Your backend sheet would look something as shown below:
Now you can use the below code to sort the data by double-clicking on the headers. When you double-click on a header, it will automatically get the arrow in the header text. Note that I have also used conditional formatting to highlight the cell as well.
Private Sub Worksheet_BeforeDoubleClick(ByVal Target As Range, Cancel As Boolean)
Dim KeyRange As Range
Dim ColumnCount As Integer
ColumnCount = Range("DataRange").Columns.Count
Cancel = False
If Target.Row = 1 And Target.Column <= ColumnCount Then
Cancel = True
Worksheets("Backend").Range("C1") = Target.Value
Set KeyRange = Range(Target.Address)
Range("DataRange").Sort Key1:=KeyRange, Header:=xlYes
Worksheets("BackEnd").Range("A1") = Target.Column
For i = 1 To ColumnCount
Range("DataRange").Cells(1, i).Value = Worksheets("Backend").Range("A4").Offset(0, i - 1).Value
Next i
End If
End Sub
Note that this code works well for the way my data and workbook is constructed. If you change the structure of the data, you will have to modify the code accordingly.
Download the Example File
You May Also Like the Following Excel Tutorials:
- Sort Worksheets in Excel (Alphabetically)
- How to Filter Data in a Pivot Table in Excel.
- Dynamic Excel Filter Search Box – Extract Data as you Type.
- How to do a Multi-level Data Sorting in Excel.
- Excel Advanced Filter – A Complete Guide with Examples.
- 24 Useful Excel Macro Examples for VBA Beginners.
- How to Use Excel VBA InStr Function (with practical EXAMPLES).
- Excel VBA Autofilter.
Excel VBA Sort
There are different ways to sort the data in Microsoft Excel. There is a sort icon under Excel Data tab ribbon from where you can sort your data in a jiffy and get the results. Why there is a need to write the complex VBA code then?
You need to keep it in your mind every time, VBA codes are there to automate the things. Suppose you have a data which gets updated every now and then. Maybe every Day, Weekly, Monthly, etc. and you need your data in a specific sorted manner. In such cases, VBA SORT function can be used and will come out as a handy tool for your reference.
VBA has a Range.Sort method to sort the data for you. Where Range specifies the range of cells which we want to sort out in ascending or descending order.
The syntax for Range.Sort is as given below:
Where,
- Key – Column/Range you need to sort. Ex. If you want to sort cells A1:A10, you should mention Range(A1:A10)
- Order – This is the parameter which allows you to sort the data in ascending or descending order.
- Header – This is the parameter which specifies whether your column/range has headers or not.
These three parameters are enough for our proceedings. However, there are some other parameters like MatchCase, SortMethod, etc. which you can always explore and see how they work.
How to Use Excel VBA Sort Function?
We will learn how VBA Sort can be used to sort the column without headers, a column with headers and Multiple columns with examples in excel.
You can download this VBA Sort Excel Template here – VBA Sort Excel Template
VBA Sort Function – Example #1
Sorting single column without a header
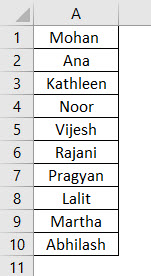
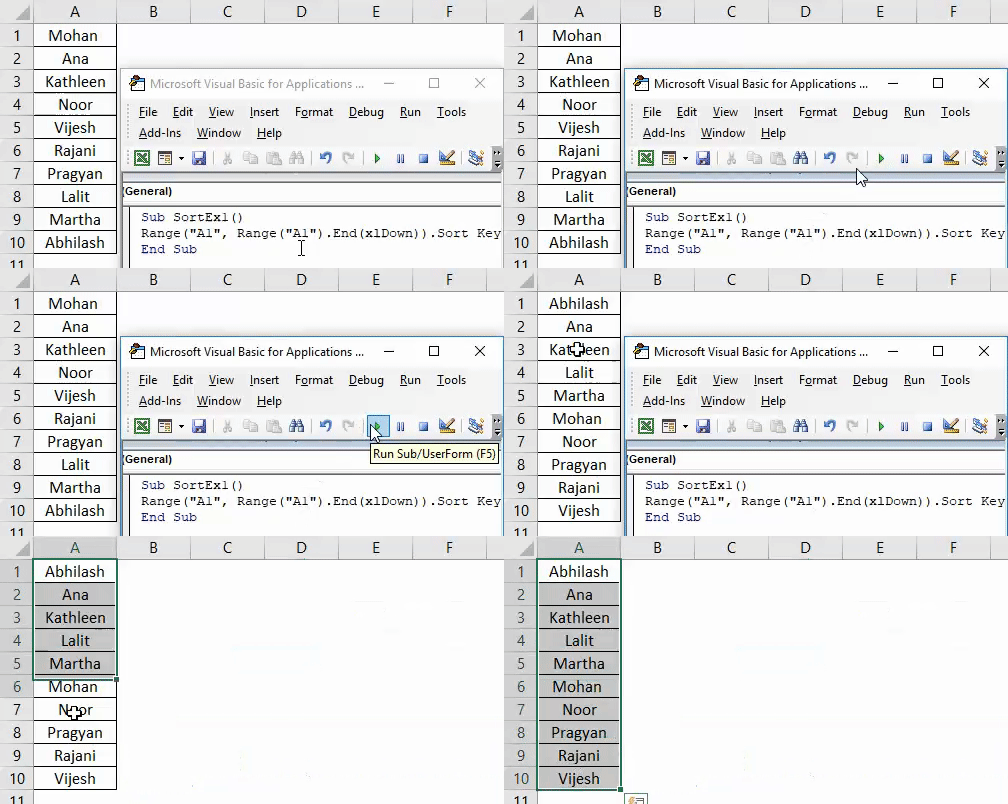
Suppose you have a column with names as shown below and all you need is to sort this data alphabetically in ascending or descending order.
Follow the below steps to use Sort function in VBA.
Step 1: Define a new sup-procedure under a module and create a macro.
Code:
Sub SortEx1()

End Sub
Step 2: Use Range.Sort function to be able to sort this column in ascending order.
Code:
Sub SortEx1()

Range("A1", Range("A1").End(xlDown)).Sort

End Sub
Here you are giving range starting from cell A1 to the last used/non-empty cell (see the function .End(xlDown)) to Range.Sort function.
Step 3: Now, input the argument values.
Code:
Sub SortEx1()

Range("A1", Range("A1").End(xlDown)).Sort Key1:=Range("A1"), Order1:=xlAscending, Header:=xlNo

End Sub
As we have discussed earlier, Key, Order, and Header are the important and necessary arguments to be provided. We have given Range(“A1”) as the column starting range which we need to sort. Order is provided as Ascending and Header as No (Which means column doesn’t have header).
This code will check for all non-empty cells starting from A1 and then sort them in ascending order starting from cell A1.
Step 4: Run this code by hitting F5 or Run button manually and see the output.
If you can compare this with the image at the start of this example, you can see that names are sorted in ascending order.
VBA Sort Function – Example #2
Sorting a Single Column with Header
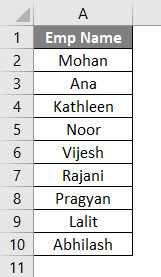
Suppose you have a column with the header as shown below. And you wanted to sort this column in ascending or descending order.
Follow the below steps to use Sort function in VBA.
Step 1: Define a new sub-procedure under a new model to store the macro.
Code:
Sub SortEx2()

End Sub
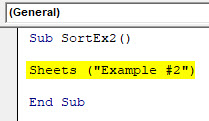
Step 2: Use Sheets(“Example #2”) to specify which sheet your data is.
Code:
Sub SortEx2()

Sheets ("Example #2")

End Sub
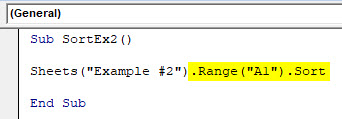
Step 3: Use Range(“A1”).Sort in front of the above code line to make it a sort function.
Code:
Sub SortEx2()

Sheets("Example #2").Range("A1").Sort

End Sub
Step 4: Provide Key1 as Range(“A1”) to sort the data from cell A1, Order1 in order to sort the data in ascending or descending order and Header as Yes in order to let the system know that first row is header in your data.
Code:
Sub SortEx2()

Sheets("Example #2").Range("A1").Sort Key1:=Range("A1"), Order1:=xlAscending, Header:=xlYes

End Sub
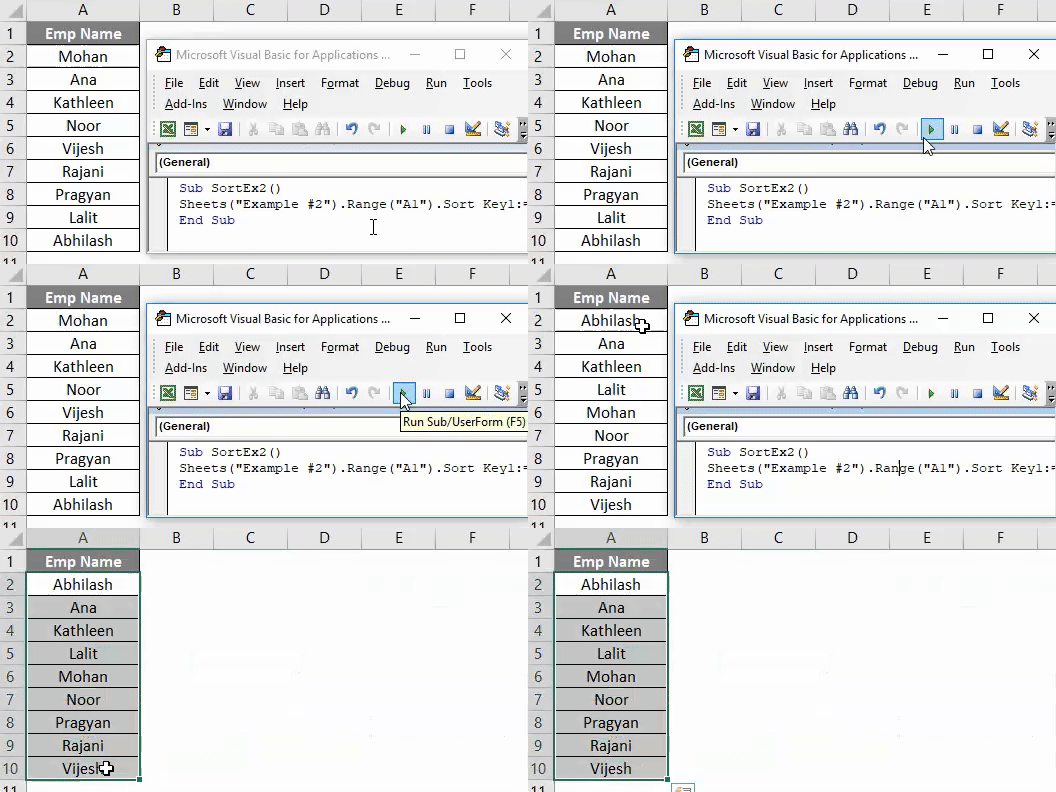
Step 5: Run this code by hitting F5 or Run button manually and See the output.
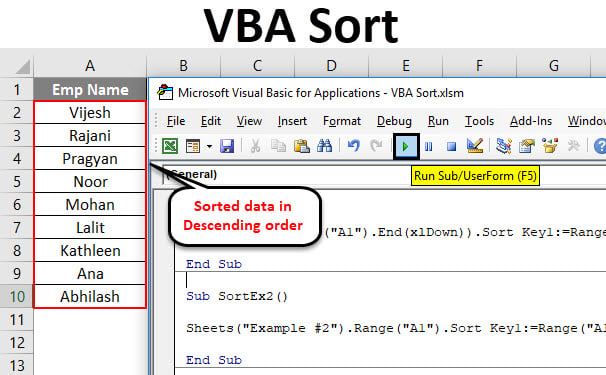
Here, the data from Example #2 of given excel workbook is sorted in ascending order given that it has a header. Which means that, while sorting this data, first row (which contains Emp Name) is neglected because it is considered as a header for this data in column A.
You can also sort the same data in descending order of alphabets. All you need to do is change the order from ascending to descending.
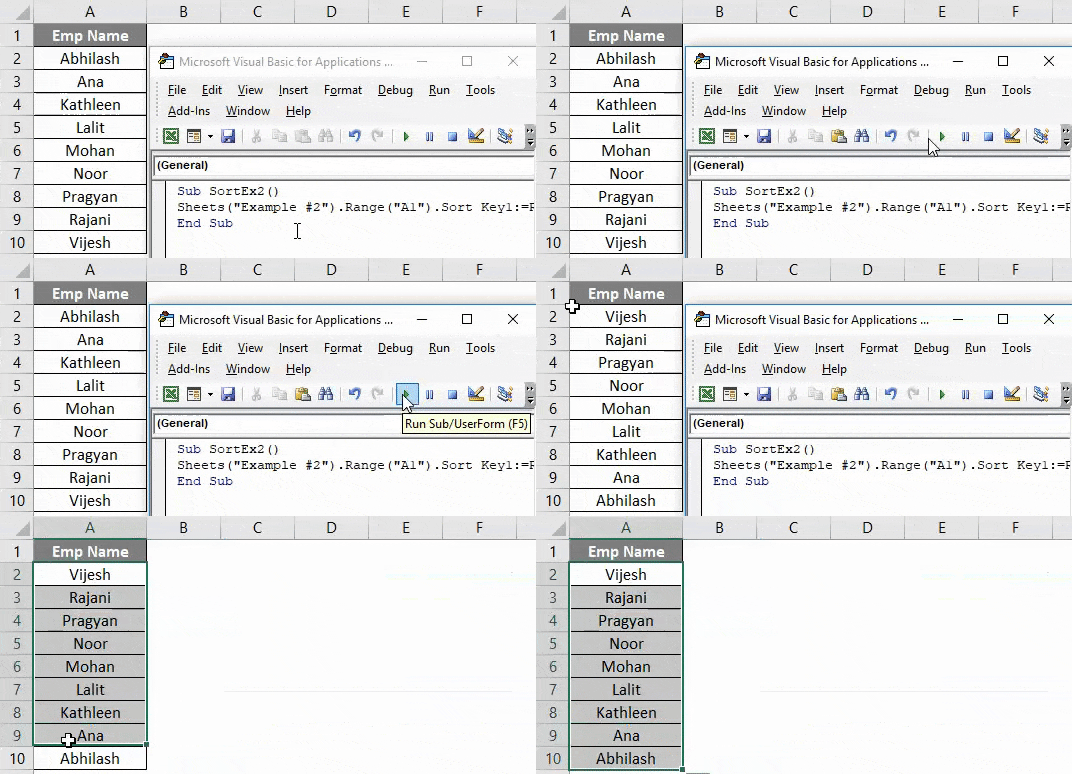
Step 6: Change order1 to descending in order to sort the data in descending order.
Code:
Sub SortEx2()

Sheets("Example #2").Range("A1").Sort Key1:=Range("A1"), Order1:=xlDescending, Header:=xlYes

End Sub
Step 7: Run the code and see an output as given below.
You can see that the data is sorted in Descending order.
VBA Sort Function – Example #3
Sorting Multiple Columns with Headers
Till now, we have covered how to sort a single column data in ascending or descending order (without header and with header). What if you have data which you need to sort based on multiple columns? Is it possible to write a code for the same?
The answer is, “Yes, surely it can be done!”
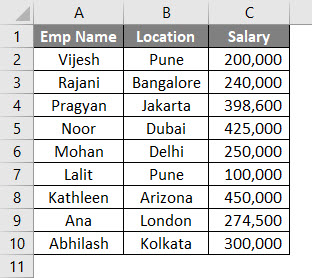
Suppose you have data as given below:
You wanted to sort this data first by Emp Name and then by Location. Follow the below steps to see how we can code it in VBA.
Step 1: Define a new sub-procedure to add a macro under a new module.
Code:
Sub SortEx3()

End Sub
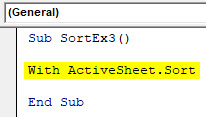
Step 2: Use a With… End With statement to add multiple sort conditions in a single loop.
Code:
Sub SortEx3()

With ActiveSheet.Sort

End Sub
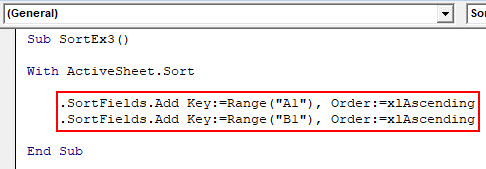
Step 3: Now, use SortFields.Add to add the multiple sort conditions in the same worksheet.
Code:
Sub SortEx3()

With ActiveSheet.Sort

   .SortFields.Add Key:=Range("A1"), Order:=xlAscending
   .SortFields.Add Key:=Range("B1"), Order:=xlAscending

End Sub
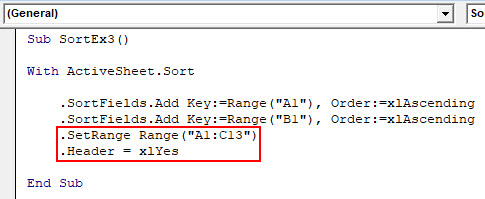
Step 4: Decide sheet range to be sorted and header In next step.
Code:
Sub SortEx3()

With ActiveSheet.Sort

    .SortFields.Add Key:=Range("A1"), Order:=xlAscending
    .SortFields.Add Key:=Range("B1"), Order:=xlAscending
    .SetRange Range("A1:C13")
    .Header = xlYes

End Sub
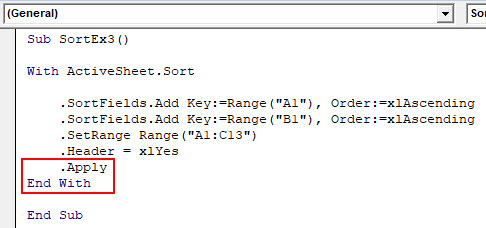
Step 5: Use .Apply to apply all these things under with statement and close the loop writing End With.
Code:
Sub SortEx3()

With ActiveSheet.Sort

    .SortFields.Add Key:=Range("A1"), Order:=xlAscending
    .SortFields.Add Key:=Range("B1"), Order:=xlAscending
    .SetRange Range("A1:C13")
    .Header = xlYes
    .Apply
End With

End Sub
Step 6: Run this code by hitting F5 or Run button manually and see the Output.
In this code, ActiveSheets.Sort helps the system identify the sheet under which data is to be sorted. SortFields.Add allows adding two sorting conditions with their order (Ascending in both cases). SetRange allows the system to set the range from A1 to C13. You can move this range up as well. Apply statements allows the system to apply all the changes made in With loop.
Finally, you’ll get the data which is sorted based on Emp Name First and then by Location.
Things to Remember
- Under VBA Sort, you can create named ranges instead of cell references and use the same. Ex. If you have created the named range for cell A1:A10 as “EmpRange”, you can use it under Range.Sort like Range(“EmpRange”).
- You can sort the data in ascending as well as in descending order same as that of in excel.
- If you are not sure whether your data has a header or not, you can use xlGuess under Header section to let system guess whether the first line of data is a header or not.
Recommended Articles
This has been a guide to Excel VBA Sort. Here we discussed VBA Sort and how to use Excel VBA Sort Function along with practical examples and downloadable excel template. You can also go through our other suggested articles –
- VBA Match
- VBA Month
- VBA While Loop
- VBA XML
Содержание
- Vba excel метод sort
- Range.Sort method (Excel)
- Syntax
- Parameters
- Return value
- Example
- Support and feedback
- Метод Range.Sort (Excel)
- Синтаксис
- Параметры
- Возвращаемое значение
- Пример
- Поддержка и обратная связь
Vba excel метод sort
На этом шаге мы рассмотрим параметры этого метода и пример его использования .
Сортировка позволяет выстраивать данные в лексикографическом порядке по возрастанию или убыванию. Метод Sort осуществляет сортировку строк списков и баз данных, а также столбцов рабочих листов с учетом до трех критериев, по которым производится сортировка. Сортировка данных вручную совершается с использованием команды Данные | Сортировка (Data | Sort) .
| Аргумент | Назначение |
|---|---|
| Объект | Диапазон, который будет сортироваться |
| key1 | Ссылка на первое упорядочиваемое поле |
| order1 | Задает порядок упорядочивания. Допустимые значения:
|
| key2 | Ссылка на второе упорядочиваемое поле |
| order2 | Задает порядок упорядочивания. Допустимые значения:
|
| key3 | Ссылка на третье упорядочиваемое поле |
| order3 | Задает порядок упорядочивания. Допустимые значения:
|
| header | Допустимые значения:
|
| orderCustom | Пользовательский порядок сортировки. По умолчанию используется Normal |
| matchCase | Допустимые значения: True (учитывается регистр) и False (регистр не учитывается) |
| orientation | Допустимые значения:
|
Таблица 1. Аргументы метода Sort
Например, диапазон А1:С20 рабочего листа Лист1 сортируется следующей командой в порядке возрастания так, что первоначальная сортировка происходит по первому столбцу этого диапазона, а второстепенная — по второму.
Приведем соответствие между аргументами метода Sort и сортировкой данных на рабочем листе вручную при помощи команды Данные | Сортировка (Data | Sort) .
- Выделяем диапазон A1:G13 , содержащий записи базы данных о туристах, которые должны быть отсортированы (рисунок 1).
Рис.1. Сортируемый список
В методе Sort за диапазон с записями, подлежащими сортировке, отвечает объект, к которому применяется метод. В данном случае метод Sort надо применить к диапазону R ange(«A1:G13») .
Выберем команду Данные | Сортировка (Data | Sort) . В результате появится диалоговое окно Сортировка диапазона (Sort) (рисунок 2).
Рис.2. Диалоговое окно Сортировка диапазона
Используя это окно, можно установить до трех критериев, по которым производится сортировка.
- Выбор в списках Сортировать по (Sort by) , Затем по (Then by) и В последнюю очередь, по (Then by) определяют поля, используемые для фильтрации списка.
- Переключатели по возрастанию (Ascending) и по убыванию (Descending) , расположенные рядом с каждым раскрывающимся списком, определяют порядок сортировки.
- Записи для идентификации полей, выводимые в раскрывающихся списках, определяются группой Идентифицировать диапазон данных по (My list has) . Если в этой группе выбран переключатель подписям (первая строка диапазона) (Header row) , то в раскрывающихся списках выводятся тексты из первых строк диапазонов. Если выбран переключатель обозначениям столбцов листа (No header row) , то выводятся названия столбцов.
Например, отсортируем базу данных о туристах в порядке возрастания полей, выбранных в качестве критериев сортировки, установив первоначальным критерием поле Направление тура , вторичным — Оплачено . Сортировку по третьему критерию производить не будем. Так как был выбран диапазон A1:G13 , содержащий названия полей, то для идентификации полей выберем в группе Идентифицировать поля по (My list has) переключатель подписям (первая строка диапазона) (Header row) . В методе Sort за выбор поля, по которому производится первоначальная сортировка, отвечает аргумент key1 . В данном случае для выбора поля Направление тура аргументу key1 надо присвоить значение Range («D2») . Порядок сортировки по первому критерию устанавливается аргументом order1 . В данном случае сортируем по возрастанию, поэтому аргументу order1 присваиваем xlAscending . Вторичная сортировка происходит по полю Оплачено по возрастанию, поэтому аргументам key2 и order2 присваиваем Range («E2») и xlAscending соответственно. Параметром, отвечающим за идентификацию полей, является header . В данном случае в группе Идентифицировать поля по (My list has) выбран переключатель подписям (первая строка диапазона) (Header row) , поэтому параметру header присвоим значение xlYes . Таким образом, имеем:
Нажатие кнопки OK приведет к сортировке записей по указанным критериям (рисунок 3).
Рис.3. Результат сортировки
На следующем шаге мы рассмотрим метод Subtotal .
Источник
Range.Sort method (Excel)
Sorts a range of values.
Syntax
expression.Sort (Key1, Order1, Key2, Type, Order2, Key3, Order3, Header, OrderCustom, MatchCase, Orientation, SortMethod, DataOption1, DataOption2, DataOption3)
expression A variable that represents a Range object.
Parameters
| Name | Required/Optional | Data type | Description |
|---|---|---|---|
| Key1 | Optional | Variant | Specifies the first sort field, either as a range name (String) or Range object; determines the values to be sorted. |
| Order1 | Optional | XlSortOrder | Determines the sort order for the values specified in Key1. |
| Key2 | Optional | Variant | Second sort field; cannot be used when sorting a PivotTable. |
| Type | Optional | Variant | Specifies which type of elements are to be sorted within a PivotTable. Specify xLSortLabels to sort by the labels targeted by the experession Range in the Row/Colum Labels areas of the PivotTable’s range, or xLSortValues when Key1 additionally targets a cell in the Values or Sub/Grand Totals areas using R1C1 notation. |
| Order2 | Optional | XlSortOrder | Determines the sort order for the values specified in Key2. |
| Key3 | Optional | Variant | Third sort field; cannot be used when sorting a PivotTable. |
| Order3 | Optional | XlSortOrder | Determines the sort order for the values specified in Key3. |
| Header | Optional | XlYesNoGuess | Specifies whether the first row contains header information. xlNo is the default value; specify xlGuess if you want Excel to attempt to determine the header. |
| OrderCustom | Optional | Variant | Specifies a one-based integer offset into the list of custom sort orders. |
| MatchCase | Optional | Variant | Set to True to perform a case-sensitive sort, False to perform a non-case-sensitive sort; cannot be used with PivotTables. |
| Orientation | Optional | XlSortOrientation | Specifies if the sort should be by row (default) or column. Set xlSortColumns value to 1 to sort by column. Set xlSortRows value to 2 to sort by row (this is the default value). |
| SortMethod | Optional | XlSortMethod | Specifies the sort method. |
| DataOption1 | Optional | XlSortDataOption | Specifies how to sort text in the range specified in Key1; does not apply to PivotTable sorting. |
| DataOption2 | Optional | XlSortDataOption | Specifies how to sort text in the range specified in Key2; does not apply to PivotTable sorting. |
| DataOption3 | Optional | XlSortDataOption | Specifies how to sort text in the range specified in Key3; does not apply to PivotTable sorting. |
Return value
Example
This example gets the value of the color of a cell in column A by using the ColorIndex property, and then uses that value to sort the range by color.
Support and feedback
Have questions or feedback about Office VBA or this documentation? Please see Office VBA support and feedback for guidance about the ways you can receive support and provide feedback.
Источник
Метод Range.Sort (Excel)
Сортирует диапазон значений.
Синтаксис
expression. Сортировка (Key1, Order1, Key2, Type, Order2, Key3, Order3, Header, OrderCustom, MatchCase, Orientation, SortMethod, DataOption1, DataOption2, DataOption3)
выражение: переменная, представляющая объект Range.
Параметры
| Имя | Обязательный или необязательный | Тип данных | Описание |
|---|---|---|---|
| Key1 | Необязательный | Variant | Указывает первое поле сортировки в виде имени диапазона (String) или объекта Range ; определяет отсортированные значения. |
| Order1 | Необязательный | XlSortOrder | Определяет порядок сортировки для значений, указанных в Key1. |
| Key2 | Необязательный | Variant | Второе поле сортировки; не может использоваться при сортировке сводной таблицы. |
| Type | Необязательный | Variant | Указывает, какой тип элементов следует отсортировать в сводной таблице. Укажите xLSortLabels для сортировки по меткам, предназначенным для диапазонаexperession в областях Метки строк или колумов в диапазоне сводной таблицы, или xLSortValues, если Key1 дополнительно ориентируется на ячейку в областях Значений или Под/итоговых значений с помощью нотации R1C1. |
| Order2 | Необязательный | XlSortOrder | Определяет порядок сортировки для значений, указанных в Key2. |
| Key3 | Необязательный | Variant | Третье поле сортировки; не может использоваться при сортировке сводной таблицы. |
| Заказ3 | Необязательный | XlSortOrder | Определяет порядок сортировки для значений, указанных в Key3. |
| Header | Необязательный | XlYesNoGuess | Указывает, содержит ли первая строка сведения о заголовке. xlNo — значение по умолчанию; укажите xlGuess, если вы хотите, чтобы Excel попытался определить заголовок. |
| OrderCustom | Необязательный | Variant | Задает одночисленное смещение в списке настраиваемых заказов сортировки. |
| MatchCase | Необязательный | Variant | Задайте значение True , чтобы выполнить сортировку с учетом регистра, значение False — для сортировки без учета регистра; не может использоваться со сводными таблицами. |
| Orientation | Необязательный | XlSortOrientation | Указывает, должна ли сортировка выполняться по строке (по умолчанию) или столбцу. Задайте для xlSortColumns значение 1, чтобы сортировать по столбцам. Задайте значение xlSortRows равным 2, чтобы сортировать по строкам (это значение по умолчанию). |
| SortMethod | Необязательный | XlSortMethod | Указывает метод сортировки. |
| DataOption1 | Необязательный | XlSortDataOption | Указывает, как сортировать текст в диапазоне, указанном в Key1; не применяется к сортировке сводной таблицы. |
| DataOption2 | Необязательный | XlSortDataOption | Указывает способ сортировки текста в диапазоне, указанном в Key2; не применяется к сортировке сводной таблицы. |
| DataOption3 | Необязательный | XlSortDataOption | Указывает способ сортировки текста в диапазоне, указанном в Key3; не применяется к сортировке сводной таблицы. |
Возвращаемое значение
Пример
В этом примере возвращается значение цвета ячейки в столбце A с помощью свойства ColorIndex , а затем используется это значение для сортировки диапазона по цвету.
Поддержка и обратная связь
Есть вопросы или отзывы, касающиеся Office VBA или этой статьи? Руководство по другим способам получения поддержки и отправки отзывов см. в статье Поддержка Office VBA и обратная связь.
Источник


