
Имитация нажатия клавиш на клавиатуре в VBA Excel с помощью оператора SendKeys, в том числе эмуляция нажатия сочетаний клавиш. Синтаксис, коды, примеры.
Параметры оператора SendKeys:
| Параметр | Описание |
|---|---|
| string | Обязательный параметр. Строковое выражение, возвращающее код клавиши (сочетания клавиш). |
| wait | Необязательный параметр. Логическое значение, определяющее режим ожидания. False (по умолчанию) – контроль процедуре возвращается сразу после отправки кода клавиш. True – перед возвратом контроля процедуре коды клавиш обрабатываются. |
Имитация нажатия клавиш
Эмуляция нажатия алфавитно-цифровых клавиш из кода VBA Excel, не представляющих спецсимволы: параметру string задается значение символа в прямых кавычках, например, "А", "Абвгд", "356".
Имитация нажатия клавиш, представляющих спецсимволы: параметру string задается значение символа в фигурных скобках, например, "{^}", "{)}".
Спецсимволы, которые следует заключать в фигурные скобки: плюс +, возведение в степень ^, знак процента %, тильда ~, круглые скобки (), квадратные скобки [] и сами фигурные скобки {}. Символы фигурных скобок указываются так: "{{}" и "{}}".
Для эмуляции нажатия специальных клавиш, включая функциональные и клавиши управления курсором, используются специальные коды, заключенные в фигурные скобки.
Фигурные скобки используются и для имитации нескольких нажатий одной клавиши из кода VBA Excel. В этом случае параметр string записывается в виде {клавиша число}, где число – количество нажатий. Например: "{а 10}".
Коды специальных клавиш
| Клавиша | Код |
|---|---|
| BACKSPACE | {BACKSPACE} или {BS} |
| BREAK | {BREAK} |
| CAPS LOCK | {CAPSLOCK} |
| DEL или DELETE | {DELETE} или {DEL} |
| СТРЕЛКА ВНИЗ | {DOWN} |
| END | {END} |
| ENTER | {ENTER} или ~ |
| ESC | {ESC} |
| HELP | {HELP} |
| HOME | {HOME} |
| INS или INSERT | {INSERT} или {INS} |
| СТРЕЛКА ВЛЕВО | {LEFT} |
| NUM LOCK | {NUMLOCK} |
| PAGE DOWN | {PGDN} |
| PAGE UP | {PGUP} |
| PRINT SCREEN | {PRTSC} |
| СТРЕЛКА ВПРАВО | {RIGHT} |
| SCROLL LOCK | {SCROLLLOCK} |
| TAB | {TAB} |
| СТРЕЛКА ВВЕРХ | {UP} |
| F1 … F16 | {F1} … {F16} |
Эмуляция сочетаний клавиш
Чтобы указать сочетание клавиш с SHIFT, CTRL, ALT или их комбинацией, необходимо добавить перед кодом клавиши один или несколько следующих кодов:
| Клавиша | Код |
|---|---|
| SHIFT | + |
| CTRL | ^ |
| ALT | % |
Чтобы указать, что клавиши SHIFT, CTRL и ALT в любом сочетании необходимо удерживать, нажимая несколько других клавиш, заключите код для последних клавиш в круглые скобки. Например, чтобы указать, что нужно удерживать клавишу SHIFT, нажимая клавиши а, б, в, г, д, введите "+(абвгд)".
Важное примечание:
Применение оператора SendKeys может приводить к автоматическому отключению* правого цифрового блока клавиатуры (переключает на стрелки и специальные клавиши). Чтобы вернуть исходную функциональность цифрового блока, необходимо в конце процедуры применить имитацию нажатия клавиши «NUM LOCK»: SendKeys "{NUMLOCK}". К сожалению, работает не всегда.
* Обнаружено в Windows 8.1 (Excel 2016).
Примеры с оператором SendKeys
Коды примеров запускаются через кнопку на рабочем листе, иначе имитация нажатия клавиш произойдет в окне редактора VBA с записью символов внутри процедуры. Попробуйте, ради интереса, запустить код первого примера из редактора VBA.
Пример 1
Заполняем первые три ячейки столбца «A» различными значениями, имитируя нажатия клавиш из кода VBA Excel:
|
Sub Primer1() ‘Выбираем первую ячейку Range(«A1»).Select ‘Нажимаем клавиши «а», «б» и «в» SendKeys «абв» ‘Нажимаем «ENTER» SendKeys «~» ‘Нажимаем клавиши «1», «2», «3» и «ENTER» SendKeys «123 ~» ‘Нажимаем клавишу «7» пять раз и «ENTER» SendKeys «{7 5} ~» ‘Активируем правый цифровой блок ‘SendKeys «{NUMLOCK}» End Sub |
Пример 2
Раскрываем с помощью кода VBA Excel автофильтр или выпадающий список (имитация нажатия сочетания клавиш ALT+↓):
|
Sub Primer2() ‘Выбираем ячейку с автофильтром или раскрывающимся списком Range(«D1»).Select ‘Раскрываем список SendKeys «%{DOWN}» ‘Активируем правый цифровой блок ‘SendKeys «{NUMLOCK}» End Sub |
Пример 3
Еще три варианта эмуляции нажатия сочетаний клавиш:
|
‘Создание новой книги SendKeys «^n» ‘Открытие Диспетчера имен SendKeys «^{F3}» ‘Открытие Диспетчера задач SendKeys «^+{ESC}» |
Содержание
- Application.SendKeys method (Excel)
- Syntax
- Parameters
- Remarks
- Example
- Support and feedback
- VBA Excel. Первая кнопка (для начинающих)
- Добавление вкладки «Разработчик»
- Кнопка – элемент управления формы
- Вставка кнопки на лист
- Создание процедуры для кнопки
- VBA Excel. Оператор SendKeys (имитация нажатия клавиш)
- Синтаксис оператора SendKeys
- Имитация нажатия клавиш
- Коды специальных клавиш
- Эмуляция сочетаний клавиш
- Примеры с оператором SendKeys
- VBA Excel. Элемент управления CommandButton (кнопка)
- Элемент управления CommandButton
- Свойства элемента CommandButton
- Примеры кода VBA Excel с кнопкой
- Пример 1
- Условие примера 1
- Решение примера 1
Application.SendKeys method (Excel)
Sends keystrokes to the active application.
Syntax
expression.SendKeys (Keys, Wait)
expression A variable that represents an Application object.
Parameters
| Name | Required/Optional | Data type | Description |
|---|---|---|---|
| Keys | Required | Variant | The key or key combination that you want to send to the application, as text. |
| Wait | Optional | Variant | True to have Microsoft Excel wait for the keys to be processed before returning control to the macro. False (or omitted) to continue running the macro without waiting for the keys to be processed. |
This method places keystrokes in a key buffer. In some cases, you must call this method before you call the method that will use the keystrokes. For example, to send a password to a dialog box, you must call the SendKeys method before you display the dialog box.
The Keys argument can specify any single key or any key combined with Alt, Ctrl, or Shift (or any combination of those keys). Each key is represented by one or more characters, such as «a» for the character a, or «» for the Enter key.
To specify characters that aren’t displayed when you press the corresponding key (for example, Enter or Tab), use the codes listed in the following table. Each code in the table represents one key on the keyboard.
(tilde)
| Key | Code |
|---|---|
| BACKSPACE | or |
| BREAK | |
| CAPS LOCK | |
| CLEAR | |
| DELETE or DEL | or |
| DOWN ARROW | |
| END | |
| ENTER (numeric keypad) | |
| ENTER | |
| ESC | or |
| HELP | |
| HOME | |
| INS | |
| LEFT ARROW | |
| NUM LOCK | |
| PAGE DOWN | |
| PAGE UP | |
| RETURN | |
| RIGHT ARROW | |
| SCROLL LOCK | |
| TAB | |
| UP ARROW | |
| F1 through F15 | through |
You can also specify keys combined with Shift and/or Ctrl and/or Alt. To specify a key combined with another key or keys, use the following table.
| To combine a key with | Precede the key code with |
|---|---|
| Shift | + (plus sign) |
| Ctrl | ^ (caret) |
| Alt | % (percent sign) |
Example
The following example creates a new workbook.
The following example displays the Name Manager.
The following example enters the value 1234 into the Active Cell.
Support and feedback
Have questions or feedback about Office VBA or this documentation? Please see Office VBA support and feedback for guidance about the ways you can receive support and provide feedback.
Источник
VBA Excel. Первая кнопка (для начинающих)
Вставка командной кнопки на рабочий лист для начинающих программировать с нуля. Кнопки из коллекций «Элементы управления формы» и «Элементы ActiveX».
Начинаем программировать с нуля
Часть 3. Первая кнопка
[Часть 1] [Часть 2] [Часть 3] [Часть 4]
Добавление вкладки «Разработчик»
Вкладка с инструментами, связанными с VBA Excel, называется «Разработчик». Если этой вкладки нет на вашей ленте, добавьте ее через окно «Параметры»:

- Откройте окно «Параметры» через меню «Файл».
- Выберите вкладку «Настроить ленту».
- В правой колонке установите галочку у пункта «Разработчик» и нажмите «OK».
Кнопка – элемент управления формы
Вставка кнопки на лист
- Выберите вкладку «Разработчик» и нажмите на кнопку «Вставить».
- Нажмите на значок кнопки в коллекции «Элементы управления формы».

- Кликните в любом месте на рабочем листе Excel.
- Откроется окно «Назначить макрос объекту». Нажмите «Отмена», так как макрос для этой кнопки еще не готов.
- После нажатия кнопки «Отмена», на рабочем листе появится новая кнопка из коллекции «Элементы управления формы» в режиме редактирования.

Ухватив мышкой за один из кружочков, можно изменить размер кнопки. Ухватив кнопку за границу, можно перетащить ее в другое место. Также, в режиме редактирования, можно изменить название кнопки прямо на ее поверхности.
Чтобы выйти из режима редактирования кнопки из коллекции «Элементы управления формы», кликните в любом месте на рабочем листе.
Чтобы вернуться в режим редактирования кнопки, кликните по ней правой кнопкой мыши и выберите из контекстного меню нужный пункт. Если вы хотите изменить размер или размещение кнопки перетаскиванием, кликните левой кнопкой мыши в любом месте рабочего листа. После первого клика контекстное меню закроется, а кнопка останется в режиме редактирования.
Создание процедуры для кнопки
Кнопке из коллекции «Элементы управления формы» можно назначить макрос (процедуру), размещенную в стандартном программном модуле.
Создайте или откройте файл Excel с расширением .xlsm (Книга Excel с поддержкой макросов) и перейдите в редактор VBA, нажав сочетание клавиш «Левая_клавиша_Alt+F11».
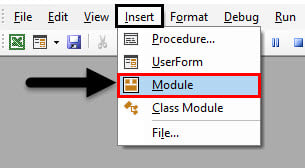
Если вы не создавали ранее в этом проекте VBA стандартный программный модуль, нажмите кнопку «Module» во вкладке «Insert» главного меню. То же подменю откроется при нажатии на вторую кнопку (после значка Excel) на панели инструментов.

Ссылка на модуль появится в проводнике слева. Если модуль создан ранее, дважды кликните по его ссылке в проводнике, и он откроется справа для редактирования.
Нажмите кнопку «Procedure…» во вкладке «Insert» главного меню. Та же ссылка будет доступна при нажатии на вторую кнопку после значка Excel на панели инструментов.

В открывшемся окне добавления шаблона процедуры оставьте выбранным переключатель «Sub», вставьте в поле «Name» название процедуры «NovayaProtsedura» и нажмите «OK».

В стандартный программный модуль будет вставлен шаблон процедуры «NovayaProtsedura».

Вставьте внутрь шаблона процедуры следующий код:
Источник
VBA Excel. Оператор SendKeys (имитация нажатия клавиш)
Имитация нажатия клавиш на клавиатуре в VBA Excel с помощью оператора SendKeys, в том числе эмуляция нажатия сочетаний клавиш. Синтаксис, коды, примеры.
Синтаксис оператора SendKeys
Параметры оператора SendKeys:
| Параметр | Описание |
|---|---|
| string | Обязательный параметр. Строковое выражение, возвращающее код клавиши (сочетания клавиш). |
| wait | Необязательный параметр. Логическое значение, определяющее режим ожидания. False (по умолчанию) – контроль процедуре возвращается сразу после отправки кода клавиш. True – перед возвратом контроля процедуре коды клавиш обрабатываются. |
Имитация нажатия клавиш
Эмуляция нажатия алфавитно-цифровых клавиш из кода VBA Excel, не представляющих спецсимволы: параметру string задается значение символа в прямых кавычках, например, «А» , «Абвгд» , «356» .
Имитация нажатия клавиш, представляющих спецсимволы: параметру string задается значение символа в фигурных скобках, например, «<^>» , «<)>» .
Спецсимволы, которые следует заключать в фигурные скобки: плюс + , возведение в степень ^ , знак процента % , тильда
, круглые скобки () , квадратные скобки [] и сами фигурные скобки <> . Символы фигурных скобок указываются так: «<<>» и «<>>» .
Для эмуляции нажатия специальных клавиш, включая функциональные и клавиши управления курсором, используются специальные коды, заключенные в фигурные скобки.
Фигурные скобки используются и для имитации нескольких нажатий одной клавиши из кода VBA Excel. В этом случае параметр string записывается в виде <клавиша число>, где число – количество нажатий. Например: «<а 10>» .
Коды специальных клавиш
| Клавиша | Код |
|---|---|
| BACKSPACE | или |
| BREAK | |
| CAPS LOCK | |
| DEL или DELETE | или |
| СТРЕЛКА ВНИЗ | |
| END | |
| ENTER | или |
ESC HELP HOME INS или INSERT
или СТРЕЛКА ВЛЕВО NUM LOCK PAGE DOWN PAGE UP PRINT SCREEN СТРЕЛКА ВПРАВО SCROLL LOCK TAB СТРЕЛКА ВВЕРХ F1 … F16 …
Эмуляция сочетаний клавиш
Чтобы указать сочетание клавиш с SHIFT, CTRL, ALT или их комбинацией, необходимо добавить перед кодом клавиши один или несколько следующих кодов:
| Клавиша | Код |
|---|---|
| SHIFT | + |
| CTRL | ^ |
| ALT | % |
Чтобы указать, что клавиши SHIFT, CTRL и ALT в любом сочетании необходимо удерживать, нажимая несколько других клавиш, заключите код для последних клавиш в круглые скобки. Например, чтобы указать, что нужно удерживать клавишу SHIFT, нажимая клавиши а, б, в, г, д, введите «+(абвгд)» .
* Обнаружено в Windows 8.1 (Excel 2016).
Примеры с оператором SendKeys
Коды примеров запускаются через кнопку на рабочем листе, иначе имитация нажатия клавиш произойдет в окне редактора VBA с записью символов внутри процедуры. Попробуйте, ради интереса, запустить код первого примера из редактора VBA.
Пример 1
Заполняем первые три ячейки столбца «A» различными значениями, имитируя нажатия клавиш из кода VBA Excel:
Источник
VBA Excel. Элемент управления CommandButton (кнопка)
Элемент управления пользовательской формы CommandButton, используемый в VBA Excel для запуска процедур и макросов. Свойства кнопки, примеры кода с ней.
Элемент управления CommandButton
Для запуска процедур и макросов обычно используется событие кнопки – Click.
Свойства элемента CommandButton
| Свойство | Описание |
|---|---|
| AutoSize | Автоподбор размера кнопки. True – размер автоматически подстраивается под длину введенной надписи (заголовка). False – размер элемента управления определяется свойствами Width и Height. |
| BackColor | Цвет элемента управления CommandButton. |
| Caption | Надпись (заголовок) – текст, отображаемый на кнопке. |
| ControlTipText | Текст всплывающей подсказки при наведении курсора на кнопку. |
| Enabled | Возможность взаимодействия пользователя с элементом управления CommandButton. True – взаимодействие включено, False – отключено (цвет надписи становится серым). |
| Font | Шрифт, начертание и размер текста надписи. |
| Height | Высота элемента управления. |
| Left | Расстояние от левого края внутренней границы пользовательской формы до левого края элемента управления. |
| Picture | Добавление изображения вместо текста заголовка или дополнительно к нему. |
| PicturePosition | Выравнивание изображения и текста на кнопке. |
| TabIndex | Определяет позицию элемента управления в очереди на получение фокуса при табуляции, вызываемой нажатием клавиш «Tab», «Enter». Отсчет начинается с 0. |
| Top | Расстояние от верхнего края внутренней границы пользовательской формы до верхнего края элемента управления. |
| Visible | Видимость элемента управления CommandButton. True – элемент отображается на пользовательской форме, False – скрыт. |
| Width | Ширина элемента управления. |
| WordWrap | Перенос текста заголовка на новую строку при достижении ее границы. True – перенос включен, False – перенос выключен. |
В таблице перечислены только основные, часто используемые свойства кнопки. Все доступные свойства отображены в окне Properties элемента управления CommandButton.
Пример кнопки с надписью и изображением
Примеры кода VBA Excel с кнопкой
Изначально для реализации примеров на пользовательскую форму UserForm1 добавлена кнопка CommandButton1.
Пример 1
Изменение цвета и надписи кнопки при наведении на нее курсора.
Условие примера 1
- Действия при загрузке формы: замена заголовка формы по умолчанию на «Пример 1», замена надписи кнопки по умолчанию на «Кнопка», запись цвета кнопки по умолчанию в переменную уровня модуля.
- Сделать, чтобы при наведении курсора на кнопку, она изменяла цвет на зеленый, а надпись «Кнопка» менялась на надпись «Нажми!»
- Добавление кода VBA Excel, который будет при удалении курсора с кнопки возвращать ей первоначальные настройки: цвет по умолчанию и надпись «Кнопка».
Решение примера 1
1. Объявляем в разделе Declarations модуля пользовательской формы (в самом начале модуля, до процедур) переменную myColor:
Источник
Excel VBA SendKeys
In this article, we will see an outline on Excel VBA SendKeys. Have you ever thought of creating a program that saves your worksheet automatically and you don’t need to hit the Ctrl + S or Excel Save button to do so? It seems to be a fantasy, right? However, this can be done. In VBA, there is a command statement called SendKeys which allows you to send the keypresses as a command to the application in the same way as if you are using the keyboard to do the task. (Ex. Saving the File. You do Ctrl + S button-through keyboard to save a file). It is recommended to use SendKeys as the last option while you are automating any task. The reason behind this is, as we already discussed, SendKeys sends the keystrokes to the application that is currently active. What if you have an application window active at the time of code running under which you don’t want the changes to happen? It will give unexpected results, right? This is the sole reason, we should use SendKeys as the last option while automating the things. It can be used for the small automation though, where no other application environment is about to interfere with the one which you wanted the change to happen.
Syntax SendKeys Method
Following is a syntax SendKeys Method:
SendKeys(String As String, [Wait])
Where,
The first argument ‘String As String’ specifies the key combinations that you wanted to use under the program (Ex. Ctrl + S would be the key combination).
Wait would be an optional parameter which takes Boolean values TRUE and FALSE. If the wait has the value TRUE, it means the system will wait for the keys to be processed and then go to the next line and compile/run the same. If the wait value is FALSE (can keep blank), then the system will not wait for the keys to be processed and will continue to run the entire code.
Certain methods are using which you can combine the keystrokes with Ctrl, Shift or Alt. Let’s see how we can do that Following is a table that specifies the keystroke combinations for SendKeys with Ctrl, Shift and Alt:
| Key to be combined with | Operator to be used preceding the keys for combination |
| Shift | + (Keyboard Plus Sign) |
| Ctrl | ^ (Caret Operator Sign) |
| Alt | % (Percentage Sign) |
Well, what does that mean? It means, if you want to use a keyboard combination as Ctrl + S under the code, you can use the SendKeys method and do it with SendKeys then a Caret (^) operator for Ctrl and then “s”. It will save the current worksheet in your excel file.
How to Use the SendKeys Method in Excel VBA?
We will learn how to use SendKeys Method in Excel by using the VBA Code.
You can download this VBA SendKeys Excel Template here – VBA SendKeys Excel Template
VBA SendKeys – Example #1
Let’s have some simple examples that will allow us to dive deeper into the working of the VBA SendKeys command.
In this first example, we are about to see very simple automation that automatically saves the current Excel file that is open. You don’t need to hit the Save button or Ctrl + S to save the file. Follow the steps below to achieve the result.
Step 1: Open Module from the Insert menu tab as shown below.
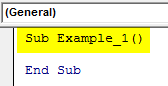
Step 2: Define a new sub-procedure that can hold your macro.
Code:
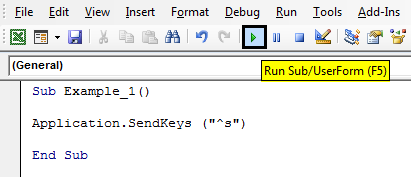
Sub Example_1()

End Sub
Step 3: Now, to save any file, you have a keyboard key combination as Ctrl + S. to convert this into code, we can use the caret operator (^) and then the “s” keyword as an argument to SendKeys statement.
Code:
Sub Example_1()

Application.SendKeys ("^s")

End Sub
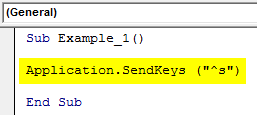
Here, keyword Application specifies the Application to which we are sending the keystrokes (in this case Excel application). “^s” under the parentheses specifies the similar keyboard operation Ctrl + S.
Step 4: Run this code by hitting the Run button or by pressing the F5 key.
After the successful run of this code, your file is saved.
VBA SendKeys – Example #2
Now, we are about to see, how to close a current application by sending softkeys through the macro code using the SendKeys method. Follow the steps below:
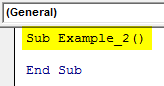
Step 1: Write the sub-procedure that can hold your macro under the module.
Code:
Sub Example_2()

End Sub
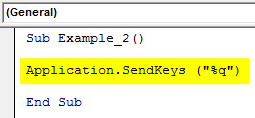
Step 2: Use Application.SendKeys method to pass the keyboard softkeys to the application. Since the current VBA pane can be closed with the keyboard Alt + Q shortcut, we can use “%q” under macro.
Code:
Sub Example_2()

Application.SendKeys ("%q")

End Sub
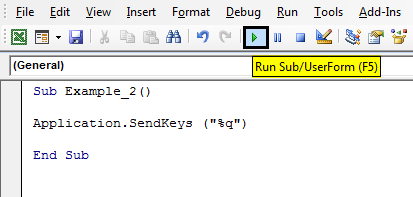
Step 3: Hit the Run button or F5 to run this code. As soon as you run this code, the current Visual Basic Editor will close and you will navigate to the Excel file.
VBA SendKeys – Example #3
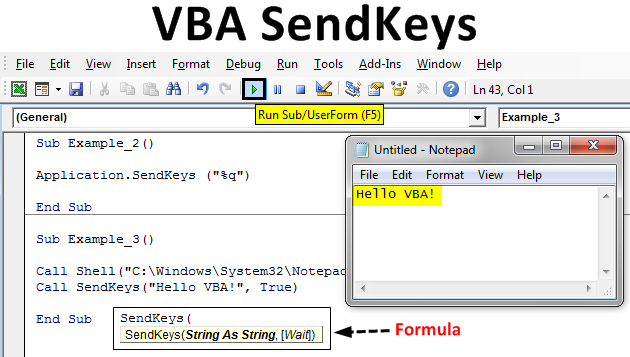
Now, we are going to write a code that automatically opens the Notepad and writes a text in it automatically. See the screenshot below:
Step 1: Write the sub-procedure that can hold your macro under the module.
Code:
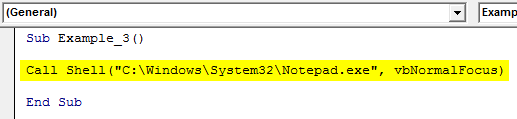
Sub Example_3()

End Sub

The Call Shell allows the system to open the application. The path is where the Notepad.exe is present. vbNormalFocus is an optional argument that specifies the focus on opening and restoring the application to its original size and position.
Step 2: Use Call and Sendkeys in combination so that the system can add a text in Notepad.
Code:
Sub Example_3()

Call Shell("C:WindowsSystem32Notepad.exe", vbNormalFocus)

End Sub
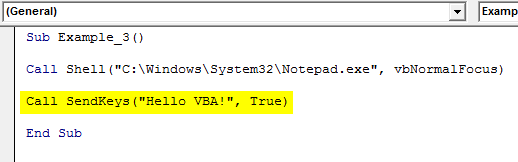
Step 3: Here, we are adding the text “Hello VBA!” using SendKeys to the Notepad. True specifies the waiting time for SendKeys command.
Code:
Sub Example_3()

Call Shell("C:WindowsSystem32Notepad.exe", vbNormalFocus)

Call SendKeys("Hello VBA!", True)

End Sub
Step 4: Run this code by hitting the F5 key or by clicking on the Run button.
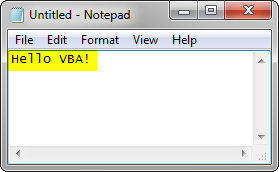
This is how we can use the SendKeys method to automate the applications through VBA macro.
Things to Remember
- Be very careful while using SendKeys since it may give unexpected results if you have multiple applications open.
- You can use the SendKeys to automate the small tasks like saving an Excel File or Closing an Excel File etc.
- Use the SendKeys method as a last option while you are trying to automate the things.
Recommended Article
This is a guide to VBA SendKeys. Here we discuss how to use SendKeys Method in Excel VBA along with practical examples and downloadable excel template. You can also go through our other suggested articles –
- VBA While Loop
- VBA Environ
- VBA Goal Seek
- VBA Name Worksheet
Excel VBA SendKeys
SendKeys in VBA language is a method to send keystrokes to the active window so we can work manually after that. Whenever we use alphabets as the keys, all the alphabets need to be in lowercase characters. It is a complex method and recommended to use only if necessary and when you are out of options.
“SendKeys” is one of the more complex topics to understand. Not many of us use this feature in VBA, but it is always good to have more knowledge on more topics. This article will show you how to use the SendKeys function. You may find it difficult to reread the article multiple times with a practical approach to learn fast and better.
Table of contents
- Excel VBA SendKeys
- Syntax
- Examples to use Excel VBA SendKeys Method
- Example #1
- Example #2
- Things to Remember
- Recommended Articles
You are free to use this image on your website, templates, etc, Please provide us with an attribution linkArticle Link to be Hyperlinked
For eg:
Source: VBA SendKeys (wallstreetmojo.com)
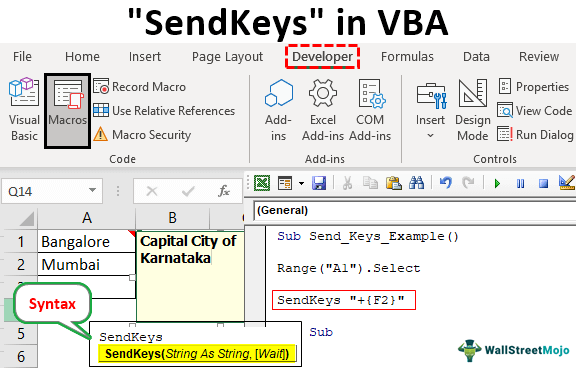
Syntax
Below is the syntax of the VBA SendKeys method.
![]()
Keys or String: The kind of key that we need to send to the active application.
Wait: In this argument, we can use two things: TRUE or FALSE.
- TRUE if you want the Excel to wait for the assigned Keys to process before returning the control to the Macro.
- FALSE if you ignore the Wait parameter, this will be the default value. If you choose FALSE, Excel continues to run the Macro without waiting for the keys to process to the active window.
We use the keyboard’s common keys: “Ctrl, Shift, and ALT.” So, with the SendKeys method, we need to use them with special characters. The below table shows the special characters for the above three common keys.
| Key | Character | Character Description |
|---|---|---|
| Ctrl | ^ | Caret |
| Shift | + | Plus Sign |
| ALT | % | Percent Sign |
Other keys have different keys and characters. The below table shows the detailed explanation for each key.
| Key | Code |
|---|---|
| BACKSPACE | {BACKSPACE} or (BS} |
| BREAK | {BREAK} |
| CAPS LOCK | {CAPSLOCK} |
| CLEAR | {CLEAR} |
| DELETE or DEL | {DELETE} or {DEL} |
| DOWN ARROW | {DOWN} |
| END | {END} |
| ENTER (numeric keypad) | {ENTER} |
| ENTER | ~ {tilde} |
| ESCAPE | {ESCAPE} or {ESC} |
| HELP | {HELP} |
| HOME | {HOME} |
| INS | {INSERT} |
| LEFT ARROW | {LEFT} |
| NUM LOCK | {NUMLOCK} |
| PAGE DOWN | {PGDN} |
| PAGE UP | {PGUP} |
| RETURN | {RETURN} |
| RIGHT ARROW | {RIGHT} |
| SCROLL LOCK | {SCROLLLOCK} |
| TAB | {TAB} |
| UP ARROW | {UP} |
| F1 through F15 | {F1} through {F15} |
As per the requirement, we can use any of the above keys. With some practical examples, we will show you how to use SendKeys.
Examples to use Excel VBA SendKeys Method
You can download this VBA SendKeys Excel Template here – VBA SendKeys Excel Template
Example #1
Look at the below cell value.

We have values in three cells. For example, in the first cell, we have a value of “Bangalore.” So for this cell, there is a comment as the “Capital City of Karnataka.”
Now, using “SendKeys,” we try to edit this comment.
Open the Excel sheet. Go to the Visual Basic Editor, and start the VBA subprocedureSUB in VBA is a procedure which contains all the code which automatically gives the statement of end sub and the middle portion is used for coding. Sub statement can be both public and private and the name of the subprocedure is mandatory in VBA.read more.
Code:
Sub Send_Keys_Example()

End Sub

First, we need to select the comment cell to edit the comment. So, use the code RANGE(“A1”).Select
Code:
Sub Send_Keys_Example()

Range("A1").Select

End Sub

Once the cell is selected, we will act on editing the comments. Here, we must recollect the keyboard shortcutAn Excel shortcut is a technique of performing a manual task in a quicker way.read more we used to edit the comment.
We use the shortcut key “Shift + F2” to edit the comment.

If you press this key, it will edit the comment.
Now, open the “SendKeys” method.
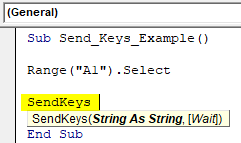
In the SendKeys method, the character for using the SHIFT key is “+” (Plus sign), so enter the “+” sign-in code.

Now, plus sign works as a SHIFT key. The next key, along with SHIFT, we use is the F2 key. We need to enclose function keys with curly brackets whenever we use function keys. So, enter the function key F2 in the curly bracket.
Code:
Sub Send_Keys_Example()

Range("A1").Select

SendKeys "+{F2}"

End Sub

Now execute the code and see what we get.
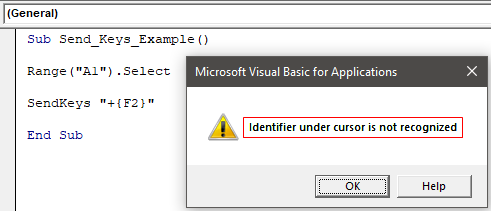
When we tried to execute the code, we got the message above. One of the key things we need to keep in mind is we cannot run the Macro, which uses “SendKeys” from the Visual Basic Editor window.
We need to run the code from the “Macro” list.
Close the Visual Basic EditorThe Visual Basic for Applications Editor is a scripting interface. These scripts are primarily responsible for the creation and execution of macros in Microsoft software.read more Window first.
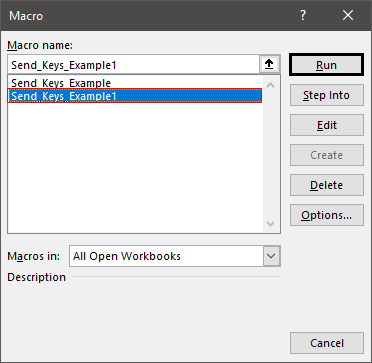
Go to the “Developer” tab and click on “Macros.”

Now, a list of all the Macros opens up. Choose the Macro that you need to run. Our Macro name is “Send_Keys_Example,” so we will press the “Run” button.

You can see that the “Edit” comment option is enabled.

As you can see above, it has assigned the shortcut key of SHIFT + F2 to open the edit comment option.
Example #2
We can do this if you want to open the “Paste SpecialPaste special in Excel allows you to paste partial aspects of the data copied. There are several ways to paste special in Excel, including right-clicking on the target cell and selecting paste special, or using a shortcut such as CTRL+ALT+V or ALT+E+S.read more” window through the SendKeys method. But, first, we need to copy certain cells and then use the SendKeys.
Code:
Sub Send_Keys_Example1()

Range("A1").Copy

SendKeys "%es"

End Sub

Choose the Macro you need to run and click on “Run.”
When you run the code, it will open below the Paste Special dialog box.

Things to Remember
- The SendKeys assigns keystrokes to the active application.
- This method is complex and recommended only if necessary and when you are out of options.
- Whenever we use alphabets as the keys, all the alphabets need to be in lowercase characters.
Recommended Articles
This article has been a guide to SendKeys in VBA. Here, we discuss the examples of the VBA SendKeys method, used to send keystrokes to the active window to work manually in Excel. Below you can find some useful Excel VBA articles: –
- VBA ReDim Array
- VBA ByVal
- VBA String Comparison
- VBA On Error GoTo
Return to VBA Code Examples
VBA SendKeys
The VBA SendKeys method is used to send keystrokes to the active application:
Application.SendKeys ("s")The above code will mimic pressing the “s” key on the keyboard.
The SendKeys method takes two arguments:
- Keys – The key(s) you want to send to the application as text.
- Wait (Optional) – This value can either be True or False. If True, then Excel waits for the keys to be processed first before running the next line of code. If False, then Excel continues to run the procedure without waiting for the keys to be processed.
SendKeys is usually used when interacting with other applications because it’s a quick and easy way to accomplish tasks. For example, you might use SendKeys when automating Internet Explorer.
However, you should be extremely careful when using the SendKeys Method since it can have unexpected results. We recommend using SendKeys only as a last resort and/or when mistakes are tolerable (or easily detectable).
VBA SendKeys Examples
Each key in terms of letters is represented by their character, for example a is “a”.
If you would like to use keys in combination with Ctrl, Shift or Alt then you have to precede the key code with the following:
| Key | Code |
|---|---|
| Ctrl | ^ |
| Shift | + |
| Alt | % |
The following code uses the SendKeys Method to save the workbook:
Sub UsingSendKeys()

Application.SendKeys ("^s")

End Sub
As we mentioned before, you need to be extremely careful when using SendKeys. The following code specifies a waiting time of 10 seconds before the text is entered/sent to Notepad. By waiting 10 seconds, you allow Notepad a chance to open properly, reducing the chance of an error.
Note: This code uses the Application.Wait Method.
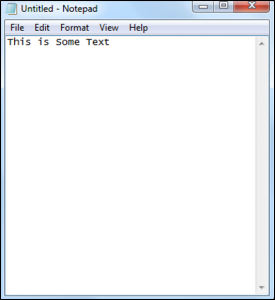
Sub UsingSendKeysWithWait()

Call Shell("C:Windowssystem32Notepad.Exe", vbNormalFocus)
Application.Wait (Now() + TimeValue("00:00:10"))
Call SendKeys("This is Some Text", True)

End Sub
The result after 10 seconds of waiting time is:
SendKeys can be an extremely quick and easy way to accomplish tasks. However, the risks of errors are relatively high. Only use SendKeys when that risk is acceptable!
VBA Coding Made Easy
Stop searching for VBA code online. Learn more about AutoMacro — A VBA Code Builder that allows beginners to code procedures from scratch with minimal coding knowledge and with many time-saving features for all users!

Learn More!