

Using Excel for Mac is a great way to gather and analyse data. However, the amount of data collected by businesses is becoming challenging to manage, so Mac users are turning to VBA macros to help.
Using Excel VBA for Mac enables you to streamline processes and automate mundane tasks. Depending on the Excel versions you’re running, one way to do this is by adding Excel VBA macros in the VBA editor dialogue box/code window.
As a team of expert Excel Programmers, The Excel Experts understand the many benefits of using VBA and how it works on different types of computers, such as Macs.
Like many software tools, VBA works slightly differently on Mac compared to the Windows version. While the fundamentals are the same, there are some differences that Mac users need to be aware of when creating a personal macro workbook.
If your company uses Mac Office, and you want to learn more about how to use Excel VBA on these computers, then keep reading.
We’ve put together this guide to everything you need to know about VBA, the benefits of using it and how you can get started using it on your Mac today.

What Is VBA? (Visual Basic For Applications)
VBA, which stands for Visual Basic For Applications, is the programming language created by Microsoft that allows users to modify Excel worksheets and create custom solutions that suit their needs.
When using VBA in Excel, users can create macros, which are sets of instructions that can help them automate basic tasks such as sending automatic emails and making specific calculations or moving data from one part of the sheet to another.
VBA can be used across a range of Microsoft Office applications. As well as Excel, it can also be used in PowerPoint, Publisher, Word and more.
As such, learning how to use VBA is important when you’re trying to make the most of Microsoft’s suite of solutions and adapt them to fit your organisation’s unique needs.
NEED HELP WITH EXCEL VBA?
The Excel Experts can help you or your business complete an unfinished project, integrate web applications, automate tasks, and much more.

What Is Visual Basic Editor?
Visual Basic Editor is a separate application from Excel, which helps users to use VBA in Excel. Therefore, when you’re learning to use VBA, it’s vital that you download VB Editor and learn how to use it.
It is the application where you keep and edit your VBA code. It’s separate from your Excel workbooks and can help you to improve your programming skills and keep your VBA code safe, particularly if your spreadsheets are communal and you give other users file access.
With VBA editor, you can manage your code and learn new skills. The editor is very different to traditional Excel and other Microsoft applications, but it is also intuitive and easy to learn thanks to the simple user interface.

Opening The Visual Basic Editor For MAC
There are multiple ways to open the Visual Basic Editor in Excel 2011 for Mac. One way is to click on the “Developer” tab and then click on the “Visual Basic” button.
Another way is to press “Ctrl+F11” simultaneously.
What Are Excel Macros?
A macro is effectively an instruction, which you can make in Excel using VBA. A macro can be run as many times as you like, and when it’s being run, the macro will fulfil its task.
One prime example of a macro is setting up a workbook to automatically send an email to a specific group of addresses. You can put the email addresses and any other personalised info into an Excel workbook and set up the macro to automatically fill in a Word document as the emails are being created.
Then, when you run the macro, the emails will be created and automatically sent with personalised information, saving you time and hard work.
If you want to use macros, you need to create a macro-enabled workbook in Excel. These workbooks are different from normal spreadsheets and can have security issues, particularly if you take macros from the internet, which might potentially be dangerous. You can also create your own macros using the macro recorder feature.
So, when you’re using macros, you should collaborate with the professionals here at The Excel Experts. We can help you to create bespoke instructions and manage them. Our team can also assist your staff and support them so that they always use macros correctly.

Will Excel Macros Work On Mac?
If you have Excel downloaded onto your Mac, macros will definitely work. However, macros don’t work on Apple’s version of Excel, called Numbers, so if you try using them there, you’ll like get an error message.
So, if you haven’t downloaded Microsoft Office onto your Mac, you should do so immediately to start making and using macros.

Discover how to use Microsoft Excel with the latest edition from Leonard J Ledger.
Enabling Macros In Excel On Mac
Enabling macros in Excel on Mac is as easy as working on a Microsoft computer, but slightly different from Windows versions. Thankfully, Microsoft recognises that many computer users love Macs, so they’ve created guidelines to help you easily enable macros on a Mac.
All you have to do is open the Excel menu bar and then go to the Preferences menu. Click on the Security and Privacy section and click macros that you want enabled.
If you’re happy with the macros you have, then you can allow your computer to run all macros. If you want to manually enable macros or to only allow macros with a notification, then these options are available also so that you can choose the best approach for you.
Manually Recording A Macro In Excel On Mac
To manually record a macro in Excel when using a Mac, you need first to open Excel and go to Preferences again. You then need to select Ribbons and Toolbar, then select the Developer tab.
Then when you save your preferences, the Developer tab will remain visible on the side of your Excel screen whenever you have the program open.
Once you have the Developer tab open, you can select Record Macro and follow the instructions to create the macro. You’ll need to include a macro name, description and shortcut key, as well as the instructions that you want to give the program while it runs the macro.

Benefits Of Using Excel VBA For Mac
If you’re looking to supercharge your Excel workbooks, then using VBA can be the ideal solution for you and your organisation. Especially as it can be used with other Office apps.
Using Excel VBA for Mac offers many benefits, as it can allow you to improve automation throughout your organisation and streamline your administrative processes.
Here are some of the main benefits of using Excel VBA for Mac.
It Saves Time
Macros can save you time and effort by following code and automating simple tasks, such as sending mass emails or linking specific Microsoft programs and transferring data between them. This can save you and your team valuable time and allow you to continue to drive your business forward towards greater success.
Macros Reduce Repetitive Tasks
Undertaking repetitive tasks, such as manual data entry, can be de-motivating for your staff, so using a macro to do them instead can help you to support your team.
Personalisation Is Easy
Macros can easily be changed to suit what you need using the code editor. You can set and change the parameters you need to get the solutions required to support your organisation.
Using Macros On Excel Is Easier Than You Might Think
Using macros on Excel is intuitive and remarkably easy, so it’s worth spending some time learning about these innovative tools, as it will save your team a lot of time and effort going forward.
Making Macros Is Free
While learning how to make macros and improve your company’s VBA knowledge can come at a cost, making your own macros is free. If you want to collaborate with experts like us to get bespoke macros for your business, then you can easily do this at an affordable cost.
In Summary: Use VBA For Mac To Automate Tasks And Save Time
As this article highlights, VBA is a useful solution that can help you to personalise your Excel workbooks and save you time and effort.
While VBA can save you a lot of time if you use it correctly, if you make mistakes, these could take a lot of hard work and effort to rectify.
As such, you need to make sure that you understand VBA and the basics of Excel and how the two work. Once you know how to use VBA in Excel, you can start testing it out and learning about the practical implications of this versatile programming language.
The first step in learning how to use VBA is to check out Excel training courses to learn the basics. Then you can start using bespoke Excel tools and custom Excel spreadsheets to make the most of your business’s data and save your precious time.

About The Excel Experts
For business leaders and executives who aren’t experienced in using Excel and VBA, The Excel Experts are here to help. Whether your team uses Macs or another brand of computer, we can help you to understand the benefits of VBA and use it.
We offer loads of useful resources on our blog, so you can learn more about how to make the most out of Excel and other Microsoft products.
To get more bespoke support and tailored advice on how to use our Excel services to support your business, then you can get in touch with us or visit our Excel VBA Consulting page.
Our friendly and experienced team is always happy to help business leaders from across the corporate market make the most of Excel.
NEED HELP WITH EXCEL VBA?
The Excel Experts can help you or your business complete an unfinished project, integrate web applications, automate tasks, and much more.
Содержание
- 1 Включение макросов в Excel на Mac
- 2 Запись макроса вручную в Excel на Mac
- 2.1 Пример 1: дневной объем продаж и среднечасовой
- 3 Макросы VBA в Excel на Mac
- 3.1 Пример 2: дневной объем продаж и среднечасовое значение с кодом
- 3.2 Шаг 1: Объявление переменных
- 3.3 Шаг 2: для каждого цикла
- 3.4 Шаг 3: пометьте свои резюме
- 4 Что дальше для макросов в Excel на Mac?
Excel на Mac не всегда был таким же мощным, как в Windows. Макросы действительно не будут работать, если они не были созданы исключительно для Mac.
Начиная с 2013 года Microsoft вернула макросы. Существует два типа макросов: те, которые вы можете создать, быстро записывая свои действия, и те, которые используют VBA для разработки более совершенной автоматизации. В Office 2016 Excel использует одну и ту же кодовую базу на всех платформах. Это изменение облегчит работу макросов на разных платформах.
Итак, давайте посмотрим, как это работает в MacOS.
Включение макросов в Excel на Mac
Работа с макросами в Excel на вашем Mac может быть отключена по умолчанию. Этот параметр объясняется тем, что макросы могут быть потенциальным переносчиком
, Самый простой способ узнать, есть ли у вас разработчик Вкладка доступна на ленте в Excel. Если вы этого не видите, это просто включить.

Нажмите на превосходить в строке меню, а затем выберите предпочтения в раскрывающемся списке. В меню нажмите на лента Панель инструментов. В правом списке разработчик должен быть внизу, установите флажок. Наконец, нажмите Сохранить и вы должны увидеть вкладку «Разработчик» в конце ленты.
После создания каждой книги с макросами сохраните ее в новом формате. .XLSM использовать макросы после повторного открытия файла. Если вы забудете, Excel будет напоминать вам каждый раз, когда вы пытаетесь сохранить. Вам также нужно будет включать макросы каждый раз, когда вы открываете файл.
Запись макроса вручную в Excel на Mac
Хотя вы можете кодировать макросы
Это может быть не для всех. Если вы не готовы начать работу с VBA, Excel позволит вам записать шаги для вашего макроса на существующий лист. Нажмите на вкладку Разработчик, чтобы увидеть ваши варианты.

Вы ищете третий вариант на ленте, Запись макроса. Нажмите на это, и появится диалоговое окно, позволяющее вам назвать ваш макрос и установить сочетание клавиш. Вы можете настроить свой макрос на Текущая рабочая тетрадь, Новая рабочая книга, или в вашем Личная Макро Книга. Персональная книга макросов находится в вашем профиле пользователя и позволяет вам использовать ваши макросы между вашими файлами.
Как только вы запишите свои действия, они будут доступны на этой же вкладке. Нажатие макросов вызовет сохраненные макросы в вашей книге. Нажмите на название вашего макроса и нажмите Бежать запустить ваши записанные действия.
Пример 1: дневной объем продаж и среднечасовой
Для примера макроса, вы собираетесь просмотреть ежедневный лист продаж, с разбивкой продаж по часам. Ваш макрос будет добавлять ежедневные итоги продаж, а затем добавлять среднее значение в последнем столбце каждого почасового периода. Если вы работаете в сфере розничной торговли или занимаете другие позиции, это полезный лист для отслеживания доходов.
Нам нужно настроить первый лист. Использование этого первого бланка в качестве шаблона для ежедневного копирования на новую вкладку может сэкономить вам время. В первом столбце / строке поставить час / дату. Через верх добавить с понедельника по пятницу.
Затем в первом столбце приведите разбивку почасовых итогов от 8-5. Я использовал 24-часовое время, но вы можете использовать нотацию AM / PM, если хотите. Ваш лист должен соответствовать скриншоту выше.
Добавьте новую вкладку и скопируйте в нее свой шаблон. Затем заполните данные о продажах за день. (Если у вас нет данных для заполнения этого листа, вы можете ввести = RANDBETWEEN (10,1000) во всех ячейках, чтобы создать фиктивные данные.) Затем нажмите на разработчик в ленте.
Затем нажмите на Запись макроса. В диалоговом окне введите имя как AverageandSum и оставить его в Эта книга. Вы можете установить клавишу быстрого доступа, если хотите. Вы можете ввести описание, если вам нужно больше подробностей о том, что делает макрос. Нажмите кнопку ОК, чтобы начать настройку макроса.
В нижней части почасовых списков введите Ежедневные итоги. В ячейку рядом с ним введите = СУММ (В2: В10). Затем скопируйте и вставьте это в остальные столбцы. Потом в шапку добавь Средний после последнего столбца. Затем в следующую ячейку вниз введите = Среднее (В2: F2),. Затем вставьте это в ячейки в оставшейся части столбца.
Затем нажмите Остановить запись. Теперь ваш макрос можно использовать на каждом новом листе, который вы добавляете в свою книгу. Как только у вас будет другой лист данных, вернитесь к разработчик и нажмите макрос. Ваш макрос должен быть выделен, нажмите Run, чтобы добавить свои суммы и средние значения.
Этот пример может сэкономить вам пару шагов, но для более сложных действий, которые можно сложить. Если вы выполняете одинаковые операции с данными с одинаковым форматированием, используйте записанные макросы.
Макросы VBA в Excel на Mac
Записанные вручную макросы в Excel помогают с данными, которые всегда имеют одинаковый размер и форму. Это также полезно, если вы хотите выполнять действия на всем листе. Вы можете использовать свой макрос, чтобы доказать проблему.

Добавьте еще один час и день на лист и запустите макрос. Вы увидите, что макрос перезаписывает ваши новые данные. Чтобы обойти это, мы используем код, чтобы сделать макрос более динамичным с помощью VBA, которая является уменьшенной версией Visual Basic.
, Реализация ориентирована на автоматизацию для Office.

Это не так легко подобрать, как Applescript
, но автоматизация Office полностью построена на Visual Basic. Поэтому, как только вы поработаете с ним здесь, вы сможете быстро развернуться и использовать его в других приложениях Office. (Это также может быть очень полезно, если вы застряли на ПК с Windows на работе.)
При работе с VBA в Excel у вас есть отдельное окно. Снимок экрана выше — это наш записанный макрос, который отображается в редакторе кода. Оконный режим может быть полезен для игры с вашим кодом в процессе обучения. Когда ваш макрос зависает, есть инструменты отладки, чтобы посмотреть на состояние ваших переменных и данных листа.
Office 2016 теперь поставляется с полным редактором Visual Basic. Это позволяет вам использовать Object Browser и средства отладки, которые раньше были ограничены версией Windows. Вы можете получить доступ к Обозревателю объектов, перейдя в Вид> Обозреватель объектов или просто нажмите Shift + Command + B. Затем вы можете просмотреть все доступные классы, методы и свойства. Это было очень полезно при создании кода в следующем разделе.
Пример 2: дневной объем продаж и среднечасовое значение с кодом
Прежде чем вы начнете кодировать свой макрос, давайте начнем с добавления кнопки в шаблон. Этот шаг значительно упрощает доступ начинающего пользователя к вашему макросу. Они могут нажать кнопку, чтобы вызвать макрос, а не копаться во вкладках и меню.

Вернитесь к пустому шаблону, который вы создали на последнем шаге. Нажмите на разработчик чтобы вернуться на вкладку. Когда вы перейдете на вкладку, нажмите на кнопка. Затем щелкните где-нибудь на листе шаблона, чтобы разместить кнопку. Появится меню макросов, назовите ваш макрос и нажмите новый.
Окно Visual Basic откроется; вы увидите его в списке как Module2 в браузере проекта. Панель кода будет иметь Sub AverageandSumButton () вверху и несколькими строчками вниз End Sub. Ваш код должен находиться между этими двумя, поскольку это начало и конец вашего макроса.
Шаг 1: Объявление переменных
Для начала вам нужно будет объявить все ваши переменные
, Они находятся в блоке кода ниже, но обратите внимание на то, как они построены. Вы должны объявить все переменные, используя тусклый перед именем, а затем как с типом данных.
Sub AverageandSumButton()
Dim RowPlaceHolder As Integer
Dim ColumnPlaceHolder As Integer
Dim StringHolder As String
Dim AllCells As Range
Dim TargetCells As Range
Dim AverageTarget As Range
Dim SumTarget As Range
Теперь, когда у вас есть все ваши переменные, вам нужно сразу использовать некоторые переменные диапазона. Диапазоны — это объекты, которые содержат разделы рабочего листа в качестве адресов. Переменная Все клетки будет установлен на все активные ячейки на листе, который включает в себя метки столбца и строки. Вы получите это, позвонив ActiveSheet объект, а затем UsedRange имущество.
Проблема в том, что вам не нужны метки, включенные в средние и суммарные данные. Вместо этого вы будете использовать подмножество диапазона AllCells. Это будет диапазон TargetCells. Вы вручную объявляете его диапазон. Его начальный адрес будет ячейкой во втором ряду во втором столбце диапазона.
Вы называете это, называя AllCells диапазон, используя его ячейки класс, чтобы получить эту конкретную ячейку, используя (2,2). Чтобы получить последнюю ячейку в диапазоне, вы все равно позвоните AllCells. На этот раз с помощью SpecialCells способ получить собственность xlCellTypeLastCell. Вы можете увидеть оба из них в блоке кода ниже.
  Set AllCells = ActiveSheet.UsedRange
Set TargetCells = Range(AllCells.Cells(2, 2), AllCells.SpecialCells(xlCellTypeLastCell))
Шаг 2: для каждого цикла
Следующие два раздела кода предназначены для каждого
петли. Эти циклы проходят через объект, чтобы воздействовать на каждое подмножество этого объекта. В этом случае вы делаете два из них, один для каждой строки и один для каждого столбца. Поскольку они почти одинаковы, здесь только один из них; но оба находятся в блоке кода. Детали практически идентичны.
Перед тем, как начать цикл для каждой строки, вам нужно установить целевой столбец, в котором цикл записывает среднее значение для каждой строки. Вы используете ColumnPlaceHolder переменная, чтобы установить эту цель. Вы устанавливаете это равным подсчитывать переменная ячейки класс AllCells. Добавьте один к нему, чтобы переместить его справа от ваших данных, добавив +1.
Далее вы собираетесь запустить цикл с помощью Для каждого. Затем вы хотите создать переменную для подмножества, в этом случае, subRow. После В, мы устанавливаем основной объект, который мы анализируем TargetCells. присоединять .Ряды в конце ограничить цикл только каждой строкой, а не каждой ячейкой в диапазоне.
Внутри цикла вы используете метод ActiveSheet.Cells, чтобы установить конкретную цель на листе. Координаты задаются с помощью subRow.Row чтобы получить строку, в которой в данный момент находится цикл. Затем вы используете ColumnPlaceHolder для другой координаты.
Вы используете это для всех трех шагов. Первое вы добавляете .значение после скобок и установить равным WorksheetFunction.Average (subRow). Это записывает формулу среднего значения строки в целевую ячейку. Следующая строка, которую вы добавляете .Стиль и установите это равным «Валюта». Этот шаг соответствует остальной части вашего листа. На последней строке вы добавляете .Font.Bold и установите его равным Правда. (Обратите внимание, что вокруг этой кавычки нет, так как это логическое значение.) Эта строка выделяет шрифт, чтобы итоговая информация выделялась среди остальной части листа.
Оба шага в примере кода ниже. Второй цикл меняет местами строки для столбцов и изменяет формулу на сумма. Этот метод связывает ваши расчеты с форматом текущего листа. В противном случае он связан с размером во время записи макроса. Поэтому, когда вы работаете больше дней или часов, функция растет вместе с вашими данными.
  ColumnPlaceHolder = AllCells.Columns.Count + 1
For Each subRow In TargetCells.Rows
ActiveSheet.Cells(subRow.Row, ColumnPlaceHolder).Value = WorksheetFunction.Average(subRow)
ActiveSheet.Cells(subRow.Row, ColumnPlaceHolder).Style = "Currency"
ActiveSheet.Cells(subRow.Row, ColumnPlaceHolder).Font.Bold = True
Next subRow
RowPlaceHolder = AllCells.Rows.Count + 1
For Each subColumn In TargetCells.Columns
ActiveSheet.Cells(RowPlaceHolder, subColumn.Column).Value = WorksheetFunction.Sum(subColumn)
ActiveSheet.Cells(RowPlaceHolder, subColumn.Column).Style = "Currency"
ActiveSheet.Cells(RowPlaceHolder, subColumn.Column).Font.Bold = "True"
Next subColumn
Шаг 3: пометьте свои резюме
Далее пометьте новую строку и столбец, установите RowPlaceHolder а также ColumnPlaceHolder снова. Во-первых, используйте AllCells.Row чтобы получить первый ряд в диапазоне, а затем AllCells.Column + 1 чтобы получить последний столбец. Затем вы будете использовать тот же метод, что и цикл, чтобы установить значение «Средние продажи». Вы также будете использовать то же самое .Font.Bold свойство жирным шрифтом вашего нового ярлыка.

Затем переверните его, установив в качестве заполнителей первый столбец и последнюю строку, чтобы добавить «Тотальная распродажа». Вы хотите смело это тоже.
Оба шага находятся в блоке кода ниже. Это конец макроса, отмеченного End Sub. Теперь у вас должен быть весь макрос
и сможете нажать кнопку, чтобы запустить его. Вы можете вставить все эти блоки кода по порядку в свой лист Excel, если хотите обмануть, но где в этом удовольствие?
  ColumnPlaceHolder = AllCells.Columns.Count + 1
RowPlaceHolder = AllCells.Row
ActiveSheet.Cells(RowPlaceHolder, ColumnPlaceHolder).Value = "Average Sales"
ActiveSheet.Cells(RowPlaceHolder, ColumnPlaceHolder).Font.Bold = True
ColumnPlaceHolder = AllCells.Column
RowPlaceHolder = AllCells.Rows.Count + 1
ActiveSheet.Cells(RowPlaceHolder, ColumnPlaceHolder).Value = "Total Sales"
ActiveSheet.Cells(RowPlaceHolder, ColumnPlaceHolder).Font.Bold = True
End Sub
Что дальше для макросов в Excel на Mac?
Записанные макросы отлично подходят для предсказуемого повторения. Даже если это так просто, как изменение размера всех ячеек и выделение жирным шрифтом, это может сэкономить ваше время.
Visual Basic открывает пользователям Mac Excel возможность углубиться в автоматизацию Office. Visual Basic традиционно был доступен только в Windows. Это позволяет вашим макросам динамически адаптироваться к данным, делая их более универсальными. Если у вас есть терпение, это может стать дверью к более сложному программированию.

This Excel tutorial explains how to open the Visual Basic Editor in Excel 2011 for Mac (with screenshots and step-by-step instructions).
You can access the VBA environment in Excel 2011 for Mac by opening the Visual Basic editor.
First, be sure that the Developer tab is visible in the toolbar in Excel.
The Developer tab is the toolbar that has the buttons to open the VBA editor and create Form Controls like buttons, checkboxes, etc.
To display the Developer tab, click on Preferences under the Excel menu at the top of the screen.
When the Excel Preferences window appears, click on the Ribbon icon in the Sharing and Privacy section.
In the Customize section, check Developer in the list of tabs to show. Then click on the OK button.
Select the Developer tab from the toolbar at the top of the screen. Then click on the Editor option in the Visual Basic group.
Now the Microsoft Visual Basic editor should appear and you can view your VBA code.
Written by Puneet for Excel 2007, Excel 2010, Excel 2013, Excel 2016, Excel 2019, Excel for Mac

KEY POINTS
- Visual Basic Editor is a code editor for VBA.
- It’s a separate application but you can only use it with Excel.
- You need to have the developer tab on the ribbon to access it.
- You can also use the keyboard shortcut (Alt + F11).
- It also stores the macros that you recode with the macro recorder.
- It has multiple tools to help you to write and manage all the codes.
The world of VBA starts with the Visual Basic Editor (VBE).
It’s the place where you write and manage all the macro codes and if you ask me about VBE, I’d say if you are serious about learning VBA you need to understand all the components of VBE.
That’s why it’s part of our VBA tutorial and in this guide, we have covered every single aspect of Visual Basic Editor to make you understand its functionality.
So, let’s get started.
I will be using different words (VBA editor, VB editor, or VBE) in this guide for referring to the Visual Basic Editor, so don’t be confused with it.
What is the Visual Basic Editor?
Visual Basic Editor is an application (a separate one) in which you can write and save all the VBA codes. In simple words, it’s a code editor for Excel in which you can write all the macros and store them. Even though it is a separate application (VB Editor) you can only use it with Excel.
Yes, that’s right. You can’t run VBE separately; there must be an Excel workbook open for using VBE.
Visual Basic Editor is the only way to write a VBA code in Excel. In fact, all Microsoft applications that host VBA use the Visual Basic Editor for script writing (writing code).
Below is the VBE:
Microsoft Windows

Mac

VBA is one of the ADVANCED EXCEL SKILLS and to master the VBA; you need to learn all the aspects of Visual Basic Editor.
Open the Visual Basic Editor
From the developer tab
To open the visual basic editor, you need to have the developer tab on the ribbon and to activate the developer tab (steps to add).

Now on the developer tab, in the code group, there is a button called “Visual Basic” and when you click on this button it opens the VB editor.

Shortcut Key (Window)
You can also use the keyboard shortcut key Alt + F11 to open the VBE in windows and Opt + F11 or Fn + Opt + F11 for MAC.
Even if you don’t have the developer tab on the ribbon, this shortcut key will still work and open the editor.
Edit a Macro from the List
If you want to open the VBA editor to edit a specific macro, then you can open the macros list from the developer tab.

And click on the edit button to open the VB editor to edit that specific macro.

On Quick Access Toolbar
You can also add a button on the quick access toolbar to open the VBA editor. For this, you need to click on the drop-down on the quick access toolbar and open more commands.

And then select the developer tab from “Choose Commands From” and then add the visual basic editor to the quick access toolbar by clicking on the add button.

Now you can open the visual basic editor from the button that you have on the QAT.

From the Worksheet Tab
You can also open the VBA editor by right-clicking on the worksheet tab and clicking on the view code. It will instantly take you to the code window of that worksheet.

Components of Visual Basic Editor
When you open the VBA editor first time it looks like an old application and to understand how it works you need to go component by component.

The user interface is the same (almost) for all the Excel versions in the last more than 15 years, so no matter which Excel version you are using, you can learn about Visual Basic Editor from this guide. Yes, VBE has different components which can help you in different ways, so let’s explore them one by one.
- Menu Bar
- Tool Bar
- Project Window
- Properties Window
- Code Window
- Immediate Window
- Watch Window
- Object Browser
- Find and Replace
- Locals Window
Just like any other application VBA editor has a menu bar where you can find all the options that are available to the user.
Now in the menu bar, each tab is a category of options that are available to use. Let’s suppose, in the edit menu, you can see all the options from cut-copy-paste, find and replace, and adding indent and outdent.

Along with all the options (most of them), you can find the shortcut keys to use those options.
2. Tool Bar
Just below the menu bar, you have the toolbar which is a collection of some of the options that a normal user needs to use more frequently. When you open the visual basic editor first time you will only have the standard toolbar, just like the image below.

But there are total four toolbars that you can add and use.
- Debug
- Edit
- Standard
- User Form
If you go to the view tab in the menu bar you have the option to add or remove these toolbars.

And you can also add or remove buttons from the toolbar if you want.

You can also move a toolbar just by dragging and dropping from the small dots on the right side.

3. Project Window/ Project Explorer
The project window is the place where you can see all the ongoing projects. Whenever you open a file and then open the visual basic editor you can see the hierarchy of that file in the project window.

Every project further has a collection of objects:
- Worksheet: Each worksheet in a workbook lists as an object.
- The Workbook: It represents the workbook itself as an object.
- Module: It’s the place where you write code or recorded macros stores.
- Chart Sheet: Chart sheet in the workbook will also be listed there.

When you open the VB editor, you’ll find the project window there by default. But if it’s not there somehow you can add it from the View (Menu Bar) or you can use the shortcut key Control + R.
Each object that is listed on the project window has its own code window which you can open by double click on it or you can right-click and select the view code option.

The project window is the best way to navigate through all the ongoing projects and when you start working with the editor you will get to know more about it.
4. Properties Window
As the name suggests the properties window gives you access to the properties of the selected object. Each object, for example, a worksheet has its own properties that you can see and make changes in it.

For each property, there is a drop-down on the right side from where you can change or edit that property.

Quick Tip: You can change the name of a project from the properties window.

And, if the properties window is not there by default you can activate it from the view (menu bar), or you can also use the shortcut key F4.

5. Code Window
The code window is the place where you write codes and do most of your work (editing, writing, and testing). In simple words, the code window is the place where you do all the programming.

When you first see it, it looks like a simple text editor, but it has Intellisense that can help you while programming.
There is no way I have found to add line number in the code window as other code editors have but still, VB editor indicates you the line number of the code.
Note
There’s no way I have found to add line number in the code window as other code editors have but still, VB editor indicates you the line number of the code.
6. Immediate Window
Immediate Window is the place where you can debug your code. You can type a line of code and test how it works. Let’s say if you want to test the following code:
Range("A1").Value = 9999All you need to do is enter type a question mark and then paste the code there and HIT enter. It will immediately show the result of the code.

The other way is to add Debug.Print before the code and get its result value in the immediate window.
Sub Macro1()
Debug.Print Range("A1").Value = "Yes"
End Sub
By default, the immediate window won’t be there when you open the visual basic editor, so you need to activate it from the view tab in the menu bar. You can also use the shortcut key Control + G.
7. Watch Window
Just like Excel Watch Window, the visual basic editor also has a watch window where you can add expressions to track them. You simply need to select the expression and then right-click and go to add a watch.

In the below example, I have added the Selection.Value to the add watch.

Now, to activate the watch window, go to the view menu and click on the watch window option.

And here you have the watch window tracking the added expression.
![]()
8. Object Browser
VBA has its own object browser which can help you to work with all the objects by finding all the properties and which you can use.

Imagine if you want to use the range object, the object browser will tell you about all the properties and method that comes with it. Look at the below example.

To open the object browser, use the shortcut key F2 or you can also go to the view tab and click on the object browser to open it.
9. Find and Replace
Just like the find and replace in Excel, the VBA editor has its own find and replace option that you can use to find and replace values from procedures. To open the FIND option, you can use the shortcut key Control + F, and to open the replace you can use the shortcut key Control + H.

Otherwise, you can open both options from the edit menu.

The find and replace option in VBE gives you different search patterns, like, if you want to find and replace something from the current procedure, from the current module, or from the current project.
You can also use the CASE SENSITIVE search and decide the direction of the search as well.
10. Locals Window
You can use the Locals window in VBE to displays all declared variables in the current procedure and their present values.
Using VB Editor to Write a Code
At this point, you know all the major components of the VBA editor, so now let’s learn how to add code in it.
Module Code Window Vs Object Code Window
There are two different types of code windows and both look just the same but there is a difference that you need to know.
- Module Code Window: Code in the normal module can be executed manually or you can also call it from a separate procedure.
- Object Code Window: Code in the object code window can be executed by using an event. Let’s suppose you want to run code when you double click on a cell, in that case, you need to use the double click event and you need to add code to that worksheet.
2. Module Code Window
You will be writing most of the VBA code in a module. To add code in a module you need to use the SUB procedure or the FUNCTION procedure.
- Sub procedure
- Function procedure
The difference between a sub and a function procedure is sub procedure can’t return a value, on the other hand, a function procedure can return a value.
When you record a macro that code goes straight into a module that VBA inserts automatically when you use the macro recorder.
Insert a Module
When you need to write code, you have to insert a module and for this, you simply need to go to the project window and right-click on the project name, and from that menu go to insert and select module.

Remove a Module
You can also remove a module if it doesn’t require anymore so you just simply need to right-click on the module and select remove.

And when you click on remove, it asks you if you want to back up that module before removing it. There is also an option where you can export a module to save it as a file in your system.
3. Object Code Window
Open the code window for the object you simply need to double click on it and in its the code window, there is a dropdown from where you can select the event that you want to use to execute the code.

Imagine if you want to write the code and want to execute on the double click then you need to select “BeforeDoubleClick” from the dropdown.
Understanding Design Mode, Run Mode, and Debug Mode
You can use the visual basic editor in three different modes depending on the face of programming, writing the code, locating an error, and fixing an error.
- Design Mode: Normally, when you are working in VB editor on a code you are in the design mode. Even then you just writing the code instead of designing a user form or a form you are in the design mode, like typing a code. This is also called design time.
- Run Mode: When you run a code to test a code that is how it works you are in the run mode. The best example to define this mode is when you execute a code using the Run button from the toolbar. This is also called runtime.
- Break Mode: When a code is running and in between the execution is suspended, at that time you are in break mode. In this mode, you can run a code step by step. This is also called debugging.
Tips to work with VB editor like a PRO
Just like any other programming language in VBA you can also use comments to define how that code works. Using comments is a good habit and it can help you in so many ways.
- Track Changes
- Contact Details of the Programmer
- How to Troubleshoot the Code
- And much more
To add a comment, you need to type an apostrophe and then the line of code.
Related Tip: VBA Comment Block
Quick Info
Now, look at the below example where I am adding add a VBA function (VBA LEFT Function), and the moment I type the name of the function, it shows me a tooltip for all the arguments which I need to define.

You can also use the shortcut key Control + I or use the quick info option from the EDIT menu.

Auto List Members
Each object in VBA comes with some properties and methods and when you insert an object or a command in the code window and then you enter (.) it shows you the complete list of properties and methods which come with that object.

In the above example, when I added a (.) after the borders property of the range, it showed me all the available properties that are available to access.
List Constants
While defining expressions for a property or a method you can use the list of constants available. In the below example, while using the Border Around method it showed me all the constants which are available for the weight argument.

You can use the shortcut key Control + Shift + J to get the list of constants or you can also go to the edit menu and use the option from there.

Activate Option Explicit
While writing VBA codes you will need to use variables and one of the most important things while using variables is to declare their data type. And there’s a chance that you could forget to declare it.
But when you use the option explicit statement, then you have to declare the data type for every single variable which you are using, and if you fail to do so VBA will show an error message. It’s like forcing yourself to declare every single variable with its data type. For this, you can go to the tools menu and open the options.

And from the options, tick mark “Require Variable Declaration” and click OK.

Now every module will have an Option Explicit statement at the beginning, and you have to declare every single variable.

Change the Code Window View
When you can write multiple codes in a single code window and VBA separate them with a divider, but if you want to have a more focused view, you can change the view of the code window. Below I have the codes in a single module.

But I can change this view from the view buttons from the bottom left of the window.

Now I have only active code visible.
Run a Code Step by Step
When you write a VBA code there could be a chance that that code has a bug or an error that can come while executing it. In that case, the best way is to execute that code step by step and validate each line of code.

For this, you can use shortcut key F8 to execute a code line by line or use step into option from the debug menu.

And there is also a button on the debug toolbar that you can use.

Code Indenting
When you write lengthy and complex codes then it’s important to structure them in the right way so that you can understand them later. For this, there’s one thing which comes handy, INDENTING. Indenting is basically structuring the code using tabs, below is an example.

To add indenting in a line you can use the TAB key from the keyboard, or you can also use the indent/outdent buttons from the toolbar.

Get Code from a Text File
The visual basic editor allows you to import VBA codes from a text file without copy-pasting. Once you insert a module you can go to the insert menu and select the file option from there.

It opens the dialog box where you can locate the text file and import all the codes from it to the current module.
R1C1 Reference Style
If you ever worked with the R1C1 reference style, then I’m sure you can agree on this point that way easier to write codes with it.
R1C1 Reference Style
Line Break
Even though you can adjust the width of the code window and make it wide but there could be a situation when you will be dealing with long lines of code that makes it hard to read.
The best way to deal with this problem is to add a line break. Basically, a line break is something when you break a line into two lines using the line break character.
Use a SPACE & UNDERSCORE and hit enter to add a line break.

Formatting
When it comes to user interface visual basic editor is not that good looking. But there are few formatting options that you can use to customize it or change its look the way you want.
From the Tools Menu Options Editor Format, you can access the formatting option where you can change the font style size or background color as well

Check out this video on customizing the VBA editor for a dark theme.
Personal Macro Workbook
There could be some macros that you need to access within all the workbooks that you use.
In that case, you can use the Personal Macro Workbook that can help you to store all the important codes in one place and you can access them from all the workbooks.

Using Bookmarks
The visual basic editor allows you to add bookmarks to a line from Right Click ➤ Toggle ➤ Bookmark.

And then you can also navigate between bookmarks from the option from the edit menu.

Syntax Checking
When you write codes in the code window VBA check for the syntax error and notify you when you make a syntax error. This option is activated by default, but you can also turn it off if you don’t want VBA to notify you every time you make an error.
Tools Menu ➤ Options ➤ Editor Tab ➤ Auto Syntax Check.

But I would recommend you not to deactivate it because it can help you to identify all the syntax errors that you make while writing codes.
List of Macros
If you have a lot of macros in a module, there is an option that you can use to see all the macros (Tools ➤ Macro).

There’s one big benefit of using this list option is that you can run a macro, delete it, and edit it without navigating to that procedure.
Locking a Project with a Password
Visual Basic Editor also gives you an option to lock a module with a password. So, if you don’t want the users to know the code and don’t want them to make a change in the code, you can use this option.

Tools Menu ➤ VBAProject Properties ➤ Protection Tab

Important Shortcut Keys
- Shift + F7: Object browser.
- F5: Run macro.
- Tab: Add an indent.
- Alt + Q: Close.
- F8: Step into.
- Control + H: Find and replace.
- Control + G: Immediate Window.
- Control + R: Project Explorer.
- F4: Properties window.
Learn some AMAZING Keyboard Shortcuts: Excel Keyboard Shortcuts Cheat Sheet
Alternative to Visual Basic Editor
Well, I have tried quite a few other editors to write a macro but the problem which I have found is that without the Intellisense it’s really hard to use anything other than the visual basic editor itself.

VBA editor works along with Excel, you can test your codes instantly and you can save them into the workbook. But are a few names to try.
Visual Studio Code | Ultra Edit
Points to Remember
- You can maximize or minimize the code window.
- You can change a project’s name anytime.
- The project window is the best way to navigate through the editor.
- It will make a line red if there’s an error in it while writing the code.
- You can also add a bookmark to a line of code from the Right-Click Menu Toggle Bookmark.
- You cannot use the visual basic editor without opening an Excel workbook.
More on VBA
- VBA Functions
- VBA to Add a New Sheet
- VBA Code to Activate a Worksheet
- VBA IF Then Statement
- VBA User Defined Function
- VBA Message Box
- VBA to Extract Hyperlink
- Macro to Highlight Duplicate Values
- VBA to Create a Pivot Table
[icon name=”bell” class=”” unprefixed_class=””] VBA is one of the Advanced Excel Skills
Should I need to install the Visual Basic Editor?
No. You don’t need to install the visual basic editor. It comes pre-installed with the Microsoft Office applications.
What if I don’t have the Developer Tab on the Ribbon?
If you don’t have the developer tab on the Excel ribbon, you can activate it from the Excel ribbon.
Is there an alternative to the Visual Basic Editor?
Not really. The IntelliSense that you have in the VBE makes it perfect to use to write VBA codes.
Excel on the Mac has not always been the same powerhouse it was on Windows. Macros really wouldn’t work unless they were created exclusively for the Mac.
Starting in 2013, Microsoft brought back macros. There are two types of macros: those you can create by quickly recording your actions, and those that use VBA to design more advanced automations. With Office 2016, Excel is using the same codebase on all platforms. This change will make it easier for macros to work across platforms.
So let’s take a look at how this currently works on macOS.
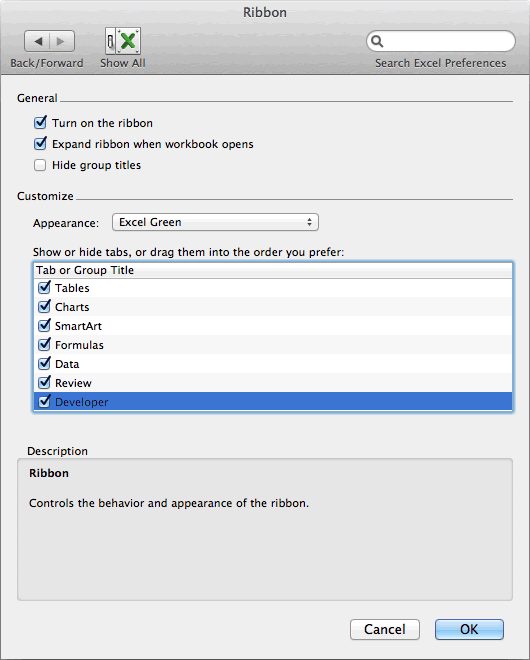
Enabling Macros in Excel on Mac
Working with macros in Excel on your Mac may not be enabled by default. This setting is because macros can be a possible malware vector. The easiest way to tell is to see if you have the Developer tab available on the Ribbon in Excel. If you don’t see it, it is simple to enable.
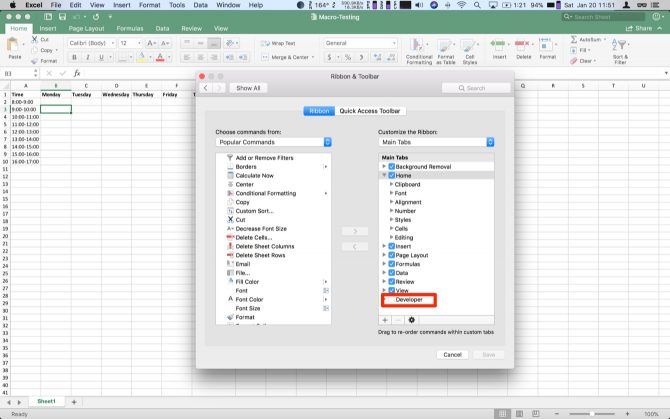
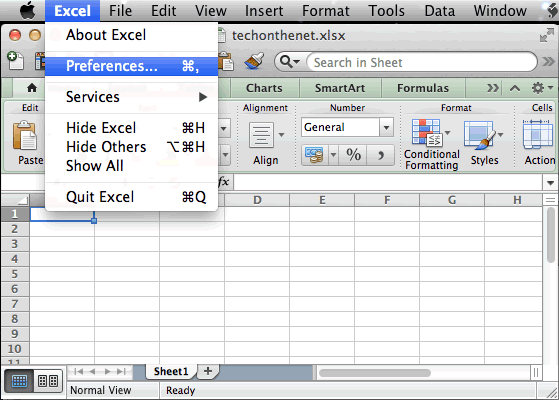
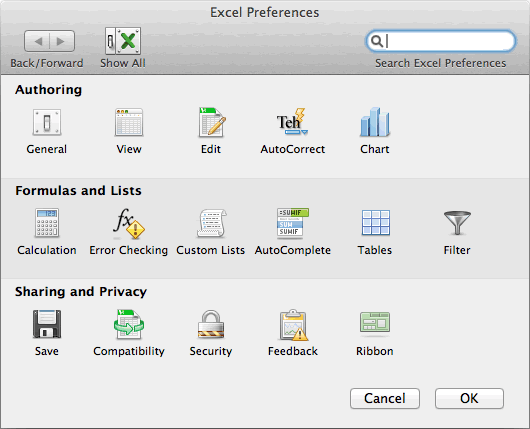
Click on Excel in the menu bar, and then select Preferences in the dropdown. In the menu, click on Ribbon & Toolbar. In the right-hand list, Developer should be at the bottom, click the checkbox. Finally, click Save and you should see the Developer tab show up at the end of the Ribbon.
After you create each workbook with macros, save it in a new format .xlsm to use the macros after reopening the file. If you forget, Excel will remind you each time you try to save. You’ll also need to enable macros every time you open the file.
Manually Recording a Macro in Excel on Mac
Though you can code macros, that might not be for everyone. If you’re not ready to start working with VBA, Excel lets you record the steps for your macro in an existing sheet. Click on the Developer tab to see your options.

You’re looking for the third option in the Ribbon, Record Macro. Click this, and a dialog pops up allowing you to name your macro and set a keyboard shortcut. You can scope your macro to the Current Workbook, a New Workbook, or in your Personal Macro Workbook. The Personal Macro Workbook is in your user profile and lets you use your macros between your files.
Once you record your actions, they are available on this same tab. Clicking macros will bring up the saved macros in your workbook. Click on your macro name and click Run to run your recorded actions.
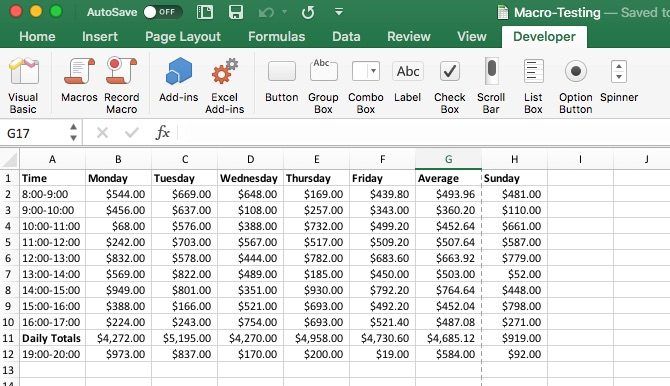
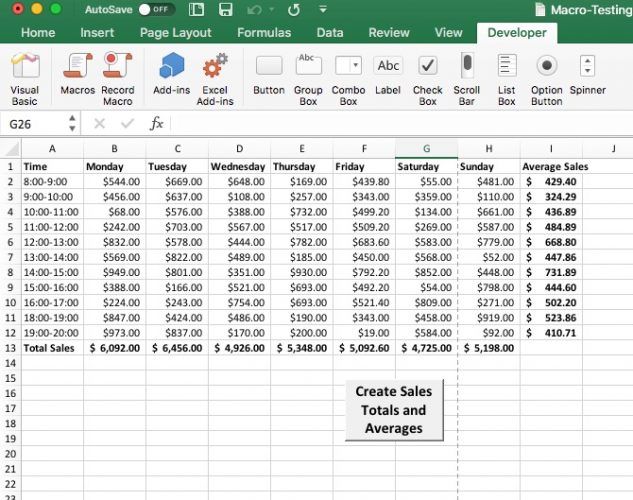
Example 1: Daily Sales Total and Hourly Average
For an example macro, you are going to run through a daily sales sheet, with the sales broken down by hourly totals. Your macro is going to add a daily sales total, and then add an average in the last column of each hourly period. If you work in retail or other sales position, this is a helpful sheet to track revenue.
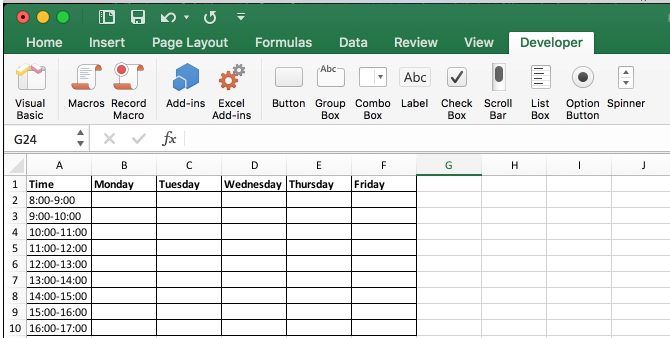
We need to set up the first sheet. Using this first blank as a template to copy into a new tab each day could save you some time. In the first column/row put Hour/Date. Across the top add Monday through Friday.
Then in the first column put a break down of hourly totals from 8-5. I used 24-hour time, but you can use AM/PM notation if you prefer. Your sheet should match the screenshot above.

Add a new tab, and copy your template into it. Then fill out your sales data for the day. (If you don’t have data to populate this sheet, you can enter =RandBetween(10,1000) in all the cells to create dummy data.) Next, click on Developer in the Ribbon.
Then, click on Record Macro. In the dialog enter the name as AverageandSum and leave it stored in This Workbook. You can set a shortcut key if you like. You can enter a description if you need more details on what the macro does. Click okay to start setting up the macro.
At the bottom of the hourly listings enter Daily Totals. In the cell next to it, enter =SUM(B2:B10). Then copy and paste that into the rest of the columns. Then in the header add Average after the last column. Then in the next cell down, enter =Average(B2:F2). Then, paste that into the cells in rest of the column.
Then click Stop Recording. Your macro is now able to use on each new sheet you add to your workbook. Once you have another sheet of data, go back to Developer and click Macros. Your macro should be highlighted, click run to add your sums and averages.
This example can save you a couple of steps, but for more complex actions that can add up. If you do the same operations on data with identical formatting, use recorded macros.
VBA Macros in Excel on Mac
Manually recorded macros in Excel help with data that is always in the same size and shape. It is also useful if you want to perform actions on the entire sheet. You can use your macro to prove the problem.
Add another hour and day to the sheet and run the macro. You’ll see the macro overwrites your new data. The way we get around this is using code to make the macro more dynamic using VBA, which is a slimmed down version of Visual Basic. The implementation focuses on automation for Office.
It is not as easy to pick up as Applescript, but Office’s automation is entirely built around Visual Basic. So once you work with it here, you are quickly able to turn around and use it in other Office apps. (It can also be a big help if you’re stuck with a Windows PC at work.)
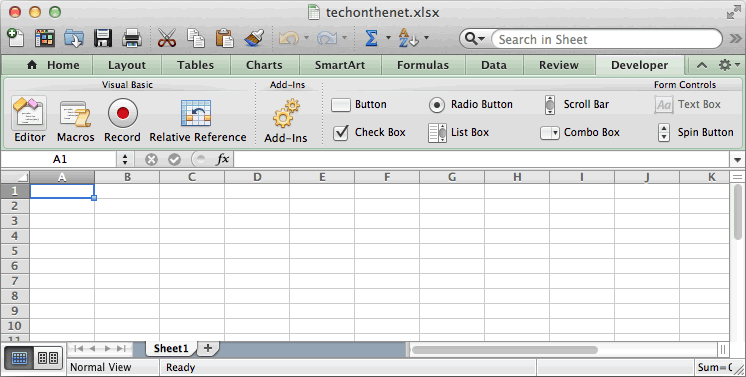
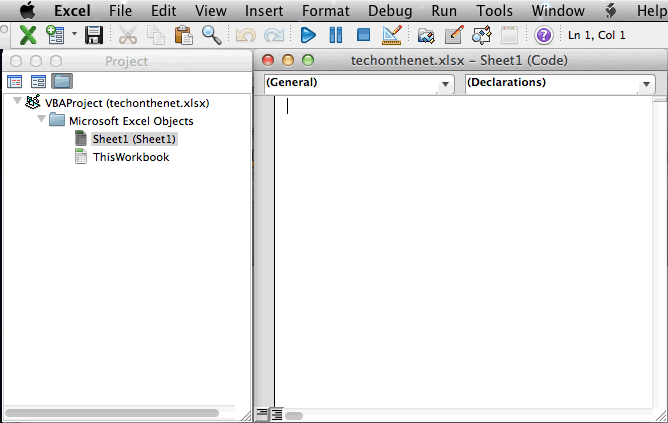
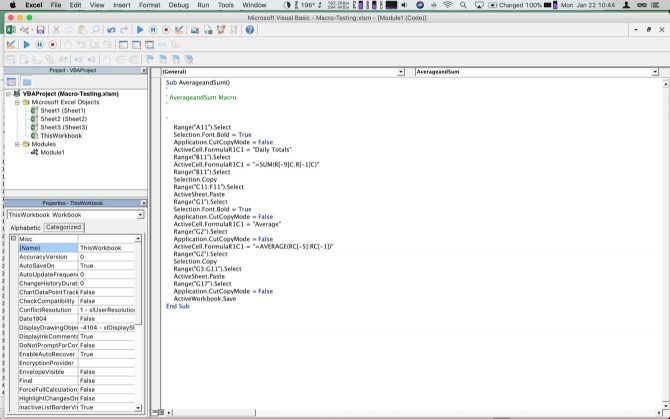
When working with VBA in Excel, you have a separate Window. The screenshot above is our recorded macro as it appears in the code editor. The windowed mode can be helpful to play around with your code as you’re learning. When your macro gets hung up, there are debugging tools to look at the state of your variables and sheet data.
Office 2016 now comes with the full Visual Basic editor. It allows you to use the Object Browser and debugging tools that used to be limited to the Windows version. You can access the Object Browser by going to View > Object Browser or just press Shift + Command + B. You can then browse through all the classes, methods, and properties available. It was very helpful in constructing the code in the next section.
Example 2: Daily Sales Total and Hourly Average With Code
Before you start coding your macro, let’s start by adding a button to the template. This step makes it much easier for a novice user to access your macro. They can click a button to call the macro rather than digging into the tabs and menus.

Switch back to the blank template sheet you created in the last step. Click on Developer to get back to the tab. Once you’re on the tab, click on Button. Next, click somewhere in the sheet on the template to place the button. The macros menu comes up, name your macro and click New.
The Visual Basic Window will open up; you’ll see it listed as Module2 in the project browser. The code pane will have Sub AverageandSumButton() at the top and a few lines down End Sub. Your code needs to go between these two, as it is the beginning and the end of your macro.
Step 1: Declaring Variables
To begin, you will need to declare all of your variables. These are in the code block below, but a note about how they are constructed. You should declare all variables using Dim before the name, and then as with the datatype.
 Sub AverageandSumButton()
  Dim RowPlaceHolder As Integer
  Dim ColumnPlaceHolder As Integer
  Dim StringHolder As String
  Dim AllCells As Range
  Dim TargetCells As Range
  Dim AverageTarget As Range
  Dim SumTarget As Range
Now that you have all of your variables, you need to use some of the range variables right away. Ranges are objects that hold sections of the worksheet as addresses. The variable All Cells will be set to all the active cells on the sheet, which includes the column and row labels. You get this by calling the ActiveSheet object and then it’s UsedRange property.
The problem is you don’t want the labels included in the average and sum data. Instead, you’ll use a subset of the AllCells range. This will be the TargetCells range. You manually declare its range. Its start address is going to be the cell at the second row in the second column of the range.
You call this by calling your AllCells range, using its Cells class to get that specific cell using (2,2). To get the final cell in the range, you will still call AllCells. This time using SpecialCells method to get the property xlCellTypeLastCell. You can see both of these in the code block below.
   Set AllCells = ActiveSheet.UsedRange
  Set TargetCells = Range(AllCells.Cells(2, 2), AllCells.SpecialCells(xlCellTypeLastCell))
Step 2: For Each Loops
The next two sections of code are For Each loops. These loops go through an object to act on each subset of that object. In this case, you are doing two of them, one for each row and one for each column. Since they are almost exactly the same, only one of them is here; but both are in the code block. The details are virtually identical.
Before you start the loop for each row, you need to set the target column where the loop writes the average of each row. You use the ColumnPlaceHolder variable to set this target. You set it equal to the Count variable of the Cells class of AllCells. Add one to it to move it to the right of your data by appending +1.
Next, you are going to start the loop by using For Each. Then you want to create a variable for the subset, in this case, subRow. After the In, we set the main object we are parsing TargetCells. Append .Rows at the end to limit the loop to only each row, instead of every cell in the range.
Inside the loop, you use the ActiveSheet.Cells method to set a specific target on the sheet. The coordinates are set by using subRow.Row to get the row the loop is currently in. Then, you use ColumnPlaceHolder for the other coordinate.
You use this for all three steps. The first you append .value after the parentheses and set equal to WorksheetFunction.Average(subRow). This writes the formula for the average of the row into your target cell. The next line you append .Style and set that equal to «Currency». This step matches the rest of your sheet. On the last line, you append .Font.Bold and set it equal to True. (Note there are not quotes around this one, as it is the boolean value.) This line bolds the font to make the summary info stand out from the rest of the sheet.
Both steps are in the code example below. The second loop swaps rows for columns and changes the formula to Sum. Using this method ties your calculations to the format of the current sheet. Otherwise, its linked to the size at the time you record the macro. So when you work more days or hours, the function grows with your data.
   ColumnPlaceHolder = AllCells.Columns.Count + 1
  For Each subRow In TargetCells.Rows
  ActiveSheet.Cells(subRow.Row, ColumnPlaceHolder).Value = WorksheetFunction.Average(subRow)
  ActiveSheet.Cells(subRow.Row, ColumnPlaceHolder).Style = "Currency"
  ActiveSheet.Cells(subRow.Row, ColumnPlaceHolder).Font.Bold = True
  Next subRow
  RowPlaceHolder = AllCells.Rows.Count + 1
  For Each subColumn In TargetCells.Columns
  ActiveSheet.Cells(RowPlaceHolder, subColumn.Column).Value = WorksheetFunction.Sum(subColumn)
  ActiveSheet.Cells(RowPlaceHolder, subColumn.Column).Style = "Currency"
  ActiveSheet.Cells(RowPlaceHolder, subColumn.Column).Font.Bold = "True"
  Next subColumn
Step 3: Label Your Summaries
Next, label the new row and column, set RowPlaceHolder and ColumnPlaceHolder again. First, use AllCells.Row to get the first row in the range, and then AllCells.Column+1 to get the last column. Then you will use the same method as the loop to set the value to «Average Sales». You’ll also use the same .Font.Bold property to bold your new label.
Then reverse it, setting your placeholders to the first column and last row to add «Total Sales». You want to bold this as well.
Both steps are in the code block below. This is the end of the macro noted by End Sub. You should now have the entire macro, and be able to click the button to run it. You can paste all these code blocks in order into your excel sheet if you want to cheat, but where is the fun in that?
   ColumnPlaceHolder = AllCells.Columns.Count + 1
  RowPlaceHolder = AllCells.Row
  ActiveSheet.Cells(RowPlaceHolder, ColumnPlaceHolder).Value = "Average Sales"
  ActiveSheet.Cells(RowPlaceHolder, ColumnPlaceHolder).Font.Bold = True
  ColumnPlaceHolder = AllCells.Column
  RowPlaceHolder = AllCells.Rows.Count + 1
  ActiveSheet.Cells(RowPlaceHolder, ColumnPlaceHolder).Value = "Total Sales"
  ActiveSheet.Cells(RowPlaceHolder, ColumnPlaceHolder).Font.Bold = True
End Sub
What’s Next for Macros in Excel on Mac?
Recorded macros are great to use for predictable repetition. Even if it’s something as simple as resizing all cells and bolding headers, these can save you time. Just avoid common macro mistakes.
Visual Basic opens the door for Mac Excel users to dig deep into Office automation. Visual Basic was traditionally only available on Windows. It allows your macros to adapt to the data dynamically, making them more versatile. If you have the patience, this can be the doorway to more advanced programming.
Want more time-saving spreadsheet tricks? Learn how to highlight specific data automatically with conditional formatting in Excel and conditional highlighting in Numbers on Mac.