
Копирование и перемещение файлов в VBA Excel с помощью методов CopyFile и MoveFile объекта FileSystemObject. Синтаксис, параметры, примеры.
Копирование файлов
Метод CopyFile
CopyFile – это метод объекта FileSystemObject, который копирует один или несколько файлов из одного расположения в другое.
Синтаксис
|
object.CopyFile source, destination, [overwrite] |
Параметры
| Параметр | Описание |
|---|---|
| object | Переменная, возвращающая объект FileSystemObject. Обязательный параметр. |
| source | Строковое выражение, задающее полное имя файла, который требуется скопировать в другое расположение. Для копирования нескольких файлов используются подстановочные знаки. Обязательный параметр. |
| destination | Строковое выражение, задающее конечное расположение, куда требуется скопировать файл (файлы) из элемента source. Подстановочные знаки не допускаются. Обязательный параметр. |
| overwrite | Логическое значение, которое указывает, требуется ли перезаписывать существующие файлы в конечном расположении. True – файлы будут перезаписаны, False – перезапись не выполняется. Необязательный параметр, по умолчанию – True. |
Если копируемый файл с полным именем source не существует, будет сгенерирована ошибка.
При копировании одного файла методом CopyFile допустимо в параметре destination указать другое собственное имя файла, тогда скопированный файл будет сохранен под новым именем. В том числе, можно изменить и расширение файла.
Примеры
Пример 1
Копирование одного файла в другое расположение с проверкой его существования:
|
Sub Primer1() Dim fso As Object ‘Присваиваем переменной fso ссылку ‘на новый экземпляр FileSystemObject Set fso = CreateObject(«Scripting.FileSystemObject») ‘Проверяем существование копируемого файла If Dir(«C:Папка 1test1.txt») <> «» Then ‘Если файл существует, копируем его в другую папку fso.CopyFile «C:Папка 1test1.txt», «C:Папка 2« End If End Sub |
Пример 2
Наглядный, но неправильный пример по копированию одного файла в другую папку со сменой собственного имени, включая расширение:
|
Sub Primer2() Dim fso As Object Set fso = CreateObject(«Scripting.FileSystemObject») If Dir(«C:Папка 1test1.txt») <> «» Then ‘Копируем файл в другую папку со сменой имени, включая расширение fso.CopyFile «C:Папка 1test1.txt», «C:Папка 2test2.xlsx» End If End Sub |
Пример назван неправильным, так как у скопированного файла меняется только расширение с .txt на .xlsx без конвертации в другой формат. На самом деле файл так и остается текстовым, и открыть его программой Excel невозможно.
Перемещение файлов
Метод MoveFile
MoveFile – это метод объекта FileSystemObject, который перемещает один или несколько файлов из одного расположения в другое.
Синтаксис
|
object.MoveFile source, destination |
Параметры
| Параметр | Описание |
|---|---|
| object | Переменная, возвращающая объект FileSystemObject. Обязательный параметр. |
| source | Строковое выражение, задающее полное имя файла, который требуется переместить в другое расположение. Для перемещения нескольких файлов используются подстановочные знаки. Обязательный параметр. |
| destination | Строковое выражение, задающее конечное расположение, куда требуется переместить файл (файлы) из элемента source. Подстановочные знаки не допускаются. Обязательный параметр. |
Если перемещаемый файл с полным именем source не существует, будет сгенерирована ошибка. Ошибка произойдет и в том случае, если одноименный файл в расположении destination уже имеется.
Примеры
Пример 3
Перемещение одного файла без проверки его существования:
|
Sub Primer3() Dim fso As Object ‘Присваиваем переменной fso ссылку ‘на новый экземпляр FileSystemObject Set fso = CreateObject(«Scripting.FileSystemObject») ‘Завершаем программу, если произойдет ошибка On Error Resume Next ‘Перемещаем файл в другую папку fso.MoveFile «C:Папка 1Документ 1.docx», «C:Папка 2« End Sub |
Обработчик ошибок On Error Resume Next необходим для того, чтобы корректно завершить программу, если перемещаемый файл не существует, или он уже есть в папке назначения, в результате чего будет сгенерирована ошибка.
Пример 4
Перемещение нескольких файлов из одного расположения в другое:
|
Sub Primer4() Dim fso As Object Set fso = CreateObject(«Scripting.FileSystemObject») On Error Resume Next ‘Перемещаем файлы в другую папку fso.MoveFile «C:Папка 1Документ*», «C:Папка 2« End Sub |
В результате работы этого кода VBA Excel в новое расположение будут перемещены все файлы начинающиеся с подстроки «Документ».
Знаки подстановки
- Звездочка (*) – заменяет любое количество символов или ни одного.
- Вопросительный знак (?) – заменяет один символ или ни одного.
Знаки подстановки позволяют создать шаблон, по которому можно скопировать или переместить сразу несколько файлов.
Примеры
Примеры шаблонов с подстановочными знаками:
Все файлы Word, включая файлы с расширениями .doc и .dot:
"C:Папка 1*.do??"
Файлы Word, кроме файлов с расширениями .dot, .dotx и .dotm:
"C:Папка 1*.doc?"
Все файлы с подстрокой «01.2020» в собственном имени:
"C:Папка 1*01.2020*"
Хитрости »
15 Август 2012 129938 просмотров
В этой статье я хотел бы рассказать как средствами VBA переименовать, переместить или скопировать файл. В принципе методы переименования, перемещения и копирования, так сказать, встроены в VBA. Это значит что можно без вызова сторонних объектов переименовать, переместить или копировать любой файл. Все это делается при помощи всего двух команд: FileCopy и Name [Исходный файл] As [Новый файл]. Притом команда FileCopy выполняет только копирование, а Name [Исходный файл] As [Новый файл] — как переименование, так и перемещение. Разница лишь в том, что при переименовании мы указываем только новое имя файла, а при перемещении — другую директорию(папку), в которую следует переместить файл. Плюс рассмотрим пример удаления файла.
Так же разберем методы копирования, перемещения, переименования и удаления файлов и папок через библиотеку FileSystemObject (FSO).
Работа с файлами встроенными командами VBA
- Копирование файла
- Перемещение файла
- Переименование файла
- Удаление файла
Работа с файлами через объект FileSystemObject (FSO)
- Копирование файла
- Перемещение файла
- Переименование файла
- Удаление файла
Работа с папками через объект FileSystemObject (FSO)
- Копирование папки
- Перемещение папки
- Переименование папки
- Удаление папки
Во всех примерах работы с файлами встроенными функциями будет присутствовать проверка на наличие файла по указанному пути. Делать это будем при помощи встроенной функции Dir([PathName],[Attributes]).
PathName — указывается полный путь к файлу
Attributes — указывается признак свойств файла. Вообще их несколько(скрытый, архивный и т.п.), но нас для наших задач будет интересовать пока только один: 16(vbDirectory). Он отвечает за проверку папок и файлов без специальных свойств(т.е. не архивные, не скрытые и т.д.). Хотя по сути его можно вообще не указывать, и тогда будет по умолчанию применен атрибут 0(vbNormal) — проверка файлов без определенных свойств. Ни в том ни в другом случае ошибкой это не будет.
Sub Copy_File()
    Dim sFileName As String, sNewFileName As String

    sFileName = "C:WWW.xls"    'имя файла для копирования
    sNewFileName = "D:WWW.xls"    'имя копируемого файла. Директория(в данном случае диск D) должна существовать
    If Dir(sFileName, 16) = "" Then
        MsgBox "Нет такого файла", vbCritical, "www.excel-vba.ru"
        Exit Sub
    End If

    FileCopy sFileName, sNewFileName 'копируем файл
    MsgBox "Файл скопирован", vbInformation, "www.excel-vba.ru"
End Sub
Sub Move_File()
    Dim sFileName As String, sNewFileName As String

    sFileName = "C:WWW.xls"    'имя исходного файла
    sNewFileName = "D:WWW.xls"    'имя файла для перемещения. Директория(в данном случае диск D) должна существовать
    If Dir(sFileName, 16) = "" Then
        MsgBox "Нет такого файла", vbCritical, "www.excel-vba.ru"
        Exit Sub
    End If

    Name sFileName As sNewFileName 'перемещаем файл
    MsgBox "Файл перемещен", vbInformation, "www.excel-vba.ru"
End Sub
Sub Rename_File()
    Dim sFileName As String, sNewFileName As String

    sFileName = "C:WWW.xls"    'имя исходного файла
    sNewFileName = "C:WWW1.xls"    'имя файла для переименования
    If Dir(sFileName, 16) = "" Then
        MsgBox "Нет такого файла", vbCritical, "www.excel-vba.ru"
        Exit Sub
    End If

    Name sFileName As sNewFileName 'переименовываем файл

    MsgBox "Файл переименован", vbInformation, "www.excel-vba.ru"
End Sub
Sub Delete_File()
    Dim sFileName As String

    sFileName = "C:WWW.xls"    'имя файла для удаления

    If Dir(sFileName, 16) = "" Then
        MsgBox "Нет такого файла", vbCritical, "www.excel-vba.ru"
        Exit Sub
    End If
    Kill sFileName 'удаляем файл
    MsgBox "Файл удален", vbInformation, "www.excel-vba.ru"
End Sub
Как видно ничего сложного.
Так же можно проделать те же операции с файлами при помощи объекта FileSystemObject. Строк кода несколько больше и выполняться операции будут медленнее(хотя вряд ли это будет заметно на примере одного файла). Однако есть существенный плюс — при помощи FileSystemObject можно корректно производить операции с файлами и папками на сетевом диске. Хотя та же
Dir(sFileName, 16)
часто выдает ошибку при работе с сетевыми дисками.
Прежде всего следует, я думаю, пояснить что за зверь такой — FileSystemObject.
FileSystemObject (FSO)
— содержится в библиотеке типов Scripting, расположенной в файле библиотеки scrrun.dll. Объектная модель FSO дает возможность создавать, изменять, перемещать и удалять папки и файлы, собирать о них различную информацию: имена, атрибуты, даты создания или изменения и т.д. Чтобы работать с FSO необходимо создать переменную со ссылкой на объект библиотеки. Сделать это можно двумя способами: через ранее связывание и позднее. Я не буду сейчас вдаваться в подробности этих методов — тема довольно обширная и я опишу её в другой статье.
Ранее связывание:
для начала необходимо подключить библиотеку Microsoft Scripting Runtime. Делается это в редакторе VBA: References-находите там Microsoft Scripting Runtime и подключаете. Объявлять переменную FSO при раннем связывании следует так:
Dim objFSO As New FileSystemObject
Плюсы раннего связывания: с помощью Object Browser можно просмотреть список объектов, свойств, методов, событий и констант, включенных в FSO. Но есть значительный минус: если планируется использовать программу на нескольких компьютерах, то есть большая вероятность получить ошибку(читать подробнее).
Позднее связывание: ничего нигде не надо подключать, а просто используем метод CreateObject(именно этот способ используется мной в примерах ниже). Методы таким образом просмотреть не получится, но зато работать будет без проблем на любых компьютерах без дополнительных действий.
Sub Copy_File()
    Dim objFSO As Object, objFile As Object
    Dim sFileName As String, sNewFileName As String

    sFileName = "C:WWW.xls"    'имя исходного файла
    sNewFileName = "D:WWW.xls"    'имя файла для переименования
    'создаем объект FileSystemObject
    Set objFSO = CreateObject("Scripting.FileSystemObject")
    'проверяем наличие файла по указанному пути
    If objFSO.FileExists(sFileName) = False Then
        MsgBox "Нет такого файла", vbCritical, "www.excel-vba.ru"
        Exit Sub
    End If
    'копируем файл
    Set objFile = objFSO.GetFile(sFileName)
    objFile.Copy sNewFileName

    MsgBox "Файл скопирован", vbInformation, "www.excel-vba.ru"
End Sub
Sub Move_File()
    Dim objFSO As Object, objFile As Object
    Dim sFileName As String, sNewFileName As String

    sFileName = "C:WWW.xls"    'имя исходного файла
    sNewFileName = "D:WWW.xls"    'имя файла для переименования
    'создаем объект FileSystemObject
    Set objFSO = CreateObject("Scripting.FileSystemObject")
    'проверяем наличие файла по указанному пути
    If objFSO.FileExists(sFileName) = False Then
        MsgBox "Нет такого файла", vbCritical, "www.excel-vba.ru"
        Exit Sub
    End If
    'перемещаем файл
    Set objFile = objFSO.GetFile(sFileName)
    objFile.Move sNewFileName
    MsgBox "Файл перемещен", vbInformation, "www.excel-vba.ru"
End Sub
Sub Rename_File()
    Dim objFSO As Object, objFile As Object
    Dim sFileName As String, sNewFileName As String

    sFileName = "C:WWW.xls"    'имя исходного файла
    sNewFileName = "WWW1.xls"    'имя файла для переименования
    'создаем объект FileSystemObject
    Set objFSO = CreateObject("Scripting.FileSystemObject")
    'проверяем наличие файла по указанному пути
    If objFSO.FileExists(sFileName) = False Then
        MsgBox "Нет такого файла", vbCritical, "www.excel-vba.ru"
        Exit Sub
    End If
    'переименовываем файл
    Set objFile = objFSO.GetFile(sFileName)
    objFile.Name = sNewFileName
    MsgBox "Файл переименован", vbInformation, "www.excel-vba.ru"
End Sub
Хочу обратить внимание, что при переименовании файла через FileSystemObject необходимо указать только имя нового файла — путь указывать не надо. Иначе получите ошибку.
Удаление файла
Sub Delete_File()
    Dim objFSO As Object, objFile As Object
    Dim sFileName As String

    sFileName = "C:WWW.xls"    'имя файла для удаления
    'создаем объект FileSystemObject
    Set objFSO = CreateObject("Scripting.FileSystemObject")
    'проверяем наличие файла по указанному пути
    If objFSO.FileExists(sFileName) = False Then
        MsgBox "Нет такого файла", vbCritical, "www.excel-vba.ru"
        Exit Sub
    End If
    'удаляем файл
    Set objFile = objFSO.GetFile(sFileName)
    objFile.Delete
    MsgBox "Файл удален", vbInformation, "www.excel-vba.ru"
End Sub
Точно так же можно перемещать, копировать и удалять целые папки:
Копирование папки
Sub Copy_Folder()
    Dim objFSO As Object
    Dim sFolderName As String, sNewFolderName As String

    sFolderName = "C:test"        'имя исходной папки
    sNewFolderName = "D:tmp"     'имя папки, в которую копируем(нужен слеш на конце)
    'создаем объект FileSystemObject
    Set objFSO = CreateObject("Scripting.FileSystemObject")
    'проверяем наличие папки по указанному пути
    If objFSO.FolderExists(sFolderName) = False Then
        MsgBox "Нет такой папки", vbCritical, "www.excel-vba.ru"
        Exit Sub
    End If
    'копируем папку
    objFSO.CopyFolder sFolderName, sNewFolderName

    MsgBox "Папка скопирована", vbInformation, "www.excel-vba.ru"
End Sub
Sub Move_Folder()
    Dim objFSO As Object
    Dim sFolderName As String, sNewFolderName As String

    sFolderName = "C:test"           'имя исходной папки
    sNewFolderName = "C:tmptest"   'имя папки, в которую перемещаем(нужен слеш на конце)
    'создаем объект FileSystemObject
    Set objFSO = CreateObject("Scripting.FileSystemObject")
    'проверяем наличие папки по указанному пути
    If objFSO.FolderExists(sFolderName) = False Then
        MsgBox "Нет такой папки", vbCritical, "www.excel-vba.ru"
        Exit Sub
    End If
    'перемещаем папку
    objFSO.MoveFolder sFolderName, sNewFolderName
    MsgBox "Папка перемещена", vbInformation, "www.excel-vba.ru"
End Sub
Sub Rename_Folder()
    Dim objFSO As Object, objFolder As Object
    Dim sFolderName As String, sNewFolderName As String

    sFolderName = "C:test"            'имя исходной папки
    'имя папки для переименования(только имя, без полного пути)
    sNewFolderName = "new folder name"
    'создаем объект FileSystemObject
    Set objFSO = CreateObject("Scripting.FileSystemObject")
    'проверяем наличие папки по указанному пути
    If objFSO.FolderExists(sFolderName) = False Then
        MsgBox "Нет такой папки", vbCritical, "www.excel-vba.ru"
        Exit Sub
    End If
    'переименовываем папку
    'получаем доступ к объекту Folder(папка)
    Set objFolder = objFSO.GetFolder(sFolderName)
    'назначаем новое имя
    objFolder.Name = sNewFolderName
    MsgBox "Папка переименована", vbInformation, "www.excel-vba.ru"
End Sub
Sub Delete_Folder()
    Dim objFSO As Object, objFolder As Object
    Dim sFolderName As String

    sFolderName = "C:test"    'имя папки для удаления
    'создаем объект FileSystemObject
    Set objFSO = CreateObject("Scripting.FileSystemObject")
    'проверяем наличие папки по указанному пути
    If objFSO.FolderExists(sFolderName) = False Then
        MsgBox "Нет такой папки", vbCritical, "www.excel-vba.ru"
        Exit Sub
    End If
    'удаляем папку
    objFSO.DeleteFolder sFolderName
    MsgBox "Папка удалена", vbInformation, "www.excel-vba.ru"
End Sub
FSO, конечно, способен на большее — но цель данной статьи была показать основные операции с папками и файлами как стандартными методами, так и более продвинутыми.
Статья помогла? Поделись ссылкой с друзьями!
![]() Видеоуроки
Видеоуроки
Поиск по меткам
Access
apple watch
Multex
Power Query и Power BI
VBA управление кодами
Бесплатные надстройки
Дата и время
Записки
ИП
Надстройки
Печать
Политика Конфиденциальности
Почта
Программы
Работа с приложениями
Разработка приложений
Росстат
Тренинги и вебинары
Финансовые
Форматирование
Функции Excel
акции MulTEx
ссылки
статистика
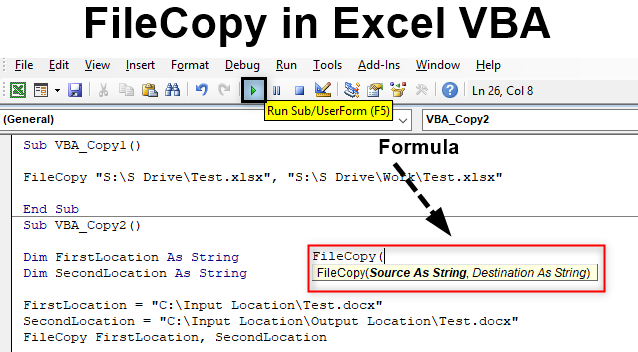
Excel VBA FileCopy
There are many ways to copy or move a file from one folder to another. We can do it manually from Copying and cutting the file icon and pasting it into the destination folder. But when it comes to automating this process of copying the file, we can do that in VBA as well. To copy the file, we have a function available in VBA named as same “File Copy”.
Syntax of FileCopy in Excel VBA
It is very easy to apply File Copy in VBA. The syntax of File Copy is as shown below.
![]()
File Copy has only two components to feed. Which are:
- Source – Here we will put the source location from where we need to copy the file.
- Destination – And this will be the destination folder where we will be pasting the copied file.
The complete syntax will be in String datatype. Because we will be using the path of the file which will be as text.
How to Copy a File in Excel VBA?
Now let us try with some examples on VBA File Copy in Excel.
You can download this VBA Copy a File Excel Template here – VBA Copy a File Excel Template
Example #1 – FileCopy In VBA
In the first example, we will see how to copy a file from a source location and paste it in a destination location in a very simple way.
For this, we need a file of any kind or extension. Here we are considering an Excel file with extension xlsx. As we can see, we have placed that excel file into a location which is easy to access named as Test.

Now we will copy this file with the help of FileCopy to the below destination folder.

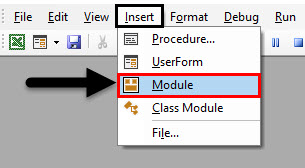
Step 1: For this, go to VBA and open a Module from Insert menu drop-down option as shown below.
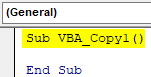
Step 2: Now in the opened module, write the subcategory of VBA FileCopy or in any other name as per your choice.
Code:
Sub VBA_Copy1()

End Sub
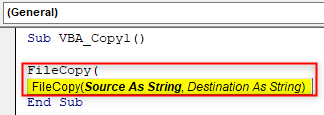
Step 3: Now directly open the FileCopy function as shown below.
Code:
Sub VBA_Copy1()

FileCopy(

End Sub
Step 4: Now in quotes write the source location address followed by file name and extension as shown below.
Code:
Sub VBA_Copy1()

FileCopy "D:Test1Hello.xlsx",

End Sub
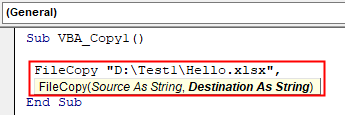
Step 5: For the Destination location, again put the path in inverted commas followed by file and extension.
Code:
Sub VBA_Copy1()

FileCopy "D:Test1Hello.xlsx", "D:VPB FileApril FilesHello.xlsx"

End Sub

Step 6: Now compile the code and run it by clicking on the Play button which is located below the menu bar. We will see, the excel file with name Test is now copied from the source location to destination location as shown below. As there was nothing in the file so the size of the file is coming as 0 KB.

Example #2 – FileCopy In VBA
In another example, we will see how to copy the file from Source location to Destination by defining the variable. This process is little lengthy but more reliable as we will be fixing the parameters and variable.
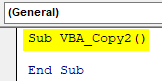
Step 1: Now first open a new module and write the subcategory of VBA File Copy as shown below.
Code:
Sub VBA_Copy2()

End Sub
Step 2: First, define a variable where we will be putting the source location of the file same excel file which we have used in example-1 as String.
Code:
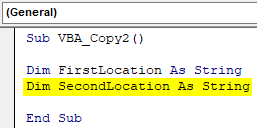
Sub VBA_Copy2()

Dim FirstLocation As String

End Sub

Step 3: In a similar way, we will be needing another variable for the Destination location.
Code:
Sub VBA_Copy2()

Dim FirstLocation As String
Dim SecondLocation As String

End Sub
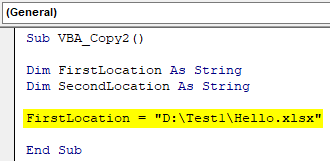
Step 4: Now put the location in the first defined variable which is “FirstLocation” along with file name and its extension.
Code:
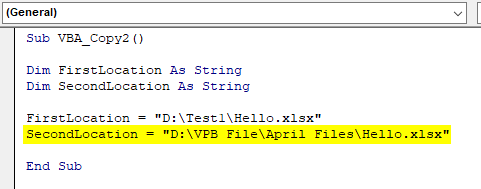
Sub VBA_Copy2()

Dim FirstLocation As String
Dim SecondLocation As String

FirstLocation = "D:Test1Hello.xlsx"

End Sub
Step 5: In a similar way, do that same thing for Destination location using variable “SecondLocation” which we have defined above.
Code:
Sub VBA_Copy2()

Dim FirstLocation As String
Dim SecondLocation As String

FirstLocation = "D:Test1Hello.xlsx"
SecondLocation = "D:VPB FileApril FilesHello.xlsx"

End Sub
Step 6: Now it is the time to use FileCopy function.
Code:
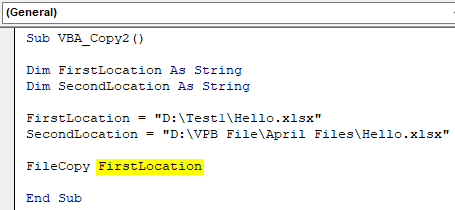
Sub VBA_Copy2()

Dim FirstLocation As String
Dim SecondLocation As String

FirstLocation = "D:Test1Hello.xlsx"
SecondLocation = "D:VPB FileApril FilesHello.xlsx"

FileCopy

End Sub

As per syntax of the FileCopy first, we have to put source location, where we have kept the file. But as we have already defined the source and destination location folders in above for both variables.
Step 7: So here we can directly select those variables. First select source location variable which is FirstLocation.
Code:
Sub VBA_Copy2()

Dim FirstLocation As String
Dim SecondLocation As String

FirstLocation = "D:Test1Hello.xlsx"
SecondLocation = "D:VPB FileApril FilesHello.xlsx"

FileCopy FirstLocation

End Sub
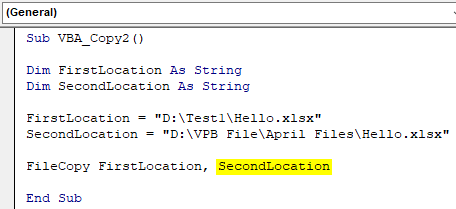
Step 8: Again in a similar way, select the destination location variable which is SecondLocation as shown below.
Code:
Sub VBA_Copy2()

Dim FirstLocation As String
Dim SecondLocation As String

FirstLocation = "D:Test1Hello.xlsx"
SecondLocation = "D:VPB FileApril FilesHello.xlsx"

FileCopy FirstLocation, SecondLocation

End Sub
Step 9: Once done, we will compile the code by pressing F8 functional key. And if there is no error found, then run the code. We will see, the file from source location is copied and pasted in the destination folder as shown below.
We can try different location path as well. For test let’s consider another source location where we will be having a word file.
As we can see, the file doesn’t have any data so the size is again showing as 0 KB.

And the destination folder will be Output Location folder which is under Input Location folder. If we see inside the file, there is no data available.

Now we will replace the source and destination in variables FirstLocation and Second Location respectively followed by the file name and its extension.
Code:
Sub VBA_Copy2()

Dim FirstLocation As String
Dim SecondLocation As String

FirstLocation = "D:VPB FileApril FilesNew ExcelTest Case.docx"
SecondLocation = "D:VPB FileApril FilesFinal locationTest Case.docx"

FileCopy FirstLocation, SecondLocation

End Sub
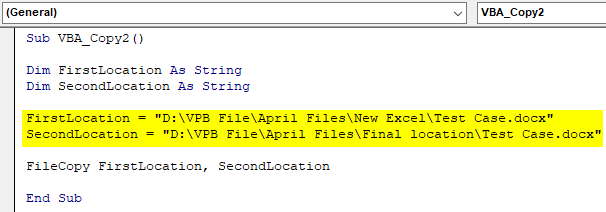
Now run the code.
We will see, the Test word file is now copied from the Input Location folder to Output location folder with the same size which is 0 KB.

Pros of FileCopy In VBA
- It can be used for copying more than 1 file in one shot.
- It takes a similar amount of time for 10 files as it takes for copying one file.
- We can use any extension file type which we want to copy.
Things to Remember
- Always put the file name and its extension at the end of the location name.
- Quote the destination and source location links into inverted commas.
- Once done, save the code in Macro enable excel to use and retain the code for future purpose.
- Always grant the permission to code so that it could copy the file from the source location and paste it in a destination location.
Recommended Articles
This is a guide to FileCopy in VBA. Here we discuss how to Copy an Excel file using VBA Code along with practical examples and downloadable excel template. You can also go through our other suggested articles –
- VBA Active Cell
- VBA XML
- VBA Transpose
- VBA RGB
Return to VBA Code Examples
This tutorial will demonstrate how to copy a file using VBA.
VBA allows you to copy a file, using the FileSystemObject.
If you want to learn how to rename a file, you can click on this link: VBA Rename File
Copy A File / Workbook
We will show how to copy the existing file Sample file 1.xlsx in the folder VBA Folder. In this example, we won’t rename the file, just copy and overwrite it. The folder currently has only this one file:
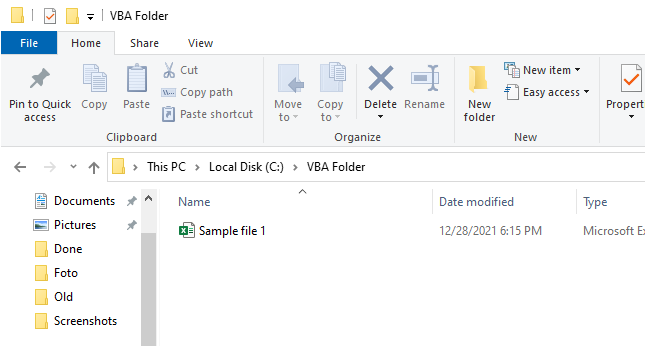
Image 1. File in folder C:VBA Folder
Here is the code:
Dim oFSO As Object

Set oFSO = CreateObject("Scripting.FileSystemObject")

Call oFSO.CopyFile("C:VBA FolderSample file 1.xlsx", "C:VBA Folder", True)
You first need to create the object of the class Scripting.FileSystemObject:
Set oFSO = CreateObject("Scripting.FileSystemObject")Then we can use the method CopyFile:
Call oFSO.CopyFile("C:VBA FolderSample file 1.xlsx", "C:VBA Folder", True)The first parameter of the method is the source path and the second is the destination path. The third parameter is Overwrite. As we have the same source and destination paths, we need to set Overwrite to True or False. In this example, we put True, which means that the original file is overwritten.
Let’s look now what happens if we have the same destinations, but set Overwrite to False. You just need to change this line of the code:
Call oFSO.CopyFile("C:VBA FolderSample file 1.xlsx", "C:VBA Folder", True)As a result, you will get an error as you can see in Image 2:
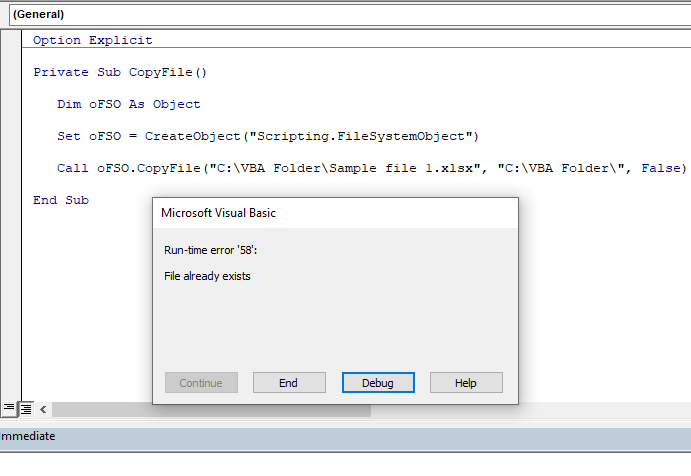
Image 2. Error when copying the file
Copy and Rename a File
Another possible option when copying a file is to rename it. It’s similar to copying a file, but now you just need to set destination path with a different name. Here is the code:
Dim oFSO As Object

Set oFSO = CreateObject("Scripting.FileSystemObject")

Call oFSO.CopyFile("C:VBA FolderSample file 1.xlsx", "C:VBA FolderSample file Copy.xlsx")
As you can see from the last line of the code, we want to copy file Sample file 1.xlsx in the same folder and name it Sample file Copy.xlsx:
Call oFSO.CopyFile("C:VBA FolderSample file 1.xlsx", "C:VBA FolderSample file Copy.xlsx")Now we have two files in the VBA Folder. The result of the code is in Image 3:
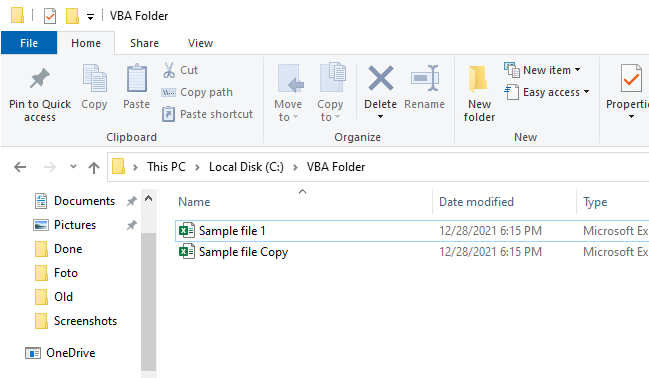
Image 3. Copy and rename the file
VBA Coding Made Easy
Stop searching for VBA code online. Learn more about AutoMacro — A VBA Code Builder that allows beginners to code procedures from scratch with minimal coding knowledge and with many time-saving features for all users!

Learn More!
Visual Basic gives us access to parts of the Windows environment; therefore, there are lots of file-based activities we can achieve with VBA. One of these is to use VBA to copy a file.
In this post, we look at 5 examples of how to achieve this.
In this post, we use the basic FileCopy method. For more advanced options, we can use the File Systems Options.
Example 1: Copy a file
The example below copies Example File.xlsx from C:UsersmarksDocuments to C:UsersmarksDocumentsTest.
Sub VBACopyFile()

FileCopy "C:UsersmarksDocumentsExample File.xlsx", _
    "C:UsersmarksDocumentsTestExample File.xlsx"

End Sub
Note: In this example, the file name is unchanged.
Example 2: Copy a file using variables
In Example 1, the file names were included within the FileCopy statement. However, they can also be provided as variables.
In the code below:
- The variables are declared (i.e., created)
- Values are assigned to the variables
- The variables are used in the FileCopy statement
Sub VBACopyFileVariables()

'Declare variables
Dim copyFromFile As String
Dim copyToFile As String

'Assign values to variables
copyFromFile = "C:UsersmarksDocumentsExample File.xlsx"
copyToFile = "C:UsersmarksDocumentsExample File Copied.xlsx"

'Use variables in the FileCopy statement
FileCopy copyFromFile, copyToFile

End Sub
Note: In this example, the file is not copied to a new location, but is renamed from Example File.xlsx to Example File Copied.xlsx
Example 3: Copy a file based on cell values
In this example, we copy a file using file paths contained in cell values.
Look at the screenshot below. Cell C2 contains the current file path and Cell C4 contains the path to which the file is to be copied.
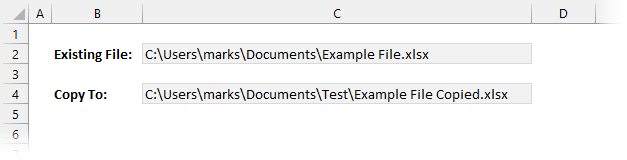
We can run the following macro to rename a file using these cell values.
Sub VBACopyFileSheetNames()

FileCopy ActiveSheet.Range("C2"), _
    ActiveSheet.Range("C4")

End Sub
Note: In this example, the file is copied to a new folder and also renamed from Example File.xlsx to Example File Copied.xlsx
Example 4: Check file existence before VBA copy
The FileCopy command will happily overwrite a file without showing any errors. Therefore, it is a good idea to check if a file already exists before copying over it.
The code below checks for the existence of a file in the target location. If a file exists, a message box with a Yes/No options appear. Clicking No exists the macro.
Sub VBACheckTargetFileCopyFile()

'Declare variables
Dim copyFromFile As String
Dim copyToFile As String
Dim msgBoxAnswer As Long

'Assign variables to file names
copyFromFile = "C:UsersmarksDocumentsExample File.xlsx"
copyToFile = "C:UsersmarksDocumentsTestExample File Copied.xlsx"

'Check if the file already exists
If Dir(copyToFile) <> "" Then

    'Display message box and capture answer
    msgBoxAnswer = MsgBox(Prompt:="File already exists in that location." & _
        vbNewLine & "Do you wish to overwrite it?", Buttons:=vbYesNo, _
        Title:="Copying file")

    'If answer is No, the exist the macro
    If msgBoxAnswer = vbNo Then

        'Exit the macro
        Exit Sub

    End If

End If

'File does not exist or Yes clicked so continue
FileCopy copyFromFile, copyToFile

End Sub
Example 5: Avoiding errors when copying files
Copying files can trigger errors; the errors are outlined in the section below. The following code builds on Example 4 and also provides an error message box if any errors occur.
Sub VBAAdvancedCopyFile()

'Declare variables
Dim copyFromFile As String
Dim copyToFile As String
Dim msgBoxAnswer As Long

'Assign variables to file names
copyFromFile = "C:UsersmarksDocumentsExample File.xlsx"
copyToFile = "C:UsersmarksDocumentsTestExample File Copied.xlsx"

On Error Resume Next

'Check if the file already exists
If Dir(copyToFile) <> "" Then

    'Display message box and capture answer
    msgBoxAnswer = MsgBox(Prompt:="File already exists in that location." & _
        vbNewLine & "Do you wish to overwrite it?", Buttons:=vbYesNo, _
        Title:="Copying file")

    'If answer is No, the exist the macro
    If msgBoxAnswer = vbNo Then

        'Exit the macro
        Exit Sub

    End If

End If

'File does not exist or Yes clicked so continue
FileCopy copyFromFile, copyToFile

'Display message if error occured
If Err.Number <> 0 Then
    MsgBox Prompt:="Unable to copy file", Buttons:=vbOK, _
        Title:="Copy file error"
End If

'Turn error checking back on
On Error GoTo 0

End Sub
Possible errors
Copying a file during automation can cause errors. Below are some of the common errors from the VBA copy file process.
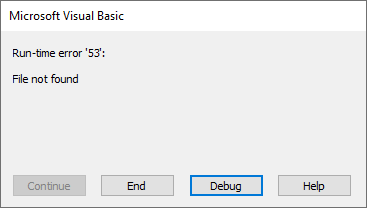
Copying a file that does not exist triggers an error: Run-time error’53’: File not found.
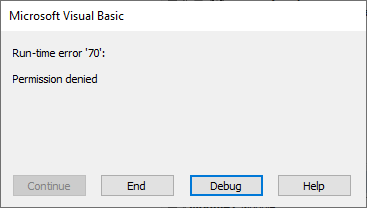
Copying a file to a file location that is locked (i.e., another user has the file open) triggers an error: Run-time error ’70’: Permission denied
Notes on copying files
To finish off this post, there are just a few things to make you aware of:
- We have used Excel workbooks in the examples, but we can use any file type.
- FileCopy cannot copy complete folders, only files.
- The FileCopy command is core Visual Basic code. We find this code in other applications windows applications such as Word and PowerPoint.
- Check out this post for more example codes to manage files and folders: VBA code to copy, move, delete and manage files.
Also, check the VBA code library for hundreds of reusable code snippets.

About the author
Hey, I’m Mark, and I run Excel Off The Grid.
My parents tell me that at the age of 7 I declared I was going to become a qualified accountant. I was either psychic or had no imagination, as that is exactly what happened. However, it wasn’t until I was 35 that my journey really began.
In 2015, I started a new job, for which I was regularly working after 10pm. As a result, I rarely saw my children during the week. So, I started searching for the secrets to automating Excel. I discovered that by building a small number of simple tools, I could combine them together in different ways to automate nearly all my regular tasks. This meant I could work less hours (and I got pay raises!). Today, I teach these techniques to other professionals in our training program so they too can spend less time at work (and more time with their children and doing the things they love).
Do you need help adapting this post to your needs?
I’m guessing the examples in this post don’t exactly match your situation. We all use Excel differently, so it’s impossible to write a post that will meet everybody’s needs. By taking the time to understand the techniques and principles in this post (and elsewhere on this site), you should be able to adapt it to your needs.
But, if you’re still struggling you should:
- Read other blogs, or watch YouTube videos on the same topic. You will benefit much more by discovering your own solutions.
- Ask the ‘Excel Ninja’ in your office. It’s amazing what things other people know.
- Ask a question in a forum like Mr Excel, or the Microsoft Answers Community. Remember, the people on these forums are generally giving their time for free. So take care to craft your question, make sure it’s clear and concise. List all the things you’ve tried, and provide screenshots, code segments and example workbooks.
- Use Excel Rescue, who are my consultancy partner. They help by providing solutions to smaller Excel problems.
What next?
Don’t go yet, there is plenty more to learn on Excel Off The Grid. Check out the latest posts: