
Remember that when you write:
MyArray = Range("A1:A5000")
you are really writing
MyArray = Range("A1:A5000").Value
You can also use names:
MyArray = Names("MyWSTable").RefersToRange.Value
But Value is not the only property of Range. I have used:
MyArray = Range("A1:A5000").NumberFormat
I doubt
MyArray = Range("A1:A5000").Font
would work but I would expect
MyArray = Range("A1:A5000").Font.Bold
to work.
I do not know what formats you want to copy so you will have to try.
However, I must add that when you copy and paste a large range, it is not as much slower than doing it via an array as we all thought.
Post Edit information
Having posted the above I tried by own advice. My experiments with copying Font.Color and Font.Bold to an array have failed.
Of the following statements, the second would fail with a type mismatch:
  ValueArray = .Range("A1:T5000").Value
  ColourArray = .Range("A1:T5000").Font.Color
ValueArray must be of type variant. I tried both variant and long for ColourArray without success.
I filled ColourArray with values and tried the following statement:
.Range("A1:T5000").Font.Color = ColourArray
The entire range would be coloured according to the first element of ColourArray and then Excel looped consuming about 45% of the processor time until I terminated it with the Task Manager.
There is a time penalty associated with switching between worksheets but recent questions about macro duration have caused everyone to review our belief that working via arrays was substantially quicker.
I constructed an experiment that broadly reflects your requirement. I filled worksheet Time1 with 5000 rows of 20 cells which were selectively formatted as: bold, italic, underline, subscript, bordered, red, green, blue, brown, yellow and gray-80%.
With version 1, I copied every 7th cells from worksheet «Time1» to worksheet «Time2» using copy.
With version 2, I copied every 7th cells from worksheet «Time1» to worksheet «Time2» by copying the value and the colour via an array.
With version 3, I copied every 7th cells from worksheet «Time1» to worksheet «Time2» by copying the formula and the colour via an array.
Version 1 took an average of 12.43 seconds, version 2 took an average of 1.47 seconds while version 3 took an average of 1.83 seconds. Version 1 copied formulae and all formatting, version 2 copied values and colour while version 3 copied formulae and colour. With versions 1 and 2 you could add bold and italic, say, and still have some time in hand. However, I am not sure it would be worth the bother given that copying 21,300 values only takes 12 seconds.
** Code for Version 1**
I do not think this code includes anything that needs an explanation. Respond with a comment if I am wrong and I will fix.
Sub SelectionCopyAndPaste()

  Dim ColDestCrnt As Integer
  Dim ColSrcCrnt As Integer
  Dim NumSelect As Long
  Dim RowDestCrnt As Integer
  Dim RowSrcCrnt As Integer
  Dim StartTime As Single

  Application.ScreenUpdating = False
  Application.Calculation = xlCalculationManual
  NumSelect = 1
  ColDestCrnt = 1
  RowDestCrnt = 1
  With Sheets("Time2")
    .Range("A1:T715").EntireRow.Delete
  End With
  StartTime = Timer
  Do While True
    ColSrcCrnt = (NumSelect Mod 20) + 1
    RowSrcCrnt = (NumSelect - ColSrcCrnt) / 20 + 1
    If RowSrcCrnt > 5000 Then
      Exit Do
    End If
    Sheets("Time1").Cells(RowSrcCrnt, ColSrcCrnt).Copy _
                 Destination:=Sheets("Time2").Cells(RowDestCrnt, ColDestCrnt)
    If ColDestCrnt = 20 Then
      ColDestCrnt = 1
      RowDestCrnt = RowDestCrnt + 1
    Else
     ColDestCrnt = ColDestCrnt + 1
    End If
    NumSelect = NumSelect + 7
  Loop
  Debug.Print Timer - StartTime
  ' Average 12.43 secs
  Application.Calculation = xlCalculationAutomatic

End Sub
** Code for Versions 2 and 3**
The User type definition must be placed before any subroutine in the module. The code works through the source worksheet copying values or formulae and colours to the next element of the array. Once selection has been completed, it copies the collected information to the destination worksheet. This avoids switching between worksheets more than is essential.
Type ValueDtl
  Value As String
  Colour As Long
End Type

Sub SelectionViaArray()

  Dim ColDestCrnt As Integer
  Dim ColSrcCrnt As Integer
  Dim InxVLCrnt As Integer
  Dim InxVLCrntMax As Integer
  Dim NumSelect As Long
  Dim RowDestCrnt As Integer
  Dim RowSrcCrnt As Integer
  Dim StartTime As Single
  Dim ValueList() As ValueDtl

  Application.ScreenUpdating = False
  Application.Calculation = xlCalculationManual

  ' I have sized the array to more than I expect to require because ReDim
  ' Preserve is expensive.  However, I will resize if I fill the array.
  ' For my experiment I know exactly how many elements I need but that
  ' might not be true for you.
  ReDim ValueList(1 To 25000)

  NumSelect = 1
  ColDestCrnt = 1
  RowDestCrnt = 1
  InxVLCrntMax = 0      ' Last used element in ValueList.
  With Sheets("Time2")
    .Range("A1:T715").EntireRow.Delete
  End With
  StartTime = Timer
  With Sheets("Time1")
    Do While True
      ColSrcCrnt = (NumSelect Mod 20) + 1
      RowSrcCrnt = (NumSelect - ColSrcCrnt) / 20 + 1
      If RowSrcCrnt > 5000 Then
        Exit Do
      End If
      InxVLCrntMax = InxVLCrntMax + 1
      If InxVLCrntMax > UBound(ValueList) Then
        ' Resize array if it has been filled
        ReDim Preserve ValueList(1 To UBound(ValueList) + 1000)
      End If
      With .Cells(RowSrcCrnt, ColSrcCrnt)
        ValueList(InxVLCrntMax).Value = .Value              ' Version 2
        ValueList(InxVLCrntMax).Value = .Formula            ' Version 3
        ValueList(InxVLCrntMax).Colour = .Font.Color
      End With
      NumSelect = NumSelect + 7
    Loop
  End With
  With Sheets("Time2")
    For InxVLCrnt = 1 To InxVLCrntMax
      With .Cells(RowDestCrnt, ColDestCrnt)
        .Value = ValueList(InxVLCrnt).Value                 ' Version 2
        .Formula = ValueList(InxVLCrnt).Value               ' Version 3
        .Font.Color = ValueList(InxVLCrnt).Colour
      End With
      If ColDestCrnt = 20 Then
        ColDestCrnt = 1
        RowDestCrnt = RowDestCrnt + 1
      Else
       ColDestCrnt = ColDestCrnt + 1
      End If
    Next
  End With
  Debug.Print Timer - StartTime
  ' Version 2 average 1.47 secs
  ' Version 3 average 1.83 secs
  Application.Calculation = xlCalculationAutomatic

End Sub
I have a cell, with formatted (color, size, bold, …) text in it.
I want to edit the text with a user form (which works), but I want, that the new text keeps the old texts formatting (color, …).
How do I do that? When I just copy the .Value in a Textbox, then change it in the textbox and paste the value into the cell, it loses its formatting.
Is there a way to get the value with its formatting? Like BBCodes ore Markdown formatting.
Thanks, Luca
![]()
Dominique
15.9k15 gold badges52 silver badges104 bronze badges
asked Jul 15, 2020 at 6:40
![]()
4
Are you aware that you can record a macro and see what’s inside?
I’ve just done a «copy/paste formatting», and the code looks as follows:
    Selection.Copy
    Range("C8").Select
    Selection.PasteSpecial Paste:=xlPasteFormats, Operation:=xlNone, _
        SkipBlanks:=False, Transpose:=False
    Application.CutCopyMode = False
The most important part here is the .PasteSpecial Paste:=xlPasteFormats, which, as you can imagine, pastes the formatting but not the content.
answered Jul 15, 2020 at 9:08
![]()
DominiqueDominique
15.9k15 gold badges52 silver badges104 bronze badges
I solved the problem by copying the cell with text formatting using the copy function and then editing the text and using Cells#Characters in a loop of the length of the text to change the font properties. Thanks for every answer!
answered Jul 15, 2020 at 12:40
![]()
0xLuca0xLuca
1551 silver badge7 bronze badges
1
Если вы хотите скопировать только форматирование ячейки из диапазона, как это сделать быстро? В этом руководстве представлены быстрые сокращения, позволяющие легко копировать только форматирование.
Копирование форматирования только с помощью Format Painter в Excel
Копировать форматирование только с помощью VBA
Копировать форматирование только с Kutools for Excel ![]()
Копирование форматирования только с помощью Format Painter в Excel
В Excel вы можете копировать форматирование ячеек только с помощью Формат Painter инструмент.
1. Выберите диапазон, содержащий формат ячеек, который вы хотите скопировать. Смотрите скриншот:

2. Применение Формат Painter щелкнув его под Главная вкладку, см. снимок экрана:

3. Выберите пустую ячейку и щелкните по ней, будет вставлено только форматирование ячеек. Смотрите скриншот:

Внимание: Формат Painter также можно копировать форматирование только на другой лист.
Копировать форматирование только с помощью VBA
Следующие макросы также могут помочь вам скопировать только форматирование ячеек.
1. Держать ALT и нажмите F11 на клавиатуре, чтобы открыть Microsoft Visual Basic для приложений окно.
2. Нажмите Вставить > Модули, и скопируйте VBA в модуль.
VBA: копировать только форматирование ячеек:
Sub CopyFormat()
'Update 20130815
Dim CopyRng As Range, PasteRng As Range
xTitleId = "KutoolsforExcel"
Set CopyRng = Application.Selection
Set CopyRng = Application.InputBox("Ranges to be copied :", xTitleId, CopyRng.Address, Type:=8)
Set PasteRng = Application.InputBox("Paste to (single cell):", xTitleId, Type:=8)
CopyRng.Copy
PasteRng.Parent.Activate
PasteRng.PasteSpecial xlPasteFormats
Application.CutCopyMode = False
End Sub
3. Нажмите Run или нажмите F5 для запуска VBA. На экране отображается диалоговое окно, и вы должны выбрать ячейки, форматирование которых вы хотите скопировать. Смотрите скриншот:
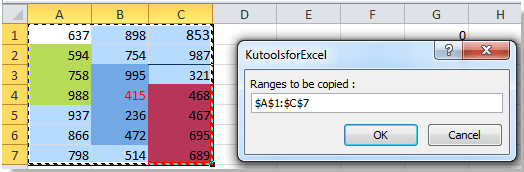
4. Нажмите Ok и другое диалоговое окно отображается для вас, чтобы выбрать ячейку для вставки форматирования. Смотрите скриншот:

6. Нажмите Ok, то форматирование ячеек вставляется в выбранную ячейку. Смотрите скриншот:
Внимание: С помощью этого кода VBA вы можете вставлять только форматирование в другие рабочие листы, которые вы хотите.
Копировать форматирование только с Kutools for Excel
Есть Kutools for Excel установлен, Копировать диапазоны Функция может помочь вам быстро и легко скопировать только форматирование ячеек.
После установки Kutools for Excel, пожалуйста, сделайте, как показано ниже  Бесплатная загрузка Kutools for Excel Сейчас!)
Пожалуйста, примените Копировать диапазоны функция, нажав Кутулс > Копировать диапазоны. Смотрите скриншот:

1. Выделите ячейки, форматирование которых вы хотите скопировать.
2. Нажмите Кутулс > Копировать диапазонs, на экране появится диалог, отметьте Форматы вариант под Специальная вставка, см. снимок экрана:

3. И нажмите ОК. Другой диалог отображается для вас, чтобы выбрать ячейку для вставки результата. Смотрите скриншот:

4. Нажмите Ok, и в выбранную ячейку вставляется только форматирование. Смотрите скриншот:
Внимание: Вы также можете копировать и вставлять форматирование ячеек между двумя электронными таблицами. Если вы хотите скопировать высоту строки и ширину столбца, вы можете проверить Включая высоту строки и Включая ширину столбца коробка в Копировать несколько диапазонов Диалог.
Работы С Нами Kutools for Excel‘ Копировать диапазоны, вы также можете копировать только значения, формулы или комментарии.
Наконечник.Если вы хотите подсчитать или суммировать ячейки на основе цветов, попробуйте использовать Kutools for ExcelАвтора Считать по цвету как показано на следующем снимке экрана. Полная функция без ограничений в 30 дней, пожалуйста, скачайте и получите бесплатную пробную версию сейчас.
Считать по цвету
|
| В некоторых случаях у вас может быть диапазон значений с несколькими цветами, и вы хотите подсчитывать / суммировать значения на основе одного и того же цвета, как вы можете быстро рассчитать? Работы С Нами Kutools for Excel‘s Считать по цвету, вы можете быстро выполнить множество вычислений по цвету, а также можете сформировать отчет о рассчитанном результате. |

Относительные статьи:
- Копировать числа без формул в ячейки
- Копировать только комментарии из ячеек в другую
- Копировать значения и форматирование в ячейки
Лучшие инструменты для работы в офисе
Kutools for Excel Решит большинство ваших проблем и повысит вашу производительность на 80%
- Снова использовать: Быстро вставить сложные формулы, диаграммы и все, что вы использовали раньше; Зашифровать ячейки с паролем; Создать список рассылки и отправлять электронные письма …
- Бар Супер Формулы (легко редактировать несколько строк текста и формул); Макет для чтения (легко читать и редактировать большое количество ячеек); Вставить в отфильтрованный диапазон…
- Объединить ячейки / строки / столбцы без потери данных; Разделить содержимое ячеек; Объединить повторяющиеся строки / столбцы… Предотвращение дублирования ячеек; Сравнить диапазоны…
- Выберите Дубликат или Уникальный Ряды; Выбрать пустые строки (все ячейки пустые); Супер находка и нечеткая находка во многих рабочих тетрадях; Случайный выбор …
- Точная копия Несколько ячеек без изменения ссылки на формулу; Автоматическое создание ссылок на несколько листов; Вставить пули, Флажки и многое другое …
- Извлечь текст, Добавить текст, Удалить по позиции, Удалить пробел; Создание и печать промежуточных итогов по страницам; Преобразование содержимого ячеек в комментарии…
- Суперфильтр (сохранять и применять схемы фильтров к другим листам); Расширенная сортировка по месяцам / неделям / дням, периодичности и др .; Специальный фильтр жирным, курсивом …
- Комбинируйте книги и рабочие листы; Объединить таблицы на основе ключевых столбцов; Разделить данные на несколько листов; Пакетное преобразование xls, xlsx и PDF…
- Более 300 мощных функций. Поддерживает Office/Excel 2007-2021 и 365. Поддерживает все языки. Простое развертывание на вашем предприятии или в организации. Полнофункциональная 30-дневная бесплатная пробная версия. 60-дневная гарантия возврата денег.
")
Вкладка Office: интерфейс с вкладками в Office и упрощение работы
- Включение редактирования и чтения с вкладками в Word, Excel, PowerPoint, Издатель, доступ, Visio и проект.
- Открывайте и создавайте несколько документов на новых вкладках одного окна, а не в новых окнах.
- Повышает вашу продуктивность на 50% и сокращает количество щелчков мышью на сотни каждый день!
")
|
itsokay  Пользователь Сообщений: 12 |
#1 05.01.2018 22:54:41 Господа, доброго времени суток. Помогите, пожалуйста, вот в таком вопросе :
Теперь вопрос по части как сделать так, что бы после нажатия хоткея отрабатывалось копирование, а потом после выбора нужной ячейки мышью скопированный формат применялся к выбранной ячейке ? Спасибо за ответ. Изменено: itsokay — 05.01.2018 23:09:35 |
||
|
если Вам интересно изучать программирование — Вы можете экспериментировать с кодом до того времени пока все не получится так, ка Вы того хотите Программисты — это люди, решающие проблемы, о существовании которых Вы не подозревали, методами, которых Вы не понимаете! |
|
|
itsokay Пользователь Сообщений: 12 |
#3 05.01.2018 23:29:42
инструмент и вправду есть, тут вопрос в том что хочется на него сделать хоткей так как часто им пользуюсь. |
||
|
Ігор Гончаренко Пользователь Сообщений: 13746 |
#4 05.01.2018 23:40:40 не знаю что Вы на этом выиграете
вместо Вашего хоткей макроса Программисты — это люди, решающие проблемы, о существовании которых Вы не подозревали, методами, которых Вы не понимаете! |
||
|
itsokay Пользователь Сообщений: 12 |
Чудно! Единственный момент это то что приходится дважды нажимать на хоткей (макрос). Задумка была изначально что бы хоткей нажимался один раз (происходит копирование) и потом мышкой выбирается ячейка для вставки формата после чего макрос сам вставляет формат по select мышкой. Как-то так. |
|
Ігор Гончаренко Пользователь Сообщений: 13746 |
#6 06.01.2018 01:13:59 а теперь это:
Программисты — это люди, решающие проблемы, о существовании которых Вы не подозревали, методами, которых Вы не понимаете! |
||
|
itsokay Пользователь Сообщений: 12 |
мы наверное немного не понимаем друг друга. |
|
согласен взаимопонимание стремится к нулю (на этапе, когда люди разговаривают на разных языках — это нормально) Программисты — это люди, решающие проблемы, о существовании которых Вы не подозревали, методами, которых Вы не понимаете! |
|
|
itsokay Пользователь Сообщений: 12 |
#9 07.01.2018 22:32:25
задача макроса свести процесс форматирования к нажатию хоткея + 1 клик мышки. Это должно занимать меньше секунды. В идеале вот так : 4. отмечаете мишью требуемый диапазон |
||
|
Юрий М  Модератор Сообщений: 60575 Контакты см. в профиле |
|
|
itsokay, фактически Вы хотите хоткей на вызов команды «Формат по образцу». К сожалению, программно активировать кнопку на ленте весьма сложно — обычно используют SendKeys для имитации нажатия клавиш. Но это довольно ненадежный метод. ИМХО наилучший из простых способов описан тут: https://www.quora.com/What-is-the-shortcut-key-for-format-painter-in-Excel-2010 , Method 2. https://www.google.ru/search?q=excel+format+painter+hotkey |
|
|
itsokay Пользователь Сообщений: 12 |
#12 08.01.2018 01:33:10
Вот же он по вашей ссылке
И не нужно никаких макросов. Прелестно! Казанский , Ігор Гончаренко , благодарю за помощь! |
||||
|
r_a_s  Пользователь Сообщений: 9 |
Добрый День. Уважаемые. |
|
Ігор Гончаренко Пользователь Сообщений: 13746 |
#14 02.03.2023 15:06:04
Программисты — это люди, решающие проблемы, о существовании которых Вы не подозревали, методами, которых Вы не понимаете! |
||
Excel VBA Copy Range to Another Sheet with Formatting
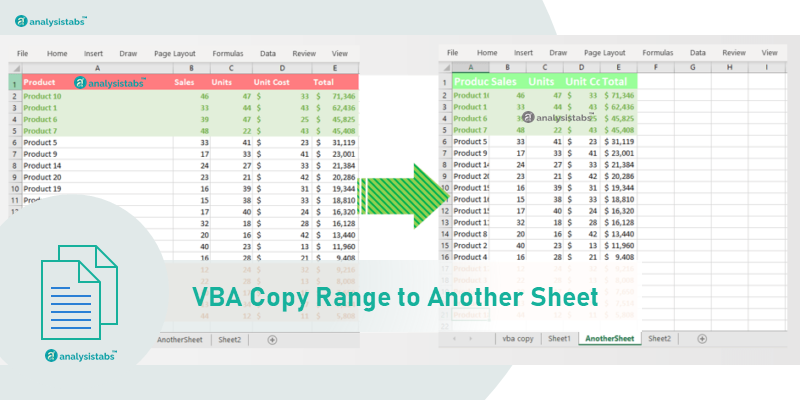
Very often we need to copy the Excel Range to another sheet with formatting. We can use VBA to automate this task. Excel VBA Copy Range to Another Sheet with Formatting macro is explained to know how to copy a range to another worksheet using VBA.
How to Copy Range to Another Sheet with Formatting in Excel VBA
Here is the ‘Excel VBA Copy Range to Another Sheet with Formatting‘ macro to copy a range to another sheet with formatting. You can clearly observe that the Excel VBA is copying the given range to another sheet.
Sub Excel_VBA_Copy_Range_to_Another_Sheet_with_Formatting()
Range("A1:E21").Copy Destination:=Sheets("AnotherSheet").Range("A1")
End Sub
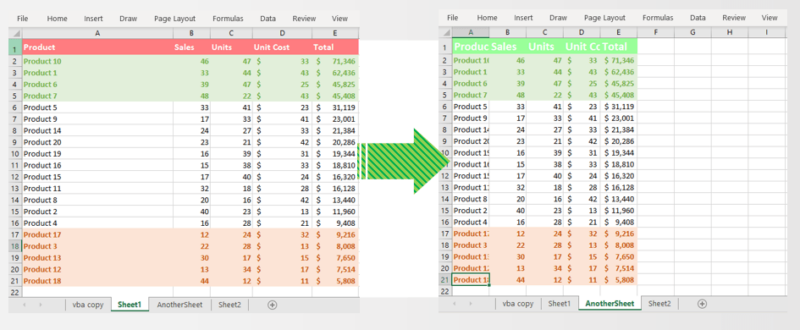
The above example macro will copy the given range to another sheet. Macro will copy the Range A1:A21 and paste at Range A1 of Another Sheet. You can edit the sheet name and range to suit your requirement. You can clearly see form the two sheets and notice these points:
- The macro is perfectly copying the range of data to another sheet
- It is also copying the Format of the given range to destination sheet.
- But not the column width.
How to copy the Excel Range including Column widths
It is easy to copy Excel Range to another sheet with formatting and column widths. We have theree solutions, you can implement one of this to suite your process automation.
Method 1: Using PasteSpecial Method to Copy Range and Paste in Another Sheet with Formatting and Column Widths.
Sub Excel_VBA_Copy_Range_to_Another_Sheet_with_Formatfting_ColumnWidth()

Range("A1:E21").Copy Destination:=Sheets("AnotherSheet").Range("A1")
Range("A1:E21").Copy
Sheets("AnotherSheet").Range("A1").PasteSpecial Paste:=xlPasteColumnWidths, Operation:=xlNone, _
SkipBlanks:=False, Transpose:=False

End Sub

Method 3: Copying Entire Range of Columns and Paste in Another Sheet.
We copy entire columns of the required range and paste in another sheet. This approach is useful when there is no other data in both the sheets. This will copy range of data including Formatting and Column Widths. Please check the following macro to copy both formatting and column widths.
Sub Excel_VBA_Copy_Range_to_Another_Sheet_with_FormattingAndColumnWidths()

Range("A:E").Copy Destination:=Sheets("AnotherSheet2").Range("a1")
End Sub
The only change in this method is, removing the row numbers from the ranges (A1:E21) and just using the columns A:E.
Method 3: Explicitly specifying the Column Widths
The following macro will copy the range and paste into another sheet. This will also make copy the Formatting and Column widths of the given Range.
Sub Excel_VBA_Copy_Range_to_Another_Sheet_with_FormattingForEachColumn()
Range("A1:E21").Copy Destination:=Sheets("AnotherSheet").Range("a1")
colCntr = 0
For Each col In Range("A1:E21").Columns
Sheets("AnotherSheet").Range("A1").Offset(1, colCntr).ColumnWidth = col.ColumnWidth
colCntr = colCntr + 1
Next
End Sub
Copy Range Values to Another Sheet with out Formatting in Excel VBA
We may need to copy only the values of the given range to another sheet with no formatting. You can copy and paste only values into the another sheet using Excel VBA.
The following macro will copy a range and paste only values in another sheet.
Range("A1:E21").Copy

Sheets("AnotherSheet").Range("A1").PasteSpecial _
Paste:=xlPasteValues, Operation:=xlNone, SkipBlanks _
:=False, Transpose:=False
Copy Formats of a Range to Another Sheet using Excel VBA
Alternatively, we can also paste only the formats of the given range into another sheet. We can copy the range use pastespecial method to paste only formats of the source range using Excel VBA.
Here is the macro will copy a range and paste only the formats in another sheet.
Sheets("AnotherSheet").Range("A1").PasteSpecial Paste:=xlPasteFormats, Operation:=xlNone, _
SkipBlanks:=False, Transpose:=False
Copy Formulas of a Range to Another Sheet using Excel VBA
Sometimes, we may need copy the formulas of the given range and paste in to another range. PasteSpecial method allows us to paste only Formulas to the target range and sheet using Excel VBA.
Macro to copy the formulas from source range and paste into another range and sheet.
Sheets("AnotherSheet").Range("A1").PasteSpecial Paste:=xlPasteFormulas, Operation:=xlNone, _
SkipBlanks:=False, Transpose:=False
CopyPaste Only the Border of a Range to Another Sheet in Excel VBA
The following macro will help us to copy and paste only the borders of the source range and ignore all other formats. We need this when you wants to maintain same border formats in all our target sheets.
Sheets("AnotherSheet").Range("A1").PasteSpecial Paste:=xlPasteAllExceptBorders, Operation:=xlNone, _
SkipBlanks:=False, Transpose:=False


Sheets("AnotherSheet").Range("A1").PasteSpecial Paste:=xlPasteAllExceptBorders, Operation:=xlNone, _
SkipBlanks:=True, Transpose:=True
Best Practices to follow while Copying Excel Range to another Sheet
Excel VBA macros are very helpfull to copy Excel Range to another sheet. We recommend you to note the below points while automating the copy paste tasks.
- Clear the Target Range: Always clear the target range (in Another sheet) before copying and pasting the data. There may be some data or formats avaialbe in the target range. This will make sure that you have same source data in the target sheet. And this will clear any pre formats and reduce the file size.
- Specify Source and Destination Sheets: Try to specify both of the source and destination sheets. So that you can run your macro from any sheet. If your source range is alwas from active sheet, then do not specify the source sheet.
- Do not perform any other operations between Copy and Paste. It is noticed many beginners copy the range and do some task and then pasting the values. Excel will turn off the CutCopy mode and no data will be pasted in your destination sheet.
A Powerful & Multi-purpose Templates for project management. Now seamlessly manage your projects, tasks, meetings, presentations, teams, customers, stakeholders and time. This page describes all the amazing new features and options that come with our premium templates.
Save Up to 85% LIMITED TIME OFFER

All-in-One Pack
120+ Project Management Templates
Essential Pack
50+ Project Management Templates
Excel Pack
50+ Excel PM Templates
PowerPoint Pack
50+ Excel PM Templates
MS Word Pack
25+ Word PM Templates
Ultimate Project Management Template
Ultimate Resource Management Template
Project Portfolio Management Templates
Related Posts
- How to Copy Range to Another Sheet with Formatting in Excel VBA
- How to copy the Excel Range including Column widths
- Method 1: Using PasteSpecial Method to Copy Range and Paste in Another Sheet with Formatting and Column Widths.
- Method 3: Copying Entire Range of Columns and Paste in Another Sheet.
- Method 3: Explicitly specifying the Column Widths
- Copy Range Values to Another Sheet with out Formatting in Excel VBA
- Copy Formats of a Range to Another Sheet using Excel VBA
- Copy Formulas of a Range to Another Sheet using Excel VBA
- CopyPaste Only the Border of a Range to Another Sheet in Excel VBA
- Best Practices to follow while Copying Excel Range to another Sheet
- How to copy the Excel Range including Column widths
VBA Reference
Effortlessly
Manage Your Projects
120+ Project Management Templates
Seamlessly manage your projects with our powerful & multi-purpose templates for project management.
120+ PM Templates Includes:
One Comment
-
Jo
July 10, 2019 at 8:31 AM — ReplyClear and very helpful. Thanks for providing a the macro to copy ranges in Excel sheets.
Effectively Manage Your
Projects and Resources
ANALYSISTABS.COM provides free and premium project management tools, templates and dashboards for effectively managing the projects and analyzing the data.
We’re a crew of professionals expertise in Excel VBA, Business Analysis, Project Management. We’re Sharing our map to Project success with innovative tools, templates, tutorials and tips.
Project Management
Excel VBA
Download Free Excel 2007, 2010, 2013 Add-in for Creating Innovative Dashboards, Tools for Data Mining, Analysis, Visualization. Learn VBA for MS Excel, Word, PowerPoint, Access, Outlook to develop applications for retail, insurance, banking, finance, telecom, healthcare domains.
Page load link

3 Realtime VBA Projects
with Source Code!
Go to Top