
Home / VBA / Count Rows using VBA in Excel
To count rows using VBA, you need to define the range from which you want to count the rows and then use the count and rows property to get the count of the row from that range. You can also use a loop to count rows where you have data only.
Use VBA to Count Rows
- First, you need to define the range for which you want to count the rows.
- After that, use a dot (.) to open the list of properties and methods.
- Next, type or select the “Rows” property.
- In the end, use the “Count” property.

Now when you run this code, it will return the count of the rows, and to get the count you can use a message box or directly enter that value into a cell as well.
Sub vba_count_rows()
Range("A1:A10").Rows.Count
End Sub
Count Rows for the Used Range
Sub vba_count_rows2()
   MsgBox Worksheets("Sheet1").UsedRange.Rows.Count
End Sub
Count Rows with Data using VBA
You can also count rows where you have data by ignoring the blank rows.

The following code will take the used range as the range to loop up at and loop through each row one by one and check if there’s a non-empty cell there, and if it is there it will consider it as a row with data, and in the end, show a message box with the total count of rows.
Sub vba_count_rows_with_data()

Dim counter As Long
Dim iRange As Range

With ActiveSheet.UsedRange

    'loop through each row from the used range
    For Each iRange In .Rows

        'check if the row contains a cell with a value
        If Application.CountA(iRange) > 0 Then

            'counts the number of rows non-empty Cells
            counter = counter + 1

        End If

    Next

End With

MsgBox "Number of used rows is " & counter
End Sub
More Tutorials
- Excel VBA Font (Color, Size, Type, and Bold)
- Excel VBA Hide and Unhide a Column or a Row
- Excel VBA Range – Working with Range and Cells in VBA
- Apply Borders on a Cell using VBA in Excel
- Find Last Row, Column, and Cell using VBA in Excel
- Insert a Row using VBA in Excel
- Merge Cells in Excel using a VBA Code
- Select a Range/Cell using VBA in Excel
- SELECT ALL the Cells in a Worksheet using a VBA Code
- ActiveCell in VBA in Excel
- Special Cells Method in VBA in Excel
- UsedRange Property in VBA in Excel
- VBA AutoFit (Rows, Column, or the Entire Worksheet)
- VBA ClearContents (from a Cell, Range, or Entire Worksheet)
- VBA Copy Range to Another Sheet + Workbook
- VBA Enter Value in a Cell (Set, Get and Change)
- VBA Insert Column (Single and Multiple)
- VBA Named Range | (Static + from Selection + Dynamic)
- VBA Range Offset
- VBA Sort Range | (Descending, Multiple Columns, Sort Orientation
- VBA Wrap Text (Cell, Range, and Entire Worksheet)
- VBA Check IF a Cell is Empty + Multiple Cells
⇠ Back to What is VBA in Excel
Helpful Links – Developer Tab – Visual Basic Editor – Run a Macro – Personal Macro Workbook – Excel Macro Recorder – VBA Interview Questions – VBA Codes
This tutorial shows how to count the total number of rows from a selected range through the use of an Excel formula or VBA
Example: Count number of rows in a range

METHOD 1. Count number of rows in a range
EXCEL
|
This formula uses the Excel ROWS function to return the number of rows in the selected range. In this example we have selected range (E5:E15) inside the ROWS function, which returns a total of 11 rows. |
METHOD 1. Count number of rows in a range using VBA
VBA
Sub Count_number_of_rows_in_range()
‘declare a variable
Dim ws As Worksheet
Set ws = Worksheets(«Analysis»)
‘count the total number of rows in a specific range
ws.Range(«B5») = ws.Range(«E5:E15»).Rows.Count
End Sub
ADJUSTABLE PARAMETERS
Output Range: Select the output range by changing the cell reference («B5») in the VBA code.
Range: Select the range from which you want to count the number of rows by changing the range reference («E5:E15») in the VBA code.
Worksheet Selection: Select the worksheet in which you want to count the number of rows from a selected range by changing the Analysis worksheet name in the VBA code. You can also change the name of this object variable, by changing the name ‘ws’ in the VBA code.
Explanation about the formula used to count number of rows in a range
EXPLANATION
EXPLANATION
This tutorial shows how to count the total number of rows from a selected range through the use of an Excel formula or VBA.
Both the Excel formula and VBA approach make use of the ROWS function to count the number of rows in a selected range.
Using the VBA method you will also need to combine the Rows function with the Count function to return the total number of rows in a selected range.
FORMULA
=ROWS(array)
ARGUMENTS
array: An array or reference to a range of cells.
| Related Topic | Description | Related Topic and Description |
|---|---|---|
| Count number of columns in a range | How to count the total number of columns in a range using Excel and VBA methods | |
| Count number of cells in a range | How to count the total number of cells in a range using Excel and VBA methods | |
| Count number of characters in a cell | How to count the total number of characters, including spaces, in a cell using Excel and VBA methods | |
| Count number of characters in a cell excluding spaces | How to count the total number of characters in a cell, excluding spaces, using Excel and VBA methods | |
| Count number of characters in a range | How to ccount the total number of characters in a range, including spaces, using Excel and VBA methods |
| Related Functions | Description | Related Functions and Description |
|---|---|---|
| ROWS Function | The Excel ROWS function returns the number of rows in a specified array |
I am developing a dashboard in excel. And I am looking for calculating row count. (How many records are present) ..
Since there are some blank cells I thought to go from bottom to up. I use the following
   Range("A1048576").Select
Selection.End(xlUp).Select
After this execution the active cell is at A113 which means the row count is 113.
My question is how to get this number 113 from the active cell?
![]()
asked Feb 4, 2014 at 13:37
![]()
You can use this:
Dim lastrow as Long
lastrow = Cells(Rows.Count,"A").End(xlUp).Row
lastrow will contain number of last empty row in column A, in your case 113
answered Feb 4, 2014 at 13:38
![]()
Dmitry PavlivDmitry Pavliv
35.2k13 gold badges79 silver badges80 bronze badges
1
Here is what I usually use for that:
lastrow = WorksheetFunction.CountA(Columns("A:A"))
This will return the number of non-empty cells in Column «A» which is what I think you’re after. Hope this helps.
answered Feb 4, 2014 at 13:49
![]()
Jim SimsonJim Simson
2,7663 gold badges21 silver badges30 bronze badges
2
The best way to get the count of rows/records (in most cases) is to use .UsedRange.Rows.Count. You can assign the return value to a variable like this:
lastRow = Sheets(1).UsedRange.Rows.Count
If you use a function that includes a column (such as column A) as shown in other examples, that will only get you the count of rows in that column, which may or may not be what you’re going for. One caveat: if you have formatted rows below your last row with a value then it will return that row number.
answered Mar 3, 2021 at 0:28
![]()
If there is a slight chance that the last row of the worksheet is not empty, you should add an IsEmpty() check to @simoco ‘s solution. Therefore; following is a function that returns the last used row and check if the last row of the worksheet is empty:
Function lastRow(WS As Worksheet, iColumn As String) As Long

    If Not IsEmpty(WS.Range(iColumn & WS.Rows.Count)) Then
        lastRow = WS.Rows.Count
    Else
        lastRow = WS.Range(iColumn & WS.Rows.Count).End(xlUp).Row
    End If

End Function
answered Feb 4, 2014 at 14:22
![]()
simpLE MAnsimpLE MAn
1,56213 silver badges22 bronze badges
Как определить количество строк и колонок диапазона?
Сообщений: 5
• Страница 1 из 1
- wap
- Начинающий

- Сообщения: 6
- Зарегистрирован: 13.08.2007 (Пн) 14:14

Как определить количество строк и колонок диапазона?
![]() wap » 17.08.2007 (Пт) 15:40
wap » 17.08.2007 (Пт) 15:40
Как в VBA определить число строк и число колонок в выделенном диапазоне ячеек?
Заодно, подскажите пожалуйста, как в массив данные из этих ячеек загнать, а то вдруг еще проблемы появятся, придется топик заводить ![]()
- Genyaa
- Обычный пользователь
- Сообщения: 59
- Зарегистрирован: 17.10.2006 (Вт) 13:46
-
- Сайт

![]() Genyaa » 17.08.2007 (Пт) 16:37
Genyaa » 17.08.2007 (Пт) 16:37
Всякое решение плодит новые проблемы.
- dormouse
- Продвинутый пользователь
-

- Сообщения: 140
- Зарегистрирован: 10.01.2007 (Ср) 21:58
- Откуда: Волжский
-
- ICQ


![]() dormouse » 17.08.2007 (Пт) 17:19
dormouse » 17.08.2007 (Пт) 17:19
Dim x As Byte, y As Byte
Dim i As Byte, j As Byte, a As Byte, b As Byte
Dim ar() As Integer
y = Selection.Rows.Count
x = Selection.Columns.Count
ReDim ar(x — 1, y — 1) As Integer
For i = Selection.Row To Selection.Row + y — 1
For j = Selection.Column To Selection.Column + x — 1
ar(a, b) = ActiveSheet.Cells(i, j).Value
a = a + 1
Next j
a = 0
b = b + 1
Next i
Stop
VBA, MSA97
- KL
- Microsoft MVP
- Сообщения: 483
- Зарегистрирован: 30.10.2005 (Вс) 0:31
- Откуда: Madrid
![]() KL » 17.08.2007 (Пт) 17:40
KL » 17.08.2007 (Пт) 17:40
dormouse писал(а):
- Код: Выделить всё
Dim x As Byte, y As Byte
Dim i As Byte, j As Byte, a As Byte, b As Byte
Dim ar() As Integer
y = Selection.Rows.Count
x = Selection.Columns.Count
ReDim ar(x - 1, y - 1) As Integer
For i = Selection.Row To Selection.Row + y - 1
    For j = Selection.Column To Selection.Column + x - 1
        ar(a, b) = ActiveSheet.Cells(i, j).Value
        a = a + 1
    Next j
    a = 0
    b = b + 1
Next i
Stop
Ага, или так:
- Код: Выделить всё
Dim ar As Variant


ar=Selection.Value
![]()
Привет,
KL
- dormouse
- Продвинутый пользователь
-
- Сообщения: 140
- Зарегистрирован: 10.01.2007 (Ср) 21:58
- Откуда: Волжский
-
- ICQ
![]() dormouse » 17.08.2007 (Пт) 18:44
dormouse » 17.08.2007 (Пт) 18:44
![]()
VBA, MSA97
Сообщений: 5
• Страница 1 из 1
Вернуться в VBA
Кто сейчас на конференции
Сейчас этот форум просматривают: нет зарегистрированных пользователей и гости: 2
You could also use the «Last» function from Ron de Bruin (http://www.rondebruin.nl/win/s9/win005.htm), it worked perfectly for me and also gives back the last column and cell if you want. To get the last row use it like
lastRow = Last(1,yourRange)
I found this quite handy.
Function Last(choice As Long, rng As Range)
'Ron de Bruin, 5 May 2008
' 1 = last row
' 2 = last column
' 3 = last cell
    Dim lrw As Long
    Dim lcol As Long

    Select Case choice

    Case 1:
        On Error Resume Next
        Last = rng.Find(What:="*", _
                        After:=rng.Cells(1), _
                        Lookat:=xlPart, _
                        LookIn:=xlFormulas, _
                        SearchOrder:=xlByRows, _
                        SearchDirection:=xlPrevious, _
                        MatchCase:=False).Row
        On Error GoTo 0

    Case 2:
        On Error Resume Next
        Last = rng.Find(What:="*", _
                        After:=rng.Cells(1), _
                        Lookat:=xlPart, _
                        LookIn:=xlFormulas, _
                        SearchOrder:=xlByColumns, _
                        SearchDirection:=xlPrevious, _
                        MatchCase:=False).Column
        On Error GoTo 0

    Case 3:
        On Error Resume Next
        lrw = rng.Find(What:="*", _
                       After:=rng.Cells(1), _
                       Lookat:=xlPart, _
                       LookIn:=xlFormulas, _
                       SearchOrder:=xlByRows, _
                       SearchDirection:=xlPrevious, _
                       MatchCase:=False).Row
        On Error GoTo 0

        On Error Resume Next
        lcol = rng.Find(What:="*", _
                        After:=rng.Cells(1), _
                        Lookat:=xlPart, _
                        LookIn:=xlFormulas, _
                        SearchOrder:=xlByColumns, _
                        SearchDirection:=xlPrevious, _
                        MatchCase:=False).Column
        On Error GoTo 0

        On Error Resume Next
        Last = rng.Parent.Cells(lrw, lcol).Address(False, False)
        If Err.Number > 0 Then
            Last = rng.Cells(1).Address(False, False)
            Err.Clear
        End If
        On Error GoTo 0

    End Select
End Function
Содержание
- Свойство Application.Rows (Excel)
- Синтаксис
- Примечания
- Пример
- Поддержка и обратная связь
- Count Rows using VBA in Excel
- Use VBA to Count Rows
- Count Rows for the Used Range
- Count Rows with Data using VBA
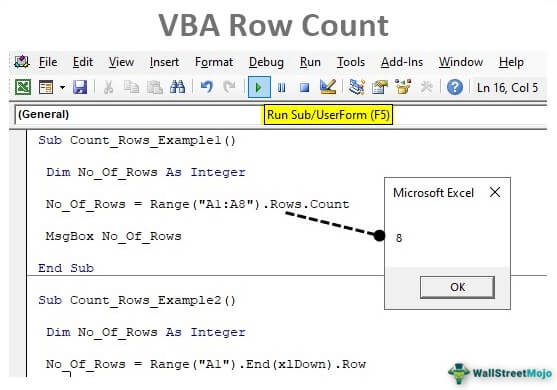
- VBA Row Count
- Excel VBA Row Count
- How to Count Rows in VBA?
- Example #1
- Example #2
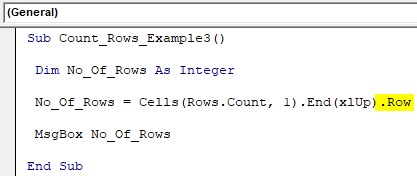
- Example #3 – Find Last Used Row
- Things to Remember
- Recommended Articles
- VBA Excel. Переменная диапазона ячеек (As Range)
- Присвоение диапазона ячеек переменной
- Адресация ячеек в диапазоне
- Работа с диапазонами в VBA
- Копирование диапазона
- Запрос значения ячейки
- Ввод значения в следующую пустую ячейку
- Приостановка работы макроса для определения диапазона пользователем
- Подсчет выделенных ячеек
- Просмотр выделенного диапазона
- Дублирование строк
- Определение диапазона, находящегося в другом диапазоне
- Определение типа данных ячейки
Свойство Application.Rows (Excel)
Возвращает объект Range , представляющий все строки на активном листе. Если активный документ не является листом, свойство Rows завершается ошибкой . Объект Range предназначен только для чтения.
Синтаксис
expression. Строк
выражение: переменная, представляющая объект Application.
Примечания
Использование этого свойства без квалификатора объекта эквивалентно использованию ActiveSheet.Rows.
При применении к объекту Range , который является множественным выделением, это свойство возвращает строки только из первой области диапазона. Например, если объект Range имеет две области — A1:B2 и C3:D4, selection.Rows.Count возвращает 2, а не 4.
Чтобы использовать это свойство в диапазоне, который может содержать несколько выделенных элементов, проверьте Areas.Count, чтобы определить, является ли диапазон множественным выбором. Если это так, выполните цикл по каждой области диапазона, как показано в третьем примере.
Пример
В этом примере удаляется третья строка на листе Sheet1.
В этом примере удаляются строки в текущем регионе на листе, где значение одной ячейки в строке совпадает со значением в ячейке в предыдущей строке.
В этом примере отображается количество строк в выделенном фрагменте на листе Sheet1. Если выбрано несколько областей, в примере выполняется цикл по каждой области.
Поддержка и обратная связь
Есть вопросы или отзывы, касающиеся Office VBA или этой статьи? Руководство по другим способам получения поддержки и отправки отзывов см. в статье Поддержка Office VBA и обратная связь.
Источник
Count Rows using VBA in Excel
To count rows using VBA, you need to define the range from which you want to count the rows and then use the count and rows property to get the count of the row from that range. You can also use a loop to count rows where you have data only.
Use VBA to Count Rows
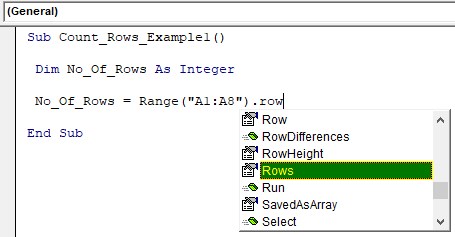
- First, you need to define the range for which you want to count the rows.
- After that, use a dot (.) to open the list of properties and methods.
- Next, type or select the “Rows” property.
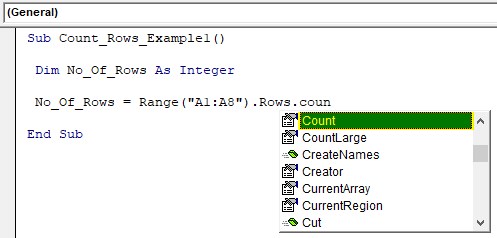
- In the end, use the “Count” property.

Now when you run this code, it will return the count of the rows, and to get the count you can use a message box or directly enter that value into a cell as well.
Count Rows for the Used Range
Count Rows with Data using VBA
You can also count rows where you have data by ignoring the blank rows.

The following code will take the used range as the range to loop up at and loop through each row one by one and check if there’s a non-empty cell there, and if it is there it will consider it as a row with data, and in the end, show a message box with the total count of rows.
Источник
VBA Row Count


Excel VBA Row Count
In VBA programming, referring to rows is most important as well, and counting them is one thing you must be aware of when it comes to VBA coding. We can get a lot of value if we understand the importance of counting rows with data in the worksheet. This article will show you how to count rows using VBA coding.
You are free to use this image on your website, templates, etc., Please provide us with an attribution link How to Provide Attribution? Article Link to be Hyperlinked
For eg:
Source: VBA Row Count (wallstreetmojo.com)
Table of contents
How to Count Rows in VBA?
Example #1
Look at the below data in Excel.

From the above data, we need to identify how many rows are there from the range A1 to A8. So first, define the variable as an Integer to store the number of rows.
Code:

We will assign row numbers for this variable, so enter the variable name and the equal sign.
Code:

Code:

Once we supply the range, we need to count the number of rows, so choose the ROWS property of the RANGE object.
We are counting several rows in the RANGE object’s ROWS property, so choose the “COUNT” property now.
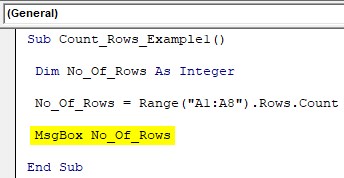
Now in the message box, show the value of the variable.
Code:
Now, run the code and see the count of rows of the supplied range of cells.

There are 8 rows supplied for the range, so the row count is 8 in the message box.
Example #2
We have other ways of counting rows as well. For the above method, we need to supply a range of cells, showing the number of rows selected.
But imagine the scenario where we need to find the last use of any column. For example, take the same data as seen above.
To move to the last used cell from cell A1, we press the shortcut excel key Shortcut Excel Key An Excel shortcut is a technique of performing a manual task in a quicker way. read more “Ctrl + Down Arrow,” so it will take you to the last cell before the empty cell.
First, supply the cell as A1 using the RANGE object.
Code:
Look there with the END key. We can see all the arrow keys like “xlDown, xlToLeft, xlToRight, and xlUp” since we need to move down and use the “xlDown” option.
Code:
Code:

So in rows, we have data.
Example #3 – Find Last Used Row
Finding the last used row is important to decide how many times the loop has to run. Also, in the above method, the last row stops to select if there is any breakpoint cell. So in this method, we can find the last used row without any problems.
Code:
Now, we need to mention the row number to start with. The problem here is we are not sure how many rows of data we have so that we can go straight to the last row of the worksheet, for this mention, ROWS.COUNT property.
Code:
Next, we need to mention in which column we are finding the last used row, so in this case, we are finding it in the first column, so mention 1.
Code:
At this moment, it will take you to the last cell of the first column. We need to move upwards to the last used cell from there onwards, so use the End(xlUp) property.
Code:
So, this will take you to the last used cell of column 1, and in this cell, we need the row number, so use the ROW property to get the row number.
Code:
Things to Remember
- The COUNT will give several rows in the worksheet.
- If you have a range, then it will give several rows selected in the range.
- The ROW property will return the active cell row number.
Recommended Articles
This article has been a guide to VBA Row Count. Here, we discuss how to count used rows in Excel using VBA coding, practical examples, and a downloadable Excel template. You may learn more about Excel from the following articles: –
Источник
VBA Excel. Переменная диапазона ячеек (As Range)
Присвоение диапазона ячеек объектной переменной в VBA Excel. Адресация ячеек в переменной диапазона и работа с ними. Определение размера диапазона. Примеры.
Присвоение диапазона ячеек переменной
Чтобы переменной присвоить диапазон ячеек, она должна быть объявлена как Variant, Object или Range:
Чтобы было понятнее, для чего переменная создана, объявляйте ее как Range.
Присваивается переменной диапазон ячеек с помощью оператора Set:
В выражении Range(Cells(3, 4), Cells(26, 18)) вместо чисел можно использовать переменные.
Для присвоения диапазона ячеек переменной можно использовать встроенное диалоговое окно Application.InputBox, которое позволяет выбрать диапазон на рабочем листе для дальнейшей работы с ним.
Адресация ячеек в диапазоне
К ячейкам присвоенного диапазона можно обращаться по их индексам, а также по индексам строк и столбцов, на пересечении которых они находятся.
Индексация ячеек в присвоенном диапазоне осуществляется слева направо и сверху вниз, например, для диапазона размерностью 5х5:
| 1 | 2 | 3 | 4 | 5 |
| 6 | 7 | 8 | 9 | 10 |
| 11 | 12 | 13 | 14 | 15 |
| 16 | 17 | 18 | 19 | 20 |
| 21 | 22 | 23 | 24 | 25 |
Индексация строк и столбцов начинается с левой верхней ячейки. В диапазоне этого примера содержится 5 строк и 5 столбцов. На пересечении 2 строки и 4 столбца находится ячейка с индексом 9. Обратиться к ней можно так:
Источник
Работа с диапазонами в VBA
Настоящая заметка продолжает знакомство с VBA, в ней описана работа с диапазонами в VBA.[1]
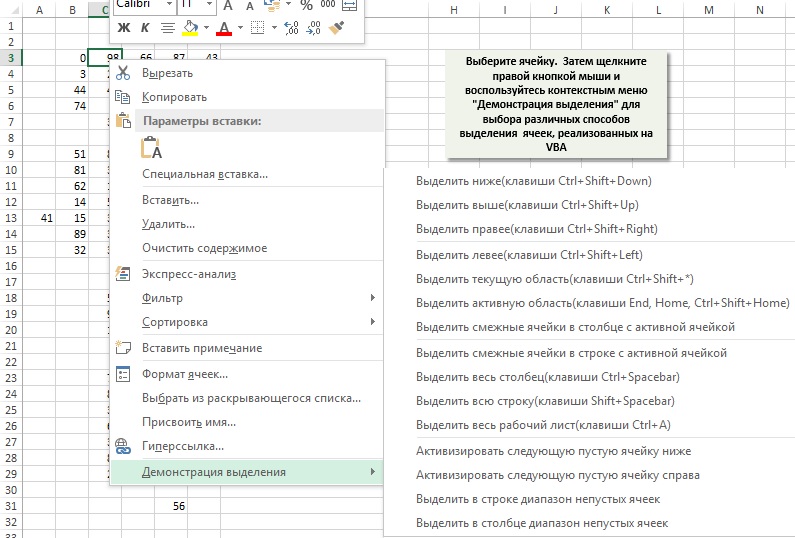
Рис. 1. Пример, демонстрирующий, как выделять диапазоны различной формы в VBA$ чтобы увеличить изображение кликните на нем правой кнопкой мыши и выберите Открыть картинку в новой вкладке
Скачать заметку в формате Word или pdf, примеры в архиве (политика безопасности провайдера не позволяет загружать файлы Excel с поддержкой макросов)
Копирование диапазона
Функция записи макросов Excel используется не столько для создания хорошего кода, сколько для поиска названий необходимых объектов, методов и свойств. Например, при записи операции копирования и вставки можно получить код:
Sub Макрос()
Range( » A1 » ).Select
Selection.Copy
Range( » B1 » ).Select
ActiveSheet.Paste
End Sub
Обратите внимание, что данная программа выделяет ячейки. Однако в VBA для работы с объектом не обязательно его выделять. Данную процедуру можно заменить значительно более простой — применить метод Сору, который использует аргумент, представляющий адрес места вставки копируемого диапазона.
Sub CopyRange()
Range( » А1 » ).Copy Range( » В1 » )
End Sub
Предполагается, что рабочий лист является активным и операция выполняется на активном рабочем листе. Чтобы скопировать диапазон на другой рабочий лист или в другую книгу, необходимо задать ссылку:
Sub CopyRange2()
Workbooks( » File1.xlsx » ).Sheets( » Лист1 » ).Range( » A1 » ).Copy _
Workbooks( » File2.xlsx » ).Sheets( » Лист2 » ).Range( » A1 » )
End Sub
Еще одним подходом к решению этой задачи является использование для представления диапазонов объектных переменных:
Sub CopyRange3()
Dim Rngl As Range, Rng2 As Range
Set Rngl = Workbooks( » File1.xlsx » ).Sheets( » Лист1 » ).Range( » A1 » )
Set Rng2 = Workbooks( » File2.xlsx » ).Sheets( » Лист2 » ).Range( » A1 » )
Rngl.Copy Rng2 End Sub
Можно копировать большой диапазон. Адрес места вставки определяется единственной ячейкой (представляющей верхний левый угол вставляемого диапазона):
Sub CopyRange4 ()
Range( » А1:С800 » ).Copy Range( » D1 » )
End Sub
Для перемещения диапазона ячеек вместо метода Сору используется метод Cut.
Если размер копируемого диапазона не известен используется свойство CurrentRegion, возвращающее объект Range, который соответствует прямоугольнику ячеек вокруг заданной ячейки:
Sub CopyCurrentRegion2()
Range( » A1 » ).CurrentRegion.Copy Sheets( » Лист2 » ).Range( » A1 » )
End Sub
Метод End имеет один аргумент, определяющий направление, в котором увеличивается выделение ячеек. Следующий оператор выделяет диапазон от активной ячейки до последней непустой ячейки внизу:
Range (ActiveCell, ActiveCell.End(xlDown)).Select
Три остальные константы имитируют комбинации клавиш при выделении в других направлениях: xlUp (вверх), xlToLeft (влево) и xlToRight (вправо).
В прилагаемом Excel-файле определено несколько распространенных типов выделения ячеек (см. рис. 1). Код любопытен тем, что является также примером создания контекстного меню.
Запрос значения ячейки
Следующая процедура запрашивает значение у пользователя и вставляет его в ячейку А1:
Sub GetValuel()
Range( » A1 » ).Value = InputBox( » Введите значение » )
End Sub
Однако при выполнении этой процедуры возникает проблема. Если пользователь щелкнет на кнопке Отмена в окне ввода данных, то процедура удалит данные, которые находились в текущей ячейке. Модифицированная версия процедуры адекватно реагирует на щелчок на кнопке Отмена и не выполняет при этом никаких действий:
Sub GetValue2()
Dim UserEntry As Variant
UserEntry = InputBox( » Введите значение » )
If UserEntry <> » » Then Range( » A1 » ).Value = UserEntry
End Sub
Во многих случаях следует проверить правильность данных, введенных пользователем. Например, необходимо обеспечить введение только чисел в диапазоне от 1 до 12 (рис. 2). Это можно сделать при помощи процедуры GetValue3(), код которой приведен в Модуле1 приложенного Excel-файла. Некорректные данные игнорируются, и окно запроса значения отображается снова. Этот цикл будет повторяться, пока пользователь не введет правильное значение или не щелкнет на кнопке Отмена.

Рис. 2. Проверка данных, введенных пользователем
Ввод значения в следующую пустую ячейку
Если требуется ввести значение в следующую пустую ячейку столбца или строки, используйте код (рис. 3):
Sub GetData()
Dim NextRow As Long
Dim Entry1 As String, Entry2 As String
Do
‘ Определение следующей пустой строки
NextRow = Cells(Rows.Count, 1).End(xlUp).Row + 1
‘ Запрос данных
Entry1 = InputBox( » Введите имя » )
If Entry1 = » » Then Exit Sub
Entry2 = InputBox( » Введите сумму » )
If Entry2 = » » Then Exit Sub
‘ Запись данных
Cells(NextRow, 1) = Entry1
Cells(NextRow, 2) = Entry2
Loop
End Sub

Рис. 3. Макрос вставляет данные в следующую пустую строку рабочего листа
Это бесконечный цикл. Для выхода из него (щелкните на кнопке Cancel) использовались операторы Exit Sub. Обратите внимание строку, в который определяется значение переменной NextRow. Если вам трудно ее понять, проанализируйте содержимое ячейки: перейдите в последнюю ячейку столбца А и нажмите и . После этого будет выделена последняя непустая ячейка в столбце А. Свойство Row возвращает номер этой строки; чтобы получить расположенную под ней строку (следующую пустую строку), к этому номеру прибавляется 1.
Приостановка работы макроса для определения диапазона пользователем
В некоторых ситуациях макрос должен взаимодействовать с пользователем. Например, можно создать макрос, который приостанавливается, когда пользователь указывает диапазон ячеек. Для этого воспользуйтесь функцией Excel InputBox. Не путайте метод Excel InputBox с функцией VBA InputBox. Несмотря на идентичность названий, это далеко не одно и то же.
Процедура, представленная ниже, демонстрирует, как приостановить макрос и разрешить пользователю выбрать ячейку. Затем автоматически формула вставляется в каждую ячейку выделенного диапазона.
Sub GetUserRange()
Dim UserRange As Range
Prompt = » Выберите диапазон для случайных чисел. »
Title = » Выбор диапазона »
‘ Отображение поля ввода
On Error Resume Next
Set UserRange = Application.InputBox( _
Prompt:=Prompt, _
Title:=Title, _
Default:=ActiveCell.Address, _
Type:=8) ‘ Выделение диапазона
On Error GoTo 0
‘ Отменено ли отображение поля ввода?
If UserRange Is Nothing Then
MsgBox » Отменено. »
Else
UserRange.Formula = » =RAND() »
End If
End Sub
Окно ввода данных показано на рис. 4. Важный момент в этой процедуре – определение аргумента Туре равным 8 (в этом случае InputBox вернет диапазон; подробнее см. Application.InputBox Method).

Рис. 4. Использование окна ввода данных с целью приостановки выполнения макроса
Оператор On Error Resume Next игнорирует ошибку, если пользователь не выберет диапазон, а щелкает Отмена. В таком случае объектная переменная UserRange не получает значения. В этом случае отобразится окно сообщения с текстом «Отменено». Если же пользователь щелкнет на кнопке OK, то макрос продолжит выполняться. Строка On Error Go То указывает на переход к стандартной обработке ошибки. Проверка корректного выделения диапазона необязательна. Excel позаботится об этом вместо вас.
Обязательно проверьте, включено ли обновление экрана при использовании метода InputBox для выделения диапазона. Если обновление экрана отключено, вы не сможете выделить рабочий лист. Чтобы проконтролировать обновление экрана, в процессе выполнения макроса используйте свойство ScreenUpdating объекта Application.
Подсчет выделенных ячеек
Работая с макросом, который обрабатывает выделенный диапазон ячеек, можно использовать свойство Count, чтобы определить, сколько ячеек содержится в выделенном (или любом другом) диапазоне. Например, оператор MsgBox Selection.Count демонстрирует окно сообщения, которое отображает количество ячеек в текущем выделенном диапазоне. Свойство Count использует тип данных Long, поэтому наибольшее значение, которое может храниться в нем, равно 2 147 483 647. Если выделить лист целиком, то ячеек будет больше, и свойство Count сгенерирует ошибку. Используйте свойство CountLarge, которое не имеет таких ограничений.
Если активный лист содержит диапазон data, то следующий оператор присваивает количество ячеек в диапазоне data переменной с названием CellCount:
CellCount = Range( » data » ).Count
Вы можете также определить, сколько строк или столбцов содержится в диапазоне. Следующее выражение вычисляет количество столбцов в выделенном диапазоне:
Следующий оператор пересчитывает количество строк в диапазоне с названием data и присваивает это количество переменной RowCount.
RowCount = Range( » data » ).Rows.Count
Просмотр выделенного диапазона
Вы можете столкнуться с трудностями при создании макроса, который оценивает каждую ячейку в диапазоне и выполняет операцию, определенную заданному критерию. Если выделен целый столбец или строка, то работа макроса может занять много времени. Процедура ColorNegative устанавливает красный цвет для ячеек, которые содержат отрицательные значения. Цвет фона для других ячеек не определяется. Код процедуры можно найти в Модуле4 приложенного Excel-файла.
Усовершенствованная процедура ColorNegative2, создает объектную переменную WorkRange типа Range, которая представляет собой пересечение выделенного диапазона и диапазона рабочего листа (рис. 5). Если выделить столбец F (1048576 ячеек), то его пересечение с рабочим диапазоном В2:I16) даст область F2:F16, которая намного меньше исходного выделенного диапазона. Время, затрачиваемое на обработку 15 ячеек, намного меньше времени, уходящего на обработку миллиона ячеек.

Рис. 5. В результате пересечения используемого диапазона и выделенного диапазона рабочего листа уменьшается количество обрабатываемых ячеек
И всё же процедура ColorNegative2 недостаточно эффективна, поскольку обрабатывает все ячейки в диапазоне. Поэтому предлагается процедура ColorNegative3. В ней используется метод SpecialCells, с помощью которого генерируются два поднабора выделенной области: один поднабор (ConstantCells) включает ячейки, которые содержат исключительно числовые константы; второй поднабор (FormulaCells) включает ячейки, содержащие числовые формулы. Обработка ячеек в этих поднаборах осуществляется с помощью двух конструкций For Each-Next. Благодаря тому, что исключается обработка пустых и нетекстовых ячеек, скорость выполнения макроса существенно увеличивается.
Sub ColorNegative3()
‘ Окрашивание ячеек с отрицательными значениями в красный цвет
Dim FormulaCells As Range, ConstantCells As Range
Dim cell As Range
If TypeName(Selection) <> » Range » Then Exit Sub
Application.ScreenUpdating = False
‘ Создание поднаборов исходной выделенной области
On Error Resume Next
Set FormulaCells = Selection.SpecialCells(xlFormulas, xlNumbers)
Set ConstantCells = Selection.SpecialCells(xlConstants, xlNumbers)
On Error GoTo 0
‘ Обработка ячеек с формулами
If Not FormulaCells Is Nothing Then
For Each cell In FormulaCells
If cell.Value ‘ Обработка ячеек с константами
If Not ConstantCells Is Nothing Then
For Each cell In ConstantCells
If cell.Value » Пустые строки удалены. »
End Sub
Первый шаг — определить последнюю используемую строку и присвоить этот номер строки переменной LastRow. Это не так просто, как можно ожидать, поскольку текущий диапазон необязательно начинается со строки 1. Следовательно, значение LastRow вычисляется таким образом: к найденному количеству строк используемого диапазона прибавляется номер первой строки текущего диапазона и вычитается 1.
В процедуре применена функция Excel СЧЁТЗ, определяющая, является ли строка пустой. Если данная функция для конкретной строки возвращает 0, то эта строка пустая. Обратите внимание, что процедура просматривает строки снизу вверх и использует отрицательное значение шага в цикле For-Next. Это необходимо, поскольку при удалении все последующие строки перемещаются «вверх» в рабочем листе. Если бы в цикле просмотр выполнялся сверху вниз, то значение счетчика цикла после удаления строки оказалось бы неправильным.
В макросе используется еще одна переменная, Counter, с помощью которой подсчитывается количество удаленных строк. Эта величина отображается в окне сообщения по завершении процедуры.
Дублирование строк
Пример, рассматриваемый в этом разделе, демонстрирует использование возможностей VBA для создания дубликатов строк. На рис. 6 показан пример рабочего листа, используемого организаторами лотереи. В столбце А вводится имя. В столбце В содержится количество лотерейных билетов, приобретенных одним покупателем. В столбце С находится случайное число сгенерированное с помощью функции СЛЧИС. Победитель определяется путем сортировки данных в третьем столбце (выигрыш соответствует наибольшему случайному числу).

Рис. 6. Дублирование строк на основе значений в столбце В
А теперь нужно продублировать строки, в результате чего количество строк для каждого участника лотереи будут соответствовать количеству купленных им билетов. Например, если Барбара приобрела два билета, для нее создаются две строки. Ниже показана процедура, выполняющая вставку новых строк.
Sub DupeRows()
Dim cell As Range
‘ 1-я ячейка, содержащая сведения о количестве билетов
Set cell = Range( » B2 » )
Do While Not IsEmpty(cell)
If cell > 1 Then
Range(cell.Offset(1, 0), cell.Offset(cell.Value _
— 1,0)).EntireRow.Insert
Range(cell, cell.Offset(cell.Value — 1, — 1)). _
EntireRow.FillDown
End If
Set cell = cell.Offset(cell.Value, 0)
Loop
End Sub
Объектная переменная cell была инициализирована ячейкой В2, первой ячейкой, в которой находится числовая величина. Вставка новых строк осуществляется в цикле, а их копирование происходит с помощью метода FillDown. Значение переменной cell увеличивается на единицу, после чего выбирается следующий участник лотереи, Цикл выполняется до тех пор, пока не встретится пустая ячейка. На рис. 7 показан рабочий лист после выполнения этой процедуры.

Рис. 7. В соответствии со значением в столбце В добавлены новые строки
Определение диапазона, находящегося в другом диапазоне
Функция InRange имеет два аргумента, оба — объекты Range. Функция возвращает значение True (Истина), если первый диапазон содержится во втором.
Function InRange(rng1, rng2) As Boolean
‘ Возвращает True, если rng1 является подмножеством rng2
InRange = False
If rng1.Parent.Parent.Name = rng2.Parent.Parent.Name Then
If rng1.Parent.Name = rng2.Parent.Name Then
If Union(rng1, rng2).Address = rng2.Address Then
InRange = True
End If
End If
End If
End Function
Возможно, функция InRange кажется сложнее, чем того требует ситуация, поскольку в коде должна быть реализована проверка принадлежности двух диапазонов одной и той же книге и рабочему листу. Обратите внимание, что в процедуре используется свойство Parent, которое возвращает объект-контейнер заданного объекта. Например, следующее выражение возвращает название листа для объекта rng1:
Следующее выражение возвращает название рабочей книги rng1:
Функция VBA Union возвращает объект Range, который представляет собой объединение двух объектов типа Range. Объединение содержит все ячейки, относящиеся к исходным диапазонам. Если адрес объединения двух диапазонов совпадает с адресом второго диапазона, первый диапазон входит в состав второго диапазона.
Определение типа данных ячейки
В состав Excel входит ряд встроенных функций, которые могут помочь определить тип данных, содержащихся в ячейке. Это функции ЕНЕТЕКСТ, ЕЛОГИЧ и ЕОШИБКА. Кроме того, VBA поддерживает функции IsEmpty, IsDate и IsNumeric.
Ниже описана функция CellType, которая принимает аргумент-диапазон и возвращает строку, описывающую тип данных левой верхней ячейки этого диапазона (рис. 8). Такую функцию можно использовать в формуле рабочего листа или вызвать из другой процедуры VBA.

Рис. 8. Функция CellType, возвращающая тип данных ячейки
Function CellType(Rng)
‘ Возвращает тип ячейки, находящейся в левом верхнем углу диапазона
Dim TheCell As Range
Set TheCell = Rng.Range( » A1 » )
Select Case True
Case IsEmpty(TheCell)
CellType = » Пустая »
Case TheCell.NumberFormat = » @ »
CellType = » Текст »
Case Application.IsText(TheCell)
CellType = » Текст »
Case Application.IsLogical(TheCell)
CellType = » Логический »
Case Application.IsErr(TheCell)
CellType = » Ошибка »
Case IsDate(TheCell)
CellType = » Дата »
Case InStr(1, TheCell.Text, » : » ) <> 0
CellType = » Время »
Case IsNumeric(TheCell)
CellType = » Число »
End Select
End Function
Обратите внимание на использование оператора SetTheCell. Функция CellType получает аргумент-диапазон произвольного размера, но этот оператор указывает, что функция оперирует только левой верхней ячейкой диапазона (представленной переменной TheCell).
Источник
Excel VBA Row Count
In VBA programming, referring to rows is most important as well, and counting them is one thing you must be aware of when it comes to VBA coding. We can get a lot of value if we understand the importance of counting rows with data in the worksheet. This article will show you how to count rows using VBA coding.
You are free to use this image on your website, templates, etc, Please provide us with an attribution linkArticle Link to be Hyperlinked
For eg:
Source: VBA Row Count (wallstreetmojo.com)
Table of contents
- Excel VBA Row Count
- How to Count Rows in VBA?
- Example #1
- Example #2
- Example #3 – Find Last Used Row
- Things to Remember
- Recommended Articles
- How to Count Rows in VBA?
How to Count Rows in VBA?
You can download this VBA Row Count Excel Template here – VBA Row Count Excel Template
Example #1
To count rowsThere are numerous ways to count rows in Excel using the appropriate formula, whether they are data rows, empty rows, or rows containing numerical/text values. Depending on the circumstance, you can use the COUNTA, COUNT, COUNTBLANK, or COUNTIF functions.read more, we need to use the RANGE object. In this object, we need to use the ROWS object. In this, we need to use the COUNT property.
Look at the below data in Excel.
From the above data, we need to identify how many rows are there from the range A1 to A8. So first, define the variable as an Integer to store the number of rows.
Code:
Sub Count_Rows_Example1()

Dim No_Of_Rows As Integer

End Sub
We will assign row numbers for this variable, so enter the variable name and the equal sign.
Code:
Sub Count_Rows_Example1()

Dim No_Of_Rows As Integer

No_Of_Rows =

End Sub
We need to provide a range of cells, so open the RANGE objectRange is a property in VBA that helps specify a particular cell, a range of cells, a row, a column, or a three-dimensional range. In the context of the Excel worksheet, the VBA range object includes a single cell or multiple cells spread across various rows and columns.read more and supply the range as “A1:A8”.
Code:
Sub Count_Rows_Example1()

Dim No_Of_Rows As Integer

No_Of_Rows = Range("A1:A8")

End Sub
Once we supply the range, we need to count the number of rows, so choose the ROWS property of the RANGE object.
We are counting several rows in the RANGE object’s ROWS property, so choose the “COUNT” property now.
Now in the message box, show the value of the variable.
Code:
Sub Count_Rows_Example1()

Dim No_Of_Rows As Integer

No_Of_Rows = Range("A1:A8").Rows.Count

MsgBox No_Of_Rows

End Sub
Now, run the code and see the count of rows of the supplied range of cells.
There are 8 rows supplied for the range, so the row count is 8 in the message box.
Example #2
We have other ways of counting rows as well. For the above method, we need to supply a range of cells, showing the number of rows selected.
But imagine the scenario where we need to find the last use of any column. For example, take the same data as seen above.
To move to the last used cell from cell A1, we press the shortcut excel keyAn Excel shortcut is a technique of performing a manual task in a quicker way.read more “Ctrl + Down Arrow,” so it will take you to the last cell before the empty cell.
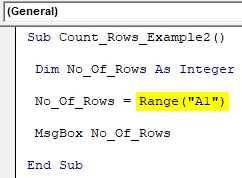
First, supply the cell as A1 using the RANGE object.
Code:
Sub Count_Rows_Example2()

Dim No_Of_Rows As Integer

No_Of_Rows = Range("A1")

MsgBox No_Of_Rows

End Sub
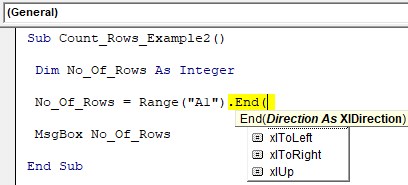
From this cell, we need to move down. We use Ctrl + Down Arrow in the worksheet, but in VBA, we use the END propertyEnd is a VBA statement that can be used in a variety of ways in VBA applications. Anywhere in the code, a simple End statement can be used to instantly end the execution of the code. In procedures, the end statement is used to end a subprocedure or any loop function, such as ‘End if’.read more. Choose this property and open the bracket to see options.
Look there with the END key. We can see all the arrow keys like “xlDown, xlToLeft, xlToRight, and xlUp” since we need to move down and use the “xlDown” option.
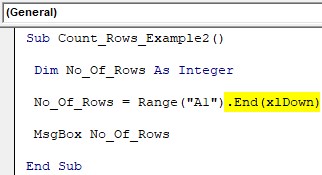
Code:
Sub Count_Rows_Example2()

Dim No_Of_Rows As Integer

No_Of_Rows = Range("A1").End(xlDown)

MsgBox No_Of_Rows

End Sub
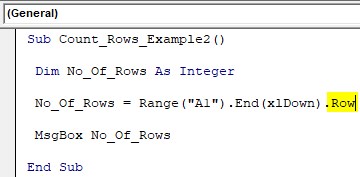
It will take you to the last cell before any break. We need the row number in the active cellThe active cell is the currently selected cell in a worksheet. Active cell in VBA can be used as a reference to move to another cell or change the properties of the same active cell or the cell’s reference provided from the active cell.read more so use the ROW property.
Code:
Sub Count_Rows_Example2()

Dim No_Of_Rows As Integer

No_Of_Rows = Range("A1").End(xlDown).Row

MsgBox No_Of_Rows

End Sub
Now, this will show the last row numberThe End(XLDown) method is the most commonly used method in VBA to find the last row, but there are other methods, such as finding the last value in VBA using the find function (XLDown).read more, which will be the count of the number of rows.
So in rows, we have data.
Example #3 – Find Last Used Row
Finding the last used row is important to decide how many times the loop has to run. Also, in the above method, the last row stops to select if there is any breakpoint cell. So in this method, we can find the last used row without any problems.
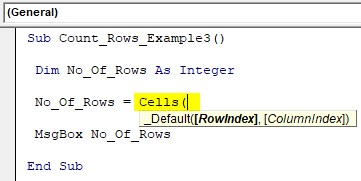
Open CELL propertyCells are cells of the worksheet, and in VBA, when we refer to cells as a range property, we refer to the same cells. In VBA concepts, cells are also the same, no different from normal excel cells.read more.
Code:
Sub Count_Rows_Example3()

Dim No_Of_Rows As Integer

No_Of_Rows = Cells(

MsgBox No_Of_Rows

End Sub
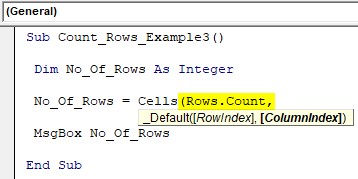
Now, we need to mention the row number to start with. The problem here is we are not sure how many rows of data we have so that we can go straight to the last row of the worksheet, for this mention, ROWS.COUNT property.
Code:
Sub Count_Rows_Example3()

Dim No_Of_Rows As Integer

No_Of_Rows = Cells(Rows.Count,

MsgBox No_Of_Rows

End Sub
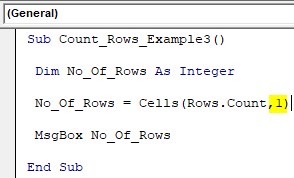
Next, we need to mention in which column we are finding the last used row, so in this case, we are finding it in the first column, so mention 1.
Code:
Sub Count_Rows_Example3()

Dim No_Of_Rows As Integer

No_Of_Rows = Cells(Rows.Count, 1)

MsgBox No_Of_Rows

End Sub
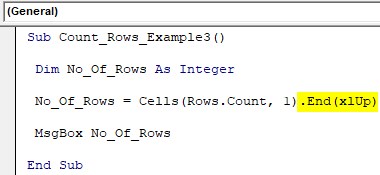
At this moment, it will take you to the last cell of the first column. We need to move upwards to the last used cell from there onwards, so use the End(xlUp) property.
Code:
Sub Count_Rows_Example3()

Dim No_Of_Rows As Integer

No_Of_Rows = Cells(Rows.Count, 1).End(xlUp)

MsgBox No_Of_Rows

End Sub
So, this will take you to the last used cell of column 1, and in this cell, we need the row number, so use the ROW property to get the row number.
Code:
Sub Count_Rows_Example3()

Dim No_Of_Rows As Integer

No_Of_Rows = Cells(Rows.Count, 1).End(xlUp).Row

MsgBox No_Of_Rows

End Sub
Things to Remember
- The COUNT will give several rows in the worksheet.
- If you have a range, then it will give several rows selected in the range.
- The ROW property will return the active cell row number.
Recommended Articles
This article has been a guide to VBA Row Count. Here, we discuss how to count used rows in Excel using VBA coding, practical examples, and a downloadable Excel template. You may learn more about Excel from the following articles: –
- VBA Insert Row
- VBA Delete Row
- VBA StatusBar
- VBA Variable Range