
Открытие книги Excel из кода VBA. Проверка существования книги. Создание новой книги, обращение к открытой книге и ее закрытие. Методы Open, Add и Close.
Открытие существующей книги
Существующая книга открывается из кода VBA Excel с помощью метода Open:
|
Workbooks.Open Filename:=«D:test1.xls» |
или
|
Workbooks.Open («D:test1.xls») |
В кавычках указывается полный путь к открываемому файлу Excel. Если такой файл не существует, произойдет ошибка.
Проверка существования файла
Проверить существование файла можно с помощью функции Dir. Проверка существования книги Excel:
|
If Dir(«D:test1.xls») = «» Then MsgBox «Файл не существует» Else MsgBox «Файл существует» End If |
Или, если файл (книга Excel) существует, можно сразу его открыть:
|
If Dir(«D:test1.xls») = «» Then MsgBox «Файл не существует» Else Workbooks.Open Filename:=«D:test1.xls» End If |
Создание новой книги
Новая рабочая книга Excel создается в VBA с помощью метода Add:
Созданную книгу, если она не будет использоваться как временная, лучше сразу сохранить:
|
Workbooks.Add ActiveWorkbook.SaveAs Filename:=«D:test2.xls» |
В кавычках указывается полный путь сохраняемого файла Excel, включая присваиваемое имя, в примере — это «test2.xls».
Обращение к открытой книге
Обращение к активной книге:
Обращение к книге с выполняемым кодом:
Обращение к книге по имени:
|
Workbooks(«test1.xls») Workbooks(«test2.xls») |
Обратиться по имени можно только к уже открытой книге, а чтобы из кода VBA Excel книгу открыть, необходимо указать полный путь к файлу.
Открытая рабочая книга закрывается из кода VBA Excel с помощью метода Close:
|
Workbooks(«test1.xlsx»).Close |
Если закрываемая книга редактировалась, а внесенные изменения не были сохранены, тогда при ее закрытии Excel отобразит диалоговое окно с вопросом: Вы хотите сохранить изменения в файле test1.xlsx? Чтобы файл был закрыт без сохранения изменений и вывода диалогового окна, можно воспользоваться параметром метода Close — SaveChanges:
|
Workbooks(«test1.xlsx»).Close SaveChanges:=False |
или
|
Workbooks(«test1.xlsx»).Close (False) |
Закрыть книгу Excel из кода VBA с сохранением внесенных изменений можно также с помощью параметра SaveChanges:
|
Workbooks(«test1.xlsx»).Close SaveChanges:=True |
или
|
Workbooks(«test1.xlsx»).Close (True) |
Фразы для контекстного поиска: открыть книгу, открытие книги, создать книгу, создание книги, закрыть книгу, закрытие книги, открыть файл Excel, открытие файла Excel, существование книги, обратиться к открытой книге.
 In this Excel VBA Tutorial, you learn how to activate workbooks with macros.
This Excel VBA Activate Workbook Tutorial is currently under development. Subscribe to the Power Spreadsheets Newsletter to get future updates to this Excel VBA Tutorial.
Use the following Table of Contents to navigate to the Section you’re interested in.
VBA Code to Activate This Workbook
To activate this workbook, use the following statement in the applicable procedure.
Process to Activate This Workbook with VBA
- Refer to this workbook (the workbook where the macro is stored).
- Activate the workbook.
Main VBA Constructs Used to Activate This Workbook
(1) Application.ThisWorkbook property.
Returns a Workbook object representing the workbook where the macro is stored (the workbook where the macro is running).
(2) Workbook object.
Represents an Excel workbook.
(3) Workbook.Activate method.
Activates the (first) window associated with a workbook.
Macro Example to Activate This Workbook
The macro below does the following:
- Activate this workbook (the workbook where the macro is stored).
- Maximize the active window.
Sub ActivateThisWorkbook()
    'Source: https://powerspreadsheets.com/
    'For further information: https://powerspreadsheets.com/excel-vba-activate-workbook/

    'This procedure:
        '(1) Activates this workbook (the workbook where the macro is stored)
        '(2) Maximizes the active window

    'Activate this workbook
    ThisWorkbook.Activate

    'Maximize the active window
    ActiveWindow.WindowState = xlMaximized

End Sub
Effects of Executing Macro Example to Activate This Workbook
The image below illustrates the effects of using the macro example. In this example:
- 2 workbooks (“Excel VBA Activate Workbook” and “Book1”) are open.
- The “Book1” workbook is the active workbook.
- The macro example is stored in the “Excel VBA Activate Workbook” workbook.
When the macro is executed, Excel:
- Activates this workbook (“Excel VBA Activate Workbook”; the workbook where the macro example is stored); and
- Maximizes the active window.

Excel VBA Activate Workbook by Filename
VBA Code to Activate Workbook by Filename
To activate a workbook by filename, use the following structure/template in the applicable statement.
Workbooks("Filename").Activate
Process to Activate Workbook by Filename with VBA
- Refer to the workbook to activate by filename.
- Activate the applicable workbook.
Main VBA Constructs Used to Activate Workbook by Filename
(1) Application.Workbooks property.
Returns a Workbooks collection representing all open workbooks.
(2) Workbooks object.
Represents all open workbooks.
(3) Workbooks.Item property.
Returns a specific Workbook object from the applicable Workbooks collection.
(4) Workbook object.
Represents an Excel workbook.
(5) Workbook.Activate method.
Activates the (first) window associated with a workbook.
Cues to Activate Workbook by Filename with VBA
- Consider whether you must wrap the workbook filename in double quotes and parentheses ((“Filename”)).
- As a general rule: Include the complete filename, including file extension (for ex., “Filename.xlsm”), of a previously saved workbook.
Macro Example to Activate Workbook by Filename
The macro below does the following:
- Activate the workbook with filename “Excel VBA Activate Workbook.xlsm”.
- Maximize the active window.
Sub ActivateWorkbookByFilename()
    'Source: https://powerspreadsheets.com/
    'For further information: https://powerspreadsheets.com/excel-vba-activate-workbook/

    'This procedure:
        '(1) Activates the workbook with filename "Excel VBA Activate Workbook.xlsm"
        '(2) Maximizes the active window

    'Activate the workbook with filename "Excel VBA Activate Workbook.xlsm"
    Workbooks("Excel VBA Activate Workbook.xlsm").Activate

    'Maximize the active window
    ActiveWindow.WindowState = xlMaximized

End Sub
Effects of Executing Macro Example to Activate Workbook by Filename
The image below illustrates the effects of using the macro example. In this example:
- 2 workbooks (“Excel VBA Activate Workbook.xlsm” and “Book1”) are open.
- The “Book1” workbook is the active workbook.
When the macro is executed, Excel:
- Activates the workbook with filename “Excel VBA Activate Workbook.xlsm”; and
- Maximizes the active window.

Excel VBA Activate Workbook with Partial Filename (with Left, Mid, or Right Functions)
VBA Code to Activate Workbook with Partial Filename (with Left, Mid, or Right Functions)
To activate a workbook with partial filename (with the Left, Mid, or Right functions), use the following structure/template in the applicable procedure.
VariableDeclarationStatement iWorkbook As Workbook
For Each iWorkbook In Application.Workbooks
    If VbaBuiltInTextFunction(TextFunctionArgumentsIncludingWorkbookName) = "PartialWorkbookFilename" Then
        iWorkbook.Activate
    End If
Next iWorkbook
Process to Activate Workbook with Partial Filename (with Left, Mid, or Right Functions)
- Declare iteration object variable (usually of the Workbook object data type).
- Loop through all open workbooks.
- Test whether the applicable part (for example, the beginning or end) of the name of the workbook (the loop is currently iterating through) matches the (known) partial filename (of the workbook to activate).
- If the condition is met (the applicable part of the name of the applicable workbook matches the partial filename of the workbook to activate), activate the workbook (the loop is currently iterating through).
Main VBA Constructs Used to Activate Workbook with Partial Filename (with Left, Mid, or Right Functions)
(1) Variable declaration statement.
One of the following 4 statements:
- Dim: Declares variables and allocates storage space.
- Private:
- Used at the module level.
- Declares module-level variables and allocates storage space.
- Public:
- Used at the module level.
- Declares global variables and allocates storage space.
- Static: Declares static variables and allocates storage space.
(2) Workbook object.
Represents an Excel workbook.
(3) For Each… Next statement.
Repeats a set of statements for each element in an array or collection.
(4) Application.Workbooks property.
Returns a Workbooks collection representing all open workbooks.
(5) Workbooks object.
Represents all open workbooks.
(6) Object variable.
A named storage location containing data (a reference to an object) that can be modified during procedure execution.
(7) If… Then… Else statement.
Conditionally executes a set of statements, depending on the value returned by a logical expression.
(8) VBA built-in text function.
One (or more) of the following VBA built-in text functions:
- Left: Returns a string containing a specific number of characters from the start (left side) of a string.
- Mid: Returns a string containing a specific number of characters from the middle (starting at a specific position) of a string.
- Right: Returns a string containing a specific number of characters from the end (right side) of a string.
- InStr: Returns the position of the first occurrence of one string inside another string.
(9) String.
A sequence of contiguous characters.
(10) Workbook.Activate method.
Activates the (first) window associated with a workbook.
Cues to Activate Workbook with Partial Filename (with Left, Mid, or Right Functions) with VBA
- Consider explicitly declaring:
- The iteration object variable.
- The data type (usually Workbook object) of the iteration object variable.
- As a general rule, declare the iteration object variable:
- Using the Dim statement; and
- As of the Workbook object data type.
- If the scope of the iteration object variable is module-level or global, follow the applicable rules for (module-level or global) variable declaration.
- Depending on the case you deal with, you may need to work with different versions of the If… Then… Else statement. Consider the following 4 basic versions of the If… Then… Else statement:
- If… Then. This is the version I use in the structure/template above.
- If… Then… Else.
- If… Then… ElseIf.
- If… Then… ElseIf… Else.
- The appropriate VBA built-in text function you work with depends on the case you deal with (for example, the structure and position of the known partial filename).
- As a general rule:
- The (main) string you use as one of the arguments of the VBA built-in text function (the string from which you extract characters) is the name of the applicable workbook (the For Each… Next statement is currently iterating through).
- Work with the Workbook.Name property to obtain the name of the applicable workbook. The Workbook.Name property returns a workbook’s name.
- When specifying the (known) partial filename, consider whether you must wrap this partial filename in double quotes (“PartialWorkbookFilename”).
Macro Example to Activate Workbook with Partial Filename (with Left, Mid, or Right Functions)
The macro below does the following:
- Declare an object variable (iWorkbook) of the Workbook object data type.
- Loop through all open workbooks.
- Test whether the first/leftmost 9 letters of the name of the workbook (the loop is currently iterating through) spell “Excel VBA”.
- If the condition is met (the first/leftmost 9 letters of the name of the applicable workbook spell “Excel VBA”), activate the workbook (the loop is currently iterating through).
Sub ActivateWorkbookPartialFilenameLeftMidRight()
    'Source: https://powerspreadsheets.com/
    'For further information: https://powerspreadsheets.com/excel-vba-activate-workbook/

    'Declare iteration object variable
    Dim iWorkbook As Workbook

    'Loop through all open workbooks
    For Each iWorkbook In Application.Workbooks

        'Do the following:
            '(1) Test whether the first/leftmost 9 letters of the name of the workbook (the loop is currently iterating through) spell "Excel VBA"
            '(2) If the condition is met, activate the workbook (the loop is currently iterating through)
        If Left(iWorkbook.Name, 9) = "Excel VBA" Then iWorkbook.Activate

    Next iWorkbook

End Sub
Effects of Executing Macro Example to Activate Workbook with Partial Filename (with Left, Mid, or Right Functions)
The image below illustrates the effects of using the macro example. In this example:
- 10 workbooks (“Excel VBA Activate Workbook.xlsm”, and “Book1” through “Book9”) are open.
- The “Book1” workbook is the active workbook.
When the macro is executed, Excel activates the workbook whose filename (Excel VBA Activate Workbook.xlsm) contains the (known) partial filename (Excel VBA).

Excel VBA Activate Workbook with Partial Filename (with InStr Function)
VBA Code to Activate Workbook with Partial Filename (with InStr Function)
To activate a workbook with partial filename (with the InStr function), use the following structure/template in the applicable procedure.
VariableDeclarationStatement iWorkbook As Workbook
For Each iWorkbook In Application.Workbooks
    If InStr(1, iWorkbook.Name, "PartialWorkbookFilename", StringCompareMethodConstant) > 0 Then
        iWorkbook.Activate
    End If
Next iWorkbook
Process to Activate Workbook with Partial Filename (with InStr Function)
- Declare iteration object variable (usually of the Workbook object data type).
- Loop through all open workbooks.
- Test whether the name of the workbook (the loop is currently iterating through) contains the (known) partial filename (of the workbook to activate).
- If the condition is met (the name of the applicable workbook contains the partial filename of the workbook to activate), activate the workbook (the loop is currently iterating through).
Main VBA Constructs Used to Activate Workbook with Partial Filename (with InStr Function)
(1) Variable declaration statement.
One of the following 4 statements:
- Dim: Declares variables and allocates storage space.
- Private:
- Used at the module level.
- Declares module-level variables and allocates storage space.
- Public:
- Used at the module level.
- Declares global variables and allocates storage space.
- Static: Declares static variables and allocates storage space.
(2) Workbook object.
Represents an Excel workbook.
(3) For Each… Next statement.
Repeats a set of statements for each element in an array or collection.
(4) Application.Workbooks property.
Returns a Workbooks collection representing all open workbooks.
(5) Workbooks object.
Represents all open workbooks.
(6) Object variable.
A named storage location containing data (a reference to an object) that can be modified during procedure execution.
(7) If… Then… Else statement.
Conditionally executes a set of statements, depending on the value returned by a logical expression.
(8) InStr function.
Returns the position of the first occurrence of one string inside another string.
Accepts the following 4 arguments:
- start:
- Optional argument.
- The starting position for the search.
- If omitted, the search begins at the first character.
- string1:
- Required argument.
- The string you search in.
- string2:
- Required argument.
- The string you search for.
- compare:
- Optional argument.
- The string comparison method.
- If omitted, the module’s Option Compare setting applies.
(9) Workbook.Name property.
Returns a workbook’s name.
(10) String.
A sequence of contiguous characters.
(11) Greater than operator (>).
Compares 2 expressions and returns True, False, or Null as follows:
- True: If Expression1 > Expression2.
- False: If Expression1 <= Expression2.
- Null: If (either) Expression1 or Expression2 are Null.
(12) Workbook.Activate method.
Activates the (first) window associated with a workbook.
Cues to Activate Workbook with Partial Filename (with InStr Function) with VBA
- Consider explicitly declaring:
- The iteration object variable.
- The data type (usually Workbook object) of the iteration object variable.
- As a general rule, declare the iteration object variable:
- Using the Dim statement; and
- As of the Workbook object data type.
- If the scope of the iteration object variable is module-level or global, follow the applicable rules for (module-level or global) variable declaration.
- Depending on the case you deal with, you may need to work with different versions of the If… Then… Else statement. Consider the following 4 basic versions of the If… Then… Else statement:
- If… Then. This is the version I use in the structure/template above.
- If… Then… Else.
- If… Then… ElseIf.
- If… Then… ElseIf… Else.
- As a general rule, set the arguments of the InStr function as follows:
- start: 1.
- string1: The name of the workbook the loop is currently iterating through, as returned by the Workbook.Name property.
- string2: The (known) partial filename.
- compare: vbBinaryCompare. vbBinaryCompare (usually) results in a case sensitive comparison.
- When specifying the (known) partial filename (as string2 argument of the InStr function), consider whether you must wrap this partial filename in double quotes (“PartialWorkbookFilename”).
Macro Example to Activate Workbook with Partial Filename (with InStr Function)
The macro below does the following:
- Declare an object variable (iWorkbook) of the Workbook object data type.
- Loop through all open workbooks.
- Test whether the name of the workbook (the loop is currently iterating through) contains “Excel VBA”.
- If the condition is met (the name of the applicable workbook contains “Excel VBA”), activate the workbook (the loop is currently iterating through).
Sub ActivateWorkbookPartialFilenameInStr()
    'Source: https://powerspreadsheets.com/
    'For further information: https://powerspreadsheets.com/excel-vba-activate-workbook/

    'Declare iteration object variable
    Dim iWorkbook As Workbook

    'Loop through all open workbooks
    For Each iWorkbook In Application.Workbooks

        'Do the following:
            '(1) Test whether the name of the workbook (the loop is currently iterating through) contains "Excel VBA"
            '(2) If the condition is met, activate the workbook (the loop is currently iterating through)
        If InStr(1, iWorkbook.Name, "Excel VBA", vbBinaryCompare) > 0 Then iWorkbook.Activate

    Next iWorkbook

End Sub
Effects of Executing Macro Example to Activate Workbook with Partial Filename (with InStr Function)
The image below illustrates the effects of using the macro example. In this example:
- 10 workbooks (“Excel VBA Activate Workbook.xlsm”, and “Book1” through “Book9”) are open.
- The “Book1” workbook is the active workbook.
When the macro is executed, Excel activates the workbook whose filename (Excel VBA Activate Workbook.xlsm) contains the (known) partial filename (Excel VBA).

Excel VBA Activate Workbook Using Wildcard
VBA Code to Activate Workbook Using Wildcard
To activate a workbook using a wildcard, use the following structure/template in the applicable procedure.
VariableDeclarationStatement Dim iWorkbook As Workbook
For Each iWorkbook In Application.Workbooks
    If iWorkbook.Name Like "WorkbookNameUsingWildcard" Then
        iWorkbook.Activate
    End If
Next iWorkbook
Process to Activate Workbook Using Wildcard
- Declare iteration object variable (usually of the Workbook object data type).
- Loop through all open workbooks.
- Test whether the name of the workbook (the loop is currently iterating through) is like the (known) filename (of the workbook to activate). Use wildcards (as necessary) to specify the filename of the workbook to activate.
- If the condition is met (the name of the applicable workbook is like the filename -including any wildcards- of the workbook to activate), activate the workbook (the loop is currently iterating through).
Main VBA Constructs Used to Activate Workbook Using Wildcard
(1) Variable declaration statement.
One of the following 4 statements:
- Dim: Declares variables and allocates storage space.
- Private:
- Used at the module level.
- Declares module-level variables and allocates storage space.
- Public:
- Used at the module level.
- Declares global variables and allocates storage space.
- Static: Declares static variables and allocates storage space.
(2) Workbook object.
Represents an Excel workbook.
(3) For Each… Next statement.
Repeats a set of statements for each element in an array or collection.
(4) Application.Workbooks property.
Returns a Workbooks collection representing all open workbooks.
(5) Workbooks object.
Represents all open workbooks.
(6) Object variable.
A named storage location containing data (a reference to an object) that can be modified during procedure execution.
(7) If… Then… Else statement.
Conditionally executes a set of statements, depending on the value returned by a logical expression.
(8) Workbook.Name property.
Returns a workbook’s name.
(9) Like operator.
Compares a string against a pattern and returns True, False, or Null as follows:
- True: If the string matches the pattern.
- False: If the string doesn’t match the pattern.
- Null: If (either) the string or the pattern are Null.
You can combine the following elements when specifying the pattern:
- Wildcard characters.
- Character lists.
- Character ranges.
(10) String.
A sequence of contiguous characters.
(11) Workbook.Activate method.
Activates the (first) window associated with a workbook.
Cues to Activate Workbook Using Wildcard with VBA
- Consider explicitly declaring:
- The iteration object variable.
- The data type (usually Workbook object) of the iteration object variable.
- As a general rule, declare the iteration object variable:
- Using the Dim statement; and
- As of the Workbook object data type.
- If the scope of the iteration object variable is module-level or global, follow the applicable rules for (module-level or global) variable declaration.
- Depending on the case you deal with, you may need to work with different versions of the If… Then… Else statement. Consider the following 4 basic versions of the If… Then… Else statement:
- If… Then. This is the version I use in the structure/template above.
- If… Then… Else.
- If… Then… ElseIf.
- If… Then… ElseIf… Else.
- Use the Like operator to compare the string returned by the Workbook.Name property (the name of the workbook the loop is currently iterating through) against a string with the filename (including any wildcards) of the workbook to activate.
- Use the following wildcards when specifying the pattern the Like operator works with:
- ?: Represents any single character.
- *: Represents any sequence of 0 or more characters.
- When specifying the pattern the Like operator works with (the filename -including any wildcards- of the workbook to activate), consider whether you must wrap this partial filename in double quotes (“WorkbookNameUsingWildcard”).
Macro Example to Activate Workbook Using Wildcard
The macro below does the following:
- Declare an object variable (iWorkbook) of the Workbook object data type.
- Loop through all open workbooks.
- Test whether the name of the workbook (the loop is currently iterating through) has the following structure:
- Starts with “Excel VBA”;
- Followed by any sequence of characters; and
- Ends with the “.xlsm” file extension.
- If the condition is met (the name of the applicable workbook is like the specified filename, including the * wildcard), activate the workbook (the loop is currently iterating through).
Sub ActivateWorkbookUsingWildcard()
    'Source: https://powerspreadsheets.com/
    'For further information: https://powerspreadsheets.com/excel-vba-activate-workbook/

    'Declare iteration object variable
    Dim iWorkbook As Workbook

    'Loop through all open workbooks
    For Each iWorkbook In Application.Workbooks

        'Do the following:
            '(1) Test whether the name of the workbook (the loop is currently iterating through) has the following structure:
                '(1) Starts with "Excel VBA"
                '(2) Followed by any sequence of characters
                '(3) Ends with the ".xlsm" file extension
            '(2) If the condition is met, activate the workbook (the loop is currently iterating through)
        If iWorkbook.Name Like "Excel VBA*.xlsm" Then iWorkbook.Activate

    Next iWorkbook

End Sub
Effects of Executing Macro Example to Activate Workbook Using Wildcard
The image below illustrates the effects of using the macro example. In this example:
- 10 workbooks (“Excel VBA Activate Workbook.xlsm”, and “Book1” through “Book9”) are open.
- The “Book1” workbook is the active workbook.
When the macro is executed, Excel activates the workbook whose filename (Excel VBA Activate Workbook.xlsm) has the following structure:
- Starts with “Excel VBA”;
- Followed by any sequence of characters; and
- Ends with the “.xlsm” file extension.

Excel VBA Activate Workbook and Worksheet
VBA Code to Activate Workbook and Worksheet
To activate a workbook and a worksheet, use the following structure/template in the applicable statement.
WorkbookObjectReference.WorksheetObjectReference.Activate
Process to Activate Workbook and Worksheet with VBA
- Refer to the workbook and worksheet to activate.
- Activate the applicable worksheet.
Main VBA Constructs Used to Activate Workbook and Worksheet
(1) Workbook object.
Represents an Excel workbook.
(2) Workbook.Worksheets property.
Returns a Sheets collection representing all worksheets in the applicable workbook.
(3) Worksheets object.
Represents all worksheets in the applicable workbook.
(4) Worksheets.Item property.
Returns a specific Worksheet object from the applicable Worksheets collection.
(5) Worksheet object.
Represents a worksheet.
(6) Worksheet.Activate method.
Activates the applicable worksheet.
Cues to Activate Workbook and Worksheet with VBA
- Work with (among others) one of the following VBA constructs (or groups of constructs) to return a Workbook object:
- Application.Workbooks property, Workbooks object, and Workbooks.Item property.
- Application.ThisWorkbook property.
- As a general rule, identify the applicable Worksheet object (inside the Worksheets collection) using one of the following:
- An index number. The index number:
- Represents the position of the Worksheet object in the Worksheets collection.
- Is:
- Wrapped in parentheses ((IndexNumber)).
- Included after the reference to the Worksheets collection (Worksheets(IndexNumber)).
- The Worksheet object’s name (Worksheet.Name property). The name is:
- Wrapped in:
- Double quotes (“WorksheetName”); and
- Parentheses ((“WorksheetName”)).
- Included after the reference to the Worksheets collection (Worksheets(“WorksheetName”)).
- Wrapped in:
- An index number. The index number:
- You can (also) use a Worksheet object’s CodeName property (Worksheet.CodeName property) to refer to the applicable worksheet.
Macro Example to Activate Workbook and Worksheet
The macro below does the following:
- Activate:
- The “Excel VBA Activate Workbook.xlsm” workbook; and
- The “Activate Workbook and Worksheet” worksheet.
- Maximize the active window.
Sub ActivateWorkbookAndWorksheet()
    'Source: https://powerspreadsheets.com/
    'For further information: https://powerspreadsheets.com/excel-vba-activate-workbook/

    'This procedure:
        '(1) Activates the "Activate Workbook and Worksheet" worksheet in the "Excel VBA Activate Workbook.xlsm" workbook
        '(2) Maximizes the active window

    'Activate the "Activate Workbook and Worksheet" worksheet in the "Excel VBA Activate Workbook.xlsm" workbook
    Workbooks("Excel VBA Activate Workbook.xlsm").Worksheets("Activate Workbook and Worksheet").Activate

    'Maximize the active window
    ActiveWindow.WindowState = xlMaximized

End Sub
Effects of Executing Macro Example to Activate Workbook and Worksheet
The image below illustrates the effects of using the macro example. In this example:
- 2 workbooks (“Excel VBA Activate Workbook.xlsm” and “Book1”) are open.
- The “Book1” workbook is the active workbook.
- The “Sheet1” worksheet is the active worksheet in both (“Excel VBA Activate Workbook.xlsm” and “Book1”) workbooks.
When the macro is executed, Excel:
- Activates:
- The “Excel VBA Activate Workbook.xlsm” workbook; and
- The “Activate Workbook and Worksheet” worksheet.
- Maximizes the active window.

Excel VBA Activate Workbook and Chart Sheet
VBA Code to Activate Workbook and Chart Sheet
To activate a workbook and a chart sheet, use the following structure/template in the applicable statement.
WorkbookObjectReference.ChartObjectReference.Activate
Process to Activate Workbook and Chart Sheet with VBA
- Refer to the workbook and chart sheet to activate.
- Activate the applicable chart sheet.
Main VBA Constructs Used to Activate Workbook and Chart Sheet
(1) Workbook object.
Represents an Excel workbook.
(2) Workbook.Charts property.
Returns a Sheets collection representing all chart sheets in the applicable workbook.
(3) Charts object.
Represents all chart sheets in the applicable workbook.
(4) Charts.Item property.
Returns a specific Chart object from the applicable Charts collection.
(5) Chart object.
Represents a chart in a workbook. The chart can be either of the following:
- A chart sheet.
- An embedded chart (not the subject of this Section).
(6) Chart.Activate method.
Activates the applicable chart.
Cues to Activate Workbook and Chart Sheet with VBA
- Work with (among others) one of the following VBA constructs (or groups of constructs) to return a Workbook object:
- Application.Workbooks property, Workbooks object, and Workbooks.Item property.
- Application.ThisWorkbook property.
- As a general rule, identify the applicable Chart object (inside the Charts collection) using one of the following:
- An index number. The index number:
- Represents the position of the Chart object in the Charts collection.
- Is:
- Wrapped in parentheses ((IndexNumber)).
- Included after the reference to the Charts collection (Charts(IndexNumber)).
- The Chart object’s name (Chart.Name property). The name is:
- Wrapped in:
- Double quotes (“ChartSheetName”); and
- Parentheses ((“ChartSheetName”)).
- Included after the reference to the Charts collection (Charts(“ChartSheetName”)).
- Wrapped in:
- An index number. The index number:
- You can (also) use a Chart object’s CodeName property (Chart.CodeName property) to refer to the applicable chart sheet.
Macro Example to Activate Workbook and Chart Sheet
The macro below does the following:
- Activate:
- The “Excel VBA Activate Workbook.xlsm” workbook; and
- The “Activate Workbook Chart Sheet” chart sheet.
- Maximize the active window.
Sub ActivateWorkbookAndChartSheet()
    'Source: https://powerspreadsheets.com/
    'For further information: https://powerspreadsheets.com/excel-vba-activate-workbook/

    'This procedure:
        '(1) Activates the "Activate Workbook Chart Sheet" chart sheet in the "Excel VBA Activate Workbook.xlsm" workbook
        '(2) Maximizes the active window

    'Activate the "Activate Workbook Chart Sheet" chart sheet in the "Excel VBA Activate Workbook.xlsm" workbook
    Workbooks("Excel VBA Activate Workbook.xlsm").Charts("Activate Workbook Chart Sheet").Activate

    'Maximize the active window
    ActiveWindow.WindowState = xlMaximized

End Sub
Effects of Executing Macro Example to Activate Workbook and Chart Sheet
The image below illustrates the effects of using the macro example. In this example:
- 2 workbooks (“Excel VBA Activate Workbook.xlsm” and “Book1”) are open.
- The “Book1” workbook is the active workbook.
- The “Sheet1” worksheet is the active sheet in both (“Excel VBA Activate Workbook.xlsm” and “Book1”) workbooks.
When the macro is executed, Excel:
- Activates:
- The “Excel VBA Activate Workbook.xlsm” workbook; and
- The “Activate Workbook Chart Sheet” chart sheet.
- Maximizes the active window.

Excel VBA Activate Workbook with Variable Name
VBA Code to Activate Workbook with Variable Name
To activate a workbook with variable name (where the workbook filename is held by a variable), use the following structure/template in the applicable procedure.
VariableDeclarationStatement WorkbookFilenameVariable As String
WorkbookFilenameVariable = WorkbookFilenameString
Workbooks(WorkbookFilenameVariable).Activate
Process to Activate Workbook with Variable Name
- Declare variable (usually of the String data type) to represent workbook filename.
- Assign workbook filename to variable.
- Refer to the workbook to activate by using the applicable variable name (representing the workbook filename).
- Activate the applicable workbook.
Main VBA Constructs Used to Activate Workbook with Variable Name
(1) Variable declaration statement.
One of the following 4 statements:
- Dim: Declares variables and allocates storage space.
- Private:
- Used at the module level.
- Declares module-level variables and allocates storage space.
- Public:
- Used at the module level.
- Declares global variables and allocates storage space.
- Static: Declares static variables and allocates storage space.
(2) String data type.
Holds textual data (a sequence of characters representing the characters themselves).
(3) Assignment operator (=).
Assigns a value to a variable or property.
(4) Application.Workbooks property.
Returns a Workbooks collection representing all open workbooks.
(5) Workbooks object.
Represents all open workbooks.
(6) Workbooks.Item property.
Returns a specific Workbook object from the applicable Workbooks collection.
(7) Workbook object.
Represents an Excel workbook.
(8) Variable.
A named storage location containing data that can be modified during procedure execution.
(9) Workbook.Activate method.
Activates the (first) window associated with a workbook.
Cues to Activate Workbook with Variable Name with VBA
- Consider explicitly declaring:
- The variable representing the workbook filename.
- The data type (usually String) of the variable representing the workbook filename.
- As a general rule, declare the variable representing the workbook filename:
- Using the Dim statement; and
- As of the String data type.
- If the scope of the variable representing the workbook filename is module-level or global, follow the applicable rules for (module-level or global) variable declaration.
- When assigning the workbook filename to the variable representing the workbook filename:
- Consider whether you must wrap the workbook filename in double quotes and parentheses ((“Filename”)).
- As a general rule:
- Include the complete filename, including file extension (for ex., “Filename.xlsm”), of a previously saved workbook.
- Do not include the file path.
Macro Example to Activate Workbook with Variable Name
The macro below does the following:
- Declare a variable (WorkbookFilename) of the String data type.
- Assign a string (Excel VBA Activate Workbook.xlsm) to the WorkbookFilename variable.
- Activate the workbook whose filename is represented by the WorkbookFilename variable.
- Maximize the active window.
Sub ActivateWorkbookWithVariableName()
    'Source: https://powerspreadsheets.com/
    'For further information: https://powerspreadsheets.com/excel-vba-activate-workbook/

    'This procedure:
        '(1) Declares a variable (WorkbookFilename) of the String data type
        '(2) Assigns a string (Excel VBA Activate Workbook.xlsm) to the WorkbookFilename variable
        '(3) Activates the workbook whose filename is represented by the WorkbookFilename variable
        '(4) Maximizes the active window

    'Declare variable to represent workbook filename
    Dim WorkbookFilename As String

    'Assign workbook filename to variable
    WorkbookFilename = "Excel VBA Activate Workbook.xlsm"

    'Activate the workbook whose filename is represented by the WorkbookFilename variable
    Workbooks(WorkbookFilename).Activate

    'Maximize the active window
    ActiveWindow.WindowState = xlMaximized

End Sub
Effects of Executing Macro Example to Activate Workbook with Variable Name
The image below illustrates the effects of using the macro example. In this example:
- 2 workbooks (“Excel VBA Activate Workbook.xlsm” and “Book1”) are open.
- The “Book1” workbook is the active workbook.
When the macro is executed, Excel:
- Activates the workbook whose filename (Excel VBA Activate Workbook.xlsm) is held by a variable (WorkbookFilename); and
- Maximizes the active window.

Excel VBA Activate Workbook with Object Variable Name
VBA Code to Activate Workbook with Object Variable Name
To activate a workbook with object variable name (where the Workbook object is represented by an object variable), use the following structure/template in the applicable procedure.
VariableDeclarationStatement WorkbookObjectVariable As Workbook
Set WorkbookObjectVariable = WorkbookObjectReference
WorkbookObjectVariable.Activate
Process to Activate Workbook with Object Variable Name
- Declare object variable (usually of the Workbook object data type) to represent workbook.
- Assign Workbook object reference to object variable.
- Refer to the workbook to activate by using the applicable object variable name (representing the workbook).
- Activate the applicable workbook.
Main VBA Constructs Used to Activate Workbook with Object Variable Name
(1) Variable declaration statement.
One of the following 4 statements:
- Dim: Declares variables and allocates storage space.
- Private:
- Used at the module level.
- Declares module-level variables and allocates storage space.
- Public:
- Used at the module level.
- Declares global variables and allocates storage space.
- Static: Declares static variables and allocates storage space.
(2) Workbook object.
Represents an Excel workbook.
(3) Set statement.
Assigns an object reference to a variable or property.
(4) Application.Workbooks property.
Returns a Workbooks collection representing all open workbooks.
(5) Workbooks object.
Represents all open workbooks.
(6) Workbooks.Item property.
Returns a specific Workbook object from the applicable Workbooks collection.
(7) Object Variable.
A named storage location containing data (a reference to an object) that can be modified during procedure execution.
(8) Workbook.Activate method.
Activates the (first) window associated with a workbook.
Cues to Activate Workbook with Object Variable Name with VBA
- Consider explicitly declaring:
- The object variable representing the workbook.
- The data type (usually Workbook object) of the object variable representing the workbook.
- As a general rule, declare the object variable representing the workbook:
- Using the Dim statement; and
- As of the Workbook object data type.
- If the scope of the object variable representing the workbook is module-level or global, follow the applicable rules for (module-level or global) variable declaration.
Macro Example to Activate Workbook with Object Variable Name
The macro below does the following:
- Declare an object variable (WorkbookObjectVariable) of the Workbook object data type.
- Assign a Workbook object reference (Excel VBA Activate Workbook.xlsm) to the WorkbookObjectVariable object variable.
- Activate the workbook represented by the WorkbookObjectVariable object variable.
- Maximize the active window.
Sub ActivateWorkbookWithObjectVariableName()
    'Source: https://powerspreadsheets.com/
    'For further information: https://powerspreadsheets.com/excel-vba-activate-workbook/

    'This procedure:
        '(1) Declares an object variable (WorkbookObjectVariable) of the Workbook object data type
        '(2) Assigns a Workbook object reference (to the "Excel VBA Activate Workbook.xlsm" workbook) to the WorkbookObjectVariable object variable
        '(3) Activates the workbook represented by the WorkbookObjectVariable object variable
        '(4) Maximizes the active window

    'Declare object variable to represent workbook
    Dim WorkbookObjectVariable As Workbook

    'Assign Workbook object reference to object variable
    Set WorkbookObjectVariable = Workbooks("Excel VBA Activate Workbook.xlsm")

    'Activate workbook represented by the WorkbookObjectVariable object variable
    WorkbookObjectVariable.Activate

    'Maximize the active window
    ActiveWindow.WindowState = xlMaximized

End Sub
Effects of Executing Macro Example to Activate Workbook with Object Variable Name
The image below illustrates the effects of using the macro example. In this example:
- 2 workbooks (“Excel VBA Activate Workbook.xlsm” and “Book1”) are open.
- The “Book1” workbook is the active workbook.
When the macro is executed, Excel:
- Activates the workbook whose reference (Excel VBA Activate Workbook.xlsm) is held by an object variable (WorkbookObjectVariable); and
- Maximizes the active window.

Excel VBA Open and Activate Workbook
VBA Code to Open and Activate Workbook
To open and activate a workbook, use the following structure/template in the applicable statement.
Workbooks.Open Filename:="PathAndFilename"
Process to Open and Activate Workbook with VBA
- Open the workbook with the Workbooks.Open method.
Main VBA Constructs Used to Open and Activate Workbook
(1) Workbooks.Open method.
Opens a workbook.
(2) Filename parameter.
The:
- First parameter of the Workbooks.Open method.
- Filename of the workbook to open.
Cues to Open and Activate Workbook with VBA
- When you open a workbook with the Workbooks.Open method, the opened workbook becomes the active workbook.
- Consider whether you must wrap the workbook path and filename in double quotes (“PathAndFilename”).
- As a general rule:
- Include the full path and filename (including file extension).
- If the workbook is stored in the default file folder (where Excel currently saves files by default), you can exclude the workbook’s path (use only the filename, including file extension).
Macro Example to Open and Activate Workbook
The macro below opens (and activates) the workbook with filename “Excel VBA Open and Activate Workbook.xlsx” stored in the Desktop folder.
Sub OpenAndActivateWorkbook()
    'Source: https://powerspreadsheets.com/
    'For further information: https://powerspreadsheets.com/excel-vba-activate-workbook/

    'Open the workbook with filename "Excel VBA Open and Activate Workbook.xlsx" stored in the Desktop folder. The opened workbook becomes the active workbook
    Workbooks.Open Filename:="C:UsersPowerSpreadsheetsDesktopExcel VBA Open and Activate Workbook.xlsx"

End Sub
Effects of Executing Macro Example to Open and Activate Workbook
The image below illustrates the effects of using the macro example.
In this example (only) 1 workbook (“Excel VBA Activate Workbook”) is open. This is (also) the active workbook.
When the macro is executed, Excel opens and activates the workbook with filename “Excel VBA Open and Activate Workbook.xlsx” stored in the Desktop folder.

In this Article
- Open a Workbook in VBA
- Open Workbook From Path
- Open Workbook – ActiveWorkbook
- Open Workbook and Assign to a Variable
- Workbook Open File Dialog
- Open New Workbook
- Open New Workbook To Variable
- Open Workbook Syntax
- Open Workbook Read-Only
- Open Password Protected Workbook
- Open Workbook Syntax Notes
- Close a Workbook in VBA
- Close Specific Workbook
- Close Active Workbook
- Close All Open Workbooks
- Close First Opened Workbook
- Close Without Saving
- Save and Close Without Prompt
- Other Workbook Open Examples
- Open Multiple New Workbooks
- Open All Excel Workbooks in a Folder
- Check if a Workbook is Open
- Workbook_Open Event
- Open Other Types of Files in VBA
- Open a Text file and Read its Contents
- Open a Text File and Append to it
- Opening a Word File and Writing to it
In this tutorial, you will learn how to use VBA to open and close Excel Workbooks and other types of Files in several ways.
VBA allows you to open or close files using the standard methods .Open and .Close.
If you want to learn how to check if a file exists before attempting to open the file, you can click on this link: VBA File Exists
Open a Workbook in VBA
Open Workbook From Path
If you know which file you want to open, you can specify its full path name in the function. Here is the code:
Workbooks.Open "C:VBA FolderSample file 1.xlsx"This line of the code opens “Sample file 1” file from the “VBA Folder”.
Open Workbook – ActiveWorkbook
When you open a workbook, it automatically becomes the ActiveWorkbook. You can reference the newly opened workbook like so:
ActiveWorkbook.SaveWhen you reference a sheet or range and omit the workbook name, VBA will assume you are referring to the ActiveWorkbook:
Sheets("Sheet1").Name = "Input"Open Workbook and Assign to a Variable
You can also open a workbook and assign it directly to an object variable. This procedure will open a workbook to the wb variable and then save the workbook.
Sub OpenWorkbookToVariable()
    Dim wb As Workbook
    Set wb = Workbooks.Open("C:VBA FolderSample file 1.xlsx")

    wb.Save
End Sub
Assigning workbooks to variables when they open is the best way to keep track of your workbooks
Workbook Open File Dialog
You can also trigger the workbook Open File Dialog box. This allows the user to navigate to a file and open it:
Sub OpenWorkbook ()

    Dim strFile As String

    strFile = Application.GetOpenFilename()
    Workbooks.Open (strFile)

End Sub
As you can see in Image 1, with this approach users can choose which file to open. The Open File Dialog Box can be heavily customized. You can default to a certain folder, choose which types of files are visible (ex. .xlsx only), and more. Read our tutorial on the Open File Dialog Box for detailed examples.
Open New Workbook
This line of code will open a new workbook:
Workbooks.AddVBA Coding Made Easy
Stop searching for VBA code online. Learn more about AutoMacro — A VBA Code Builder that allows beginners to code procedures from scratch with minimal coding knowledge and with many time-saving features for all users!

Learn More
Open New Workbook To Variable
This procedure will open a new workbook, assigning it to variable wb:
Sub OpenNewWorkbook()
    Dim wb As Workbook
    Set wb = Workbooks.Add
End Sub
Open Workbook Syntax
When you use Workbooks.Open you might notice that there are many options available when opening the workbook:

The Filename is required. All other arguments are optional – and you probably won’t need to know most of the other arguments. Here are the two most common:
Open Workbook Read-Only
When workbook is opened read-only, you can’t save over the original file. This prevents the file from being edited by the user.
Workbooks.Open "C:VBA FolderSample file 1.xlsx", , TrueVBA Programming | Code Generator does work for you!
Open Password Protected Workbook
A workbook might be password-protected. Use this code to open the password-protected workbook:
Workbooks.Open "C:VBA FolderSample file 1.xlsx", , , "password"Open Workbook Syntax Notes
Notice that in the image above, we included a parenthesis “(” to show the syntax. If you use parenthesis when working with Workbooks.Open, you must assign the workbook to a variable:
Sub OpenWB()
    Dim wb As Workbook
    Set wb = Workbooks.Open("C:VBA FolderSample file 1.xlsx", True, True)
End Sub
Close a Workbook in VBA
Close Specific Workbook
Similarly to opening a workbook, there are several ways to close a file. If you know which file you want to close, you can use the following code:
Workbooks.Close ("C:VBA FolderSample file 1.xlsx")This line of code closes the file “Sample file 1” if it’s opened. If not, it will return an error, so you should take care of error handling.
Close Active Workbook
If you want to close the Workbook which is currently active, this line of code will enable you to do that:
ActiveWorkbook.CloseAutoMacro | Ultimate VBA Add-in | Click for Free Trial!
Close All Open Workbooks
To close all open Workbooks, you can simply use this code:
Workbooks.CloseClose First Opened Workbook
This will close the first opened/created workbook:
Workbooks(1).CloseReplace 1 with 2 to close the second opened / created workbook and so on.
Close Without Saving
This will close a Workbook without saving and without showing the save prompt:
ActiveWorkbook.Close savechanges:=FalseSave and Close Without Prompt
Similarly this will save and close a Workbook without showing the save prompt:
ActiveWorkbook.Close savechanges:=TrueNote: There are several other ways to indicate whether to save or not save a Workbook and also whether to show prompts or not. This is discussed in more detail here.
AutoMacro | Ultimate VBA Add-in | Click for Free Trial!
Other Workbook Open Examples
Open Multiple New Workbooks
This procedure will open multiple new workbooks, assigning the new workbooks to an array:
Sub OpenMultipleNewWorkbooks()
    Dim arrWb(3) As Workbook
    Dim i As Integer

    For i = 1 To 3
        Set arrWb(i) = Workbooks.Add
    Next i
End Sub
Open All Excel Workbooks in a Folder
This procedure will open all Excel Workbooks in a folder, using the Open File Dialog picker.
Sub OpenMultipleWorkbooksInFolder()
    Dim wb As Workbook
    Dim dlgFD As FileDialog
    Dim strFolder As String
    Dim strFileName As String
    Set dlgFD = Application.FileDialog(msoFileDialogFolderPicker)
    If dlgFD.Show = -1 Then
        strFolder = dlgFD.SelectedItems(1) & Application.PathSeparator
        strFileName = Dir(strFolder & "*.xls*")
        Do While strFileName <> ""
            Set wb = Workbooks.Open(strFolder & strFileName)

            strFileName = Dir
        Loop
    End If
End Sub
Check if a Workbook is Open
This procedure will test if a workbook is open:
Sub TestByWorkbookName()
Dim wb As Workbook

    For Each wb In Workbooks
        If wb.Name = "New Microsoft Excel Worksheet.xls" Then
            MsgBox "Found it"
            Exit Sub 'call code here, we'll just exit for now
        End If
    Next

End Sub
AutoMacro | Ultimate VBA Add-in | Click for Free Trial!
Workbook_Open Event
VBA Events are “triggers” that tell VBA to run certain code. You can set up workbook events for open, close, before save, after save and more.
Read our Workbook_Open Event tutorial to learn more about automatically running macros when a workbook is opened.
Open Other Types of Files in VBA
You can use the VBA to open other types of files with VBA – such as txt or Word files.
Open a Text file and Read its Contents
The VBA open method allows you to read or write to the file once you have opened it. To read the contents of a file, we can open the file for INPUT.
Sub OpenTextFile()
   Dim strFile As String
   Dim strBody As String
   Dim intFile As Integer

   strFile = "C:datatest.txt"
   intFile = FreeFile
   Open strFile For Input As intFile
   strBody = Input(LOF(intFile), intFile)
   'loop here through your text body and extract what you need
   ''some vba code here
   Debug.Print strBody
   Close intFile
End Sub
The code above will open the text file “test.txt” and then it will read the entire contents of the file to the strBody variable. Once you have extracted the file data into the strBody variable, you can use it for what you require. Using the Debug.Print command above enables us to see the contents of the strBody variable in the Immediate window in the VBE.
Open a Text File and Append to it
We can also open a text file in VBA, and then append to the bottom of the file using the Append method.
Sub AppendToTextFile()
Dim strFile As String
Dim strBody As String
Dim intFile As Integer

   strFile = "C:datatest.txt"
   intFile = FreeFile
   Open strFile For Append As intFile
'add two lines to the bottom
   Print #intFile, "This is an extra line of text at the bottom"
   Print #intFile, "and this is another one"
'close the file
   Close intFile
End Sub
The above code will open the text file and then append 2 lines of text to the bottom of the file using the #intFile variable (the # sign is the key!). The code then closes the file.
Opening a Word File and Writing to it
We can also use VBA in Excel to open a Word file.
Sub OpenWordFile()
   Dim wApp As Object
   Dim wDoc As Object
   Set wApp = CreateObject("Word.Application")
   Set wd = wApp.documents.Open("c:datatest.docx")
   wApp.Visible = True
End Sub
This code will open a copy of Word, and then open the document test.docx.
To open a workbook using VBA, you need to use the “Workbook.Open” method and specify the path of the file (make sure to specify the full path to the workbook with name and extension file type). This method has a total of fifteen optional arguments which you can use to deal with different kinds of files.
In this tutorial, we will explore it in detail and look at an alternative method that you can use.
Steps to Open a Workbook using VBA
- To start the code, use the “Workbooks” object.
- Type a dot (.) after that and select the Open method from the list.
- Specify the file path in the first argument and make sure to enclose it in double quotation marks.
- In the end, run the code to open the workbook.

Sub vba_open_workbook()
Workbooks.Open "C:UsersDellDesktopmyFile.xlsx"
End Sub
Helpful Links: Run a Macro – Macro Recorder – Visual Basic Editor – Personal Macro Workbook
Workbook.Open Syntax
Now it’s time to look at the syntax of the method that you just have used in the above example. As I mentioned, there are fifteen arguments that you can use:
expression.Open (FileName, UpdateLinks, _
ReadOnly, Format, Password, WriteResPassword, IgnoreReadOnlyRecommended, Origin, _
Delimiter, Editable, Notify, Converter, AddToMru, Local, CorruptLoad)
You won’t be using all these arguments. But a few of them are quite important and could be useful for you in the real world.
Opening a Password Protected Workbook
If you want to open a workbook that is password-protected, in that case, you can specify the password with the password argument.
Here I have a workbook on the desktop that has the password “test123” and now I want to open it and unprotect it at the same time. Following is the code that I need to use.
Workbooks.Open "C:UsersDellDesktopmyFile.xlsx", , , Password:="test123"Opening a Workbook as Read Only
When you open a workbook as read-only you can’t make changes to the same workbook, but you need to save a copy of it.
Workbooks.Open "C:UsersDellDesktopFolder1.xlsx", , TrueOpen All the Workbooks from a Folder
Sub vba_open_multiple_workbooks_folder()
    Dim wb As Workbook
    Dim strFolder As String
    Dim strFile As String
        strFolder = "C:UsersDellDesktopFolder"
        strFile = Dir(strFolder & "*.xls*")
        Do While strFile <> ""
            Set wb = Workbooks.Open(strFolder & strFile)
            strFile = Dir
        Loop
End Sub
To use it as per your needs, make sure to change the folder path.
Sub vba_open_dialog()
    Dim strFile As String
    strFile = Application.GetOpenFilename()
    Workbooks.Open (strFile)
End Sub
More on VBA Workbooks
VBA Save Workbook | VBA Close Workbook | VBA Delete Workbook | VBA ThisWorkbook | VBA Rename Workbook | VBA Activate Workbook | VBA Combine Workbook | VBA Protect Workbook (Unprotect) | VBA Check IF a Workbook is Open | VBA Check IF an Excel Workbook Exists in a Folder| VBA Create New Workbook (Excel File)
- VBA Workbook
| title | keywords | f1_keywords | ms.prod | api_name | ms.assetid | ms.date | ms.localizationpriority |
|---|---|---|---|---|---|---|---|
|
Workbooks.Open method (Excel) |
vbaxl10.chm203082 |
vbaxl10.chm203082 |
excel |
Excel.Workbooks.Open |
1d1c3fca-ae1a-0a91-65a2-6f3f0fb308a0 |
08/14/2019 |
medium |
Workbooks.Open method (Excel)
Opens a workbook.
[!includeAdd-ins note]
Syntax
expression.Open (FileName, UpdateLinks, ReadOnly, Format, Password, WriteResPassword, IgnoreReadOnlyRecommended, Origin, Delimiter, Editable, Notify, Converter, AddToMru, Local, CorruptLoad)
expression A variable that represents a Workbooks object.
Parameters
| Name | Required/Optional | Data type | Description |
|---|---|---|---|
| FileName | Optional | Variant | String. The file name of the workbook to be opened. |
| UpdateLinks | Optional | Variant | Specifies the way external references (links) in the file, such as the reference to a range in the Budget.xls workbook in the following formula =SUM([Budget.xls]Annual!C10:C25), are updated. If this argument is omitted, the user is prompted to specify how links will be updated. For more information about the values used by this parameter, see the Remarks section.
If Microsoft Excel is opening a file in the WKS, WK1, or WK3 format and the UpdateLinks argument is 0, no charts are created; otherwise, Microsoft Excel generates charts from the graphs attached to the file. |
| ReadOnly | Optional | Variant | True to open the workbook in read-only mode. |
| Format | Optional | Variant | If Microsoft Excel opens a text file, this argument specifies the delimiter character. If this argument is omitted, the current delimiter is used. For more information about the values used by this parameter, see the Remarks section. |
| Password | Optional | Variant | A string that contains the password required to open a protected workbook. If this argument is omitted and the workbook requires a password, the user is prompted for the password. |
| WriteResPassword | Optional | Variant | A string that contains the password required to write to a write-reserved workbook. If this argument is omitted and the workbook requires a password, the user will be prompted for the password. |
| IgnoreReadOnlyRecommended | Optional | Variant | True to have Microsoft Excel not display the read-only recommended message (if the workbook was saved with the Read-Only Recommended option). |
| Origin | Optional | Variant | If the file is a text file, this argument indicates where it originated, so that code pages and Carriage Return/Line Feed (CR/LF) can be mapped correctly. Can be one of the following XlPlatform constants: xlMacintosh, xlWindows, or xlMSDOS. If this argument is omitted, the current operating system is used. |
| Delimiter | Optional | Variant | If the file is a text file and the Format argument is 6, this argument is a string that specifies the character to be used as the delimiter. For example, use Chr(9) for tabs, use «,» for commas, use «;» for semicolons, or use a custom character. Only the first character of the string is used. |
| Editable | Optional | Variant | If the file is a Microsoft Excel 4.0 add-in, this argument is True to open the add-in so that it is a visible window. If this argument is False or omitted, the add-in is opened as hidden, and it cannot be unhidden. This option does not apply to add-ins created in Microsoft Excel 5.0 or later.
If the file is an Excel template, True to open the specified template for editing. False to open a new workbook based on the specified template. The default value is False. |
| Notify | Optional | Variant | If the file cannot be opened in read/write mode, this argument is True to add the file to the file notification list. Microsoft Excel will open the file as read-only, poll the file notification list, and then notify the user when the file becomes available. If this argument is False or omitted, no notification is requested, and any attempts to open an unavailable file will fail. |
| Converter | Optional | Variant | The index of the first file converter to try when opening the file. The specified file converter is tried first; if this converter does not recognize the file, all other converters are tried. The converter index consists of the row numbers of the converters returned by the FileConverters property. |
| AddToMru | Optional | Variant | True to add this workbook to the list of recently used files. The default value is False. |
| Local | Optional | Variant | True saves files against the language of Microsoft Excel (including control panel settings). False (default) saves files against the language of Visual Basic for Applications (VBA) (which is typically United States English unless the VBA project where Workbooks.Open is run from is an old internationalized XL5/95 VBA project). |
| CorruptLoad | Optional | XlCorruptLoad | Can be one of the following constants: xlNormalLoad, xlRepairFile and xlExtractData. The default behavior if no value is specified is xlNormalLoad, and does not attempt recovery when initiated through the OM. |
Return value
A Workbook object that represents the opened workbook.
Remarks
By default, macros are enabled when opening files programmatically. Use the AutomationSecurity property to set the macro security mode used when opening files programmatically.
You can specify one of the following values in the UpdateLinks parameter to determine whether external references (links) are updated when the workbook is opened.
| Value | Description |
|---|---|
| 0 | External references (links) will not be updated when the workbook is opened. |
| 3 | External references (links) will be updated when the workbook is opened. |
You can specify one of the following values in the Format parameter to determine the delimiter character for the file.
| Value | Delimiter |
|---|---|
| 1 | Tabs |
| 2 | Commas |
| 3 | Spaces |
| 4 | Semicolons |
| 5 | Nothing |
| 6 | Custom character (see the Delimiter argument) |
Example
The following code example opens the workbook Analysis.xls and then runs its Auto_Open macro.
Workbooks.Open "ANALYSIS.XLS"
ActiveWorkbook.RunAutoMacros xlAutoOpen
The following code example imports a sheet from another workbook onto a new sheet in the current workbook. Sheet1 in the current workbook must contain the path name of the workbook to import in cell D3, the file name in cell D4, and the worksheet name in cell D5. The imported worksheet is inserted after Sheet1 in the current workbook.
Sub ImportWorksheet()
    ' This macro will import a file into this workbook
    Sheets("Sheet1").Select
    PathName = Range("D3").Value
    Filename = Range("D4").Value
    TabName = Range("D5").Value
    ControlFile = ActiveWorkbook.Name
    Workbooks.Open Filename:=PathName & Filename
    ActiveSheet.Name = TabName
    Sheets(TabName).Copy After:=Workbooks(ControlFile).Sheets(1)
    Windows(Filename).Activate
    ActiveWorkbook.Close SaveChanges:=False
    Windows(ControlFile).Activate
End Sub
[!includeSupport and feedback]
In this tutorial, I will cover the how to work with workbooks in Excel using VBA.
In Excel, a ‘Workbook’ is an object that is a part of the ‘Workbooks’ collection. Within a workbook, you have different objects such as worksheets, chart sheets, cells and ranges, chart objects, shapes, etc.
With VBA, you can do a lot of stuff with a workbook object – such as open a specific workbook, save and close workbooks, create new workbooks, change the workbook properties, etc.
So let’s get started.
If you’re interested in learning VBA the easy way, check out my Online Excel VBA Training.
Referencing a Workbook using VBA
There are different ways to refer to a Workbook object in VBA.
The method you choose would depend on what you want to get done.
In this section, I will cover the different ways to refer to a workbook along with some example codes.
Using Workbook Names
If you have the exact name of the workbook that you want to refer to, you can use the name in the code.
Let’s begin with a simple example.
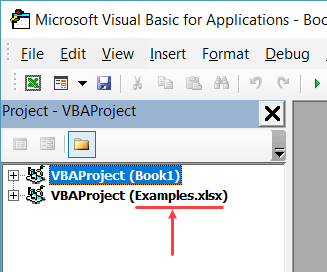
If you have two workbooks open, and you want to activate the workbook with the name – Examples.xlsx, you can use the below code:
Sub ActivateWorkbook()
Workbooks("Examples.xlsx").Activate
End Sub
Note that you need to use the file name along with the extension if the file has been saved. If it hasn’t been saved, then you can use the name without the file extension.
If you’re not sure what name to use, take help from the Project Explorer.
If you want to activate a workbook and select a specific cell in a worksheet in that workbook, you need to give the entire address of the cell (including the Workbook and the Worksheet name).
Sub ActivateWorkbook()
Workbooks("Examples.xlsx").Worksheets("Sheet1").Activate
Range("A1").Select
End Sub
The above code first activates Sheet1 in the Examples.xlsx workbook and then selects cell A1 in the sheet.
You will often see a code where a reference to a worksheet or a cell/range is made without referring to the workbook. This happens when you’re referring to the worksheet/ranges in the same workbook that has the code in it and is also the active workbook. However, in some cases, you do need to specify the workbook to make sure the code works (more on this in the ThisWorkbook section).
Using Index Numbers
You can also refer to the workbooks based on their index number.
For example, if you have three workbooks open, the following code would show you the names of the three workbooks in a message box (one at a time).
Sub WorkbookName()
MsgBox Workbooks(1).Name
MsgBox Workbooks(2).Name
MsgBox Workbooks(3).Name
End Sub
The above code uses MsgBox – which is a function that shows a message box with the specified text/value (which is the workbook name in this case).
One of the troubles I often have with using index numbers with Workbooks is that you never know which one is the first workbook and which one is the second and so on. To be sure, you would have to run the code as shown above or something similar to loop through the open workbooks and know their index number.
Excel treats the workbook opened first to have the index number as 1, and the next one as 2 and so on.
Despite this drawback, using index numbers can come in handy.
For example, if you want to loop through all the open workbooks and save all, you can use the index numbers.
In this case, since you want this to happen to all the workbooks, you’re not concerned about their individual index numbers.
The below code would loop through all the open workbooks and close all except the workbook that has this VBA code.
Sub CloseWorkbooks()
Dim WbCount As Integer
WbCount = Workbooks.Count
For i = WbCount To 1 Step -1
If Workbooks(i).Name <> ThisWorkbook.Name Then
Workbooks(i).Close
End If
Next i
End Sub
The above code counts the number of open workbooks and then goes through all the workbooks using the For Each loop.
It uses the IF condition to check if the name of the workbook is the same as that of the workbook where the code is being run.
If it’s not a match, it closes the workbook and moves to the next one.
Note that we have run the loop from WbCount to 1 with a Step of -1. This is done as with each loop, the number of open workbooks is decreasing.
ThisWorkbook is covered in detail in the later section.
Also read: How to Open Excel Files Using VBA (Examples)
Using ActiveWorkbook
ActiveWorkbook, as the name suggests, refers to the workbook that is active.
The below code would show you the name of the active workbook.
Sub ActiveWorkbookName()
MsgBox ActiveWorkbook.Name
End Sub
When you use VBA to activate another workbook, the ActiveWorkbook part in the VBA after that would start referring to the activated workbook.
Here is an example of this.
If you have a workbook active and you insert the following code into it and run it, it would first show the name of the workbook that has the code and then the name of Examples.xlsx (which gets activated by the code).
Sub ActiveWorkbookName()
MsgBox ActiveWorkbook.Name
Workbooks("Examples.xlsx").Activate
MsgBox ActiveWorkbook.Name
End Sub
Note that when you create a new workbook using VBA, that newly created workbook automatically becomes the active workbook.
Using ThisWorkbook
ThisWorkbook refers to the workbook where the code is being executed.
Every workbook would have a ThisWorkbook object as a part of it (visible in the Project Explorer).
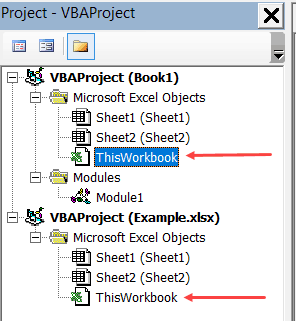
‘ThisWorkbook’ can store regular macros (similar to the ones that we add-in modules) as well as event procedures. An event procedure is something that is triggered based on an event – such as double-clicking on a cell, or saving a workbook or activating a worksheet.
Any event procedure that you save in this ‘ThisWorkbook’ would be available in the entire workbook, as compared to the sheet level events which are restricted to the specific sheets only.
For example, if you double-click on the ThisWorkbook object in the Project Explorer and copy-paste the below code in it, it will show the cell address whenever you double-click on any of the cells in the entire workbook.
Private Sub Workbook_SheetBeforeDoubleClick(ByVal Sh As Object, ByVal Target As Range, Cancel As Boolean)
MsgBox Target.Address
End Sub
While ThisWorkbook’s main role is to store event procedure, you can also use it to refer to the workbook where the code is being executed.
The below code would return the name of the workbook in which the code is being executed.
Sub ThisWorkbookName()
MsgBox ThisWorkbook.Name
End Sub
The benefit of using ThisWorkbook (over ActiveWorkbook) is that it would refer to the same workbook (the one that has the code in it) in all the cases. So if you use a VBA code to add a new workbook, the ActiveWorkbook would change, but ThisWorkbook would still refer to the one that has the code.
Creating a New Workbook Object
The following code will create a new workbook.
Sub CreateNewWorkbook()
Workbooks.Add
End Sub
When you add a new workbook, it becomes the active workbook.
The following code will add a new workbook and then show you the name of that workbook (which would be the default Book1 type name).
Sub CreateNewWorkbook()
Workbooks.Add
MsgBox ActiveWorkbook.Name
End Sub
Open a Workbook using VBA
You can use VBA to open a specific workbook when you know the file path of the workbook.
The below code will open the workbook – Examples.xlsx which is in the Documents folder on my system.
Sub OpenWorkbook()
Workbooks.Open ("C:UserssumitDocumentsExamples.xlsx")
End Sub
In case the file exists in the default folder, which is the folder where VBA saves new files by default, then you can just specify the workbook name – without the entire path.
Sub OpenWorkbook()
Workbooks.Open ("Examples.xlsx")
End Sub
In case the workbook that you’re trying to open doesn’t exist, you’ll see an error.
To avoid this error, you can add a few lines to your code to first check whether the file exists or not and if it exists then try to open it.
The below code would check the file location and if it doesn’t exist, it will show a custom message (not the error message):
Sub OpenWorkbook()
If Dir("C:UserssumitDocumentsExamples.xlsx") <> "" Then
Workbooks.Open ("C:UserssumitDocumentsExamples.xlsx")
Else
MsgBox "The file doesn't exist"
End If
End Sub
You can also use the Open dialog box to select the file that you want to open.
Sub OpenWorkbook()
If Dir("C:UserssumitDocumentsExamples.xlsx") <> "" Then
Workbooks.Open ("C:UserssumitDocumentsExamples.xlsx")
Else
MsgBox "The file doesn't exist"
End If
End Sub
The above code opens the Open dialog box. When you select a file that you want to open, it assigns the file path to the FilePath variable. Workbooks.Open then uses the file path to open the file.
In case the user doesn’t open a file and clicks on Cancel button, FilePath becomes False. To avoid getting an error in this case, we have used the ‘On Error Resume Next’ statement.
Saving a Workbook
To save the active workbook, use the code below:
Sub SaveWorkbook()
ActiveWorkbook.Save
End Sub
This code works for the workbooks that have already been saved earlier. Also, since the workbook contains the above macro, if it hasn’t been saved as a .xlsm (or .xls) file, you will lose the macro when you open it next.
If you’re saving the workbook for the first time, it will show you a prompt as shown below:
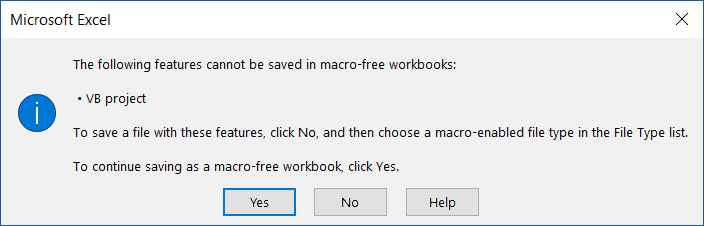
When saving for the first time, it’s better to use the ‘Saveas’ option.
The below code would save the active workbook as a .xlsm file in the default location (which is the document folder in my system).
Sub SaveWorkbook()
ActiveWorkbook.SaveAs Filename:="Test.xlsm", FileFormat:=xlOpenXMLWorkbookMacroEnabled
End Sub
If you want the file to be saved in a specific location, you need to mention that in the Filename value. The below code saves the file on my desktop.
Sub SaveWorkbook()
ActiveWorkbook.SaveAs Filename:="C:UserssumitDesktopTest.xlsm", FileFormat:=xlOpenXMLWorkbookMacroEnabled
End Sub
If you want the user to get the option to select the location to save the file, you can use call the Saveas dialog box. The below code shows the Saveas dialog box and allows the user to select the location where the file should be saved.
Sub SaveWorkbook()
Dim FilePath As String
FilePath = Application.GetSaveAsFilename
ActiveWorkbook.SaveAs Filename:=FilePath & ".xlsm", FileFormat:=xlOpenXMLWorkbookMacroEnabled
End Sub
Note that instead of using FileFormat:=xlOpenXMLWorkbookMacroEnabled, you can also use FileFormat:=52, where 52 is the code xlOpenXMLWorkbookMacroEnabled.
Saving All Open Workbooks
If you have more than one workbook open and you want to save all the workbooks, you can use the code below:
Sub SaveAllWorkbooks()
Dim wb As Workbook
For Each wb In Workbooks
wb.Save
Next wb
End Sub
The above saves all the workbooks, including the ones that have never been saved. The workbooks that have not been saved previously would get saved in the default location.
If you only want to save those workbooks that have previously been saved, you can use the below code:
Sub SaveAllWorkbooks()
Dim wb As Workbook
For Each wb In Workbooks
If wb.Path <> "" Then
wb.Save
End If
Next wb
End Sub
Saving and Closing All Workbooks
If you want to close all the workbooks, except the workbook that has the current code in it, you can use the code below:
Sub CloseandSaveWorkbooks()
Dim wb As Workbook
For Each wb In Workbooks
If wb.Name <> ThisWorkbook.Name Then
wb.Close SaveChanges:=True
End If
Next wb
End Sub
The above code would close all the workbooks (except the workbook that has the code – ThisWorkbook). In case there are changes in these workbooks, the changes would be saved. In case there is a workbook that has never been saved, it will show the save as dialog box.
Save a Copy of the Workbook (with Timestamp)
When I am working with complex data and dashboard in Excel workbooks, I often create different versions of my workbooks. This is helpful in case something goes wrong with my current workbook. I would at least have a copy of it saved with a different name (and I would only lose the work I did after creating a copy).
Here is the VBA code that will create a copy of your workbook and save it in the specified location.
Sub CreateaCopyofWorkbook()
ThisWorkbook.SaveCopyAs Filename:="C:UserssumitDesktopBackupCopy.xlsm"
End Sub
The above code would save a copy of your workbook every time you run this macro.
While this works great, I would feel more comfortable if I had different copies saved whenever I run this code. The reason this is important is that if I make an inadvertent mistake and run this macro, it will save the work with the mistakes. And I wouldn’t have access to the work before I made the mistake.
To handle such situations, you can use the below code that saves a new copy of the work each time you save it. And it also adds a date and timestamp as a part of the workbook name. This can help you track any mistake you did as you never lose any of the previously created backups.
Private Sub Workbook_BeforeSave(ByVal SaveAsUI As Boolean, Cancel As Boolean)
ThisWorkbook.SaveCopyAs Filename:="C:UserssumitDesktopBackupCopy" & Format(Now(), "dd-mm-yy-hh-mm-ss-AMPM") & ".xlsm"
End Sub
The above code would create a copy every time you run this macro and add a date/time stamp to the workbook name.
Create a New Workbook for Each Worksheet
In some cases, you may have a workbook that has multiple worksheets, and you want to create a workbook for each worksheet.
This could be the case when you have monthly/quarterly reports in a single workbook and you want to split these into one workbook for each worksheet.
Or, if you have department wise reports and you want to split these into individual workbooks so that you can send these individual workbooks to the department heads.
Here is the code that will create a workbook for each worksheet, give it the same name as that of the worksheet, and save it in the specified folder.
Sub CreateWorkbookforWorksheets()
Dim ws As Worksheet
Dim wb As Workbook
For Each ws In ThisWorkbook.Worksheets
Set wb = Workbooks.Add
ws.Copy Before:=wb.Sheets(1)
Application.DisplayAlerts = False
wb.Sheets(2).Delete
Application.DisplayAlerts = True
wb.SaveAs "C:UserssumitDesktopTest" & ws.Name & ".xlsx"
wb.Close
Next ws
End Sub
In the above code, we have used two variable ‘ws’ and ‘wb’.
The code goes through each worksheet (using the For Each Next loop) and creates a workbook for it. It also uses the copy method of the worksheet object to create a copy of the worksheet in the new workbook.
Note that I have used the SET statement to assign the ‘wb’ variable to any new workbook that is created by the code.
You can use this technique to assign a workbook object to a variable. This is covered in the next section.
Assign Workbook Object to a Variable
In VBA, you can assign an object to a variable, and then use the variable to refer to that object.
For example, in the below code, I use VBA to add a new workbook and then assign that workbook to the variable wb. To do this, I need to use the SET statement.
Once I have assigned the workbook to the variable, all the properties of the workbook are made available to the variable as well.
Sub AssigntoVariable()
Dim wb As Workbook
Set wb = Workbooks.Add
wb.SaveAs Filename:="C:UserssumitDesktopExamples.xlsx"
End Sub
Note that the first step in the code is to declare ‘wb’ as a workbook type variable. This tells VBA that this variable can hold the workbook object.
The next statement uses SET to assign the variable to the new workbook that we are adding. Once this assignment is done, we can use the wb variable to save the workbook (or do anything else with it).
Looping through Open Workbooks
We have already seen a few examples codes above that used looping in the code.
In this section, I will explain different ways to loop through open workbooks using VBA.
Suppose you want to save and close all the open workbooks, except the one with the code in it, then you can use the below code:
Sub CloseandSaveWorkbooks()
Dim wb As Workbook
For Each wb In Workbooks
If wb.Name <> ThisWorkbook.Name Then
wb.Close SaveChanges:=True
End If
Next wb
End Sub
The above code uses the For Each loop to go through each workbook in the Workbooks collection. To do this, we first need to declare ‘wb’ as the workbook type variable.
In every loop cycle, each workbook name is analyzed and if it doesn’t match the name of the workbook that has the code, it’s closed after saving its content.
The same can also be achieved with a different loop as shown below:
Sub CloseWorkbooks()
Dim WbCount As Integer
WbCount = Workbooks.Count
For i = WbCount To 1 Step -1
If Workbooks(i).Name <> ThisWorkbook.Name Then
Workbooks(i).Close SaveChanges:=True
End If
Next i
End Sub
The above code uses the For Next loop to close all the workbooks except the one that has the code in it. In this case, we don’t need to declare a workbook variable, but instead, we need to count the total number of open workbooks. When we have the count, we use the For Next loop to go through each workbook. Also, we use the index number to refer to the workbooks in this case.
Note that in the above code, we are looping from WbCount to 1 with Step -1. This is needed as with each loop, the workbook gets closed and the number of workbooks gets decreased by 1.
Error while Working with the Workbook Object (Run-time error ‘9’)
One of the most common error you may encounter when working with workbooks is – Run-time Error ‘9’ – Subscript out of range.
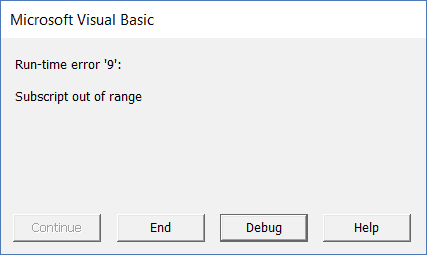
Generally, VBA errors are not very informative and often leave it to you to figure out what went wrong.
Here are some of the possible reasons that may lead to this error:
- The workbook that you’re trying to access does not exist. For example, if I am trying to access the fifth workbook using Workbooks(5), and there are only 4 workbooks open, then I will get this error.
- If you’re using a wrong name to refer to the workbook. For example, if your workbook name is Examples.xlsx and you use Example.xlsx. then it will show you this error.
- If you haven’t saved a workbook, and you use the extension, then you get this error. For example, if your workbook name is Book1, and you use the name Book1.xlsx without saving it, you will get this error.
- The workbook you’re trying to access is closed.
Get a List of All Open Workbooks
If you want to get a list of all the open workbooks in the current workbook (the workbook where you’re running the code), you can use the below code:
Sub GetWorkbookNames()
Dim wbcount As Integer
wbcount = Workbooks.Count
ThisWorkbook.Worksheets.Add
ActiveSheet.Range("A1").Activate
For i = 1 To wbcount
Range("A1").Offset(i - 1, 0).Value = Workbooks(i).Name
Next i
End Sub
The above code adds a new worksheet and then lists the name of all the open workbooks.
If you want to get their file path as well, you can use the below code:
Sub GetWorkbookNames()
Dim wbcount As Integer
wbcount = Workbooks.Count
ThisWorkbook.Worksheets.Add
ActiveSheet.Range("A1").Activate
For i = 1 To wbcount
Range("A1").Offset(i - 1, 0).Value = Workbooks(i).Path & "" & Workbooks(i).Name
Next i
End Sub
Open the Specified Workbook by Double-clicking on the Cell
If you have a list of file paths for Excel workbooks, you can use the below code to simply double-click on the cell with the file path and it will open that workbook.
Private Sub Workbook_SheetBeforeDoubleClick(ByVal Sh As Object, ByVal Target As Range, Cancel As Boolean)
Workbooks.Open Target.Value
End Sub
This code would be placed in the ThisWorkbook code window.
To do this:
- Double click on the ThisWorkbook object in the project explorer. Note that the ThisWorkbook object should be in the workbook where you want this functionality.
- Copy and paste the above code.
Now, if you have the exact path of the files that you want to open, you can do that by simply double-clicking on the file path and VBA would instantly open that workbook.
Where to Put the VBA Code
Wondering where the VBA code goes in your Excel workbook?
Excel has a VBA backend called the VBA editor. You need to copy and paste the code into the VB Editor module code window.
Here are the steps to do this:
- Go to the Developer tab.

- Click on the Visual Basic option. This will open the VB editor in the backend.
- In the Project Explorer pane in the VB Editor, right-click on any object for the workbook in which you want to insert the code. If you don’t see the Project Explorer go to the View tab and click on Project Explorer.
- Go to Insert and click on Module. This will insert a module object for your workbook.

- Copy and paste the code in the module window.


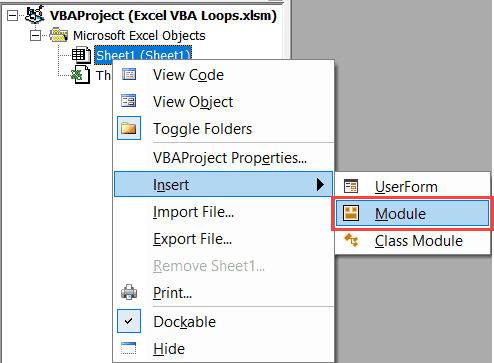
You May Also Like the Following Excel VBA Tutorials:
- How to Record a Macro in Excel.
- Creating a User Defined Function in Excel.
- How to Create and Use Add-in in Excel.
- How to Resue Macros by placing it in the Personal Macro Workbook.
- Get the List of File Names from a Folder in Excel (with and without VBA).
- How to Use Excel VBA InStr Function (with practical EXAMPLES).
- How to Sort Data in Excel using VBA (A Step-by-Step Guide).
|
deathogre  Пользователь Сообщений: 14 |
Здрасьте. Как программно открыть книгу эксель и сохранить эту книгу (объект) в глобальной переменной? |
|
Юрий М  Модератор Сообщений: 60575 Контакты см. в профиле |
#2 13.02.2016 13:53:37 1. Открытие нужной книги запишите макрорекордером — получите готовый код.
|
||
|
Hugo Пользователь Сообщений: 23251 |
#3 13.02.2016 13:53:58
|
||
|
deathogre Пользователь Сообщений: 14 |
Мне нужно открыть книгу из другой книги |
|
Юрий М Модератор Сообщений: 60575 Контакты см. в профиле |
#5 13.02.2016 13:55:02
И что? |
||
|
deathogre Пользователь Сообщений: 14 |
#6 13.02.2016 14:02:59 Объявил глобальную переменную в модуле ЭтаКнига
открыл книгу в модуле АктивХ формы
выдает ошибку на 3 строке, Run-time error 9 Subscript out of range |
||||
|
Юрий М Модератор Сообщений: 60575 Контакты см. в профиле |
Глобальную переменную в стандартный модуль — будет доступна всюду. И модуль не нужно указывать. |
|
deathogre Пользователь Сообщений: 14 |
Мне нужно в открытую книгу писать изменения, через глобальную переменную хочу обращаться к этой книге |
|
Юрий М Модератор Сообщений: 60575 Контакты см. в профиле |
#9 13.02.2016 14:21:54 Обращайтесь — кто мешает? )
|
||
|
KL  Пользователь Сообщений: 2186 |
#10 13.02.2016 14:53:27 Или даже так:
KL |
||
|
KL Пользователь Сообщений: 2186 |
Кстати, ChDir для открытия книги таким способом не нужен. Он нужен для функции GetOpenFileName, которая, кстати, тоже уже не нужна, т.к. уже давно есть Application.FileDialog(msoFileDialogOpen) |
|
Юрий М Модератор Сообщений: 60575 Контакты см. в профиле |
Кирилл, а рекордер упорно пишет ChDir )) |
|
KL Пользователь Сообщений: 2186 |
Юр, ну мало ли что на заборах пишут. Рекордер еще и Select обожает |
|
Юрий М Модератор Сообщений: 60575 Контакты см. в профиле |
#14 13.02.2016 15:16:46 )) |
Содержание
- Ссылка на книгу с помощью VBA
- Создание нового объекта книги
- Откройте книгу с помощью VBA
- Сохранение книги
- Сохранение всех открытых книг
- Сохранение и закрытие всех книг
- Сохранить копию книги (с отметкой времени)
- Создайте новую книгу для каждого рабочего листа
- Назначьте объект книги переменной
- Цикл через открытые книги
- Ошибка при работе с объектом книги (ошибка времени выполнения «9»)
- Получить список всех открытых книг
- Откройте указанную книгу, дважды щелкнув ячейку
- Куда поместить код VBA
В этом руководстве я расскажу, как работать с книгами в Excel с помощью VBA.
В Excel «Рабочая книга» — это объект, который является частью коллекции «Рабочие книги». В книге у вас есть различные объекты, такие как рабочие листы, листы диаграмм, ячейки и диапазоны, объекты диаграмм, фигуры и т. Д.
С помощью VBA вы можете выполнять множество операций с объектом книги, например открывать конкретную книгу, сохранять и закрывать книги, создавать новые книги, изменять свойства книги и т. Д.
Итак, приступим.
Все коды, которые я упоминаю в этом руководстве, необходимо поместить в редактор Visual Basic. Перейдите в раздел «Где разместить код VBA», чтобы узнать, как это работает.
Если вы заинтересованы в изучении VBA простым способом, ознакомьтесь с моими Онлайн-обучение по Excel VBA.
Есть разные способы ссылаться на объект Workbook в VBA. Выбранный вами метод будет зависеть от того, что вы хотите сделать. В этом разделе я расскажу о различных способах обращения к книге вместе с некоторыми примерами кодов.
Использование имен книг
Если у вас есть точное имя книги, к которой вы хотите обратиться, вы можете использовать это имя в коде.
Начнем с простого примера.
Если у вас открыты две книги и вы хотите активировать книгу с именем — Examples.xlsx, вы можете использовать следующий код:
Sub ActivateWorkbook () Workbooks ("Examples.xlsx"). Активировать End Sub
Обратите внимание, что вам нужно использовать имя файла вместе с расширением, если файл был сохранен. Если оно не было сохранено, вы можете использовать имя без расширения файла.
Если вы не знаете, какое имя использовать, обратитесь за помощью в Project Explorer.

Если вы хотите активировать книгу и выбрать определенную ячейку на листе в этой книге, вам необходимо указать полный адрес ячейки (включая книгу и имя рабочего листа).
Sub ActivateWorkbook () Рабочие книги ("Examples.xlsx"). Рабочие листы ("Sheet1"). Активировать диапазон ("A1"). Выберите End Sub
Приведенный выше код сначала активирует Sheet1 в книге Examples.xlsx, а затем выбирает ячейку A1 на листе.
Вы часто будете видеть код, в котором ссылка на рабочий лист или ячейку / диапазон делается без ссылки на книгу. Это происходит, когда вы ссылаетесь на лист / диапазоны в той же книге, в которой есть код и которая также является активной книгой. Однако в некоторых случаях вам необходимо указать книгу, чтобы убедиться, что код работает (подробнее об этом в разделе ThisWorkbook).
Использование порядковых номеров
Вы также можете ссылаться на книги по их порядковому номеру.
Например, если у вас открыто три книги, следующий код покажет вам имена трех книг в окне сообщения (по одному).
Sub WorkbookName () MsgBox Workbooks (1) .Name MsgBox Workbooks (2) .Name MsgBox Workbooks (3) .Name End Sub
В приведенном выше коде используется MsgBox — функция, отображающая окно сообщения с указанным текстом / значением (в данном случае это имя книги).
Одна из проблем, с которыми я часто сталкиваюсь при использовании порядковых номеров с рабочими книгами, заключается в том, что вы никогда не знаете, какая из них первая книга, а какая вторая и так далее. Конечно, вам нужно будет запустить код, как показано выше, или что-то подобное, чтобы просмотреть открытые книги и узнать их порядковый номер.
Excel обрабатывает книгу, открытую первой, так, чтобы она имела номер индекса как 1, а следующая — как 2 и так далее.
Несмотря на этот недостаток, использование индексных номеров может оказаться полезным. Например, если вы хотите перебрать все открытые книги и сохранить все, вы можете использовать номера индексов. В этом случае, поскольку вы хотите, чтобы это произошло со всеми книгами, вас не беспокоят их индивидуальные порядковые номера.
Приведенный ниже код будет перебирать все открытые книги и закрывать все, кроме книги с этим кодом VBA.
Sub CloseWorkbooks () Dim WbCount как целое число WbCount = Workbooks.Count For i = WbCount To 1 Step -1 Если Workbooks (i) .Name ThisWorkbook.Name Then Workbooks (i) .Close End If Next i End Sub
Приведенный выше код подсчитывает количество открытых книг, а затем просматривает все книги, используя цикл For Each.
Он использует условие IF, чтобы проверить, совпадает ли имя книги с именем книги, в которой выполняется код.
Если совпадений нет, рабочая книга закрывается и переходит к следующей.
Обратите внимание, что мы выполнили цикл от WbCount до 1 с шагом -1. Это делается по мере того, как с каждым циклом количество открытых книг уменьшается.
ThisWorkbook подробно рассматривается в следующем разделе.
Использование ActiveWorkbook
ActiveWorkbook, как следует из названия, относится к активной книге.
Приведенный ниже код покажет вам имя активной книги.
Sub ActiveWorkbookName () MsgBox ActiveWorkbook.Name End Sub
Когда вы используете VBA для активации другой книги, часть ActiveWorkbook в VBA после этого начнет ссылаться на активированную книгу.
Вот пример этого.
Если у вас есть активная книга, и вы вставляете в нее следующий код и запускаете ее, сначала будет показано имя книги с кодом, а затем имя Examples.xlsx (которое активируется кодом).
Sub ActiveWorkbookName () MsgBox ActiveWorkbook.Name Workbooks («Examples.xlsx»). Активировать MsgBox ActiveWorkbook.Name End Sub
Обратите внимание, что когда вы создаете новую книгу с помощью VBA, эта вновь созданная книга автоматически становится активной.
Использование ThisWorkbook
ThisWorkbook относится к книге, в которой выполняется код.
Каждая книга будет иметь объект ThisWorkbook как часть (видимый в Project Explorer).

ThisWorkbook может хранить обычные макросы (аналогичные тем, которые мы добавляем в модули), а также процедуры обработки событий. Процедура события — это то, что запускается на основе события, например двойного щелчка по ячейке, сохранения книги или активации листа.
Любая процедура события, которую вы сохраняете в этой «ThisWorkbook», будет доступна во всей книге по сравнению с событиями уровня листа, которые ограничены только определенными листами.
Например, если вы дважды щелкните объект ThisWorkbook в проводнике проекта и скопируйте и вставьте в него приведенный ниже код, он будет отображать адрес ячейки всякий раз, когда вы дважды щелкаете любую из ячеек во всей книге.
Private Sub Workbook_SheetBeforeDoubleClick (ByVal Sh As Object, ByVal Target As Range, Cancel As Boolean) MsgBox Target.Address End Sub
Хотя основная роль ThisWorkbook заключается в хранении процедуры события, вы также можете использовать ее для ссылки на книгу, в которой выполняется код.
Приведенный ниже код вернет имя книги, в которой выполняется код.
Sub ThisWorkbookName () MsgBox ThisWorkbook.Name End Sub
Преимущество использования ThisWorkbook (над ActiveWorkbook) заключается в том, что он будет ссылаться на одну и ту же книгу (ту, в которой есть код) во всех случаях. Поэтому, если вы используете код VBA для добавления новой книги, ActiveWorkbook изменится, но ThisWorkbook по-прежнему будет относиться к той, которая имеет код.
Создание нового объекта книги
Следующий код создаст новую книгу.
Sub CreateNewWorkbook () Workbooks.Add End Sub
Когда вы добавляете новую книгу, она становится активной.
Следующий код добавит новую книгу, а затем покажет вам имя этой книги (которое будет именем типа Book1 по умолчанию).
Sub CreateNewWorkbook () Workbooks.Add MsgBox ActiveWorkbook.Name End Sub
Откройте книгу с помощью VBA
Вы можете использовать VBA для открытия определенной книги, если знаете путь к файлу книги.
Приведенный ниже код откроет книгу — Examples.xlsx, которая находится в папке Documents в моей системе.
Sub OpenWorkbook () Workbooks.Open ("C: Users sumit Documents Examples.xlsx") End Sub
Если файл существует в папке по умолчанию, которая является папкой, в которой VBA сохраняет новые файлы по умолчанию, вы можете просто указать имя книги — без полного пути.
Sub OpenWorkbook () Workbooks.Open ("Examples.xlsx") End Sub
Если книга, которую вы пытаетесь открыть, не существует, вы увидите сообщение об ошибке.
Чтобы избежать этой ошибки, вы можете добавить несколько строк в свой код, чтобы сначала проверить, существует ли файл или нет, и, если он существует, попробуйте его открыть.
Приведенный ниже код проверит местоположение файла и, если он не существует, отобразит настраиваемое сообщение (не сообщение об ошибке):
Sub OpenWorkbook () If Dir ("C: Users sumit Documents Examples.xlsx") "" Then Workbooks.Open ("C: Users sumit Documents Examples.xlsx") Else MsgBox "Файл не "не существует" Конец Если Конец Подп.
Вы также можете использовать диалоговое окно «Открыть», чтобы выбрать файл, который хотите открыть.
Sub OpenWorkbook () При ошибке Возобновить следующий Dim FilePath As String FilePath = Application.GetOpenFilename Workbooks.Open (FilePath) End Sub
Приведенный выше код открывает диалоговое окно Открыть. Когда вы выбираете файл, который хотите открыть, он назначает путь к файлу переменной FilePath. Workbooks.Open затем использует путь к файлу для открытия файла.
Если пользователь не открывает файл и нажимает кнопку «Отмена», FilePath принимает значение False. Чтобы избежать появления ошибки в этом случае, мы использовали оператор «On Error Resume Next».
Связанный: Узнать все об обработке ошибок в Excel VBA
Сохранение книги
Чтобы сохранить активную книгу, используйте приведенный ниже код:
Подложка SaveWorkbook () ActiveWorkbook.Save End Sub
Этот код работает с книгами, которые уже были сохранены ранее. Кроме того, поскольку книга содержит указанный выше макрос, если он не был сохранен как файл .xlsm (или .xls), вы потеряете макрос, когда откроете его в следующий раз.
Если вы сохраняете книгу в первый раз, она покажет вам подсказку, как показано ниже:

При первом сохранении лучше использовать опцию «Сохранить».
Приведенный ниже код сохранит активную книгу как файл .xlsm в расположении по умолчанию (которое является папкой документов в моей системе).
Sub SaveWorkbook () ActiveWorkbook.SaveAs Имя файла: = "Test.xlsm", FileFormat: = xlOpenXMLWorkbookMacroEnabled End Sub
Если вы хотите, чтобы файл был сохранен в определенном месте, вам необходимо указать это в значении Filename. Приведенный ниже код сохраняет файл на моем рабочем столе.
Sub SaveWorkbook () ActiveWorkbook.SaveAs Имя файла: = "C: Users sumit Desktop Test.xlsm", FileFormat: = xlOpenXMLWorkbookMacroEnabled End Sub
Если вы хотите, чтобы пользователь мог выбрать место для сохранения файла, вы можете использовать диалоговое окно «Сохранить как». Приведенный ниже код показывает диалоговое окно «Сохранить как» и позволяет пользователю выбрать место для сохранения файла.
Sub SaveWorkbook () Dim FilePath As String FilePath = Application.GetSaveAsFilename ActiveWorkbook.SaveAs Filename: = FilePath & ".xlsm", FileFormat: = xlOpenXMLWorkbookMacroEnabled End Sub
Обратите внимание, что вместо использования FileFormat: = xlOpenXMLWorkbookMacroEnabled можно также использовать FileFormat: = 52, где 52 — это код xlOpenXMLWorkbookMacroEnabled.
Сохранение всех открытых книг
Если у вас открыто несколько книг и вы хотите сохранить все книги, вы можете использовать приведенный ниже код:
Sub SaveAllWorkbooks () Dim wb As Workbook for each wb In Workbooks wb.Save Next wb End Sub
Приведенное выше сохраняет все книги, включая те, которые никогда не сохранялись. Книги, которые не были сохранены ранее, будут сохранены в расположении по умолчанию.
Если вы хотите сохранить только те книги, которые были ранее сохранены, вы можете использовать следующий код:
Sub SaveAllWorkbooks () Dim wb As Workbook For each wb In Workbooks If wb.Path "" Then wb.Save End If Next wb End Sub
Сохранение и закрытие всех книг
Если вы хотите закрыть все книги, кроме книги, в которой есть текущий код, вы можете использовать приведенный ниже код:
Sub CloseandSaveWorkbooks () Dim wb As Workbook для каждого wb в рабочих книгах Если wb.Name ThisWorkbook.Name Then wb.Close SaveChanges: = True End If Next wb End Sub
Приведенный выше код закроет все книги (кроме книги с кодом — ThisWorkbook). Если в этих книгах есть изменения, они будут сохранены. Если есть книга, которая никогда не сохранялась, отобразится диалоговое окно «Сохранить как».
Сохранить копию книги (с отметкой времени)
Когда я работаю со сложными данными и панелью мониторинга в книгах Excel, я часто создаю разные версии своих книг. Это полезно на случай, если с моей текущей книгой что-то пойдет не так. По крайней мере, у меня была бы его копия, сохраненная под другим именем (и я потеряю только ту работу, которую проделал после создания копии).
Вот код VBA, который создаст копию вашей книги и сохранит ее в указанном месте.
Sub CreateaCopyofWorkbook () ThisWorkbook.SaveCopyAs Имя файла: = "C: Users sumit Desktop BackupCopy.xlsm" End Sub
Приведенный выше код будет сохранять копию вашей книги каждый раз, когда вы запускаете этот макрос.
Хотя это отлично работает, мне было бы удобнее, если бы я сохранял разные копии при каждом запуске этого кода. Причина, по которой это важно, заключается в том, что если я сделаю непреднамеренную ошибку и запущу этот макрос, он сохранит работу с ошибками. И у меня не будет доступа к работе, пока я не совершу ошибку.
Чтобы справиться с такими ситуациями, вы можете использовать приведенный ниже код, который сохраняет новую копию работы каждый раз, когда вы ее сохраняете. И он также добавляет дату и метку времени как часть имени книги. Это может помочь вам отследить любую допущенную вами ошибку, поскольку вы никогда не потеряете ни одну из ранее созданных резервных копий.
Private Sub Workbook_BeforeSave (ByVal SaveAsUI As Boolean, Cancel As Boolean) ThisWorkbook.SaveCopyAs Имя файла: = "C: Users sumit Desktop BackupCopy" & Format (Now (), "dd-mm-yy-hh-mm-ss -AMPM ") &" .xlsm "End Sub
Приведенный выше код будет создавать копию при каждом запуске этого макроса и добавлять метку даты / времени к имени книги.
Создайте новую книгу для каждого рабочего листа
В некоторых случаях у вас может быть книга с несколькими листами, и вы хотите создать книгу для каждого листа.
Это может быть в том случае, если у вас есть ежемесячные / ежеквартальные отчеты в одной книге, и вы хотите разделить их на одну книгу для каждого листа.
Или, если у вас есть отчеты по отделам, и вы хотите разделить их на отдельные книги, чтобы можно было отправлять эти отдельные книги руководителям отделов.
Вот код, который создаст книгу для каждого рабочего листа, присвоит ему то же имя, что и рабочий лист, и сохранит его в указанной папке.
Sub CreateWorkbookforWorksheets () Dim ws As Worksheet Dim wb As Workbook For each ws In ThisWorkbook.Worksheets Установить wb = Workbooks.Add ws.Copy Before: = wb.Sheets (1) Application.DisplayAlerts = False wb.Sheets (2) .Delete Application.DisplayAlerts = True wb.SaveAs "C: Users sumit Desktop Test " & ws.Name & ".xlsx" wb.Close Next ws End Sub
В приведенном выше коде мы использовали две переменные «ws» и «wb».
Код просматривает каждый рабочий лист (используя цикл For Each Next) и создает для него книгу. Он также использует метод копирования объекта рабочего листа для создания копии рабочего листа в новой книге.
Обратите внимание, что я использовал оператор SET для присвоения переменной «wb» любой новой книге, созданной с помощью кода.
Вы можете использовать этот метод, чтобы назначить объект книги переменной. Это рассматривается в следующем разделе.
Назначьте объект книги переменной
В VBA вы можете назначить объект переменной, а затем использовать переменную для ссылки на этот объект.
Например, в приведенном ниже коде я использую VBA для добавления новой книги, а затем назначаю эту книгу переменной wb. Для этого мне нужно использовать инструкцию SET.
После того, как я назначил книгу переменной, все свойства книги также становятся доступными для переменной.
Sub AssigntoVariable () Dim wb As Workbook Set wb = Workbooks.Add wb.SaveAs Filename: = "C: Users sumit Desktop Examples.xlsx" End Sub
Обратите внимание, что первый шаг в коде — объявить «wb» как переменную типа книги. Это сообщает VBA, что эта переменная может содержать объект книги.
Следующий оператор использует SET для присвоения переменной новой книги, которую мы добавляем. Как только это назначение будет выполнено, мы можем использовать переменную wb для сохранения книги (или сделать с ней что-нибудь еще).
Цикл через открытые книги
Мы уже видели несколько примеров кода выше, в которых использовался цикл в коде.
В этом разделе я объясню различные способы перебора открытых книг с помощью VBA.
Предположим, вы хотите сохранить и закрыть все открытые книги, кроме той, в которой есть код, тогда вы можете использовать следующий код:
Sub CloseandSaveWorkbooks () Dim wb As Workbook для каждого wb в рабочих книгах Если wb.Name ThisWorkbook.Name Then wb.Close SaveChanges: = True End If Next wb End Sub
В приведенном выше коде цикл For Each используется для просмотра каждой книги в коллекции Workbooks. Для этого нам сначала нужно объявить «wb» в качестве переменной типа книги.
В каждом цикле цикла каждое имя книги анализируется, и если оно не соответствует имени книги с кодом, она закрывается после сохранения своего содержимого.
То же самое может быть достигнуто с помощью другого цикла, как показано ниже:
Sub CloseWorkbooks () Dim WbCount As Integer WbCount = Workbooks.Count For i = WbCount To 1 Step -1 Если Workbooks (i) .Name ThisWorkbook.Name Then Workbooks (i) .Close SaveChanges: = True End If Next i End Sub
В приведенном выше коде цикл For Next используется для закрытия всех книг, кроме той, в которой есть код. В этом случае нам не нужно объявлять переменную книги, но вместо этого нам нужно подсчитать общее количество открытых книг. Когда у нас есть счетчик, мы используем цикл For Next для просмотра каждой книги. Кроме того, в этом случае мы используем порядковый номер для ссылки на книги.
Обратите внимание, что в приведенном выше коде мы переходим от WbCount к 1 с шагом -1. Это необходимо, поскольку с каждым циклом книга закрывается, а количество книг уменьшается на 1.
Ошибка при работе с объектом книги (ошибка времени выполнения «9»)
Одна из наиболее частых ошибок, с которыми вы можете столкнуться при работе с книгами, — это ошибка времени выполнения «9» — индекс вне допустимого диапазона.

Как правило, ошибки VBA не очень информативны и часто оставляют вам задачу выяснить, что пошло не так.
Вот некоторые из возможных причин, которые могут привести к этой ошибке:
- Книга, к которой вы пытаетесь получить доступ, не существует. Например, если я пытаюсь получить доступ к пятой книге с помощью Workbooks (5), а открыты только 4 книги, я получу эту ошибку.
- Если вы используете неправильное имя для ссылки на книгу. Например, если имя вашей книги — Examples.xlsx, и вы используете Example.xlsx. тогда он покажет вам эту ошибку.
- Если вы не сохранили книгу и используете расширение, вы получите эту ошибку. Например, если имя вашей книги — Book1, и вы используете имя Book1.xlsx, не сохраняя его, вы получите эту ошибку.
- Книга, к которой вы пытаетесь получить доступ, закрыта.
Получить список всех открытых книг
Если вы хотите получить список всех открытых книг в текущей книге (книге, в которой вы запускаете код), вы можете использовать следующий код:
Sub GetWorkbookNames () Dim wbcount As Integer wbcount = Workbooks.Count ThisWorkbook.Worksheets.Add ActiveSheet.Range ("A1"). Активировать для i = 1 В диапазон wbcount ("A1"). Смещение (i - 1, 0). Значение = Workbooks (i). Name Next i End Sub
Приведенный выше код добавляет новый лист, а затем перечисляет имена всех открытых книг.
Если вы также хотите получить путь к их файлу, вы можете использовать приведенный ниже код:
Sub GetWorkbookNames () Dim wbcount As Integer wbcount = Workbooks.Count ThisWorkbook.Worksheets.Add ActiveSheet.Range ("A1"). Активировать для i = 1 В диапазон wbcount ("A1"). Смещение (i - 1, 0). Значение = Workbooks (i) .Path & "" & Workbooks (i) .Name Next i End Sub
Откройте указанную книгу, дважды щелкнув ячейку
Если у вас есть список путей к файлам для книг Excel, вы можете использовать приведенный ниже код, чтобы просто дважды щелкнуть ячейку с путем к файлу, и эта книга откроется.
Private Sub Workbook_SheetBeforeDoubleClick (ByVal Sh As Object, ByVal Target As Range, Cancel As Boolean) Workbooks.Open Target.Value End Sub
Этот код будет помещен в окно кода ThisWorkbook.
Сделать это:
- Дважды щелкните объект ThisWorkbook в проводнике проекта. Обратите внимание, что объект ThisWorkbook должен находиться в книге, где вам нужна эта функция.
- Скопируйте и вставьте приведенный выше код.
Теперь, если у вас есть точный путь к файлам, которые вы хотите открыть, вы можете сделать это, просто дважды щелкнув путь к файлу, и VBA мгновенно откроет эту книгу.
Куда поместить код VBA
Хотите знать, где находится код VBA в вашей книге Excel?
В Excel есть серверная часть VBA, называемая редактором VBA. Вам необходимо скопировать и вставить код в окно кода модуля VB Editor.
Вот как это сделать:
- Перейдите на вкладку Разработчик.

- Выберите вариант Visual Basic. Это откроет редактор VB в бэкэнде.
- На панели Project Explorer в редакторе VB щелкните правой кнопкой мыши любой объект книги, в которую вы хотите вставить код. Если вы не видите Project Explorer, перейдите на вкладку View и нажмите Project Explorer.
- Перейдите во вкладку «Вставить» и нажмите «Модуль». Это вставит объект модуля для вашей книги.
- Скопируйте и вставьте код в окно модуля.


Вам также могут понравиться следующие руководства по Excel VBA:
- Как записать макрос в Excel.
- Создание пользовательской функции в Excel.
- Как создать и использовать надстройку в Excel.
- Как возобновить макрос, поместив его в личную книгу макросов.
- Получите список имен файлов из папки в Excel (с VBA и без).
- Как использовать функцию Excel VBA InStr (с практическими примерами).
- Как отсортировать данные в Excel с помощью VBA (пошаговое руководство).