Удаление лишних пробелов из строк с помощью кода VBA Excel. Функции LTrim, RTrim, Trim. Встроенная функция рабочего листа и пользовательская функция. Пример.
- LTrim(строка) — удаление пробелов слева;
- RTrim(строка) — удаление пробелов справа;
- Trim(строка) — удаление пробелов слева и справа.
Встроенная функция рабочего листа
Функция VBA Trim удаляет пробелы только по краям строки, не затрагивая двойные, тройные и т.д. пробелы внутри текста. Для удаления всех лишних пробелов следует использовать встроенную функцию Trim рабочего листа Excel.
Синтаксис функции Trim рабочего листа:
|
WorksheetFunction.Trim(строка) |
Пользовательская функция
Можно бороться с лишними пробелами и с помощью пользовательской функции:
|
Function myTrim(text As String) As String ‘Удаляем пробелы слева и справа строки text = Trim(text) ‘Удаляем лишние пробелы внутри строки Do While InStr(text, » «) text = Replace(text, » «, » «) Loop myTrim = text End Function |
Пример удаления лишних пробелов
Сократим лишние пробелы в одной и той же строке с помощью функции Trim VBA, встроенной функции Trim рабочего листа Excel, пользовательской функции myTrim и сравним результаты.
|
Sub Primer() Dim a1 As String a1 = » Жили у бабуси « MsgBox Trim(a1) & vbCrLf _ & WorksheetFunction.Trim(a1) _ & vbCrLf & myTrim(a1) End Sub |
Чтобы код примера сработал без ошибок, код пользовательской функции myTrim должен быть добавлен в тот же модуль.
In this Article
- Trim Function
- Trim Spaces Before and After Text
- Trim Multiple Spaces Before and After Text
- VBA Trim will NOT Remove Multiple Spaces Between Words
- Trim as a Worksheet Function
- Use Worksheet Trim Function in VBA
- Difference Between WorksheetFunction.Trim and VBA Trim
- Use VBA to add Trim Function in a Range
- LTrim Function
- RTrim Function
- Remove all spaces from text
This tutorial will demonstrate how to use the Trim, LTrim, and RTrim VBA functions as well as the Trim worksheet function.
Trim Function
The VBA Trim function removes (“trims”) erroneous spaces before and after strings of text.
Trim Spaces Before and After Text
The VBA Trim function will remove spaces before and after strings of text:
Sub TrimExample_1()
MsgBox Trim(" I love excel ")
'Result is: "I love excel"

MsgBox Trim(" I love excel")
'Result is: "I love excel"

MsgBox Trim("I love excel ")
'Result is: "I love excel"
End Sub
Trim Multiple Spaces Before and After Text
This includes trimming multiple spaces before and after text:
Sub TrimExample_2()
MsgBox Trim("     I love excel          ")
'Result is: "I love excel"

MsgBox Trim("      I love excel")
'Result is: "I love excel"

MsgBox Trim("I love excel             ")
'Result is: "I love excel"
End Sub
VBA Trim will NOT Remove Multiple Spaces Between Words
However, the Trim function will not remove multiple spaces in between words:
Sub TrimExample_3()
MsgBox Trim("     I love    excel          ")
'Result is: "I love    excel"

MsgBox Trim("      I  love excel")
'Result is: "I  love excel"

MsgBox Trim("I love        excel             ")
'Result is: "I love        excel"
End Sub
Trim as a Worksheet Function
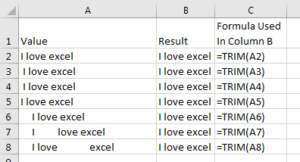
However, the Excel Trim worksheet function can be used to remove extra spaces between words:
Use Worksheet Trim Function in VBA
To use the Excel Trim Function in VBA, call it by using WorksheetFunction:
Sub TrimExample_4()
Msgbox WorksheetFunction.Trim("     I love    excel          ")
'Result is: "I love excel"

Msgbox WorksheetFunction.Trim("      I  love excel")
'Result is: "I love excel"

Msgbox WorksheetFunction.Trim("I love        excel             ")
'Result is: "I love excel"
End Sub
VBA Coding Made Easy
Stop searching for VBA code online. Learn more about AutoMacro — A VBA Code Builder that allows beginners to code procedures from scratch with minimal coding knowledge and with many time-saving features for all users!
Learn More
Difference Between WorksheetFunction.Trim and VBA Trim
This will demonstrate the differences between Trim and WorksheetFunction.Trim:
Sub TrimExample_5()
Msgbox WorksheetFunction.Trim("     I love    excel          ")
'Result is: "I love excel"
Msgbox Trim("     I love    excel          ")
'Result is: "I love    excel"

Msgbox WorksheetFunction.Trim("      I  love excel")
'Result is: "I love excel"
Msgbox Trim("      I  love excel")
'Result is: "I  love excel"

Msgbox WorksheetFunction.Trim("I love        excel             ")
'Result is: "I love excel"
Msgbox Trim("I love        excel             ")
'Result is: "I love        excel"

End Sub
Use VBA to add Trim Function in a Range
The Trim Worksheet function can be added in a Range using property .Formula:
Sub TrimExample_6()
ThisWorkbook.Worksheets("Sheet1").Range("B1").Formula = "=trim(A1)"
End Sub
LTrim Function
The LTrim function removes spaces only from the left side of the word:
Sub TrimExample_7()
MsgBox LTrim(" I love excel ")
'Result is: "I love excel "

MsgBox LTrim(" I love excel")
'Result is: "I love excel"

MsgBox LTrim("I love excel ")
'Result is: "I love excel "

MsgBox LTrim("   I love   excel   ")
'Result is: "I love   excel   "

MsgBox LTrim("   I   love excel")
'Result is: "I   love excel"

MsgBox LTrim("I love    excel   ")
'Result is: "I love    excel    "
End Sub
VBA Programming | Code Generator does work for you!
RTrim Function
The RTrim function removes spaces only from the right side of the word:
Sub TrimExample_8()
MsgBox RTrim(" I love excel ")
'Result is: " I love excel"

MsgBox RTrim(" I love excel")
'Result is: " I love excel"

MsgBox RTrim("I love excel ")
'Result is: "I love excel"

MsgBox RTrim("   I love   excel   ")
'Result is: "   I love   excel"

MsgBox RTrim("    I    love excel")
'Result is: "    I    love excel"

MsgBox RTrim("I    love excel    ")
'Result is: "I     love excel    "
End Sub
Trim, Ltrim and Rtrim do not remove spaces between words.
Remove all spaces from text
Trim will only remove extra spaces in between words, but to remove all spaces in a string of text, you can use the Replace Function:
Sub ReplaceExample ()
MsgBox Replace("     I love     excel ", " ", "")
'Result is: "Iloveexcel"
End Sub
I created a macro for removing all whitespace in a string, specifically an email address. However it only removes about 95% of the whitespace, and leaves a few.
My code:
Sub NoSpaces()
    Dim w As Range

    For Each w In Selection.Cells
        w = Replace(w, " ", "")
    Next
End Sub
Things I have tried to solve the issue include:
~ Confirmed the spaces are indeed spaces with the Code function, it is character 32 (space)
~ Used a substitute macro in conjuction with the replace macro
~ Have additional macro utilizing Trim function to remove leading and trailing whitespace
~ Made a separate macro to test for non-breaking spaces (character 160)
~ Used the Find and Replace feature to search and replace spaces with nothing. Confirmed working.
I only have one cell selected when I run the macro. It selects and goes through all the cells because of the Selection.Cells part of the code.
A few examples:
1 STAR MOVING @ ATT.NET
322 TRUCKING@GMAIL.COM
ALEZZZZ@AOL. COM.
These just contain regular whitespace, but are skipped over.
Are all your other functions leaving whitespace behind?
Get CleanUltra!
CleanUltra removes all whitespace and non-printable characters including whitespace left behind by other functions!
I hope you find this useful. Any improvements are welcome!
Function CleanUltra( _
       ByVal stringToClean As String, _
       Optional ByVal removeSpacesBetweenWords As Boolean = False) _
        As String
' Removes non-printable characters and whitespace from a string


' Remove the 1 character vbNullChar. This must be done first
'  if the string contains vbNullChar
    stringToClean = Replace(stringToClean, vbNullChar, vbNullString)

    ' Remove non-printable characters.
    stringToClean = Application.Clean(stringToClean)

    ' Remove all spaces except single spaces between words
    stringToClean = Application.Trim(stringToClean)

    If removeSpacesBetweenWords = True Then _
       stringToClean = Replace(stringToClean, " ", vbNullString)

    CleanUltra = stringToClean
End Function
Here’s an example of it’s usage:
Sub Example()
    Dim myVar As String
    myVar = " abc d e  "

    MsgBox CleanUltra(myVar)
End Sub
Here’s a test I ran to verify that the function actually removed all whitespace. vbNullChar was particularly devious. I had to set the function to remove it first, before the CLEAN and TRIM functions were used to stop them from removing all characters after the vbNullChar.
Sub Example()
    Dim whitespaceSample As String
    Dim myVar As String

' Examples of various types of whitespace
'  (vbNullChar is particularly devious!)
    whitespaceSample = vbNewLine & _
                       vbCrLf & _
                       vbVerticalTab & _
                       vbFormFeed & _
                       vbCr & _
                       vbLf & _
                       vbNullChar

    myVar = "     1234" & _
            whitespaceSample & _
            "     56      " & _
            "789     "

    Debug.Print "ORIGINAL"
    Debug.Print myVar
    Debug.Print "Character Count: " & Len(myVar)


    Debug.Print
    Debug.Print "CLEANED, Option FALSE"


    Debug.Print CleanUltra(myVar)
    Debug.Print CleanUltra(myVar, False)
    '   Both of these perform the same action.  If the optional parameter to
    '   remove spaces between words is left blank it defaults to FALSE.
    '   Whitespace is removed but spaces between words are preserved.
    Debug.Print "Character Count: " & Len(CleanUltra(myVar))


    Debug.Print
    Debug.Print "CLEANED, Option TRUE"

    Debug.Print CleanUltra(myVar, True)
    '   Optional parameter to remove spaces between words is set to TRUE.
    '   Whitespace and all spaces between words are removed.
    Debug.Print "Character Count: " & Len(CleanUltra(myVar, True))

End Sub
Excel VBA Trim Function
Excel VBA Trim Function is used for removing the extra spaces from any cell or text and gives us the output which has a standard in terms of required spaces. VBA Trim function works exactly as the Excel Trim function and Trim function also removes the extra spaces in 3 ways;
- Spaces from the starting of the text.
- Spaces from the end of the text.
- Spaces from the middle of the text if more than 1 extra space is seen.
This mostly happens when we download data from some server, data warehouse or while incorrectly inserting the extra spaces manually. Even though we can easily see the spaces at the middle of the text, but spaces at the beginning and end of text cannot be seen easily until and unless we go to edit mode of that specific cell. This can be done by VBA Marco.
How to Use Excel VBA Trim Function?
We will discuss how to use VBA Trim Function by using some examples.
You can download this VBA Trim Function Excel Template here – VBA Trim Function Excel Template
VBA Trim Function – Example #1
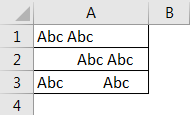
Here we have 3 cells in the below screenshot.
And each cell has some spaces associated with them. Cell A1 has spaces at the end.
Cell A2 has spaces at the beginning of the text.
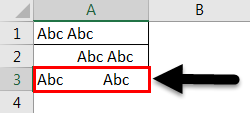
And cell A3 has space in between the text which is highlighted in the below screenshot.
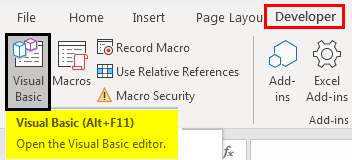
For trimming these cells we will use Excel VBA. For that, press Alt + F11 keys together or under Developer tab click on Visual Basic as shown below.
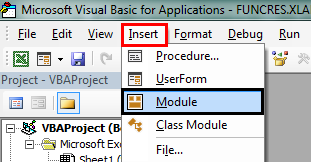
This will take us to Visual Basic coding window. Now go to the Insert menu from VBA window and select Module as shown below.
This will create a new Module where we will write a code for trimming. Below are the steps for creating and writing trimming code:
- First, choose a variable and define a range. Here we have selected the variable “A”. This variable can be anything.
- As our data set has already some text or object then we need to set the range for it. And for that, we will use “Selection”. It will automatically select the data in the present sheet.
Code:
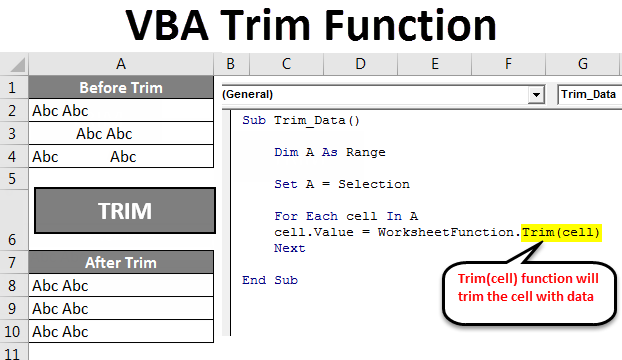
Sub Trim_Data()

    Dim A As Range

    Set A = Selection

End Sub
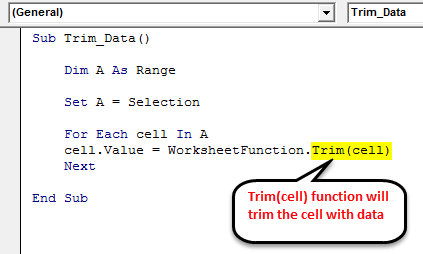
- For selecting each filled cell of the sheet “For Each” is the function And Value function is used for selecting the value with Trim(Cell) selection.
Code:
Sub Trim_Data()

    Dim A As Range

    Set A = Selection

    For Each cell In A
    cell.Value = WorksheetFunction.Trim(cell)
    Next

End Sub
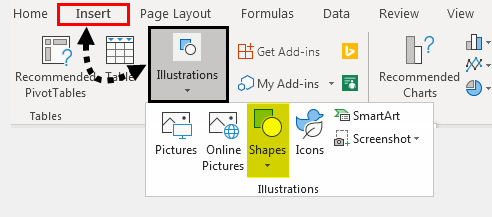
By this, we complete the coding work for creating macro through VBA Trim. Now let’s apply the created code into some tab. For this go to Insert Menu and under Illustrations select Shapes.
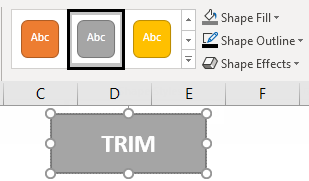
From that Shapes option, create any shape using shape formats and styles.
Here we have created a rectangular box and named it TRIM as shown below.
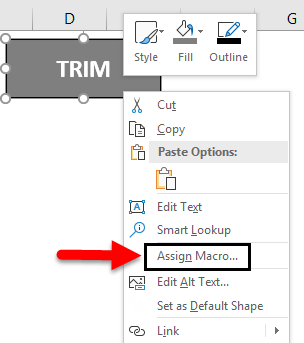
Now click on the Design Mode in Developer menu and right-click on the created box or shape. From the right-click, menu list select Assign Macro to link our created code as shown below.
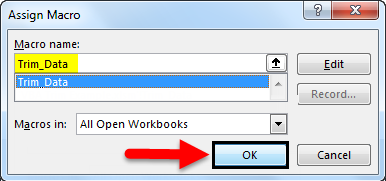
We will get the Assign Marco window, from there select already created macro code, here we have Trim_Data and then click on OK.
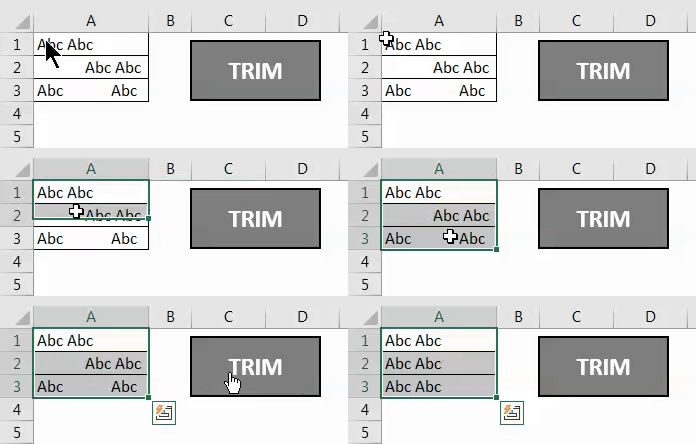
Now select the data and click on the TRIM button. We will get the selected trimmed and spaces that were not required are now removed as shown below.
VBA Trim Function – Example #2
VBA Coding shown above can be written in one more way. In the above example, we only trimmed the selected data. In this we will insert the function in the message box as well it will show once the data is trimmed.
For this, we will use the same data which we used in example 1. Follow the same steps, go to the Developer tab and click on Visual Basic.
Once we do that, we will get the Visual Basic window. Now open a fresh Module and start coding on that page.
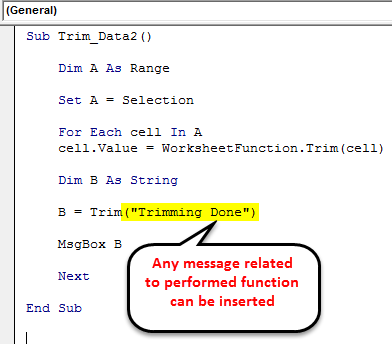
Now consider the same code which we have written in example-1. But here for printing a message box with the text we will insert some text.
Code:
Sub Trim_Data2()

    Dim A As Range

    Set A = Selection

    For Each cell In A
    cell.Value = WorksheetFunction.Trim(cell)

    Dim B As String

    B = Trim("Trimming Done")

    MsgBox B

    Next

End Sub
Once we are done with writing the code, close the Visual Basic windows.
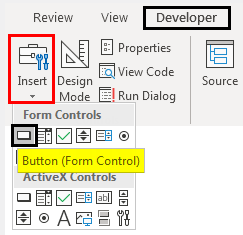
Now go to the Developer tab again and click on Insert menu as shown below. We will get a drop-down menu of different button shapes as shown below.
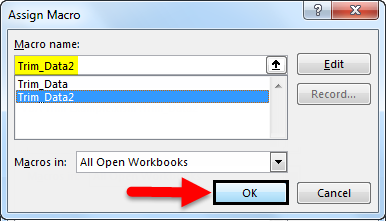
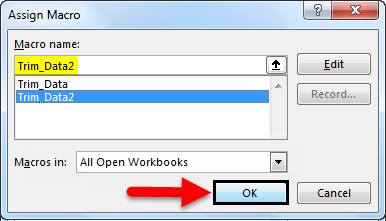
Now select any of the button shapes and draw it on anywhere on your workbook. From the list of created macros select the required option. Here we have selected Trim_Data2 which we created for this example and then click OK.
After that, we will get the button created on the screen.
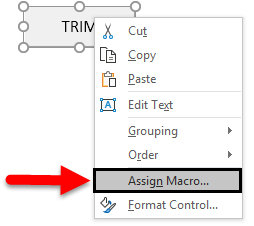
We can name the button as per function which we will be performing. Let’s name it TRIM as per function. Now right click on the created TRIM button and select Assign Marco. Once we do that we will get the window Assign Marco as shown below. Now select the required macro and click OK.
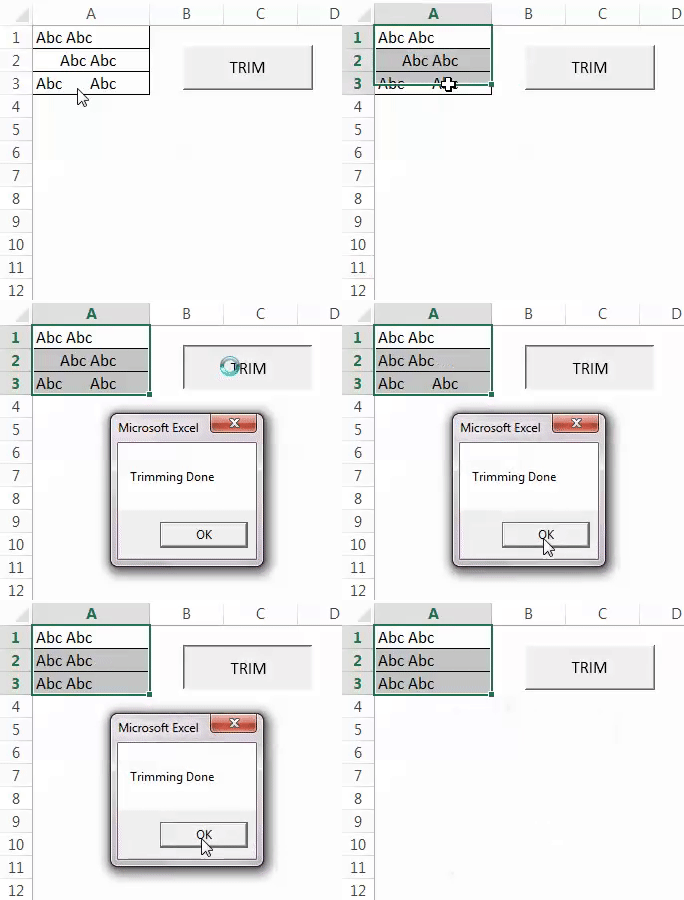
By this, our trim coding will get assigned to TRIM Button. Now for testing select the data first and then click on this TRIM Button.
As we can see above, here our data got trimmed and we can see the message as well of “Trimming Done”.
Pros of Excel VBA Trim Function
- We can trim huge sets of data in one shot without checking the number of extra spaces the cells have.
- Coding of trimming function is also quite small.
- There are very less or no chances that any extra space will get spared.
Things To Remember
- Always save the file as Macro-Enabled Worksheet. By doing this, we can use assigned macro multiple time.
- Compile the code before assigning it to any button.
- There are 2 different ways are shown for creating a button and both can be used as per individuals need or wish.
- Consider writing VBA Code as shown in example-2 which will give the message as well.
Recommended Articles
This has been a guide to Excel VBA Trim. Here we discussed how to use VBA Trim Function to remove spaces in Excel along with some practical examples and downloadable excel template. You can also go through our other suggested articles–
- VBA Function
- VBA VLOOKUP
- VBA Get Cell Value
- VBA XML

