
Вставка диапазона со сдвигом ячеек вправо или вниз методом Insert объекта Range. Вставка и перемещение строк и столбцов из кода VBA Excel. Примеры.
Range.Insert – это метод, который вставляет диапазон пустых ячеек (в том числе одну ячейку) на рабочий лист Excel в указанное место, сдвигая существующие в этом месте ячейки вправо или вниз. Если в буфере обмена содержится объект Range, то вставлен будет он со своими значениями и форматами.
Синтаксис
|
Expression.Insert(Shift, CopyOrigin) |
Expression – выражение (переменная), возвращающее объект Range.
Параметры
| Параметр | Описание | Значения |
|---|---|---|
| Shift | Необязательный параметр. Определяет направление сдвига ячеек. Если параметр Shift опущен, направление выбирается в зависимости от формы* диапазона. | xlShiftDown (-4121) – ячейки сдвигаются вниз; xlShiftToRight (-4161) – ячейки сдвигаются вправо. |
| CopyOrigin | Необязательный параметр. Определяет: из каких ячеек копировать формат. По умолчанию формат копируется из ячеек сверху или слева. | xlFormatFromLeftOrAbove (0) – формат копируется из ячеек сверху или слева; xlFormatFromRightOrBelow (1) – формат копируется из ячеек снизу или справа. |
* Если диапазон горизонтальный или квадратный (количество строк меньше или равно количеству столбцов), ячейки сдвигаются вниз. Если диапазон вертикальный (количество строк больше количества столбцов), ячейки сдвигаются вправо.
Примеры
Простая вставка диапазона
Вставка диапазона ячеек в диапазон «F5:K9» со сдвигом исходных ячеек вправо:
|
Range(«F5:K9»).Insert Shift:=xlShiftToRight |
Если бы параметр Shift не был указан, сдвиг ячеек, по умолчанию, произошел бы вниз, так как диапазон горизонтальный.
Вставка вырезанного диапазона
Вставка диапазона, вырезанного в буфер обмена методом Range.Cut, из буфера обмена со сдвигом ячеек по умолчанию:
|
Range(«A1:B6»).Cut Range(«D2»).Insert |
Обратите внимание, что при использовании метода Range.Cut, точка вставки (в примере: Range("D2")) не может находится внутри вырезанного диапазона, а также в строке или столбце левой верхней ячейки вырезанного диапазона вне вырезанного диапазона (в примере: строка 1 и столбец «A»).
Вставка скопированного диапазона
Вставка диапазона, скопированного в буфер обмена методом Range.Copy, из буфера обмена со сдвигом ячеек по умолчанию:
|
Range(«B2:D10»).Copy Range(«F2»).Insert |
Обратите внимание, что при использовании метода Range.Copy, точка вставки (в примере: Range("F2")) не может находится внутри скопированного диапазона, но в строке или столбце левой верхней ячейки скопированного диапазона вне скопированного диапазона находится может.
Вставка и перемещение строк
Вставка одной строки на место пятой строки со сдвигом исходной строки вниз:
Вставка четырех строк на место пятой-восьмой строк со сдвигом исходных строк вниз:
Вставка строк с использованием переменных, указывающих над какой строкой осуществить вставку и количество вставляемых строк:
|
1 2 3 4 5 6 7 8 9 10 11 12 13 14 15 16 17 18 19 20 21 22 |
Sub Primer1() Dim n As Long, k As Long, s As String ‘Номер строки, над которой необходимо вставить строки n = 8 ‘Количесто вставляемых строк k = 4 ‘Указываем адрес диапазона строк s = n & «:» & (n + k — 1) ‘Вставляем строки Rows(s).Insert End Sub ‘или то же самое с помощью цикла Sub Primer2() Dim n As Long, k As Long, i As Long n = 8 k = 4 For i = 1 To k Rows(n).Insert Next End Sub |
Перемещение второй строки на место шестой строки:
|
Rows(2).Cut Rows(6).Insert |
Вторая строка окажется на месте пятой строки, так как третья строка заместит вырезанную вторую строку, четвертая встанет на место третьей и т.д.
Перемещение шестой строки на место второй строки:
|
Rows(6).Cut Rows(2).Insert |
В этом случае шестая строка окажется на месте второй строки.
Вставка и перемещение столбцов
Вставка одного столбца на место четвертого столбца со сдвигом исходного столбца вправо:
Вставка трех столбцов на место четвертого-шестого столбцов со сдвигом исходных столбцов вправо:
Перемещение третьего столбца на место седьмого столбца:
|
Columns(3).Cut Columns(7).Insert |
Третий столбец окажется на месте шестого столбца, так как четвертый столбец заместит вырезанный третий столбец, пятый встанет на место четвертого и т.д.
Перемещение седьмого столбца на место третьего столбца:
|
Columns(7).Cut Columns(3).Insert |
В этом случае седьмой столбец окажется на месте третьего столбца.
Home / VBA / VBA Insert Column (Single and Multiple)
In this tutorial, we will look at how to insert a column using a VBA code in Excel. We will also explore what are the different ways to write a macro for this.
To insert a column using a VBA code, you need to use the “Entire Column” property with the “Insert” method. With the entire column property, you can refer to the entire column using a cell and then insert a new column. By default, it will insert a column before the cell that you have mentioned.

- First, specify a cell using the range object.
- Now, enter a dot (.) to get the list of properties and methods.
- After that, select the “Entire Column” property or type it.
- In the end, again enter a dot (.) and select the “Insert” method or type it.
Range("A1").EntireColumn.InsertYour code is ready here to insert a column. Now when you run this code, it will instantly insert a new column before the column A.
Insert Multiple Columns
There are two ways to insert multiple columns in a worksheet that I have found. The first is the same insert method that we have used in the above example. With this, you need to specify a range of columns whose count is equal to the count of the column you want to insert.
Now let’s say you want to insert 5 columns after column C in the case you can use a code like the following.

Range("C:G").EntireColumn.InsertTo be honest, I haven’t found this method quite useful because you need to change the range if you want to change the code itself. So, here’s the second method.
'variables to use in the code
Dim iCol As Long
Dim iCount As Long
Dim i As Long

'to get the number of columns that you want to insert with an input box
iCount = InputBox(Prompt:="How many column you want to add?")

'to get the column number where you want to insert the new column
iCol = InputBox _
(Prompt:= _
"After which column you want to add new column? (Enter the column number)")

'loop to insert new column(s)
For i = 1 To iCount
    Columns(iCol).EntireColumn.Insert
Next i
When you run this code, it asks you to enter the number of columns that you want to add and then the column number where you want to add all those new columns. It uses a FOR LOOP (For Next) to enter the number of columns that you have mentioned.
Insert Columns Based on the Cell Values
If you want to insert columns based on a cell value, then you can use the following code.
Dim iCol As Long
Dim iCount As Long
Dim i As Long

iCount = Range("A1").Value
iCol = Range("B1").Value

For i = 1 To iCount
    Columns(iCol).EntireColumn.Insert
Next i
When you run this macro, it takes count of columns from the cell A1 and the column where you want to add columns from the cell B1.
Insert a Column without Formatting
When you insert a column where the above column has some specific formatting, in that case, the column will also have that formatting automatically. And the simplest way to deal with this thing is to use clear formats. Consider the following code.
Columns(7).EntireColumn.Insert
Columns(7).ClearFormats
When you run the above code, it inserts a new column before the 7th column. Now, what happens, when you insert a column before the 7th column that new column becomes the 7th column, and then the second line of code clear the formats from it.
Insert Copied Column
You can also use the same method to copy a column and then insert it somewhere else. See the following code.
Application.CutCopyMode = False

With Worksheets("Data")
.Columns(5).Copy
.Columns(9).Insert Shift:=xlShiftDown
End With

Application.CutCopyMode = True
More Tutorials
- Count Rows using VBA in Excel
- Excel VBA Font (Color, Size, Type, and Bold)
- Excel VBA Hide and Unhide a Column or a Row
- Excel VBA Range – Working with Range and Cells in VBA
- Apply Borders on a Cell using VBA in Excel
- Find Last Row, Column, and Cell using VBA in Excel
- Insert a Row using VBA in Excel
- Merge Cells in Excel using a VBA Code
- Select a Range/Cell using VBA in Excel
- SELECT ALL the Cells in a Worksheet using a VBA Code
- ActiveCell in VBA in Excel
- Special Cells Method in VBA in Excel
- UsedRange Property in VBA in Excel
- VBA AutoFit (Rows, Column, or the Entire Worksheet)
- VBA ClearContents (from a Cell, Range, or Entire Worksheet)
- VBA Copy Range to Another Sheet + Workbook
- VBA Enter Value in a Cell (Set, Get and Change)
- VBA Named Range | (Static + from Selection + Dynamic)
- VBA Range Offset
- VBA Sort Range | (Descending, Multiple Columns, Sort Orientation
- VBA Wrap Text (Cell, Range, and Entire Worksheet)
- VBA Check IF a Cell is Empty + Multiple Cells
⇠ Back to What is VBA in Excel
Helpful Links – Developer Tab – Visual Basic Editor – Run a Macro – Personal Macro Workbook – Excel Macro Recorder – VBA Interview Questions – VBA Codes
In this Article
- Insert a Single Row or Column
- Insert New Row
- Insert New Column
- Insert Multiple Rows or Columns
- Insert Multiple Rows
- Insert Multiple Columns
- Insert – Shift & CopyOrigin
- Other Insert Examples
- Insert Copied Rows or Columns
- Insert Rows Based on Cell Value
- Delete Rows or Columns
This tutorial will demonstrate how to use VBA to insert rows and columns in Excel.
To insert rows or columns we will use the Insert Method.
Insert a Single Row or Column
Insert New Row
To insert a single row, you can use the Rows Object:
Rows(4).InsertOr you can use the Range Object along with EntireRow:
Range("b4").EntireRow.InsertInsert New Column
Similar to inserting rows, we can use the Columns Object to insert a column:
Columns(4).InsertOr the Range Object, along with EntireColumn:
Range("b4").EntireColumn.InsertInsert Multiple Rows or Columns
Insert Multiple Rows
When inserting multiple rows with the Rows Object, you must enter the rows in quotations:
Rows("4:6").InsertInserting multiple rows with the Range Object works the same as with a single row:
Range("b4:b6").EntireRow.InsertInsert Multiple Columns
When inserting multiple columns with the Columns Object, enter the column letters in quotations:
Columns("B:D").InsertInserting multiple columns with the Range Object works the same as with a single column:
Range("b4:d4").EntireColumn.InsertVBA Coding Made Easy
Stop searching for VBA code online. Learn more about AutoMacro — A VBA Code Builder that allows beginners to code procedures from scratch with minimal coding knowledge and with many time-saving features for all users!

Learn More
Insert – Shift & CopyOrigin
The Insert Method has two optional arguments:
- Shift – Which direction to shift the cells
- CopyOrigin – Which cell formatting to copy (above, below, left, or right)
The Shift argument is irrelevant when inserting entire rows or columns. It only allows you to indicate to shift down or shift to the right:
- xlShiftDown – Shift cells down
- xlShiftToRight – Shift cells to the right
As you can see, you can’t shift up or to the left.
The CopyOrigin argument has two potential inputs:
- xlFormatFromLeftorAbove – (0) Newly-inserted cells take formatting from cells above or to the left
- xlFormatFromRightorBelow (1) Newly-inserted cells take formatting from cells below or to the right.
Let’s look at some examples of the CopyOrigin argument. Here’s our initial data:
This example will insert a row, taking the formatting from the above row.
Rows(5).Insert , xlFormatFromLeftOrAbove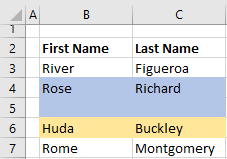
This example will insert a row, taking the formatting from the below row.
Rows(5).Insert , xlFormatFromRightOrBelow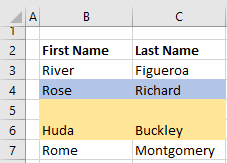
Other Insert Examples
Insert Copied Rows or Columns
If you’d like to insert a copied row, you would use code like this:
Range("1:1").Copy
Range("5:5").Insert
Here we copy Row 1 and Insert it at Row 5.
VBA Programming | Code Generator does work for you!
Insert Rows Based on Cell Value
This will loop through a range, inserting rows based on cell values:
Sub InsertRowswithSpecificValue()

Dim cell As Range

For Each cell In Range("b2:b20")
    If cell.Value = "insert" Then
        cell.Offset(1).EntireRow.Insert
    End If
Next cell

End Sub
Delete Rows or Columns
To delete rows or columns, simply use the Delete method.
Rows(1).Delete

Range("a1").EntireRow.Delete

Columns(1).Delete

Range("a1").EntireColumn.DeleteNormally in an Excel worksheet, we have two different methods to add or insert columns: the keyboard shortcut and the right-click and insert method. Still, in VBA, we have to use the insert command and entire column statement to add any column together. The trick is that if we need to insert a single column, we give a single column reference. Still, for the multiple columns, we give multiple column references.
Table of contents
- Insert Columns in Excel using VBA
- How to Insert Columns in Excel Worksheet using VBA?
- Example #1 – Insert Columns Using Range Object in VBA
- Example #2 – Insert Multiple Columns
- Example #4 – Insert Columns Using COLUMNS Property in VBA
- Example #5 – Insert Alternative Columns
- Example #6 – Insert Column Based on Cell Value
- Recommended Articles
- How to Insert Columns in Excel Worksheet using VBA?
Insert Columns in Excel using VBA
As part of the VBA codeVBA code refers to a set of instructions written by the user in the Visual Basic Applications programming language on a Visual Basic Editor (VBE) to perform a specific task.read more, we may need to insert a few columns to fit our needs in our datasheet. Inserting a column is the easy shortcut key in the worksheet by pressing Ctrl +,but how about inserting a new column through VBA code? In this article on “VBA Insert Column,” we will show you the process of adding columns in excelAdding a column in excel means inserting a new column to the existing dataset.read more and different scenarios examples.

You are free to use this image on your website, templates, etc, Please provide us with an attribution linkArticle Link to be Hyperlinked
For eg:
Source: VBA Insert Columns (wallstreetmojo.com)
How to Insert Columns in Excel Worksheet using VBA?
We can insert columns in VBA using the COLUMNS propertyVBA Columns property refers to columns in the worksheet. With this property, any column in the specified worksheet can be used to work on it. Similarly, for cells, a Range object or cell property is used.read more and RANGE object. But, first, you must know why we need columns and range objects to insert a new column.
To insert a new column, we need to identify after which column we need to insert, without telling, after which column we need to insert how VBA can understand the logic.
For example, if you want to insert the column after column B, you can construct the code like this.
Columns(“C”)
Note: We have used C to insert a column after because it will shift the selected cell to the right side.
After the columns are specified, we need to access the “Entire Column” property.
Columns(“C”).EntireColumn
Then we need to choose the “Insert” method.
Columns(“C”).EntireColumn.Insert
It will insert the column after column C and move the existing column C to D.
Example #1 – Insert Columns Using Range Object in VBA
Now, we want to insert the column after the A column. Follow the below steps to construct the code.

Now I want to VBA insert the column after the A column. Follow the below steps to construct the code.
Step 1: Start the Sub Procedure.
Step 2: Open Range object.
Code:
Sub ColumnInsert_Example1()

  Range(

End Sub

Step 3: Now, mention the column in double quotes.
Code:
Sub ColumnInsert_Example1()

  Range ("B:B")

End Sub

Step 4: Now, choose the Entire Column property.
Code:
Sub ColumnInsert_Example1()

  Range("B:B").ent

End Sub

Step 5: After selecting the Entire Column property, choose the “Insert” method.
Code:
Sub ColumnInsert_Example1()

  Range("B:B").EntireColumn.ins

End Sub

Now, your code looks like this.
Code:
Sub ColumnInsert_Example1()

  Range("B:B").EntireColumn.Insert

End Sub
Run the code. It will insert the new B column.

Example #2 – Insert Multiple Columns
For example, if you want to insert two new columns after column A, then we need to mention two column addresses.
Code:
Sub ColumnInsert_Example1()

  Range("B:C").EntireColumn.Insert

End Sub
The above code will insert two columns after column A.
Example #3 – With “Insert” Only Method
We can insert a new column using “Insert,” the only method without accessing the Entire Column property. For this, let us understand the “Insert” method syntax.
Expression.Insert([Shift],[Copy Origin])
[Shift]: When we insert the new column, whether we need the columns to shift to the right side or to shift to the downside in case of rows. Here we can use two options, “xlToRight” and “xlDownTo.”
[Copy Origin]: This will specify the format for the newly inserted column. Do you need the format from the left side of the column or the above cells? Here we can use two options “xlFormatFromLeftOrAbove” and “xlFormatFromRightOrBelow.”
Below is the example code for you.
Sub ColumnInsert_Example1()

  Range("B:B").Insert Shift:=xlToRight, Copyorigin:=xlFormatFromLeftOrAbove

End Sub
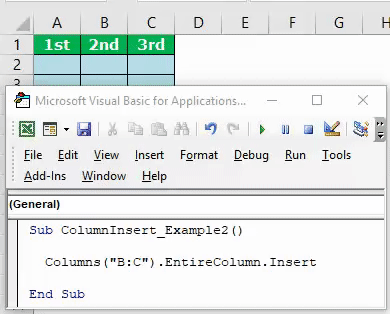
Example #4 – Insert Columns Using COLUMNS Property in VBA
We have seen how to insert columns VBA using the RANGE object. Next, we will show we can insert columns using the “COLUMNS” property.
Open the COLUMNS property.
Code:
Sub ColumnInsert_Example2()

  Columns(

End Sub

We can specify the column in two ways here. One is using as usual alphabetic references, and another one uses column numbers.
If you want to insert the column after column A, the code will be COLUMNS(“B”). Likewise, the code will be COLUMNS(2) if you use numerical references.
Code:
Sub ColumnInsert_Example2()

  Columns("B").

End Sub

Now, the problem for you arises because when we use the COLUMNS property, we do not get access to the IntelliSense list.
Code:
Sub ColumnInsert_Example2()

  Columns("B").Entir

End Sub

Here, we need to be sure of what we are doing. So, this is the reason we have shown you the RANGE object first.
Code:
Sub ColumnInsert_Example2()

  Columns("B:B").EntireColumn.Insert

End Sub
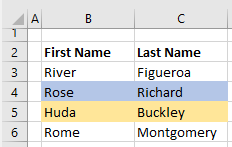
Example #5 – Insert Alternative Columns
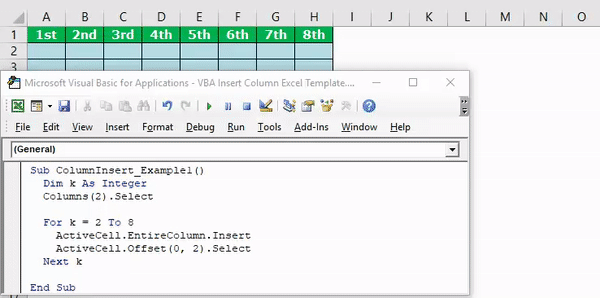
Assume you have the data like the below image.

Assume you have the data like the below image.
We need to use VBA loopsA VBA loop in excel is an instruction to run a code or repeat an action multiple times.read more if you want to insert new columns after every alternate row. The below code is tailor-made for you.
Code:
Sub ColumnInsert_Example3()

  Dim k As Integer
  Columns(2).Select

  For k = 2 To 8
    ActiveCell.EntireColumn.Insert
    ActiveCell.Offset(0, 2).Select
  Next k

End Sub
It will insert the column like this.
Example #6 – Insert Column Based on Cell Value
We can also insert a column based on cell value as well. For example, look at the below data.

Here, we want to insert the column if the first-row cell value is “Year.” Our data should be like this after inserting new columns.

Use the below code to perform this task.
Code:
Sub ColumnInsert_Example4()

  Dim k As Integer
  Dim x As Integer

  x = 2
  For k = 2 To 12
    If Cells(1, x).Value = "Year" Then
    Cells(1, x).EntireColumn.Insert
    x = x + 1
    End If
    x = x + 1
  Next k

End Sub
You can download this VBA Insert Columns Excel here. VBA Insert Columns Excel Template
Recommended Articles
This article has been a guide to VBA Insert Columns. Here, we will show you how to insert single/multiple columns under different scenarios, examples, and a downloadable Excel template. Below are some useful Excel articles related to VBA: –
- Count in Excel VBA
- VBA Union
- VBA ENUM
- Delete Column using VBA
I know the thread is old, but I must point out that the most upvoted answer here is risky and can get you in a serious trouble. I don’t know if it depends Excel version — I use Excel’16.
Let’s consider table containing columns: col A, col B and col C.

We use «The Dudes» one-liner code and want to name our new column «Col B». It already exists but check what happens:
Sub theDude()

  Dim Table As ListObject
  Set Table = ActiveSheet.ListObjects(1)

  With Table

    ' adding column on the second place
    ' and trying to force its header to "Col B"
    .ListColumns.Add(2).Name = "Col B"

    'fill "Col B" with value
    .ListColumns("Col B").DataBodyRange = "test"

  End With

End Sub
And what we get? In result we have 4 columns:
- Col A
- New inserted Column1 or another DEFAULT NAME of Table’s column (1)
- Col B — the «old» B column filled with «test» string
- Col C

(1) it depends on yours language version- mine is called Kolumna1 and it’s given by Excel automatically
The worst thing is our data in Col B is lost after macro run. So I would suggest instead one-liner (methods chaining) use @stenci’s step by step solution, or even better add some error handling e.g.:
Sub AddingColumn()

  Dim Table As ListObject
  ' ActiveSheet just for test
  Set Table = ActiveSheet.ListObjects(1)

  Dim newColName As Variant     ' or string / long
      newColName = "Col B"

  If headerExists(newColName, Table) Then

    Dim tit As String:  tit = "Error"
    Dim txt As String
        txt = "Header " & newColName & " already exists. Macro will be interrupted"

        MsgBox txt, vbOKOnly, tit
        Exit Sub

  Else

    ' main code goes here *********************
    With Table
      ' adding column on the second place
      ' and trying to force its header to "Col B"
        .ListColumns.Add(2).Name = newColName
      'fill "Col B" with value
        .ListColumns("Col B").DataBodyRange = "test"
    End With

  End If

End Sub

Function headerExists(ByVal findHeader As String, ByVal tbl As ListObject) As Boolean

    Dim pos As Variant     ' position
        pos = Application.Match(findHeader, tbl.HeaderRowRange, 0)

        headerExists = Not IsError(pos)

End Function