
Hi all How can I make a statement if label have text And TextBox have no text in a loop? I can’t find anything about it I know with a textbox I can use the .TextLength but that don’t work as .CaptionLength Hope you can help
For k = 2 To 41
   If Me.Controls("Label" & k).CaptionLength < 0 And Me.Controls("TextBox" &
   k).TextLength = 0 Then
   MsgBox "You have a name without Hdc"

   Exit Sub
 End If
UPDATED With working Code
Dim k As Long
For k = 1 To 40
    If Len(Me.Controls("Label" & k).Caption) > 0 And Me.Controls("TextBox" &
k).Text = vbNullString Then
    MsgBox "You have a name without Hdc"
    Exit Sub
    End If
Next
asked Oct 13, 2017 at 15:25
![]()
Try
If len(Me.Controls("Label" & k).caption) > 0 And ...
The len function returns the length of a string and the caption-property gives the text (caption) of a label
answered Oct 13, 2017 at 15:32
![]()
FunThomasFunThomas
20.1k2 gold badges18 silver badges34 bronze badges
4
UserForm Controls — Label, TextBox and CommandButton
UserForm acts as a container in which you add multiple ActiveX controls, each of which has a specific use and associated properties. By itself, a UserForm will not be of much use unless ActiveX controls are added to it which are the actual user-interactive objects. Using ActiveX Controls on a Worksheet have been illustrated in detail, in the separate section of «Excel VBA: ActiveX Controls, Form Controls & AutoShapes on a Worksheet».
Also refer «2. UserForm and Controls — Properties» for properties common to the UserForm and most Controls
Note: In below given examples, vba codes are required to be entered in the Code Module of the UserForm, unless specified otherwise.
——————————-
Contents:
Label
CommandButton
TextBox
——————————-
Label
A Label Control displays text and is used to describe other controls viz. it is often used to describe a TextBox, or if you want to display instructions on the form. Use the Caption property to display text, the Left & Top properties to position it, the TextAlign property to align text within the Label, the Font property for font name/style/size, the BackColor and ForeColor properties for background and text colors. You can format a Label either in the Properties Window or using a VBA statement like Label1.Caption = «Enter brief particulars» or using the vba WITH statement as shown below.
Private Sub CommandButton1_Click()
‘clicking the command button in the UserForm will format the Label
With Label1
‘to display text
.Caption = «Enter brief particulars»
‘text alignment set to center
.TextAlign = fmTextAlignCenter
‘wrap text
.WordWrap = True
‘set font property
.Font.Name = «Arial»
.Font.Size = 12
.Font.Italic = True
‘set font color to yellow and background color to red
.ForeColor = RGB(255, 255, 0)
.BackColor = RGB(255, 0, 0)
End With
End Sub
———————————————————————————————————————-
CommandButton
A CommandButton is typically used to execute a macro. The Click event of the CommandButton is used to attach vba code to a CommandButton of a UserForm. In VBE (Visual Basic Editor), if the UserForm is visible, you can double-click on the CommandButton to access the Click event, or else you can select the name of the CommandButton (in the code module for the UserForm) from the top-left dropdown of the code window and then select Click from the top-right dropdown. Clicking on the CommandButton will run the code which is attached to the Click event or you can insert the name of a macro to be run on clicking the CommandButton. See below example(s):
Example 1 — The Click event which unloads the UserForm on clicking the CommandButton:
Private Sub CommandButton2_Click()
‘clicking on the button unloads the UserForm
‘display message before closing
MsgBox «Closing UserForm!»
‘unloads the UserForm
Unload Me
End Sub
Example 2 — Clicking the CommandButton will call (& execute) another macro whose name has been inserted — used typically when a set of codes are often or repeatedly required to be executed. Refer Images 5a (before Clear Button is clicked) & 5b (after Clear Button is clicked):


Private Sub CommandButton1_Click()
‘clicking on the «Clear» button will call another macro, named clearForm, which will get executed:
clearForm
End Sub
Private Sub clearForm()
‘this macro is called on clicking the «Clear» button — clears all controls in the UserForm:
‘clear all text appearing in TextBox
TextBox1.Value = «»
‘clear the text area of the ComboBox (ie. user-entered or user-selected value)
ComboBox1.Value = «»
‘deselect the CheckBox
CheckBox1.Value = False
‘deselect the OptionButton
OptionButton1.Value = False
End Sub
———————————————————————————————————————
TextBox
A TextBox accepts text or data from the user. In addition to the common properties mentioned earlier, its key properties include:
AutoTab Property: A Boolean value (True/False) which specifies whether the tab moves automatically to the next control in the tab order after the the maximum allowable number of characters (as determined by the MaxLength property) are entered in the TextBox by the user. False value (is the default) indicates moving manually to the next control in the tab order when the user presses the Tab key. This property is particularly useful in a case where the TextBox accepts a 5-digit item code number and the tab moves on automatically after 5 digits are entered.
EnterKeyBehavior Property: A Boolean value (True/False) which determines the effect when a user presses the ENTER key in a TextBox. If MultiLine property is set to True, then the True value indicates creating a new line on pressing ENTER while the False value (Default) moves focus to the next control in the tab order. If MultiLine property is set to False, then focus is always moved to the next control in the tab order ignoring the EnterKeyBehavior Property.
MaxLength Property: Specifies the maximum number of characters which can be entered in a TextBox. Specifying a value of 0 indicates there is no maximum limit.
MultiLine Property: A Boolean value (True/False) which determines if text will be displayed in multiple lines or not, in the TextBox. True indicates that the text is displayed in multiple lines, and this is also the default value. See the ScrollBars Property below for how a multiline TextBox can have vertical scroll bars and even a horizontal scroll bar under certain conditions. The WordWrap property is ignored in the single-line setting.
PasswordChar Property: Specifies what characters to display in TextBox instead of the characters actually entered or typed by the user. This property is useful to protect sensitive information or security codes, or to validate a user before allowing to proceed further.
ScrollBars Property: Specifies whether a TextBox has vertical and/or horizontal scroll bars, or none. There are 4 ‘self-explanatory’ settings: (i) fmScrollBarsNone (value 0) — this is the default setting; (ii) fmScrollBarsHorizontal (value 1); (iii) fmScrollBarsVertical (value 2); and (iv) fmScrollBarsBoth (value 3). The scroll bar setting fmScrollBarsNone displays no scroll bar. If AutoSize is set to True, no scroll bar is diplayed because the TextBox enlarges itself to accommodate the additional text or data. If WordWrap is set to True, a multiline TexBox displays no horizontal scroll bar. The scroll bar settings fmScrollBarsHorizontal or fmScrollBarsBoth, display a horizontal scroll bar in a singleline TextBox if the text is longer than the edit region. The scroll bar settings fmScrollBarsVertical or fmScrollBarsBoth, display a vertical scroll bar in a multiline TextBox if the text is longer than the edit region and WordWrap is set to True. To display a horizontal scroll bar in a multiline TexBox, the scroll bar setting should be fmScrollBarsHorizontal, WordWrap should be set to False and the text should be longer than the edit region. Note 1: A horizontal (or vertical) scroll bar is visible only if the control has enough room to include the scroll bar under (or at the right edge of) its edit region.
Text Property: The text in a TextBox is returned or set by this property. A value assigned to the Text property gets automatically assigned to the Value property, and vice-versa.
Example 1: You can Add a TextBox in a UserForm and format it (ie. apply or set properties), either in the Properties Window, or using VBA code as shown below.
Private Sub CommandButton1_Click()
‘click command button to create new TextBox and apply properties — a MultiLine TextBox with a vertical scroll bar
Dim txtSampleTextBox As MSForms.TextBox
Set txtSampleTextBox = Controls.Add(«Forms.TextBox.1», «txtSampleTB»)
With txtSampleTextBox
‘set font property
.Font.Name = «Times New Roman»
.Font.Size = 10
‘text alignment set to center
.TextAlign = fmTextAlignLeft
‘specify size
.Width = 100
.Height = 50
‘set position in the UserForm
.Left = 50
.Top = 75
‘set behaviour
.MultiLine = True
.WordWrap = True
.AutoSize = False
.ScrollBars = 2
‘set focus
.SetFocus
End With
End Sub
Example 2: Enabled Property of a TextBox is particularly useful where you do not want to allow the user to type directly into the TextBox which should be filled only per the user-selected option, say from a ListBox — see below vba code(s):
Private Sub UserForm_Initialize()
‘set properties for ListBox and TextBox on initialization of UserForm
‘populating ListBox with numbers 1 to 10; display a ControlTip instructing the user to select from ListBox.
With ListBox1
For i = 1 To 10
.AddItem i
Next i
.ControlTipText = «Select Number from ListBox, to enter in TextBox.»
End With
‘set Enabled Property to False so that the user cannot type directly; Note: ControlTip cannot be displayed when Enabled is set to False
Me.TextBox1.Enabled = False
End Sub
Private Sub ListBox1_Click()
‘ListBox click event
‘fills TextBox on ListBox selection
TextBox1.Text = ListBox1.Value
End Sub
Example 3: Use TextBox to set up a password — set multiple username-password matches to enable multi-user access.

In this Example we use the PasswordChar Property to check if username and password match, in which case the user is allowed to proceed and UserForm1 gets loaded. UserForm2 (Refer Image 6) contains TextBox1 for entering username and TextBox2 for entering password, and CommandButton1 which on being clicked matches the username & password, and on validating a match the UserForm1 is loaded allowing the user to proceed.
Private Sub UserForm_Initialize()
‘set properties for TextBox2 on initialization of UserForm2.
‘set maximum length for password field
TextBox2.MaxLength = 5
‘specify characters displayed in TextBox instead of the characters actually entered
TextBox2.PasswordChar = «*»
‘set yellow as background color
TextBox2.BackColor = RGB(255, 255, 0)
End Sub
Private Sub CommandButton1_Click()
‘use TextBox to set up a password; click command button to validate password to proceed to UserForm1.
Dim password As String
‘set matching usernames and passwords — (Angelina & 12345), (Brad & 23456) & (George & 34567)
If TextBox1.Text = «Angelina» And TextBox2.Text = «12345» Then
password = «True»
ElseIf TextBox1.Text = «Brad» And TextBox2.Text = «23456» Then
password = «True»
ElseIf TextBox1.Text = «George» And TextBox2.Text = «34567» Then
password = «True»
End If
‘if username and password match, the user is allowed to proceed and UserForm1 gets loaded:
If password = «True» Then
MsgBox «Password Validated! Please Continue.»
Unload Me
UserForm1.Show
‘if if username and password do not match, user is requested to try again:
Else
MsgBox «Incorrect UserName/Password. Try Again.»
‘clear both TextBox
TextBox1.Text = vbNullString
TextBox2.Text = vbNullString
‘set focus to TextBox1
TextBox1.SetFocus
End If
End Sub
Элемент управления пользовательской формы Label, применяемый в VBA Excel для отображения надписей, меток, информационного текста. Свойства Label, примеры кода.
UserForm.Label – это элемент управления пользовательской формы, предназначенный для отображения на ней поясняющих надписей к другим элементам управления, меток, заметок, вывода дополнительной текстовой информации.
Элемент управления Label, как и другие элементы управления, реагирует на нажатия мышью, то есть его можно использовать для запуска подпрограмм, изменения собственных свойств, свойств пользовательской формы и других элементов управления.
Свойства элемента Метка
| Свойство | Описание |
|---|---|
| AutoSize | Автоподбор размера надписи. True – размер автоматически подстраивается под длину набираемой строки. False – размер элемента управления определяется свойствами Width и Height. |
| Caption | Текст надписи (заголовок). |
| ControlTipText | Текст всплывающей подсказки при наведении курсора на метку. |
| Enabled | Возможность взаимодействия пользователя с элементом управления Label. True – взаимодействие включено, False – отключено (цвет текста становится серым). |
| Font | Шрифт, начертание и размер текста надписи. |
| Height | Высота элемента управления. |
| Left | Расстояние от левого края внутренней границы пользовательской формы до левого края элемента управления. |
| Picture | Добавление изображения вместо текста метки или дополнительно к нему. |
| PicturePosition | Выравнивание изображения и текста в поле надписи. |
| TabIndex | Определяет позицию элемента управления в очереди на получение фокуса при табуляции, вызываемой нажатием клавиш «Tab», «Enter». Отсчет начинается с 0. |
| TextAlign* | Выравнивание текста надписи: 1 (fmTextAlignLeft) – по левому краю, 2 (fmTextAlignCenter) – по центру, 3 (fmTextAlignRight) – по правому краю. |
| Top | Расстояние от верхнего края внутренней границы пользовательской формы до верхнего края элемента управления. |
| Visible | Видимость элемента управления Label. True – элемент отображается на пользовательской форме, False – скрыт. |
| Width | Ширина элемента управления. |
| WordWrap | Перенос текста надписи на новую строку при достижении ее границы. True – перенос включен, False – перенос выключен. |
* При загруженной в надпись картинке свойство TextAlign не работает, следует использовать свойство PicturePosition.
Свойство по умолчанию для элемента Label – Caption, основное событие – Click.
В таблице перечислены только основные, часто используемые свойства надписи. Все доступные свойства отображены в окне Properties элемента управления Label.
Примеры кода VBA с Label
Пример 1
Загрузка элемента управления Label на пользовательскую форму с параметрами, заданными в коде VBA Excel:
|
1 2 3 4 5 6 7 8 9 10 11 12 13 14 15 16 17 18 19 20 21 22 |
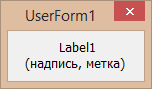
Private Sub UserForm_Initialize() ‘Устанавливаем значения свойств ‘пользовательской формы With Me .Width = 200 .Height = 110 .Caption = «Пользовательская форма» End With ‘Устанавливаем значения свойств ‘метки (надписи) Label1 With Label1 .Caption = «Добрый доктор Айболит!» _ & vbNewLine & «Он под деревом сидит.» .Width = 150 .Height = 40 .Left = 20 .Top = 20 .Font.Size = 12 .BorderStyle = fmBorderStyleSingle .BackColor = vbYellow End With End Sub |
Добавьте на пользовательскую форму элемент управления Label1, а в модуль формы представленный выше код VBA. При запуске формы или процедуры UserForm_Initialize() откроется следующее окно:

Пример 2
Изменение цвета элемента управления Label при нажатии на нем любой (правой, левой) кнопки мыши, и возвращение первоначального цвета при отпускании кнопки:
|
‘Событие перед щелчком кнопки мыши при нажатии Sub Label1_MouseDown(ByVal Button As Integer, _ ByVal Shift As Integer, ByVal X As Single, _ ByVal Y As Single) Label1.BackColor = vbBlue End Sub ‘Событие перед щелчком кнопки мыши при отпускании Sub Label1_MouseUp(ByVal Button As Integer, _ ByVal Shift As Integer, ByVal X As Single, _ ByVal Y As Single) Label1.BackColor = Me.BackColor End Sub |
При нажатии кнопки мыши над меткой, ее цвет станет синим. При отпускании кнопки – цвет станет таким же, как цвет формы.
Для наглядной демонстрации второго примера вы можете добавить эти две процедуры к коду первого примера или создать новую пользовательскую форму с элементом управления Label1 и добавить процедуры в ее модуль.
grant84
Пользователь
Сообщений: 129
Регистрация: 01.01.1970
Anatolyi
Здравствуйте друзья.
Значение лейбела у меня становится таким же как в нужной мне ячейке, только после того как я по нему кликну мышкой. При этом код выглядит так:
Private Sub Label1_Click()
Label1.Caption = Sheets(«Лист1»).Range(«A1»).Value
End Sub
А форма у меня загружается так:
Sub Cnopka()
UserForm1.Show
End Sub
Вопрос:
Можно сделать так, чтобы в итоге работы макроса «Cnopka» значение «Label1» стало как в ячейке «A1» на листе «Лист1»?
Благодарю.
Я соображаю, но не всегда. 
|
КАК найти все Label на форме и присвоить им название с файла |
||||||||
Ответить |
||||||||
Ответить |
||||||||
Ответить |
||||||||
Ответить |
||||||||
Ответить |
||||||||
Ответить |
||||||||
Ответить |
||||||||
Ответить |


