
I think Collection might be what you are looking for.
Example:
Private Function getProducts(ByVal supplier As String) As Collection
    Dim getProducts_ As New Collection

    If supplier = "ACME" Then
        getProducts_.Add ("Anvil")
        getProducts_.Add ("Earthquake Pills")
        getProducts_.Add ("Dehydrated Boulders")
        getProducts_.Add ("Disintegrating Pistol")
    End If

    Set getProducts = getProducts_
    Set getProducts_ = Nothing
End Function

Private Sub fillProducts()
    Dim products As Collection
    Set products = getProducts("ACME")
    For i = 1 To products.Count
        Sheets(1).Cells(i, 1).Value = products(i)
    Next i
End Sub
Edit:
Here is a pretty simple solution to the Problem: Populating a ComboBox for Products whenever the ComboBox for Suppliers changes it’s value with as little vba as possible.
Public Function getProducts(ByVal supplier As String) As Collection
    Dim getProducts_ As New Collection
    Dim numRows As Long
    Dim colProduct As Integer
    Dim colSupplier As Integer
    colProduct = 1
    colSupplier = 2

    numRows = Sheets(1).Cells(1, colProduct).CurrentRegion.Rows.Count

    For Each Row In Sheets(1).Range(Sheets(1).Cells(1, colProduct), Sheets(1).Cells(numRows, colSupplier)).Rows
        If supplier = Row.Cells(1, colSupplier) Then
            getProducts_.Add (Row.Cells(1, colProduct))
        End If
    Next Row

    Set getProducts = getProducts_
    Set getProducts_ = Nothing
End Function

Private Sub comboSupplier_Change()
    comboProducts.Clear
    For Each Product In getProducts(comboSupplier)
        comboProducts.AddItem (Product)
    Next Product
End Sub
Notes: I named the ComboBox for Suppliers comboSupplier and the one for Products comboProducts.
Return to VBA Code Examples
This article will demonstrate how to return an Array using a VBA Function.
VBA Function Return Array
When using functions to return arrays, I strongly recommend declaring arrays with type variant:
    Function ReturnArray() As Variant

    End Function
Variant Arrays are easier to work with. Array size becomes less of a concern.
Function Return Array Examples
Here is an example of a function that returns an array:
Function ReturnArray() As Variant
    Dim tempArr As Variant

    'Create New Temp Array
    ReDim tempArr(1 To 3, 1 To 2)

    'Assign Array Values
    tempArr(1, 1) = "Steve"
    tempArr(1, 2) = "Johnson"
    tempArr(2, 1) = "Ryan"
    tempArr(2, 2) = "Johnson"
    tempArr(3, 1) = "Andrew"
    tempArr(3, 2) = "Scott"

    'Output Array
    ReturnArray = tempArr

End Function

Sub TestTransposeArray()
    Dim outputArr As Variant

    'Call Return Function
    outputArr = ReturnArray()

    'Test Output
    MsgBox outputArr(2, 1)

End Sub
Notice we declared the Arrays with data type = variant to avoid size issues.
This example takes an array as an input, transposes the array, and outputs the new transposed array:
Function TransposeArray(MyArray As Variant) As Variant
    Dim x As Long, y As Long
    Dim maxX As Long, minX As Long
    Dim maxY As Long, minY As Long

    Dim tempArr As Variant

    'Get Upper and Lower Bounds
    maxX = UBound(MyArray, 1)
    minX = LBound(MyArray, 1)
    maxY = UBound(MyArray, 2)
    minY = LBound(MyArray, 2)

    'Create New Temp Array
    ReDim tempArr(minX To maxX, minY To maxX)

    'Transpose the Array
    For x = minX To maxX
        For y = minY To maxY
            tempArr(y, x) = MyArray(x, y)
        Next y
    Next x

    'Output Array
    TransposeArray = tempArr

End Function

Sub TestTransposeArray()
    Dim testArr(1 To 3, 1 To 2) As Variant
    Dim outputArr As Variant

    'Assign Array Values
    testArr(1, 1) = "Steve"
    testArr(1, 2) = "Johnson"
    testArr(2, 1) = "Ryan"
    testArr(2, 2) = "Johnson"
    testArr(3, 1) = "Andrew"
    testArr(3, 2) = "Scott"

    'Call Transpose Function
    outputArr = TransposeArray(testArr)

    'Test Output
    MsgBox outputArr(2, 1)

End Sub
VBA Coding Made Easy
Stop searching for VBA code online. Learn more about AutoMacro — A VBA Code Builder that allows beginners to code procedures from scratch with minimal coding knowledge and with many time-saving features for all users!

Learn More!
As the title suggests, we will learn how to create a user-defined function in Excel that returns an array. We have already learned how to create a user-defined function in VBA. So without wasting any time let’s get started with the tutorial.
What is an Array Function?
Array functions are the functions that return an array when used. These function are used with CTRL+SHIFT+ENTER key combinations and this is why we prefer calling array function or formulas as CSE function and formulas.
The excel array function is often multicell array formulas. One example is the TRANSPOSE function.
Creating a UDF array function in VBA
So, the scenario is that I just want to return the first 3 even numbers using function ThreeEven() function.
The code will look like this.
Function ThreeEven() As Integer()

'define array
Dim numbers(2) As Integer

'Assign values to array
numbers(0) = 0
numbers(1) = 2
numbers(2) = 4

'return values
ThreeEven = numbers

End Function
Let us use this function on the worksheet.
 You can see that, we first select three cells (horizontally, for vertical we have to use two-dimensional array. We have it covered below.). Then we start writing our formula. Then we hit CTRL+SHIFT+ENTER. This fills the selected cells with the array values.
Note:
- In practice, you will not know how many cells you gonna need. In that case always select more cells than expected array length. The function will fill the cells with array and extra cells will show #N/A error.
- By default, this array function returns values in a horizontal array. If you try to select vertical cells, all cells will show the first value of array only.
How it works?
To create an array function you have to follow this syntax.
Function functionName(variables) As returnType()

dim resultArray(length) as dataType

'Assign values to array here

functionName =resultArray

End Function
The function declaration must be as defined above. This declared that it is an array function.
While using it on the worksheet, you have to use CTRL+SHIFT+ENTER key combination. Otherwise, it will return the first value of the array only.
VBA Array Function to Return Vertical Array
To make your UDF array function work vertically, you don’t need to do much. Just declare the arrays as a two-dimensional array. Then in first dimension add the values and leave the other dimension blank. This is how you do it:
Function ThreeEven() As Integer()

'define array
Dim numbers(2,0) As Integer

'Assign values to array
numbers(0,0) = 0
numbers(1,0) = 2
numbers(2,0) = 4

'return values
ThreeEven = numbers

End Function
This is how you use it on the worksheet.
 UDF Array Function with Arguments in Excel
 UDF Array Function with Arguments in Excel
In the above examples, we simply printed sum static values on the sheet. Let’s say we want our function to accept a range argument, perform some operations on them and return the resultant array.
Example Add «-done» to every value in the range
Now, I know this can be done easily but just to show you how you can use user-defined VBA array functions to solve problems.
So, here I want an array function that takes a range as an argument and adds «-done» to every value in range. This can be done easily using the concatenation function but we will use an array function here.
Function CONCATDone(rng As Range) As Variant()
Dim resulArr() As Variant

'Create a collection
Dim col As New Collection

'Adding values to collection
On Error Resume Next
For Each v In rng
col.Add v
Next
On Error GoTo 0

'completing operation on each value and adding them to Array
ReDim resulArr(col.Count - 1, 0)
For i = 0 To col.Count - 1
resulArr(i, 0) = col(i + 1) & "-done"
Next

CONCATDone = resulArr

End Function
Explanation:
The above function will accept a range as an argument and it will add «-done» to each value in range.
You can see that we have used a VBA collection here to hold the values of the array and then we have done our operation on each value and added them back on a two-dimensional array.
So yeah guys, this is how you can create a custom VBA array function that can return an array. I hope it was explanatory enough. If you have any queries regarding this article, put it in the comments section below.
Click the link below to download the working file:
Related Articles:
Arrays in Excel Formul|Learn what arrays are in excel.
How to Create User Defined Function through VBA | Learn how to create user-defined functions in Excel
Using a User Defined Function (UDF) from another workbook using VBA in Microsoft Excel | Use the user-defined function in another workbook of Excel
Return error values from user-defined functions using VBA in Microsoft Excel | Learn how you can return error values from a user-defined function
Popular Articles:
50 Excel Shortcuts to Increase Your Productivity
The VLOOKUP Function in Excel
COUNTIF in Excel 2016
How to Use SUMIF Function in Excel
With VBA, you can create a custom Function (also called a User Defined Function) that can be used in the worksheets just like regular functions.
These are helpful when the existing Excel functions are not enough. In such cases, you can create your own custom User Defined Function (UDF) to cater to your specific needs.
In this tutorial, I’ll cover everything about creating and using custom functions in VBA.
If you’re interested in learning VBA the easy way, check out my Online Excel VBA Training.
What is a Function Procedure in VBA?
A Function procedure is a VBA code that performs calculations and returns a value (or an array of values).
Using a Function procedure, you can create a function that you can use in the worksheet (just like any regular Excel function such as SUM or VLOOKUP).
When you have created a Function procedure using VBA, you can use it in three ways:
- As a formula in the worksheet, where it can take arguments as inputs and returns a value or an array of values.
- As a part of your VBA subroutine code or another Function code.
- In Conditional Formatting.
While there are already 450+ inbuilt Excel functions available in the worksheet, you may need a custom function if:
- The inbuilt functions can’t do what you want to get done. In this case, you can create a custom function based on your requirements.
- The inbuilt functions can get the work done but the formula is long and complicated. In this case, you can create a custom function that is easy to read and use.
Note that custom functions created using VBA can be significantly slower than the inbuilt functions. Hence, these are best suited for situations where you can’t get the result using the inbuilt functions.
Function Vs. Subroutine in VBA
A ‘Subroutine’ allows you to execute a set of code while a ‘Function’ returns a value (or an array of values).
To give you an example, if you have a list of numbers (both positive and negative), and you want to identify the negative numbers, here is what you can do with a function and a subroutine.
A subroutine can loop through each cell in the range and can highlight all the cells that have a negative value in it. In this case, the subroutine ends up changing the properties of the range object (by changing the color of the cells).
With a custom function, you can use it in a separate column and it can return a TRUE if the value in a cell is negative and FALSE if it’s positive. With a function, you can not change the object’s properties. This means that you can not change the color of the cell with a function itself (however, you can do it using conditional formatting with the custom function).
When you create a User Defined Function (UDF) using VBA, you can use that function in the worksheet just like any other function. I will cover more on this in the ‘Different Ways of Using a User Defined Function in Excel’ section.
Creating a Simple User Defined Function in VBA
Let me create a simple user-defined function in VBA and show you how it works.
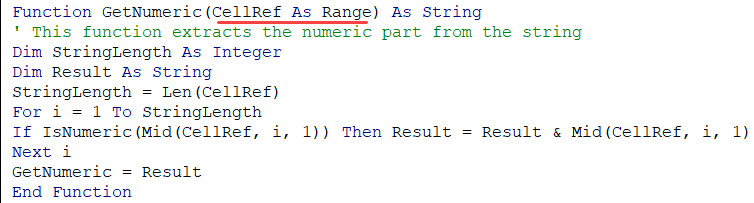
The below code creates a function that will extract the numeric parts from an alphanumeric string.
Function GetNumeric(CellRef As String) as Long
Dim StringLength As Integer
StringLength = Len(CellRef)
For i = 1 To StringLength
If IsNumeric(Mid(CellRef, i, 1)) Then Result = Result & Mid(CellRef, i, 1)
Next i
GetNumeric = Result
End Function
When you have the above code in the module, you can use this function in the workbook.
Below is how this function – GetNumeric – can be used in Excel.
Now before I tell you how this function is created in VBA and how it works, there are a few things you should know:
- When you create a function in VBA, it becomes available in the entire workbook just like any other regular function.
- When you type the function name followed by the equal to sign, Excel will show you the name of the function in the list of matching functions. In the above example, when I entered =Get, Excel showed me a list that had my custom function.
I believe this is a good example when you can use VBA to create a simple-to-use function in Excel. You can do the same thing with a formula as well (as shown in this tutorial), but that becomes complicated and hard to understand. With this UDF, you only need to pass one argument and you get the result.
Anatomy of a User Defined Function in VBA
In the above section, I gave you the code and showed you how the UDF function works in a worksheet.
Now let’s deep dive and see how this function is created. You need to place the below code in a module in the VB Editor. I cover this topic in the section – ‘Where to put the VBA Code for a User-Defined Function’.
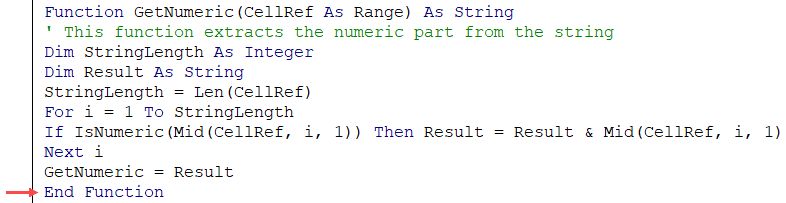
Function GetNumeric(CellRef As String) as Long
' This function extracts the numeric part from the string
Dim StringLength As Integer
StringLength = Len(CellRef)
For i = 1 To StringLength
If IsNumeric(Mid(CellRef, i, 1)) Then Result = Result & Mid(CellRef, i, 1)
Next i
GetNumeric = Result
End Function
The first line of the code starts with the word – Function.
This word tells VBA that our code is a function (and not a subroutine). The word Function is followed by the name of the function – GetNumeric. This is the name that we will be using in the worksheet to use this function.
- The name of the function cannot have spaces in it. Also, you can’t name a function if it clashes with the name of a cell reference. For example, you can not name the function ABC123 as it also refers to a cell in Excel worksheet.
- You shouldn’t give your function the same name as that of an existing function. If you do this, Excel would give preference to the in-built function.
- You can use an underscore if you want to separate words. For example, Get_Numeric is an acceptable name.
The function name is followed by some arguments in parenthesis. These are the arguments that our function would need from the user. These are just like the arguments that we need to supply to Excel’s inbuilt functions. For example in a COUNTIF function, there are two arguments (range and criteria)

Within the parenthesis, you need to specify the arguments.
In our example, there is only one argument – CellRef.
It’s also a good practice to specify what kind of argument the function expects. In this example, since we will be feeding the function a cell reference, we can specify the argument as a ‘Range’ type. If you don’t specify a data type, VBA would consider it to be a variant (which means you can use any data type).
If you have more than one arguments, you can specify those in the same parenthesis – separated by a comma. We will see later in this tutorial on how to use multiple arguments in a user-defined function.
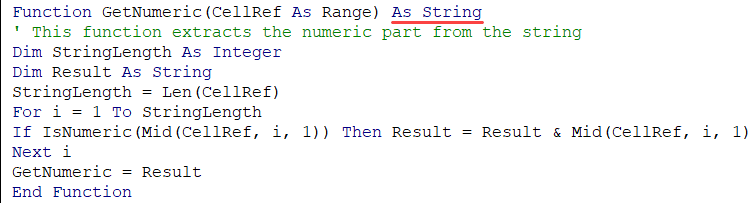
Note that the function is specified as the ‘String’ data type. This would tell VBA that the result of the formula would be of the String data type.
While I can use a numeric data type here (such as Long or Double), doing that would limit the range of numbers it can return. If I have a 20 number long string that I need to extract from the overall string, declaring the function as a Long or Double would give an error (as the number would be out of its range). Hence I have kept the function output data type as String.
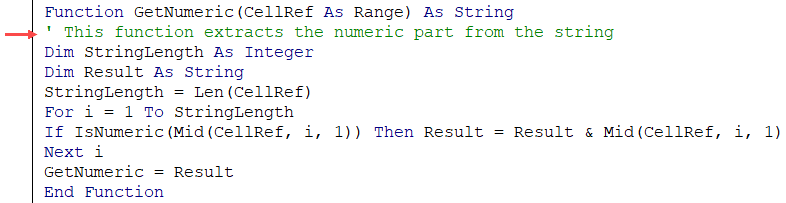
The second line of the code – the one in green that starts with an apostrophe – is a comment. When reading the code, VBA ignores this line. You can use this to add a description or a detail about the code.
The third line of the code declares a variable ‘StringLength’ as an Integer data type. This is the variable where we store the value of the length of the string that is being analyzed by the formula.
The fourth line declares the variable Result as a String data type. This is the variable where we will extract the numbers from the alphanumeric string.

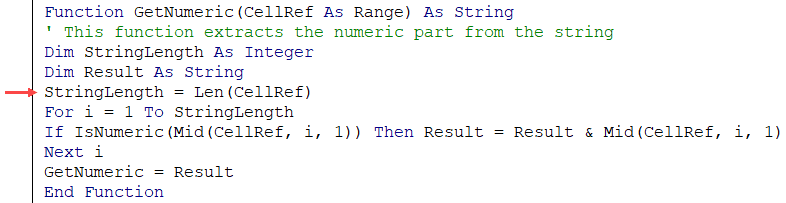
The fifth line assigns the length of the string in the input argument to the ‘StringLength’ variable. Note that ‘CellRef’ refers to the argument that will be given by the user while using the formula in the worksheet (or using it in VBA – which we will see later in this tutorial).
Sixth, seventh, and eighth lines are the part of the For Next loop. The loop runs for as many times as many characters are there in the input argument. This number is given by the LEN function and is assigned to the ‘StringLength’ variable.
So the loop runs from ‘1 to Stringlength’.
Within the loop, the IF statement analyzes each character of the string and if it’s numeric, it adds that numeric character to the Result variable. It uses the MID function in VBA to do this.
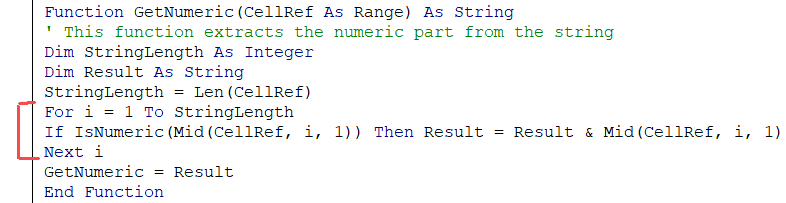
The second last line of the code assigns the value of the result to the function. It’s this line of code that ensures that the function returns the ‘Result’ value back in the cell (from where it’s called).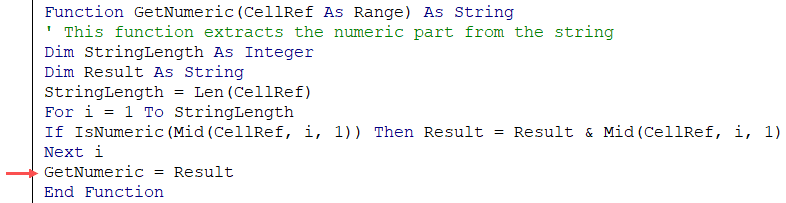
The last line of the code is End Function. This is a mandatory line of code that tells VBA that the function code ends here.
The above code explains the different parts of a typical custom function created in VBA. In the following sections, we will deep dive into these elements and also see the different ways to execute the VBA function in Excel.
Arguments in a User Defined Function in VBA
In the above examples, where we created a user-defined function to get the numeric part from an alphanumeric string (GetNumeric), the function was designed to take one single argument.
In this section, I will cover how to create functions that take no argument to the ones that take multiple arguments (required as well as optional arguments).
Creating a Function in VBA without Any Arguments
In Excel worksheet, we have several functions that take no arguments (such as RAND, TODAY, NOW).
These functions are not dependent on any input arguments. For example, the TODAY function would return the current date and the RAND function would return a random number between 0 and 1.
You can create such similar function in VBA as well.
Below is the code that will give you the name of the file. It doesn’t take any arguments as the result it needs to return is not dependent on any argument.
Function WorkbookName() As String
WorkbookName = ThisWorkbook.Name
End Function
The above code specifies the function’s result as a String data type (as the result we want is the file name – which is a string).
This function assigns the value of ‘ThisWorkbook.Name’ to the function, which is returned when the function is used in the worksheet.
If the file has been saved, it returns the name with the file extension, else it simply gives the name.
The above has one issue though.
If the file name changes, it wouldn’t automatically update. Normally a function refreshes whenever there is a change in the input arguments. But since there are no arguments in this function, the function doesn’t recalculate (even if you change the name of the workbook, close it and then reopen again).
If you want, you can force a recalculation by using the keyboard shortcut – Control + Alt + F9.
To make the formula recalculate whenever there is a change in the worksheet, you need to a line of code to it.
The below code makes the function recalculate whenever there is a change in the worksheet (just like other similar worksheet functions such as TODAY or RAND function).
Function WorkbookName() As String
Application.Volatile True
WorkbookName = ThisWorkbook.Name
End Function
Now, if you change the workbook name, this function would update whenever there is any change in the worksheet or when you reopen this workbook.
Creating a Function in VBA with One Argument
In one of the sections above, we have already seen how to create a function that takes only one argument (the GetNumeric function covered above).
Let’s create another simple function that takes only one argument.
Function created with the below code would convert the referenced text into uppercase. Now we already have a function for it in Excel, and this function is just to show you how it works. If you have to do this, it’s better to use the inbuilt UPPER function.
Function ConvertToUpperCase(CellRef As Range)
ConvertToUpperCase = UCase(CellRef)
End Function
This function uses the UCase function in VBA to change the value of the CellRef variable. It then assigns the value to the function ConvertToUpperCase.
Since this function takes an argument, we don’t need to use the Application.Volatile part here. As soon as the argument changes, the function would automatically update.
Creating a Function in VBA with Multiple Arguments
Just like worksheet functions, you can create functions in VBA that takes multiple arguments.
The below code would create a function that will extract the text before the specified delimiter. It takes two arguments – the cell reference that has the text string, and the delimiter.
Function GetDataBeforeDelimiter(CellRef As Range, Delim As String) as String
Dim Result As String
Dim DelimPosition As Integer
DelimPosition = InStr(1, CellRef, Delim, vbBinaryCompare) - 1
Result = Left(CellRef, DelimPosition)
GetDataBeforeDelimiter = Result
End Function
When you need to use more than one argument in a user-defined function, you can have all the arguments in the parenthesis, separated by a comma.
Note that for each argument, you can specify a data type. In the above example, ‘CellRef’ has been declared as a range datatype and ‘Delim’ has been declared as a String data type. If you don’t specify any data type, VBA considers these are a variant data type.
When you use the above function in the worksheet, you need to give the cell reference that has the text as the first argument and the delimiter character(s) in double quotes as the second argument.
It then checks for the position of the delimiter using the INSTR function in VBA. This position is then used to extract all the characters before the delimiter (using the LEFT function).
Finally, it assigns the result to the function.
This formula is far from perfect. For example, if you enter a delimiter that is not found in the text, it would give an error. Now you can use the IFERROR function in the worksheet to get rid of the errors, or you can use the below code that returns the entire text when it can’t find the delimiter.
Function GetDataBeforeDelimiter(CellRef As Range, Delim As String) as String
Dim Result As String
Dim DelimPosition As Integer
DelimPosition = InStr(1, CellRef, Delim, vbBinaryCompare) - 1
If DelimPosition < 0 Then DelimPosition = Len(CellRef)
Result = Left(CellRef, DelimPosition)
GetDataBeforeDelimiter = Result
End Function
We can further optimize this function.
If you enter the text (from which you want to extract the part before the delimiter) directly in the function, it would give you an error. Go ahead.. try it!
This happens as we have specified the ‘CellRef’ as a range data type.
Or, if you want the delimiter to be in a cell and use the cell reference instead of hard coding it in the formula, you can’t do that with the above code. It’s because the Delim has been declared as a string datatype.
If you want the function to have the flexibility to accept direct text input or cell references from the user, you need to remove the data type declaration. This would end up making the argument as a variant data type, which can take any type of argument and process it.
The below code would do this:
Function GetDataBeforeDelimiter(CellRef, Delim) As String
Dim Result As String
Dim DelimPosition As Integer
DelimPosition = InStr(1, CellRef, Delim, vbBinaryCompare) - 1
If DelimPosition < 0 Then DelimPosition = Len(CellRef)
Result = Left(CellRef, DelimPosition)
GetDataBeforeDelimiter = Result
End Function
Creating a Function in VBA with Optional Arguments
There are many functions in Excel where some of the arguments are optional.
For example, the legendary VLOOKUP function has 3 mandatory arguments and one optional argument.
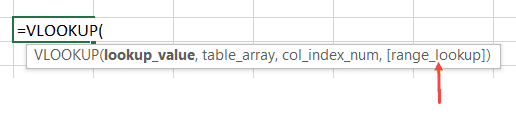
An optional argument, as the name suggests, is optional to specify. If you don’t specify one of the mandatory arguments, your function is going to give you an error, but if you don’t specify the optional argument, your function would work.
But optional arguments are not useless. They allow you to choose from a range of options.
For example, in the VLOOKUP function, if you don’t specify the fourth argument, VLOOKUP does an approximate lookup and if you specify the last argument as FALSE (or 0), then it does an exact match.
Remember that the optional arguments must always come after all the required arguments. You can’t have optional arguments at the beginning.
Now let’s see how to create a function in VBA with optional arguments.
Function with Only an Optional Argument
As far as I know, there is no inbuilt function that takes optional arguments only (I can be wrong here, but I can’t think of any such function).
But we can create one with VBA.
Below is the code of the function that will give you the current date in the dd-mm-yyyy format if you don’t enter any argument (i.e. leave it blank), and in “dd mmmm, yyyy” format if you enter anything as the argument (i.e., anything so that the argument is not blank).
Function CurrDate(Optional fmt As Variant)
Dim Result
If IsMissing(fmt) Then
CurrDate = Format(Date, "dd-mm-yyyy")
Else
CurrDate = Format(Date, "dd mmmm, yyyy")
End If
End Function
Note that the above function uses ‘IsMissing’ to check whether the argument is missing or not. To use the IsMissing function, your optional argument must be of the variant data type.
The above function works no matter what you enter as the argument. In the code, we only check if the optional argument is supplied or not.
You can make this more robust by taking only specific values as arguments and showing an error in rest of the cases (as shown in the below code).
Function CurrDate(Optional fmt As Variant)
Dim Result
If IsMissing(fmt) Then
CurrDate = Format(Date, "dd-mm-yyyy")
ElseIf fmt = 1 Then
CurrDate = Format(Date, "dd mmmm, yyyy")
Else
CurrDate = CVErr(xlErrValue)
End If
End Function
The above code creates a function that shows the date in the “dd-mm-yyyy” format if no argument is supplied, and in “dd mmmm,yyyy” format when the argument is 1. It gives an error in all other cases.
Function with Required as well as Optional Arguments
We have already seen a code that extracts the numeric part from a string.
Now let’s have a look at a similar example that takes both required as well as optional arguments.
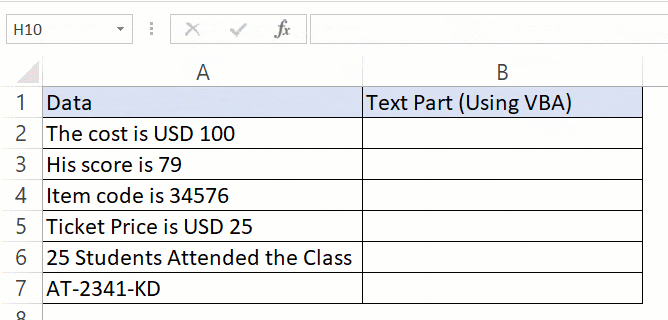
The below code creates a function that extracts the text part from a string. If the optional argument is TRUE, it gives the result in uppercase, and if the optional argument is FALSE or is omitted, it gives the result as is.
Function GetText(CellRef As Range, Optional TextCase = False) As String
Dim StringLength As Integer
Dim Result As String
StringLength = Len(CellRef)
For i = 1 To StringLength
If Not (IsNumeric(Mid(CellRef, i, 1))) Then Result = Result & Mid(CellRef, i, 1)
Next i
If TextCase = True Then Result = UCase(Result)
GetText = Result
End Function
Note that in the above code, we have initialized the value of ‘TextCase’ as False (look within the parenthesis in the first line).
By doing this, we have ensured that the optional argument starts with the default value, which is FALSE. If the user specifies the value as TRUE, the function returns the text in upper case, and if the user specifies the optional argument as FALSE or omits it, then the text returned is as is.
Creating a Function in VBA with an Array as the Argument
So far we have seen examples of creating a function with Optional/Required arguments – where these arguments were a single value.
You can also create a function that can take an array as the argument. In Excel worksheet functions, there are many functions that take array arguments, such as SUM, VLOOKUP, SUMIF, COUNTIF, etc.
Below is the code that creates a function that gives the sum of all the even numbers in the specified range of the cells.
Function AddEven(CellRef as Range)
 Dim Cell As Range
 For Each Cell In CellRef
 If IsNumeric(Cell.Value) Then
 If Cell.Value Mod 2 = 0 Then
 Result = Result + Cell.Value
 End If
 End If
 Next Cell
 AddEven = Result
 End Function
You can use this function in the worksheet and provide the range of cells that have the numbers as the argument. The function would return a single value – the sum of all the even numbers (as shown below).
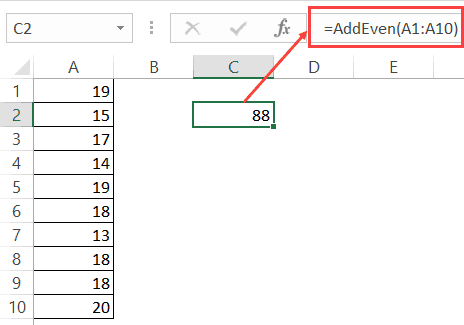
In the above function, instead of a single value, we have supplied an array (A1:A10). For this to work, you need to make sure your data type of the argument can accept an array.
In the code above, I specified the argument CellRef as Range (which can take an array as the input). You can also use the variant data type here.
In the code, there is a For Each loop that goes through each cell and checks if it’s a number of not. If it isn’t, nothing happens and it moves to the next cell. If it’s a number, it checks if it’s even or not (by using the MOD function).
In the end, all the even numbers are added and teh sum is assigned back to the function.
Creating a Function with Indefinite Number of Arguments
While creating some functions in VBA, you may not know the exact number of arguments that a user wants to supply. So the need is to create a function that can accept as many arguments are supplied and use these to return the result.
An example of such worksheet function is the SUM function. You can supply multiple arguments to it (such as this):
=SUM(A1,A2:A4,B1:B20)
The above function would add the values in all these arguments. Also, note that these can be a single cell or an array of cells.
You can create such a function in VBA by having the last argument (or it could be the only argument) as optional. Also, this optional argument should be preceded by the keyword ‘ParamArray’.
‘ParamArray’ is a modifier that allows you to accept as many arguments as you want. Note that using the word ParamArray before an argument makes the argument optional. However, you don’t need to use the word Optional here.
Now let’s create a function that can accept an arbitrary number of arguments and would add all the numbers in the specified arguments:
Function AddArguments(ParamArray arglist() As Variant)
For Each arg In arglist
AddArguments = AddArguments + arg
Next arg
End Function
The above function can take any number of arguments and add these arguments to give the result.
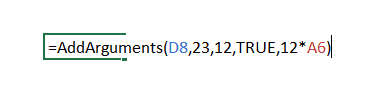
Note that you can only use a single value, a cell reference, a boolean, or an expression as the argument. You can not supply an array as the argument. For example, if one of your arguments is D8:D10, this formula would give you an error.
If you want to be able to use both multi-cell arguments you need to use the below code:
Function AddArguments(ParamArray arglist() As Variant)
For Each arg In arglist
For Each Cell In arg
AddArguments = AddArguments + Cell
Next Cell
Next arg
End Function
Note that this formula works with multiple cells and array references, however, it can not process hardcoded values or expressions. You can create a more robust function by checking and treating these conditions, but that’s not the intent here.
The intent here is to show you how ParamArray works so you can allow an indefinite number of arguments in the function. In case you want a better function than the one created by the above code, use the SUM function in the worksheet.
Creating a Function that Returns an Array
So far we have seen functions that return a single value.
With VBA, you can create a function that returns a variant that can contain an entire array of values.
Array formulas are also available as inbuilt functions in Excel worksheets. If you’re familiar with array formulas in Excel, you would know that these are entered using Control + Shift + Enter (instead of just the Enter). You can read more about array formulas here. If you don’t know about array formulas, don’t worry, keep reading.
Let’s create a formula that returns an array of three numbers (1,2,3).
The below code would do this.
Function ThreeNumbers() As Variant
Dim NumberValue(1 To 3)
NumberValue(1) = 1
NumberValue(2) = 2
NumberValue(3) = 3
ThreeNumbers = NumberValue
End Function
In the above code, we have specified the ‘ThreeNumbers’ function as a variant. This allows it to hold an array of values.
The variable ‘NumberValue’ is declared as an array with 3 elements. It holds the three values and assigns it to the ‘ThreeNumbers’ function.
You can use this function in the worksheet by entering the function and hitting the Control + Shift + Enter key (hold the Control and the Shift keys and then press Enter).
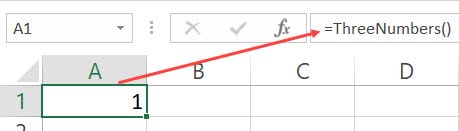
When you do this, it will return 1 in the cell, but in reality, it holds all the three values. To check this, use the below formula:
=MAX(ThreeNumbers())
Use the above function with Control + Shift + Enter. You will notice that the result is now 3, as it is the largest values in the array returned by the Max function, which gets the three numbers as the result of our user-defined function – ThreeNumbers.
You can use the same technique to create a function that returns an array of Month Names as shown by the below code:
Function Months() As Variant
Dim MonthName(1 To 12)
MonthName(1) = "January"
MonthName(2) = "February"
MonthName(3) = "March"
MonthName(4) = "April"
MonthName(5) = "May"
MonthName(6) = "June"
MonthName(7) = "July"
MonthName(8) = "August"
MonthName(9) = "September"
MonthName(10) = "October"
MonthName(11) = "November"
MonthName(12) = "December"
Months = MonthName
End Function
Now when you enter the function =Months() in Excel worksheet and use Control + Shift + Enter, it will return the entire array of month names. Note that you see only January in the cell as that is the first value in the array. This does not mean that the array is only returning one value.
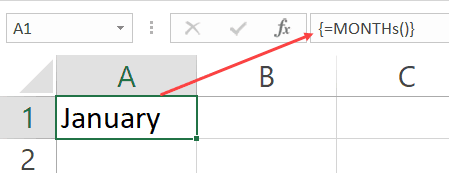
To show you the fact that it is returning all the values, do this – select the cell with the formula, go to the formula bar, select the entire formula and press F9. This will show you all the values that the function returns.

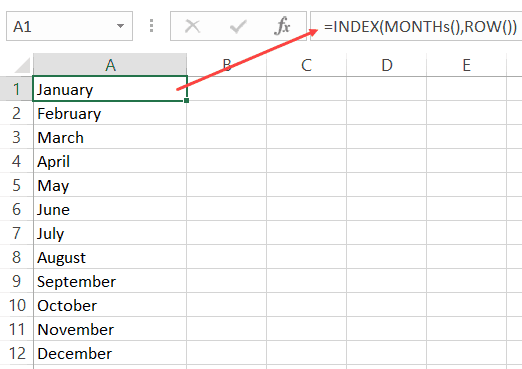
You can use this by using the below INDEX formula to get a list of all the month names in one go.
=INDEX(Months(),ROW())
Now if you have a lot of values, it’s not a good practice to assign these values one by one (as we have done above). Instead, you can use the Array function in VBA.
So the same code where we create the ‘Months’ function would become shorter as shown below:
Function Months() As Variant
Months = Array("January", "February", "March", "April", "May", "June", _
"July", "August", "September", "October", "November", "December")
End Function
The above function uses the Array function to assign the values directly to the function.
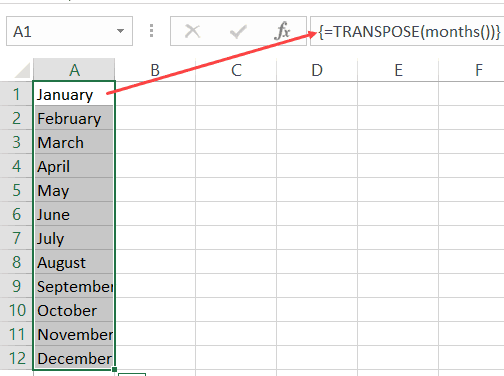
Note that all the functions created above return a horizontal array of values. This means that if you select 12 horizontal cells (let’s say A1:L1), and enter the =Months() formula in cell A1, it will give you all the month names.

But what if you want these values in a vertical range of cells.
You can do this by using the TRANSPOSE formula in the worksheet.
Simply select 12 vertical cells (contiguous), and enter the below formula.
Understanding the Scope of a User Defined Function in Excel
A function can have two scopes – Public or Private.
- A Public scope means that the function is available for all the sheets in the workbook as well as all the procedures (Sub and Function) across all modules in the workbook. This is useful when you want to call a function from a subroutine (we will see how this is done in the next section).
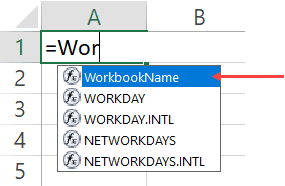
- A Private scope means that the function is available only in the module in which it exists. You can’t use it in other modules. You also won’t see it in the list of functions in the worksheet. For example, if your Function name is ‘Months()’, and you type function in Excel (after the = sign), it will not show you the function name. You can, however, still, use it if you enter the formula name.
If you don’t specify anything, the function is a Public function by default.
Below is a function that is a Private function:
Private Function WorkbookName() As String
WorkbookName = ThisWorkbook.Name
End Function
You can use this function in the subroutines and the procedures in the same modules, but can’t use it in other modules. This function would also not show up in the worksheet.
The below code would make this function Public. It will also show up in the worksheet.
Function WorkbookName() As String
WorkbookName = ThisWorkbook.Name
End Function
Different Ways of Using a User Defined Function in Excel
Once you have created a user-defined function in VBA, you can use it in many different ways.
Let’s first cover how to use the functions in the worksheet.
Using UDFs in Worksheets
We have already seen examples of using a function created in VBA in the worksheet.
All you need to do is enter the functions name, and it shows up in the intellisense.
Note that for the function to show up in the worksheet, it must be a Public function (as explained in the section above).
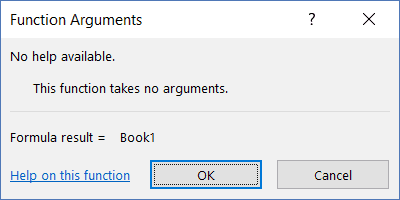
You can also use the Insert Function dialog box to insert the user defined function (using the steps below). This would work only for functions that are Public.
The above steps would insert the function in the worksheet. It also displays a Function Arguments dialog box that will give you details on the arguments and the result.
You can use a user defined function just like any other function in Excel. This also means that you can use it with other inbuilt Excel functions. For example. the below formula would give the name of the workbook in upper case:
=UPPER(WorkbookName())
Using User Defined Functions in VBA Procedures and Functions
When you have created a function, you can use it in other sub-procedures as well.
If the function is Public, it can be used in any procedure in the same or different module. If it’s Private, it can only be used in the same module.
Below is a function that returns the name of the workbook.
Function WorkbookName() As String
WorkbookName = ThisWorkbook.Name
End Function
The below procedure call the function and then display the name in a message box.
Sub ShowWorkbookName()
MsgBox WorkbookName
End Sub
You can also call a function from another function.
In the below codes, the first code returns the name of the workbook, and the second one returns the name in uppercase by calling the first function.
Function WorkbookName() As String
WorkbookName = ThisWorkbook.Name
End Function
Function WorkbookNameinUpper()
WorkbookNameinUpper = UCase(WorkbookName)
End Function
Calling a User Defined Function from Other Workbooks
If you have a function in a workbook, you can call this function in other workbooks as well.
There are multiple ways to do this:
- Creating an Add-in
- Saving function in the Personal Macro Workbook
- Referencing the function from another workbook.
Creating an Add-in
By creating and installing an add-in, you will have the custom function in it available in all the workbooks.
Suppose you have created a custom function – ‘GetNumeric’ and you want it in all the workbooks. To do this, create a new workbook and have the function code in a module in this new workbook.
Now follow the steps below to save it as an add-in and then install it in Excel.
Now the add-in has been activated.
Now you can use the custom function in all the workbooks.
Saving the Function in Personal Macro Workbook
A Personal Macro Workbook is a hidden workbook in your system that opens whenever you open the Excel application.
It’s a place where you can store macro codes and then access these macros from any workbook. It’s a great place to store those macros that you want to use often.
By default, there is no personal macro workbook in your Excel. You need to create it by recording a macro and saving it in the Personal macro workbook.
You can find the detailed steps on how to create and save macros in the personal macro workbook here.
Referencing the function from another workbook
While the first two methods (creating an add-in and using personal macro workbook) would work in all situations, if you want to reference the function from another workbook, that workbook needs to be open.
Suppose you have a workbook with the name ‘Workbook with Formula’, and it has the function with the name ‘GetNumeric’.
To use this function in another workbook (while the Workbook with Formula is open), you can use the below formula:
=’Workbook with Formula’!GetNumeric(A1)
The above formula will use the user defined function in the Workbook with Formula file and give you the result.
Note that since the workbook name has spaces, you need to enclose it in single quotes.
Using Exit Function Statement VBA
If you want to exit a function while the code is running, you can do that by using the ‘Exit Function’ statement.
The below code would extract the first three numeric characters from an alphanumeric text string. As soon as it gets the three characters, the function ends and returns the result.
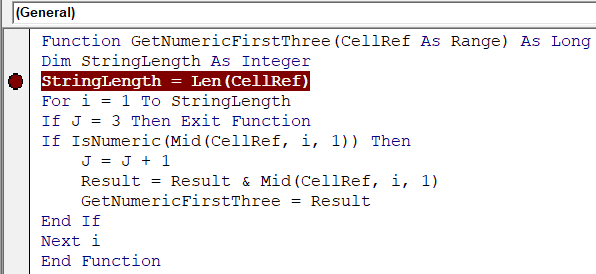
Function GetNumericFirstThree(CellRef As Range) As Long
Dim StringLength As Integer
StringLength = Len(CellRef)
For i = 1 To StringLength
If J = 3 Then Exit Function
If IsNumeric(Mid(CellRef, i, 1)) Then
J = J + 1
Result = Result & Mid(CellRef, i, 1)
GetNumericFirstThree = Result
End If
Next i
End Function
The above function checks for the number of characters that are numeric, and when it gets 3 numeric characters, it Exits the function in the next loop.
Debugging a User Defined Function
There are a few techniques you can use while debugging a user-defined function in VBA:
Debugging a Custom Function by Using the Message Box
Use MsgBox function to show a message box with a specific value.
The value you display can be based on what you want to test. For example, if you want to check if the code is getting executed or not, any message would work, and if you want to check whether the loops are working or not, you can display a specific value or the loop counter.
Debugging a Custom Function by Setting the Breakpoint
Set a breakpoint to be able to go step through each line one at a time. To set a breakpoint, select the line where you want it and press F9, or click on the gray vertical area which is left to the code lines. Any of these methods would insert a breakpoint (you will see a red dot in the gray area).
Once you have set the breakpoint and you execute the function, it goes till the breakpoint line and then stops. Now you can step through the code using the F8 key. Pressing F8 once moves to the next line in the code.
Debugging a Custom Function by Using Debug.Print in the Code
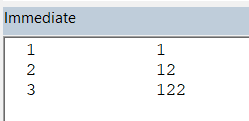
You can use Debug.Print statement in your code to get the values of the specified variables/arguments in the immediate window.
For example, in the below code, I have used Debug.Print to get the value of two variables – ‘j’ and ‘Result’
Function GetNumericFirstThree(CellRef As Range) As Long
Dim StringLength As Integer
StringLength = Len(CellRef)
For i = 1 To StringLength
If J = 3 Then Exit Function
If IsNumeric(Mid(CellRef, i, 1)) Then
 J = J + 1
 Result = Result & Mid(CellRef, i, 1)
 Debug.Print J, Result
 GetNumericFirstThree = Result
End If
Next i
End Function
When this code is executed, it shows the following in the immediate window.
Excel Inbuilt Functions Vs. VBA User Defined Function
There are few strong benefits of using Excel in-built functions over custom functions created in VBA.
- Inbuilt functions are a lot faster than the VBA functions.
- When you create a report/dashboard using VBA functions, and you send it to a client/colleague, they wouldn’t have to worry about whether the macros are enabled or not. In some cases, clients/customers get scared by seeing a warning in the yellow bar (which simply asks them to enable macros).
- With inbuilt Excel functions, you don’t need to worry about file extensions. If you have macros or user-defined functions in the workbook, you need to save it in .xlsm.
While there are many strong reasons to use Excel in-built functions, in a few cases, you’re better off using a user-defined function.
- It’s better to use a user-defined function if your inbuilt formula is huge and complicated. This becomes even more relevant when you need someone else to update the formulas. For example, if you have a huge formula made up of many different functions, even changing a reference to a cell can be tedious and error-prone. Instead, you can create a custom function that only takes one or two arguments and does all the heavy lifting the backend.
- When you have to get something done that can not be done by Excel inbuilt functions. An example of this can be when you want to extract all the numeric characters from a string. In such cases, the benefit of using a user-defined function gar outweighs its negatives.
Where to put the VBA Code for a User-Defined Function
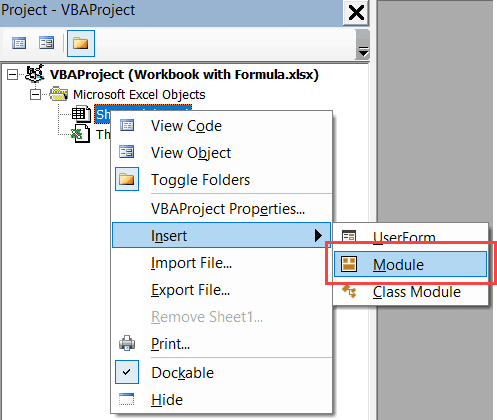
When creating a custom function, you need to put the code in the code window for the workbook in which you want the function.
Below are the steps to put the code for the ‘GetNumeric’ function in the workbook.
- Go to the Developer tab.

- Click on the Visual Basic option. This will open the VB editor in the backend.
- In the Project Explorer pane in the VB Editor, right-click on any object for the workbook in which you want to insert the code. If you don’t see the Project Explorer go to the View tab and click on Project Explorer.
- Go to Insert and click on Module. This will insert a module object for your workbook.

- Copy and paste the code in the module window.


You May Also Like the Following Excel VBA Tutorials:
- Working with Cells and Ranges in Excel VBA.
- Working with Worksheets in Excel VBA.
- Working with Workbooks using VBA.
- How to use Loops in Excel VBA.
- Excel VBA Events – An Easy (and Complete) Guide
- Using IF Then Else Statements in VBA.
- How to Record a Macro in Excel.
- How to Run a Macro in Excel.
- How to Sort Data in Excel using VBA (A Step-by-Step Guide).
- Excel VBA InStr Function – Explained with Examples.

Returning Arrays From VBA User Defined Functions
This page describes returning arrays as the result of VBA User Defined Functions.

If you often write your own User Defined Functions (UDFs) in VBA or in a COM or Automation Add-Ins (click
here for information about writing your own functions in VBA; click
here for information about writing COM Add-Ins, or click
here for information about writing Automation Add-Ins), you have likely needed to or
at least found it useful to return an array as the result of your VBA function. This allows the user to array enter
your function (click here for information about array formulas) into a range of cells
on the worksheet to display the contents of the array that is returned by your UDF.
This page looks at a few issue that might arise when you are returning arrays from UDFs.

At its simplest, the size of the returned array can be mandated by the function and require that the user use an array that size
in order to get all the results. The Excel function LINEST function works this way. You must
array-enter that function into a range of cells that is 5 rows tall and 2 columns wide. If you enter it into a larger range,
Excel fills out the unused elements of the range with #N/A errors. If you enter it into a smaller
range, you will not get all the values created by LINEST.
To mandate the size of the returned array, simply declare the array to that size and setting the result of the function to that
array. For example,
    Function Test() As Variant
        Dim V() As Variant
        Dim N As Long
        Dim R As Long
        Dim C As Long
        ReDim V(1 To 3, 1 To 4)
        For R = 1 To 3
            For C = 1 To 4
                N = N + 1
                V(R, C) = N
            Next C
        Next R
        Test = V
    End Function
This function simply returns an array with 3 rows and 4 columns that contains the integers from 1 to 12.
Returning such a fixed-size array can be useful if the number of results does not vary with the number and/or values of the
inputs to the function. However, this is usually not the case.
In the majority of circumstances, if your UDF is going to return an array, that array will vary in size and the size will depend
on any one or more of three things: the size of the range into which the UDF was entered, the number of elements passed into
the function, and, of course, the nature and function of the UDF itself. The Application.Caller object,
when used in a UDF called from a worksheet range, is a Range reference to the range from which your UDF was called.
CAUTION: Application.Caller will be a Range object only when the function in which it appears
was called from a worksheet cell. If the function was called from another VB procedure, Application.Caller
will be an Error-type Variant and most any attempt to use it will result in a Type Mismatch (13) error. If the code containing
Application.Caller was called via the OnAction property of a Shape object on
a worksheet, Application.Caller will be a String containing the name of the sheet. Therefore, if your
function might be called from another VB procedure rather than only from a worksheet cell, you should test
Application.Caller with the IsObject function to ensure that it is indeed
an object before attempting to access any of its properties.
CAUTION: In Excel 2003, a new object, Application.ThisCell, was introduced. It is similar in nature to
Application.Caller, but differs when a UDF is array entered into a range of more than one cell.
Application.Caller will return the a Range reference to the entire range in which the UDF was array-entered.
Application.ThisCell returns a reference to the first (upper left) cell in the range from which the UDF
was called. Frankly, I’m not sure why Application.ThisCell was introduced in the first place.
In the example code on this page, we will not test Application.Caller with IsObject.
For simplicity and brevity, we will assume that the function is being called from a worksheet.
Using Application.Caller, you can determine the number of rows and columns from which the function
was called. For example,
    Function Test()
        Dim CallerRows As Long
        Dim CallerCols As Long
        With Application.Caller
            CallerRows = .Rows.Count
            CallerCols = .Columns.Count
        End With
        Test = CallerRows * CallerCols
    End Function
In this code, the variables CallerRows and CallerCols get the number of rows
and columns in the range from which the function was called. If you want to return an array the same size as the range from
which the function was called, you can use code like the following:
Function Test() As Variant
    Dim CallerRows As Long
    Dim CallerCols As Long
    Dim CallerAddr As String
    Dim Result() As Long
    Dim N As Long
    Dim RowNdx As Long
    Dim ColNdx As Long

    With Application.Caller
        CallerRows = .Rows.Count
        CallerCols = .Columns.Count
    End With
    ReDim Result(1 To CallerRows, 1 To CallerCols)
    For RowNdx = 1 To CallerRows
        For ColNdx = 1 To CallerCols
            N = N + 1
            Result(RowNdx, ColNdx) = N
        Next ColNdx
     Next RowNdx
     Test = Result
End Function
This function returns an array with the same dimensions as the range from which the function was called, and simply fills those
elements with the first Rows*Columns integers.
You can, of course, ignore the size of the range from which the function was called and return an array with the dimensions
required by your function’s purpose. In this case, if the function is entered into a range smaller than the result array of
the function, the result array is trunctated on the bottom and on the right to the size of the calling range. If the function
was entered into a range larger than the size of the returned array, Excel fills the unused cells with #N/A
values. This is the normal behavior of Excel’s own array functions. For example, if you array enter
=ROW(A1:A3) into cells B1:B5, the result will be
1 2 3 #N/A #N/A. The ROW(A1:A3) returns an array with only three elements,
so Excel fills in the rest of the calling range with #N/A values.
If your UDF creates a 1-dimensional array as its result, it can orient the array as either a row vector or a column vector so that
is will be properly displayed in the worksheet cells without requiring the user to wrap your UDF result in a TRANSPOSE
function. If the function was called from a row vector of cells (e.g., A1:E1), it does not need to
be transposed. If the function was called from a column vector of cells (e.g., A1:A5), the array needs
to be transposed. The code below looks at Application.Caller.Rows.Count and if this is greater than
1, it tranposes the array before returning it to the caller. Note that this should be done only with single-dimensional
arrays and only when the UDF is being called from a worksheet range. Therefore, you should first test
Application.Caller with IsObject and then test
Application.Caller.Rows.Count and Application.Caller.Columns.Count to test
if it is being called from a row or column vector. For example,
    Function Test(NN As Long)
        Dim Result() As Long
        Dim N As Long
        ReDim Result(1 To NN)
        For N = 1 To NN
            Result(N) = N
        Next N
        If Application.Caller.Rows.Count > 1 Then
            Test = Application.Transpose(Result)
        Else
            Test = Result
        End If
    End Function
You can, of course, forego this and return the array as-is and leave it up to the user to use the TRANSPOSE
function to properly orient the array.
This page last updated: 6-Nov-2007
Today I’m going to show you how to return an array from a VBA function. VBA functions can return arrays of any data type. But sometimes we need to return arrays with elements of different data types. Luckily we can do it using the variant data type. I will show how to return an array of type variant in an example. Let’s start with a simple example. Assume we want to create a VBA function which returns 3 random numbers between 1 and 100. The VBA function can return these 3 numbers as an array. We can use the inbuilt function called Rnd to generate a random number. Then we can do some additional calculations and use the VBA Int function to get a number between 1 and 100. Here is how you can do it.
Function ThreeRandomNumbers() As Integer()
Dim ResultArr(2) As Integer
ResultArr(0) = Int(Rnd * 100) + 1
ResultArr(1) = Int(Rnd * 100) + 1
ResultArr(2) = Int(Rnd * 100) + 1
ThreeRandomNumbers = ResultArr
End Function
Rnd function return values similar to this.
0.8626193
0.7904852
0.3735362
So I multiplied those numbers by 100.
86.26193
79.04852
37.35362
And the VBA Int function returns the integer part of the number. So finally we get random numbers like below.
86
79
37
Rnd function returns values equal or greater than 0 and less than 1. Then Int(Rnd * 100) will output numbers from 0 to 99. Therefore we have to add 1 to get a random number between 1 and 100.
Int(Rnd * 100) + 1 => Generates integer values between 1 and 100
Now we have a VBA function which can return an array. Let’s see how we can call this function within a subroutine. Data type of the array returned by our function is integer. So we need an array of the type integer inside our subroutine. Then we can assign the function’s return value to that array.
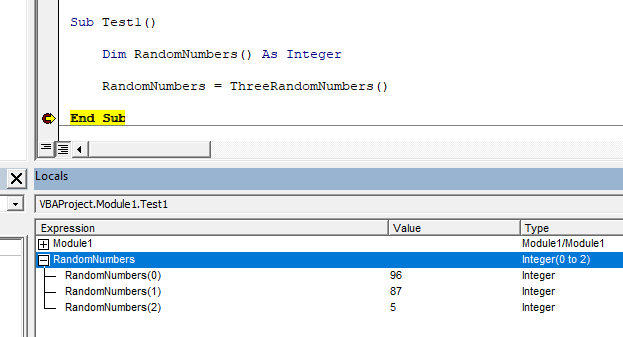
Sub Test1()
Dim RandomNumbers() As Integer
RandomNumbers = ThreeRandomNumbers()
End Sub
Add a breakpoint at End Sub and run the subroutine. Then you will see the result in the Locals window like this.
Also you can print these values to an Excel sheet as well. If the name of the worksheet is “Sheet1” then you can write the array to the worksheet as follows.
Sub Test2()
Dim WS As Worksheet
Dim RandomNumbers() As Integer
Dim i As Integer
Set WS = Worksheets(«Sheet1»)
RandomNumbers = ThreeRandomNumbers()
For i = 0 To 2
WS.Range(«A1»).Offset(i, 0).Value = RandomNumbers(i)
Next i
End Sub
Here is the result of the Test2 subroutine.

Next let’s look at another example where we need to pass arguments to the VBA function. Assume we need to find 5 powers/exponents of a given number. For an example if the given number is 3 then the VBA function should return 1,3,9,27 and 81 (30,31,32,33,34)
Here we have to pass the given number as an argument to the function. Then the function can return 5 exponents of the number as an array.
Function FiveExponents(GivenNumber As Integer) As Integer()
Dim ResultArr(4) As Integer
ResultArr(0) = GivenNumber ^ 0
ResultArr(1) = GivenNumber ^ 1
ResultArr(2) = GivenNumber ^ 2
ResultArr(3) = GivenNumber ^ 3
ResultArr(4) = GivenNumber ^ 4
FiveExponents = ResultArr
End Function
.
Now we can call this function within a subroutine like this.
Sub Test3()
Dim WS As Worksheet
Dim Exponents() As Integer
Dim i As Integer
Set WS = Worksheets(«Sheet1»)
Exponents = FiveExponents(5)
For i = 0 To 4
WS.Range(«A1»).Offset(i, 0).Value = Exponents(i)
Next i
End Sub
Below is the outcome of the above subroutine.

Above functions output arrays of integer data type. So the returned array consists of only integers. But sometimes we need VBA functions which should return arrays with elements of various data types. They may contain values of data types such as integer, string, boolean etc. Here is an example.
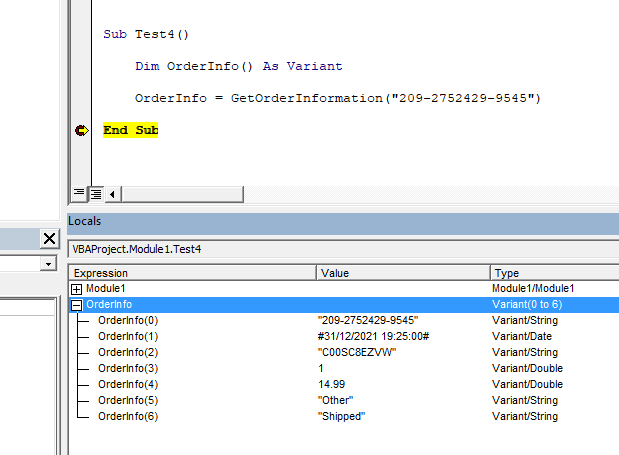
This worksheet contains order information of a shop. Assume we need a VBA function which takes an order id as an argument and then returns all the other information of that order as an array. It is a type of function we need when searching data. So here various columns have various data types. Therefore we need to declare the data type of the return value of the function as the variant.
This is the function developed for the above requirement.
Function GetOrderInformation(OrderId As String) As Variant
Dim WS As Worksheet
Dim WS_LastRow As Long
Dim i As Long
Dim j As Integer
Dim ResultArr(6) As Variant
Set WS = Worksheets(«Order Details»)
WS_LastRow = WS.Cells.Find(«*», [A1], , , xlByRows, xlPrevious).Row
For i = 2 To WS_LastRow
If StrComp(WS.Range(«A» & i).Value, OrderId, vbTextCompare) = 0 Then
For j = 0 To 6
ResultArr(j) = WS.Range(«A» & i).Offset(0, j).Value
Next j
Exit For
End If
Next i
GetOrderInformation = ResultArr
End Function
First we find the last row of the worksheet. Then use For Next Statement to iterate through the rows. Strcomp function is used to find the matching row for the given order id. If a matching row is found then all the information of that row is written to an array.
Here is how you can call the above function inside a subroutine.
Sub Test4()
Dim OrderInfo() As Variant
OrderInfo = GetOrderInformation(«209-2752429-9545»)
End Sub
Add a breakpoint at End Sub and run the macro. Then you can view the OrderInfo array in the Locals window.
Also read
Quickly Write Multidimensional Array to Excel Range
Re-size Dynamic Arrays
Calculate With Arrays
How to use preserve keyword in arrays
Transposing an Array in VBA
|
Как задать функцию, возвращающую массив? |
||||||||
Ответить |
||||||||
Ответить |
||||||||
Ответить |


На чтение 24 мин. Просмотров 90.6k.

Дональд Кнут
Список настолько же силен, как и его самое слабое звено
В таблице ниже краткая справка по использованию массивов в VBA. В статье постарался замахнуться на звание самого подробного руководства, которое вы найдете о массивах VBA.
Содержание
- Краткое руководство по массивам VBA
- Введение
- Быстрые заметки
- Что такое массивы и зачем они нужны?
- Типы массивов VBA
- Объявление массива
- Присвоение значений массиву
- Использование функций Array и Split
- Использование циклов с массивами
- Использование Erase
- ReDim с Preserve
- Сортировка массива
- Передача массива в Sub или функцию
- Возвращение массива из функции
- Двумерные массивы
- Чтение из диапазона ячеек в массив
- Как заставить ваши макросы работать на суперскорости
- Заключение
Краткое руководство по массивам VBA
| Задача | Статический массив |
Динамический массив |
| Объявление | Dim arr(0 To 5) As Long |
Dim arr() As Long Dim arr As Variant |
| Установить размер | Dim arr(0 To 5) As Long |
ReDim arr(0 To 5)As Variant |
| Увеличить размер (сохранить существующие данные) |
Только динамический |
ReDim Preserve arr(0 To 6) |
| Установить значения |
arr(1) = 22 | arr(1) = 22 |
| Получить значения | total = arr(1) | total = arr(1) |
| Первая позиция | LBound(arr) | LBound(arr) |
| Последняя позиция | Ubound(arr) | Ubound(arr) |
| Читать все записи (1D) | For i = LBound(arr) To UBound(arr) Next i Or For i = LBound(arr,1) To UBound(arr,1) Next i |
For i = LBound(arr) To UBound(arr) Next i Or For i = LBound(arr,1) To UBound(arr,1) Next i |
| Читать все записи (2D) | For i = LBound(arr,1) To UBound(arr,1) For j = LBound(arr,2) To UBound(arr,2) Next j Next i |
For i = LBound(arr,1) To UBound(arr,1) For j = LBound(arr,2) To UBound(arr,2) Next j Next i |
| Читать все записи | Dim item As Variant For Each item In arr Next item |
Dim item As Variant For Each item In arr Next item |
| Перейти на Sub | Sub MySub(ByRef arr() As String) | Sub MySub(ByRef arr() As String) |
| Возврат из функции | Function GetArray() As Long() Dim arr(0 To 5) As Long GetArray = arr End Function |
Function GetArray() As Long() Dim arr() As Long GetArray = arr End Function |
| Получить от функции |
Только динамический |
Dim arr() As Long Arr = GetArray() |
| Стереть массив | Erase arr *Сбрасывает все значения по умолчанию |
Erase arr *Удаляет массив |
| Строка в массив | Только динамический |
Dim arr As Variant arr = Split(«James:Earl:Jones»,»:») |
| Массив в строку | Dim sName As String sName = Join(arr, «:») |
Dim sName As String sName = Join(arr, «:») |
| Заполните значениями |
Только динамический |
Dim arr As Variant arr = Array(«John», «Hazel», «Fred») |
| Диапазон в массив | Только динамический |
Dim arr As Variant arr = Range(«A1:D2») |
| Массив в диапазон | Так же, как в динамическом |
Dim arr As Variant Range(«A5:D6») = arr |
Введение
В этой статье подробно рассматриваются массивы на языке программирования Excel VBA. Она охватывает важные моменты, такие как:
- Зачем вам массивы
- Когда вы должны их использовать
- Два типа массивов
- Использование более одного измерения
- Объявление массивов
- Добавление значений
- Просмотр всех предметов
- Супер эффективный способ чтения Range в массив
В первом разделе мы рассмотрим, что такое массивы и зачем они нужны. Вы можете не понимать часть кода в первом разделе. Это нормально. Я буду разбивать на простые термины в следующих разделах статьи.
Быстрые заметки
Иногда коллекции лучше, чем массивы. Вы можете прочитать о коллекциях здесь.
Массивы и циклы идут рука об руку. Наиболее распространенными циклами, которые вы используете с массивами, являются циклы For i и For Each.
Что такое массивы и зачем они нужны?
Массив VBA — это тип переменной. Используется для хранения списков данных одного типа. Примером может быть сохранение списка стран или списка итогов за неделю.
В VBA обычная переменная может хранить только одно значение за раз.
В следующем примере показана переменная, используемая для хранения оценок ученика.
' Может хранить только 1 значение за раз
Dim Student1 As Integer
Student1 = 55
Если мы хотим сохранить оценки другого ученика, нам нужно создать вторую переменную.
В следующем примере у нас есть оценки пяти студентов

Мы собираемся прочитать эти отметки и записать их в Immediate Window.
Примечание. Функция Debug.Print записывает значения в Immediate Window. Для просмотра этого окна выберите View-> Immediate Window из меню (сочетание клавиш Ctrl + G).


Как видите в следующем примере, мы пишем один и тот же код пять раз — по одному для каждого учащегося.
Public Sub StudentMarks()

    With ThisWorkbook.Worksheets("Лист1")

        ' Объявите переменную для каждого студента
        Dim Student1 As Integer
        Dim Student2 As Integer
        Dim Student3 As Integer
        Dim Student4 As Integer
        Dim Student5 As Integer

        ' Читайте оценки студентов из ячейки
        Student1 = .Range("C2").Offset(1)
        Student2 = .Range("C2").Offset(2)
        Student3 = .Range("C2").Offset(3)
        Student4 = .Range("C2").Offset(4)
        Student5 = .Range("C2").Offset(5)

        ' Печать студенческих оценок
        Debug.Print "Оценки студентов"
        Debug.Print Student1
        Debug.Print Student2
        Debug.Print Student3
        Debug.Print Student4
        Debug.Print Student5

    End With

End Sub
Ниже приведен вывод из примера

Проблема с использованием одной переменной для каждого учащегося заключается в том, что вам необходимо добавить код для каждого учащегося. Поэтому, если в приведенном выше примере у вас будет тысяча студентов, вам понадобится три тысячи строк кода!
К счастью, у нас есть массивы, чтобы сделать нашу жизнь проще. Массивы позволяют нам хранить список элементов данных в одной структуре.
Следующий код показывает приведенный выше пример с использованием массива.
Public Sub StudentMarksArr()

    With ThisWorkbook.Worksheets("Лист1")

        ' Объявите массив для хранения оценок для 5 студентов
        Dim Students(1 To 5) As Integer

        ' Читайте оценки учеников из ячеек C3: C7 в массив
        Dim i As Integer
        For i = 1 To 5
            Students(i) = .Range("C2").Offset(i)
        Next i

        ' Распечатывать оценки студентов из массива
        Debug.Print "Оценки студентов"
        For i = LBound(Students) To UBound(Students)
            Debug.Print Students(i)
        Next i

    End With

End Sub
Преимущество этого кода в том, что он будет работать для любого количества студентов. Если нам нужно изменить этот код для работы с 1000 студентами, нам нужно всего лишь изменить (от 1 до 5) на (от 1 до 1000) в декларации. В предыдущем примере нам нужно было добавить примерно пять тысяч строк кода.
Давайте проведем быстрое сравнение переменных и массивов. Сначала мы сравним процесс объявления.
 ' Объявляем переменные
        Dim Student As Integer
        Dim Country As String

  ' Объявляем массивы
        Dim Students(1 To 3) As Integer
        Dim Countries(1 To 3) As String
Далее мы сравниваем присвоение значения
    ' присвоить значение переменной
        Student1 = .Cells(1, 1)

    ' присваивать значение первому элементу в массиве
        Students(1) = .Cells(1, 1)
Наконец, мы смотрим на запись значений
  ' Вывести значение переменной
        Debug.Print Student1

  ' Вывести значение первого студента в массиве
        Debug.Print Students(1)
Как видите, использование переменных и массивов очень похоже.
Важным является тот факт, что массивы используют индекс (также называемый нижним индексом) для доступа к каждому элементу. Это означает, что мы можем легко получить доступ ко всем элементам в массиве, используя цикл For.
Теперь, когда у вас есть представление о том, почему массивы полезны, давайте пройдемся по ним шаг за шагом.
Типы массивов VBA
В VBA есть два типа массивов:
- Статический — массив фиксированного размера.
- Динамический — массив, в котором размер задается во время выполнения
Разница между этими массивами в основном в том, как они создаются. Доступ к значениям в обоих типах массивов абсолютно одинаков. В следующих разделах мы рассмотрим оба типа.
Объявление массива
Статический массив объявляется следующим образом
Public Sub DecArrayStatic()

    ' Создать массив с местоположениями 0,1,2,3
    Dim arrMarks1(0 To 3) As Long

    ' По умолчанию от 0 до 3, то есть местоположения 0,1,2,3
    Dim arrMarks2(3) As Long

    ' Создать массив с местоположениями 1,2,3,4,5
    Dim arrMarks1(1 To 5) As Long

    ' Создать массив с местоположениями 2,3,4 'Это редко используется
    Dim arrMarks3(2 To 4) As Long

End Sub
![]()
Как видите, размер указывается при объявлении статического массива. Проблема в том, что вы никогда не можете быть заранее уверены, какой размер вам нужен. Каждый раз, когда вы запускаете макрос, у вас могут быть разные требования к размеру.
Если вы не используете все расположения массива, ресурсы тратятся впустую. Если вам нужно больше места, вы можете использовать ReDim, но это по сути создает новый статический массив.
Динамический массив не имеет таких проблем. Вы не указываете размер, когда объявляете. Поэтому вы можете увеличиваться и уменьшаться по мере необходимости.
Public Sub DecArrayDynamic()

    ' Объявить динамический массив
    Dim arrMarks() As Long

    ' Установите размер массива, когда вы будете готовы
    ReDim arrMarks(0 To 5)

End Sub
Динамический массив не выделяется, пока вы не используете оператор ReDim. Преимущество в том, что вы можете подождать, пока не узнаете количество элементов, прежде чем устанавливать размер массива. Со статическим массивом вы должны указать размер заранее.
Присвоение значений массиву
Чтобы присвоить значения массиву, вы используете номер местоположения (пересечении строки и столбца). Вы присваиваете значение для обоих типов массивов одинаково.
Public Sub AssignValue()

    ' Объявить массив с местоположениями 0,1,2,3
    Dim arrMarks(0 To 3) As Long

    ' Установите значение позиции 0
    arrMarks(0) = 5

    ' становите значение позиции 3
    arrMarks(3) = 46

    ' Это ошибка, так как нет местоположения 4
    arrMarks(4) = 99

End Sub
![]()
Номер места называется индексом. Последняя строка в примере выдаст ошибку «Индекс вне диапазона», так как в примере массива нет местоположения 4.
Использование функций Array и Split
Вы можете использовать функцию Array для заполнения массива списком элементов. Вы должны объявить массив как тип Variant. Следующий код показывает, как использовать эту функцию.
  Dim arr1 As Variant
    arr1 = Array("Апельсин", "Персик","Груша")

  Dim arr2 As Variant
    arr2 = Array(5, 6, 7, 8, 12)
![]()
Массив, созданный функцией Array, начнется с нулевого индекса, если вы не используете Option Base 1 в верхней части вашего модуля. Затем он начнется с первого индекса. В программировании, как правило, считается плохой практикой иметь ваши реальные данные в коде. Однако иногда это полезно, когда вам нужно быстро протестировать некоторый код. Функция Split используется для разделения строки на массив на основе разделителя. Разделитель — это символ, такой как запятая или пробел, который разделяет элементы.
Следующий код разделит строку на массив из трех элементов.
 Dim s As String
    s = "Красный,Желтый,Зеленый,Синий"

    Dim arr() As String
    arr = Split(s, ",")
![]()
Функция Split обычно используется, когда вы читаете из cvs или txt-файла, разделенного запятыми, или из другого источника, который предоставляет список элементов, разделенных одним и тем же символом.
Использование циклов с массивами
Использование цикла For обеспечивает быстрый доступ ко всем элементам массива. Вот где сила использования массивов становится очевидной. Мы можем читать массивы с десятью значениями или десятью тысячами значений, используя те же несколько строк кода. В VBA есть две функции: LBound и UBound. Эти функции возвращают самый маленький и самый большой индекс в массиве. В массиве arrMarks (от 0 до 3) LBound вернет 0, а UBound вернет 3.
В следующем примере случайные числа присваиваются массиву с помощью цикла. Затем он печатает эти числа, используя второй цикл.
Public Sub ArrayLoops()

    ' Объявить массив
    Dim arrMarks(0 To 5) As Long

    ' Заполните массив случайными числами
    Dim i As Long
    For i = LBound(arrMarks) To UBound(arrMarks)
        arrMarks(i) = 5 * Rnd
    Next i

    ' Распечатайте значения в массиве
    Debug.Print "Место нахождения", "Значение"
    For i = LBound(arrMarks) To UBound(arrMarks)
        Debug.Print i, arrMarks(i)
    Next i

End Sub
Функции LBound и UBound очень полезны. Их использование означает, что наши циклы будут работать правильно с любым размером массива. Реальное преимущество заключается в том, что если размер массива изменяется, нам не нужно менять код для печати значений. Цикл будет работать для массива любого размера, пока вы используете эти функции.
Использование цикла For Each
Вы можете использовать цикл For Each с массивами. Важно помнить, что он доступен только для чтения. Это означает, что вы не можете изменить значение в массиве.
В следующем коде значение метки изменяется, но оно не меняет значение в массиве.
 For Each mark In arrMarks
        ' Не изменит значение массива
        mark = 5 * Rnd
    Next mark
Цикл For Each отлично подходит для чтения массива. Как видите, лучше писать специально для двумерного массива.
  Dim mark As Variant
    For Each mark In arrMarks
        Debug.Print mark
    Next mark
Использование Erase
Функция Erase может использоваться для массивов, но она работает по-разному в зависимости от типа массива.
Для статического массива функция Erase сбрасывает все значения по умолчанию. Если массив состоит из целых чисел, то все значения устанавливаются в ноль. Если массив состоит из строк, то все строки устанавливаются в «» и так далее.
Для динамического массива функция удаления стирает память. То есть она удаляет массив. Если вы хотите использовать его снова, вы должны использовать ReDim для выделения памяти.
Давайте рассмотрим пример статического массива. Этот пример аналогичен примеру ArrayLoops в последнем разделе с одним отличием — мы используем Erase после установки значений. Когда значение будет распечатано, все они будут равны нулю.
Public Sub EraseStatic()

    ' Объявить массив
    Dim arrMarks(0 To 3) As Long

    ' Заполните массив случайными числами
    Dim i As Long
    For i = LBound(arrMarks) To UBound(arrMarks)
        arrMarks(i) = 5 * Rnd
    Next i

    ' ВСЕ ЗНАЧЕНИЯ УСТАНОВЛЕНЫ НА НОЛЬ
    Erase arrMarks

    ' Распечатайте значения - там все теперь ноль
    Debug.Print "Место нахождения", "Значение"
    For i = LBound(arrMarks) To UBound(arrMarks)
        Debug.Print i, arrMarks(i)
    Next i

End Sub
Теперь мы попробуем тот же пример с динамикой. После того, как мы используем Erase, все места в массиве были удалены. Нам нужно использовать ReDim, если мы хотим использовать массив снова.
Если мы попытаемся получить доступ к членам этого массива, мы получим ошибку «Индекс вне диапазона».
Public Sub EraseDynamic()

    ' Объявить массив
    Dim arrMarks() As Long
    ReDim arrMarks(0 To 3)

    ' Заполните массив случайными числами
    Dim i As Long
    For i = LBound(arrMarks) To UBound(arrMarks)
        arrMarks(i) = 5 * Rnd
    Next i

    ' arrMarks теперь освобожден. Места не существуют.
    Erase arrMarks

End Sub
ReDim с Preserve
Если мы используем ReDim для существующего массива, то массив и его содержимое будут удалены.
В следующем примере второй оператор ReDim создаст совершенно новый массив. Исходный массив и его содержимое будут удалены.
Sub UsingRedim()

    Dim arr() As String

    ' Установить массив в слоты от 0 до 2
    ReDim arr(0 To 2)
    arr(0) = "Яблоко"

    ' Массив с яблоком теперь удален
    ReDim arr(0 To 3)

End Sub
Если мы хотим расширить размер массива без потери содержимого, мы можем использовать ключевое слово Preserve.
Когда мы используем Redim Preserve, новый массив должен начинаться с того же начального размера, например мы не можем сохранить от (0 до 2) до (от 1 до 3) или до (от 2 до 10), поскольку они являются различными начальными размерами.
В следующем коде мы создаем массив с использованием ReDim, а затем заполняем массив типами фруктов.
Затем мы используем Preserve для увеличения размера массива, чтобы не потерять оригинальное содержимое.
Sub UsingRedimPreserve()

    Dim arr() As String

    ' Установить массив в слоты от 0 до 1
    ReDim arr(0 To 2)
    arr(0) = "Яблоко"
    arr(1) = "Апельсин"
    arr(2) = "Груша"

    ' Изменение размера и сохранение исходного содержимого
    ReDim Preserve arr(0 To 5)

End Sub
Из приведенных ниже снимков экрана видно, что исходное содержимое массива было «сохранено».


Предостережение: в большинстве случаев вам не нужно изменять размер массива, как мы делали в этом разделе. Если вы изменяете размер массива несколько раз, то вам захочется рассмотреть возможность использования коллекции.
Использование Preserve с 2-мерными массивами
Preserve работает только с верхней границей массива.
Например, если у вас есть двумерный массив, вы можете сохранить только второе измерение, как показано в следующем примере:
Sub Preserve2D()

    Dim arr() As Long

    ' Установите начальный размер
    ReDim arr(1 To 2, 1 To 5)

    ' Изменить размер верхнего измерения
    ReDim Preserve arr(1 To 2, 1 To 10)

End Sub
Если мы попытаемся использовать Preserve на нижней границе, мы получим ошибку «Индекс вне диапазона».
В следующем коде мы используем Preserve для первого измерения. Запуск этого кода приведет к ошибке «Индекс вне диапазона»:
Sub Preserve2DError()

    Dim arr() As Long

    ' Установите начальный размер
    ReDim arr(1 To 2, 1 To 5)

    ' Ошибка «Вне диапазона»
    ReDim Preserve arr(1 To 5, 1 To 5)

End Sub
Когда мы читаем из диапазона в массив, он автоматически создает двумерный массив, даже если у нас есть только один столбец.
Применяются те же правила сохранения. Мы можем использовать Preserve только на верхней границе, как показано в следующем примере:
Sub Preserve2DRange()

    Dim arr As Variant

    ' Назначить диапазон массиву
    arr = Sheet1.Range("A1:A5").Value

    ' Preserve будет работать только на верхней границе
    ReDim Preserve arr(1 To 5, 1 To 7)

End Sub
Сортировка массива
В VBA нет функции для сортировки массива. Мы можем отсортировать ячейки листа, но это медленно, если данных много.
Функция быстрой сортировки ниже может использоваться для сортировки массива.
Sub QuickSort(arr As Variant, first As Long, last As Long)

  Dim vCentreVal As Variant, vTemp As Variant

  Dim lTempLow As Long
  Dim lTempHi As Long
  lTempLow = first
  lTempHi = last

  vCentreVal = arr((first + last) / 2)
  Do While lTempLow <= lTempHi

    Do While arr(lTempLow) < vCentreVal And lTempLow < last
      lTempLow = lTempLow + 1
    Loop

    Do While vCentreVal < arr(lTempHi) And lTempHi > first
      lTempHi = lTempHi - 1
    Loop

    If lTempLow <= lTempHi Then

        ' Поменять значения
        vTemp = arr(lTempLow)

        arr(lTempLow) = arr(lTempHi)
        arr(lTempHi) = vTemp

        ' Перейти к следующим позициям
        lTempLow = lTempLow + 1
        lTempHi = lTempHi - 1

    End If

  Loop

  If first < lTempHi Then QuickSort arr, first, lTempHi
  If lTempLow < last Then QuickSort arr, lTempLow, last

End Sub
Вы можете использовать эту функцию так:
Sub TestSort()

    ' Создать временный массив
    Dim arr() As Variant
    arr = Array("Банан", "Дыня", "Персик", "Слива", "Яблоко")

    ' Сортировать массив
    QuickSort arr, LBound(arr), UBound(arr)

    ' Печать массива в Immediate Window(Ctrl + G)
    Dim i As Long
    For i = LBound(arr) To UBound(arr)
        Debug.Print arr(i)
    Next i

End Sub
Передача массива в Sub или функцию
Иногда вам нужно будет передать массив в процедуру. Вы объявляете параметр, используя круглые скобки, аналогично тому, как вы объявляете динамический массив.
Переход к процедуре с использованием ByRef означает, что вы передаете ссылку на массив. Таким образом, если вы измените массив в процедуре, он будет изменен, когда вы вернетесь.
Примечание. Когда вы используете массив в качестве параметра, он не может использовать ByVal, он должен использовать ByRef. Вы можете передать массив с помощью ByVal, сделав параметр вариантом.
' Передает массив в функцию
Public Sub PassToProc()
    Dim arr(0 To 5) As String
    ' Передать массив в функцию
    UseArray arr
End Sub

Public Function UseArray(ByRef arr() As String)
    ' Использовать массив
    Debug.Print UBound(arr)
End Function
Возвращение массива из функции
Важно помнить следующее. Если вы хотите изменить существующий массив в процедуре, вы должны передать его как параметр, используя ByRef (см. Последний раздел). Вам не нужно возвращать массив из процедуры.
Основная причина возврата массива — это когда вы используете процедуру для создания нового. В этом случае вы присваиваете возвращаемый массив массиву в вызывающей программе. Этот массив не может быть уже выделен. Другими словами, вы должны использовать динамический массив, который не был выделен.
Следующие примеры показывают это:
Public Sub TestArray()

    ' Объявить динамический массив - не выделен
    Dim arr() As String
    ' Возврат нового массива
    arr = GetArray

End Sub

Public Function GetArray() As String()

    ' Создать и выделить новый массив
    Dim arr(0 To 5) As String
    ' Возвращаемый массив
    GetArray = arr

End Function
Двумерные массивы
Массивы, на которые мы смотрели до сих пор, были одномерными. Это означает, что массивы представляют собой один список элементов.
Двумерный массив — это список списков. Если вы думаете об одной строке электронной таблицы как об одном измерении, то более одного столбца является двухмерным. На самом деле электронная таблица является эквивалентом двумерного массива. Он имеет два измерения — строки и столбцы.
Следует отметить одну маленькую вещь: Excel обрабатывает одномерный массив как строку, если вы записываете его в электронную таблицу. Другими словами, массив arr (от 1 до 5) эквивалентен arr (от 1 до 1, от 1 до 5) при записи значений в электронную таблицу.
На следующем рисунке показаны две группы данных. Первый — это одномерный массив, а второй — двухмерный.

Чтобы получить доступ к элементу в первом наборе данных (одномерном), все, что вам нужно сделать, это дать строку, например. 1,2, 3 или 4.
Для второго набора данных (двумерного) вам нужно указать строку И столбец. Таким образом, вы можете думать, что 1-мерное — это несколько столбцов, а одна строка и двухмерное — это несколько строк и несколько столбцов.
Примечание. В массиве может быть более двух измерений. Это редко требуется. Если вы решаете проблему с помощью 3+-мерного массива, то, вероятно, есть лучший способ сделать это.
Вы объявляете двумерный массив следующим образом:
Dim ArrayMarks(0 To 2, 0 To 3) As Long
В следующем примере создается случайное значение для каждого элемента в массиве и печатается значение в Immediate Window.
Public Sub TwoDimArray()

    ' Объявить двумерный массив
    Dim arrMarks(0 To 3, 0 To 2) As String

    ' Заполните массив текстом, состоящим из значений i и j
    Dim i As Long, j As Long
    For i = LBound(arrMarks) To UBound(arrMarks)
        For j = LBound(arrMarks, 2) To UBound(arrMarks, 2)
            arrMarks(i, j) = CStr(i) & ":" & CStr(j)
        Next j
    Next i

    ' Вывести значения в массиве в Immediate Window
    Debug.Print "i", "j", "Знаечние"
    For i = LBound(arrMarks) To UBound(arrMarks)
        For j = LBound(arrMarks, 2) To UBound(arrMarks, 2)
            Debug.Print i, j, arrMarks(i, j)
        Next j
    Next i

End Sub
Видите, что мы используем второй цикл For внутри первого цикла, чтобы получить доступ ко всем элементам.
Результат примера выглядит следующим образом:

Этот макрос работает следующим образом:
- Входит в цикл i
- i установлен на 0
- цикл Enters j
- j установлен на 0
- j установлен в 1
- j установлен на 2
- Выход из цикла j
- i установлен в 1
- j установлен на 0
- j установлен в 1
- j установлен на 2
- И так до тех пор, пока i = 3 и j = 2
Заметьте, что LBound и UBound имеют второй аргумент 2. Это указывает, что это верхняя или нижняя граница второго измерения. Это начальное и конечное местоположение для j. Значение по умолчанию 1, поэтому нам не нужно указывать его для цикла i.
Использование цикла For Each
Использование For Each лучше использовать при чтении из массива.
Давайте возьмем код сверху, который выписывает двумерный массив.
 ' Для цикла For необходимо два цикла
    Debug.Print "i", "j", "Значение"
    For i = LBound(arrMarks) To UBound(arrMarks)
        For j = LBound(arrMarks, 2) To UBound(arrMarks, 2)
            Debug.Print i, j, arrMarks(i, j)
        Next j
    Next i
Теперь давайте перепишем его, используя цикл For Each. Как видите, нам нужен только один цикл, и поэтому гораздо проще написать:
 ' Использование For Each требует только одного цикла
    Debug.Print "Значение"
    Dim mark As Variant
    For Each mark In arrMarks
        Debug.Print mark
    Next mark
Использование цикла For Each дает нам массив только в одном порядке — от LBound до UBound. В большинстве случаев это все, что вам нужно.
Чтение из диапазона ячеек в массив
Если вы читали мою статью о ячейках и диапазонах, то вы знаете, что VBA имеет чрезвычайно эффективный способ чтения из диапазона ячеек в массив и наоборот.
Public Sub ReadToArray()

    ' Объявить динамический массив
    Dim StudentMarks As Variant

    ' Считать значения в массив из первой строки
    StudentMarks = Range("A1:Z1").Value

    ' Запишите значения обратно в третий ряд
    Range("A3:Z3").Value = StudentMarks

End Sub
Динамический массив, созданный в этом примере, будет двухмерным массивом. Как видите, мы можем прочитать весь диапазон ячеек в массив всего за одну строку.
В следующем примере будут считаны примеры данных студента ниже из C3: E6 Лист1 и распечатаны в Immediate Window.
Public Sub ReadAndDisplay()

    ' Получить диапазон
    Dim rg As Range
    Set rg = ThisWorkbook.Worksheets("Лист1").Range("C3:E6")

    ' Создать динамический массив
    Dim StudentMarks As Variant

    ' Считать значения в массив из листа 1
    StudentMarks = rg.Value

    ' Вывести значения массива
    Debug.Print "i", "j", "Значение"
    Dim i As Long, j As Long
    For i = LBound(StudentMarks) To UBound(StudentMarks)
        For j = LBound(StudentMarks, 2) To UBound(StudentMarks, 2)
            Debug.Print i, j, StudentMarks(i, j)
        Next j
    Next i

End Sub


Как видите, первое измерение (доступное через i) массива — это строка, а второе — столбец. Чтобы продемонстрировать это, взглянем на значение 44 в Е4 данных образца. Это значение находится в строке 2 столбца 3 наших данных. Вы можете видеть, что 44 хранится в массиве в StudentMarks (2,3).
Как заставить ваши макросы работать на суперскорости
Если ваши макросы работают очень медленно, этот раздел будет очень полезным. Особенно, если вы имеете дело с большими объемами данных. В VBA это держится в секрете.
Обновление значений в массивах происходит экспоненциально быстрее, чем обновление значений в ячейках.
В последнем разделе вы увидели, как мы можем легко читать из группы ячеек в массив и наоборот. Если мы обновляем много значений, то мы можем сделать следующее
- Скопируйте данные из ячеек в массив.
- Измените данные в массиве.
- Скопируйте обновленные данные из массива обратно в ячейки.
Например, следующий код будет намного быстрее, чем код ниже:
Public Sub ReadToArray()

    ' Считать значения в массив из первой строки
    Dim StudentMarks  As Variant
    StudentMarks = Range("A1:Z20000").Value

    Dim i As Long
    For i = LBound(StudentMarks) To UBound(StudentMarks)
        ' Обновление отметок здесь
        StudentMarks(i, 1) = StudentMarks(i, 1) * 2
        '...
    Next i

    ' Запишите новые значения обратно на лист
    Range("A1:Z20000").Value = StudentMarks

End Sub
Sub UsingCellsToUpdate()

    Dim c As Variant
    For Each c In Range("A1:Z20000")
        c.Value = ' Обновите значения здесь
    Next c

End Sub
Назначение из одного набора ячеек в другой также намного быстрее, чем с помощью копирования и вставки.
' Назначение - быстрее
Range("A1:A10").Value = Range("B1:B10").Value

' Копировать Вставить - медленнее
Range("B1:B1").Copy Destination:=Range("A1:A10")
Заключение
Ниже приводится краткое изложение основных моментов этой статьи.
- Массивы — это эффективный способ хранения списка элементов одного типа.
- Вы можете получить доступ к элементу массива напрямую, используя номер местоположения, который известен как индекс.
- Распространенная ошибка «Индекс вне диапазона» вызвана доступом к несуществующему местоположению.
- Существует два типа массивов: статический и динамический.
- Статический используется, когда размер массива всегда одинаков.
- Динамические массивы позволяют вам определять размер массива во время выполнения.
- LBound и UBound обеспечивают безопасный способ поиска самых маленьких и самых больших подписок массива.
- Основной массив является одномерным. Есть еще многомерные массивы.
- Чтобы только передать массив в процедуру, используйте ByRef. Вы делаете это так: ByRef arr() as long.
- Вы можете вернуть массив из функции, но массив, которому он назначен, не должен быть выделен в данный момент.
- Рабочий лист с его строками и столбцами по сути является двумерным массивом.
- Вы можете читать непосредственно из диапазона листа в двухмерный массив всего за одну строку кода.
- Вы также можете записать из двумерного массива в диапазон всего за одну строку кода.