Удаление любых файлов из кода VBA Excel с помощью оператора Kill и метода DeleteFile объекта FileSystemObject. Знаки подстановки, синтаксис, примеры.
Оператор Kill
Описание
Kill – это оператор, предназначенный для удаления файлов с диска.
Синтаксис
- PathName – это строковое выражение, задающее одно или несколько имен файлов (по шаблону), которые требуется удалить.
Строка PathName может содержать каталоги (папки) и букву диска. Если файл с именем PathName не существует, будет сгенерирована ошибка.
Оператор Kill поддерживает использование знаков подстановки в последнем компоненте параметра PathName (собственное имя файла без пути к нему):
- Звездочка (*) – заменяет любое количество символов или ни одного.
- Вопросительный знак (?) – заменяет один символ или ни одного.
Знаки подстановки позволяют создать шаблон, по которому можно удалить сразу несколько файлов.
Примеры
Пример 1
Удаление одного файла без проверки его существования (в примере — удаление книги Excel):
|
Sub Primer1() On Error Resume Next Kill ThisWorkbook.Path & «Книга1.xlsx» End Sub |
Инструкция On Error Resume Next нужна для того, чтобы корректно завершить программу в том случае, если файла с именем PathName не существует.
Пример 2
Удаление одного файла с проверкой его существования:
|
Sub Primer2() Dim myPathName As String myPathName = «C:Новая папкаФайл1.docx» If Dir(myPathName) <> «» Then Kill myPathName End Sub |
Пример 3
Удаление нескольких файлов по шаблону:
|
Sub Primer3() On Error Resume Next Kill «C:Новая папкаСправка*» End Sub |
В результате работы этого кода VBA Excel будут удалены все файлы с любыми расширениями, которые начинаются со слова «Справка». Если строку Kill "C:Новая папкаСправка*" заменить строкой Kill "C:Новая папка*2020*", она удалит все файлы, в имени которых есть подстрока «2020».
Как удалить объект ThisWorkbook с помощью оператора Kill из кода VBA Excel, размещенного в нем же, смотрите в статье: Удаление книги из собственного кода.
Метод DeleteFile
Описание
DeleteFile – это метод объекта FileSystemObject, предназначенный для удаления файлов с диска из кода VBA Excel.
Синтаксис
|
Object.DeleteFile PathName, [force] |
- Object – переменная, возвращающая объект FileSystemObject (обязательный параметр);
- PathName – строковое выражение, задающее одно или несколько имен файлов (по шаблону), которые требуется удалить (обязательный параметр);
- force – значение типа Boolean: True – удаляются все файлы, False (по умолчанию) – не удаляются файлы с атрибутом «только для чтения» (необязательный параметр).
В последнем компоненте параметра PathName (собственное имя файла без пути к нему) можно использовать знаки подстановки, также, как и для оператора Kill. Если указанный файл не существует, будет сгенерирована ошибка.
Примеры
Пример 4
Удаление одного файла с проверкой его существования:
|
Sub Primer4() Dim fso As Object ‘Присваиваем переменной fso ссылку на новый экземпляр FileSystemObject Set fso = CreateObject(«Scripting.FileSystemObject») ‘Проверяем существование удаляемого файла If Dir(ThisWorkbook.Path & «Изображение.png») <> «» Then ‘Удаляем файл, если он существует fso.DeleteFile ThisWorkbook.Path & «Изображение.png» End If End Sub |
Пример 5
Удаление нескольких или всех файлов по шаблону:
|
Sub Primer5() Dim fso As Object ‘Присваиваем переменной fso ссылку на новый экземпляр FileSystemObject Set fso = CreateObject(«Scripting.FileSystemObject») ‘Завершаем программу, если не существует ни одного файла, подходящего под указанный шаблон On Error Resume Next ‘Удаляем указанный файл (файлы) fso.DeleteFile «C:Новая папка*.docx» End Sub |
В результате работы этого кода VBA Excel из папки «Новая папка» будут удалены все файлы с расширением .docx.
Фразы для контекстного поиска: удаление файла, удаление всех файлов, удаление нескольких книг, удаление всех книг, удаление по шаблону.
Using VBA, how can I:
- test whether a file exists, and if so,
- delete it?
1.) Check here. Basically do this:
Function FileExists(ByVal FileToTest As String) As Boolean
   FileExists = (Dir(FileToTest) <> "")
End Function
I’ll leave it to you to figure out the various error handling needed but these are among the error handling things I’d be considering:
- Check for an empty string being passed.
- Check for a string containing characters illegal in a file name/path
2.) How To Delete a File. Look at this. Basically use the Kill command but you need to allow for the possibility of a file being read-only. Here’s a function for you:
Sub DeleteFile(ByVal FileToDelete As String)
   If FileExists(FileToDelete) Then 'See above
      ' First remove readonly attribute, if set
      SetAttr FileToDelete, vbNormal
      ' Then delete the file
      Kill FileToDelete
   End If
End Sub
Again, I’ll leave the error handling to you and again these are the things I’d consider:
-
Should this behave differently for a directory vs. a file? Should a user have to explicitly have to indicate they want to delete a directory?
-
Do you want the code to automatically reset the read-only attribute or should the user be given some sort of indication that the read-only attribute is set?
EDIT: Marking this answer as community wiki so anyone can modify it if need be.
2
An alternative way to code Brettski’s answer, with which I otherwise agree entirely, might be
With New FileSystemObject
    If .FileExists(yourFilePath) Then
        .DeleteFile yourFilepath
    End If
End With
Same effect but fewer (well, none at all) variable declarations.
The FileSystemObject is a really useful tool and well worth getting friendly with. Apart from anything else, for text file writing it can actually sometimes be faster than the legacy alternative, which may surprise a few people. (In my experience at least, YMMV).
answered Sep 16, 2008 at 11:03
Mike WoodhouseMike Woodhouse
51.5k12 gold badges88 silver badges127 bronze badges
4
I’ll probably get flamed for this, but what is the point of testing for existence if you are just going to delete it? One of my major pet peeves is an app throwing an error dialog with something like «Could not delete file, it does not exist!»
On Error Resume Next
aFile = "c:file_to_delete.txt"
Kill aFile
On Error Goto 0
return Len(Dir$(aFile)) > 0 ' Make sure it actually got deleted.
If the file doesn’t exist in the first place, mission accomplished!
answered Sep 15, 2008 at 23:34
4
The following can be used to test for the existence of a file, and then to delete it.
Dim aFile As String
aFile = "c:file_to_delete.txt"
If Len(Dir$(aFile)) > 0 Then
     Kill aFile
End If
answered Sep 15, 2008 at 23:12
Rich AdamsRich Adams
25.9k4 gold badges39 silver badges62 bronze badges
2
In VB its normally Dir to find the directory of the file. If it’s not blank then it exists and then use Kill to get rid of the file.
test = Dir(Filename)
If Not test = "" Then
    Kill (Filename)
End If
ZygD
21k39 gold badges77 silver badges98 bronze badges
answered Sep 15, 2008 at 23:11
Leo MooreLeo Moore
2,0982 gold badges19 silver badges21 bronze badges
set a reference to the Scripting.Runtime library and then use the FileSystemObject:
Dim fso as New FileSystemObject, aFile as File

if (fso.FileExists("PathToFile")) then
    aFile = fso.GetFile("PathToFile")
    aFile.Delete
End if
answered Sep 15, 2008 at 23:40
BrettskiBrettski
19.1k15 gold badges75 silver badges95 bronze badges
2
Here’s a tip: are you re-using the file name, or planning to do something that requires the deletion immediately?
No?
You can get VBA to fire the command DEL «C:TEMPscratchpad.txt» /F from the command prompt asynchronously using VBA.Shell:
Shell «DEL » & chr(34) & strPath & chr(34) & » /F «, vbHide
Note the double-quotes (ASCII character 34) around the filename: I’m assuming that you’ve got a network path, or a long file name containing spaces.
If it’s a big file, or it’s on a slow network connection, fire-and-forget is the way to go.
Of course, you never get to see if this worked or not; but you resume your VBA immediately, and there are times when this is better than waiting for the network.
1
You can set a reference to the Scripting.Runtime library and then use the FileSystemObject. It has a DeleteFile method and a FileExists method.
See the MSDN article here.
answered Sep 15, 2008 at 23:12
Darrel MillerDarrel Miller
138k31 gold badges193 silver badges242 bronze badges
0
A shorter version of the first solution that worked for me:
Sub DeleteFile(ByVal FileToDelete As String)
   If (Dir(FileToDelete) <> "") Then
      ' First remove readonly attribute, if set
      SetAttr FileToDelete, vbNormal
      ' Then delete the file
      Kill FileToDelete
   End If
End Sub
Содержание
- VBA Удалить файл — Как удалить файл с помощью VBA (с примерами)
- Введение в VBA Удалить файл
- Синтаксис удаления файла в Excel VBA
- Как удалить файл с помощью VBA?
- Пример № 1 — VBA Удалить файл
- Пример № 2 — VBA Удалить файл
- То, что нужно запомнить
- Рекомендуемые статьи
- Как удалить папку или все файлы из папки через VBA
- VBA Delete File
- How to Delete Files using VBA Code?
- Kill Method to Delete Files in a Folder using VBA Code
- Delete Particular File Name
- Delete All Excel Files
- Delete Entire Folder Only
- Delete All the Text Files in the Folder
- Delete Read-Only Files
- Recommended Articles
- Comments
VBA Удалить файл — Как удалить файл с помощью VBA (с примерами)
Введение в VBA Удалить файл
Иногда, когда мы работаем в VBA, мы создаем некоторые нежелательные файлы, или у нас есть некоторые нежелательные файлы на нашем компьютере. Как мы от них избавимся? Мы можем просто пойти и удалить каждый файл вручную, найдя файл и щелкнув по нему правой кнопкой мыши, затем мы нажимаем кнопку удаления, чтобы удалить файл. Или мы можем нажать кнопку удаления на клавиатуре, чтобы удалить файл. Но как мы сделаем это в VBA, мы узнаем из этой статьи.
Итак, теперь мы поняли концепцию этой темы, что нам нужно удалить файл с помощью макросов VBA. В VBA у нас есть команда kill, которая используется для удаления файла из его местоположения. Когда мы просто удаляем файл, пройдя через процесс поиска файла и щелкнув правой кнопкой мыши по нему, чтобы удалить или даже нажать кнопку удаления, файл отправляется в корзину. Но когда мы используем команду Kill в VBA для удаления файла, файл навсегда удаляется с компьютера. Это не идет в корзину. Теперь давайте посмотрим на синтаксис, который мы будем использовать для удаления файла с использованием VBA. Это выглядит следующим образом:
Синтаксис удаления файла в Excel VBA
Всегда помните, что путь к файлу должен быть в кавычках. Теперь, чтобы удалить файл в VBA, мы должны иметь его путь. Как мы получаем путь к файлу? Нам нужно щелкнуть правой кнопкой мыши по файлу и выбрать свойства, которые дают нам различные варианты свойств файла, как только мы нажмем на вкладку безопасности, которая является вторым номером на вкладках, где мы можем найти путь под именем объекта. Взгляните на скриншот ниже для справки.
Путь, указанный после имени объекта, является аргументом, который нам нужно указать для функции killfile, чтобы удалить любой файл. Теперь давайте начнем удалять файлы, посмотрев на несколько примеров ниже.
Прежде чем перейти к примерам, всегда убедитесь, что у нас включена вкладка разработчика для использования макросов. Это делается путем перехода в раздел файлов, а затем в раздел параметров. Мы найдем флажок, который нужно установить, чтобы включить вкладку разработчика. Теперь давайте перейдем к примерам. Например, у меня есть два файла с именем sample 1 и sample 2. Оба являются текстовыми файлами и находятся на рабочем столе. Посмотрите на них ниже.
Как удалить файл с помощью VBA?
Давайте посмотрим примеры удаления файла в Excel VBA.
Вы можете скачать этот VBA Удалить файл Excel шаблоны здесь — VBA Удалить файл Excel шаблоны
Пример № 1 — VBA Удалить файл
Давайте сначала удалим файл образца 1 в этом примере. Оба примера будут иметь разницу в одну минуту, которую я объясню в конце темы. Во-первых, нам нужно получить путь к файлу примера 1. Чтобы сделать это, щелкните правой кнопкой мыши на файле и перейдите в раздел «Свойства», и мы найдем путь рядом с именем объекта следующим образом.
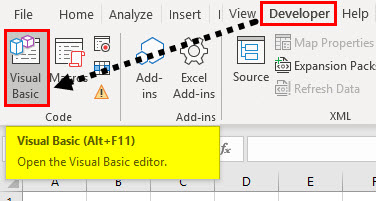
Шаг 1: Теперь давайте войдем в VBA с опцией visual basic. Его можно найти на вкладке разработчика.
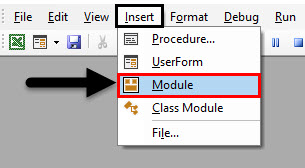
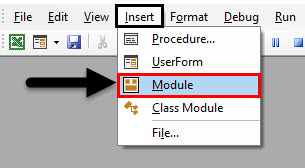
Шаг 2: Как только мы находимся в VBA, нам нужно вставить модуль. Чтобы войти в окно кода, дважды щелкните модуль, который приведет нас к окну кода.
Шаг 3: Теперь первый шаг для написания кода VBA — назвать макрос следующим образом.
Код:
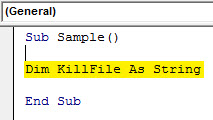
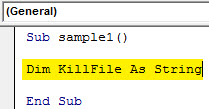
Шаг 4: Объявите переменную как строку, которая будет хранить путь к файлу.
Код:
Шаг 5: Теперь давайте назначим путь к этой строке файла, который мы хотим удалить, это sample1.
Код:
Шаг 6: Теперь давайте удалим файл, используя функцию Kill следующим образом.
Код:
Шаг 7: Когда мы запускаем приведенный выше код и смотрим на рабочий стол, мы больше не можем найти первый созданный нами текстовый файл.
Присутствует только второй файл, и первый файл перемещается. Теперь, что произойдет, если путь к файлу был неправильным или файл даже не существует. Теперь мы удалили первый файл, и он даже не существует, поэтому мы можем запустить код еще раз, чтобы проверить, какой результат мы получим. Запустите приведенный выше код еще раз.
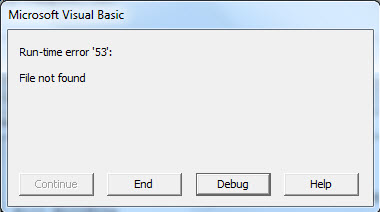
VBA дает нам ошибку во время выполнения, что файл не найден. Это важно, что мы должны иметь в виду.
Пример № 2 — VBA Удалить файл
Теперь давайте удалим второй файл, используя функцию kill. Опять же, нам нужно указать путь ко второму файлу, для которого нам нужно щелкнуть правой кнопкой мыши по файлу, и из опции свойств перейти к безопасности, и мы найдем путь к имени объекта следующим образом.
Теперь у нас есть путь для второго файла, поэтому давайте удалим этот файл.
Шаг 1: Войдите в VBA через вкладку разработчика.
Шаг 2: Как только мы находимся в VBA, нам нужно вставить модуль. Чтобы войти в окно кода, дважды щелкните модуль, который приведет нас к окну кода.
Шаг 3: Сначала назовите макрос, чтобы продолжить работу следующим образом.
Код:
Шаг 4: Как и выше, объявите переменную как строку для хранения пути к файлу.
Код:
Шаг 5: В строке сохраните путь к файлу следующим образом.
Код:
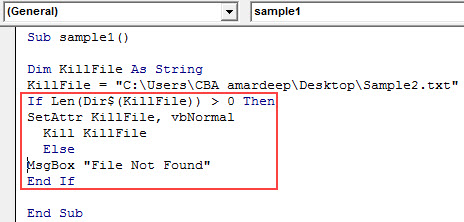
Шаг 6: Теперь мы проверим, что файл даже существует, используя функцию If следующим образом.
Код:
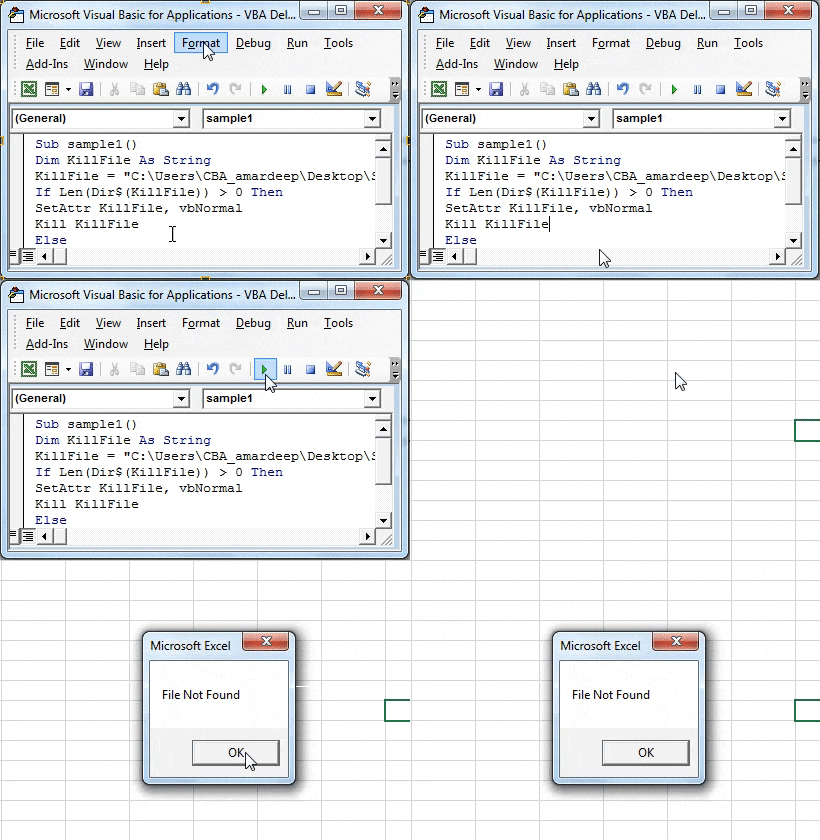
Шаг 7: Теперь, если мы запустим приведенный выше код, мы увидим, что файл удален и его больше нет на рабочем столе.
Шаг 8: В приведенном выше примере мы видели, что если файл не существует, VBA выдает нам ошибку и в этом случае, поскольку файл был удален, мы можем снова запустить код и увидеть, что вместо ошибки мы получаем персонализированное сообщение следующим образом.
То, что нужно запомнить
Есть несколько вещей, которые мы должны помнить об удалении файла в VBA:
- Мы используем функцию Kill для удаления файла.
- Нам нужен путь к конкретному файлу, который нужно удалить.
- Если файл не найден, мы сталкиваемся с ошибкой.
- Файлы, удаленные функцией Kill, не попадают в корзину.
Рекомендуемые статьи
Это руководство по удалению файла VBA. Здесь мы обсудим, как использовать Excel VBA Delete File вместе с несколькими практическими примерами и загружаемым шаблоном Excel. Вы также можете просмотреть наши другие предлагаемые статьи —
- Как использовать VBA While Loop?
- VBA Удалить дубликаты
- Понимание типов данных VBA
- VBA Sleep с примерами
Источник
Как удалить папку или все файлы из папки через VBA
Предположим, что ежедневно во временную папку поступают файлы отчетов от филиалов. Они могут собираться из почты кодом вроде такого: Сохранить вложения из Outlook в указанную папку или добавляться в папку иными средствами. Далее Вы собираете данные из этих файлов неким кодом(вроде этого — Как собрать данные с нескольких листов или книг?). Но с каждым днем файлов все больше и больше и приходится заходить в папку и руками чистить её от лишних файлов, чтобы при сборе данных не приходилось каждый раз искать и отбирать только новые файлы.
Если надо удалять только конкретные файлы(например только файлы Excel, содержащие в имени слово «отчет»), то можно использовать такой код:
Sub Remove_AllFilesFromFolder() Dim sFolder As String, sFiles As String ‘диалог запроса выбора папки с файлами ‘подробнее про диалоги выбора папки или файла: ‘ http://www.excel-vba.ru/chto-umeet-excel/dialogovoe-okno-vybora-fajlovpapki/ With Application.FileDialog(msoFileDialogFolderPicker) If .Show = False Then Exit Sub sFolder = .SelectedItems(1) End With sFolder = sFolder & IIf(Right(sFolder, 1) = Application.PathSeparator, «», Application.PathSeparator) ‘отбирать только файлы Excel, содержащие в имени слово «отчет» sFiles = Dir(sFolder & «*отчет*.xls*») ‘цикл по всем файлам в папке On Error Resume Next Do While sFiles <> «» ‘удаляем файл Kill sFolder & sFiles If Err.Number = 70 Then MsgBox «Невозможно удалить файл ‘» & sFiles & «‘. Возможно файл открыт в другой программе или нет прав на удаление», vbCritical, «www.excel-vba.ru» Err.Clear End If ‘на всякий случай передаем управление системе, ‘чтобы дождаться удаления DoEvents ‘получаем имя следующего файла в папке sFiles = Dir Loop End Sub
Чтобы удалять полностью все файлы в папке(а не только файлы Excel), а саму папку оставить, то строку sFiles = Dir(sFolder & «*отчет*.xls*») надо записать так: sFiles = Dir(sFolder & «*»)
Если необходимо удалять файлы по дате создания/изменения(например, только файлы, созданные раньше 01.03.2017), то можно использовать такой код:
Sub Remove_FilesFromFolder_AfterDate() Dim sFolder As String, sFiles As String Dim dd As Date, dKill As Date ‘задаем дату. Если файл был создан/изменен до этой даты — он будет удален dKill = CDate(«01.03.2017») ‘можно задать проще: dKill = #3/1/2017# ‘диалог запроса выбора папки с файлами ‘подробнее про диалоги выбора папки или файла: ‘ http://www.excel-vba.ru/chto-umeet-excel/dialogovoe-okno-vybora-fajlovpapki/ With Application.FileDialog(msoFileDialogFolderPicker) If .Show = False Then Exit Sub sFolder = .SelectedItems(1) End With sFolder = sFolder & IIf(Right(sFolder, 1) = Application.PathSeparator, «», Application.PathSeparator) sFiles = Dir(sFolder & «*») ‘цикл по всем файлам в папке On Error Resume Next Do While sFiles <> «» ‘получаем дату создания или изменения файла dd = FileDateTime(sFolder & sFiles) ‘если дата файла меньше заданной для удаления(был создан раньше) If dd dKill = CDate(«01.03.2017») нужно заменить на такую: dKill = Date . Если удалить надо файлы недельной давности, то: dKill = Date-7
Если же необходимо удалить папку полностью, а не только файлы в ней, то лучше использовать такой код:
Sub RemoveFolderWithContent() Dim sFolder As String, sFiles As String ‘диалог запроса выбора папки на удаление With Application.FileDialog(msoFileDialogFolderPicker) If .Show = False Then Exit Sub sFolder = .SelectedItems(1) End With sFolder = sFolder & IIf(Right(sFolder, 1) = Application.PathSeparator, «», Application.PathSeparator) ‘путь к папке можно задать статично, если он заранее известен и не изменяется ‘ sFolder = «C:tempЕжедневные отчеты10072017» ‘путь к папке, которую надо удалить Shell «cmd /c rd /S/Q «»» & sFolder & «»»» End Sub
Этот код удалить папку вместе со всеми файлами буквально за секунду.
Вообще в VBA есть специальная команда для удаления директорий(папок) RmDir . Но она способна удалить только пустую папку, поэтому редко когда можно найти её практическое применение. Если в файле есть хоть один файл то команда RmDir выдаст ошибку ’75’ — File/Path access error .
Статья помогла? Поделись ссылкой с друзьями!
Источник
VBA Delete File
In VBA, we can delete any file present in the computer using VBA codes. The code used to delete files is known as the “Kill” command. The method to delete any file is that first, we must provide the file’s path, which means the file’s location on the computer. Then, we use the “Kill” command to delete the file.
Table of contents
How to Delete Files using VBA Code?
VBA is a tough thing initially, but as you spend more time with VBA, you will start loving it just like me. We can open files from another computer folder and work with them. Now, we can delete files as well by using VBA coding. This article will show you how to delete files using VBA code in a specific folder.
When working with large projects, we usually create many intermediate files to support our process. we need to delete those files to avoid future confusion after completing the work.
And one scenario is when we usually receive an email. For example, we save attachments for our regular work, or we want to see the report for that point in time, and later we may need to delete those files.
Deleting those files manually may take time, or we may forget to save them. In addition, it will occupy the space on our computer. Therefore, we will show you how to delete those files with simple VBA codes Simple VBA Codes VBA code refers to a set of instructions written by the user in the Visual Basic Applications programming language on a Visual Basic Editor (VBE) to perform a specific task. read more .
You are free to use this image on your website, templates, etc., Please provide us with an attribution link How to Provide Attribution? Article Link to be Hyperlinked
For eg:
Source: VBA Delete File (wallstreetmojo.com)
Kill Method to Delete Files in a Folder using VBA Code
A simple Kill function will delete the folder, specific file, all Excel files, etc. Take a look at the syntax of the Kill method in VBA. The Kill method cannot delete read-only files.
Path Name: Pathname is nothing but the folder path in the computer to delete the files.
Asterisk (*) is useful to match any length string. In addition, it also considers zero.
Question mark (?) is useful to match only a single character.
Delete Particular File Name
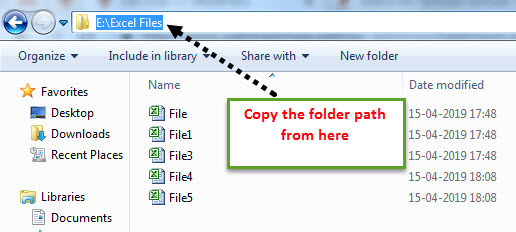
For example, we have a folder like the one below.
We want to delete the file named “File 5” in this folder. But, first, start the code with the Kill function.
Code:
Copy and paste the folder path.
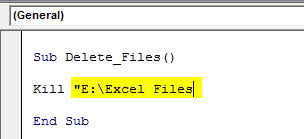
And Paste in double-quotes.
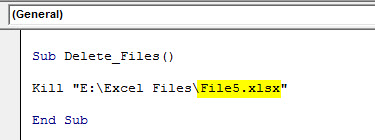
Now put one more backward slash () and enter the file name with extension.
When you run this code, it will delete the file named “File 5.xlsx” in the mentioned folder path.
Delete All Excel Files
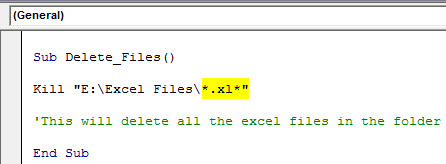
Using VBA, we need to use wildcard characters with the Kill function to delete all the Excel files in the folder. After mentioning the folder path, we need to mention the file as “*.xl*.”
Code:
When you run this code, it will delete all the Excel files in the folder.
We have seen how we can delete a single Excel file and all the Excel files. But if we want to delete all the files in the folder, how can we delete them? Also, since we are using Excel VBA, can it delete other files?
The answer is Yes! Use the below code to delete all the files in the folder.
Code:
Delete Entire Folder Only
Is it possible to delete the entire folder itself?
Yes, it is possible.
We need to delete all the files in the folder using the Kill function. Then to delete the folder, we need to use one more function called RmDir.
Code:
Here RmDir will delete only the empty folder if any subfolder is where it cannot delete them.
Delete All the Text Files in the Folder
To delete all the text files in the folder, use the below code.
Code:
Delete Read-Only Files
As we said, the Kill function cannot delete “Read Only” files in the folder. In such a scenario, we need to use the other two functions: “Dir$” and “SetAttr.” Below is the example code to delete the read-only files as well.
Code:
You can download this VBA Delete File Excel Template from here – VBA Delete File Excel Template.
Recommended Articles
This article has been a guide to VBA Delete Files. Here, we discuss the VBA code to delete 1. Particular File Name, 2. All files, 3. Entire folder, and 4. Read-only Files with downloadable Excel template. Below are some useful articles related to VBA: –

thank you so much .

Источник
В этом руководстве вы изучите сценарий VBA, чтобы проверить, существует ли определенный файл в указанной папке, и если он существует, то удалите его из папки в Excel.
Проверьте, существует ли файл в папке, а затем удалите его в Excel с помощью кода VBA.
Следующий сценарий VBA помогает проверить, существует ли определенный файл в папке, и удалить его, если он существует. Пожалуйста, сделайте следующее.
1. В открытой книге Excel нажмите другой + F11 , чтобы открыть Microsoft Visual Basic для приложений окно.
2. в Microsoft Visual Basic для приложений окна, нажмите Вставить > Модули, затем скопируйте следующий скрипт VBA в папку Модуль (код) окно.
Код VBA: проверьте, существует ли файл в указанной папке, а затем удалите его.
Sub CheckFileThenDelete()
'Updated by Extendoffice 20221024
Dim FilePath As String
    FilePath = "C:UsersWin10x64TestDesktopsave attachmentsaaa.xlsx"

    If Dir(FilePath) <> "" Then
    MsgBox "The file exists in the folder, click the OK button to delete it.", vbInformation, "Kutools for Excel"
        Kill FilePath
    Else
    If Dir(FilePath) = "" Then
    MsgBox "The file does not exist.", vbInformation, "Kutools for Excel"
    End If
    End If
End Sub
Внимание: В коде VBA C:UsersWin10x64TestDesktopсохранить вложенияaaa.xlsx это путь к файлу, который вы хотите проверить, существует ли он. В этом примере я хочу проверить, является ли файл Excel с именем «ааа” существует в папке с именем “сохранить вложения» на рабочем столе. Вы можете изменить путь к файлу и расширение файла в соответствии с вашими потребностями.
3. нажмите F5 ключ для запуска кода.
4. Если файл существует, вы получите Kutools for Excel диалоговое окно, как показано на скриншоте ниже. Щелкните OK кнопку, чтобы удалить этот файл из папки.
Если файл не существует в папке, другой Kutools for Excel диалоговое окно также появится, чтобы предупредить вас.
Лучшие инструменты для работы в офисе
Kutools for Excel Решит большинство ваших проблем и повысит вашу производительность на 80%
- Снова использовать: Быстро вставить сложные формулы, диаграммы и все, что вы использовали раньше; Зашифровать ячейки с паролем; Создать список рассылки и отправлять электронные письма …
- Бар Супер Формулы (легко редактировать несколько строк текста и формул); Макет для чтения (легко читать и редактировать большое количество ячеек); Вставить в отфильтрованный диапазон…
- Объединить ячейки / строки / столбцы без потери данных; Разделить содержимое ячеек; Объединить повторяющиеся строки / столбцы… Предотвращение дублирования ячеек; Сравнить диапазоны…
- Выберите Дубликат или Уникальный Ряды; Выбрать пустые строки (все ячейки пустые); Супер находка и нечеткая находка во многих рабочих тетрадях; Случайный выбор …
- Точная копия Несколько ячеек без изменения ссылки на формулу; Автоматическое создание ссылок на несколько листов; Вставить пули, Флажки и многое другое …
- Извлечь текст, Добавить текст, Удалить по позиции, Удалить пробел; Создание и печать промежуточных итогов по страницам; Преобразование содержимого ячеек в комментарии…
- Суперфильтр (сохранять и применять схемы фильтров к другим листам); Расширенная сортировка по месяцам / неделям / дням, периодичности и др .; Специальный фильтр жирным, курсивом …
- Комбинируйте книги и рабочие листы; Объединить таблицы на основе ключевых столбцов; Разделить данные на несколько листов; Пакетное преобразование xls, xlsx и PDF…
- Более 300 мощных функций. Поддерживает Office/Excel 2007-2021 и 365. Поддерживает все языки. Простое развертывание на вашем предприятии или в организации. Полнофункциональная 30-дневная бесплатная пробная версия. 60-дневная гарантия возврата денег.
Вкладка Office: интерфейс с вкладками в Office и упрощение работы
- Включение редактирования и чтения с вкладками в Word, Excel, PowerPoint, Издатель, доступ, Visio и проект.
- Открывайте и создавайте несколько документов на новых вкладках одного окна, а не в новых окнах.
- Повышает вашу продуктивность на 50% и сокращает количество щелчков мышью на сотни каждый день!
Комментарии (0)
Оценок пока нет. Оцените первым!
ТРЕНИНГИ
Быстрый старт
Расширенный Excel
Мастер Формул
Прогнозирование
Визуализация
Макросы на VBA
КНИГИ
Готовые решения
Мастер Формул
Скульптор данных
ВИДЕОУРОКИ
Бизнес-анализ
Выпадающие списки
Даты и время
Диаграммы
Диапазоны
Дубликаты
Защита данных
Интернет, email
Книги, листы
Макросы
Сводные таблицы
Текст
Форматирование
Функции
Всякое
Коротко
Подробно
Версии
Вопрос-Ответ
Скачать
Купить
ПРОЕКТЫ
ОНЛАЙН-КУРСЫ
ФОРУМ
Excel
Работа
PLEX
© Николай Павлов, Planetaexcel, 2006-2022
info@planetaexcel.ru
Использование любых материалов сайта допускается строго с указанием прямой ссылки на источник, упоминанием названия сайта, имени автора и неизменности исходного текста и иллюстраций.
Техническая поддержка сайта
|
ООО «Планета Эксел» ИНН 7735603520 ОГРН 1147746834949 |
ИП Павлов Николай Владимирович ИНН 633015842586 ОГРНИП 310633031600071 |
Хитрости »
28 Июль 2017 20500 просмотров
Предположим, что ежедневно во временную папку поступают файлы отчетов от филиалов. Они могут собираться из почты кодом вроде такого: Сохранить вложения из Outlook в указанную папку или добавляться в папку иными средствами. Далее Вы собираете данные из этих файлов неким кодом(вроде этого — Как собрать данные с нескольких листов или книг?). Но с каждым днем файлов все больше и больше и приходится заходить в папку и руками чистить её от лишних файлов, чтобы при сборе данных не приходилось каждый раз искать и отбирать только новые файлы.
Если надо удалять только конкретные файлы(например только файлы Excel, содержащие в имени слово «отчет»), то можно использовать такой код:
Sub Remove_AllFilesFromFolder()
    Dim sFolder As String, sFiles As String
    'диалог запроса выбора папки с файлами
    'подробнее про диалоги выбора папки или файла:
    '       http://www.excel-vba.ru/chto-umeet-excel/dialogovoe-okno-vybora-fajlovpapki/
    With Application.FileDialog(msoFileDialogFolderPicker)
        If .Show = False Then Exit Sub
        sFolder = .SelectedItems(1)
    End With
    sFolder = sFolder & IIf(Right(sFolder, 1) = Application.PathSeparator, "", Application.PathSeparator)
    'отбирать только файлы Excel, содержащие в имени слово "отчет"
    sFiles = Dir(sFolder & "*отчет*.xls*")
    'цикл по всем файлам в папке
    On Error Resume Next
    Do While sFiles <> ""
        'удаляем файл
        Kill sFolder & sFiles
        If Err.Number = 70 Then
            MsgBox "Невозможно удалить файл '" & sFiles & "'. Возможно файл открыт в другой программе или нет прав на удаление", vbCritical, "www.excel-vba.ru"
            Err.Clear
        End If
        'на всякий случай передаем управление системе,
        'чтобы дождаться удаления
        DoEvents
        'получаем имя следующего файла в папке
        sFiles = Dir
    Loop
End Sub
Чтобы удалять полностью все файлы в папке(а не только файлы Excel), а саму папку оставить, то строку sFiles = Dir(sFolder & «*отчет*.xls*») надо записать так: sFiles = Dir(sFolder & «*»)
Если необходимо удалять файлы по дате создания/изменения(например, только файлы, созданные раньше 01.03.2017), то можно использовать такой код:
Sub Remove_FilesFromFolder_AfterDate()
    Dim sFolder As String, sFiles As String
    Dim dd As Date, dKill As Date

    'задаем дату. Если файл был создан/изменен до этой даты - он будет удален
    dKill = CDate("01.03.2017") 'можно задать проще: dKill = #3/1/2017#
    'диалог запроса выбора папки с файлами
    'подробнее про диалоги выбора папки или файла:
    '       http://www.excel-vba.ru/chto-umeet-excel/dialogovoe-okno-vybora-fajlovpapki/
    With Application.FileDialog(msoFileDialogFolderPicker)
        If .Show = False Then Exit Sub
        sFolder = .SelectedItems(1)
    End With
    sFolder = sFolder & IIf(Right(sFolder, 1) = Application.PathSeparator, "", Application.PathSeparator)
    sFiles = Dir(sFolder & "*")
    'цикл по всем файлам в папке
    On Error Resume Next
    Do While sFiles <> ""
        'получаем дату создания или изменения файла
        dd = FileDateTime(sFolder & sFiles)
        'если дата файла меньше заданной для удаления(был создан раньше)
        If dd < dKill Then
            'удаляем файл
            Kill sFolder & sFiles
            If Err.Number = 70 Then
                MsgBox "Невозможно удалить файл '" & sFiles & "'. Возможно файл открыт в другой программе или нет прав на удаление", vbCritical, "www.excel-vba.ru"
                Err.Clear
            End If
            'на всякий случай передаем управление системе,
            'чтобы дождаться удаления
            DoEvents
        End If
        'получаем имя следующего файла в папке
        sFiles = Dir
    Loop
End Sub
Если необходимо всегда удалять файлы, дата создания которых раньше текущей, то строку dKill = CDate(«01.03.2017») нужно заменить на такую: dKill = Date. Если удалить надо файлы недельной давности, то: dKill = Date-7
Если же необходимо удалить папку полностью, а не только файлы в ней, то лучше использовать такой код:
Sub RemoveFolderWithContent()
    Dim sFolder As String, sFiles As String
    'диалог запроса выбора папки на удаление
    With Application.FileDialog(msoFileDialogFolderPicker)
        If .Show = False Then Exit Sub
        sFolder = .SelectedItems(1)
    End With
    sFolder = sFolder & IIf(Right(sFolder, 1) = Application.PathSeparator, "", Application.PathSeparator)
    'путь к папке можно задать статично, если он заранее известен и не изменяется
    '    sFolder = "C:tempЕжедневные отчеты10072017" 'путь к папке, которую надо удалить
    Shell "cmd /c rd /S/Q """ & sFolder & """"
End Sub
Этот код удалить папку вместе со всеми файлами буквально за секунду.
Вообще в VBA есть специальная команда для удаления директорий(папок) RmDir. Но она способна удалить только пустую папку, поэтому редко когда можно найти её практическое применение. Если в файле есть хоть один файл то команда RmDir выдаст ошибку ’75’ — File/Path access error.
Так же см.:
Как средствами VBA переименовать/переместить/скопировать файл
Просмотреть все файлы в папке
Как собрать данные с нескольких листов или книг?
Как удалить книгу из самой себя
Статья помогла? Поделись ссылкой с друзьями!
Видеоуроки
Поиск по меткам
Access
apple watch
Multex
Power Query и Power BI
VBA управление кодами
Бесплатные надстройки
Дата и время
Записки
ИП
Надстройки
Печать
Политика Конфиденциальности
Почта
Программы
Работа с приложениями
Разработка приложений
Росстат
Тренинги и вебинары
Финансовые
Форматирование
Функции Excel
акции MulTEx
ссылки
статистика
Return to VBA Code Examples
VBA allows you to delete an existing file, using the Kill command. In this tutorial, you will learn how to delete a specific file or multiple files.
If you want to learn how to copy and rename a file, you can click on this link: VBA Copy File
Delete a Single File (or Workbook) in VBA
We will show how to delete the file Sample file 1.xlsx in the folder VBA Folder. The folder with the file now looks like in Image 1:
Image 1. Delete a single file
Here is the code which will delete the file:
Kill "C:VBA FolderSample File 1.xlsx"After running the code, the file Sample file 1.xlsx is now deleted from the VBA Folder. The output is in Image 2:
Image 2. File deleted from the C:VBA Folder
Delete All Excel Files From the Folder
The same command enables you to delete all Excel files from the folder. You just need to put an asterisk (*) instead of the file name. An asterisk replaces any string. Here is the code:
Kill "C:VBA Folder*.xlsx"As you can see in Image 3, all Excel files from Folder VBA are deleted:
Image 3. Delete all Excel files from the C:VBA Folder
VBA Coding Made Easy
Stop searching for VBA code online. Learn more about AutoMacro — A VBA Code Builder that allows beginners to code procedures from scratch with minimal coding knowledge and with many time-saving features for all users!
Learn More!
Introduction to VBA Delete File
Sometimes when we work in VBA we create some unwanted files, or we have some unwanted files on our computer. How do we get rid of them? We can simply go and delete each file manually by locating the file and right click on it then, we click on the delete button to delete the file. Or we can press the delete button from the keyboard to delete the file. But how do we do this in VBA is what we will learn in this article.
So now we have understood the concept of this topic that we need to delete a file by using VBA macros. In VBA, we have a kill command which is used to delete a file from its location. When we simply delete the file by going through the process of locating the file and right-clicking on it to delete or press the delete button even, the file goes to the recycle bin. But when we use the Kill command in VBA to delete a file the file is permanently deleted from the computer. It doesn’t go to the recycle bin. Now let us look at the syntax which we will be using to delete a file using VBA. It is as follows:
Syntax of Delete File in Excel VBA
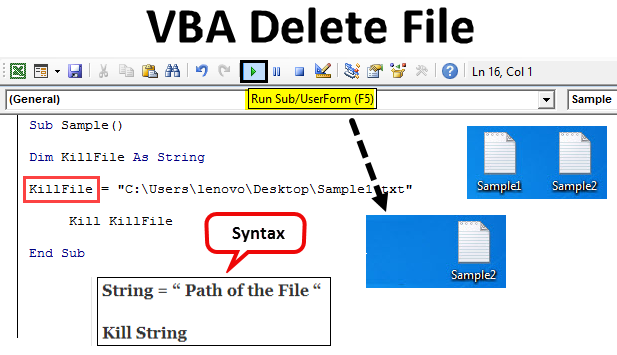
String = “ Path of the File “
Kill String
Always remember that the path of the file should be in the inverted commas. Now to delete a file in VBA we must have its path. How do we get a path of the file? We need to right-click on the file and click on properties which give us different options for the properties of the file once we click on the security tab which is the second number in the tabs we can find the path location under the object name. Have a look at the screenshot below for reference.
The path written after the object name is the argument we need to feed for the killfile function in order to delete any file. Now let us start deleting files by looking at a few examples below.
Before we move to examples always ensure that we have the developer’s tab enabled in order to use macros. It is done by moving to the files section and then to the options section. We will find a checkbox that should be checked to enable the developer’s tab. Now let us move ahead to examples. For example, I have two files named sample 1 and sample 2. Both are text files and are on desktop. Have a look at them below.
How to Delete a File Using VBA?
Let’s see the examples of Delete File in Excel VBA.
You can download this VBA Delete File Excel Templates here – VBA Delete File Excel Templates
Example #1 – VBA Delete File
Let us first delete the sample 1 file in this example. Both the examples will have one minute difference which I will explain at the end of the topic. First, we need to get a path for the sample 1 file. In order to do that right click on the file and from the properties option go to security and we will find the path to beside the object name as follows.
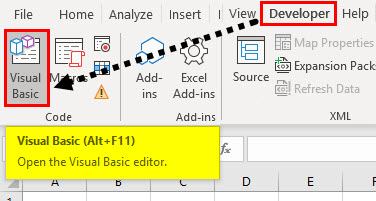
Step 1: Now let us enter into VBA from the visual basic option. It can be found under the developer’s tab.
Step 2: Once we are in VBA we need to insert a module. To enter the code window double click on the module which will take us to the code window.
Step 3: Now the first step for writing a VBA code is to name the macro as follows.
Code:
Sub Sample()

End Sub
Step 4: Declare a variable as a string which will store the path for the file.
Code:
Sub Sample()

Dim KillFile As String

End Sub
Step 5: Now let us assign the path to this string of the file we want to delete which is sample1.
Code:
Sub Sample()

Dim KillFile As String
KillFile = "C:UsersCBA_amardeepDesktopSample1.txt"

End Sub
Step 6: Now let us delete the file using the Kill Function as follows.
Code:
Sub Sample()

Dim KillFile As String
KillFile = "C:UsersCBA_amardeepDesktopSample1.txt"
Kill KillFile

End Sub
Step 7: When we run the above code and look at the desktop we can no longer find the first text file we created.
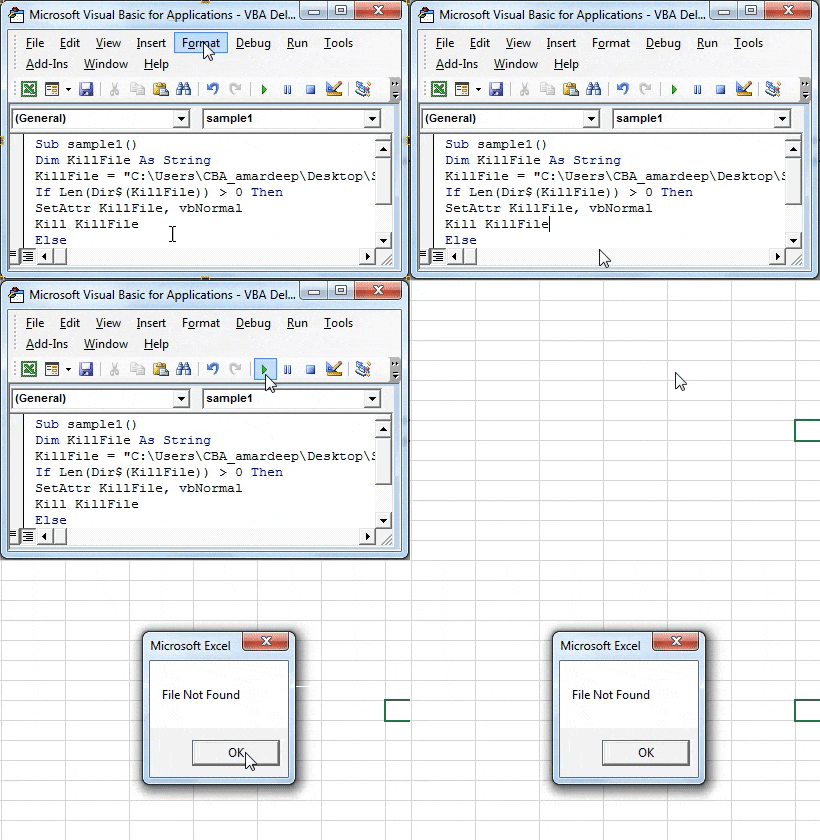
Only the second file is present and the first file is moved. Now, what happens if the file path was wrong or the file didn’t even exist. Now we have deleted the first file and it didn’t even exist so we can run the code again to check what result we will get. Run the above code again.
VBA gives us a runtime error that the file is not found. This is important which we need to keep in mind.
Example #2 – VBA Delete File
Now let us delete the second file using the kill function. Again we need to have the path for the second file for which we need to right click on the file and from the properties option go to security and we will find the path to in beside the object name as follows.
Now we have the path for the second file so let us delete this file.
Step 1: Enter into VBA through the developer’s tab.
Step 2: Once we are in VBA we need to insert a module. To enter the code window double click on the module which will take us to the code window.
Step 3: Name the macro first in order to proceed further as follows.
Code:
Sub sample1()

End Sub
Step 4: Similar to above, declare a variable as a string to store the file’s path.
Code:
Sub sample1()

Dim KillFile As String

End Sub
Step 5: In the string store the path of the file as follows.
Code:
Sub sample1()

Dim KillFile As String
KillFile = "C:UsersCBA_amardeepDesktopSample2.txt"

End Sub
Step 6: Now we will check that the file even exists using the If function as follows.
Code:
Sub sample1()

Dim KillFile As String
KillFile = "C:UsersCBA_amardeepDesktopSample2.txt"
If Len(Dir$(KillFile)) > 0 Then
SetAttr KillFile, vbNormal
  Kill KillFile
  Else
MsgBox "File Not Found"
End If

End Sub
Step 7: Now if we run the above code we can see that the file has been deleted and it is no longer in the desktop.
Step 8: In above example, we have seen that if the file doesn’t exist VBA gives us an error also in this case as the file has been deleted we can run the code again and we can see that instead of the error we get a personalized message as follows.
Things to Remember
There are few things which we need to remember about deleting a file in VBA:
- We use the Kill function to delete a file.
- We need to have the path of the specific file which is to be deleted.
- If the file is not found we encounter an error.
- The files deleted by the Kill function do not go in the recycle bin.
Recommended Articles
This is a guide to VBA Delete File. Here we discuss how to use Excel VBA Delete File along with few practical examples and downloadable excel template. You can also go through our other suggested articles –
- VBA While Loop
- VBA Remove Duplicates
- VBA Data Types
- VBA Sleep
In VBA, we can delete any file present in the computer using VBA codes. The code used to delete files is known as the “Kill” command. The method to delete any file is that first, we must provide the file’s path, which means the file’s location on the computer. Then, we use the “Kill” command to delete the file.
Table of contents
- How to Delete Files using VBA Code?
- Kill Method to Delete Files in a Folder using VBA Code
- Delete Particular File Name
- Delete All Excel Files
- Delete Entire Folder Only
- Delete All the Text Files in the Folder
- Delete Read-Only Files
- Recommended Articles
How to Delete Files using VBA Code?
VBA is a tough thing initially, but as you spend more time with VBA, you will start loving it just like me. We can open files from another computer folder and work with them. Now, we can delete files as well by using VBA coding. This article will show you how to delete files using VBA code in a specific folder.
When working with large projects, we usually create many intermediate files to support our process. we need to delete those files to avoid future confusion after completing the work.
And one scenario is when we usually receive an email. For example, we save attachments for our regular work, or we want to see the report for that point in time, and later we may need to delete those files.
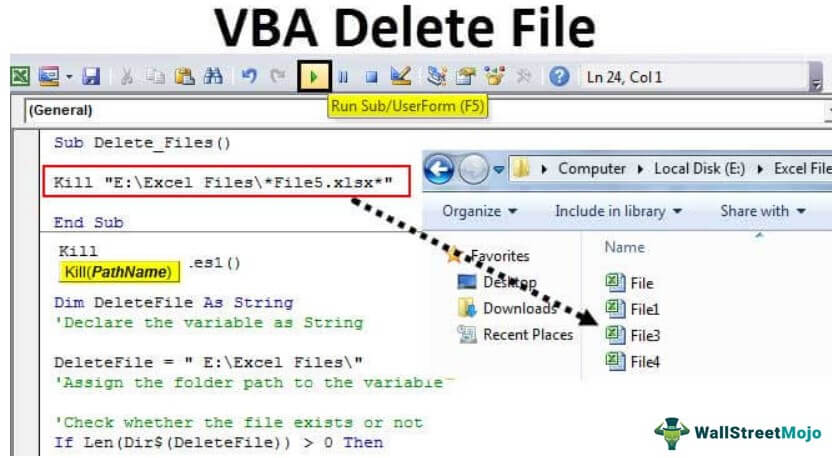
Deleting those files manually may take time, or we may forget to save them. In addition, it will occupy the space on our computer. Therefore, we will show you how to delete those files with simple VBA codesVBA code refers to a set of instructions written by the user in the Visual Basic Applications programming language on a Visual Basic Editor (VBE) to perform a specific task.read more.
You are free to use this image on your website, templates, etc, Please provide us with an attribution linkArticle Link to be Hyperlinked
For eg:
Source: VBA Delete File (wallstreetmojo.com)
Kill Method to Delete Files in a Folder using VBA Code
A simple Kill function will delete the folder, specific file, all Excel files, etc. Take a look at the syntax of the Kill method in VBA. The Kill method cannot delete read-only files.
Path Name: Pathname is nothing but the folder path in the computer to delete the files.
Note: Path Name can include wildcard characters as well. We can use an asterisk (*) and question marks (?) as wildcard characters in excelIn Excel, wildcards are the three special characters asterisk, question mark, and tilde. Asterisk denotes multiple characters, a question mark denotes a single character, and a tilde denotes the identification of a wild card character.read more.
Asterisk (*) is useful to match any length string. In addition, it also considers zero.
Question mark (?) is useful to match only a single character.
Delete Particular File Name
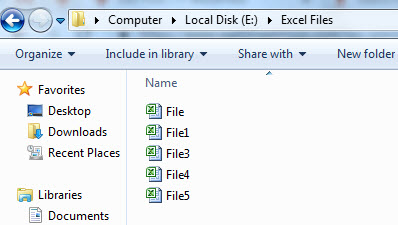
For example, we have a folder like the one below.
We want to delete the file named “File 5” in this folder. But, first, start the code with the Kill function.
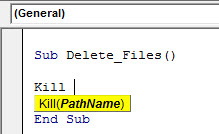
Code:
Sub Delete_Files()

Kill(PathName)

End Sub
Copy and paste the folder path.
And Paste in double-quotes.
Kill "E:Excel Files"
Now put one more backward slash () and enter the file name with extension.
Kill "E:Excel FilesFile5.xlsx"
When you run this code, it will delete the file named “File 5.xlsx” in the mentioned folder path.
Delete All Excel Files
Using VBA, we need to use wildcard characters with the Kill function to delete all the Excel files in the folder. After mentioning the folder path, we need to mention the file as “*.xl*.”
Code:
Kill "E:Excel Files*.xl*"
When you run this code, it will delete all the Excel files in the folder.
We have seen how we can delete a single Excel file and all the Excel files. But if we want to delete all the files in the folder, how can we delete them? Also, since we are using Excel VBA, can it delete other files?
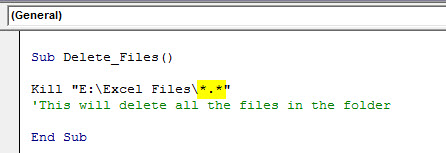
The answer is Yes! Use the below code to delete all the files in the folder.
Code:
Kill "E:Excel Files*.*"
Delete Entire Folder Only
Is it possible to delete the entire folder itself?
Yes, it is possible.
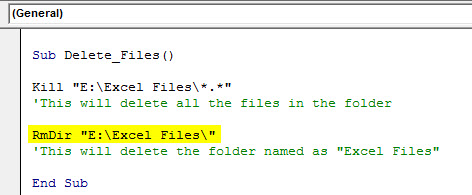
We need to delete all the files in the folder using the Kill function. Then to delete the folder, we need to use one more function called RmDir.
Code:
RmDir "E:Excel Files"
Here RmDir will delete only the empty folder if any subfolder is where it cannot delete them.
Delete All the Text Files in the Folder
To delete all the text files in the folder, use the below code.
Code:
Kill "E:Excel Files*.txt"
Delete Read-Only Files
As we said, the Kill function cannot delete “Read Only” files in the folder. In such a scenario, we need to use the other two functions: “Dir$” and “SetAttr.” Below is the example code to delete the read-only files as well.
Code:
Sub Delete_Files1()

Dim DeleteFile As String

DeleteFile = " E:Excel Files"

If Len(Dir$(DeleteFile)) > 0 Then

SetAttr DeleteFile, vbNormal

Kill DeleteFile
End If
End Sub
You can download this VBA Delete File Excel Template from here – VBA Delete File Excel Template.
Recommended Articles
This article has been a guide to VBA Delete Files. Here, we discuss the VBA code to delete 1. Particular File Name, 2. All files, 3. Entire folder, and 4. Read-only Files with downloadable Excel template. Below are some useful articles related to VBA: –
- VBA InStr
- VBA Join
- New Line in Excel VBA
- Split Function in Excel VBA


