Цикл For Each… Next в VBA Excel, его синтаксис и описание отдельных компонентов. Примеры использования цикла For Each… Next.
Цикл For Each… Next в VBA Excel предназначен для выполнения блока операторов по отношению к каждому элементу из группы элементов (диапазон, массив, коллекция). Этот замечательный цикл применяется, когда неизвестно количество элементов в группе и их индексация, в противном случае, более предпочтительным считается использование цикла For…Next.
|
For Each element In group [ statements ] [ Exit For ] [ statements ] Next [ element ] |
В квадратных скобках указаны необязательные атрибуты цикла For Each… Next.
Компоненты цикла For Each… Next
| Компонент | Описание |
|---|---|
| element | Обязательный атрибут в операторе For Each, необязательный атрибут в операторе Next. Представляет из себя переменную, используемую для циклического прохода элементов группы (диапазон, массив, коллекция), которая предварительно должна быть объявлена с соответствующим типом данных*. |
| group | Обязательный атрибут. Группа элементов (диапазон, массив, коллекция), по каждому элементу которой последовательно проходит цикл For Each… Next. |
| statements | Необязательный** атрибут. Операторы вашего кода. |
| Exit For | Необязательный атрибут. Оператор выхода из цикла до его окончания. |
*Если цикл For Each… Next используется в VBA Excel для прохождения элементов коллекции (объект Collection) или массива, тогда переменная element должна быть объявлена с типом данных Variant, иначе цикл работать не будет.
**Если не использовать в цикле свой код, смысл применения цикла теряется.
Примеры циклов For Each… Next
Цикл для диапазона ячеек
На активном листе рабочей книги Excel выделите диапазон ячеек и запустите на выполнение следующую процедуру:
|
Sub test1() Dim element As Range, a As String a = «Данные, полученные с помощью цикла For Each… Next:» For Each element In Selection a = a & vbNewLine & «Ячейка « & element.Address & _ » содержит значение: « & CStr(element.Value) Next MsgBox a End Sub |
Информационное окно MsgBox выведет адреса выделенных ячеек и их содержимое, если оно есть. Если будет выбрано много ячеек, то полностью информация по всем ячейкам выведена не будет, так как максимальная длина параметра Prompt функции MsgBox составляет примерно 1024 знака.
Цикл для коллекции листов
Скопируйте следующую процедуру VBA в стандартный модуль книги Excel:
|
Sub test2() Dim element As Worksheet, a As String a = «Список листов, содержащихся в этой книге:» For Each element In Worksheets a = a & vbNewLine & element.Index _ & «) « & element.Name Next MsgBox a End Sub |
Информационное окно MsgBox выведет список наименований всех листов рабочей книги Excel по порядковому номеру их ярлычков, соответствующих их индексам.
Цикл для массива
Присвоим массиву список наименований животных и в цикле For Each… Next запишем их в переменную a. Информационное окно MsgBox выведет список наименований животных из переменной a.
|
Sub test3() Dim element As Variant, a As String, group As Variant group = Array(«бегемот», «слон», «кенгуру», «тигр», «мышь») ‘или можно присвоить массиву значения диапазона ячеек ‘рабочего листа, например, выбранного: group = Selection a = «Массив содержит следующие значения:» & vbNewLine For Each element In group a = a & vbNewLine & element Next MsgBox a End Sub |
Повторим ту же процедуру VBA, но всем элементам массива в цикле For Each… Next присвоим значение «Попугай». Информационное окно MsgBox выведет список наименований животных, состоящий только из попугаев, что доказывает возможность редактирования значений элементов массива в цикле For Each… Next.
|
Sub test4() Dim element As Variant, a As String, group As Variant group = Array(«бегемот», «слон», «кенгуру», «тигр», «мышь») ‘или можно присвоить массиву значения диапазона ячеек ‘рабочего листа, например, выделенного: group = Selection a = «Массив содержит следующие значения:» & vbNewLine For Each element In group element = «Попугай» a = a & vbNewLine & element Next MsgBox a End Sub |
Этот код, как и все остальные в этой статье, тестировался в Excel 2016.
Цикл для коллекции подкаталогов и выход из цикла
В этом примере мы будем добавлять в переменную a названия подкаталогов на диске C вашего компьютера. Когда цикл дойдет до папки Program Files, он добавит в переменную a ее название и сообщение: «Хватит, дальше читать не буду! С уважением, Ваш цикл For Each… Next.».
|
1 2 3 4 5 6 7 8 9 10 11 12 13 14 15 16 17 18 19 20 21 22 |
Sub test5() Dim FSO As Object, myFolders As Object, myFolder As Object, a As String ‘Создаем новый FileSystemObject и присваиваем его переменной «FSO» Set FSO = CreateObject(«Scripting.FileSystemObject») ‘Извлекаем список подкаталогов на диске «C» и присваиваем ‘его переменной «myFolders» Set myFolders = FSO.GetFolder(«C:») a = «Папки на диске C:» & vbNewLine ‘Проходим циклом по списку подкаталогов и добавляем в переменную «a« ‘их имена, дойдя до папки «Program Files«, выходим из цикла For Each myFolder In myFolders.SubFolders a = a & vbNewLine & myFolder.Name If myFolder.Name = «Program Files» Then a = a & vbNewLine & vbNewLine & «Хватит, дальше читать не буду!» _ & vbNewLine & vbNewLine & «С уважением,» & vbNewLine & _ «Ваш цикл For Each... Next.« Exit For End If Next Set FSO = Nothing MsgBox a End Sub |
Информационное окно MsgBox выведет список наименований подкаталогов на диске C вашего компьютера до папки Program Files включительно и сообщение цикла о прекращении своей работы.
В результате работы программы будут выведены не только наименования подкаталогов, видимых при переходе в проводнике к диску C, но и скрытые и служебные папки. Для просмотра списка всех подкаталогов на диске C, закомментируйте участок кода от If до End If включительно и запустите выполнение процедуры в редакторе VBA Excel.
This is one of those things that I’m sure there’s a built-in function for (and I may well have been told it in the past), but I’m scratching my head to remember it.
How do I loop through each row of a multi-column range using Excel VBA? All the tutorials I’ve been searching up seem only to mention working through a one-dimensional range…
asked Sep 22, 2009 at 23:53
1
Dim a As Range, b As Range

Set a = Selection

For Each b In a.Rows
    MsgBox b.Address
Next
answered Sep 23, 2009 at 0:19
MikeMike
2,9751 gold badge18 silver badges14 bronze badges
0
Something like this:
Dim rng As Range
Dim row As Range
Dim cell As Range

Set rng = Range("A1:C2")

For Each row In rng.Rows
  For Each cell in row.Cells
    'Do Something
  Next cell
Next row
answered Sep 22, 2009 at 23:58
David AndresDavid Andres
31.2k7 gold badges45 silver badges36 bronze badges
1
Just stumbled upon this and thought I would suggest my solution. I typically like to use the built in functionality of assigning a range to an multi-dim array (I guess it’s also the JS Programmer in me).
I frequently write code like this:
Sub arrayBuilder()

myarray = Range("A1:D4")

'unlike most VBA Arrays, this array doesn't need to be declared and will be automatically dimensioned

For i = 1 To UBound(myarray)

    For j = 1 To UBound(myarray, 2)

    Debug.Print (myarray(i, j))

    Next j

Next i

End Sub
Assigning ranges to variables is a very powerful way to manipulate data in VBA.
answered Dec 9, 2015 at 1:33
tc_NYCtc_NYC
1921 gold badge2 silver badges11 bronze badges
1
In Loops, I always prefer to use the Cells class, using the R1C1 reference method, like this:
Cells(rr, col).Formula = ...
This allows me to quickly and easily loop over a Range of cells easily:
Dim r As Long
Dim c As Long

c = GetTargetColumn() ' Or you could just set this manually, like: c = 1

With Sheet1 ' <-- You should always qualify a range with a sheet!

    For r = 1 To 10 ' Or 1 To (Ubound(MyListOfStuff) + 1)

        ' Here we're looping over all the cells in rows 1 to 10, in Column "c"
        .Cells(r, c).Value = MyListOfStuff(r)

        '---- or ----

        '...to easily copy from one place to another (even with an offset of rows and columns)
        .Cells(r, c).Value = Sheet2.Cells(r + 3, 17).Value


    Next r

End With
answered Aug 20, 2015 at 16:50
LimaNightHawkLimaNightHawk
6,5033 gold badges40 silver badges60 bronze badges
0
Skip to content
Как сделать перебор диапазона ячеек
На чтение 2 мин. Просмотров 14.1k.
Что делает макрос: Этот базовый макрос показывает вам простой способ сделать перебор диапазона ячеек по одной и выполнить какое-либо действие.
Содержание
- Как макрос работает
- Код макроса
- Как этот код работает
- Как использовать
Как макрос работает
В этом макросе используются две переменные объекта Range. Одна из переменных отражает объем данных, с которым мы работаем, в то время как другая используется для хранения каждой отдельной клетки в диапазоне. Потом мы используем оператор For Each, чтобы активировать или принести каждую ячейку в фокусе целевого диапазона.
Код макроса
Sub PereborDiapazonaYacheek()
'Шаг 1: Объявить переменные
Dim MyRange As Range
Dim MyCell As Range
'Шаг 2: Определение целевого диапазона.
Set MyRange = Range("D6:D17")
'Шаг 3: Запуск цикла через диапазон.
For Each MyCell In MyRange
'Шаг 4: Какое-либо действие с каждой ячейкой.
If MyCell.Value > 3000 Then
MyCell.Font.Bold = True
End If
'Шаг 5: Перейти к следующей ячейке в диапазоне
Next MyCell
End Sub
Как этот код работает
- Макрос объявляет две переменные объекта Range. Одна из них, называется MyRange, держит весь целевой диапазон. Другая, называемый MyCell, держит каждую ячейку в диапазоне, так как макрос проводит цикл через них один за другим.
- На шаге 2 мы заполняем переменную MyRange с целевым диапазоном. В этом примере мы используем Range («D6:D17»). Если ваш целевой диапазон является именованным, можно просто ввести его название — Range («MyNamedRange»).
- На этом этапе макрос начинает цикл через каждую ячейку в целевом диапазоне, активизируя ее.
- После того, как ячейка активируется, можно с ней что-то сделать. Это «что-то» на самом деле зависит от поставленной задачи. Вы можете удалять строки, когда активная ячейка имеет определенное значение, или вы можете вставить строку между каждой активной ячейки. В этом примере макрос меняется шрифт полужирный для любого элемента, который имеет значение больше, чем 3000.
- На шаге 5, макрос возвращается назад, чтобы получить следующую ячейку. После активации всех ячеек в целевом диапазоне, макрос заканчивает работу.
Как использовать
Для реализации этого макроса, вы можете скопировать и вставить его в стандартный модуль:
- Активируйте редактор Visual Basic, нажав ALT + F11 на клавиатуре.
- Щелкните правой кнопкой мыши имя проекта / рабочей книги в окне проекта.
- Выберите Insert➜Module.
- Введите или вставьте код.
In this Article
- For Each Loop
- For Each: Basic Examples
- Loop Through Cells
- Loop Through Sheets
- Loop Through Workbooks
- Loop Through Shapes
- Loop Through Charts
- Loop Through PivotTables
- Loop Through Tables
- Loop Through Items in Array
- Loop Through Numbers
- For Each Loop Builder
- For Each – If
- For Each Cell in Range – If
- For Each Common Examples
- Close All Workbooks
- Hide All Sheets
- Unhide All Sheets
- Protect All Sheets
- Unprotect All Sheets
- Delete All Shapes On All Worksheets
- Refresh All PivotTables
- Using For Each in Access VBA
This tutorial will show you examples of using the For Each Loop in VBA. Click here to learn more about loops in general.
For Each Loop
The For Each Loop allows you to loop through each object in a collection:
- All cells in a range
- All worksheets in a workbook
- All open workbooks
- All shapes in a worksheet
- All items in an array
- and more!
For Each: Basic Examples
These examples will demonstrate how to set up For Each loops to loop through different types of objects.
Loop Through Cells
This procedure will loop through each cell in range A1:A10, setting the cell to it’s right equal to itself.
Sub ForEachCell()
    Dim Cell As Range

    For Each Cell In Sheets("Sheet1").Range("A1:A10")
        Cell.Offset(0, 1).value = Cell.value
    Next Cell

End Sub
Loop Through Sheets
This procedure will loop through each sheet in a Workbook, unhiding each sheet.
Sub ForEachSheets()
    Dim ws As Worksheet

    For Each ws In Sheets
        ws.Visible = True
    Next ws

End Sub
Loop Through Workbooks
This procedure will loop through each Workbook, closing each one.
Sub ForEachWorkbooks()
    Dim wb As Workbook

    For Each wb In Workbooks
        wb.Close
    Next wb

End Sub
Loop Through Shapes
This procedure will loop through each shape in Sheet1, deleting each one.
Sub ForEachShape()
    Dim Shp As Shape

    For Each Shp In Sheets("Sheet1").Shapes
        Shp.Delete
    Next Shp

End Sub
VBA Coding Made Easy
Stop searching for VBA code online. Learn more about AutoMacro — A VBA Code Builder that allows beginners to code procedures from scratch with minimal coding knowledge and with many time-saving features for all users!
Learn More
Loop Through Charts
This procedure will loop through each Chart in Sheet1, deleting each one.
Sub ForEachCharts()
    Dim cht As ChartObject

    For Each cht In Sheets("Sheet1").ChartObjects
        cht.Delete
    Next cht

End Sub
Loop Through PivotTables
This procedure will loop through each PivotTable in Sheet1, clearing each one
Sub ForEachPivotTables()
    Dim pvt As PivotTable

    For Each pvt In Sheets("Sheet1").PivotTables
        pvt.ClearTable
    Next pvt

End Sub
Loop Through Tables
This procedure will loop through each Table in Sheet1, deleting each one.
Sub ForEachTables()
    Dim tbl As ListObject

    For Each tbl In Sheets("Sheet1").ListObjects
        tbl.Delete
    Next tbl

End Sub
VBA Programming | Code Generator does work for you!
Loop Through Items in Array
This procedure will loop through each item in an Array, display each value in a msgbox,
Sub ForEachItemInArray()
    Dim arrValue As Variant
    Dim Item As Variant
    arrValue = Array("Item 1", "Item 2", "Item 3")

    For Each Item In arrValue
        MsgBox Item
    Next Item

End Sub
Loop Through Numbers
This procedure will loop through each number in an Array, display each value in a msgbox,
Sub ForEachNumberInNumbers()
    Dim arrNumber(1 To 3) As Integer
    Dim num As Variant

    arrNumber(1) = 10
    arrNumber(2) = 20
    arrNumber(3) = 30

    For Each num In arrNumber
        Msgbox num
    Next num

End Sub
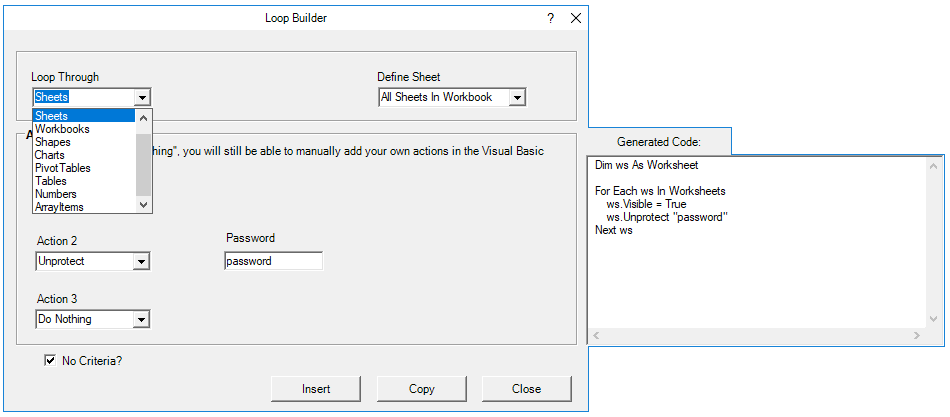
For Each Loop Builder
The examples in this article were built with the Loop Builder in our VBA Add-in: AutoMacro.
The Loop Builder makes it very easy to generate code to loop through objects. AutoMacro also contains many other Code Generators, an extensive Code Library, and powerful Coding Tools.
For Each – If
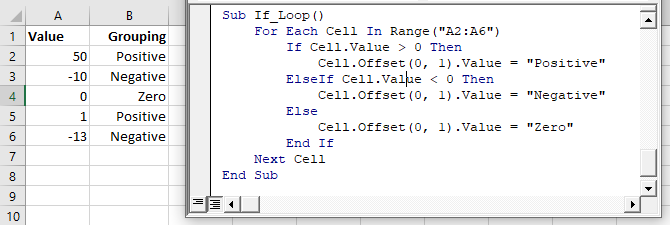
You can also use If Statements within Loops to test if objects meet certain criteria, only performing actions on those objects that meet the criteria. Here is an example of looping through each cell in a range:
For Each Cell in Range – If
Sub If_Loop()
Dim Cell as Range

  For Each Cell In Range("A2:A6")
    If Cell.Value > 0 Then
      Cell.Offset(0, 1).Value = "Positive"
    ElseIf Cell.Value < 0 Then
      Cell.Offset(0, 1).Value = "Negative"
    Else
      Cell.Offset(0, 1).Value = "Zero"
    End If
  Next Cell

End Sub
AutoMacro | Ultimate VBA Add-in | Click for Free Trial!
For Each Common Examples
Close All Workbooks
This procedure will close all open workbooks, saving changes.
Sub CloseAllWorkbooks()

    Dim wb As Workbook

    For Each wb In Workbooks
        wb.Close SaveChanges:=True
    Next wb

End Sub
Hide All Sheets
This procedure will hide all worksheets.
Sub HideAllSheets()
    Dim ws As Worksheet

    For Each ws In Sheets
        ws.Visible = xlSheetHidden
    Next ws

End Sub
Unhide All Sheets
This procedure will unhide all worksheets.
Sub UnhideAllSheets()
    Dim ws As Worksheet

    For Each ws In Sheets
        ws.Visible = xlSheetVisible
    Next ws

End Sub
AutoMacro | Ultimate VBA Add-in | Click for Free Trial!
Protect All Sheets
This procedure will protect all worksheets.
Sub ProtectAllSheets()
    Dim ws As Worksheet

    For Each ws In Sheets
        ws.Protect Password:="..."
    Next ws

End Sub
Unprotect All Sheets
This procedure will unprotect all worksheets.
Sub UnprotectAllSheets()
    Dim ws As Worksheet

    For Each ws In Sheets
        ws.Unprotect Password:="..."
    Next ws

End Sub
Delete All Shapes On All Worksheets
This procedure will delete all shapes in a workbook.
Sub DeleteAllShapesOnAllWorksheets()
    Dim Sheet As Worksheet
    Dim Shp As Shape


    For Each Sheet In Sheets
        For Each Shp In Sheet.Shapes
            Shp.Delete
        Next Shp
    Next Sheet

End Sub
Refresh All PivotTables
This procedure will refresh all PivotTables on a sheet.
Sub RefreshAllPivotTables()
    Dim pvt As PivotTable

    For Each pvt In Sheets("Sheet1").PivotTables
        pvt.RefreshTable
    Next pvt

End Sub
Using For Each in Access VBA
The For Each loop works the same way in Access VBA as it does in Excel VBA. The following example will remove all the tables in the current database.
Sub RemoveAllTables()
  Dim tdf As TableDef
  Dim dbs As Database
  Set dbs = CurrentDb
  For Each tdf In dbs.TableDefs
      DoCmd.DeleteObject tdf.Name
  Loop
  Set dbs = Nothing
End SubHow to use VBA/Macros to iterate through each cell in a range, either a row, a column, or a combination of both. This is for when you need to look into each cell or do something with each cell in a range; if you just need to search for a piece of data within a range, use the Find method (link coming soon).
Sections:
How to Loop Through a Range of Cells
Loop through a User-Selected Range
Selecting Multiple Contiguous Rows and Columns
Proper Technique (Doesn’t Matter)
Notes
How to Loop Through a Range of Cells
Here I will hard-code a specific range in Excel and create the code needed to loop or iterate through that range.
Code:
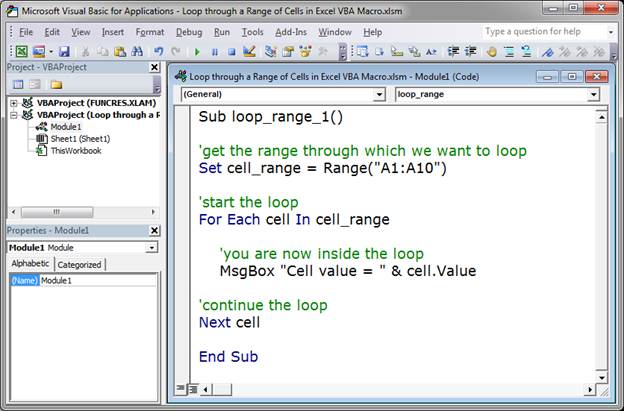
This is the full code. Below, I will explain it.
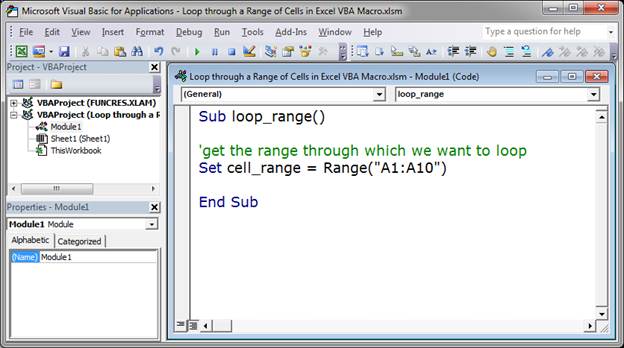
'get the range through which we want to loop
Set cell_range = Range("A1:A10")

'start the loop
For Each cell In cell_range

    'you are now inside the loop
    MsgBox "Cell value = " & cell.Value

'continue the loop
Next cell
Get the Range to Loop Through
Set cell_range = Range("A1:A10")
Here, the range A1:A10 has been assigned to the variable cell_range. You can name the variable whatever you want basically but not «Range».
I have hard-coded the range here but, below, I will show you another way to get the range, including by user selection.
Loop through the Range
Now that we have a range, we can loop through it.
There are a few ways to do this and I will show you the easiest method here.
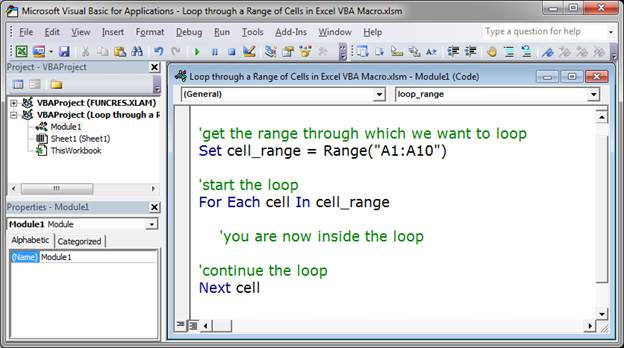
We use the For EachNext loop. It looks like this:
'start the loop
For Each cell In cell_range

    'you are now inside the loop

'continue the loop
Next cell
Put this under the code we already have like this:
This is the most basic way to loop through a range of cells in Excel using VBA/Macros.
The loop always has this format:
For Each current_cell_variable_name In range_reference(can also be a variable like in this example)
What you want to do in the loop here.
Next current_cell_variable_name
The only thing that you need to understand about this loop is where to put two variables. You need a variable that will represent the current cell that you are looping through, I called this cell in my example, and you need a variable that contains a range reference, I called this cell_range in my example.
cell_range is just what contains the range reference. You can use an actual range reference here if you want instead of using a variable that contains a range reference, but putting it into a variable like in this example will make it easier to maintain in the future.
cell is just a variable that you use ONLY for this loop. You can name it what you want, but make sure to put it after where it says «For Each» AND after where you put «Next».
Test the Loop
I will output a simple message box that shows the value of each cell so you can see that it works.
Here is the complete code (the macro has been named loop_range_1 now):
'get the range through which we want to loop
Set cell_range = Range("A1:A10")

'start the loop
For Each cell In cell_range

    'you are now inside the loop
    MsgBox "Cell value = " & cell.Value

'continue the loop
Next cell
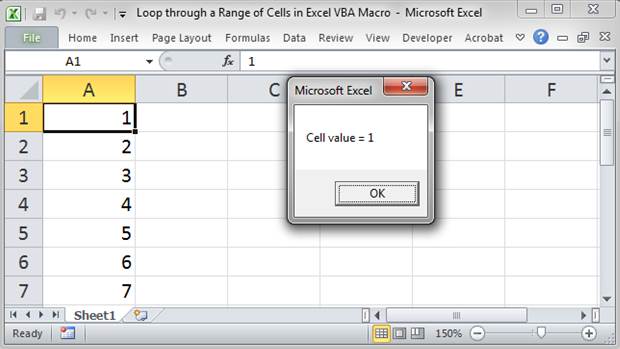
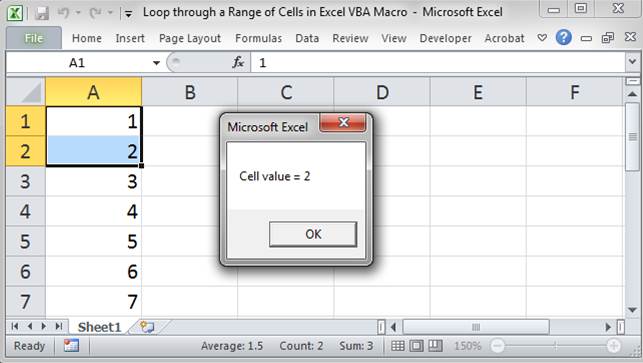
Go back to Excel, hit Alt + F8 and select the macro and hit Run and we see this:
The box will iterate through all 10 cells in the range and display the value from each cell.
Loop through a User-Selected Range
We follow the example from above but change one little thing:
'get the range through which we want to loop
Set cell_range = Selection

'start the loop
For Each cell In cell_range

    'you are now inside the loop
    MsgBox "Cell value = " & cell.Value

'continue the loop
Next cell
I replaced Range(«A1:A10») with Selection. Nothing else was changed.
Now, go back to Excel, select a range of cells, hit Alt + F8 and click the macro loop_range_selection and hit run and you will see it work.
Selecting Multiple Contiguous Rows and Columns
This works exactly the same as the previous examples. Excel doesn’t care if you select data from one row, one column, or multiples of each. It will iterate through the cells from left-to-right until it hits the end of the range and then it will go down to the next row and do the same thing.
Proper Technique (Doesn’t Matter)
Technically, you are supposed to declare all variables at the top of the macro but, for such simple things as Excel macros, this is almost never important. As such, I left that out here. If you want, you can read about variables in our other tutorials and add those, but, trust me, it is probably not worth your time and, if it is, then you are creating a macro so sophisticated that you already know about variables and won’t be reading this tutorial in the first place.
Notes
This is a pretty basic technique in Excel. It has only two parts, figuring out the range through which to loop and looping through that range.
In this example, if you select empty cells and iterate through them, there will be nothing after the «Cell value = » text in the pop-up message box.
(If you don’t know how to install/create a macro, read this tutorial: Install a Macro in Excel)
Download the accompanying Excel file to use the macros from this tutorial.


