
Цикл For… Next в VBA Excel, его синтаксис и описание отдельных компонентов. Примеры использования цикла For… Next.
Цикл For… Next в VBA Excel предназначен для выполнения группы операторов необходимое количество раз, заданное управляющей переменной цикла — счетчиком. При выполнении цикла значение счетчика после каждой итерации увеличивается или уменьшается на число, указанное выражением оператора Step, или, по умолчанию, на единицу. Когда необходимо применить цикл к элементам, количество которых и индексация в группе (диапазон, массив, коллекция) неизвестны, следует использовать цикл For Each… Next.
|
For counter = start To end [ Step step ] [ statements ] [ Exit For ] [ statements ] Next [ counter ] |
|
For счетчик = начало To конец [ Step шаг ] [ операторы ] [ Exit For ] [ операторы ] Next [ счетчик ] |
В квадратных скобках указаны необязательные атрибуты цикла For… Next.
Компоненты цикла For… Next
| Компонент | Описание |
|---|---|
| counter | Обязательный атрибут. Числовая переменная, выполняющая роль счетчика, которую еще называют управляющей переменной цикла. |
| start | Обязательный атрибут. Числовое выражение, задающее начальное значение счетчика. |
| end | Обязательный атрибут. Числовое выражение, задающее конечное значение счетчика. |
| Step* | Необязательный атрибут. Оператор, указывающий, что будет задан шаг цикла. |
| step | Необязательный атрибут. Числовое выражение, задающее шаг цикла. Может быть как положительным, так и отрицательным. |
| statements | Необязательный** атрибут. Операторы вашего кода. |
| Exit For | Необязательный атрибут. Оператор выхода из цикла до его окончания. |
| Next [ counter ] | Здесь counter — необязательный атрибут. Это то же самое имя управляющей переменной цикла, которое можно здесь не указывать. |
*Если атрибут Step отсутствует, цикл For… Next выполняется с шагом по умолчанию, равному 1.
**Если не использовать в цикле свой код, смысл применения цикла теряется.
Примеры циклов For… Next
Вы можете скопировать примеры циклов в свой модуль VBA, последовательно запускать их на выполнение и смотреть результаты.
Простейший цикл
Заполняем десять первых ячеек первого столбца активного листа Excel цифрами от 1 до 10:
|
Sub test1() Dim i As Long For i = 1 To 10 Cells(i, 1) = i Next End Sub |
Простейший цикл с шагом
В предыдущий цикл добавлен оператор Step со значением 3, а результаты записываем во второй столбец:
|
Sub test2() Dim i As Long For i = 1 To 10 Step 3 Cells(i, 2) = i Next End Sub |
Цикл с отрицательными аргументами
Этот цикл заполняет десять первых ячеек третьего столбца в обратной последовательности:
|
Sub test3() Dim i As Long For i = 0 To —9 Step —1 Cells(i + 10, 3) = i + 10 Next End Sub |
Увеличиваем размер шага до -3 и записываем результаты в четвертый столбец активного листа Excel:
|
Sub test4() Dim i As Long For i = 0 To —9 Step —3 Cells(i + 10, 4) = i + 10 Next End Sub |
Вложенный цикл
Внешний цикл последовательно задает индексы первых десяти строк активного листа, а вложенный цикл складывает числа в первых четырех ячейках строки с текущем индексом и записывает сумму в ячейку пятого столбца. Перед запуском вложенного цикла с накопительным сложением, пятую ячейку соответствующей строки обнуляем, чтобы в случае нахождения в ней какого-либо числа, оно не прибавилось к итоговой сумме.
|
Sub test5() Dim i1 As Long, i2 As Long For i1 = 1 To 10 ‘Пятой ячейке в строке i1 присваиваем 0 Cells(i1, 5) = 0 For i2 = 1 To 4 Cells(i1, 5) = Cells(i1, 5) + Cells(i1, i2) Next Next End Sub |
Выход из цикла
В шестой столбец активного листа запишем названия десяти животных, конечно же, с помощью цикла For… Next:
|
Sub test6() Dim i As Long For i = 1 To 10 Cells(i, 6) = Choose(i, «Медведь», «Слон», «Жираф», «Антилопа», _ «Крокодил», «Зебра», «Тигр», «Ящерица», «Лев», «Бегемот») Next End Sub |
Следующий цикл будет искать в шестом столбце крокодила, который съел галоши. В ячейку седьмого столбца цикл, пока не встретит крокодила, будет записывать строку «Здесь был цикл», а когда обнаружит крокодила, запишет «Он съел галоши» и прекратит работу, выполнив команду Exit For. Это будет видно по ячейкам рядом с названиями животных ниже крокодила, в которых не будет текста «Здесь был цикл».
|
Sub test7() Dim i As Long For i = 1 To 10 If Cells(i, 6) = «Крокодил» Then Cells(i, 7) = «Он съел галоши» Exit For Else Cells(i, 7) = «Здесь был цикл» End If Next End Sub |
Результат работы циклов For… Next из примеров:

Результат работы циклов For… Next
Такие данные на активном листе Excel вы получите, если последовательно запустите на выполнение в редакторе VBA все семь подпрограмм из примеров, демонстрирующих работу циклов For… Next.
Цикл с дробными аргументами
Атрибуты start, end и step могут быть представлены числом, переменной или числовым выражением:
|
For i = 1 To 20 Step 2 For i = a To b Step c For i = a — 3 To 2b + 1 Step c/2 |
В результате вычисления значения переменной вне цикла или выражения внутри его может получиться дробный результат. VBA Excel округлит его до целого числа, используя бухгалтерское округление:
|
‘Значения атрибутов до округления For i = 1.5 To 10.5 Step 2.51 ‘Округленные значения атрибутов For i = 2 To 10 Step 3 |
Старайтесь не допускать попадания в тело цикла For… Next неокругленных значений аргументов, чтобы не получить непредсказуемые результаты его выполнения. Если без дробных чисел не обойтись, а необходимо использовать обычное округление, применяйте в коде VBA функцию рабочего листа WorksheetFunction.Round для округления числа перед использованием его в цикле For… Next.
This is one of those things that I’m sure there’s a built-in function for (and I may well have been told it in the past), but I’m scratching my head to remember it.
How do I loop through each row of a multi-column range using Excel VBA? All the tutorials I’ve been searching up seem only to mention working through a one-dimensional range…
![]()
asked Sep 22, 2009 at 23:53
![]()
1
Dim a As Range, b As Range

Set a = Selection

For Each b In a.Rows
    MsgBox b.Address
Next
![]()
answered Sep 23, 2009 at 0:19
![]()
MikeMike
2,9751 gold badge18 silver badges14 bronze badges
0
Something like this:
Dim rng As Range
Dim row As Range
Dim cell As Range

Set rng = Range("A1:C2")

For Each row In rng.Rows
  For Each cell in row.Cells
    'Do Something
  Next cell
Next row
![]()
answered Sep 22, 2009 at 23:58
![]()
David AndresDavid Andres
31.2k7 gold badges45 silver badges36 bronze badges
1
Just stumbled upon this and thought I would suggest my solution. I typically like to use the built in functionality of assigning a range to an multi-dim array (I guess it’s also the JS Programmer in me).
I frequently write code like this:
Sub arrayBuilder()

myarray = Range("A1:D4")

'unlike most VBA Arrays, this array doesn't need to be declared and will be automatically dimensioned

For i = 1 To UBound(myarray)

    For j = 1 To UBound(myarray, 2)

    Debug.Print (myarray(i, j))

    Next j

Next i

End Sub
Assigning ranges to variables is a very powerful way to manipulate data in VBA.
answered Dec 9, 2015 at 1:33
![]()
tc_NYCtc_NYC
1921 gold badge2 silver badges11 bronze badges
1
In Loops, I always prefer to use the Cells class, using the R1C1 reference method, like this:
Cells(rr, col).Formula = ...
This allows me to quickly and easily loop over a Range of cells easily:
Dim r As Long
Dim c As Long

c = GetTargetColumn() ' Or you could just set this manually, like: c = 1

With Sheet1 ' <-- You should always qualify a range with a sheet!

    For r = 1 To 10 ' Or 1 To (Ubound(MyListOfStuff) + 1)

        ' Here we're looping over all the cells in rows 1 to 10, in Column "c"
        .Cells(r, c).Value = MyListOfStuff(r)

        '---- or ----

        '...to easily copy from one place to another (even with an offset of rows and columns)
        .Cells(r, c).Value = Sheet2.Cells(r + 3, 17).Value


    Next r

End With
answered Aug 20, 2015 at 16:50
![]()
LimaNightHawkLimaNightHawk
6,5033 gold badges40 silver badges60 bronze badges
0
In this Article
- VBA Loop Quick Examples
- For Each Loops
- For Next Loops
- Do While Loops
- Do Until Loops
- VBA Loop Builder
- VBA For Next Loop
- For Loop Syntax
- For Loop Step
- For Loop Step – Inverse
- Nested For Loop
- Exit For
- Continue For
- VBA For Each Loop
- For Each Cell in Range
- For Each Worksheet in Workbook
- For Each Open Workbook
- For Each Shape in Worksheet
- For Each Shape in Each Worksheet in Workbook
- For Each – IF Loop
- VBA Do While Loop
- Do While
- Loop While
- VBA Do Until Loop
- Do Until
- Loop Until
- Exit Do Loop
- End or Break Loop
- More Loop Examples
- Loop Through Rows
- Loop Through Columns
- Loop Through Files in a Folder
- Loop Through Array
- Loops in Access VBA
To work effectively in VBA, you must understand Loops.
Loops allow you to repeat a code block a set number of times or repeat a code block on a each object in a set of objects.
First we will show you a few examples to show you what loops are capable of. Then we will teach you everything about loops.
VBA Loop Quick Examples
For Each Loops
For Each Loops loop through every object in a collection, such as every worksheet in workbook or every cell in a range.
Loop Through all Worksheets in Workbook
This code will loop through all worksheets in the workbook, unhiding each sheet:
Sub LoopThroughSheets()
Dim ws As Worksheet

    For Each ws In Worksheets
        ws.Visible = True
    Next

End Sub
Loop Through All Cells in Range
This code will loop through a range of cells, testing if the cell value is negative, positive, or zero:
Sub If_Loop()
Dim Cell as Range

  For Each Cell In Range("A2:A6")
    If Cell.Value > 0 Then
      Cell.Offset(0, 1).Value = "Positive"
    ElseIf Cell.Value < 0 Then
      Cell.Offset(0, 1).Value = "Negative"
    Else
      Cell.Offset(0, 1).Value = "Zero"
     End If
  Next Cell

End Sub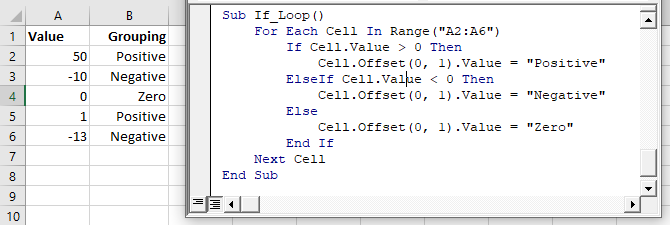
For Next Loops
Another type of “For” Loop is the For Next Loop. The For Next Loop allows you to loop through integers.
This code will loop through integers 1 through 10, displaying each with a message box:
Sub ForLoop()
    Dim i As Integer
    For i = 1 To 10
        MsgBox i
    Next i
End Sub
Do While Loops
Do While Loops will loop while a condition is met. This code will also loop through integers 1 through 10, displaying each with a message box.
Sub DoWhileLoop()
    Dim n As Integer
    n = 1
    Do While n < 11
        MsgBox n
        n = n + 1
    Loop
End Sub
Do Until Loops
Conversely, Do Until Loops will loop until a condition is met. This code does the same thing as the previous two examples.
Sub DoUntilLoop()
    Dim n As Integer
    n = 1
    Do Until n >= 10
        MsgBox n
        n = n + 1
    Loop
End Sub
We will discuss this below, but you need to be extremely careful when creating Do While or Do Until loops so that you don’t create a never ending loop.
VBA Loop Builder
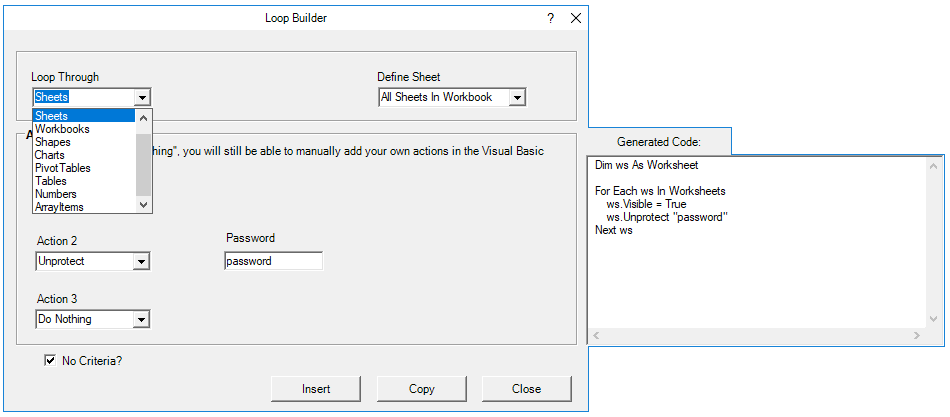
This is a screenshot of the “Loop Builder” from our Premium VBA Add-in: AutoMacro. The Loop Builder allows you to quickly and easily build loops to loop through different objects, or numbers. You can perform actions on each object and/or select only objects that meet certain criteria.
The add-in also contains many other code builders, an extensive VBA code library, and an assortment of coding tools. It’s a must have for any VBA developer.
Now we will cover the different types of loops in depth.
VBA Coding Made Easy
Stop searching for VBA code online. Learn more about AutoMacro — A VBA Code Builder that allows beginners to code procedures from scratch with minimal coding knowledge and with many time-saving features for all users!

Learn More
VBA For Next Loop
For Loop Syntax
The For Next Loop allows you to repeat a block of code a specified number of times. The syntax is:
[Dim Counter as Integer]

For Counter = Start to End [Step Value]
    [Do Something]
Next [Counter]
Where the items in brackets are optional.
- [Dim Counter as Long] – Declares the counter variable. Required if Option Explicit is declared at the top of your module.
- Counter – An integer variable used to count
- Start – The start value (Ex. 1)
- End – The end value (Ex. 10)
- [Step Value] – Allows you to count every n integers instead of every 1 integer. You can also go in reverse with a negative value (ex. Step -1)
- [Do Something] – The code that will repeat
- Next [Counter] – Closing statement to the For Next Loop. You can include the Counter or not. However, I strongly recommend including the counter as it makes your code easier to read.
If that’s confusing, don’t worry. We will review some examples:
Count to 10
This code will count to 10 using a For-Next Loop:
Sub ForEach_CountTo10()

Dim n As Integer
For n = 1 To 10
    MsgBox n
Next n

End Sub
For Loop Step
Count to 10 – Only Even Numbers
This code will count to 10 only counting even numbers:
Sub ForEach_CountTo10_Even()

Dim n As Integer
For n = 2 To 10 Step 2
    MsgBox n
Next n

End Sub
Notice we added “Step 2”. This tells the For Loop to “step” through the counter by 2. We can also use a negative step value to step in reverse:
VBA Programming | Code Generator does work for you!
For Loop Step – Inverse
Countdown from 10
This code will countdown from 10:
Sub ForEach_Countdown_Inverse()

Dim n As Integer
For n = 10 To 1 Step -1
    MsgBox n
Next n
MsgBox "Lift Off"

End Sub
Delete Rows if Cell is Blank
I’ve most frequently used a negative step For-Loop to loop through ranges of cells, deleting rows that meet certain criteria. If you loop from the top rows to the bottom rows, as you delete rows you will mess up your counter.
This example will delete rows with blank cells (starting from the bottom row):
Sub ForEach_DeleteRows_BlankCells()

Dim n As Integer
For n = 10 To 1 Step -1
    If Range("a" & n).Value = "" Then
        Range("a" & n).EntireRow.Delete
    End If
Next n

End Sub
Nested For Loop
You can “nest” one For Loop inside another For Loop. We will use Nested For Loops to create a multiplication table:
Sub Nested_ForEach_MultiplicationTable()

Dim row As Integer, col As Integer

For row = 1 To 9
    For col = 1 To 9
        Cells(row + 1, col + 1).Value = row * col
    Next col
Next row

End Sub
Exit For
The Exit For statement allows you to exit a For Next loop immediately.
You would usually use Exit For along with an If Statement, exiting the For Next Loop if a certain condition is met.
For example, you might use a For Loop to find a cell. Once that cell is found, you can exit the loop to speed up your code.
This code will loop through rows 1 to 1000, looking for “error” in column A. If it’s found, the code will select the cell, alert you to the found error, and exit the loop:
Sub ExitFor_Loop()

Dim i As Integer

For i = 1 To 1000
    If Range("A" & i).Value = "error" Then
        Range("A" & i).Select
        MsgBox "Error Found"
        Exit For
    End If
Next i

End Sub
Important: In the case of Nested For Loops, Exit For only exits the current For Loop, not all active Loops.
Continue For
VBA does not have the “Continue” command that’s found in Visual Basic. Instead, you will need to use “Exit”.
AutoMacro | Ultimate VBA Add-in | Click for Free Trial!
VBA For Each Loop
The VBA For Each Loop will loop through all objects in a collection:
- All cells in a range
- All worksheets in a workbook
- All shapes in a worksheet
- All open workbooks
You can also use Nested For Each Loops to:
- All cells in a range on all worksheets
- All shapes on all worksheets
- All sheets in all open workbooks
- and so on…
The syntax is:
For Each Object in Collection
[Do Something]
Next [Object]
Where:
- Object – Variable representing a Range, Worksheet, Workbook, Shape, etc. (ex. rng)
- Collection – Collection of objects (ex. Range(“a1:a10”)
- [Do Something] – Code block to run on each object
- Next [Object] – Closing statement. [Object] is optional, however strongly recommended.
For Each Cell in Range
This code will loop through each cell in a range:
Sub ForEachCell_inRange()

Dim cell As Range

For Each cell In Range("a1:a10")
    cell.Value = cell.Offset(0,1).Value
Next cell

End Sub
For Each Worksheet in Workbook
This code will loop through all worksheets in a workbook, unprotecting each sheet:
Sub ForEachSheet_inWorkbook()

Dim ws As Worksheet

For Each ws In Worksheets
    ws.Unprotect "password"
Next ws

End Sub
For Each Open Workbook
This code will save and close all open workbooks:
Sub ForEachWB_inWorkbooks()

Dim wb As Workbook

For Each wb In Workbooks
    wb.Close SaveChanges:=True
Next wb

End Sub
AutoMacro | Ultimate VBA Add-in | Click for Free Trial!
For Each Shape in Worksheet
This code will delete all shapes in the active sheet.
Sub ForEachShape()

Dim shp As Shape

For Each shp In ActiveSheet.Shapes
    shp.Delete
Next shp

End Sub
For Each Shape in Each Worksheet in Workbook
You can also nest For Each Loops. Here we will loop through all shapes in all worksheets in the active workbook:
Sub ForEachShape_inAllWorksheets()

Dim shp As Shape, ws As Worksheet

For Each ws In Worksheets
    For Each shp In ws.Shapes
        shp.Delete
    Next shp
Next ws

End Sub
For Each – IF Loop
As we’ve mentioned before, you can use an If statement within a loop, performing actions only if certain criteria is met.
This code will hide all blank rows in a range:
Sub ForEachCell_inRange()

Dim cell As Range

For Each cell In Range("a1:a10")
    If cell.Value = "" Then _
       cell.EntireRow.Hidden = True
Next cell

End Sub
VBA Do While Loop
The VBA Do While and Do Until (see next section) are very similar. They will repeat a loop while (or until) a condition is met.
The Do While Loop will repeat a loop while a condition is met.
Here is the Do While Syntax:
Do While Condition
[Do Something]
Loop
Where:
- Condition – The condition to test
- [Do Something] – The code block to repeat
You can also set up a Do While loop with the Condition at the end of the loop:
Do
[Do Something]
Loop While Condition
We will demo each one and show how they differ:
AutoMacro | Ultimate VBA Add-in | Click for Free Trial!
Do While
Here is the Do While loop example we demonstrated previously:
Sub DoWhileLoop()
    Dim n As Integer
    n = 1
    Do While n < 11
        MsgBox n
        n = n + 1
    Loop
End Sub
Loop While
Now let’s run the same procedure, except we will move the condition to the end of the loop:
Sub DoLoopWhile()
    Dim n As Integer
    n = 1
    Do
        MsgBox n
        n = n + 1
    Loop While n < 11
End Sub
VBA Do Until Loop
Do Until Loops will repeat a loop until a certain condition is met. The syntax is essentially the same as the Do While loops:
Do Until Condition
[Do Something]
Loop
and similarly the condition can go at the start or the end of the loop:
Do
[Do Something]
Loop Until Condition
Do Until
This do Until loop will count to 10, like our previous examples
Sub DoUntilLoop()
    Dim n As Integer
    n = 1
    Do Until n > 10
        MsgBox n
        n = n + 1
    Loop
End Sub
AutoMacro | Ultimate VBA Add-in | Click for Free Trial!
Loop Until
This Loop Until loop will count to 10:
Sub DoLoopUntil()
    Dim n As Integer
    n = 1
    Do
        MsgBox n
        n = n + 1
    Loop Until n > 10
End Sub
Exit Do Loop
Similar to using Exit For to exit a For Loop, you use the Exit Do command to exit a Do Loop immediately
Exit DoHere is an example of Exit Do:
Sub ExitDo_Loop()

Dim i As Integer
i = 1

Do Until i > 1000
    If Range("A" & i).Value = "error" Then
        Range("A" & i).Select
        MsgBox "Error Found"
        Exit Do
    End If
    i = i + 1
Loop

End Sub
End or Break Loop
As we mentioned above, you can use the Exit For or Exit Do to exit loops:
Exit ForExit DoHowever, these commands must be added to your code before you run your loop.
If you are trying to “break” a loop that’s currently running, you can try pressing ESC or CTRL + Pause Break on the keyboard. However, this may not work. If it doesn’t work, you’ll need to wait for your loop to end or, in the case of an endless loop, use CTRL + ALT + Delete to force close Excel.
This is why I try to avoid Do loops, it’s easier to accidentally create an endless loop forcing you to restart Excel, potentially losing your work.
More Loop Examples
AutoMacro | Ultimate VBA Add-in | Click for Free Trial!
Loop Through Rows
This will loop through all the rows in a column:
Public Sub LoopThroughRows()

Dim cell As Range

For Each cell In Range("A:A")
    If cell.value <> "" Then MsgBox cell.address & ": " & cell.Value
Next cell

End Sub
Loop Through Columns
This will loop through all columns in a row:
Public Sub LoopThroughColumns()

Dim cell As Range

For Each cell In Range("1:1")
    If cell.Value <> "" Then MsgBox cell.Address & ": " & cell.Value
Next cell

End Sub
Loop Through Files in a Folder
This code will loop through all files in a folder, creating a list:
Sub LoopThroughFiles ()

Dim oFSO As Object
Dim oFolder As Object
Dim oFile As Object
Dim i As Integer

Set oFSO = CreateObject("Scripting.FileSystemObject")

Set oFolder = oFSO.GetFolder("C:Demo)

i = 2

For Each oFile In oFolder.Files
    Range("A" & i).value = oFile.Name
    i = i + 1
Next oFile

End Sub
Loop Through Array
This code will loop through the array ‘arrList’:
For i = LBound(arrList) To UBound(arrList)
    MsgBox arrList(i)
Next i
The LBound function gets the “lower bound” of the array and UBound gets the “upper bound”.
Loops in Access VBA
Most of the examples above will also work in Access VBA. However, in Access, we loop through the Recordset Object rather than the Range Object.
Sub LoopThroughRecords()
   On Error Resume Next
   Dim dbs As Database
   Dim rst As Recordset
   Set dbs = CurrentDb
   Set rst = dbs.OpenRecordset("tblClients", dbOpenDynaset)
   With rst
      .MoveLast
      .MoveFirst
      Do Until .EOF = True
         MsgBox (rst.Fields("ClientName"))
        .MoveNext
     Loop
   End With
   rst.Close
   Set rst = Nothing
   Set dbs = Nothing
End SubThis post provides a complete guide to the standard VBA For Loop and the VBA For Each Loop.
If you are looking for information about the VBA While and VBA Do Loop then go here.
If you want some quick info about the For loops then check out the Quick Guide table in the section below.
If you are looking for information on a particular topic then check out the Table of Contents below.
“History is about loops and continuums” – Mike Bidlo.
Related Links for the VBA For Loop
The Complete Guide to Ranges in Excel VBA.
The Complete Guide to Copying Data in Excel VBA.
VBA Do While Loop.
A Quick Guide to the VBA For Loop
| Loop format | Description | Example |
|---|---|---|
| For … Next | Run 10 times | For i = 1 To 10 Next |
| For … Next | Run 5 times. i=2,4, 6 etc. | For i = 2 To 10 Step 2 Next |
| For … Next | Run in reverse order | For i = 10 To 1 Step -1 Debug.Print i Next |
| For … Next | Go through Collection | For i = 1 To coll.Count Debug.Print coll(i) Next |
| For … Next | Go through array | For i = LBound(arr) To UBound(arr) Debug.Print arr(i) Next i |
| For … Next | Go through 2D array | For i = LBound(arr) To UBound(arr) For j = LBound(arr,2) To UBound(arr,2) Debug.Print arr(i, j) Next j Next i |
| For Each … Next | Go through Collection | Dim item As Variant For Each item In coll Debug.Print item Next item |
| For Each … Next | Go through array | Dim item As Variant For Each item In arr Debug.Print item Next item |
| For Each … Next | Go through 2D array | Dim item As Variant For Each item In arr Debug.Print item Next item |
| For Each … Next | Go through Dictionary | Dim key As Variant For Each key In dict.Keys Debug.Print key, dict(key) Next key |
| Both types | Exit Loop | For i = 1 To 10 If Cells(i,1) = «found» Then Exit For End If Next i |
The VBA For Loop Webinar
If you are a member of the website, click on the image below to view the webinar for this post.
(Note: Website members have access to the full webinar archive.)

Introduction to the VBA For Loop
Loops are by far the most powerful component of VBA. They are the rocket fuel of your Macros. They can perform tasks in milliseconds that would take humans hours. They also dramatically reduce the lines of code your applications need.
For Loops have been part of all major programming languages since they were first used with Fortan in 1957.
If you have never used loops before then this post is a great place to start. It provides an in-depth guide to loops, written in plain English without the jargon.
Let’s start with a very important question – what are loops and why do we need them?
What are VBA For Loops?
A loop is simply a way of running the same lines of code a number of times. Obviously running the same code over and over would give the same result.
So what is important to understand is that the lines of code normally contain a variable that changes slightly each time the loop runs.
For example, a loop could write to cell A1, then cell A2, A3 and so on. The slight change each time is the row.
Let’s look at a simple example.
VBA For Loop Example 1
The following code prints the values 1 to 5 in the Immediate Window(Ctrl + G to view).
Debug.Print 1
Debug.Print 2
Debug.Print 3
Debug.Print 4
Debug.Print 5
The Immediate Window
If you have not used the Immediate Window before then this section will get you up to speed quickly.
The function Debug.Print writes values to the Immediate Window. To view this window select View->Immediate Window from the menu( the shortcut is Ctrl + G)


VBA For Loop Example 2
Now imagine we want to print out the numbers 1 to 20. We would need to add 15 more lines to the example above.
However, using a loop we only need to write Debug.Print once.
    For i = 1 To 20
        Debug.Print i
    Next i
The output is:

Output
If we needed print the numbers 1 to 1000 then we only need to change the 20 to 1000.
Normally when we write code we would use a variable instead of a number like 20 or 1000. This gives you greater flexibility. It allows you to decide the number of times you wish to run the loop when the code is running. The following example explains this.
VBA For Loop Example 3
A common task in Excel is read all the rows with with data.
The way you approach this task is as follows
- Find the last row with data
- Store the value in variable
- Use the variable to determine how many times the loop runs
Using a variable in the loop makes your code very flexible. Your will work no matter how many rows there are.
Let’s have a look at an example. Imagine you receive a sheet with a list of fruit types and their daily sales. You want to count the number of Oranges sold and this list will vary in size depending on sales.
The following screenshot shows an example of this list

Sample Data of Fruit Sales
We can use the code to count the oranges
' https://excelmacromastery.com/
Sub CountFruit()

    ' Get the last row with text
    Dim LastRow As Long
    LastRow = Sheet1.Cells(Sheet1.Rows.Count, 1).End(xlUp).Row

    Dim i As Long, Total As Long
    ' Use LastRow in loop
    For i = 2 To LastRow
        ' Check if cell has text "Orange"
        If Sheet1.Cells(i, 1).Value = "Oranges" Then
            ' Add value in column B to total
            Total = Total + Sheet1.Cells(i, 2).Value
        End If
    Next i

    ' Print total
    Debug.Print "Total oranges sold was:"; Total

End Sub
You can try this code for yourself. Change the number of fruit items and you will see that the code still works fine.
If you were to increase the number fruit items to a large value like 10,000 then you will hardly notice the difference in the time it takes to run – almost instantly.
Loops are super fast. This is what makes them so powerful. Imagine performing a manual task on 10,000 cells. It would take a considerable amount of time.
Advantages of the VBA For Loop
4To conclude this section we will list the major advantages of using loops
- They reduce the lines code you need
- They are flexible
- They are fast
In the next sections we will look at the different types of loops and how to use them.
The Standard VBA For Loop
The VBA For loop is the most common loop you will use in Excel VBA. The For Loop is used when you can determine the number of times it will be run. For example, if you want to repeat something twenty times.
YouTube Video For Loop
Check out this YouTube Video of the For Loop:
Get the workbook and code for this video here
Format of the Standard VBA For Loop
The Standard VBA For Loop has the following format:
For <variable> = <start value> to <end value>
Next <variable>
The start and end values can be variables. Also the variable after Next is optional but it is useful and it makes it clear which for loop it belongs to.
How a For Loop Works
Let’s look at a simple for loop that prints the numbers 1 to 3
    Dim i As Long
    For i = 1 To 3
        Debug.Print i
    Next i
How this code works is as follows
i is set to 1
The value of i(now 1) is printed
i is set to 2
The value of i(now 2) is printed
i is set to 3
The value of i(now 3) is printed
If we did not use a loop then the equivalent code would be
    Dim i As Long
    i = i + 1
    Debug.Print i
    i = i + 1
    Debug.Print i
    i = i + 1
    Debug.Print i
The i = i + 1 line is used to add 1 to i and is a common way in programming to update a counter.
Using Step with the VBA For Loop
You can see that i is increased by one each time. This is the default. You can specify this interval using Step keyword.
The next example shows you how to do this:
    ' Prints the even numbers i.e. 2,4,6,8 ... 20
    For i = 2 To 20 Step 2
        Debug.Print i
    Next i
You can use a negative number with Step which will count in reverse
    ' Prints the even numbers in reverse i.e. 20,18,16,14 ... 2
    For i = 20 To 2 Step -2
        Debug.Print i
    Next i
Note: if Step is positive then your starting number must be lower than you ending number. The following loop will not run because the starting number 20 is greater than 10. VBA therefore, thinks it has already reached the target value 10.
    ' Will not run as starting number already greater than 10
    For i = 20 To 10 Step 1
        Debug.Print i
    Next i
If Step is negative then the start number must be greater than the end number.
Exit the For Loop
Sometimes you may want to leave the loop earlier if a certain condition occurs. For example if you read bad data.
You can use Exit For to automatically leave the loop as shown in the following code
    For i = 1 To 1000

        ' If cell is blank then exit for
        If Cells(i, 1) = "" Then
            MsgBox "Blank Cell found - Data error"
            Exit For
        End If

    Next i
Using the VBA For Loop with a Collection
The For loop can also be used to read items in a Collection.
In the following example, we display the name of all the open workbooks
    Dim i As Long
    For i = 1 To Workbooks.Count
        Debug.Print Workbooks(i).FullName
    Next i
Using Nested For Loops
Sometimes you may want to use a loop within a loop. An example of this would be where you want to print the names of the worksheets of each open workbook.
The first loop would go through each workbook. Each time this loop runs it would use a second loop to go through all the worksheets of that workbook. It is actually much easier to do than it sounds.
The following code shows how:
' https://excelmacromastery.com/
Sub ListWorksheets()

    Dim i As Long, j As Long
    ' First Loop goes through all workbooks
    For i = 1 To Workbooks.Count

        ' Second loop goes through all the worksheets of workbook(i)
        For j = 1 To Workbooks(i).Worksheets.Count
            Debug.Print Workbooks(i).Name + ":" + Worksheets(j).Name
        Next j

    Next i

End Sub
This works as follows:
The first loop sets i to 1
The second loop then uses the workbook at 1 to go through the worksheets.
The first loop sets i to 2
The second loop then uses the workbook at 2 to go through the worksheets.
and so on
It the next section we will use a For Each loop to perform the same task. You will find the For Each version much easier to read.
The VBA For Each Loop
The VBA For Each loop is used to read items from a collection or an array. We can use the For Each loop to access all the open workbooks. This is because Application.Workbooks is a collection of open workbooks.
This is a simple example of using the For Each Loop
    Dim wk As Workbook
    For Each wk In Workbooks
        Debug.Print wk.FullName
    Next wk
Format of the VBA For Each Loop
You can see the format of the VBA for each loop here(See Microsoft For Each Next documentation):
For Each <variable> in <collection>
Next <variable>
To create a For Each loop we need a variable of the same type that the collection holds. In the example here we created a variable of type Workbook.
If the collection has different types of items we can declare the variable as a variant.
VBA contains a collection called Sheets. This is a collection of sheets of type Worksheet(normal) and Chart(when you move a chart to be a full sheet). To go through this collection you would declare the variable as a Variant.
The following code uses For Each to print out the name of all the sheets in the current workbook
    Dim sh As Variant
    For Each sh In ThisWorkbook.Sheets
        Debug.Print sh.Name
    Next sh
Order of Items in the For Loop
For Each goes through items in one way only.
For example, if you go through all the worksheets in a workbook it will always go through from left to right. If you go through a range it will start at the lowest cell e.g. Range(“A1:A10”) will return A1,A2,A3 etc.
This means if you want any other order then you need to use the For loop.
Both loops in the following example will read the worksheets from left to right:
    ' Both loops read the worksheets from left to right
    Dim wk As Worksheet
    For Each wk In ThisWorkbook.Worksheets
        Debug.Print wk.Name
    Next

    Dim i As Long
    For i = 1 To ThisWorkbook.Worksheets.Count
        Debug.Print ThisWorkbook.Worksheets(i).Name
    Next
As you can see the For Each loop is neater to write. However if you want to read the sheets in any other order e.g. right to left then you have to use the for loop:
    ' Reading the worksheets from right to left
    Dim i As Long
    For i = ThisWorkbook.Worksheets.Count To 1 Step -1
        Debug.Print ThisWorkbook.Worksheets(i).Name
    Next
Using the VBA For Each Loop With Arrays
One thing to keep in my is that the For Each loop is that it is read-only when you use it with arrays.
The following example demonstrates this:
' https://excelmacromastery.com/
Sub UseForEach()

    ' Create array and add three values
    Dim arr() As Variant
    arr = Array("A", "B", "C")

    Dim s As Variant
    For Each s In arr
        ' Changes what s is referring to - not value of array item
        s = "Z"
    Next

    ' Print items to show the array has remained unchanged
    For Each s In arr
        Debug.Print s
    Next

End Sub
In the first loop we try to assign s to “Z”. When happens is that s is now referring the string “Z” and no longer to the item in the array.
In the second loop we print out the array and you can see that none of the values have changed.
When we use the For Loop we can change the array item. If we change the previous code to use the For Loop you it will change all the array values to “Z”
' https://excelmacromastery.com/
Sub UsingForWithArray()

    ' Create array and add three values
    Dim arr() As Variant
    arr = Array("A", "B", "C")

    Dim i As Long
    For i = LBound(arr) To UBound(arr)
        ' Changes value at position to Z
        arr(i) = "Z"
    Next

    ' Print items to show the array values have change
    For i = LBound(arr) To UBound(arr)
        Debug.Print arr(i)
    Next

End Sub
If your Collection is storing Objects the you can change the items using a For Each loop.
Using Nested For Each Loops
We saw already that you can have a loop inside other loops. Here is the example from above:
' https://excelmacromastery.com/
Sub ListWorksheets()

    Dim i As Long, j As Long
    ' First Loop goes through all workbooks
    For i = 1 To Workbooks.Count

        ' Second loop goes through all the worksheets of workbook(i)
        For j = 1 To Workbooks(i).Worksheets.Count
            Debug.Print Workbooks(i).Name + ":" + Worksheets(j).Name
        Next j

    Next i

End Sub
This time we will use the For Each loop to perform the same task:
' https://excelmacromastery.com/
Sub ReadAllWorksheets()

    Dim wk As Workbook, sh As Worksheet
    ' Read each workbook
    For Each wk In Workbooks

        ' Read each worksheet in the wk workbook
        For Each sh In wk.Worksheets
            ' Print workbook name and worksheet name
            Debug.Print wk.Name + ": " + sh.Name
        Next sh

    Next wk

End Sub
As you can see this is a neater way of performing this task than using the For Loop:
This code run as follows:
- Get the first Workbook from the Workbooks collection
- Go through all the worksheets in this workbook
- Print the workbook/worksheet details
- Get the next workbooks in the collection
- Repeat steps 2 to 3
- Continue until no more workbooks are left in the collection
How to Loop Through a Range
In Excel VBA, the most common use of a For Loop is to read through a range.
Imagine we have the data set in the screenshot below. Our task is to write code that will read through the data and copy the amounts to the column J. We are only going to copy amounts that are greater than 200,000.

The following example shows how we do it:
' Read through an Excel Range using the VBA For Loop
' https://excelmacromastery.com/
Sub ForLoopThroughRange()

    ' Get the worksheet
    Dim sh As Worksheet
    Set sh = ThisWorkbook.Worksheets("Sheet1")

    ' Get the Range
    Dim rg As Range
    Set rg = sh.Range("A1").CurrentRegion

    ' Delete existing output
    sh.Range("J1").CurrentRegion.ClearContents

    ' Set the first output row
    Dim row As Long
    row = 1

    ' Read through all the rows using the For Loop
    Dim i As Long
    For i = 2 To rg.Rows.Count

        ' Check if amount is greater than 200000
        If rg.Cells(i, 4).Value > 200000 Then

            ' Copy amount to column m
            sh.Cells(row, "J").Value = rg.Cells(i, 4).Value

            ' Move to next output row
            row = row + 1

        End If

    Next i

End Sub
This is a very basic example of copying data using Excel VBA. If you want a complete guide to copying data using Excel VBA then check out this post
Summary of the VBA For Loops
The Standard VBA For Loop
- The For loop is slower than the For Each loop.
- The For loop can go through a selection of items e.g. 5 to 10.
- The For loop can read items in reverse e.g. 10 to 1.
- The For loop is not as neat to write as the For Each Loop especially with nested loops.
- To exit a For loop use Exit For.
The VBA For Each Loop
- The For Each loop is faster than the For loop.
- The For Each loop goes through all items in the collectionarray.
- The For Each loop can go through items in one order only.
- The For Each loop is neater to write than a For Loop especially for nested loops.
- To exit a For Each loop use Exit For.
What’s Next?
Free VBA Tutorial If you are new to VBA or you want to sharpen your existing VBA skills then why not try out the The Ultimate VBA Tutorial.
Related Training: Get full access to the Excel VBA training webinars.
(NOTE: Planning to build or manage a VBA Application? Learn how to build 10 Excel VBA applications from scratch.)
На чтение 13 мин. Просмотров 26.4k.

Рамакришна, Источники индийской мудрости
Сейчас … мы идем по кругу
Эта статья содержит полное руководство по VBA Do While и VBA While Loops. (Если вы ищете информацию о циклах VBA For и For Each, перейдите сюда)
Цикл VBA While существует, чтобы сделать его совместимым со старым кодом. Однако Microsoft рекомендует использовать цикл Do Loop, поскольку он более «структурирован и гибок». Оба этих цикла рассматриваются в этом посте.
Для быстрого ознакомления с этими циклами перейдите к таблице быстрого руководства ниже.
Если вы ищете что-то конкретное, вы можете посмотреть содержание ниже.
Содержание
- Краткое руководство по VBA While Loops
- Введение
- Цикл For против цикла Do While
- Условия
- Формат цикла Do
- Цикл Exit Do
- While Wend
- Бесконечный цикл
- Использование функций Worksheet вместо циклов
- Резюме
Краткое руководство по VBA While Loops
| Формат цикла | Описание | Пример |
| Do While … Loop | Запускается 0 или более раз, пока условие выполняется | Do While result = «Верно» Loop |
| Do … Loop While | Запускается 1 или более раз, пока условие выполняется | Do Loop While result = «Верно» |
| Do Until … Loop | Запускается 0 или более раз, пока условие не будет выполнено | Do Until result <> «Верно» Loop |
| Do … Until Loop | Запускается 1 или более раз, пока условие не будет выполнено | Do Loop Until result <> «Верно» |
| While … Wend R |
Запускается 0 или более раз, пока условие истинно. Примечание: этот цикл считается устаревшим. |
While result = «Верно» Wend |
| Exit the Do Loop | Завершает Do | Do While i < 10 i = GetTotal If i < 0 Then Exit Do End If Loop |
Введение
Если вы никогда ранее не использовали циклы, тогда вы можете прочитать «Что такое циклы и зачем они вам нужны» из моего поста в журнале For Loop.
Я собираюсь сосредоточиться в основном на Do Loop в этой статье. Как я упоминал выше, мы видели, что цикл While Wend считается устаревшим. Для полноты информации я все равно его включил в эту статью.
Итак, во-первых, зачем нам нужны циклы Do While, когда у нас уже есть циклы For?
Цикл For против цикла Do While
Когда мы используем цикл For Loop, мы заранее знаем, сколько раз мы хотим его запустить. Например, мы можем захотеть запустить цикл один раз для каждого элемента в коллекции, массиве или словаре.
В следующем примере кода мы видим в начале каждого цикла, сколько раз он будет выполняться.
' запускается 5 раз
For i = 1 To 5

' запускается один раз для каждого элемента коллекции
For i = 1 To coll.Count

' запускается один раз для каждого элемента в arr
For i = LBound(arr) To coll.lbound(arr)

' запускается один раз для каждого значения от 1 до значения в lastRow
For i = 1 To lastRow

' запускается один раз для каждого элемента в коллекции
For Each s In coll
Цикл Do другой. Он работает:
- В то время как условие верно
- Пока условие не будет выполнено
Другими словами, количество циклов в большинстве случаев не имеет значения.
Итак, что такое условие и как мы их используем?
Условия
Условие — это утверждение, которое оценивается как истинное или ложное. Они в основном используются с операторами Loops и If. При создании условия вы используете такие знаки, как >, <, <>,> =, =.
Ниже приведены примеры условий
| Условие | Истина, когда… |
| x < 5 | x меньше 5 |
| x <= 5 | x меньше либо равен 5 |
| x > 5 | x больше 5 |
| x >= 5 | x больше либо равен 5 |
| x = 5 | x равен 5 |
| x <> 5 | x не равен 5 |
| x > 5 And x < 10 | x больше 5 И меньше 10 |
| x = 2 Or x >10 | x равен 2 ИЛИ больше 10 |
| Range(«A1») = «Иван» | Ячейка A1 содержит текст «Иван» |
| Range(«A1») <> «Иван» | Ячейка A1 не содержит текст «Иван» |
Вы могли заметить x = 5 как условие. Его следует путать с х = 5, при использовании в качестве назначения.
Например
' означает: значение 6 будет храниться в х
x = 6

' означает: х равен 6?
If x = 6

' означает: х равен 6?
Do While x = 6
В следующей таблице показано, как «=» используется в условиях и назначениях.
| Использование «=» | Тип | Имеется в виду |
| Loop Until x = 5 | Условие | x равен 5? |
| Do While x = 5 | Условие | x равен 5? |
| If x = 5 Then | Условие | x равен 5? |
| For x = 1 To 5 | Присваивание | Установите значение x = 1, затем = 2 и т.д. |
| x = 5 | Присваивание | Установите значение x=5 |
| b = 6 = 5 | Присваивание и условие |
Присвойте b результату условия 6 = 5 |
| x = MyFunc(5,6) | Присваивание | Присвойте х значение, возвращаемое функцией |
Формат цикла Do
Цикл Do можно использовать четырьмя способами, и это часто вызывает путаницу. Однако в каждом из этих четырех способов есть только небольшая разница.
Do всегда в начале первой строки, а Loop всегда в конце последней строки.
Мы можем добавить условие после любой строки.
Do [условие]
Loop

Do
Loop [условие]
Условию предшествует While или Until, которое дает нам эти четыре возможности
Do While [условие]
Loop

Do Until [условие]
Loop

Do
Loop While [условие]

Do
Loop Until [условие]
Давайте посмотрим на некоторые примеры, чтобы прояснить это.
Примеры цикла Do
Представьте, что вы хотите, чтобы пользователь ввел список элементов. Каждый раз, когда пользователь вводит элемент, вы печатаете его в «Immediate Window». Когда пользователь вводит пустую строку, вы хотите, чтобы приложение закрывалось.
В этом случае цикл For не подойдет, поскольку вы не знаете, сколько элементов будет вводить пользователь. Пользователь может ввести пустую строку первым или с сотой попытки. Для этого типа сценария вы бы использовали цикл Do.
Следующий код показывает это
 Dim sCommand As String

    Do
        ' Получить пользовательский ввод
        sCommand = InputBox("Пожалуйста, введите элемент")

        ' Печать в Immediate Window (Ctrl + G для просмотра)
        Debug.Print sCommand

    Loop While sCommand <> ""
Код входит в цикл и продолжается до тех пор, пока не достигнет строки «Loop While». На этом этапе он проверяет, оценивается ли условие как истинное или ложное.
Если условие оценивается как ложное, то код выходит из цикла и продолжается.
Если условие оценивается как истинное, то код возвращается к строке Do и снова проходит через цикл.
Разница между наличием условия на линии Do и на линии Loop очень проста.
Когда условие находится в строке Do, цикл может вообще не работать. Так что он будет работать ноль или более раз.
Когда условие находится на линии Loop, цикл всегда будет запущен хотя бы один раз. Так что он будет запущен один или несколько раз.
В нашем последнем примере условие находится в строке Loop, потому что мы всегда хотим получить хотя бы одно значение от пользователя. В следующем примере мы используем обе версии цикла. Цикл будет выполняться, пока пользователь не введет букву «н».
Sub GetInput()

    Dim sCommand As String

    ' Условие в начале
    Do While sCommand <> "н"
        sCommand = InputBox("Пожалуйста, введите элемент для цикла 1")
    Loop

    ' Условие в конце
    Do
        sCommand = InputBox("Пожалуйста, введите элемент для цикла 2")
    Loop While sCommand <> "н"

End Sub
В приведенном выше примере оба цикла будут вести себя одинаково.
Однако, если мы установим для sCommand значение «н» до запуска цикла «Do While», код не войдет в цикл.
Sub GetInput2()

    Dim sCommand As String
    sCommand = "н"

    ' Цикл не будет работать, поскольку команда "н"
    Do Whilel sCommand <> "н"
        sCommand = InputBox("Пожалуйста, введите элемент для цикла 1")
    Loop

    ' Цикл все равно будет запущен хотя бы один раз
    Do
        sCommand = InputBox("Пожалуйста, введите элемент для цикла 2")
    Loop While sCommand <> "н"

End Sub
Второй цикл в вышеприведенном примере (то есть Loop While) всегда будет запускаться хотя бы один раз.
While против Until
При использовании Do Loop условию должно предшествовать Until или While.
Until и While, по сути, противоположны друг другу. Они используются в VBA аналогично тому, как они используются в английском языке.
Например:
- Оставьте одежду, пока не пойдет дождь
- Оставь одежду, пока не идет дождь
Другой пример:
- Оставайся в постели, пока не станет светло
- Оставайся в постели, пока темно
Еще один пример:
- повторять, пока число не станет больше или равно десяти
- повторить пока счет меньше десяти
Как видите, использование Until и While — это просто противоположный способ написания одного и того же условия.
Примеры Until и While
Следующий код показывает циклы «While» и «Until» рядом. Как видите, единственная разница в том, что условие полностью изменено.
Примечание: знаки <> означают «не равно».
Sub GetInput()

    Dim sCommand As String

    ' Условие в начале
    Do Until sCommand = "н"
        sCommand = InputBox("Пожалуйста, введите элемент для цикла 1")
    Loop

    Do While sCommand <> "н"
        sCommand = InputBox("Пожалуйста, введите элемент для цикла 1")
    Loop

    ' Условие в конце
    Do
        sCommand = InputBox("Пожалуйста, введите элемент для цикла 2")
    Loop Until sCommand = "н"

    Do
        sCommand = InputBox("Пожалуйста, введите элемент для цикла 2")
    Loop While sCommand <> "н"

End Sub
- Первый цикл: запускается только в том случае, если sCommand не равен ‘н’.
- Второй цикл: запускается только в том случае, если sCommand не равен ‘н’.
- Третий цикл: будет запущен хотя бы один раз перед проверкой sCommand.
- Четвертый цикл: будет запущен хотя бы один раз перед проверкой sCommand.
Пример: проверка объектов
Примером использования Until и While является проверка объектов. Когда объект не был назначен, он имеет значение Nothing.
Поэтому, когда мы объявляем переменную книги в следующем примере, она имеет значение Nothing, пока мы не назначим ее Workbook.
Противоположностью Nothing не является Nothing, что может сбить с толку.
Представьте, что у нас есть две функции: GetFirstWorkbook и GetNextWorkbook, которые возвращают некоторые объекты книги. Код будет печатать имя рабочей книги до тех пор, пока функции больше не вернут действительную рабочую книгу.
Вы можете увидеть пример кода здесь:
Dim wrk As Workbook
    Set wrk = GetFirstWorkbook()

    Do Until wrk Is Nothing
        Debug.Print wrk.Name
        Set wrk = GetNextWorkbook()
    Loop
Написание этого кода с использованием Do While было бы более запутанным, так как условие Not Is Nothing
Dim wrk As Workbook
    Set wrk = GetFirstWorkbook()

    Do While Not wrk Is Nothing
        Debug.Print wrk.Name
        Set wrk = GetNextWorkbook()
    Loop
Это делает код более понятным, и наличие четких условий — всегда хорошо. Честно говоря, разница маленькая, и выбор между «While» и «Until» действительно сводится к личному выбору.
Цикл Exit Do
Мы можем выйти из любого цикла Do с помощью оператора Exit Do.
Следующий код показывает пример использования Exit Do
Do While i < 1000
     If Cells(i,1) = "Найдено" Then
         Exit Do
     End If
     i = i + 1
Loop
В этом случае мы выходим из цикла Do Loop, если ячейка содержит текст «Найдено».
While Wend
Этот цикл в VBA, чтобы сделать его совместимым со старым кодом. Microsoft рекомендует использовать циклы Do, поскольку они более структурированы.
Из MSDN: «Оператор Do… Loop обеспечивает более структурированный и гибкий способ выполнения циклов».
Формат цикла VBA While Wend
Цикл VBA While имеет следующий формат:
While <Условие>
Wend
While Wend против Do
Разница между циклами VBA While и VBA Do заключается в следующем:
- While может иметь условие только в начале цикла.
- While не имеет версии Until.
- Не существует оператора для выхода из цикла While, как Exit For или Exit Do.
Условие для цикла VBA While такое же, как и для цикла VBA Do While. Два цикла в приведенном ниже коде работают точно так же.
Sub GetInput()

    Dim sCommand As String

    Do While sCommand <> "н"
        sCommand = InputBox("Пожалуйста, введите элемент для цикла 1")
    Loop

    While sCommand <> "н"
        sCommand = InputBox("Пожалуйста, введите элемент для цикла 2")
    Wend

End Sub
Бесконечный цикл
Даже если вы никогда не писали код в своей жизни, я уверен, что вы слышали фразу «Бесконечный цикл». Это цикл, в котором условие никогда не будет выполнено. Обычно это происходит, когда вы забыли обновить счетчик.
Следующий код показывает бесконечный цикл
Dim cnt As Long
    cnt = 1

    'это бесконечный цикл
    Do While cnt <> 5

    Loop
В этом примере cnt установлен в 1, но он никогда не обновляется. Поэтому условие никогда не будет выполнено — cnt всегда будет меньше 5.
В следующем коде cnt обновляется каждый раз, поэтому условие будет выполнено.
Dim cnt As Long
    cnt = 1

    Do While cnt <> 5
        cnt = cnt + 1
    Loop
Как вы можете видеть, использование For Loop безопаснее для подсчета, поскольку оно автоматически обновляет счет в цикле. Ниже приведен тот же цикл с использованием For.
Dim i As Long
    For i = 1 To 4

    Next i
Это явно лучший способ сделать это. Цикл For устанавливает начальное значение, условие и счет в одну строку.
Конечно, можно использовать бесконечный цикл, используя For — это потребует немного больше усилий 🙂
 Dim i As Long
    ' Бесконечный цикл
    For i = 1 To 4
        ' i никогда не достигнет 4
        i = 1
    Next i
Работа с бесконечным циклом
Когда у вас бесконечный цикл — VBA не выдаст ошибку. Ваш код будет продолжать работать, а редактор Visual Basic не будет отвечать.
Раньше вы могли выйти из цикла, просто нажав Ctrl и Break. В настоящее время разные ноутбуки используют разные комбинации клавиш. Полезно знать, как это настроено в вашем ноутбуке, чтобы в случае возникновения бесконечного цикла вы могли легко остановить код.
Вы также можете выйти из цикла, убив процесс. Нажмите Ctrl + Shift + Esc. На вкладке Процессы найдите Excel / Microsoft Excel. Щелкните правой кнопкой мыши по этому и выберите «Завершить процесс». Это закроет Excel, и вы можете потерять часть работы — так что гораздо лучше использовать Ctrl + Break или его эквивалент.
Использование функций Worksheet вместо циклов
Иногда вы можете использовать функцию листа вместо цикла.
Например, представьте, что вы хотите добавить значения в список ячеек. Вы можете сделать это с помощью цикла, но было бы более эффективно использовать функцию таблицы Sum. Это быстрее и экономит много кода.
Использовать функции рабочего листа очень просто. Ниже приведен пример использования Sum и Count.
Sub WorksheetFunctions()

    Debug.Print WorksheetFunction.Sum(Range("A1:A10"))

    Debug.Print WorksheetFunction.Count(Range("A1:A10"))

End Sub
В следующем примере используется цикл для выполнения того же действия. Как видите, это гораздо более длинный способ достижения той же цели.
Sub SumWithLoop()

    Dim total As Long, count As Long
    Dim rg As Range
    For Each rg In Range("A1:A10")
        ' Total
        total = total + rg
        ' Count
        If rg <> "" Then
            count = count + 1
        End If
    Next rg

    Debug.Print total
    Debug.Print count

End Sub
Резюме
Цикл Do While
- Цикл Do можно использовать 4 способами.
- Его можно использовать в начале или в конце, Do While .. Loop, Do … Loop While
- Может использоваться с Until в начале или в конце, Do Until .. Loop, Do … Loop Until
- While и Until используют противоположные условия друг к другу.
- Бесконечный цикл происходит, если ваше условие выхода никогда не будет выполнено.
- Иногда использование функции рабочего листа более эффективно, чем использование цикла.
Цикл While Wend
- Цикл Wend Wend устарел, и вы можете вместо этого использовать цикл Do.