
Поиск номера последней заполненной строки с помощью кода VBA Excel для таблиц, расположенных как в верхнем левом углу, так и в любом месте рабочего листа.
Номер последней заполненной строки в таблице Excel обычно используется в коде VBA для определения следующей за ней первой пустой строки для добавления новой записи. А также для задания интервала для поиска и обработки информации с помощью цикла For… Next (указание границ обрабатываемого диапазона).
Переменную, которой присваивается номер последней строки, следует объявлять как Long или Variant, например: Dim PosStr As Long. В современных версиях Excel количество строк на рабочем листе превышает максимальное значение типа данных Integer.
Таблица в верхнем левом углу
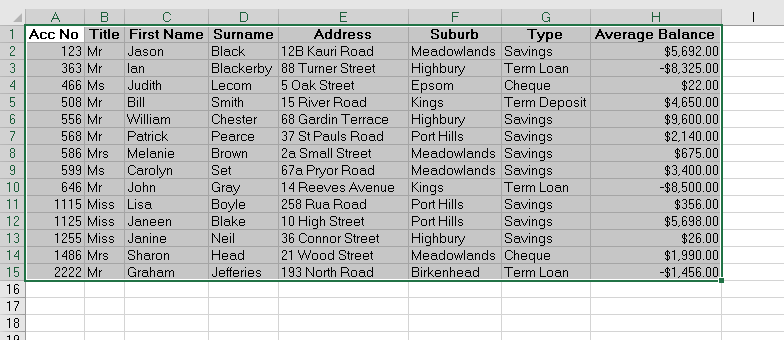
В первую очередь рассмотрим все доступные варианты поиска номера последней заполненной строки для таблиц, расположенных в верхнем левом углу рабочего листа. Такие таблицы обычно представляют собой простые базы данных в Excel, или, как их еще называют, наборы записей.

Пример таблицы с набором данных в Excel
Вариант 1
Основная формула для поиска последней строки в такой таблице, не требующая соблюдения каких-либо условий:
PosStr = Cells(1, 1).CurrentRegion.Rows.Count
Вариант 2
Ниже таблицы не должно быть никаких записей, в том числе ранее удаленных:
PosStr = ActiveSheet.UsedRange.Rows.Count
Вариант 3
В первом столбце таблицы не должно быть пропусков, а также в таблице должно быть не менее двух заполненных строк, включая строку заголовков:
PosStr = Cells(1, 1).End(xlDown).Row
Вариант 4
В первой колонке рабочего листа внутри таблицы не должно быть пропусков, а ниже таблицы в первой колонке не должно быть других заполненных ячеек:
PosStr = WorksheetFunction.CountA(Range("A:A"))
Вариант 5
Ниже таблицы не должно быть никаких записей:
PosStr = Cells.SpecialCells(xlLastCell).Row
Последняя строка любой таблицы
Последнюю заполненную строку для любой таблицы будем искать, отталкиваясь от ее верхней левой ячейки: Cells(a, b).
Вариант 1
Основная формула для поиска последней строки в любой таблице, не требующая соблюдения каких-либо условий:
PosStr = Cells(a, b).CurrentRegion.Cells(Cells(a, b).CurrentRegion.Cells.Count).Row
Вариант 2
Дополнительная формула с условием, что в первом столбце таблицы нет пустых ячеек:
PosStr = Cells(a, b).End(xlDown).Row
Если у вас на рабочем листе Excel есть записи вне таблиц, следите за тем, чтобы таблицы были окружены пустыми ячейками или пустыми ячейками и границами листа. Тогда не будет случайно внесенных заметок, примыкающих к таблицам, которые могут отрицательно повлиять на точность вычисления номера последней строки из кода VBA.
Return to VBA Code Examples
In this Article
- CurrentRegion Syntax
- Obtain the Current Region
- Counting the Rows and Columns in the Current Region
- Clearing the Current Region
- Assigning the Current Region to a Variable
- Get the Start and End Cells in the Current Region
This tutorial will explain the how to use Current Region in VBA.
The CurrentRegion property in VBA is a way to select all the cells that are contained within a Range that you might want to work with. As long as the cells within the range are all consecutive or ‘touching’ each other, the CurrentRegion will select every cell in the region.
CurrentRegion Syntax
The syntax is very simply:
Range("E11").CurrentRegion.Selectwhere you would specify the cell whose current region you wished to select and then use the CurrentRegion.Select property to select the Range of Cells.
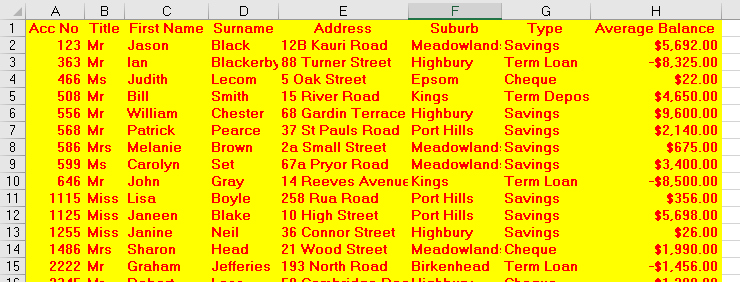
Obtain the Current Region
Consider the following worksheet.

The following Sub Procedure would select all the cells within the Excel table.
Sub FindCurrentRegion()
   Dim rng As Range
'set the range to be Cell E11
   Set rng = Range("E11")
'select the current region
   rng.CurrentRegion.Select
End Sub
If we run the routine, all the cells in the CurrentRegion of cell E11 will be selected.
If we remove the contents of the adjoining cells, and re-run the routine, the following will be selected as the current region.
However if we remove even more data, we could end up with the example below for the Current Region of Cell E11.
Putting information ack into D13, we end up with the following:
The CurrentRegion therefore returns another range object defined by the smallest combination of occupied columns and rows that surround the Range you have supplied.
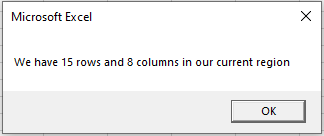
Counting the Rows and Columns in the Current Region
We can use CurrentRegion to count the rows and columns.
Sub FindCurrentRegion()
   Dim rng As Range
   Dim iRw As Integer
   Dim iCol As Integer
'set the range
   Set rng = Range("E11")
'count the rows
   iRw = rng.CurrentRegion.Rows.Count
'count the columns
   iCol = rng.CurrentRegion.Columns.Count
'show the result in a message box
   MsgBox ("We have " & iRw & " rows and " & iCol & " columns in our current region")
End Sub
If we run the procedure, the following message box will appear.
Clearing the Current Region
We can also use the current region property to clear the range of cells.
Sub ClearCurrentRegion()
   Dim rng As Range
'set the range
   Set rng = Range("E11")
   rng.CurrentRegion.Clear
End Sub
Assigning the Current Region to a Variable
We can also assign the entire Current Region to a range variable, and then use that range variable to manipulate the cells – be it formatting the cells, sorting the cells etc..
Sub AssignCurrentRegionToVariable()
   Dim rng As Range
'set the range to be the current region of E11
   Set rng = Range("E11").CurrentRegion
'color the background and text
   rng.Interior.Pattern = xlSolid
   rng.Interior.Color = 65535
   rng.Font.Bold = True
   rng.Font.Color = -16776961
End Sub
If we run the procedure above, we will end up with a worksheet as shown below!
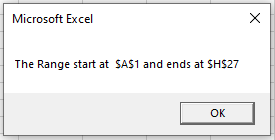
Get the Start and End Cells in the Current Region
With slightly more complicated code, we can get the first cell and last cell in a Current Region.
Sub GetStartAndEndCells()
   Dim rng As Range
   Dim iRw As Integer
   Dim iCol As Integer
   Dim iColStart, iColEnd, iRwStart, iRwEnd As String
'set the range variable to be the current region of E11
   Set rng = Range("E11").CurrentRegion
'set the start column for the range
   iColStart = rng.Column
'get the end column for the range
   iColEnd = iColStart + (rng.Columns.Count - 1)
'get the start row for the range
   iRwStart = rng.Row
'get the end row for the range
   iRwEnd = iRwStart + (rng.Rows.Count - 1)
'display the address of the start and end rows and columns in a message box
   MsgBox ("The Range start at " & Cells(iRwStart, iColStart).Address & " and ends at " & Cells(iRwEnd, iColEnd).Address)
End Sub
When we run the code above, the following message box will appear
VBA Coding Made Easy
Stop searching for VBA code online. Learn more about AutoMacro — A VBA Code Builder that allows beginners to code procedures from scratch with minimal coding knowledge and with many time-saving features for all users!

Learn More!
Хитрости »
1 Май 2011 403755 просмотров
Очень часто при внесении данных на лист Excel возникает вопрос определения последней заполненной или первой пустой ячейки. Чтобы впоследствии с этой первой пустой ячейки начать заносить данные. В этой теме я опишу несколько способов определения последней заполненной ячейки.
В качестве переменной, которой мы будем присваивать номер последней заполненной строки, у нас во всех примерах будет lLastRow. Объявлять мы её будем как Long. Для экономии памяти можно было бы использовать и тип Integer, но т.к. строк на листе может быть больше 32767(это максимальное допустимое значение переменных типа Integer) нам понадобиться именно Long, во избежание ошибки. Подробнее про типы переменных можно прочитать в статье Что такое переменная и как правильно её объявить
Одинаковые переменные для всех примеров
Во всех примерах ниже мы будем запоминать номер последней строки или столбца в одни и те же переменные:
    Dim lLastRow As Long
    'а для lLastCol можно было бы применить и тип Integer,
    'т.к. столбцов в Excel пока меньше 32767, но для однообразности назначим тоже Long
    Dim lLastCol As Long
Способ 1:
Определение
последней заполненной строки
через свойство End
    lLastRow = Cells(Rows.Count,1).End(xlUp).Row
    'или
    lLastRow = Cells(Rows.Count, "A").End(xlUp).Row
1 или «A» — это номер или имя столбца, последнюю заполненную ячейку в котором мы определяем. По сути обе приведенные строки дадут абсолютно одинаковый результат. Просто иногда удобнее указать номер столбца, а иногда его имя. Поэтому использовать можно любой из приведенных вариантов, в зависимости от ситуации.
Определение последнего столбца через свойство End
lLastCol = Cells(1, Columns.Count).End(xlToLeft).Column
1 — это номер строки, последнюю заполненную ячейку в которой мы определяем.
Данный метод определения последней строки/столбца самый распространенный. Используя его мы можем определить последнюю ячейку только в одном конкретном столбце(или строке). В большинстве случаев этого более чем достаточно.
Метод основан именно на принципе работы свойства End. На примере поиска последней строки опишу принцип так, как бы мы это делали руками через выделение ячеек на листе:
- выделили самую последнюю ячейку столбца А на листе(для Excel 2007 и выше это А1048576, а для Excel 2003 — А65536)
- и выполнили переход вверх комбинацией клавиш Ctrl+стрелка вверх. Данная комбинация заставляет Excel двигаться вверх(если точнее, то в направлении стрелки, нажатой вместе с Ctrl) до тех пор, пока не встретиться первая ячейка с формулой или значением. А в случае, если сочетание было вызвано из уже заполненных ячеек — то до первой пустой. И как только Excel доходит до этой ячейки — он её выделяет
- А через свойство .Row мы просто получаем номер строки этой выделенной ячейки
Нюансы:
- даже если в ячейке нет видимого значения, но есть формула — End посчитает ячейку не пустой. С одной стороны вполне справедливо. Но иногда нам надо определить именно «визуально» заполненные ячейки. Поиск ячеек при подобных условиях будет описан ниже(Способ 4: Определение последней ячейки через метод Find)
- если на листе заполнены все строки в просматриваемом столбце(или будут заполнены несколько последних ячеек столбца или даже только одна последняя) — то результат может быть неверный(ну или не совсем такой, какой ожидали)
- Данный способ игнорирует строки, скрытые фильтром, группировкой или командой Скрыть (Hide). Т.е. если последняя строка таблицы будет скрыта, то данный метод вернет номер последней видимой заполненной строки, а не последней реально заполненной.
Ну а если надо получить первую пустую ячейку на листе(а не первую заполненную) — придется вспомнить математику. Т.к. последнюю заполненную мы определили, то первая пустая — следующая за ней. Т.е. к результату необходимо прибавить 1. Это хоть и очевидно, но на всякий случай все же лучше об этом напомнить.
Способ 2:
Определение
последней заполненной строки
через SpecialCells
lLastRow = Cells.SpecialCells(xlLastCell).Row
Определение последнего столбца через SpecialCells
lLastCol = Cells.SpecialCells(xlLastCell).Column
Данный метод не требует указания номера столбца и возвращает последнюю ячейку(Row — строку, Column — столбец).
Если хотите получить номер первой пустой строки или столбца на листе — к результату необходимо прибавить 1.
Нюансы:
- Используя данный способ следует помнить, что не всегда можно получить реальную последнюю заполненную ячейку, т.е. именно ячейку со значением. Метод SpecialCells определяет самую «дальнюю» ячейку на листе, используя при этом механизм «запоминания» тех ячеек, в которых мы работали в данном листе. Т.е. если мы занесем в ячейку AZ90345 значение и сразу удалим его — lLastRow, полученная через SpecialCells будет равна значению именно этой ячейки, из которой вы только что удалили значения(т.е. 90345). Другими словами требует обязательного обновления данных, а этого можно добиться только сохранив файла, а временами даже только закрыв файл и открыв его снова. Так же, если какая-либо ячейка содержит форматирование(например, заливку), но не содержит никаких значений, то метод SpecialCells посчитает её используемой и будет учитывать как заполненную.
Этот недостаток можно попробовать обойти, вызвав перед определением последней ячейки вот такую строку кода:With ActiveSheet.UsedRange: End With
Это должно переопределить границы рабочего диапазона и тогда определение последней строки/столбца сработает как ожидается, даже если до этого в ячейке содержались данные, которые впоследствии были удалены.
Выглядеть в единой процедуре это будет так:Sub GetLastCell() Dim lLastRow As Long 'переопределяем рабочий диапазон листа With ActiveSheet.UsedRange: End With 'ищем последнюю заполненную ячейку на листе lLastRow = Cells.SpecialCells(xlLastCell).Row End Sub
- даже если в ячейке нет видимого значения, но есть формула — SpecialCells посчитает ячейку не пустой
- Данный метод определения последней ячейки не будет работать на защищенном листе(Рецензирование(Review) —Защитить лист(Protect Sheet)).
- Данный метод не будет работать при использовании внутри UDF. Точнее будет работать не так, как ожидается. Подробнее про некоторые «баги» работы встроенных методов внутри UDF(функций пользователя) я описывал в этой статье: Глюк работы в UDF методов SpecialCells и FindNext
Сам же я этот метод обычно использую для определения последней ячейки в только что созданном файле, в котором только добавляю строки кодом и в котором не может быть описанных выше нюансов.
Способ 3:
Определение последней строки через UsedRange
lLastRow = ActiveSheet.UsedRange.Row + ActiveSheet.UsedRange.Rows.Count - 1
Определение последнего столбца через UsedRange
lLastCol = ActiveSheet.UsedRange.Column + ActiveSheet.UsedRange.Columns.Count - 1
НЕМНОГО ПОЯСНЕНИЙ:
- ActiveSheet.UsedRange.Row — этой строкой мы определяем первую ячейку, с которой начинаются данные на листе. Важно понимать для чего это — если у вас первые строк 5 не заполнены ничем(т.е. самые первые данные заносились начиная с 6-ой строки листа), то ActiveSheet.UsedRange.Row вернет именно 6(т.е. номер первой строки с данными). Если же все строки заполнены — то вернет 1.
- ActiveSheet.UsedRange.Rows.Count — определяем кол-во строк, входящих в весь диапазон данных на листе. При этом неважно, есть ли данные в ячейках или нет — достаточно было поработать в этих ячейках и удалить значения или просто изменить цвет заливки.
В итоге получается: первая строка данных + кол-во строк с данными — 1. Зачем вычитать единицу? Попробуем посчитать вместе: первая строка: 6. Всего строк: 3. 6 + 3 = 9. Вроде все верно. А теперь выделим на листе три ячейки, начиная с 6-ой. Выделение завершилось на 8-ой строке. Потому что в 6-ой строке уже есть данные. Поэтому и надо вычесть 1, чтобы учесть этот момент. Думаю, не надо пояснять, что если надо получить первую пустую ячейку — можно 1 не вычитать
- То же самое и с ActiveSheet.UsedRange.Column, только уже не для строк, а для столбцов.

Нюансы:
- Обладает некоторыми недостатками предыдущего метода. Определяет самую «дальнюю» ячейку на листе, используя при этом механизм «запоминания» тех ячеек, в которых мы работали в данном листе. Следовательно попробовать обойти этот момент можно точно так же: перед определением последней строки/столбца записать строку: With ActiveSheet.UsedRange: End With
Это должно переопределить границы рабочего диапазона и тогда определение последней строки/столбца сработает как ожидается, даже если до этого в ячейке содержались данные, которые впоследствии были удалены. - даже если в ячейке нет видимого значения, но есть формула — UsedRange посчитает ячейку не пустой
Однако метод через UsedRange.Row работает прекрасно и при установленной на лист защите и внутри UDF, что делает его более предпочтительным, чем метод через SpecialCells при равных условиях.
Способ 4:
Определение последней строки и столбца, а так же адрес ячейки методом Find
Sub GetLastCell_Find()
    Dim rF As Range
    Dim lLastRow As Long, lLastCol As Long
    'ищем последнюю ячейку на листе, в которой хранится хоть какое-то значение
    Set rF = ActiveSheet.UsedRange.Find(What:="*", LookIn:=xlValues, LookAt:=xlWhole, SearchDirection:=xlPrevious, MatchCase:=False, MatchByte:=False)
    If Not rF Is Nothing Then
        lLastRow = rF.Row    'последняя заполненная строка
        lLastCol = rF.Column 'последний заполненный столбец
        MsgBox rF.Address 'показываем сообщение с адресом последней ячейки
    Else
        'если ничего не нашлось - значит лист пустой
        'и можно назначить в качестве последних первую строку и столбец
        lLastRow = 1
        lLastCol = 1
        MsgBox "A1" 'показываем сообщение с адресом ячейки А1
    End If
End Sub
Этот метод, пожалуй, самый оптимальный в случае, если надо определить последнюю строку/столбец на листе без учета форматов и формул — только по отображаемому значению в ячейке. Например, если на листе большая таблица и последние строки заполнены формулами, возвращающими при определенных условиях пустую ячейку(=ЕСЛИ(A1>0;1;»»)), предыдущие варианты вернут строку/столбец ячейки с последней ячейкой, в которой формула. В то время как данный метод вернет адрес ячейки только в случае, если в ячейке реально отображается какое-то значение. Такой подход часто используется для того, чтобы определить границы данных для последующего анализа заполненных данных, чтобы не захватывать пустые ячейки с формулами и не тратить время на их проверку.
Здесь следует обратить внимание на параметры метода Find. В данном случае мы специально указываем искать по значениям, а не по формулам:
Set rF = ActiveSheet.UsedRange.Find(What:=»*», LookIn:=xlValues, LookAt:=xlWhole, SearchDirection:=xlPrevious, MatchCase:=False, MatchByte:=False)
Нюансы:
- Метод Find, вызванный с листа или другим кодом, имеет свойство запоминать все параметры последнего поиска, а если поиск еще не вызывался — то применяются параметры по умолчанию. А по умолчанию поиск идет всегда по формулам. Поэтому я настоятельно рекомендую указывать принудительно все необходимые параметры, как в примере.
- Метод Find не будет учитывать в просмотре скрытые строки и столбцы. Это следует учитывать при его применении.
Пара небольших практических кодов
Коды ниже могут помочь понять, как использовать приведенные выше строки кода по поиску последней ячейки/строки:
Sub GetLastCell()
    Dim lLastRow As Long
    Dim lLastCol As Long
    'определили последнюю заполненную ячейку с учетом формул в столбце А
    lLastRow = Cells(Rows.Count, 1).End(xlUp).Row
    MsgBox "Заполненные ячейки в столбце А: " & Range("A1:A" & lLastRow).Address
    'определили последний заполненный столбец на листе(с учетом формул и форматирования)
    lLastCol = Cells.SpecialCells(xlLastCell).Column
    MsgBox "Заполненные ячейки в первой строке: " & Range(Cells(1, 1), Cells(1, lLastCol)).Address
    'выводим сообщение с адресом последней ячейки на листе(с учетом формул и форматирования)
    MsgBox "Адрес последней ячейки диапазона на листе: " & Cells.SpecialCells(xlLastCell).Address
End Sub
Выделяем диапазон ячеек в столбцах с А по С, определяя последнюю ячейку по столбцу A этого же листа:
Sub SelectToLastCell()
    Range("A1:C" & Cells(Rows.Count, 1).End(xlUp).Row).Select
End Sub
Копируем ячейку B1 в первую пустую ячейку столбца A этого же листа:
Sub CopyToFstEmptyCell()
    Dim lLastRow As Long
    lLastRow = Cells(Rows.Count, 1).End(xlUp).Row 'определили последнюю заполненную ячейку
    Range("B1").Copy Cells(lLastRow+1, 1)         'скопировали В1 и вставили в следующую после определенной ячейки
End Sub
А код ниже делает тоже самое, но одной строкой — применяется Offset и используется тот факт, что изначально методом End мы получаем именно ячейку, а не номер строки(номер строки мы получаем позже через свойство .Row):
Sub CopyToFstEmptyCell()
    Range("B1").Copy Destination:=Cells(Rows.Count, 1).End(xlUp).Offset(1)
End Sub
Range(«B1»).Copy — копирует ячейку В1. Если для аргумента Destination указать другую ячейку, то в неё будет вставлена скопированная ячейка. Мы передаем в этот аргумент определенную методом End ячейку
Cells(Rows.Count, 1).End(xlUp) — возвращает последнюю заполненную ячейку в столбце А (не строку, а именно ячейку)
Offset(1) — смещает полученную ячейку на строку вниз
Используем инструмент автозаполнение(протягивание) столбца В, начиная с ячейки B2 и определяя последнюю ячейку для заполнения на основании столбца А
Sub AutoFill_B()
    Dim lLastRow As Long
    lLastRow = Cells(Rows.Count, 1).End(xlUp).Row
    Range("B2").AutoFill Destination:=Range("B2:B" & lLastRow)
End Sub
На самом деле практических кодов может быть куда больше, т.к. определение последней заполненной или первой пустой ячейки является чуть ли не самой распространенной задачей при написании кодов в Excel.
Так же см.:
Как получить последнюю заполненную ячейку формулой?
Как определить первую заполненную ячейку на листе?
Что такое переменная и как правильно её объявить?
Статья помогла? Поделись ссылкой с друзьями!
![]() Видеоуроки
Видеоуроки
Поиск по меткам
Access
apple watch
Multex
Power Query и Power BI
VBA управление кодами
Бесплатные надстройки
Дата и время
Записки
ИП
Надстройки
Печать
Политика Конфиденциальности
Почта
Программы
Работа с приложениями
Разработка приложений
Росстат
Тренинги и вебинары
Финансовые
Форматирование
Функции Excel
акции MulTEx
ссылки
статистика
Dynamic VBA Code With Last Row/Column
Finding the Last Row or Last Column within your VBA code is key to ensuring your macro doesn’t break in the future.
Early on when I first began writing VBA macro code, I always needed to go back into the code and modify range references. I had created a bunch of macros to clean up and perform analysis on raw data exported from databases and the data never had the same amount of rows from one data pull to the next.
My coding skills dramatically changed the day I realized my VBA code could be dynamic and automatically determine the size of my raw data once executed. I soon came to realize the goal of coding a macro: to write it once and never touch it again.
Variability is also the greatest challenge for any VBA coder as you have to think of every possible change that could occur in the future. I have found writing VBA code that can automatically resize itself is one of the greatest things missing from most average macro user’s code.
In this article, I have compiled a list of the best methods you can use to accomplish finding the last row or column in your data range.
Prep Your Excel Data!
Keep in mind some of these methods may not give you the desired row or column number if you are not setting your spreadsheet up properly or using a well-formatted block of data.
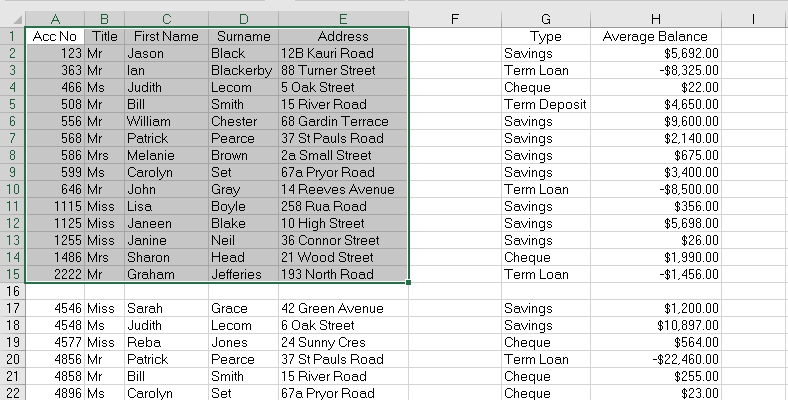
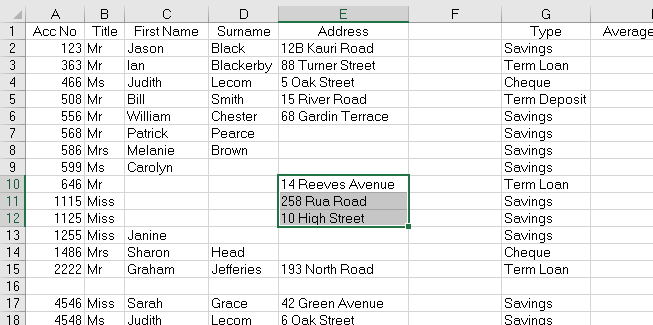
What I mean by a “well-formatted block of data”, is a worksheet with data that starts in cell A1 and does not have any blank rows or columns in the middle of the data.
The below figure illustrates the difference.
An Example of a Poorly-Formatted Data Set
An Example of a Well-Formatted Data Set
In a data set starting in Row 4, you may need to add or subtract a numerical value depending on the method you use. If you are going to be coding for a data set that has blank rows or columns within it, always be sure to test out your code to make sure it is calculating properly.
Find the Last Cell In Spreadsheet With Data
Finding the last cell with a value in it is key to determining the last row or last column. There are a couple of different ways you can locate the last cell on your spreadsheet. Let’s take a look!
1. The Find Function Method (Best Method)
This line of VBA code will search all the cells on your sheet and return the row of the last cell with any sort of value stored in it. Because the Find function is set to search from the very bottom of the spreadsheet and upwards, this code can accommodate blank rows in your data.
Dim LastCell As Range
Set LastCell = ActiveSheet.Cells.Find(«*», SearchOrder:=xlByRows, SearchDirection:=xlPrevious)
This method ignores empty cells with formatting still in them, which is ideal if you are truly wanting the find the last cell with data in it, not necessarily the last cell that had any modifications done to it.
2. SpecialCells Method
One of the best manual ways to do this is to utilize the Go To Special dialog box.
The Go To Special dialog box has a variety of actions that can be taken to select certain cells or objections on your spreadsheet. One of those options is to select the Last Cell on the active spreadsheet.

You can get to the Go To Special dialog box by using the keyboard shortcut Ctrl + G which will open the Go To dialog box. From there you can click the Special button and you’ll have arrived at the Go To Special dialog box.
In VBA, the select actions in the Go To Special dialog box are simply called SpecialCells. By calling the SpecialCells function in VBA, you gain the same actions, though they have slightly different names. The particular action you’ll want to call is named xlCellTypeLastCell.
The below VBA code stores the last cell found on the spreadsheet with a value in it to a range variable.
Dim LastCell As Range
Set LastCell = ActiveSheet.Cells.SpecialCells(xlCellTypeLastCell)
WARNING! This method could give you unintended results as this finds the last cell with any sort of data or formatting associated with it. This means it can return an empty cell that used to have data in it or simply has any formatting changes (like a yellow cell fill color).
7 Ways To Find The Last Row With VBA
There are actually quite a few ways to determine the last row of a data set in a spreadsheet. We will walk through a number of different ways in this article. I have marked specific methods with a “Best Method” tag as these coding practices are the most bullet-proof ways to determine the last row in your spreadsheet data.
1. The Find Function Method (Best Method)
This line of VBA code will search all the cells on your sheet and return the row of the last cell with any sort of value stored in it. Because the Find function is set to search from the very bottom of the spreadsheet and upwards, this code can accommodate blank rows within your data.
Dim LastRow As Long
LastRow = ActiveSheet.Cells.Find(«*», SearchOrder:=xlByRows, SearchDirection:=xlPrevious).Row
2. SpecialCells Method
SpecialCells is a function you can call in VBA that will allow you to pinpoint certain cells or a range of cells based on specific criteria. We can use the xlCellTypeLastCell action to find the last cell in the spreadsheet and call for the cell’s row number.
Dim LastRow As Long
LastRow = ActiveSheet.Cells.SpecialCells(xlCellTypeLastCell).Row
WARNING! This method could give you unintended results as this finds the last cell with any sort of data or formatting associated with it. This means it can return an empty cell that used to have data in it or simply has any formatting changes (like a yellow cell fill color).
3. Ctrl+Shift+End Method
This line of VBA code mimics the keyboard shortcut Ctrl + Shift + End and returns the numerical value of the last row in the range.
Dim LastRow As Long
LastRow = ActiveSheet.Cells(ActiveSheet.Rows.Count, «A»).End(xlUp).Row
4. UsedRange Method
The Used Range is something that Excel stores a reference to behind the scenes. It represents the area of the spreadsheet that has values in it. The Used Range can be referenced in VBA using the UsedRange object.
You must be careful with the Used Range though , as Excel does not always update the reference in real time. Sometimes when you delete cell content the Used Range will not readjust itself right away. For this reason, it is wise to force the UsedRange object to restructure itself with your VBA code. The below VBA code example calls this restructure/refresh prior to utilizing UsedRange to pull the last row.
Dim LastRow As Long
ActiveSheet.UsedRange ‘Refresh UsedRange
LastRow = ActiveSheet.UsedRange.Rows(ActiveSheet.UsedRange.Rows.Count).Row
5. Table Object Method (Best Method)
If you are using a Table Object to store your data, you can use the Table’s name in the below VBA code to return the numerical value of how many rows are in the table.
Dim LastRow As Long
LastRow = ActiveSheet.ListObjects(«Table1»).Range.Rows.Count
6. Named Range Method
If you are using a Named Range to reference your data’s location, you can use the Range name in the below VBA code to return the numerical value of how many rows are in the Named Range.
Dim LastRow As Long
LastRow = ActiveSheet.Range(«MyNamedRange»).Rows.Count
7. Ctrl+Shift+Down Method
Dim LastRow As Long
LastRow = ActiveSheet.Range(«A1»).CurrentRegion.Rows.Count
Expand Your Range To The Last Row
After you have determined the last row, how do you use it? The vast majority of the time you are going to want to store your entire data range to a Range variable. The following code shows you how to incorporate the last row number you calculated into a Range reference.
Dim DataRange As Range
Set DataRange = Range(«A1:M» & LastRow)
7 Ways To Find The Last Column With VBA
There are actually quite a few ways to determine the last column of a data set in a spreadsheet. We will walk through a number of different ways in this article. I have marked specific methods with a “Best Method” tag as these coding practices are the most bullet-proof ways to determine the last column in your spreadsheet data.
1. The Find Function Method (Best Method)
This line of VBA code will search all the cells on your sheet and return the column of the last cell with any sort of value stored in it. Because the Find function is set to search from the very far right of the spreadsheet and then leftward, this code can accommodate blank columns within your data.
Dim LastColumn As Long
LastColumn = ActiveSheet.Cells.Find(«*», SearchOrder:=xlByColumns, SearchDirection:=xlPrevious).Column
2. SpecialCells Method
SpecialCells is a function you can call in VBA that will allow you to pinpoint certain cells or a range of cells based on specific criteria. We can use the xlCellTypeLastCell action to find the last cell in the spreadsheet and call for the cell’s column number.
Dim LastColumn As Long
LastColumn = ActiveSheet.Cells.SpecialCells(xlCellTypeLastCell).Column
WARNING! This method could give you unintended results as this finds the last cell with any sort of data or formatting associated with it. This means it can return an empty cell that used to have data in it or simply has any formatting changes (like a yellow cell fill color).
3. Ctrl+Shift+End Method
Dim LastColumn As Long
LastColumn = ActiveSheet.Cells(1, ActiveSheet.Columns.Count).End(xlToLeft).Column
4. UsedRange Method
Dim LastColumn As Long
ActiveSheet.UsedRange ‘Refresh UsedRange
LastColumn = ActiveSheet.UsedRange.Columns(ActiveSheet.UsedRange.Columns.Count).Column
5. Table Object Method (Best Method)
If you are using a Table Object to store your data, you can use the Table’s name in the below VBA code to return the numerical value of how many columns are in the table.
Dim LastColumn As Long
LastColumn = ActiveSheet.ListObjects(«Table1»).Range.Columns.Count
6. Named Range Method
Dim LastColumn As Long
LastColumn = ActiveSheet.Range(«MyNamedRange»).Columns.Count
7. Ctrl+Shift+Right Method
Dim LastColumn As Long
LastColumn = ActiveSheet.Range(«A1»).CurrentRegion.Columns.Count
How To Expand Your Range To The Last Column
After you have determined the last column, how do you use it? The vast majority of the time you are going to want to store your entire data range to a Range variable. The following code shows you how to incorporate the last column number you calculated into a Range reference.
Dim DataRange As Range
Set DataRange = Range(Cells(1, 1), Cells(100, LastColumn))
VBA Function To Find Last Row or Column
Tim provided the inspiration for a function that can return either the last row or column number through a user-defined function for a given worksheet.
An example of how you could call this function to return the last row on the active worksheet would be written as: x = LastRowColumn(ActiveSheet, «Row»)
Function LastRowColumn(sht As Worksheet, RowColumn As String) As Long
‘PURPOSE: Function To Return the Last Row Or Column Number In the Active Spreadsheet
‘INPUT: «R» or «C» to determine which direction to search
Select Case LCase(Left(RowColumn, 1)) ‘If they put in ‘row’ or column instead of ‘r’ or ‘c’.
Case «c»
LastRowColumn = sht.Cells.Find(«*», LookIn:=xlFormulas, SearchOrder:=xlByColumns, _
SearchDirection:=xlPrevious).Column
Case «r»
LastRowColumn = sht.Cells.Find(«*», LookIn:=xlFormulas, SearchOrder:=xlByRows, _
SearchDirection:=xlPrevious).Row
Case Else
LastRowColumn = 1
End Select
End Function
What Can I Do With A LastRow Or LastColumn Variable?
There are many things you can do by calculating the last row or last column of a data set. Examples could be:
-
Resizing a Pivot Table range
-
Looping through cells in a column
-
Deleting only the raw data range
There are many, many more examples of this and I’m sure you can think of a few examples yourself.
Let me know in the comments section below how you use resizing a range in your macro code! Also, if you can think of any other ways to use VBA code to find the last row or last column, post your coding method in the comments section so we can improve the current list. I look forward to reading about your experiences.
I Hope This Excel Tutorial Helped!
Hopefully, I was able to explain how you can use VBA code to find the last row or last column of your range to add dynamic capabilities to your macros. If you have any questions about these techniques or suggestions on how to improve this article, please let me know in the comments section below.

About The Author
Hey there! I’m Chris and I run TheSpreadsheetGuru website in my spare time. By day, I’m actually a finance professional who relies on Microsoft Excel quite heavily in the corporate world. I love taking the things I learn in the “real world” and sharing them with everyone here on this site so that you too can become a spreadsheet guru at your company.
Through my years in the corporate world, I’ve been able to pick up on opportunities to make working with Excel better and have built a variety of Excel add-ins, from inserting tickmark symbols to automating copy/pasting from Excel to PowerPoint. If you’d like to keep up to date with the latest Excel news and directly get emailed the most meaningful Excel tips I’ve learned over the years, you can sign up for my free newsletters. I hope I was able to provide you with some value today and hope to see you back here soon! — Chris
When we use VBA to automate Excel operations on data or tables, one of the most common things we want to do is to find the number of rows of data or the number of records, in a worksheet.
In this article, we’ll go through a few key approaches to count the number of rows of data in Excel ranges.
Count Rows of Data in a Range
The Range contains continuous data
In this example, we have a list of monthly expense data as shown in the picture below. The list in continuous with no “broken rows” in between (i.e. no rows within the range are blank). It is easy to find the number of rows in a list like this.

The macro “countDataRows1” below uses range.Rows.Count to find the number of rows of data in the current selection. To use the macro, we first select the list of data, and run the macro. The macro also returns the answer in a message box.
Sub countDataRows1()
Dim tmp As Long
tmp = Selection.Rows.Count
MsgBox tmp & " rows of data in the selection"
End Sub

However, you may find it inconvenient to have to manually select the entire list before running the macro. We can enhance the macro to have it automatically find the “CurrentRegion” of the table range. (See line 3 of macro “countDataRows2” below) You’ll only have to select any cell within the list before running the macro.
Sub countDataRows2()
Dim tmp As Long
tmp = Selection.CurrentRegion.Rows.Count
MsgBox tmp & " rows of data in the selection"
End Sub
Some rows in the range are empty
Unlike databases tables (such as Access), Excel tables are not always continuous. We often work in Excel worksheets with “free-style” layouts and our tables were designed with breaks (empty rows) to make them easier to read. However, this causes an additional challenge when we try to find the actual number of populated rows in a worksheet with VBA.
Let’s say we have an income statement as shown below. There are some empty rows (e.g. rows 6, 25, and 28) which separate the key sections of the financial statement. We want to use VBA to find:
- The total number of rows of the income statement (i.e. the height of the statement)
- The number of rows that are used/filled with data

Some bad news here is that the method of “CurrentRegion” we used in the previous example (macro “countDataRows2”) won’t work anymore in this case. To illustrate the issue, if we select cell A2 manually, and then press the keyboard shortcut Ctrl+Shift+8 to select the CurrentRegion, only the first block of data from rows 1 to 5 will be selected (because row 6 is empty). Therefore we need an alternative VBA approach to find the entire range of our income statement.

We can use the “UsedRange” property of the ActiveSheet object to find the range of the income statement without being affected by the empty rows, then count the number of rows. The macro “countDataRows3” below does the job in one step in line 3.
Sub countDataRows3()
Dim tmp As Long
tmp = ActiveSheet.UsedRange.Rows.Count
MsgBox "Total number of rows of the income statement is " & tmp
End Sub

The next step is to find the number of used rows with data in this income statement. I’m going to demonstrate two approaches below.
Approach 1 – only check one column to determine used rows
Assuming that the cells in Column are always populated for used rows, we can use the COUNTA() worksheet function to count the number of used cells in column A of the UsedRange of the worksheet.
Sub countDataRows4()
Dim tmp As Long
Dim tmp2 As Long
With ActiveSheet.UsedRange
    'number of rows of range
    tmp = .Rows.Count
    'number of used rows with data
    tmp2 = Application.CountA(.Columns(1))
End With
MsgBox "Total number of rows of the income statement is " & tmp & Chr(10) & "Number of used rows is " & tmp2
End Sub
In the above macro “countDataRows4”, in line 8, the Excel built-in worksheet function CountA has been called in VBA. It is very important to note how it has been called. You can always call an Excel built-in worksheet function using the syntax: “Application.<function_name>” (and then the input parameters).
After running the macro, a message box returns both answers for total number of rows and the number of used rows. (The message box shown below is from the Mac version of Excel)

Approach 2 – check all columns to determine used rows
However, in the event we have to check through all columns to ensure the entire row is empty, we can use a For-Next loop together with the COUNTA worksheet function
The idea is to (1) find the UsedRange, (2) loop through every row of the UsedRange, and (3) use the COUNTA worksheet function to check whether any one of the cells in each row is non-empty.
Sub countDataRowswithBreaks()
Dim counter As Long
Dim r As Range
With ActiveSheet.UsedRange
'loop through every row in the usedrange
For Each r In .Rows
'check if a row contain any used cell
If Application.CountA(r) &amp;gt; 0 Then
'counts the number of rows with used cells
counter = counter + 1
End If
Next
End With
MsgBox "Number of used rows is " &amp;amp; counter
End Sub

If you’re interested in techniques to delete empty rows in Word instead of Excel, have a look at this article.
Count Rows with Specific Word
How about if we want to count the number of rows which contain the word “Expense”? We can adapt the previous macro and use the “CountIf” worksheet function (instead of “CountA”).
In the macro “countDataRowswithWord” below, line 7, the CountIf function is used to count the number of cells in each row which contains the word “Expense”. We use the wildcard “*” here, so that the function counts any cell with part of the content which contains “Expense”, for example, “Other Expense 1”, “Total Expenses”.
Sub countDataRowswithWord()
Dim counter As Long
Dim r As Range
With ActiveSheet.UsedRange
'loop through every row in the usedrange
For Each r In .Rows
'check if a row has any cell with partial match
If Application.CountIf(r, "*Expense*") &amp;gt; 0 Then
'counts the number of rows which match criteria
counter = counter + 1
End If
Next
End With
MsgBox "Number of rows is with content match: " &amp;amp; counter
End Sub
Conclusion
We have gone fully through some key techniques to find the number of rows in a range. In addition to Range.Rows.Count, you can use “CurrentRegion” or “UsedRange” to quickly find out the area of a block of data. Also, you can use a For-Next loop to go through every row in a range, together with Excel built-in functions such as “COUNTA()” or “COUNTIF()” to perform more detailed check of specific criteria.