
Программное создание элементов управления и добавление их на пользовательскую форму в VBA Excel. Метод Controls.Add — синтаксис, компоненты, примеры.
Программное (динамическое) создание элементов управления пользовательской формы в VBA Excel осуществляется с помощью метода Controls.Add.
Синтаксис метода Controls.Add
|
Set Var = Form.Controls.Add(ProgID, [Name], [Visible]) |
Описание компонентов метода
- Var — объектная переменная, которой будет присвоен созданный элемент управления. Она может быть объявлена как Control, Object или Variant.
- Form — имя пользовательской формы, на которую добавляется элемент управления.
- ProgID — программный идентификатор создаваемого элемента управления.
- Name — необязательный параметр, задающий имя добавляемого элемента управления.
- Visible — необязательный параметр, определяющий видимость создаваемого элемента управления. Может принимать значение True или False.
ProgID и Name, используемые в выражениях метода Controls.Add заключаются в прямые кавычки. Смотрите в примерах.
Идентификаторы элементов управления формы
| Элемент управления | Программный идентификатор |
|---|---|
| CheckBox | Forms.CheckBox.1 |
| ComboBox | Forms.ComboBox.1 |
| CommandButton | Forms.CommandButton.1 |
| Frame | Forms.Frame.1 |
| Image | Forms.Image.1 |
| Label | Forms.Label.1 |
| ListBox | Forms.ListBox.1 |
| OptionButton | Forms.OptionButton.1 |
| ScrollBar | Forms.ScrollBar.1 |
| SpinButton | Forms.SpinButton.1 |
| TextBox | Forms.TextBox.1 |
| ToggleButton | Forms.ToggleButton.1 |
Программное создание элементов управления
Для реализации примеров необходимо открыть рабочую книгу Excel с поддержкой макросов (.xls или .xlsm) и в редакторе VBA создать пользовательскую форму UserForm1.
Пример 1
Программное создание элемента управления TextBox с присвоением его свойству «Text» значения «Привет!». Так как это свойство TextBox является свойством по умолчанию, вместо «myCont.Text» используем в коде для присвоения значения только имя переменной «myCont».
|
Sub Primer_1() Dim myCont As Control Set myCont = UserForm1.Controls.Add(«Forms.TextBox.1», «myTextBox1») myCont = «Привет!» UserForm1.Show End Sub |
Так как мы присвоили вновь созданному элементу управления TextBox имя «myTextBox1», теперь обращаться к нему можно и по этому имени, например:
UserForm1.Controls("myTextBox1") = "Привет!"
Этой строкой можно заменить строку:
myCont = "Привет!"
Как видим, обращаться к добавленному элементу управления удобнее через переменную, чем по присвоенному имени.
Пример 2
Создание с помощью кода VBA Excel группы элементов управления ComboBox, присвоение соответствующим параметрам значений размеров и отступов.
|
1 2 3 4 5 6 7 8 9 10 11 12 13 14 15 16 17 18 19 20 21 22 |
Sub Primer_2() Dim myCont(1 To 5) As Control, i As Byte With UserForm1 For i = 1 To 5 Set myCont(i) = .Controls.Add(«Forms.ComboBox.1») With myCont(i) ‘Заполняем все ComboBox одинаковыми списками .List = Array(«Привет1», «Привет2», _ «Привет3», «Привет4», «Привет5») ‘Добавляем размеры и отступы .Width = 200 .Height = 20 .Left = 20 .Top = i * 10 + (i — 1) * 20 End With Next .Caption = «Пять полей со списком» .Height = 190 .Width = 250 .Show End With End Sub |
Как привязать стандартные события к динамически созданным элементам управления читайте в статье Привязка события к элементу управления.
Содержание
- VBA Excel. Метод Controls.Add пользовательской формы
- Метод Controls.Add пользовательской формы
- Синтаксис метода Controls.Add
- Описание компонентов метода
- Идентификаторы элементов управления формы
- Программное создание элементов управления
- How to use VBA Controls in UserForms
- Creating a UserForm
- Creating a Text Box
- Creating a Label Control
- Creating a Combo Box Control
- Adding values to the Combo Box
- Creating a List Box Control
- VBA Coding Made Easy
- Adding values to the List Box
- Creating a Check Box Control
- Creating an Option Group Control with Option Buttons
- Creating a Command Button to Exit the Form
- Adding Code to the Command Button
- VBA Code Examples Add-in
- VBA Controls – Form Control & ActiveX Control in Excel
- VBA Controls: VBA Form Control & ActiveX Controls in Excel
- VBA Form/GUI controls in Excel
- Adding GUI controls to a spreadsheet
- Setting GUI control properties
- How to use ActiveX control in VBA
- Prerequisite
VBA Excel. Метод Controls.Add пользовательской формы
Программное создание элементов управления и добавление их на пользовательскую форму в VBA Excel. Метод Controls.Add — синтаксис, компоненты, примеры.
Метод Controls.Add пользовательской формы
Программное (динамическое) создание элементов управления пользовательской формы в VBA Excel осуществляется с помощью метода Controls.Add .
Синтаксис метода Controls.Add
Описание компонентов метода
- Var — объектная переменная, которой будет присвоен созданный элемент управления. Она может быть объявлена как Control, Object или Variant.
- Form — имя пользовательской формы, на которую добавляется элемент управления.
- ProgID — программный идентификатор создаваемого элемента управления.
- Name — необязательный параметр, задающий имя добавляемого элемента управления.
- Visible — необязательный параметр, определяющий видимость создаваемого элемента управления. Может принимать значение True или False.
ProgID и Name, используемые в выражениях метода Controls.Add заключаются в прямые кавычки. Смотрите в примерах.
Идентификаторы элементов управления формы
| Элемент управления | Программный идентификатор |
|---|---|
| CheckBox | Forms.CheckBox.1 |
| ComboBox | Forms.ComboBox.1 |
| CommandButton | Forms.CommandButton.1 |
| Frame | Forms.Frame.1 |
| Image | Forms.Image.1 |
| Label | Forms.Label.1 |
| ListBox | Forms.ListBox.1 |
| OptionButton | Forms.OptionButton.1 |
| ScrollBar | Forms.ScrollBar.1 |
| SpinButton | Forms.SpinButton.1 |
| TextBox | Forms.TextBox.1 |
| ToggleButton | Forms.ToggleButton.1 |
Программное создание элементов управления
Для реализации примеров необходимо открыть рабочую книгу Excel с поддержкой макросов (.xls или .xlsm) и в редакторе VBA создать пользовательскую форму UserForm1.
Источник
How to use VBA Controls in UserForms
In this Article
This article will demonstrate how to use Controls in UserForms in Excel VBA.
VBA has the ability to create forms that the user can interact with such as Invoice forms, or Contact details. A form can contain a variety of Form Controls such as text boxes, Combo Boxes, List Boxes and Command Buttons. This article will cover the most popular controls used on User forms namely Text Boxes, Labels, Combo Boxes, List Boxes, Check Boxes and Option Groups.
To find out more about built in user forms and creating custom user forms in Excel, click here.
Creating a UserForm
To create a UserForm in Excel VBA, we first need to open the VBE Editor.
To insert a new user form into your code, select the UserForm option from the Insert Menu.
A new user form will appear in the Project Explorer and will be shown in the Code Window on the right.
You can rename your form using the Properties box. This should appear below your Project Explorer.
If it is how visible, Press F4 or click View, Properties Window.
Click in the Name property and rename your form.
We can now start populating our form with controls – the text box control is the most popular control along with the label control and command button.
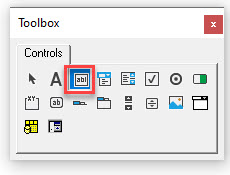
To populate the form with controls, we need to switch on the Toolbox.
In the Menu, select View > Toolbox.
Creating a Text Box
To create a Text Box on your form, select the Text Box control in the Toolbox.
Drag a box shape on the form with your mouse, holding the left button down, and then release the mouse button.

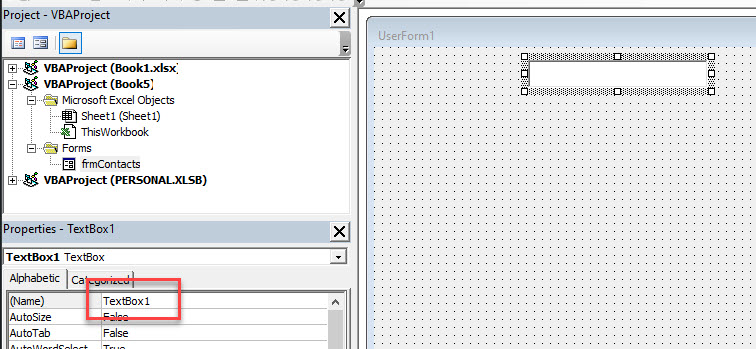
As this is the first Text Box we are creating, it will be named TextBox1. As with the form, you can use the Properties window to rename the text box.
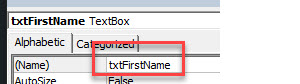
We can continue to create as many text boxes in our form that we require and name them as appropriate using the Name property in the Properties Window.
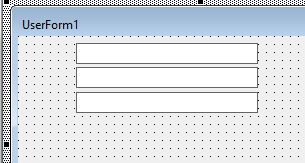
Creating a Label Control
A label control tells us what the text box is going to be used to hold. You drag on the form in the same way as you do for a Text Box, and then you can type the required text within the label control eg: First Name as shown below.
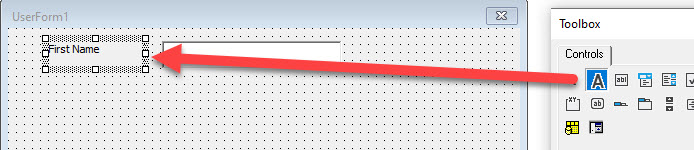
As with the text boxes, continue to create as many as are required in the form.

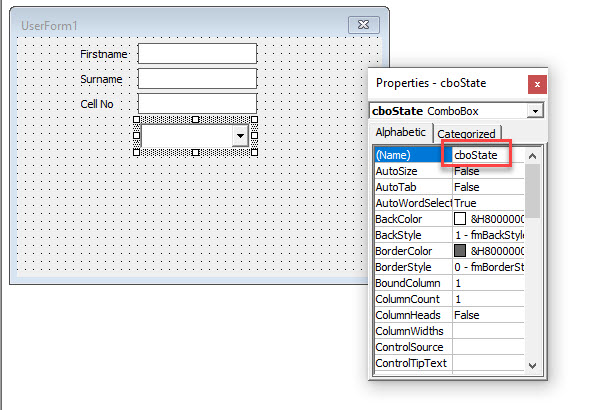
Creating a Combo Box Control
A Combo Box (or a drop-down box) allows the user to select from a list of values. To create a combo box, click in the toolbox on the Combo Box control, and click and drag the combo box in your form.
Name the Combo Box appropriately.
Adding values to the Combo Box
In order to populate it with values, we need to code into the Initialize method of the User form object.
To get to the Code Behind the Form (CBF), either double click on the form, or click on the code button in the Project Explorer to switch to code view.
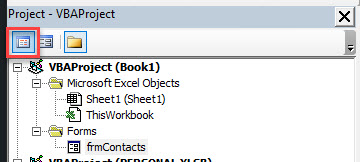
In the left hand drop down list, select User form, and then in the right-hand drop down list, select Initialize.
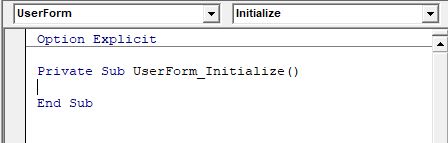
Type the following code within the Sub and End Sub to populate the drop down box:
We can of course carry on an populate the list with the rest of the states in the USA!
To run the user form to see the list in action, 1) switch back to form view and then, 2) in the Toolbar, click on the Run button.
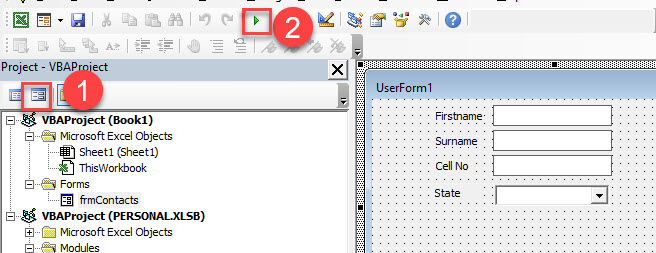
Click on the drop down arrow to see the list.

We can also use a Range in Excel to populate the Combo Box.
This will pick up any values stored in the Range A1 to A50 and populate the drop down list accordingly.

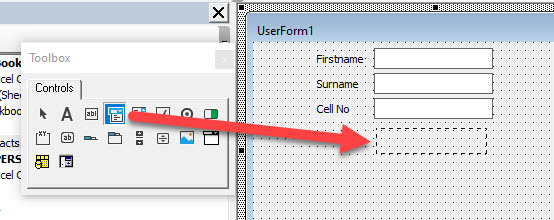
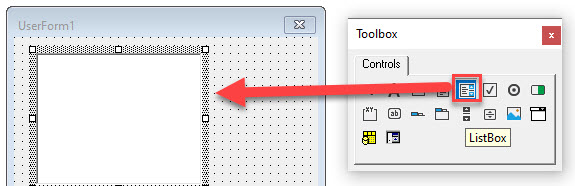
Creating a List Box Control
A List Box control work in the same way as a Combo Box control, but allows us to see all the options on the form in a list format.
Select the List Box control in the toolbox and then drag to create a list box on your form.
VBA Coding Made Easy
Stop searching for VBA code online. Learn more about AutoMacro — A VBA Code Builder that allows beginners to code procedures from scratch with minimal coding knowledge and with many time-saving features for all users!

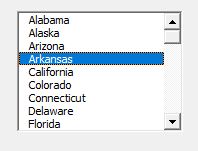
Adding values to the List Box
In the Initialize event of the form, type the following code:
When we run the form, the list box will be shown as demonstrated in the image below:
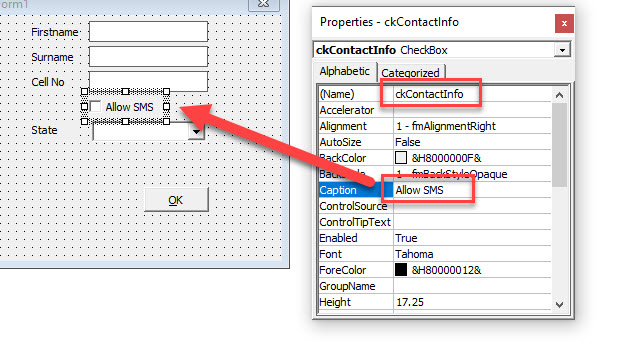
Creating a Check Box Control
Check Boxes enable the user to check or uncheck an option.
Select the Check Box control, and then click in the form where you wish it to go.
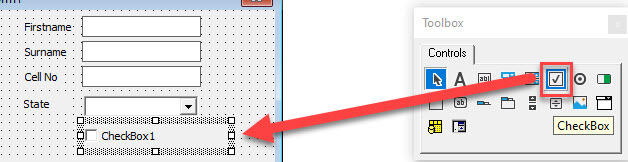
Amend the caption and name of the Check Box in the Properties Window.
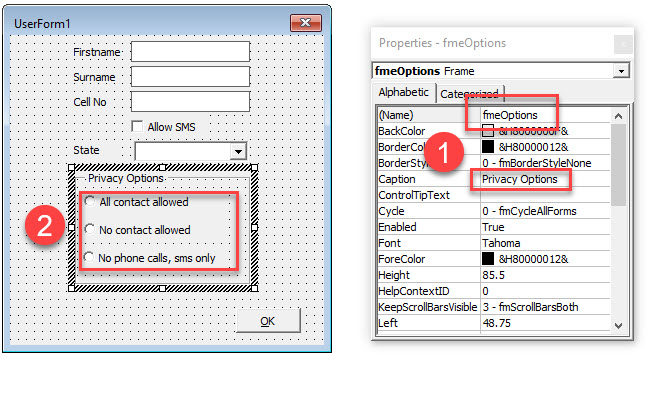
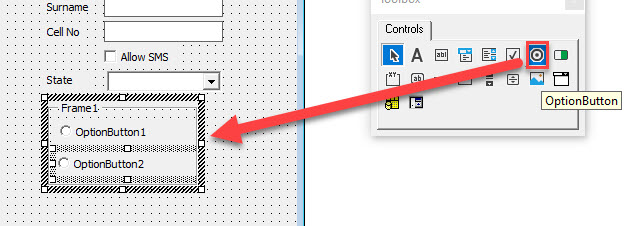
Creating an Option Group Control with Option Buttons
An Option Group allows the user to select from a number of available options. The first step in creating an option group is to add a Frame Control to the form, and then to add the Option Buttons within the frame that has been added. By doing this, we ensure that when we run the form, only one of the Option Buttons within the frame can be selected at a time.
Select the Frame control in the toolbox and then drag to create a frame on your form.

Select the Option Button control in the toolbox and then click WITHIN the frame created above to add option button into the frame. Repeat as required.
Click on the frame and 1) amend the name of the frame and the Caption. Then 2) click on each of the option buttons and amend the Caption.
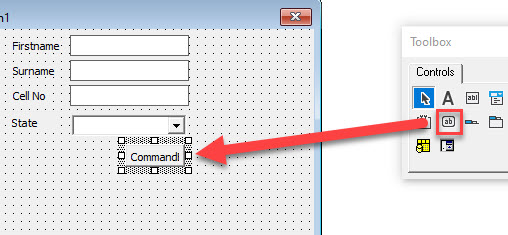
 Creating a Command Button to Exit the Form
 Creating a Command Button to Exit the Form
At this stage, the only way of closing the form is to use the close button in the right-hand corner of the form control bar. A more efficient way to exit a form, and one in which we have more control over, is by creating an Exit button on the form. This is done by means of the Command Button Control in the Toolbox.
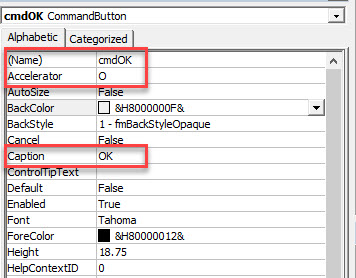
Select the Command Button control, and then click and drag in your form to create the button.
Using the Caption Property, change the caption of the command button to OK, and the Accelerator to “O”
The purpose of the Accelerator is for the user to use the keyboard to activate the button, in this case Alt+O would activate the button.
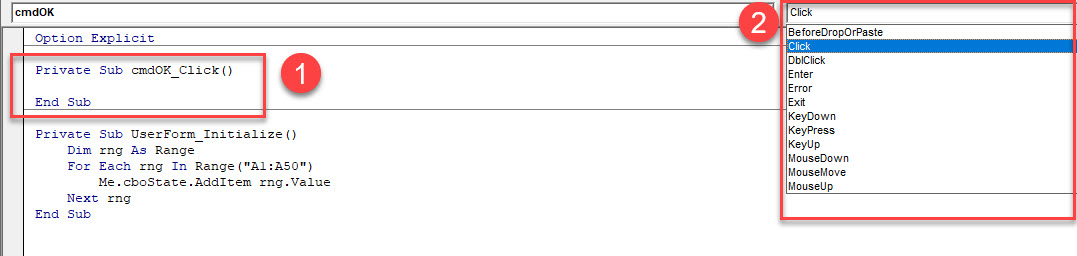
Adding Code to the Command Button
For the command button to work, we need to add code behind it so that when the button is clicked, the code runs. This is called the Click event of the button.
To get to the click event, double-click on the button in the design view of the form.
1) The Click event will be automatically created as this is the event that is most commonly used for Command buttons.
2) If we were to click in the Procedure drop-down box on the right hand side, we would see a list of all the Event Methods that are available to the Command Button. This list changes according to what type of control we have created as there are different events available for different types of controls.
Type the following code into the click event of the command button.
We can then run the form, fill in the text boxes and select from the drop down list. We then click OK to enter the information into Excel.


VBA Code Examples Add-in
Easily access all of the code examples found on our site.
Simply navigate to the menu, click, and the code will be inserted directly into your module. .xlam add-in.
Источник
VBA Controls – Form Control & ActiveX Control in Excel
Updated January 20, 2023
VBA Controls: VBA Form Control & ActiveX Controls in Excel
VBA Form/GUI controls in Excel
GUI is the acronym for Graphical User Interface. The GUI is the part of the program that the user interacts with. A GUI is made up of controls. These Excel VBA controls can be used in a Form. The following table shows some of the most commonly used GUI VBA controls.
| S/N | Control | Description |
|---|---|---|
| 1 | Command | Used to execute code |
| 2 | Combo Box | Used to present a drop down list to the users |
| 3 | Check Box | Used for true or false values. Multiple check boxes can have true value at the same time. |
| 4 | List Box | Used to present a simple list to the users |
| 5 | Text Box | Used to accept user input |
| 6 | Scroll Bar | Used for to provide a scrollbar for navigation purposes. |
| 7 | Spin Button | Used to increment or decrease numeric values by clicking on up or down arrows that appear in the spin button |
| 8 | Option Button | Used for true or false values. Only one option button can have a true value at a time. |
| 9 | Label | Used to display static text to the user |
| 10 | Image | Used to display images |
| 11 | Toggle Button | Button that has pressed and un-pressed states. |
- Click on the developer tab
- Click on Insert Drop down button
You will get the following drop down panel

If you hover the mouse over VBA form controls, the name of the control will appear as shown below

Adding GUI controls to a spreadsheet
We will now add a command button to our workbook, for that we have to
- Click on Insert drop down
- Click on Command Button (ActiveX Control) as shown in the image above
- Drag and draw the button on the sheet

Setting GUI control properties
We will now set the caption of the button to something more descriptive

- Right click on the equal button that we have just created
- Select properties menu
- You will get the following properties window

- Set the name property to btnButton. The name property is used to identify the control in the code window. btn is the prefix for the button.
- Set the Caption property to Click Me. The text in the caption property is what the users will see on the button.
Close the window when you are done.
You will get the following results.

How to use ActiveX control in VBA
In this section of ActiveX control Excel, we will see how to incorporate ‘commandclick’ button in VBA and execute a program using the button.
Step 1) In this step, click the option “insert button” from the Active X Control. Then select the command button option from it.

Step 2) To insert “clickcommandbutton1” drag the mouse cursor to Excel sheet.

Step 3) Then right click on the command button and select option “View Code”.

Step 4) Check you are on the right sheet. A code editor will open. Enter your code.
- In code, we defined range A1 to A10.
- This range defines the cell number in the Excel sheet from “A1 to A10.”
- Next, we define the string “Guru99 VBA Tutorial” in code
- So, when you click on “command button” in excel. It should print “Guru99 VBA Tutorial” in the cell range “A1 to A10.”

Step 5) In next step, save code file and then exit the editor. To return to the Excel file click the Excel sheet icon  on the extreme left.

Step 6) In Excel sheet, you will see Design Mode tab is on. Make sure it is “OFF” or else your code will not work.
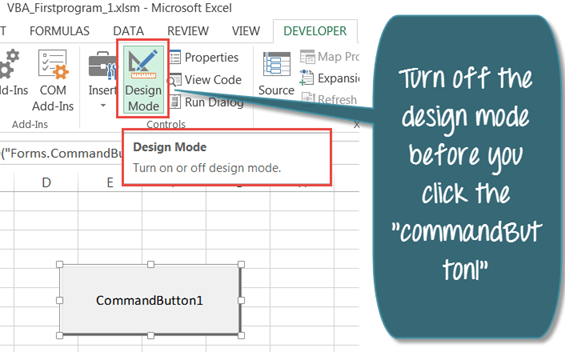
Step 7) When design mode is off, there will be no green highlight on it. Now you can Click on the command button.


Prerequisite
Configure Microsoft Excel
As we see in previous tutorial, make sure your ribbon will have “Developer” icon as shown here.

Now, rename sheet1 to “VBA Operator” as shown in screen-shot below. Save the workbook in an Excel Macro-Enabled Workbook (*.xlsm) file extension. (see the image below).
Источник
“I want to think that there is someone with sound judgement at the controls” – Martin Feldstein
The Webinar
If you are a member of the website, click on the image below to view the webinar for this post.
(Note: Website members have access to the full webinar archive.)

Introduction
In the first post on UserForms we looked at the general use of the UserForm.
In this post we are going to look at the individual VBA controls and how to use them. We will cover the most commonly used VBA controls. These are the Checkbox, ComboBox, CommandButton, Label, ListBox and TextBox. For each control, I will cover their most common uses and provide plenty of code examples you can use in your own projects.
The UserForm Controls
We add controls to the UserForms to allow the user to make selections, enter text or click a button. To add a control to a UserForm we do the following
- Go to the Toolbox dialog – if not visible select View->Toolbox.
- Click on the control icon you want to add – the icon will appear selected(pressed in) until you click another one.
- Put the cursor over the UserForm.
- Hold down the left mouse button and drag until the control is the size you want.
- To select or move a control click on the Select Objects icon(very left one) on the toolbox and this will put you in select mode.
The following table shows a list of the common controls
| Control | Description |
|---|---|
| CheckBox | Turn item on/off |
| ComboBox | Allows selection from a list of items |
| CommandButton | Click to perform action |
| Label | Displays text |
| ListBox | Allows selection from a list of items |
| Textbox | Allows text entry |
Properties of the Controls
The screenshot below shows the three important Windows when adding controls to a UserForm. These are
- The Properties Window.
- The Toolbox Dialog.
- The UserForm design Window.

UserForm Windows
If you click on any control or the UserForm itself you will see the properties of the selected item displayed in the Properties window. You can change the name, caption etc. in this Window.
To change the name of the UserForm do the following
- Click on the UserForm in the Project window or click on the UserForm itself.
- Click in the (Name) field of the Properties window.
- Enter the new name in this field.
Adding the Code
You can view the code of the UserForm in the following ways
- Double click on the UserForm.
- Right click on the UserForm itself and select View Code.
- Right click on the UserForm in the Project windows and select View Code.
Common control functions
The following table shows the most commonly used functions that are available to all controls.
| Function | Operation | Example |
|---|---|---|
| Enabled | Enable/Disable control | combobox.Enabled = True textbox.Enabled = False |
| SetFocus | Sets the focus to the control (cannot use with the Label) |
combobox.SetFocus |
| Visible | Show/Hide control | combobox.Visible = True textbox.Visible = False |
' https://excelmacromastery.com/
Private Sub checkboxAddNotes_Click()

    ' Enable texbox when checkbox set to true
    If checkboxAddNotes.Value = True Then
        textboxNotes.Enabled = True
        textboxNotes.SetFocus
    Else
        textboxNotes.Enabled = False
    End If

End Sub
The CheckBox
The CheckBox Cheat Sheet
| Function | Operation | Example |
|---|---|---|
| Caption | Get/Set the text | checkbox.Caption = «Apple» |
| Value | Get the checked state | If checkbox.Value = True Then |
| Value | Set the checked state | checkbox.Value = False |
The CheckBox is a simple control that allows the user set something to on or off. You will often see them used on web pages where you are asked to accept terms and conditions.

Turning the CheckBox on or off
We can turn the CheckBox on or off by setting it to true or false
' Set the check on
CheckBoxTerms.Value = True

' Set the check off
CheckBoxTerms.Value = False
Checkbox Event with example
If we want to create an action when the user clicks on the checkbox then we create a checkbox event. This is simply a sub that runs when the checkbox is clicked.
To create this event simply click on the checkbox in design mode and you will get the following
Private Sub CheckBoxTerms_Click()

End Sub
The following code shows an example of how we use it
' https://excelmacromastery.com/
Private Sub CheckBoxTerms_Click()

    If checkboxTerms.Value = True Then
       buttonOk.Enabled = True
    Else
       buttonOk.Enabled = False
    End If

End Sub
The Label
The Label Cheat Sheet
| Function | Operation | Example |
|---|---|---|
| Text | GetSet the text | textbox1.Text = «Apple» |
The label is the most simple control. Generally speaking, we don’t refer to it in the code. It is used to label the controls or display a short notice.
Setting the Label Text
You can set the text of the Label in the code using the Caption property
LabelAddress.Caption = "Customer Address"
The TextBox
The TextBox Cheat Sheet
| Function | Operation | Example |
|---|---|---|
| Text | Set the text | textbox1.Text = «Apple» |
| Text | Get the text | sFruit = textbox1.Text |
| Value | Set the text | textbox1.Value = «Apple» |
| Value | Get the text | sFruit = textbox1.Value |
Setting the Textbox Text
The textbox is used to allows the user to enter text. We can read or write from a text box as follows
TextBoxNotes.Value = "It was the best of times."

sNotes = TextBoxNotes.Value
The textbox has properties Text and Values. These are the same thing.
From MSDN: For a TextBox, any value you assign to the Text property is also assigned to the Value property.
The problem with the text box is that the user can enter anything. If the user is entering basic text then this is fine. If the text is to be used for a calculation or for looking up something then we need to validate it.
For example, if the user is going to pick a year between 2010 and 2019 we should use a ComboBox/Listbox that only contains valid years. Then we don’t need to validate the format and range of the user’s entry.
Making a TextBox numeric only
The following code prevents the user entering anything other than a number in the textbox
' https://excelmacromastery.com/
Private Sub textboxComments_KeyPress( _
            ByVal KeyAscii As MSForms.ReturnInteger)

    Select Case KeyAscii
        Case Is < vbKey0, Is > vbKey9
            KeyAscii = 0
            Beep
    End Select

End Sub
Using a Date Control
If you the user to select a date you can use the MonthView control. It is one of the additional controls that comes with Visual Basic. It works quite well and looks like the standard date picker you see in most applications.
To add the MonthView control:
- Go the the Visual Basic editor and make sure the Toolbox is visible(View->Toolbox if it’s not visible).
- Select Tools and then Additional Controls from the menu.
- Place a check on Microsoft MonthView Control, Version 6.0.
- The MonthView control will now appear on the Toolbox.
To get the user selection from the MonthView control you can use the DateClick event as the following code shows
' https://excelmacromastery.com/
Private Sub MonthView1_DateClick( _
     ByVal DateClicked As Date)

    ' Store date in textbox
    TextBox1.Value = MonthView1.Value

End Sub
For more information on the MonthView see these links:
Issues adding the MonthView – see top answer on this StackOverflow page
MSDN – Using the MonthView Control
The ComboBox
The ComboBox Cheat Sheet
| Function | Operation | Example |
|---|---|---|
| AddItem | Add an item | listbox.AddItem «Spain» |
| Clear | Remove all Items | combo.Clear |
| List | Add a range of items | combo.List = Range(«A1»).Value |
| ListCount | Get the number of items | cnt = combo.ListCount |
| ListIndex | Get/set selected item | Idx = combo.ListIndex combo.ListIndex = 0 |
| ListRows | Get/set number of items displayed | NoItems = combo.ListRows combo.ListRows = 12 |
| RemoveItem | Remove an item | combo.RemoveItem 1 |
| Value | Get the value of selected Item | Dim sCountry As String sCountry = combo.Value |
The ComboBox is used to allow the user to select an item from a list. It is very similar to the listbox. The main difference is the listbox allows multiple selections.
In most cases we want to do four things with the ComboBoxListBox
- Fill it with data when the Form is loaded
- Preselect an item.
- Retrieve the currently selected item(s).
- Perfom an action when the user selects a different item.
Filling the Combobox with data
We can fill the combobox one item at at a time using the AddItem property.
comboBoxFruit.AddItem "Apple"
comboBoxFruit.AddItem "Pear"
You would normally use AddItem in a loop where you are checking each item before adding it
Dim cell As Range
' Fill items with first letter is A
For Each cell In Sheet1.Range("A1:A50")
    If Left(cell.Value, 1) = "A" Then
        comboBoxFruit.AddItem cell.Value
    End If
Next
Filling the ComboBox from a range
If you want to fill the ComboBox from an entire range you can do it in one line of code
comboBoxFruit.List = Sheet1.Range("A1:A5").Value
Normally when you fill a ComboBox you want to clear the existing contents first
' Clear any existing item
comboBoxFruit.Clear
' Fill the ComboBox
comboBoxFruit.List = Sheet1.Range("A1:A5").Value
Filling the ComboBox – No duplicates
If our range has multiple entries then we want to avoid adding the same item multiple times. We can do this using a Dictionary
' https://excelmacromastery.com/
Sub TestDuplicates()

    ' clear existing values
    comboBoxFruit.Clear

    ' Fill given ComboBox from given range ignoring duplicates
    FillComboNoDuplicates comboBoxFruit, Sheet1.Range("A1:A10")

End Sub

Sub FillComboNoDuplicates(cbo As ComboBox, rg As Range)

    ' Create dictionary
    Dim dict As Object
    Set dict = CreateObject("Scripting.Dictionary")

    Dim cell As Range, sItem As String
    ' Go through each item in range
    For Each cell In rg
        sItem = Trim(cell.Value)
        ' check if item already exists in dictionary
        If dict.Exists(sItem) = False Then
            ' If doesn't exist then add to dictionary and combobox
            dict.Add sItem, 1
            cbo.AddItem sItem
        End If
    Next

    ' Clean up dictonary as we no longer need it
    Set dict = Nothing

End Sub
VBA ComboBox – Full Example 1
The easiest way to show how these work is with an example. Imagine we have a list of countries and their capitals in cells A1:B196.

We want the user to select any country. When they do our UserForm will display the capital of that country. The screenshot below shows and example of this

The first thing we want to do is fill the countries ComboBox when the form loads. We do this using the UserForm_Initialize event which we looked at in the first post on VBA UserForms.
Private Sub UserForm_Initialize()

End Sub
We can use the following code to fill the ComboBox from a range and set the selected item to be the first one. (Note we don’t need to clear the ComboBox here as the Initialize event is only used once – when the UserForm is created.)
' https://excelmacromastery.com/
Private Sub UserForm_Initialize()

    ' Add array to combobox
    ComboBoxCountry.List = Sheet1.Range("A1:A196").Value

    ' Set the first item in combobox
    ComboBoxCountry.ListIndex = 0

End Sub
When the user selects a country we want to display the capital city in the textbox. We use the Change Event of the ComboBox. To create this we simply double-click on the ComboBox and it will be automatically created.
' https://excelmacromastery.com/
Private Sub ComboBoxCountry_Change()

    ' Get the value from the combo box
    Dim sCountry As String
    sCountry = ComboBoxCountry.Value

    ' Get the range
    Dim rg As Range
    Set rg = Sheet1.Range("A1:B196")

    ' Use VLookup to find the capital of the country
    TextBoxCapital.Value = _
        WorksheetFunction.VLookup(sCountry, rg, 2)

End Sub
When the user clicks Ok we write the selected values to the Results worksheet
' https://excelmacromastery.com/
Private Sub buttonOK_Click()

    With shResult

        ' Write the country the was selected
        .Range("A1") = ComboBoxCountry.Value

        ' Write the postion of the selected country
        .Range("A3") = ComboBoxCountry.ListIndex

        ' Write the capital of the country
        .Range("A2") = TextBoxCapital.Value

    End With

    ' Close the form
    Unload Me

End Sub
VBA ComboBox – Full Example 2
A very commmon task to perform is to update a second ComboBox based on the selection of the first.

Imagine we have two ComboBoxes – one contains the name of a country and one has a list of three cities from that country.

When the user selects a country we update the city ComboBox with the cities from that country.
Our data is stored as follows

Anytime the Country ComboBox value is set to a country we update the City ComboBox to contain the three cities from that country. This happens in two places
- When we load the country combo box – the Initialize Event
- When the user selects a country – the Change Event
The code for these is as follows
' https://excelmacromastery.com/
Private Sub UserForm_Initialize()

    ' Add array to combobox
    ComboBoxCountry.List = shCity.Range("A2:A5").Value
    ComboBoxCountry.ListIndex = 0

    ' Fill the city ComboBox
    FillCityCombo ComboBoxCountry.ListIndex

End Sub

Private Sub ComboBoxCountry_Change()
    ' Fill the city ComboBox
    FillCityCombo ComboBoxCountry.ListIndex
End Sub
In both cases we call our FillCityCombo Sub to fill the city ComboBox. It takes one parameter which is the position of the current country selection.
We use the position value to count from the top row of our worksheet range.
' https://excelmacromastery.com/
Sub FillCityCombo(ByVal row As Long)

    ' Get the city range from the given row
    Dim rgCities As Range
    Set rgCities = shCity.Range("B2:D2").Offset(row)

    ' Clear current city list
    ComboBoxCity.Clear

    ' We transpose the range of columns e.g. B2:D2 to rows so
    ' we can add to the ComboBox
    ComboBoxCity.List = _
            WorksheetFunction.Transpose(rgCities)

    ' Set the first city in list
    ComboBoxCity.ListIndex = 0

End Sub
The ListBox
The ListBox is used in almost the same way as the ComboBox. The code in the ComboBox section above will work for the ListBox also.
The ListBox Cheat Sheet
| Function | Operation | Example |
|---|---|---|
| AddItem | Add an item | listbox.AddItem «Spain» |
| Clear | Remove all Items | listbox.Clear |
| ColumnCount | Set the number of visible columns | ComboBox1.ColumnCount = 2 |
| ColumnHeads | Make the column row visible | ComboBox1.ColumnHeads = True |
| List | Range to Listbox ListBox to Range |
Listbox.List = Range(«A1:A4»).Value Range(«A1:A4»).Value = Listbox.List |
| List | Update a column value | Listbox.List(1,2) = «New value» |
| ListCount | Get the number of items | cnt = listbox.ListCount |
| ListIndex | Get/set selected item | Idx = listbox.ListIndex combo.ListIndex = 0 |
| RemoveItem | Remove an item | listbox.Remove 1 |
| RowSource | Add a range of values from a worksheet | ComboBox1.RowSource = Sheet1.Range(«A2:B3»).Address |
| Value | Get the value of selected Item | Dim sCountry As String sCountry = listbox.Value |
We can use the ListBox the same way as we used the ComboBox. The difference is how they are displayed
- The ListBox displays a list of available items to select.
- The ComboBox only displays the selected item. You have to click on the ComboBox to see the other available items.
The other major difference between them is that the ListBox allows multiple selections and the ComboBox doesn’t.

We can get all the selected items in the ListBox by reading through all the items and checking if each one is selected. In the code below we add all the selected items to a Collection.
' USERFROM CODE
' https://excelmacromastery.com/
Private m_CollCountries As Collection

' OK click event
Private Sub buttonOk_Click()
    ' Get the user selections
    Set m_CollCountries = GetSelections
    ' Hide the UserForm
    Hide
End Sub

' Returns the collection of countries
Property Get Countries() As Collection
    Set Countries = m_CollCountries
End Property

' Get the selections from the ListBox
Private Function GetSelections() As Collection

    Dim collCountries As New Collection
    Dim i As Long

    ' Go through each item in the listbox
    For i = 0 To ListBoxCountry.ListCount - 1
        ' Check if item at position i is selected
        If ListBoxCountry.Selected(i) Then
            ' Add item to our collection
            collCountries.Add ListBoxCountry.List(i)
        End If
    Next i

    Set GetSelections = collCountries

End Function
' MAIN PROCEDURE CODE
' https://excelmacromastery.com/
' Sub to display the UserForm
Sub DisplayMultiCountry()

    Dim frm As New UserFormCountryMulti
    frm.Show

    ' Print the collection
    PrintCollection frm.Countries

End Sub

' Sub used to print a collection to the Immediate Window(Ctrl + G)
Public Sub PrintCollection(ByRef coll As Collection)

    Debug.Print "The user selected the following countries:"
    Dim v As Variant
    For Each v In coll
        Debug.Print v
    Next

End Sub
That concludes the two posts on UserForm(see first one here).
I hope you found them of benefit. If you have any questions or queries please feel free to add a comment or email me at Paul@ExcelMacroMastery.com.
What’s Next?
Free VBA Tutorial If you are new to VBA or you want to sharpen your existing VBA skills then why not try out the The Ultimate VBA Tutorial.
Related Training: Get full access to the Excel VBA training webinars and all the tutorials.
(NOTE: Planning to build or manage a VBA Application? Learn how to build 10 Excel VBA applications from scratch.)
In this Article
- Creating a UserForm
- Creating a Text Box
- Creating a Label Control
- Creating a Combo Box Control
- Adding values to the Combo Box
- Creating a List Box Control
- Adding values to the List Box
- Creating a Check Box Control
- Creating an Option Group Control with Option Buttons
- Creating a Command Button to Exit the Form
- Adding Code to the Command Button
This article will demonstrate how to use Controls in UserForms in Excel VBA.
VBA has the ability to create forms that the user can interact with such as Invoice forms, or Contact details. A form can contain a variety of Form Controls such as text boxes, Combo Boxes, List Boxes and Command Buttons. This article will cover the most popular controls used on User forms namely Text Boxes, Labels, Combo Boxes, List Boxes, Check Boxes and Option Groups.
To find out more about built in user forms and creating custom user forms in Excel, click here.
Creating a UserForm
To create a UserForm in Excel VBA, we first need to open the VBE Editor.
To insert a new user form into your code, select the UserForm option from the Insert Menu.
A new user form will appear in the Project Explorer and will be shown in the Code Window on the right.
You can rename your form using the Properties box. This should appear below your Project Explorer.
If it is how visible, Press F4 or click View, Properties Window.
Click in the Name property and rename your form.
We can now start populating our form with controls – the text box control is the most popular control along with the label control and command button.
To populate the form with controls, we need to switch on the Toolbox.
In the Menu, select View > Toolbox.
Creating a Text Box
To create a Text Box on your form, select the Text Box control in the Toolbox.
Drag a box shape on the form with your mouse, holding the left button down, and then release the mouse button.
As this is the first Text Box we are creating, it will be named TextBox1. As with the form, you can use the Properties window to rename the text box.
We can continue to create as many text boxes in our form that we require and name them as appropriate using the Name property in the Properties Window.
Creating a Label Control
A label control tells us what the text box is going to be used to hold. You drag on the form in the same way as you do for a Text Box, and then you can type the required text within the label control eg: First Name as shown below.
As with the text boxes, continue to create as many as are required in the form.
Creating a Combo Box Control
A Combo Box (or a drop-down box) allows the user to select from a list of values. To create a combo box, click in the toolbox on the Combo Box control, and click and drag the combo box in your form.
Name the Combo Box appropriately.
Adding values to the Combo Box
In order to populate it with values, we need to code into the Initialize method of the User form object.
To get to the Code Behind the Form (CBF), either double click on the form, or click on the code button in the Project Explorer to switch to code view.
In the left hand drop down list, select User form, and then in the right-hand drop down list, select Initialize.
Type the following code within the Sub and End Sub to populate the drop down box:
Me.cboState.AddItem "Alabama"
Me.cboState.AddItem "Alaska"
Me.cboState.AddItem "Arizona"
Me.cboState.AddItem "Arkansas"
We can of course carry on an populate the list with the rest of the states in the USA!
To run the user form to see the list in action, 1) switch back to form view and then, 2) in the Toolbar, click on the Run button.
Click on the drop down arrow to see the list.
We can also use a Range in Excel to populate the Combo Box.
Private Sub UserForm_Initialize()
 Dim rng As Range
 For Each rng In Range("A1:A50")
   Me.cboState.AddItem rng.Value
 Next rng
End Sub
This will pick up any values stored in the Range A1 to A50 and populate the drop down list accordingly.
Creating a List Box Control
A List Box control work in the same way as a Combo Box control, but allows us to see all the options on the form in a list format.
Select the List Box control in the toolbox and then drag to create a list box on your form.
VBA Coding Made Easy
Stop searching for VBA code online. Learn more about AutoMacro — A VBA Code Builder that allows beginners to code procedures from scratch with minimal coding knowledge and with many time-saving features for all users!
Learn More
Adding values to the List Box
In the Initialize event of the form, type the following code:
Private Sub UserForm_Initialize()
  Dim rng As Range
  For Each rng In Range("A1:A50")
    Me.lstState.AddItem rng.Value
  Next rng
End Sub
When we run the form, the list box will be shown as demonstrated in the image below:
Creating a Check Box Control
Check Boxes enable the user to check or uncheck an option.
Select the Check Box control, and then click in the form where you wish it to go.
Amend the caption and name of the Check Box in the Properties Window.
Creating an Option Group Control with Option Buttons
An Option Group allows the user to select from a number of available options. The first step in creating an option group is to add a Frame Control to the form, and then to add the Option Buttons within the frame that has been added. By doing this, we ensure that when we run the form, only one of the Option Buttons within the frame can be selected at a time.
Select the Frame control in the toolbox and then drag to create a frame on your form.
Select the Option Button control in the toolbox and then click WITHIN the frame created above to add option button into the frame. Repeat as required.
Click on the frame and 1) amend the name of the frame and the Caption. Then 2) click on each of the option buttons and amend the Caption.
VBA Programming | Code Generator does work for you!
 Creating a Command Button to Exit the Form
At this stage, the only way of closing the form is to use the close button in the right-hand corner of the form control bar. A more efficient way to exit a form, and one in which we have more control over, is by creating an Exit button on the form. This is done by means of the Command Button Control in the Toolbox.
Select the Command Button control, and then click and drag in your form to create the button.
Using the Caption Property, change the caption of the command button to OK, and the Accelerator to “O”
The purpose of the Accelerator is for the user to use the keyboard to activate the button, in this case Alt+O would activate the button.
![]()
Adding Code to the Command Button
For the command button to work, we need to add code behind it so that when the button is clicked, the code runs. This is called the Click event of the button.
To get to the click event, double-click on the button in the design view of the form.
1) The Click event will be automatically created as this is the event that is most commonly used for Command buttons.
2) If we were to click in the Procedure drop-down box on the right hand side, we would see a list of all the Event Methods that are available to the Command Button. This list changes according to what type of control we have created as there are different events available for different types of controls.
Type the following code into the click event of the command button.
Private Sub cmdOK_Click()
 Range("E1") = Me.txtFirstname
 Range("E2") = Me.txtSurname
 Range("E3") = Me.txtCellPhone
 Range("E4") = Me.cboState
 If Me.ckContactInfo = True Then
   Range("E5") = "SMS allowed"
 Else
   Range("E5") = "SMS not allowed"
 End If
 If Me.opt1.Value = True Then Range("E6") = Me.opt1.Caption
 If Me.opt2.Value = True Then Range("E6") = Me.opt2.Caption
 If Me.opt3.Value = True Then Range("E6") = Me.opt3.Caption
 Unload Me
End Sub
We can then run the form, fill in the text boxes and select from the drop down list. We then click OK to enter the information into Excel.
UserForms in Excel VBA — UserForm Basics; Add Controls dynamically at run-time using the Add Method; UserForm Controls (A Snapshot)
————————————————————————
Contents:
Excel UserForms
Create a UserForm
UserForm Controls — A SnapShot
UserForm Basics
Add Controls to a UserForm
————————————————————————
Note: In below given examples, vba codes are required to be entered in the Code Module of the UserForm, unless specified otherwise.
Excel UserForms
UserForm is a customized user interface, developed in VBA. It enables a user to interact, using a Form, in an organized and logical manner, to make data entry or for data retrieval with an Excel worksheet or to run a VBA application. UserForm acts as a container in which you add multiple ActiveX controls, each of which has a specific use and associated properties. By itself, a UserForm will not be of much use unless controls are added to it which are the actual user-interactive objects.
ActiveX controls can be used with VBA code or without, either directly on worksheets, while some can be used only on VBA UserForms. Using ActiveX Controls on a Worksheet have been illustrated in detail, in the separate section of «Excel VBA: ActiveX Controls, Form Controls & AutoShapes on a Worksheet».
Create a UserForm

Open Visual Basic Editor (VBE) in Excel by pressing ALT+F11 in an open workbook, or right-click on the worksheet tab at the bottom, and select View Code.
Click on View -> Project Explorer if the Project window is not visible.
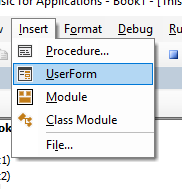
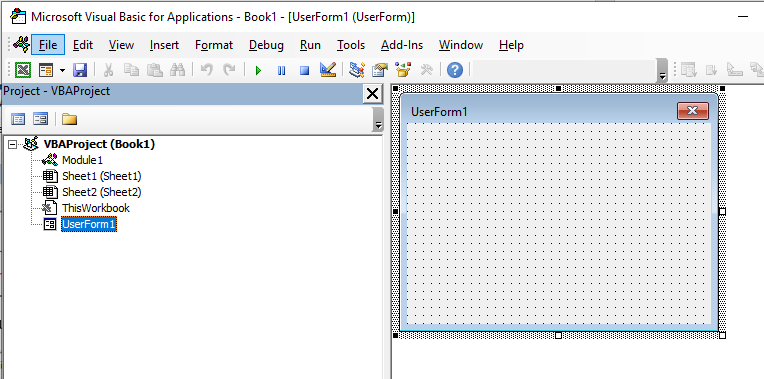
Create a Userform in the Project window of the Visual Basic Editor by clicking Insert -> UserForm, and your screen should appear as shown in Image 1.
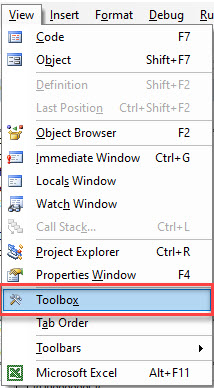
If the Toolbox does not appear by itself, first check if it is not hidden by clicking on the UserForm (or double-clicking on UserForm name in Project Window), else click View -> Toolbox (while UserForm is selected);
Toolbox consists of Controls required for developing a VBA Application. Controls are added in the UserForm from the Toolbox, in the Visual Basic Editor.
If the Properties Window is not visible, click on View -> Properties Window. On clicking the UserForm in the Project Explorer, you can view and change the properties of the UserForm in the Properties Window. Each control in the Toolbox such as a Label or TextBox, has its own associated properties, which can be edited in the Properties Window (ensure that the respective control is selected).
UserForm Controls — A SnapShot
UserForm Controls ToolBox is shown in Image 2

UserForm ToolBox Controls — A Snapshot
| Control | Use |
| Label | Stores text which is not editable by user, and is used to describe other controls. |
| TextBox | Holds text by allowing user to enter or modify. |
| ComboBox | Is a list of items from which a user can select, and also allows user to enter his own item in the text box. ComboBox is a combination of TextBox and ListBox. |
| ListBox | Is a list of items from which a user can select, but does not allow user to enter his own item. |
| CheckBox | A CheckBox whether selected or not, indicates True or False values. Used to select mutually exclusive options viz. Yes/No, On/Off, … |
| OptionButton | Used to make one selection from multiple options. Also referred to as Radio Button. |
| ToggleButton | Executes one action when clicked first and a different action on the second click. The button toggles bewteen the two states, On and Off. |
| Frame | Used to group controls that work together or have some commonality. Particularly useful to group OptionButtons which become mutually exclusive within a Frame. |
| CommandButton | A button, when clicked by the user, executes a code or action. |
| TabStrip | Is a collection of Tabs wherein each Tab contains the same set of controls, and the content of the controls changes when a different Tab is selected. |
| MultiPage | Comprises of one or more Page objects, each containing its own set of controls. Selecting a Page (ie. making it visible) hides the other Pages of the MultiPage control. |
| ScrollBar | Is used to change (increment or decrement) the value displayed by other controls. The ScrollBar box can be dragged to change the control’s value over larger increments. |
| SpinButton | Similar to a ScrollBar, is used to increment or decrement the value displayed by other controls, without the drag facility. |
| Image | Is used to display a Picture on the UserForm. |
| RefEdit | Allows a user to select a worksheet range from a box, or to type in the range therein. It behaves similar to the built-in Excel reference boxes. |
UserForm Basics
| UserForm Application | VBA Code | What is Does |
| To Display a UserForm | UserForm1.Show | Displays the UserForm with name UserForm1. This code should be inserted in a Standard VBA Module and not in the Code Module of the UserForm. You can create a button in a worksheet, then right click to assign macro to this button, and select the macro which shows the UserForm. |
| Load a UserForm into memory but do not display | Load UserForm1 | Load statement is useful in case of a complex UserForm that you want to load into memory so that it displays quickly on using the Show method, which otherwise might take a longer time to appear. |
| Remove a UserForm from memory / Close UserForm | Unload UserForm1 | Note: The Hide method (UserForm1.Hide) does not unload the UserForm from memory. To unload the UserForm from memory, the Unload method should be used. |
| Unload Me | Use the Me keyword in a procedure in the Code Module of the UserForm. | |
| Hide a UserForm | UserForm1.Hide | Using the Hide method will temporarily hide the UserForm, but will not close it and it will remain loaded in memory. |
| Print a UserForm | UserForm1.PrintForm | The PrintForm method sends the UserForm directly for printing. |
| Display UserForm as Modeless | UserForm1.Show False | If the UserForm is displayed as Modeless, user can continue working in Excel while the UserForm continues to be shown. Omitting the Boolean argument (False or 0) will display the UserForm as Modal, in which case user cannot simultaneously work in Excel. By default UserForm is displayed as Modal. |
| Close a UserForm | Unload UserForm1 | The Unload method closes the specified UserForm. |
| Unload Me | The Unload method closes the UserForm within whose Code Module it resides. | |
| End | Use the End statement in the «Close» CommandButton to close the form. The «End» statement unloads all forms. | |
| Specify UserForm Caption | UserForm1.Caption = «Bio Data» | Caption is the text which describes and identifies a UserForm and will display in the header of the Userform. |
| Set UserForm Size | UserForm1.Height = 350 | Set Height of the UserForm, in points. |
| UserForm1.Width = 550 | Set Width of the UserForm, in points. | |
| Set UserForm Position: | ||
| Left & Top properties | UserForm1.Left = 30 | Distance set is between the form and the Left or Top edge of the window that contains it, in pixels. |
| UserForm1.Top = 50 | ||
| Move method | UserForm1.Move 200, 50 | Move method includes two arguments which are required — the Left distance and the Top distance, in that order. |
To determine which UserForms are Loaded:
Private Sub CommandButton1_Click()
‘return names of all Loaded UserForms:
Dim usrFrm As Object
For Each usrFrm In UserForms
MsgBox usrFrm.Name
Next usrFrm
End Sub
Trapping UserForm Events
Among the most common events used for UserForm and its Controls are the UserForm Initialization event and the Click event. The below example explains how these work.
UserForm Events «Initialize» and «Activate»:
The initialization event precedes activation because the UserForm gets initialized while Loading into memory, and thereafter the form gets activated when it is Shown.
When you «Load» or «Show» the UserForm, the initialization event is the first which fires after the UserForm gets Loaded into memory but before it Shows (ie. displays).
When a UserForm is hidden and you use the Show method, it will fire the activation event but not the initialization event. This means that the Show method will only display the UserForm if already Loaded BUT will also Load the UserForm if not already so.
The initialization event fires only when UserForm Loads into memory, while the activation event fires whenever the UserForm is displayed.
Example of Initialization and Click events:
Private Sub UserForm_Initialize()
‘Set properties of Controls on initialization of UserForm.
Dim i As Integer
‘populate a ListBox
With Me.ListBox1
For i = 1 To 100
.AddItem i & » yrs»
Next i
End With
‘set size for TextBox
TextBox1.Height = 20
TextBox1.Width = 60
‘set Caption for OptionButtons
OptionButton1.Caption = «Male»
OptionButton2.Caption = «Female»
‘set Caption for CommandButton3
CommandButton3.Caption = «Save»
End Sub
Private Sub CommandButton3_Click()
‘Click Event on clicking the CommandButton3. Note: Caption for CommandButton3 was set as «Save» at initialization of UserForm.
‘saves text entered in TextBox1, in a worksheet range
Sheet9.Range(«A1»).Value = TextBox1.Value
‘saves ListBox selection in a worksheet range
Sheet9.Range(«A2»).Value = ListBox1.Value
‘saves OptionButton selection in a worksheet range
If OptionButton1.Value = True Then
Sheet9.Range(«A3»).Value = «Male»
ElseIf OptionButton2.Value = True Then
Sheet9.Range(«A3»).Value = «Female»
End If
End Sub
Add Controls to a UserForm
In the Visual Basic Editor (VBE):
Controls are added in the UserForm from the Toolbox, in the Visual Basic Editor. Select the control in the ToolBox and drag to the form to add it. Another method is to left-click on the control in the ToolBox, go to the form and left-click again, and the control will be added. You can also resize the control, by pointing the mouse control over its adjustment handles which are in the middle or corner of its side borders, and then drag these handles to adjust to the desired size. You can adjust the control’s alignment and spacing in the UserForm, using the Format menu in VBE.
Using the Add Method (VBA):
In VBA, use the «Add Method» to create or add a control to a Page or UserForm. The Add Method: (i) inserts a new Tab or Page in the controls TabStrip or MultiPage; or (ii) adds controls to a Page or UserForm.
Syntax:
For the controls TabStrip & MultiPage: Set Object = object.Add(Name,Caption,index)
Note 1: Name & Caption are optional in case these are omitted, the defaults are generated.
Note 2: It is also optional to mention index. The position of a tab in TabStrip and of a Page in MultiPage is determined by this wherein index value is 0 for for the first Tab or Page of a collection. Omitting index appends the tab or page at the end of the Tabs or Pages collection.
For other controls: Set Control = object.Add(ProgID, Name,Visible)
Note 1: It is necessary to specify the Programmatic Identifier (ProgID), which identifies an object class. These are given in below Table for all individual Controls.
Note 2: Name and Visible are optional. If name is omitted, the default is generated. Value of Visible is True if the object is visible and False if hidden, default being True.
| Controls | ProgID | Controls | ProgID |
| CheckBox | Forms.CheckBox.1 | MultiPage | Forms.MultiPage.1 |
| ComboBox | Forms.ComboBox.1 | OptionButton | Forms.OptionButton.1 |
| CommandButton | Forms.CommandButton.1 | ScrollBar | Forms.ScrollBar.1 |
| Frame | Forms.Frame.1 | SpinButton | Forms.SpinButton.1 |
| Image | Forms.Image.1 | TabStrip | Forms.TabStrip.1 |
| Label | Forms.Label.1 | TextBox | Forms.TextBox.1 |
| ListBox | Forms.ListBox.1 | ToggleButton | Forms.ToggleButton.1 |
Creating the control TextBox (name: txtSampleTextBox) in vba, using the Add Method:
Dim txtSampleTextBox As MSForms.TextBox
Set txtSampleTextBox = Controls.Add(«Forms.TextBox.1», «txtSampleTextBox»)
Use the Remove Method to remove a control added using the Add Method (ie. dynamically at run-time). Controls added at design-time cannot be removed.
Syntax (name of the control is CheckBox1): Controls.Remove «CheckBox1»
__________________________________________________________________________________________________
Example: Dynamically add Event Handler Code to a Class Module for Dynamically added Controls (using the Add Method). When controls are added at run-time, you can Trap events in a «WithEvents» class viz. declare a WithEvents variable in a class module. Refer Images 3a (cilcking the CommandButton) and 3b (clicking the CheckBox) . See below codes:


Note: In this example, the TextBox has been created at design-time, while the CommandButton and CheckBox have been added at run-time; the class module named Class1 has been created at design-time wherein the the event handlers for the dynamically added CommandButton and CheckBox reside.
Code to be placed in the Userform module (UserForm8):
Option Explicit
‘Referencing the class module, Class1 — the New keyword instantiates (calls into existence) a class object and assigns the result to a variable named chkB (or cmdB) which references the class. The New keyword creates a new instance of the class by declaring an object variable of type classname which represents the class name:
Dim chkB As New Class1
Dim cmdB As New Class1
—————————————————————————————————————-
Private Sub UserForm_Initialize()
‘Add Controls (CommandButton and CheckBox) on UserForm initialization; trap events in a class:
Dim cmdB1 As MSForms.CommandButton
Dim chkB1 As MSForms.CheckBox
‘add a new CommandButton using the Add Method
Set cmdB1 = Me.Controls.Add(«Forms.CommandButton.1», «cmdClick»)
cmdB1.Caption = «Click to Enter»: cmdB1.top = 10: cmdB1.Left = 10
‘the event handler (cbEvent1) in re. of the new CommandButton resides in the class module (Class1)
Set cmdB.cbEvent1 = cmdB1
‘add a new CheckBox using the Add Method
Set chkB1 = Controls.Add(«Forms.CheckBox.1»)
chkB1.Name = «chkDemo»: chkB1.Caption = «Check for Msg»: chkB1.top = 50: chkB1.Left = 10
‘the event handler (ckbEvent1) in re. of the new CheckBox resides in the class module (Class1)
Set chkB.ckbEvent1 = chkB1
‘set positional properties for TextBox created at design-time
TextBox1.top = 10
TextBox1.Left = 100
End Sub
Codes to be placed in the in the class module (Class1):
‘Use the WithEvents keyword to define an object variable in a Class module. The WithEvents keyword is valid only in class modules and multiple variables can be defined within a module with this keyword
Public WithEvents ckbEvent1 As MSForms.CheckBox
Public WithEvents cbEvent1 As MSForms.CommandButton
————————————————————————————————————
Private Sub cbEvent1_click()
‘clicking the CommandButton will enter «Hello» in the TextBox and color it yellow — refer Image 3a
‘The class code (entered in the Class Module of «Class1»):
UserForm8.TextBox1.Text = «Hello»
UserForm8.TextBox1.BackColor = RGB(255, 255, 0)
End Sub
——————————————————————————————————————
Private Sub ckbEvent1_click()
‘selecting the CheckBox will return the message «Yes» — refer Image 3b
‘The class code (entered in the Class Module of «Class1»):
MsgBox «Yes»
End Sub