
Элемент управления пользовательской формы CommandButton, используемый в VBA Excel для запуска процедур и макросов. Свойства кнопки, примеры кода с ней.
UserForm.CommandButton – это элемент управления пользовательской формы, предназначенный исключительно для запуска процедур и макросов VBA Excel.

Для запуска процедур и макросов обычно используется событие кнопки – Click.
Свойства элемента CommandButton
| Свойство | Описание |
|---|---|
| AutoSize | Автоподбор размера кнопки. True – размер автоматически подстраивается под длину введенной надписи (заголовка). False – размер элемента управления определяется свойствами Width и Height. |
| BackColor | Цвет элемента управления CommandButton. |
| Caption | Надпись (заголовок) – текст, отображаемый на кнопке. |
| ControlTipText | Текст всплывающей подсказки при наведении курсора на кнопку. |
| Enabled | Возможность взаимодействия пользователя с элементом управления CommandButton. True – взаимодействие включено, False – отключено (цвет надписи становится серым). |
| Font | Шрифт, начертание и размер текста надписи. |
| Height | Высота элемента управления. |
| Left | Расстояние от левого края внутренней границы пользовательской формы до левого края элемента управления. |
| Picture | Добавление изображения вместо текста заголовка или дополнительно к нему. |
| PicturePosition | Выравнивание изображения и текста на кнопке. |
| TabIndex | Определяет позицию элемента управления в очереди на получение фокуса при табуляции, вызываемой нажатием клавиш «Tab», «Enter». Отсчет начинается с 0. |
| Top | Расстояние от верхнего края внутренней границы пользовательской формы до верхнего края элемента управления. |
| Visible | Видимость элемента управления CommandButton. True – элемент отображается на пользовательской форме, False – скрыт. |
| Width | Ширина элемента управления. |
| WordWrap | Перенос текста заголовка на новую строку при достижении ее границы. True – перенос включен, False – перенос выключен. |
В таблице перечислены только основные, часто используемые свойства кнопки. Все доступные свойства отображены в окне Properties элемента управления CommandButton.

Пример кнопки с надписью и изображением
Примеры кода VBA Excel с кнопкой
Изначально для реализации примеров на пользовательскую форму UserForm1 добавлена кнопка CommandButton1.
Пример 1
Изменение цвета и надписи кнопки при наведении на нее курсора.
Условие примера 1
- Действия при загрузке формы: замена заголовка формы по умолчанию на «Пример 1», замена надписи кнопки по умолчанию на «Кнопка», запись цвета кнопки по умолчанию в переменную уровня модуля.
- Сделать, чтобы при наведении курсора на кнопку, она изменяла цвет на зеленый, а надпись «Кнопка» менялась на надпись «Нажми!»
- Добавление кода VBA Excel, который будет при удалении курсора с кнопки возвращать ей первоначальные настройки: цвет по умолчанию и надпись «Кнопка».
Решение примера 1
1. Объявляем в разделе Declarations модуля пользовательской формы (в самом начале модуля, до процедур) переменную myColor:
2. Загружаем пользовательскую форму с заданными параметрами:
|
Private Sub UserForm_Initialize() Me.Caption = «Пример 1» With CommandButton1 myColor = .BackColor .Caption = «Кнопка» End With End Sub |
3. Меняем цвет и надпись кнопки при наведении на нее курсора мыши:
|
Private Sub CommandButton1_MouseMove(ByVal _ Button As Integer, ByVal Shift As Integer, _ ByVal X As Single, ByVal Y As Single) With CommandButton1 .BackColor = vbGreen .Caption = «Нажми!» End With End Sub |
4. Возвращаем цвет и надпись кнопки при удалении с нее курсора мыши:
|
Private Sub UserForm_MouseMove(ByVal _ Button As Integer, ByVal Shift As Integer, _ ByVal X As Single, ByVal Y As Single) With CommandButton1 .BackColor = myColor .Caption = «Кнопка» End With End Sub |

Все процедуры размещаются в модуле пользовательской формы. Переменная myColor объявляется на уровне модуля, так как она используется в двух процедурах.
Пример 2
Запуск кода, размещенного внутри процедуры обработки события Click элемента управления CommandButton:
|
Private Sub CommandButton1_Click() MsgBox «Код внутри обработки события Click» End Sub |
Пример 3
Запуск внешней процедуры из процедуры обработки события Click элемента управления CommandButton.
Внешняя процедура, размещенная в стандартном модуле проекта VBA Excel:
|
Sub Test() MsgBox «Запуск внешней процедуры» End Sub |
Вызов внешней процедуры из кода обработки события Click
- с ключевым словом Call:
|
Private Sub CommandButton1_Click() Call Test End Sub |
- без ключевого слова Call:
|
Private Sub CommandButton1_Click() Test End Sub |
Строки вызова внешней процедуры с ключевым словом Call и без него – равнозначны. На ключевое слово Call можно ориентироваться как на подсказку, которая указывает на то, что эта строка вызывает внешнюю процедуру.
Fairly easy method for doing this, even if it’s not really documented.
CommandButton1.Value = True
answered Oct 26, 2015 at 20:01
![]()
1
Did you actually try? Because you want exaclty what is suggested there.
Application.Run Activesheet.Shapes(1).OnAction
![]()
answered Sep 27, 2012 at 7:33
![]()
GSergGSerg
75.3k17 gold badges160 silver badges340 bronze badges
If in a worksheet. I used this in the past and it worked!
Sheet1.CommandButton1_Click
else
Sheets("Sheet Name").CommandButton1_Click
answered Jun 20, 2013 at 6:14
![]()
DamianDamian
4,3154 gold badges38 silver badges67 bronze badges
1
In my case, I needed to add a button, say on Sheet1, to call the code of CommandButton1 on, say, Sheet2. First I had to delete the ‘Private’ statement that was in front of CommandButton1_Click(). Then I had to call Worksheets(«Sheet2»).Activate before calling Worksheets(«Sheet2»).CommandButton1_Click. Then it worked. You can then add Worksheets(«Sheet1»).Activate to get you back to your original sheet. So:
Private Sub CommandButton1_Click()
Worksheets("Sheet2").Activate
Worksheets("Sheet2").CommandButton1_Click
Worksheets("Sheet1").Activate
End Sub
answered Jan 11, 2021 at 20:22
![]()
In this Article
- Adding a Macro Button to an Excel Worksheet
- Adding a Form Control Button
- Adding an ActiveX Button
- Adding a Macro to a Shape in an Excel Worksheet
- Adding Command Buttons to VBA Forms
This tutorial will demonstrate how to add a macro button in Excel VBA.
Once we have created macros in Excel, it is sometimes useful to create a button in the Excel worksheet to run the macro.
Also, as we use VBA to create UserForms in Excel, we need to be able to create buttons on these UserForms to perform the OK and Cancel operations. This tutorial will demonstrate how to add a macro button to a VBA worksheet, how to add a macro to a shape in VBA (as opposed to a button), and how to add a button onto a User Form in the VBE Editor.
Adding a Macro Button to an Excel Worksheet
Once we have created a macro in Excel VBA, we can create a button on the worksheet to run the macro.
In the Ribbon, select the Developer tab if it is visible. This tab is switched off by default so you will need to switch it on to see the tab on the ribbon.
If the Developer tab is not visible on the ribbon, click on the File tab in the Ribbon, and go down to Options. In the Customize Ribbon options, tick the Developer check box.
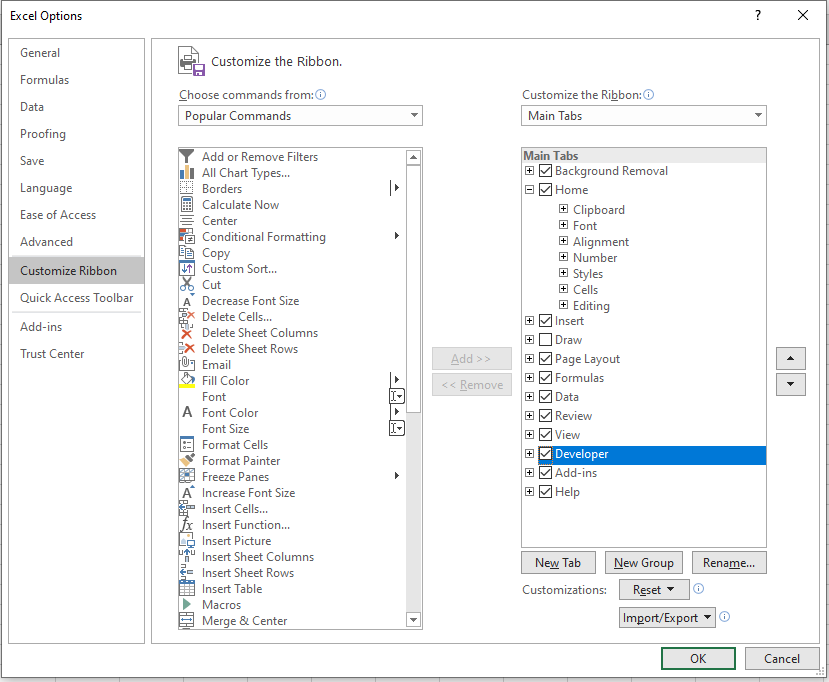
Click OK.
The Developer tab will appear on the main ribbon.

There are 2 types of buttons we can add to an Excel sheet – a Form Control button and an ActiveX Control Button.
Adding a Form Control Button
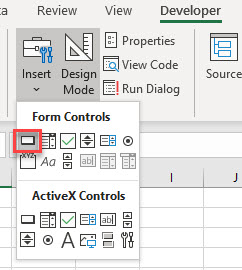
In the Ribbon, select Developer > Insert > Form Controls > Button.
Click and drag in the worksheet to create a button. As soon as you release the mouse button, the assign macro dialog box will appear.
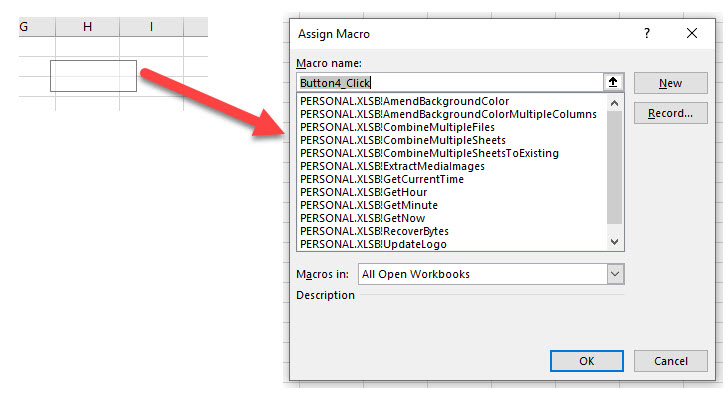
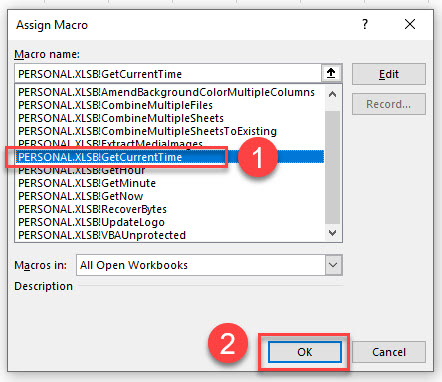
Scroll down to 1) select the macro you wish to assign to the button, and then, 2) click OK.
Right click on the button, and select Edit Text to change the text on the button.
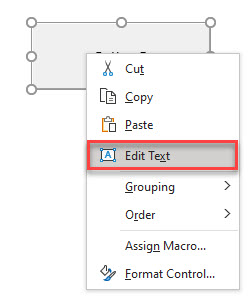
Type an appropriate name for the button and then click off the button.
Click the button to run the macro.
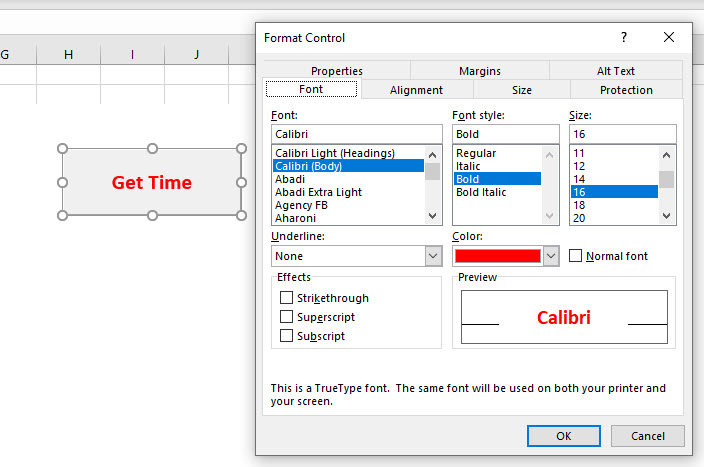
To change the format of the button, right click on the button and select Format Control.

Select the options to format, and click OK.
Adding an ActiveX Button
The ActiveX button is similar to a Form Control Button but instead of assigning an existing macro to the button, we need to write code behind the Click Event of the button. It also has a lot more Properties than the Form Control Button making it a much more flexible control.
In the Ribbon, select Developer > Insert > ActiveX Controls > Command button.
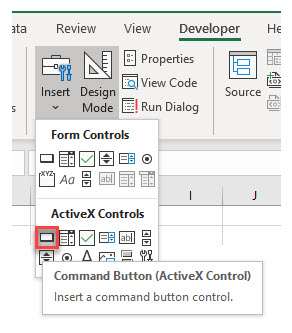
Click and drag in your worksheet to create the button. The button will appear as an Embedded Command Button.
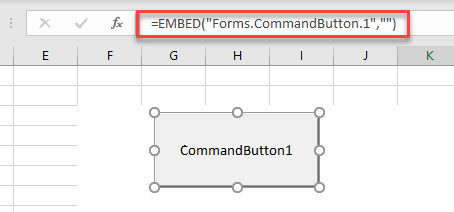
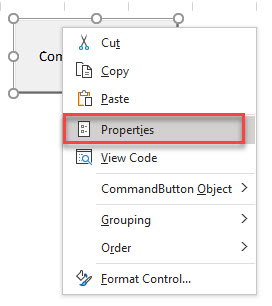
To change the name of the command button, or the text that is displayed, right-click on the command button and click on Properties.
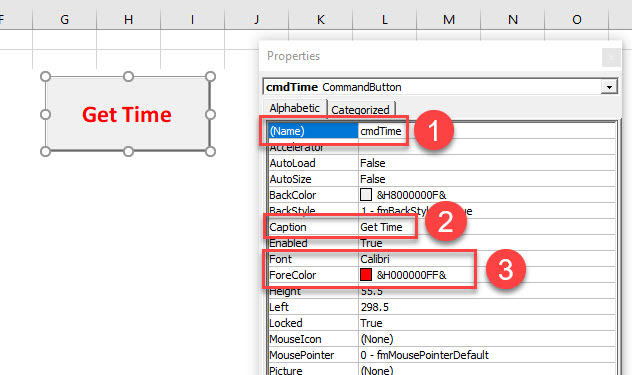
Amend the 1) name of the button, 2) caption of the button and 3) format of the text as required.
To add code to the button, right-click on the button once more and select View Code.
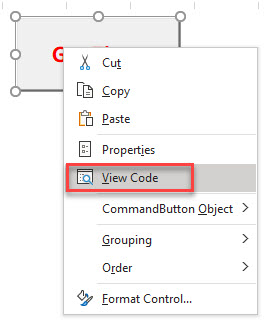
This will automatically create the click event for the button in the VBE Editor. (the click event is the most common event for command buttons and is created by default).
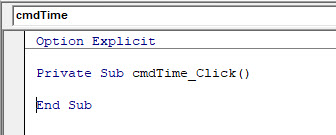
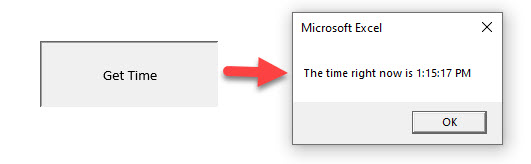
Type the code you require into the event that has been created.
Private Sub cmdTime_Click()
 Dim strT As String
 strT = Time()
 MsgBox "The time right now is " & strT
End Sub
Close the VBE Editor to return to your worksheet.
Click once more on your new button. You will notice that macro does not run, but the button gets selected. This is due to the fact that when you create an ActiveX button, you are automatically put into Design Mode.
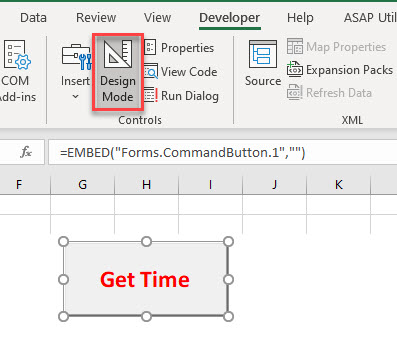
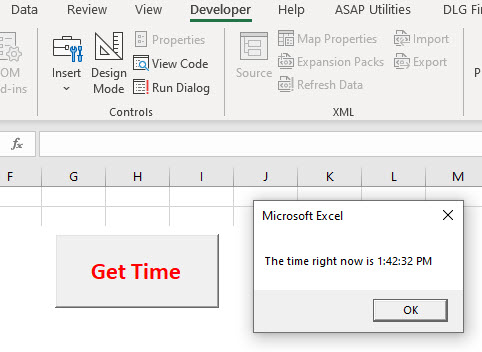
To run the code behind the button, click on the Design Mode button on the Ribbon to go out of Design mode, and then click the button.
Adding a Macro to a Shape in an Excel Worksheet
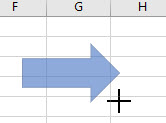
In the Ribbon, select Insert > Shape.
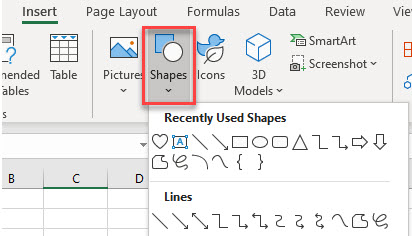
Select the shape from the drop down, and then drag in the Excel worksheet to create the shape.
Right-click on the shape, and select Assign Macro.
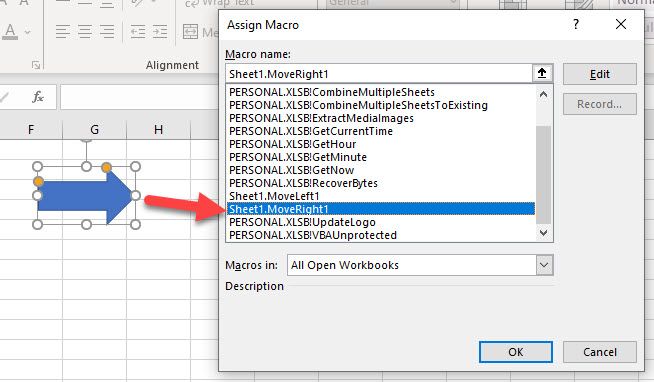
Select the macro to assign, and then click OK.
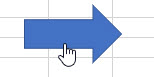
When you move your mouse over your shape, the mouse cursor should turn into a small hand. Click on the shape to run the macro.
Adding Command Buttons to VBA Forms
Creating VBA UserForms is a big part of programming in VBA. It allows you to build a professional looking user interface to communicate with the users of your VBA application. It also allows you to totally control the user in what they are doing to your workbook. To learn how to create UserForms in VBA, click here.
Once a UserForm is created, and controls have been added to a UserForm, buttons can be added to perform functions such as OK and Cancel.
In the Toolbox, select the Command Button control, and then click and drag in your form to create the button.
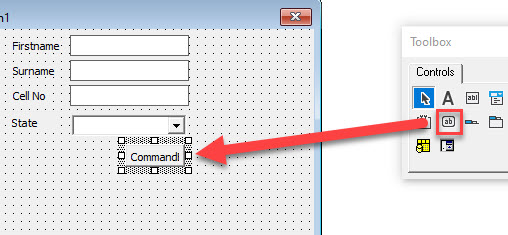
Using the Caption Property, change the caption of the command button to OK, and the Accelerator to “O”
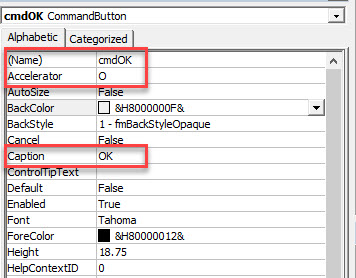
The purpose of the Accelerator is for the user to use the keyboard to activate the button, in this case Alt+O would activate the button.
![]()
Once we have created the command button, we can double-click on the command button to go to the VBA code. Double-clicking on the command button in the form will automatically create the Click Event for the button as this is the event that is most commonly used by command buttons.
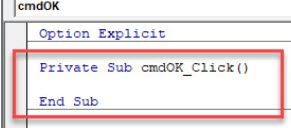
We can now type our relevant VBA code within the procedure that has been created.
VBA Coding Made Easy
Stop searching for VBA code online. Learn more about AutoMacro — A VBA Code Builder that allows beginners to code procedures from scratch with minimal coding knowledge and with many time-saving features for all users!

Learn More!
Excel VBA UserForm CommandButton
CommandButton is one of the UserForm control. You can select and drag CommandButton on the UserForm. CommandButton is used to run or execute a macro or procedure. It performs a task or an action when a user clicks on a command button. Command Button can be used on the WorkSheet or UserForm. Please find more details about ActiveX CommandButton Control in the following chapter. You can see how we are adding or deleting command button on the UserForm or Worksheet.
- VBA CommandButton Control on the UserForm
- Add Dynamic CommandButton Control on the UserForm Using VBA
- Delete CommandButton control on the UserForm using VBA
VBA ActiveX CommandButton Control on the UserForm
Please find more details about VBA ActiveX Command Button Control on the UserForm.
-
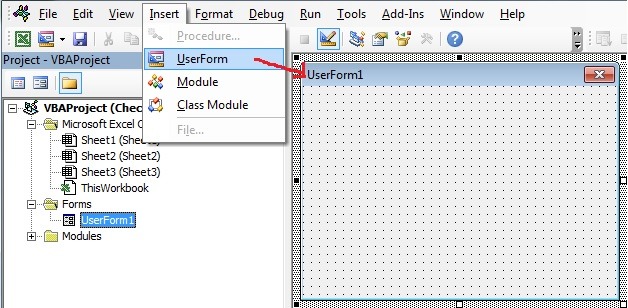
- Go To Developer Tab and then click Visual Basic from the Code or Press Alt+F11.
- Go To Insert Menu, Click UserForm. Please find the screenshot for the same.
-
- Drag a CommandButton on the Userform from the Toolbox. Please find the below screenshot for the same.

-
- Now double click on the Command Button, which is dragged on the UserForm .
- Now you can see the following code in the VBA Editor window.
Private Sub CommandButton1_Click()

End Sub
-
- Now add the following code to the in between above procedure.
Code:
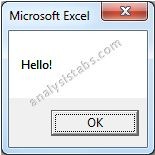
Private Sub CommandButton1_Click()
    MsgBox "Hello!"
End Sub
-
- Now, Press ‘F5’ to run the code. You can see the following Output. It is shown in the following Screen Shot.
output:
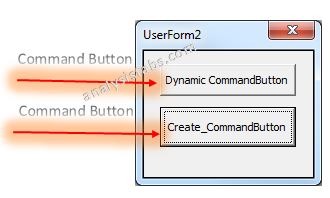
Add dynamic CommandButton Control on the UserForm using VBA
Please find the following steps and example code, it will show you how to add dynamic Command Button control on the userform.
-
- Add command button on the userform from the toolbox.
- Right click on the command button, click properties
- Change the command button caption to ‘Create_CommandButton’
- Double click on the command button
- Now, it shows the following code.
Private Sub CommandButton1_Click()

End Sub
-
- Call the below procedure named ‘Add_Dynamic_CommandButton ’ and find the below procedure to run.
Private Sub CommandButton1_Click()
    Call Add_Dynamic_CommandButton
End Sub
Procedure to call in the Command Button :
Sub Add_Dynamic_CommandButton()
    'Add Dynamic CommandButton and assign it to object 'CmdBtn'
    Set CmdBtn = UserForm2.Controls.Add("Forms.CommandButton.1")

    With CmdBtn
        'Assign CommandButton Name
        CmdBtn.Caption = "Dynamic CommandButton"

        'CommandButton Position
        .Left = 12
        .Top = 10
        .Width = 102
    End With
End Sub
-
- Now, click F5 to run the macro, click ‘Create_CommandButton’ button to see the result.
- You can see the created dynamic Command Button which is shown in the following screen shot.
output:
Delete CommandButton Control on the UserForm using VBA
Please find the below code, it will show you how to delete or remove a command button on the UserForm. In the below example, its deleting the command button named ‘New Button’ which is on the UserForm named ‘UserForm4’. We can use Remove method to delete the controls which are created during run time. Controls which are created during design time cannot be deleted using this method. Please find the below example and screen shots for better understand.
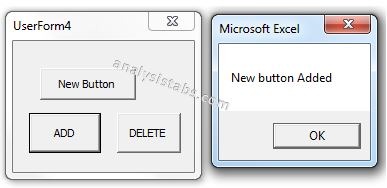
Code 1: Adding CommandButton During Run Time
Private Sub CommandButton1_Click()
    'We can use Add method to add the new controls on run time
    Set CmdBtn = Me.Controls.Add("Forms.CommandButton.1")
    With CmdBtn
        .Top = 20
        .Left = 20
        .Caption = "New Button"
        .Name = "cmdNew1"
    End With
    MsgBox "New button Added"
End Sub
Please find the below screen shot for your reference for the above macro and its output.
When we click on Add Command Button:
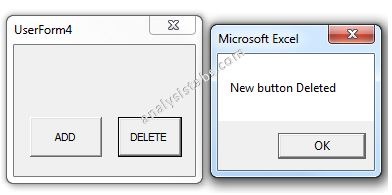
Code 2: Deleting or Removing CommandButton which is created during run time.
Private Sub CommandButton2_Click()
    'We can use Remove method to delete the controls which are created during run time
    'Note: Controls which are created on design time can not be deleted using this method
    Me.Controls.Remove ("cmdNew1")
    MsgBox "New button Deleted"
End Sub
Please find the below screen shot for your reference for the above macro and its output.
When we click on Delete Command Button:
A Powerful & Multi-purpose Templates for project management. Now seamlessly manage your projects, tasks, meetings, presentations, teams, customers, stakeholders and time. This page describes all the amazing new features and options that come with our premium templates.
Save Up to 85% LIMITED TIME OFFER

All-in-One Pack
120+ Project Management Templates
Essential Pack
50+ Project Management Templates
Excel Pack
50+ Excel PM Templates
PowerPoint Pack
50+ Excel PM Templates
MS Word Pack
25+ Word PM Templates
Ultimate Project Management Template
Ultimate Resource Management Template
Project Portfolio Management Templates
-
-
- In this topic:
-
- VBA ActiveX CommandButton Control on the UserForm
- Add dynamic CommandButton Control on the UserForm using VBA
-
- Procedure to call in the Command Button :
-
- Delete CommandButton Control on the UserForm using VBA
VBA Reference
Effortlessly
Manage Your Projects
120+ Project Management Templates
Seamlessly manage your projects with our powerful & multi-purpose templates for project management.
120+ PM Templates Includes:
Effectively Manage Your
Projects and Resources
ANALYSISTABS.COM provides free and premium project management tools, templates and dashboards for effectively managing the projects and analyzing the data.
We’re a crew of professionals expertise in Excel VBA, Business Analysis, Project Management. We’re Sharing our map to Project success with innovative tools, templates, tutorials and tips.
Project Management
Excel VBA
Download Free Excel 2007, 2010, 2013 Add-in for Creating Innovative Dashboards, Tools for Data Mining, Analysis, Visualization. Learn VBA for MS Excel, Word, PowerPoint, Access, Outlook to develop applications for retail, insurance, banking, finance, telecom, healthcare domains.
Page load link

3 Realtime VBA Projects
with Source Code!
Go to Top
<< Оглавление
Стандартный элемент управления: CommandButton
Что есть CommandButton — это кнопка, управляющая кнопка. При нажатии на кнопку в приложении выполняются определенные, разработчиком, действия. Применяется для выполнения команд и запуска программ.
Является наиболее часто применяемым элементом.
В этой статья я попытаюсь рассмотреть основные свойства, методы и события элемента CommandButton.
На рис 1 и рис 2 представлен внешний вид кнопки на панели элементов управления и на форме.

Рис 1. Изображение CommandButton на панели элементов управления

Рис 2. Изображение CommandButton на форме
Чтобы добавить кнопку на форму, необходимо произвести двойной щелчок по пиктограмме кнопки на панели элементов управления. Либо перетащить элемент CommandButton с панели элементов управления на форму.
После добавления кнопки, она выделяется маркерами для изменения размера. При попытке перетащить кнопку за угловые маркеры будут изменяться, как ширина, так и высота кнопки. Если изменять размер, потянув за другие маркеры, то изменяется соответственно, либо высота, либо ширина.
Изменять размер кнопки можно так же и с помощью клавиатуры.
Для этого необходимо, выделить кнопку, т.е. щелкнуть по кнопке, чтобы появились маркеры. Нажать и удерживать клавишу Shift на клавиатуре, стрелками влево, вправо, вверх и вниз изменять размер элемента CommandButton.
Если же выделить кнопку и удерживая клавишу Ctrl на клавиатуре, стрелками влево, вправо, вверх и вниз, можно изменять место положения кнопки на форме.
Итак, кнопку мы уже расположили на форме, теперь проделаем простую операцию. Произведем двойной щелчок на кнопке и попадем в окно редактирования кода. По умолчанию открывается наиболее часто используемая процедура обработки события Click.
Private Sub Command1_Click()
' Знак апострофа в коде указывает, что это комментарий, в данном случае
' текст выделяется зеленым цветом. Здесь будет располагаться код, который
' произойдет по событию Click элемента CommandButton
End Sub
Добавим в процедуру обработки события Click следующее: Command1 и поставим точку, мы увидим весь перечень свойств и методов элемента кнопка (Рис 3). Есть некоторые свойства, которые доступны лишь во время выполнения приложения. Эти свойства не отображаются в окне свойств Visual Basic.

Рис 3. Ниспадающее меню, содержащее методы и свойства элемента CommandButton
Свойства CommandButton
Appearance — объемный вид.
Значения:
- 0 — Flat (плоский);
- 1 — 3D (трехмерный).
BackColor — цвет фона кнопки, можно выбрать из двух вкладок System или Palette. Если цвет выбирается из системной вкладки, то он будет, зависеть от цветовой схемы Windows. В моей статье «Фундамент программы или основные свойства форм» я приводил цветовые константы Visual Basic. Использование констант при задаче цвета удобнее, проще запомнить vbWhite, чем 16777215. Т.е. Const vbWhite = 16777215 (&HFFFFFF) и задавать цвет можно как константой, так и значением &HFFFFFF.
Следовательно, два следующих кода выполнять одно и тоже действие, зададут белый цвет кнопке.
Command1.BackColor = vbWhite
Command1.BackColor = &HFFFFFF
Главное не забывать, чтобы изменить цвет необходимо установить свойство Style в Graphical.
Cancel — будет ли кнопка срабатывать по нажатию клавиши Escape. Т.е. кнопка реагирует на все нажатия клавиши Escape на клавиатуре. Только у одной кнопке на форме свойство Cancel, может быть True.
Значения:
- True;
- False.
Пример использования:
Private Sub Command1_Click()
End
End Sub
По нажатию клавиши Escape выполнится процедура обработки события Click, и приложение завершит работу.
Caption — заголовок кнопки, не путайте со свойством Name, свойство Caption задает текст, который будет отображаться на кнопке. Обычно несет информацию о том, какое действие произойдет после нажатия на кнопку.
Интересным моментом является, возможность, управления кнопкой с помощью клавиши ALT. В имени кнопки следует указать «амперсанд» (&) — «Нажми для &Старта». На кнопке знак амперсанд отображаться не будет, а буква, перед которой он был поставлен, будет подчеркнута. И назначена как горячая, при нажатии ALT + С — произойдет событие Click для кнопки. Не стоит забывать про раскладку клавиатуры.

Рис 4. Изображение кнопки, в имени которой поставлен знак «&».
CausesValidation — это свойство, нужно устанавливать, если вы будете использовать событие Validate, для текстового поля.
Значения:
- True;
- False.
Пример использования:
Private Sub Text1_Validate(Cancel As Boolean)
    If Not (IsNumeric(Text1.Text)) Then
        MsgBox "Введите в текстовое поле числа"
        Cancel = True
    End If
End Sub
В примере Cancel = True возвращает фокус обратно текстовому полю.
Default — когда, свойство установлено в True, кнопка окаймляется черной рамкой и реагирует на все нажатия клавиши Enter на клавиатуре. Только у одной кнопке на форме свойство Default, может быть True.
Значения:
- True;
- False.
DisabledPicture — изображение, которое будет на кнопке, пока она не доступна. Для расположения изображения, необходимо установить свойство Style в Graphical.
DownPicture — изображение, которое будет на кнопке, пока она нажата. Для расположения изображения, необходимо установить свойство Style в Graphical.
DragIcon — значок, который приобретет указатель мыши при нажатии на кнопку и движении курсором. Для работы свойства необходимо установить свойство DragMode в Automatic.
DragMode — определяет режим перетаскивания для объекта.
- 0 — Manual; ручной.
- 1 — Automatic; автоматический.
Enabled — блокировка кнопки. Если вам необходимо ограничить пользователя, т.е., чтобы он дождался выполнения какой либо операции, кнопку можно заблокировать.
Значения:
- True;
- False.
Font — тип шрифта, который будет установлен для текста на кнопке. Выбирается из списка.
FontBold — полужирный шрифт.
Значения:
- True;
- False.
FontItalic — курсив.
Значения:
- True;
- False.
FontName — название шрифта.
FontSize — размер шрифта в пунктах. Максимальное значение 2160.
FontStrikethru — перечеркнутый текст.
Значения:
- True;
- False.
FontUnderline — подчеркнутый текст.
Значения:
- True;
- False.
Height — высота кнопки.
Index — по умолчанию, свойству не присвоено ни какое значение. Используется при создании массивов элементов управления. Принимает значения от 0 и до нужного числа элементов, т.е. если необходимо использовать в массиве 3 кнопки, то свойства Index у кнопок будут 0, 1, 2 соответственно.
Вы спросите, а как использовать массивы элементов управления?
А вот как.
Создаем на форме одну кнопку, задаем свойству Index значение 0. Далее копируем кнопку в буфер и вставляем на форму. Свойство Index у вставленной кнопки будет равно 1. Создадим всего 3 кнопки.
Какие выгоды при использовании массивов элементов управления?
Упрощение написания программного кода, уменьшение объема написанного кода. Плюсов много.
Private Sub Form_Load()
Dim i As Byte
For i = 0 To 2
    Command1(i).Caption = "Кнопка № " & i
    Command1(i).ToolTipText = "Подсказка для кнопки № " & i
Next
End Sub
Используя массив, мы в 3 раза уменьшили объем кода. Т.е. мы не стали писать для каждой кнопки отдельный код, а написали один общий для всего массива элементов.
Вы спросите, а как обработать нажатие на кнопку?
Ведь при щелчках на любой из кнопок мы попадаем в код одной и той же процедуры.
Да именно так! Эта процедура обработки нажатий на любую из кнопок массива.
Private Sub Command1_Click(Index As Integer)

End Sub
А различаются события для разных элементов по индексам.
Private Sub Command1_Click(Index As Integer)
Label1 = "Нажата кнопка № " & Index
Label1.ToolTipText = "Подсказка для метки, нажата кнопка № " & Index
End Sub
Left — определяет расположение кнопки на форме, от левого края кнопки до левого края формы.
MouseIcon — выбор графического изображения курсора. Выбираем на диске нужный указатель и устанавливаем свойство MousePointer в 99 — Custom, после чего, когда указатель мыши будет перемещаться над кнопкой, он будет принимать выбранный вами вид.
MousePointer — вид указателя мыши. Числовое значение.
Name — имя кнопки. Все обращения и действия с кнопкой производятся с указанием имени. Обычно к имени кнопки добавляют префикс cmd.
OLEDropMode — как объект-приемник обрабатывает операцию перетаскивания.
Значения:
- 0 — None; не обрабатывает.
- 1 — Manual; вручную.
Picture — изображение, которое будет располагаться на кнопке, в обычном состоянии. Для расположения изображения, необходимо установить свойство Style в Graphical.
Style — стиль кнопки.
Значения:
- 0 — Standart; обычный.
- 1 — Graphical; графический.
TabIndex — при добавлении нового элемента управления на форму, элементы получают номер (если они могут получить фокус), от 0 и далее. Если расположить на форме несколько элементов и запустить проект, то по нажатию клавиши Tab фокус будет получать элемента за элементом. При загрузке формы фокус получит элемент, у которого свойство TabIndex = 0. Изменить это можно, если передать фокус нужному элементу при загрузке.
Private Sub Form_Activate()
Text1.SetFocus
End Sub
TabStop — будет ли фокус перемещаться на кнопку при нажатии клавиши Tab. Некоторые элементы управления не могут получить фокус, об этом не стоит забывать. Не видимые или заблокированные элементы так же не могут получить фокус.
Значения:
- True;
- False.
ToolTipText — всплывающая подсказка, которая будет появляться если задержать указатель мыши над кнопкой.
Top — определяет расположение кнопки на форме, от верхнего края кнопки до верхнего края формы.
Visible — видима ли кнопка на форме.
Значения:
- True;
- False.
Width — ширина кнопки.
Методы CommandButton
Drag — позволяет осуществлять операцию перетаскивания.
Move — позволяет перемещать элемент управления по форме.
Пример использования:
Private Sub Command1_MouseUp _
    (Button As Integer, _
     Shift As Integer, _
     X As Single, _
     Y As Single)
Command1.Move X + 100, Y + 100
End Sub
SetFocus — используется для передачи фокуса необходимой кнопке.
ZOrder — с помощью метода, можно определить порядок перекрытия объектов на форме.
Пример использования:
На форме расположите элемент PictureBox и три кнопки. На первую кнопку положите сверху PictureBox и загрузить любую картинку, чтобы кнопку не было видно, в режиме редактирования кода.
Private Sub Command2_Click()
Command1.ZOrder 0
End Sub

Private Sub Command3_Click()
Command1.ZOrder 1
End Sub
По нажатию кнопок 2 и 3, по очереди, кнопка, то появляется, то исчезает. Она не становится не видимой, просто меняется ее местоположение, над картинкой и под картинкой. Аналогичное действие можно совершить и в режиме редактирования кода. Расположите картинку так, чтобы она перекрывал кнопку, нажмите правую кнопку мыши на любом из этих элементов. И при помощи Send to Back и Bring to Front измените расположение объекта.
События CommandButton
Click — наиболее часто используемое событие. Происходит при нажатии на кнопку. Если кнопка имеет фокус, событие происходит по нажатию клавиши «Пробел» на клавиатуре. Если свойства Default и Cancel установлены в True, то соответственно событие происходит, по нажатию клавиш Enter и Escape.
GotFocus — происходит когда кнопка получает фокус, при нажатии клавиши Tab или с помощью метода SetFocus.
KeyDown — происходит, когда кнопка имеет фокус и пользователь нажимает клавишу на клавиатуре.
KeyPress — происходит, когда пользователь нажал и отпустил клавишу, можно получить код нажатой клавиши.
Пример использования:
Private Sub Command1_KeyPress(KeyAscii As Integer)
Label1 = KeyAscii
End Sub
KeyUp — происходит, когда кнопка имеет фокус и пользователь отпускает клавишу на клавиатуре.
LostFocus — происходит во время передачи фокуса от кнопки к другому элементу.
MouseDown — происходит во время нажатия кнопки мыши на кнопке.
MouseMove — происходит при перемещении указателя мыши над кнопкой.
MouseUp — происходит лишь тогда, когда пользователь после нажатия, отпускает клавишу мыши. Лучше использовать вместо события Click, т.к. после нажатия пользователь может передумать и захочет отменить действие.
События MouseDown, MouseMove и MouseUp имеют одинаковые параметры:
Command1_MouseDown(Button As Integer,
                   Shift As Integer,
                   X As Single,
                   Y As Single)

Command1_MouseMove(Button As Integer,
                   Shift As Integer,
                   X As Single,
                   Y As Single)

Command1_MouseUp(Button As Integer,
                 Shift As Integer,
                 X As Single,
                 Y As Single)
Button — содержит номер клавиши мыши.
Константы:
Const vbLeftButton = 1
Const vbMiddleButton = 4
Const vbRightButton = 2
Пример использования:
If Button = 1 Then Text1 = _
    "Ты нажал левую кнопку мыши"
If Button = 4 Then Text1 = _
    "Ты нажал среднюю кнопку мыши"
If Button = 2 Then Text1 = _
    "Ты нажал правую кнопку мыши"
Shift — содержит информацию о состоянии клавиш ALT, CTRL и SHIFT.
Константы:
Const vbAltMask = 4
Const vbCtrlMask = 2
Const vbShiftMask = 1
Пример использования:
If Shift = vbShiftMask Then Text1 = _
    "Ты нажал кнопку мыши, удерживая Shift"
If Shift = vbAltMask Then Text1 = _
    "Ты нажал кнопку мыши, удерживая Alt"
If Shift = vbCtrlMask Then Text1 = _
    "Ты нажал кнопку мыши, удерживая Ctrl"
If (Shift And (vbCtrlMask Or vbShiftMask)) _
    = (vbCtrlMask Or vbShiftMask) Then Text1 = _
    "Ты нажал кнопку мыши, удерживая Ctrl и Shift"
X, Y — координаты указателя мыши, где произошло событие.
Данная статья не является учебным пособием или полным руководством к использованию — это обзор наиболее часто используемых свойств, событий и методов элемента управления CommandButton . Статья рассчитана на начальный уровень знания программирования на языке Visual Basic 6.
Оглавление
UserForm Controls — Label, TextBox and CommandButton
UserForm acts as a container in which you add multiple ActiveX controls, each of which has a specific use and associated properties. By itself, a UserForm will not be of much use unless ActiveX controls are added to it which are the actual user-interactive objects. Using ActiveX Controls on a Worksheet have been illustrated in detail, in the separate section of «Excel VBA: ActiveX Controls, Form Controls & AutoShapes on a Worksheet».
Also refer «2. UserForm and Controls — Properties» for properties common to the UserForm and most Controls
Note: In below given examples, vba codes are required to be entered in the Code Module of the UserForm, unless specified otherwise.
——————————-
Contents:
Label
CommandButton
TextBox
——————————-
Label
A Label Control displays text and is used to describe other controls viz. it is often used to describe a TextBox, or if you want to display instructions on the form. Use the Caption property to display text, the Left & Top properties to position it, the TextAlign property to align text within the Label, the Font property for font name/style/size, the BackColor and ForeColor properties for background and text colors. You can format a Label either in the Properties Window or using a VBA statement like Label1.Caption = «Enter brief particulars» or using the vba WITH statement as shown below.
Private Sub CommandButton1_Click()
‘clicking the command button in the UserForm will format the Label
With Label1
‘to display text
.Caption = «Enter brief particulars»
‘text alignment set to center
.TextAlign = fmTextAlignCenter
‘wrap text
.WordWrap = True
‘set font property
.Font.Name = «Arial»
.Font.Size = 12
.Font.Italic = True
‘set font color to yellow and background color to red
.ForeColor = RGB(255, 255, 0)
.BackColor = RGB(255, 0, 0)
End With
End Sub
———————————————————————————————————————-
CommandButton
A CommandButton is typically used to execute a macro. The Click event of the CommandButton is used to attach vba code to a CommandButton of a UserForm. In VBE (Visual Basic Editor), if the UserForm is visible, you can double-click on the CommandButton to access the Click event, or else you can select the name of the CommandButton (in the code module for the UserForm) from the top-left dropdown of the code window and then select Click from the top-right dropdown. Clicking on the CommandButton will run the code which is attached to the Click event or you can insert the name of a macro to be run on clicking the CommandButton. See below example(s):
Example 1 — The Click event which unloads the UserForm on clicking the CommandButton:
Private Sub CommandButton2_Click()
‘clicking on the button unloads the UserForm
‘display message before closing
MsgBox «Closing UserForm!»
‘unloads the UserForm
Unload Me
End Sub
Example 2 — Clicking the CommandButton will call (& execute) another macro whose name has been inserted — used typically when a set of codes are often or repeatedly required to be executed. Refer Images 5a (before Clear Button is clicked) & 5b (after Clear Button is clicked):


Private Sub CommandButton1_Click()
‘clicking on the «Clear» button will call another macro, named clearForm, which will get executed:
clearForm
End Sub
Private Sub clearForm()
‘this macro is called on clicking the «Clear» button — clears all controls in the UserForm:
‘clear all text appearing in TextBox
TextBox1.Value = «»
‘clear the text area of the ComboBox (ie. user-entered or user-selected value)
ComboBox1.Value = «»
‘deselect the CheckBox
CheckBox1.Value = False
‘deselect the OptionButton
OptionButton1.Value = False
End Sub
———————————————————————————————————————
TextBox
A TextBox accepts text or data from the user. In addition to the common properties mentioned earlier, its key properties include:
AutoTab Property: A Boolean value (True/False) which specifies whether the tab moves automatically to the next control in the tab order after the the maximum allowable number of characters (as determined by the MaxLength property) are entered in the TextBox by the user. False value (is the default) indicates moving manually to the next control in the tab order when the user presses the Tab key. This property is particularly useful in a case where the TextBox accepts a 5-digit item code number and the tab moves on automatically after 5 digits are entered.
EnterKeyBehavior Property: A Boolean value (True/False) which determines the effect when a user presses the ENTER key in a TextBox. If MultiLine property is set to True, then the True value indicates creating a new line on pressing ENTER while the False value (Default) moves focus to the next control in the tab order. If MultiLine property is set to False, then focus is always moved to the next control in the tab order ignoring the EnterKeyBehavior Property.
MaxLength Property: Specifies the maximum number of characters which can be entered in a TextBox. Specifying a value of 0 indicates there is no maximum limit.
MultiLine Property: A Boolean value (True/False) which determines if text will be displayed in multiple lines or not, in the TextBox. True indicates that the text is displayed in multiple lines, and this is also the default value. See the ScrollBars Property below for how a multiline TextBox can have vertical scroll bars and even a horizontal scroll bar under certain conditions. The WordWrap property is ignored in the single-line setting.
PasswordChar Property: Specifies what characters to display in TextBox instead of the characters actually entered or typed by the user. This property is useful to protect sensitive information or security codes, or to validate a user before allowing to proceed further.
ScrollBars Property: Specifies whether a TextBox has vertical and/or horizontal scroll bars, or none. There are 4 ‘self-explanatory’ settings: (i) fmScrollBarsNone (value 0) — this is the default setting; (ii) fmScrollBarsHorizontal (value 1); (iii) fmScrollBarsVertical (value 2); and (iv) fmScrollBarsBoth (value 3). The scroll bar setting fmScrollBarsNone displays no scroll bar. If AutoSize is set to True, no scroll bar is diplayed because the TextBox enlarges itself to accommodate the additional text or data. If WordWrap is set to True, a multiline TexBox displays no horizontal scroll bar. The scroll bar settings fmScrollBarsHorizontal or fmScrollBarsBoth, display a horizontal scroll bar in a singleline TextBox if the text is longer than the edit region. The scroll bar settings fmScrollBarsVertical or fmScrollBarsBoth, display a vertical scroll bar in a multiline TextBox if the text is longer than the edit region and WordWrap is set to True. To display a horizontal scroll bar in a multiline TexBox, the scroll bar setting should be fmScrollBarsHorizontal, WordWrap should be set to False and the text should be longer than the edit region. Note 1: A horizontal (or vertical) scroll bar is visible only if the control has enough room to include the scroll bar under (or at the right edge of) its edit region.
Text Property: The text in a TextBox is returned or set by this property. A value assigned to the Text property gets automatically assigned to the Value property, and vice-versa.
Example 1: You can Add a TextBox in a UserForm and format it (ie. apply or set properties), either in the Properties Window, or using VBA code as shown below.
Private Sub CommandButton1_Click()
‘click command button to create new TextBox and apply properties — a MultiLine TextBox with a vertical scroll bar
Dim txtSampleTextBox As MSForms.TextBox
Set txtSampleTextBox = Controls.Add(«Forms.TextBox.1», «txtSampleTB»)
With txtSampleTextBox
‘set font property
.Font.Name = «Times New Roman»
.Font.Size = 10
‘text alignment set to center
.TextAlign = fmTextAlignLeft
‘specify size
.Width = 100
.Height = 50
‘set position in the UserForm
.Left = 50
.Top = 75
‘set behaviour
.MultiLine = True
.WordWrap = True
.AutoSize = False
.ScrollBars = 2
‘set focus
.SetFocus
End With
End Sub
Example 2: Enabled Property of a TextBox is particularly useful where you do not want to allow the user to type directly into the TextBox which should be filled only per the user-selected option, say from a ListBox — see below vba code(s):
Private Sub UserForm_Initialize()
‘set properties for ListBox and TextBox on initialization of UserForm
‘populating ListBox with numbers 1 to 10; display a ControlTip instructing the user to select from ListBox.
With ListBox1
For i = 1 To 10
.AddItem i
Next i
.ControlTipText = «Select Number from ListBox, to enter in TextBox.»
End With
‘set Enabled Property to False so that the user cannot type directly; Note: ControlTip cannot be displayed when Enabled is set to False
Me.TextBox1.Enabled = False
End Sub
Private Sub ListBox1_Click()
‘ListBox click event
‘fills TextBox on ListBox selection
TextBox1.Text = ListBox1.Value
End Sub
Example 3: Use TextBox to set up a password — set multiple username-password matches to enable multi-user access.

In this Example we use the PasswordChar Property to check if username and password match, in which case the user is allowed to proceed and UserForm1 gets loaded. UserForm2 (Refer Image 6) contains TextBox1 for entering username and TextBox2 for entering password, and CommandButton1 which on being clicked matches the username & password, and on validating a match the UserForm1 is loaded allowing the user to proceed.
Private Sub UserForm_Initialize()
‘set properties for TextBox2 on initialization of UserForm2.
‘set maximum length for password field
TextBox2.MaxLength = 5
‘specify characters displayed in TextBox instead of the characters actually entered
TextBox2.PasswordChar = «*»
‘set yellow as background color
TextBox2.BackColor = RGB(255, 255, 0)
End Sub
Private Sub CommandButton1_Click()
‘use TextBox to set up a password; click command button to validate password to proceed to UserForm1.
Dim password As String
‘set matching usernames and passwords — (Angelina & 12345), (Brad & 23456) & (George & 34567)
If TextBox1.Text = «Angelina» And TextBox2.Text = «12345» Then
password = «True»
ElseIf TextBox1.Text = «Brad» And TextBox2.Text = «23456» Then
password = «True»
ElseIf TextBox1.Text = «George» And TextBox2.Text = «34567» Then
password = «True»
End If
‘if username and password match, the user is allowed to proceed and UserForm1 gets loaded:
If password = «True» Then
MsgBox «Password Validated! Please Continue.»
Unload Me
UserForm1.Show
‘if if username and password do not match, user is requested to try again:
Else
MsgBox «Incorrect UserName/Password. Try Again.»
‘clear both TextBox
TextBox1.Text = vbNullString
TextBox2.Text = vbNullString
‘set focus to TextBox1
TextBox1.SetFocus
End If
End Sub

- Remove From My Forums
-
Question
-
Hello:
How can I write a VBA code for clicking a command button? Basically, I want to write a if sence that if clicking the «YES» command button, it will run a maroc. While I do not know how to write the code. Thanks for help!
B.regards/Yaping
All replies
-
Hi,
You either assign a macro to the OnAction property or add code in the Click event.
But it all depends on what type of button, where you are using it (userform/worksheet) and which application.
Can you provide more information? -
I’m not the original poster, but I have a similar problem. Here is my situation: I have two Excel workbooks that have macros in them. Workbook 1 contains Macro 1, which I wrote. I’m using Macro 1 to send input data to Workbook 2, and then retrieve calculations from Workbook 2 and copy them back to Workbook 1. Workbook 2 was assembled by someone else, and its calculations require exercising Macro 2, which is activated by clicking a command button in Workbook 2. The button must be clicked every time new input data is sent to Workbook 2. Since Workbook 2 is password-protected, I can only access Macro 2 by clicking the command button. Macro 2 does not show in the macro menu for Workbook 2, and I cannot use the macro recorder in Workbook 2 (would require the password) to identify the code that would be associated with clicking the button. When I used the macro recorder in Workbook 1 to write Macro 1, it only showed me code lines for activating Workbook 2, and then activating Workbook 1 again. It did not give me a line of code for the command button click that occurs immediately after activating Workbook 2.
I have written Macro 1 with a simple For loop that can send and retrieve the data between the two workbooks. All I am missing is a way to click the command button in Workbook 2. Is there a line of code that would allow me to do that, given the constraints imposed by the password protection in Workbook 2? Of course, I can carry out the operation manually, but that would defeat the purpose of writing a macro in the first place.
-
Hi, i’m having basically the same problem… It’s an old discussion, but maybe someone can still help me (us)…
¿how can i press a commandbar button through VBA? need it because password staff in the macro that the button lounches…
thanks!
-
Hi,
It really depends on what the button is that needs clicking.
If it’s a message box button then you will need to resort to Application.SendKeys, although this is not 100% reliable.If the button is on a userform and you can action code whilst it is displayed you can use the .Value property of the control to invoke a click.
But I have a feeling you will not have control when the password screen is displayed.
Cheers
www.andypope.info-
Proposed as answer by
Thursday, September 27, 2012 6:04 PM
-
Proposed as answer by
-
Hello — How would one use the .Value property of the control to invoke a click? Many thanks in advance for clarifying! (a simple code snippet would be very helpful, if possible. tks!)
DragonForest
-
You want to press something from Menu Bar Commandbar
If you press left Alt you can see shortcut. This as the letters you must use in SendKeys commends. Run [F1] if you need help.
you can look on this line:
sub print_by_sk()
'Print in my lang office
SendKeys "%PRR"
end sub
In english Excel you can use «%FPP» I guess.
You can test this only from worksheet [Alt+F8]. From VBA Developer Gui you run another menu — developers menu.
Check and answer.
Oskar Shon, Office System
MVPPress
 if Helpful; Answer when a problem solved
 -
Example of using .Value property of command button.
Userform with single command button.
Private m_blnViaForm As Boolean
Private Sub CommandButton1_Click()

    If Not m_blnViaForm Then
        MsgBox "You clicked the button directly", vbCritical
    Else
        MsgBox "Hello", vbExclamation
    End If

End Sub


Private Sub UserForm_Click()

    m_blnViaForm = True

    CommandButton1.Value = True

    m_blnViaForm = False

End Sub


Private Sub UserForm_Initialize()

    Me.Caption = "Click form to auto click button"
    CommandButton1.Caption = "Click Form not ME!"

End Sub
Cheers,
Andy
www.andypope.info -
I know this is an older post, but I have need of this functionality also. Unfortunately, there is no .Value property on a command button in Access (2007 at least).
When I execute the code above, I get an error saying «The object does not support this property or method».
I also tried «Me!Button = True», hoping for a default property, but no luck.
Is there any easy way in VBA to click a button on the form programatically?
Ron Mittelman
-
I’m not an access guy but this appears to work.
Userform with 2 buttons named Command0 and Detail
Private Sub Command0_Click()
    MsgBox "Click"
    Detail_Click
End Sub
Private Sub Detail_Click()
    MsgBox "Detail Clicked"
End Sub
Press the Command0 buttton should display a message and then execute the click event of the other button
Cheers,
Andy
www.andypope.info -
Thanks for the try, Andy, but this does not do the trick. What you are doing is calling the desired button_click event from other code. What I am trying to do is actually click the button itself. In VB6 you could say Button.Value = True.
In VB.Net you can say Button.PerformClick(). There is no easy way I can find to actually click the button itself in Access VBA.The reason I need this is outlined in This other thread. In a nutshell, my command button executes a function, then in
that function executes a function which lives in a sub-form:Me!SubForm.Form.MyFunction
This works fine when clicking a button, but if I use a context menu instead (which is actually a series of macros in Access 2007), I get an error saying I’m improperly referring to the Form object.
I thought if my code from the context menu could programatically actually click that button, it would help keep that error from occurring.
Ron Mittelman
-
I don’t know about Excel VBA, but in Access 2007 VBA, there is no .Value property available for command buttons. You can execute the command button’s Click event itself, as already mentioned, but you cannot programatically click the button in VBA code.
It *may* be possible to do this using Windows APIs if you could find the window handle of the button itself, but this would be complex.
The only other way to simulate an actual click is to do something like the following (assuming a form with cmdButton1 and cmdButton2):
Private Sub cmdButton1_Click()
    Me!cmdButton2.SetFocus
    SendKeys "{Enter}"
End Sub
This will cause the button to click, and execute its own Click event. Downsides:
1: Usually reliable, but not always.
2: There is a known but in Access since forever: Using SendKeys can cause the Numlock to turn off, making your numeric keypad somewhat useless. I have seen this bug as recently as Access 2007. Granted, it was when running a non-2007
database (an MDB), but it was happening. It is unclear whether it would happen in 2007 in an ACCDB database, or in Access 2010.
Ron Mittelman
-
I have found a way to *actually* click a command button on an Access form using the Windows API. Put the following code in a module:
Private Const VK_RETURN As Long = &HD
Private Declare Sub keybd_event Lib "user32" (ByVal bVk As Byte, ByVal bScan As Byte, ByVal dwFlags As Long, ByVal dwExtraInfo As Long)

Public Sub SendKey(key As Long)
    keybd_event key, 0, 0, 0
End Sub
Now call the function in code like this:
myButton.SetFocus
SendKey VK_RETURN

'Optional:
DoEvents
Screen.PreviousControl.SetFocus
This works similarly to SendKeys. I have not tested it extensively, so I don’t know if it will cause the NumLock to turn off like SendKeys does. This is an older API functionality, but it still works, as recently as Windows 7 in Access 2010.
Ron Mittelman
-
Edited by
RMittelman
Tuesday, August 6, 2013 8:13 PM -
Proposed as answer by
RMittelman
Tuesday, August 6, 2013 9:25 PM
-
Edited by
