
Элемент управления пользовательской формы OptionButton для выбора одной опции из группы и передачи результата в VBA Excel. Свойства переключателя, примеры.
UserForm.OptionButton – это элемент управления пользовательской формы, который используется в группе одноименных элементов и предназначен для передачи в код VBA информации о его выборе или невыборе пользователем: False – переключатель не выбран, True – переключатель выбран.

В VBA Excel элемент управления OptionButton состоит из белого кружка с черной точкой (переключатель выбран) или без нее (переключатель не выбран) и надписи. Надпись расположена справа и реагирует на нажатие мышью так же, как и белый кружок.
В отличие от элемента управления CheckBox, только один OptionButton из группы переключателей может иметь значение True. Для разделения разных групп переключателей друг от друга используются элементы управления Frame (рамки). Все переключатели вне рамок являются одной группой.

Так же, как и элемент управления CheckBox, OptionButton принимает третье состояние при присвоении ему в коде VBA Excel значения Null. Переключатель отображается с серым кружком и серой точкой.

Свойства элемента Переключатель
| Свойство | Описание |
|---|---|
| AutoSize | Автоподбор размера переключателя. True – размер автоматически подстраивается под длину набираемой строки. False – размер элемента управления определяется свойствами Width и Height. |
| ControlSource | Ссылка на источник данных для свойства Value. |
| ControlTipText | Текст всплывающей подсказки при наведении курсора на OptionButton. |
| Enabled | Возможность взаимодействия пользователя с элементом управления. True – взаимодействие включено, False – отключено (цвет переключателя становится серым). |
| Font | Шрифт, начертание и размер текста надписи. |
| Height | Высота элемента управления. |
| Left | Расстояние от левого края внутренней границы пользовательской формы до левого края элемента управления. |
| Picture | Добавление изображения вместо текста надписи или дополнительно к нему. |
| PicturePosition | Выравнивание изображения и текста в поле надписи. |
| TabIndex | Определяет позицию элемента управления в очереди на получение фокуса при табуляции, вызываемой нажатием клавиш «Tab», «Enter». Отсчет начинается с 0. |
| TextAlign* | Выравнивание текста надписи: 1 (fmTextAlignLeft) – по левому краю, 2 (fmTextAlignCenter) – по центру, 3 (fmTextAlignRight) – по правому краю. |
| Top | Расстояние от верхнего края внутренней границы пользовательской формы до верхнего края элемента управления. |
| Value | Значение переключателя: True – включен, False – выключен, Null – серый кружок с серой точкой. |
| Visible | Видимость элемента OptionButton. True – элемент отображается на пользовательской форме, False – скрыт. |
| Width | Ширина элемента управления. |
| WordWrap | Перенос текста надписи на новую строку при достижении границы ее поля. True – перенос включен, False – перенос выключен. |
* При загруженной в поле надписи картинке свойство TextAlign не работает, следует использовать свойство PicturePosition.
Свойство по умолчанию для элемента OptionButton – Value, основное событие – Click.
В таблице перечислены только основные, часто используемые свойства переключателя. Все доступные свойства отображены в окне Properties элемента управления OptionButton.
Примеры кода VBA с OptionButton
Пример 1
Отображение элементов управления OptionButton на пользовательской форме с параметрами, заданными в коде VBA Excel:
|
1 2 3 4 5 6 7 8 9 10 11 12 13 14 15 16 17 18 19 20 21 22 23 24 25 26 27 28 29 30 31 32 33 34 |
Private Sub UserForm_Initialize() With Me .Width = 160 .Height = 110 .Caption = «Пьедестал почета» End With With OptionButton1 .Caption = «1 место» .Value = True .Width = 60 .Height = 18 .Left = 60 .Top = 18 .Font.Size = 10 End With With OptionButton2 .Caption = «2 место» .Value = False .Width = 60 .Height = 18 .Left = 12 .Top = 36 .Font.Size = 10 End With With OptionButton3 .Caption = «3 место» .Value = False .Width = 60 .Height = 18 .Left = 90 .Top = 48 .Font.Size = 10 End With End Sub |
Разместите на пользовательской форме три переключателя с именами OptionButton1, OptionButton2, OptionButton3 и добавьте в модуль формы представленный выше код. Запуск этого кода отобразит следующую форму:

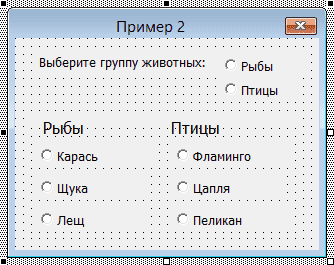
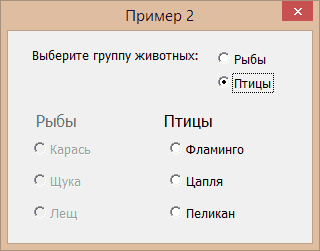
Пример 2
Управление доступностью двух групп переключателей, заключенных в рамки, с помощью двух управляющих элементов OptionButton, расположенных непосредственно на пользовательской форме.
Для этого создадим следующий проект формы в редакторе VBA Excel («Рыбы» и «Птицы» большими буквами – это значения свойств Caption рамок Frame1 и Frame2):
В модуль формы вставляем следующий код:
|
1 2 3 4 5 6 7 8 9 10 11 12 13 14 15 16 17 18 19 20 21 22 23 24 25 26 27 28 29 30 31 32 33 34 35 36 37 38 39 40 41 42 43 44 45 46 47 48 49 50 51 52 53 54 55 56 57 58 59 60 61 62 63 64 65 66 67 68 69 70 71 72 73 74 75 76 77 78 79 80 81 82 83 |
‘Присвоение исходных значений ‘свойствам элементов управления ‘перед отображением формы Private Sub UserForm_Initialize() OptionButton1.Value = False OptionButton2.Value = False OptionButton3.Enabled = False OptionButton4.Enabled = False OptionButton5.Enabled = False OptionButton6.Enabled = False OptionButton7.Enabled = False OptionButton8.Enabled = False Frame1.Enabled = False Frame2.Enabled = False End Sub ‘Смена значений свойств переключателей, ‘расположенных в рамке Frame1, ‘при смене значения OptionButton1.Value Private Sub OptionButton1_Change() If OptionButton1.Value Then Frame1.Enabled = True With OptionButton3 .Value = False .Enabled = True End With With OptionButton4 .Value = False .Enabled = True End With With OptionButton5 .Value = False .Enabled = True End With Else Frame1.Enabled = False With OptionButton3 .Value = False .Enabled = False End With With OptionButton4 .Value = False .Enabled = False End With With OptionButton5 .Value = False .Enabled = False End With End If End Sub ‘Смена значений свойств переключателей, ‘расположенных в рамке Frame2, ‘при смене значения OptionButton2.Value Private Sub OptionButton2_Change() If OptionButton2.Value Then Frame2.Enabled = True With OptionButton6 .Value = False .Enabled = True End With With OptionButton7 .Value = False .Enabled = True End With With OptionButton8 .Value = False .Enabled = True End With Else Frame2.Enabled = False With OptionButton6 .Value = False .Enabled = False End With With OptionButton7 .Value = False .Enabled = False End With With OptionButton8 .Value = False .Enabled = False End With End If End Sub |
При запуске пользовательской формы или процедуры UserForm_Initialize() откроется форма с неактивными переключателями в рамках Frame1 и Frame2. Нажатие мышью на элементы управления OptionButton с надписями «Рыбы» и «Птицы» будет активировать группу переключателей в одноименных рамках.
In VBA, you can create an Option button to enable a user to choose from several options. An Option button is often used in UserForms, but can also be used in a Worksheet. In this tutorial, you will learn how to create an Option button, get a user choice in VBA and use it in code.
If you want to learn how to create a Checkbox, click here: VBA Checkbox
Create an Option Button
In order to insert an Option button in the Worksheet, you need to go to the Developer tab, click Insert and under ActiveX Controls choose Option button:
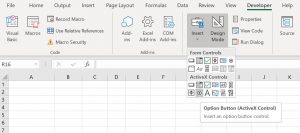
Image 1. Insert an Option button in the Worksheet
When you select the Option button which you inserted, you can click on Properties under the Developer tab:
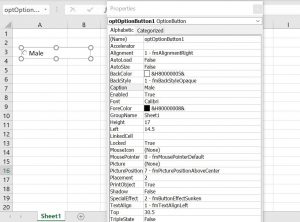
Image 2. Change the Option button Properties
Here you can set different properties of the Option button. For the beginning, we changed the attribute Name to optOptionButton1. Now, we can use the Option button with this name in VBA code.
Also, we changed the text which appears next to the Option button to Male. To do this, you need to set the attribute Caption.
As we want to allow a user to choose gender, we will repeat the whole process for another Option button. The second one has name optOptionButton2, while the caption is Female. You can also create a new Option button by copying the existing one and changing properties. Now our Worksheet has two option buttons:
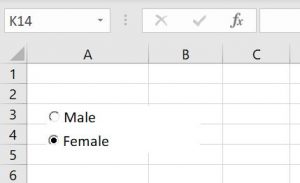
Image 3. Insert the second Option button
Get a Selected Option Button in VBA
The purpose of an Option button is to get a users decision. We will show in the example how to write Male in the cell C3 if the Option button 1 is chosen or Female if the second one is chosen. Every Option button has its event which triggers when its chosen – Click.
Therefore, for the first Option button we need to put the following code in the event Click of the object optOptionButon1:
Private Sub optOptionButton1_Click()

     If Sheet1.optOptionButton1.Value = True Then

         Sheet1.Range("C3") = "Male"

     End If

End Sub
Similarly, we will put this code in the event Click of the object optOptionButton2:
Private Sub optOptionButton2_Click()

     If Sheet1.optOptionButton2.Value = True Then

         Sheet1.Range("C3") = "Female"

     End If

End Sub
The value of the Option button is in the Value attribute of the object optOptionButton1 or optOptionButton2. The value of the Option button can be true if it is chosen or false if it’s not chosen.
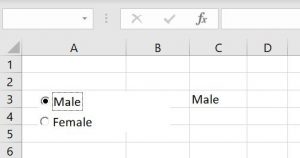
Image 3. Return Male if the first Option button is chosen
As you can see in Image 3, we clicked on the first Option button. Therefore, the value of Sheet1.optOptionButton1.Value is true, so the result in C3 is Male.
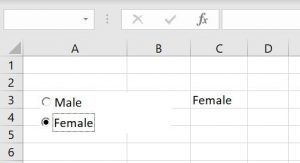
Image 4. Return Female if the second Option button is chosen
Similarly to the previous example, the value of C3 is changed to Female, as we have chosen the second Option button. In this case, the procedure optOptionButton2_Click() is triggered.
Use an Option button in a UserForm
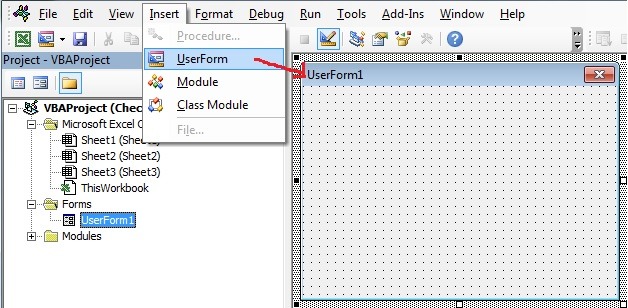
As we mentioned, Option button is most often used in UserForms. To explain how you can do it, we will first insert an UserForm. In VBA Editor, right-click on Module name, click on Insert and choose UserForm:
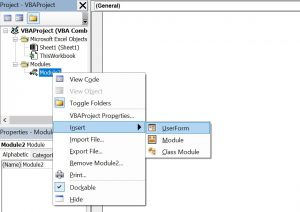
Image 5. Insert a Userform
To display controls for inserting, you need to enable the Toolbox. To do this, click on the Toolbox icon in the toolbar. After that, you will get the windows with all the controls available. You can click on the Option button to create it in the Userform:
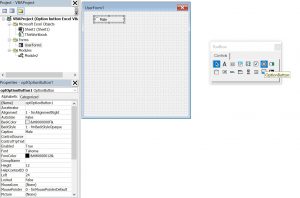
Image 6. Insert an Option button in the Userform
In the properties window, we change the name of the Option button to optOptionButton1 and caption to Male. Similarly, we created another Option button for Female. When we run the Userform, we get two Option buttons:
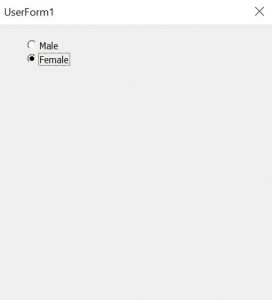
Image 7. Two Option buttons in the Userform
If you want to get a selected Option button, you need to use the same logic as for a Worksheet, which is explained earlier in the article.
VBA Coding Made Easy
Stop searching for VBA code online. Learn more about AutoMacro — A VBA Code Builder that allows beginners to code procedures from scratch with minimal coding knowledge and with many time-saving features for all users!

Learn More!
Excel VBA UserForm OptionButton
OptionButton is one of the UserForm control. You can select and drag OptionButton on the UserForm. This Control is used to select only one selection from multiple selections within a group. When we select an OptionButton_Control on the user form in a group immediately it will de select all other OptionButtons in the same group. It has value property. It indicates whether the OptionButton_Control is selected or not. When we select Option Button the value is ‘True’. And when it de selects the value is ‘False’. Option Button is used on the UserForm. You can see how it works and more details about Option Button Control on the UserForm in the following chapter.
- VBA OptionButton_Control on the UserForm
- Add Dynamic OptionButton_Control on the UserForm Using VBA
- Delete OptionButton_Control on the UserForm Using VBA
- Check if a OptionButton is Selected or Not Using VBA
- Difference Between OptionButton and CheckBox Control
VBA OptionButton_Control on the UserForm
Please find more details about VBA ActiveX Option Button Control on the UserForm.
-
- Go To Developer Tab and then click Visual Basic from the Code or Press Alt+F11.
- Go To Insert Menu, Click UserForm. Please find the screenshot for the same.
-
- Drag the Frame and two Option Button controls on the Userform from the Toolbox. Please find the below screenshot for the same.

-
- Select Frame and change its properties as follows.
Caption: Gender
-
- Select first OptionButton and change its properties as mentioned below.
Caption: Male
-
- Double click on first OptionButton control, now you will see the following code in the VBA Editor window.
Private Sub OptionButton1_Click()

End Sub
-
- Now add the following statement to the above procedure.
Private Sub OptionButton1_Click()
    MsgBox "Selected Gender is Male"
End Sub
-
- Now, Select second OptionButton and change its properties as follows.
Caption: FeMale
-
- Double click on second OptionButton control, now you will see the following code in the VBA Editor window.
Private Sub OptionButton2_Click()

End Sub
-
- Now add the following statement to the above procedure.
Private Sub OptionButton2_Click()
    MsgBox "Selected Gender is FeMale"
End Sub
-
- You can see the following outputs. It is as shown in the following screen shot.
Output1: When we select ‘Male’ Option Button

Output2: When we select ‘FeMale’ Option Button

Add dynamic OptionButton_Control on the UserForm using VBA
Please find the following steps and example code, it will show you how to add dynamic Option Button control on the UserForm.
-
- Add Option Button and CommandButton on the userform from the toolbox.
- Right click on the CommandButton, click properties
- Change the CommandButton caption to ‘Create_Option Button ’
- Double click on the CommandButton
- Now, it shows the following code.
Private Sub CommandButton1_Click()

End Sub
-
- Call the below procedure named ‘Add_Dynamic_OptionButton ’ and find the below procedure to run.
Private Sub CommandButton1_Click()
    Call Add_Dynamic_OptionButton
End Sub
Procedure to call in the CommandButton:
Sub Add_Dynamic_OptionButton()
    'Add Dynamic OptionButton and assign it to object 'OpBtn'
    Set OpBtn = UserForm2.Controls.Add("Forms.OptionButton.1")

    'Assign OptionButton Name
    OpBtn.Caption = "Dynamic OptionButton"

    'OptionButton Position
    OpBtn.Left = 15
    OpBtn.Top = 10
End Sub
-
- Now, click F5 to run the macro, click ‘Create_Option Button ’ button to see the result.
- You can see the created dynamic Option Button which is shown in the following screen shot.
output:

Delete OptionButton_Control on the UserForm using VBA
Please find the below code, it will show you how to delete or remove the control on the UserForm. In the below example, its deleting the Option Button named ‘New Option Button’ which is on the UserForm named ‘UserForm4’. We can use Remove method to delete the controls which are created during run time. Controls which are created during design time cannot be deleted using this method. Please find the below example and screen shots for better understand.
Code 1: Adding control During Run Time
Private Sub CommandButton1_Click()
    'We can use Add method to add the new controls on run time
    Set lblBtn = Me.Controls.Add("Forms.Option Button.1")
    With lblBtn
        .Top = 20
        .Left = 20
        .Caption = "New Option Button"
        .Name = "lblNew1"
    End With
    MsgBox "New Option Button Added"
End Sub
Please find the below screen shot for your reference for the above macro and its output.
When we click on Add Command Button:

Code 1: Deleting or Removing Option Button_control which is created during run time.
Private Sub CommandButton2_Click()
    'We can use Remove method to delete the controls which are created during run time
    'Note: Controls which are created on design time cannot be deleted using this method
    Me.Controls.Remove ("lblNew1")
    MsgBox "New Option Button Deleted"
End Sub
Please find the below screen shot for your reference for the above macro and its output.
When we click on Delete Command Button:

Check if a OptionButton is Selected or Not Using VBA
Here is the below example. It will show you how to Check if a OptionButton is Selected or Not Using VBA.
Sub Chk_OptBtn_Selection()
    If OptionButton1.Value = True Then
        MsgBox "OptionButton has Selected"
    Else
        MsgBox "OptionButton has Not Selected"
    End If
End Sub
Difference Between OptionButton and CheckBox Control
Option Button and Checkbox both displays an option. Both are used to turn On or Off options. Difference between is, Option Button is used to select only one selection from multiple selections. Where as CheckBox is used to select multiple selections from the available list.
A Powerful & Multi-purpose Templates for project management. Now seamlessly manage your projects, tasks, meetings, presentations, teams, customers, stakeholders and time. This page describes all the amazing new features and options that come with our premium templates.
Save Up to 85% LIMITED TIME OFFER

All-in-One Pack
120+ Project Management Templates
Essential Pack
50+ Project Management Templates
Excel Pack
50+ Excel PM Templates
PowerPoint Pack
50+ Excel PM Templates
MS Word Pack
25+ Word PM Templates
Ultimate Project Management Template
Ultimate Resource Management Template
Project Portfolio Management Templates
-
-
- In this topic:
-
- VBA OptionButton_Control on the UserForm
- Add dynamic OptionButton_Control on the UserForm using VBA
-
- Procedure to call in the CommandButton:
-
- Delete OptionButton_Control on the UserForm using VBA
- Check if a OptionButton is Selected or Not Using VBA
- Difference Between OptionButton and CheckBox Control
VBA Reference
Effortlessly
Manage Your Projects
120+ Project Management Templates
Seamlessly manage your projects with our powerful & multi-purpose templates for project management.
120+ PM Templates Includes:
Effectively Manage Your
Projects and Resources
ANALYSISTABS.COM provides free and premium project management tools, templates and dashboards for effectively managing the projects and analyzing the data.
We’re a crew of professionals expertise in Excel VBA, Business Analysis, Project Management. We’re Sharing our map to Project success with innovative tools, templates, tutorials and tips.
Project Management
Excel VBA
Download Free Excel 2007, 2010, 2013 Add-in for Creating Innovative Dashboards, Tools for Data Mining, Analysis, Visualization. Learn VBA for MS Excel, Word, PowerPoint, Access, Outlook to develop applications for retail, insurance, banking, finance, telecom, healthcare domains.
Page load link

3 Realtime VBA Projects
with Source Code!
Go to Top
Содержание
- OptionButton control
- Remarks
- See also
- Support and feedback
- Option Button Excel VBA
- Create an Option Button
- Get a Selected Option Button in VBA
- Use an Option button in a UserForm
- VBA Coding Made Easy
- VBA Code Examples Add-in
- VBA Excel. Элемент управления OptionButton (переключатель)
- Элемент управления OptionButton
- Свойства элемента Переключатель
- Примеры кода VBA с OptionButton
- Vba для excel optionbutton
- 10.7 Coding For Option Buttons in VBA
OptionButton control
Shows the selection status of one item in a group of choices.
Use an OptionButton to show whether a single item in a group is selected. Note that each OptionButton in a Frame is mutually exclusive.
If an OptionButton is bound to a data source, the OptionButton can show the value of that data source as either Yes/No, True/False, or On/Off.
If the user selects the OptionButton, the current setting is Yes, True, or On; if the user does not select the OptionButton, the setting is No, False, or Off. For example, an OptionButton in an inventory-tracking application might show whether an item is discontinued. If the OptionButton is bound to a data source, changing the settings changes the value of that data source. A disabled OptionButton is dimmed and does not show a value.
Depending on the value of the TripleState property, an OptionButton can also have a null value.
You can also use an OptionButton inside a group box to select one or more of a group of related items. For example, you can create an order form with a list of available items, with an OptionButton preceding each item. The user can select a particular item by checking the corresponding OptionButton.
The default property for an OptionButton is the Value property. The default event for an OptionButton is the Click event.
See also
Support and feedback
Have questions or feedback about Office VBA or this documentation? Please see Office VBA support and feedback for guidance about the ways you can receive support and provide feedback.
Источник
Option Button Excel VBA
In this Article
In VBA, you can create an Option button to enable a user to choose from several options. An Option button is often used in UserForms, but can also be used in a Worksheet. In this tutorial, you will learn how to create an Option button, get a user choice in VBA and use it in code.
If you want to learn how to create a Checkbox, click here: VBA Checkbox
Create an Option Button
In order to insert an Option button in the Worksheet, you need to go to the Developer tab, click Insert and under ActiveX Controls choose Option button:
Image 1. Insert an Option button in the Worksheet
When you select the Option button which you inserted, you can click on Properties under the Developer tab:
Image 2. Change the Option button Properties
Here you can set different properties of the Option button. For the beginning, we changed the attribute Name to optOptionButton1. Now, we can use the Option button with this name in VBA code.
Also, we changed the text which appears next to the Option button to Male. To do this, you need to set the attribute Caption.
As we want to allow a user to choose gender, we will repeat the whole process for another Option button. The second one has name optOptionButton2, while the caption is Female. You can also create a new Option button by copying the existing one and changing properties. Now our Worksheet has two option buttons:
Image 3. Insert the second Option button
Get a Selected Option Button in VBA
The purpose of an Option button is to get a users decision. We will show in the example how to write Male in the cell C3 if the Option button 1 is chosen or Female if the second one is chosen. Every Option button has its event which triggers when its chosen – Click.
Therefore, for the first Option button we need to put the following code in the event Click of the object optOptionButon1:
Similarly, we will put this code in the event Click of the object optOptionButton2:
The value of the Option button is in the Value attribute of the object optOptionButton1 or optOptionButton2. The value of the Option button can be true if it is chosen or false if it’s not chosen.
Image 3. Return Male if the first Option button is chosen
As you can see in Image 3, we clicked on the first Option button. Therefore, the value of Sheet1.optOptionButton1.Value is true, so the result in C3 is Male.
Image 4. Return Female if the second Option button is chosen
Similarly to the previous example, the value of C3 is changed to Female, as we have chosen the second Option button. In this case, the procedure optOptionButton2_Click() is triggered.
Use an Option button in a UserForm
As we mentioned, Option button is most often used in UserForms. To explain how you can do it, we will first insert an UserForm. In VBA Editor, right-click on Module name, click on Insert and choose UserForm:
Image 5. Insert a Userform
To display controls for inserting, you need to enable the Toolbox. To do this, click on the Toolbox icon in the toolbar. After that, you will get the windows with all the controls available. You can click on the Option button to create it in the Userform:
Image 6. Insert an Option button in the Userform
In the properties window, we change the name of the Option button to optOptionButton1 and caption to Male. Similarly, we created another Option button for Female. When we run the Userform, we get two Option buttons:
Image 7. Two Option buttons in the Userform
If you want to get a selected Option button, you need to use the same logic as for a Worksheet, which is explained earlier in the article.
VBA Coding Made Easy
Stop searching for VBA code online. Learn more about AutoMacro — A VBA Code Builder that allows beginners to code procedures from scratch with minimal coding knowledge and with many time-saving features for all users!

VBA Code Examples Add-in
Easily access all of the code examples found on our site.
Simply navigate to the menu, click, and the code will be inserted directly into your module. .xlam add-in.
Источник
VBA Excel. Элемент управления OptionButton (переключатель)
Элемент управления пользовательской формы OptionButton для выбора одной опции из группы и передачи результата в VBA Excel. Свойства переключателя, примеры.
Элемент управления OptionButton
В VBA Excel элемент управления OptionButton состоит из белого кружка с черной точкой (переключатель выбран) или без нее (переключатель не выбран) и надписи. Надпись расположена справа и реагирует на нажатие мышью так же, как и белый кружок.
В отличие от элемента управления CheckBox, только один OptionButton из группы переключателей может иметь значение True. Для разделения разных групп переключателей друг от друга используются элементы управления Frame (рамки). Все переключатели вне рамок являются одной группой.
Так же, как и элемент управления CheckBox, OptionButton принимает третье состояние при присвоении ему в коде VBA Excel значения Null. Переключатель отображается с серым кружком и серой точкой.
Свойства элемента Переключатель
| Свойство | Описание |
|---|---|
| AutoSize | Автоподбор размера переключателя. True – размер автоматически подстраивается под длину набираемой строки. False – размер элемента управления определяется свойствами Width и Height. |
| ControlSource | Ссылка на источник данных для свойства Value. |
| ControlTipText | Текст всплывающей подсказки при наведении курсора на OptionButton. |
| Enabled | Возможность взаимодействия пользователя с элементом управления. True – взаимодействие включено, False – отключено (цвет переключателя становится серым). |
| Font | Шрифт, начертание и размер текста надписи. |
| Height | Высота элемента управления. |
| Left | Расстояние от левого края внутренней границы пользовательской формы до левого края элемента управления. |
| Picture | Добавление изображения вместо текста надписи или дополнительно к нему. |
| PicturePosition | Выравнивание изображения и текста в поле надписи. |
| TabIndex | Определяет позицию элемента управления в очереди на получение фокуса при табуляции, вызываемой нажатием клавиш «Tab», «Enter». Отсчет начинается с 0. |
| TextAlign* | Выравнивание текста надписи: 1 (fmTextAlignLeft) – по левому краю, 2 (fmTextAlignCenter) – по центру, 3 (fmTextAlignRight) – по правому краю. |
| Top | Расстояние от верхнего края внутренней границы пользовательской формы до верхнего края элемента управления. |
| Value | Значение переключателя: True – включен, False – выключен, Null – серый кружок с серой точкой. |
| Visible | Видимость элемента OptionButton. True – элемент отображается на пользовательской форме, False – скрыт. |
| Width | Ширина элемента управления. |
| WordWrap | Перенос текста надписи на новую строку при достижении границы ее поля. True – перенос включен, False – перенос выключен. |
* При загруженной в поле надписи картинке свойство TextAlign не работает, следует использовать свойство PicturePosition.
Свойство по умолчанию для элемента OptionButton – Value, основное событие – Click.
В таблице перечислены только основные, часто используемые свойства переключателя. Все доступные свойства отображены в окне Properties элемента управления OptionButton.
Примеры кода VBA с OptionButton
Пример 1
Отображение элементов управления OptionButton на пользовательской форме с параметрами, заданными в коде VBA Excel:
Источник
Vba для excel optionbutton
На этом шаге мы рассмотрим назначение, основные свойства и пример использования этого элемента управления .
Элемент управления ОptionButton (Переключатель) создается с помощью кнопки Переключатель (OptionButton) (рисунок 1).
Рис.1. Переключатель на форме
Он позволяет выбрать один из нескольких взаимоисключающих параметров или действий. Переключатели обычно отображаются группами, обеспечивая возможность выбора альтернативного варианта.
Приведем наиболее часто используемые свойства элемента управления OptionButton .
| Свойство | Назначение |
|---|---|
| Value | Возвращает True , если переключатель выбран и False в противном случае |
| Enabled | Допустимые значения: True (пользователь может выбрать переключатель) и False (в противном случае) |
| Visible | Допустимые значения: True (переключатель отображается во время выполнения программы) и False (в противном случае) |
| Capture | Надпись, отображаемая рядом с переключателем |
Таблица 1. Основные свойства OptionButton
Рассмотрим способ использования переключателей на примере классической игры «Орел и Решка». Выбирая один из двух переключателей, игрок загадывает один из вариантов: орел (1 для компьютера) или решка (0 для компьютера). Не зная о выборе игрока, компьютер синтезирует с равной вероятностью либо 0, либо 1, что моделирует бросание монеты. Если игрок угадал правильную сторону монеты, подброшенную компьютером, то он выигрывает. В противном случае выигрывает компьютер. Компьютер информирует игрока о результате игры. На рисунке 2 приведено диалоговое окно, отображаемое на экране в случае проигрыша игрока.
Рис.2. Диалоговое окно, отображаемое на экране при проигрыше игрока
Для создания приложения, моделирующего игру «Орел и Решка», с помощью пользовательской формы UserForm1 создадим диалоговое окно, показанное на рисунке 3, а в модуле UserForm1 введем следующую процедуру, синтезирующую отклик на нажатие кнопки Бросание монеты .
Рис.3. Диалоговое окно игры Орел-Решка
На следующем шаге мы рассмотрим элемент управления Frame .
Источник
10.7 Coding For Option Buttons in VBA
Option buttons tend to work as a group. When one button is selected the other (or others) become deselected.
So that your buttons are treated as a group, return to your form in the VBA Editor and click on the YES option button. Now have a look at the properties for the button. Locate the GroupName property and type OB1. Press the enter key on your keyboard and do the same for the NO option button. Both buttons will then have a value of OB1 for their GroupName property (OB1 is just something we came up with — you can call your group of option buttons anything you like.):
Go back to your coding window and create a new Private Sub. Call it GetOptionButtonValue. What we need to do, here, is to get the value from Column 7 on our spreadsheet (the G Column). We’ll then use an If Statement to test this value. Here’s the full code for this new Sub:
Private Sub GetOptionButtonValue( )
Dim OB As Variant
OB = ActiveCell.Offset(, 6).Value
If OB = «Yes» Then
We’ve set up a Variant variable and called it OB. The second line gets the value from the spreadsheet:
OB = ActiveCell.Offset(, 6).Value
The active cell is in column 1, remember, so we use Offset to move 6 columns over into the G Column. We then get the Value of this cell.
The If Statement checks what is inside of the OB variable:
If OB = «Yes» Then
If the value is «Yes» then we set the Value property of OptionButton1 to True. If it’s not «Yes» then we set the value of OptionButton2 to True. This is enough to either switch on an Option Button or switch it off.
We now need to call this new Sub into action. Click inside of your cmdLoad code and add the following line just before End Sub:
Your code will then look like this:
You can test it out again. Run your form and click the Load Image Information button. You should find that the correct option button is selected for the Flash item.
We can now load an image into the image box. We’ll do that in the next lesson below.
Источник
В этой статье мы рассмотрим такой элемент управления как OptionButton – Переключатель. Полагаю, многим приходилось видеть форму, на которой находятся несколько надписей и возле каждой надписи маленькая точка. Пользователь может выбрать только один элемент из списка. Компонент OptionButton в vba также называется RadioButton – по аналогии с радио, где можно выбрать одновременно только одну радиостанцию.
Если вы расположите на форме несколько переключателей vba OptionButton, то они будут между собой связаны, то есть вы сможете нажать одновременно только на один. Что бы создать отдельную группу объектов OptionButton, их нужно поместить в отдельную рамку или на отдельную вкладку.
Основные свойства для переключателя следующие:
Name – имя объекта, оно назначается автоматически в стиле: OptionButton1, OptionButton2, … , OptionButtonN. Но вы можете переименовать объект так, как вам подходит.
Caption – надпись, которая будет отображаться рядом с переключателем, при добавлении на форму компонента OptionButton в vba, свойство caption автоматически принимает такое же значение как и свойство Name.
Enabled – позволяет сделать активным и доступным (значение true) объект, или наоборот, сделать объект неактивным и недоступным (значение false).
Value – содержит логическое значение: true – элемент управления включен (вы нажали на переключатель) или false – элемент управления выключен.
Visible – определяет видимость объект, принимает логическое true – отображать или false – не отображать компонент.
Как и для большинства управляющих компонентов, для OptionButton главным событием vba является Change – событие возникает при включении/выключении радио-кнопки.
Хорошо, теперь давайте приступим к практике. Добавим в проект новую форму (я ее назвал OBForm) и новый модуль (OBModule), за добавление отвечает меню Insert, пункты UserForm и Module.
В окне свойств для формы (UserForm) установите следующие значения:
- Caption – работа с компонентом OptionButton
- Width – 320
- Height – 134
Далее надо добавить на поверхность формы четыре переключателя, пусть они будут в одном столбике, справа от них добавьте один под другим два текстовых поля TextBox (соответственно TestBox1 и TextBox2), а под ними одну простую кнопку (CommandButton). Как все должно выглядеть можете посмотреть на рисунке.

Как и прежде, в редакторе кода для модуля следует прописать следующую процедуру:
Sub OBModule()
    OBForm.Show
End Sub
Тут мы просто указываем, что при запуске макроса должна отобразиться форма, Show — показать.
Хорошо, теперь немного о логике работы: возле каждого переключателя прописано имя элемента, при выборе заданного объекта OptionButton в vba (или RadioButton), в первом текстовом поле (TextBox1) должно отобразиться описание для выбранного элемента управления. При нажатии на кнопку во втором текстовом поле (TextBox2) должно отобразиться значение свойства Caption выбранного объекта OptionButton.
Хорошо, теперь пропишем в окне редактора кода для формы следующие процедуры:
Private Sub CommandButton1_Click()
    Dim ctrl As Control
    For Each ctrl In OBForm.Controls
        If ctrl.Value = True Then
            TextBox2.Text = ctrl.Caption
        End If
    Next
End Sub

Private Sub OptionButton1_Change()
    TextBox1.Text = ""
    TextBox1.Text = "CommandButton - работа с кнопками"
End Sub

Private Sub OptionButton2_Change()
    TextBox1.Text = ""
    TextBox1.Text = "CheckBox - создание флажков"
End Sub

Private Sub OptionButton3_Change()
    TextBox1.Text = ""
    TextBox1.Text = "ListBox - формирование списка с данными"
End Sub

Private Sub OptionButton4_Change()
    TextBox1.Text = ""
    TextBox1.Text = "TextBox - добавление на форму текстового поля"
End Sub
Теперь проанализируем код:
CommandButton1_Click – тут происходит обработка клика по кнопке. В цикле for … each происходит перебор коллекции всех объектов OptionButton и происходит проверка значения свойства Value, если оно ровно true – значит, элемент выбран. Во второе текстовое поле будет записываться значение свойства Caption для выбранного объекта.
Процедуры от OptionButton1_Change до OptionButton4_Change обрабатывают событие Change. Как только мы выберем переключатель OptionButton в VBA, в первое текстовое поле запишется текстовая строка. Строка TextBox1.Text = «» фактически является лишней, так как содержимое текстового поля автоматически затирается при присвоении свойству Text нового текста.
Элемент управления OptionButton
Переключатель OptionButton подобен флажку CheckBox, так как он тоже позволяет отображать и выбирать значение типа True/False или да/нет. Обычно переключатель имеет вид маленького кружка, внутри которого отображается (если переключатель выбран) или не отображается (если переключатель не выбран) черная точка. Щелкая на переключателе, пользователь выбирает его или отменяет его выбор. Отличие переключателя OptionButton от флажка CheckBox состоит в том, что из группы может быть выбран только один переключатель (тогда как флажков, принадлежащих одной группе, допускается выбрать сразу несколько).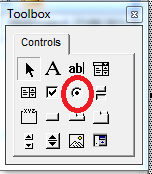
рис . 1.1 Элемент управления OptionButton на панели ToolBox
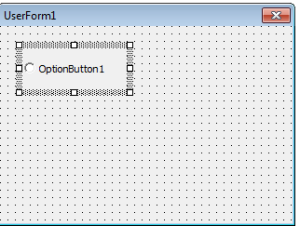
рис. 2.2 Элемент управления OptionButton на форме
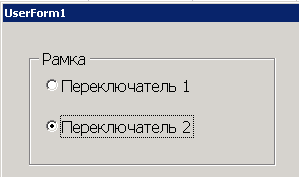
рис. 2.3 Пример элемента управления OptionButton на форме
Чтобы создать группу переключателей, поместите их на элементе управления Frame. Обратите внимание, что вначале необходимо добавить в окно формы панель Frame, а затем разместить на ней переключатели OptionButton. Чтобы сделать переключатель частью группы, его сразу же следует поместить на панель Frame. Таким образом перетащить уже созданный переключатель из окна формы на панель вы не сможете.
Еще один способ создания группы переключателей состоит в использовании свойства GroupName. Все элементы управления OptionButton, свойство GroupName которых имеет одинаковое значение, считаются частью одной группы. Выбор одного такого переключателя исключает возможность выбора других, даже если они не расположены на одной панели.
Присвоение свойству Value переключателя значения True сопровождается автоматическим присвоением значения False этому же свойству других переключателей, относящихся к данной группе. Чтобы определить, какой переключатель группы был выбран, программа должна просмотреть все элементы OptionButton и найти тот из них, свойству Value которого присвоено значение True.
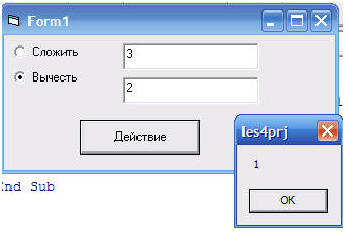
Напишем небольшой тестовый пример. Для начала кинем на форму два компонента OptionButton, один из них назовем opPlus, другой opMinus. И дадим имена: “Сложение” и “Вычитание” соответственно. У объекта opPlus установим в true свойство value*:

Теперь добавим два текстовых поля (TextBox), с именами txNumber1 и txNumber2, текст у них очистим. Еще нам понадобиться кнопочка (CommandButton). Назовем ее cmDo и назначим заголовок “Действие”. Вот что должно в итоге получиться*:

Теперь напишем для кнопочки обработчик нажатия:
Private Sub cmDo_Click()
If opPlus.Value = True Then
MsgBox (Val(txNumber1.Text) + Val(txNumber2.Text))
End If
If opMinus.Value = True Then
MsgBox (Val(txNumber1.Text) – Val(txNumber2.Text))
End If
End Sub
Данная программа у нас проверяет, какой вариант выбран, сложение или вычитание и делает с числом соответствующее действие. Главной особенностью кнопки OptionButton в том, что невозможно выбрать сразу две кнопочки. Запустите программу и убедитесь в этом сами:
Добавим еще и умножение. Для этого кинем на форму еще один OptionButton с именем opMult и заголовком “Умножить”. Добавим несколько строчек в нашу программу:
Private Sub cmDo_Click()
If opPlus.Value = True Then
MsgBox (Val(txNumber1.Text) + Val(txNumber2.Text))
End If
If opMinus.Value = True Then
MsgBox (Val(txNumber1.Text) – Val(txNumber2.Text))
End If
If opMult.Value = True Then
MsgBox (Val(txNumber1.Text) * Val(txNumber2.Text))
End If
End Sub
Запустим программу и убедимся, что она работает правильно:
