
Заполнение ComboBox данными с помощью кода VBA Excel. Добавление значений в поле со списком методом AddItem, из массива и из диапазона рабочего листа. Примеры.
Заполнение ComboBox методом AddItem
Создайте пользовательскую форму UserForm1 и разместите на ней поле со списком ComboBox1. Используйте метод AddItem для заполнения элемента управления значениями:
|
Sub Test1() With UserForm1.ComboBox1 .AddItem «Кружка» .AddItem «Стакан» .AddItem «Бокал» .AddItem «Пиала» .AddItem «Фужер» End With UserForm1.Show End Sub |
Скопируйте код и запустите его выполнение, на открывшейся форме раскройте поле со списком, в результате увидите, что элемент управления ComboBox1 заполнен соответствующими значениями:

Для заполнения элемента управления ComboBox значениями из массива будем использовать свойство поля со списком List и функцию Array:
|
Sub Test2() With UserForm1 .ComboBox1.List = Array(«Кружка», «Стакан», «Бокал», «Пиала», «Фужер») .Show End With End Sub |
Результат выполнения кода будет таким же, как и на предыдущем изображении.
Таким же образом можно использовать не только функцию Array, но и переменную массива, предварительно объявленную и заполненную значениями:
|
Sub Test3() Dim a(4) As String a(0) = «Кружка» a(1) = «Стакан» a(2) = «Бокал» a(3) = «Пиала» a(4) = «Фужер» With UserForm1 .ComboBox1.List = a .Show End With End Sub |
Заполнение ComboBox значениями из ячеек
Для заполнения поля со списком значениями из диапазона ячеек рабочего листа будем использовать свойство комбинированного списка RowSource, предварительно заполнив диапазон «A1:A5» активного листа уже известными значениями:
|
Sub Test4() With UserForm1 .ComboBox1.RowSource = «A1:A5» .Show End With End Sub |

Чтобы присвоить элементу управления ComboBox значения из диапазона ячеек любого рабочего листа, добавьте ссылку на него перед наименованием диапазона, например, замените «A1:A5» на «Лист1!A1:A5», и поле со списком будет заполнено значениями ячеек «A1:A5», расположенных на листе с именем «Лист1». Имя листа берется из наименования ярлыка.
Очистка ComboBox от значений
Очистить ComboBox можно как от всех значений сразу, так и удалить один или несколько значений (по одному) из списка.
Очистка ComboBox от всего списка значений:
Очистка ComboBox от одного значения:
|
ComboBox1.RemoveItem Index |
где Index — порядковый номер элемента в списке ComboBox, нумерация начинается с нуля.
Автоматическое заполнение ComboBox
Предполагается, что, при открытии пользовательской формы или рабочего листа с ComboBox, поле со списком должно быть уже заполнено значениями. Как это сделать?
Заполнение ComboBox на форме
Автоматическое заполнение элемента управления ComboBox на пользовательской форме осуществляется с помощью процедуры UserForm_Initialize, размещенной в модуле этой формы:
|
Private Sub UserForm_Initialize() ComboBox1.List = Лист8.[A1:A15].Value End Sub |
Или по одному:
|
Private Sub UserForm_Initialize() With ComboBox1 .Clear .AddItem «Апельсин» .AddItem «Банан» .AddItem «Виноград» .AddItem «Груша» .AddItem «Хурма» End With End Sub |
Заполнение ComboBox на листе
Автоматическое заполнение элемента управления ComboBox из коллекции «Элементы ActiveX» на рабочем листе осуществляется с помощью процедуры Workbook_Open, размещенной в модуле «ЭтаКнига»:
|
Private Sub Workbook_Open() Лист8.ComboBox1.List = Лист8.[A1:A15].Value End Sub |
Или по одному:
|
Private Sub Workbook_Open() With Лист8.ComboBox1 .Clear .AddItem «Апельсин» .AddItem «Банан» .AddItem «Виноград» .AddItem «Груша» .AddItem «Хурма» End With End Sub |
Более подробно о заполнении данными ComboBox можно прочитать в статье о заполнении ListBox, так как оба эти элемента управления используют одинаковые способы заполнения.
Иногда возникает необходимость заполнения элементов управления ListBox и ComboBox уникальными значениями из диапазона ячеек с повторяющимся содержимым. Смотрите, как отсортировать уникальные элементы из списка с помощью объектов Collection и Dictionary.
Вы можете скачать файл Excel с представленными выше примерами. Файл упакован в ZIP-архив. Для проверки работоспособности кода, непосредственно в редакторе VBA помещайте курсор внутри тела каждой процедуры и нажимайте кнопку «Run Sub».
ComboBox — значение по умолчанию
Добавление значения по умолчанию вручную
Значение по умолчанию для текстового поля ComboBox можно задать вручную в окне свойств (Properties) выбранного элемента управления:

Выберите ComboBox на форме в редакторе VBA и в окне Properties в поле Value впишите нужное значение.
Программное добавление значения по умолчанию
Добавление произвольного значения по умолчанию в текстовое поле ComboBox при инициализации пользовательской формы:
|
Private Sub UserForm_Initialize() With ComboBox1 .AddItem «Камень» .AddItem «Ножницы» .AddItem «Бумага» ‘Добавление произвольного значения по умолчанию .Value = «Выберите значение» End With End Sub |
Добавление значения по умолчанию в текстовое поле ComboBox из имеющегося списка:
|
Private Sub UserForm_Initialize() With ComboBox1 .AddItem «Камень» .AddItem «Ножницы» .AddItem «Бумага» ‘Добавление значения по умолчанию из списка .ListIndex = 0 End With End Sub |
Нумерация списка ComboBox начинается с нуля, поэтому приведенный выше код отобразит значение по умолчанию — «Камень».
In this Article
- Create a ComboBox in Excel Worksheet
- Populate a ComboBox in VBA code
- Populate a ComboBox from a Cells Range
- Get a Selected Item of a ComboBox in VBA
- Clear a ComboBox
- Use a ComboBox in a Userform
This tutorial will demonstrate how to work with ComboBoxes in VBA.
ComboBoxes allow users to select an option from a drop-down menu list. ComboBoxes can be created in VBA UserForms or with an Excel worksheet. In this tutorial, you will learn how to create and manipulate ComboBoxes in VBA and in Excel worksheets.
If you want to learn how to create a Listbox, click here: VBA Listbox
If you want to learn how to create a Checkbox, click here: VBA Checkbox
Create a ComboBox in Excel Worksheet
In order to insert a ComboBox in the Worksheet, you need to go to the Developer tab, click Insert and under ActiveX Controls choose Combo Box:
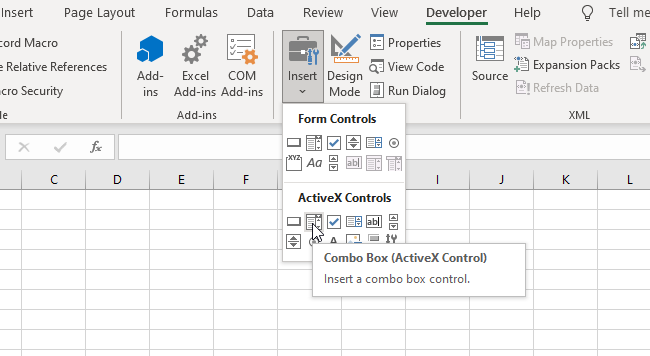
Image 1. Insert a ComboBox in the Worksheet
When you select the ComboBox which you inserted, you can click on Properties under the Developer tab:
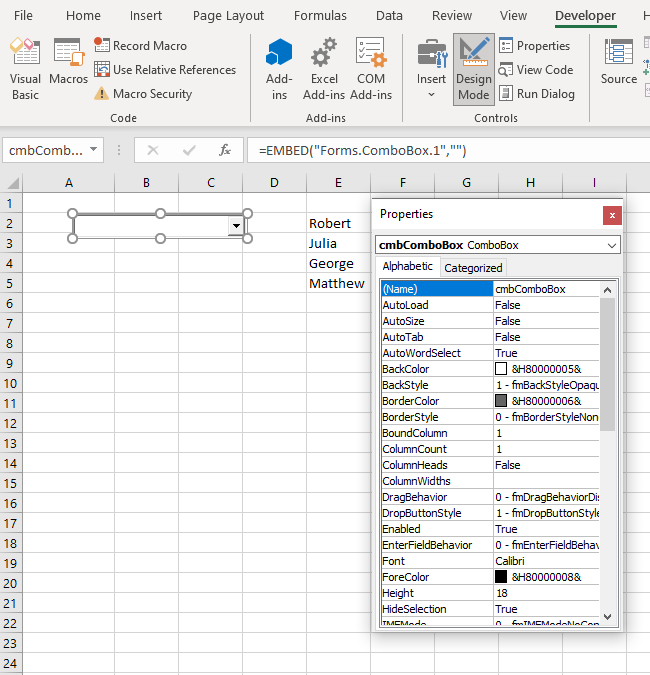
Image 2. Change ComboBox Properties
Here you can set different properties of the ComboBox. To start, we changed the attribute Name to cmbComboBox. Now, we can use the ComboBox with this name in VBA code.
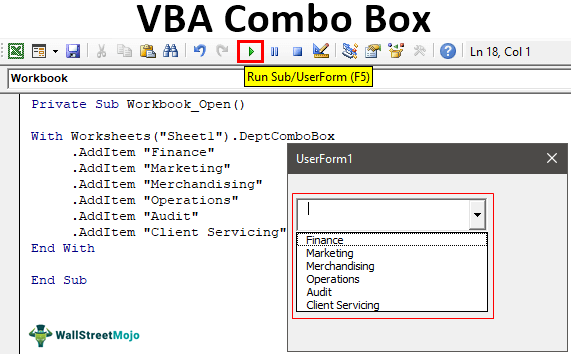
Populate a ComboBox in VBA code
First, we need to populate the ComboBox with values. In most cases, a ComboBox needs to be populated when the Workbook is opened. Because of this, we need to put a code for populating the ComboBox in object Workbook, procedure Open. This procedure is executed every time a user opens the Workbook. Here is the code:
With Sheet1.cmbComboBox

    .AddItem "John"
    .AddItem "Michael"
    .AddItem "Jennifer"
    .AddItem "Lilly"
    .AddItem "Robert"

End With
When you click on the drop-down menu, you will get 5 names to choose from (John, Michael, Jennifer, Lilly and Robert):
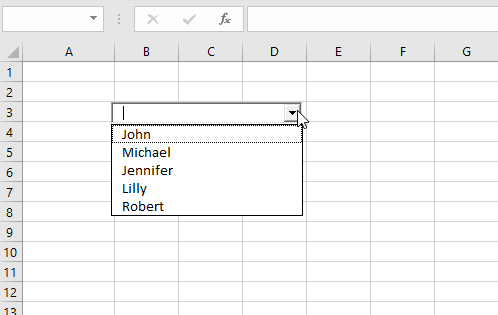
Image 3. Populate the ComboBox in VBA
Populate a ComboBox from a Cells Range
Another possible way to populate a ComboBox is to let a user do it. A ComboBox can be linked to the cells range. In this approach, every time a user enters a new value in the cells range, the ComboBox will update with that value.
If you want to enable this, you have to go to the Properties of the ComboBox and set the attribute ListFillRange to the cells range (in our case E2:E5):
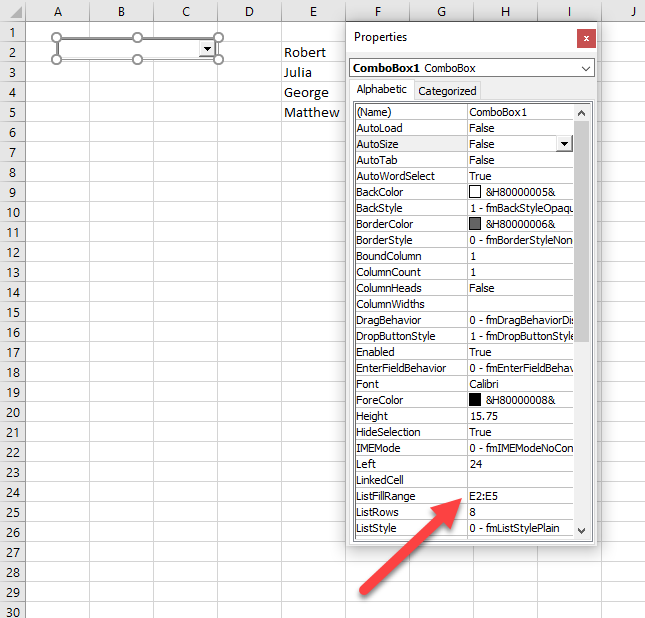
Image 4. Populate the ComboBox from the cells range
We linked our ComboBox with the range E2:E5, where we put names we want (Nathan, Harry, George, Roberta). As a result, the ComboBox is now populated with these names:
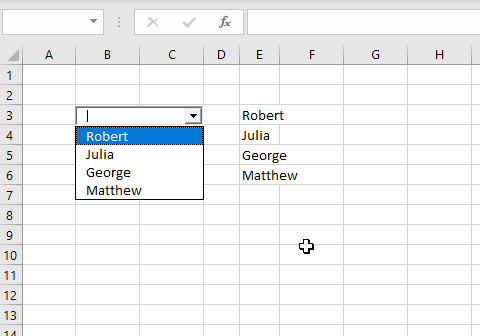
Image 5. Populated ComboBox from the cells range
Get a Selected Item of a ComboBox in VBA
The purpose of a ComboBox is to get a users choice. In order to retrieve a users choice, you need to use this code:
Dim strSelectedItem As Variant

strSelectedItem = Sheet1.cmbComboBox.Value
The users selection is in the attribute Value of Sheet1.cmbComboBox object. This value is assigned to the variable strSelectedItem:
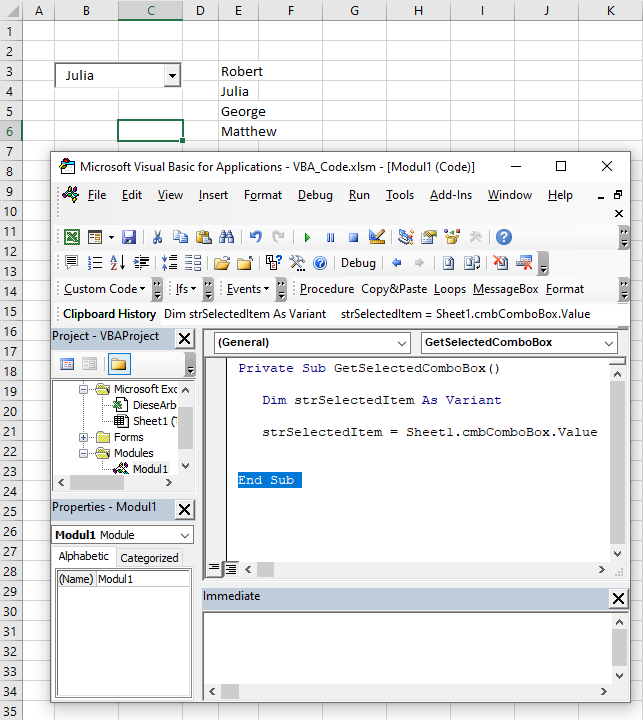
Image 6. Get a selected value from the ComboBox in VBA
We selected Julia in the ComboBox and executed the procedure. As you can see in Image 5, the value of the strSelectedItem is Julia, which is the value we selected. Now you can process this variable further in the code.
Clear a ComboBox
If you want to clear a ComboBox in VBA, you need to use Clear method of Sheet1.lstComboBox object. It will delete all the items from the ComboBox. Here is the code:
Sheet1.cmbComboBox.ClearNotice that the Clear method does not delete the attribute ListFillRange, so it must be removed from the properties of the ComboBox beforehand.
When we execute the code, we get the empty ComboBox:
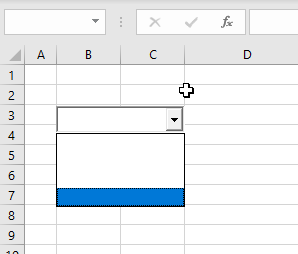
Image 7. Clear the ComboBox
Use a ComboBox in a Userform
As we mentioned, Combobox is most often used in Userforms. To explain how you can do it, we will first insert an Userform. In VBA editor, right-click on Module name, click on Insert and choose UserForm:
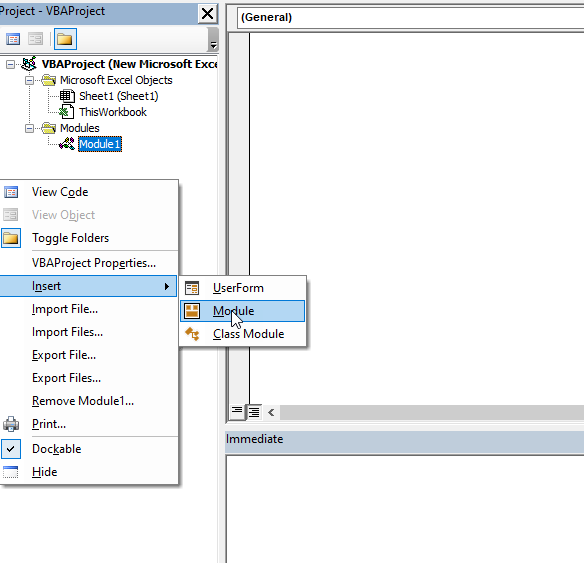
Image 8. Insert a Userform
To display controls for inserting, you need to enable the Toolbox. To do this, click on the Toolbox icon in the toolbar. After that, you will get the windows with all the controls available. You can click on ComboBox to create it in the Userform.
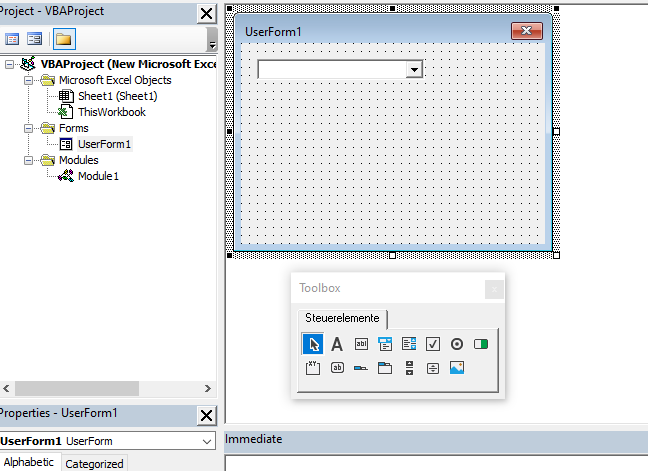
Image 9. Insert a ComboBox in the Userform
We will name the ComboBox cmbComboBox. In order to populate it with values, we need to put the following code into the method Initialize of the object UserForm:
Private Sub UserForm_Initialize()

    With UserForm1.cmbComboBox

        .AddItem "John"
        .AddItem "Michael"
        .AddItem "Jennifer"
        .AddItem "Lilly"
        .AddItem "Robert"

    End With

End Sub
This code triggers every time a user runs the Userform and populates the Combobox with these 5 names:
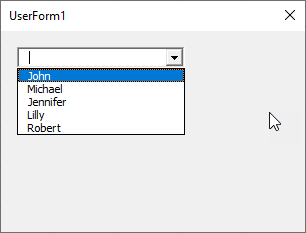
Image 10. The ComboBox with values in the Userform
If you want to get selected value from the ComboBox, you need to use the same logic for the Combobox in a Worksheet, which is explained earlier in the article.
VBA Coding Made Easy
Stop searching for VBA code online. Learn more about AutoMacro — A VBA Code Builder that allows beginners to code procedures from scratch with minimal coding knowledge and with many time-saving features for all users!

Learn More!
UserForm Controls — ComboBox and ListBox
———————————————————-
Contents:
Difference between ListBox and ComboBox
Key Properties of ComboBox and ListBox
Add Items/Data to (Populate) a ListBox or ComboBox
Extract ListBox & ComboBox Items, with VBA
Delete ListBox rows using the RemoveItem Method
———————————————————-
UserForm acts as a container in which you add multiple ActiveX controls, each of which has a specific use and associated properties. By itself, a UserForm will not be of much use unless ActiveX controls are added to it which are the actual user-interactive objects. Using ActiveX Controls on a Worksheet have been illustrated in detail, in the separate section of «Excel VBA: ActiveX Controls, Form Controls & AutoShapes on a Worksheet».
An Excel VBA ListBox or ComboBox is a list of items from which a user can select. They facilitate in accepting data from users and making entries in an Excel worksheet.
Difference between ListBox and ComboBox:
1. The ComboBox is a drop-down list (the user-entered item or the list-selected item is visible in the text area, whereas list values are visible by using the drop-down), while a ListBox shows a certain number of values with or without a scroll bar. In a ComboBox, only one row of items is visible at a given time (without using the drop-down) whereas in a ListBox one or more can be visible at a time.
2. In a ComboBox you can select ony one option from the list, while in a ListBox you can select multiple options from the list.
3. The user can enter his own item (in text area) in a ComboBox if it is not included in the list, which is not possible to do in a ListBox. In this sense, ComboBox is a combination of TextBox and ListBox.
4. CheckBox can be used within ListBox, but not within ComboBox. ListBox allows you to display a check box next to each item in the list, to enable user to select items (this might be easier for the user than using the multiple selection methods). To use CheckBoxes in a ListBox, set ListStyle property (in Properties Window) to fmListStyleOption (vba code: ListBox1.ListStyle = fmListStyleOption). This setting is best used with a multiselect ListBox.
——————————————————————————————————————-
Key Properties of ComboBox and ListBox
Note1: All properties and methods given below are common to both ListBox and ComboBox, unless mentioned otherwise. Also refer «2. UserForm and Controls — Properties.» for properties common to the UserForm and most Controls.
Note 2: In below given examples, vba codes are required to be entered in the Code Module of the UserForm, unless specified otherwise.
AddItem Method:
Adds an item to the list, in a single-column ListBox or ComboBox. Adds a row to the list (ie. an item for each row), in a multi-column ListBox or ComboBox. Syntax: Control.AddItem(Item, Index). Item specifies the item or row to add. Index is an Integer which specifies the position where the new item or row is placed within the list, and if omitted, the item or row is added at the end. The item or row numbers begin with zero, and the first item or row is numbered 0, and so on. The value of Index cannot be greater than the total number of rows (ie. value of ListCount property). AddItem method will not work if ComboBox or ListBox is bound to data, hence RowSource data should be cleared before use. AddItem method can only be used with a macro or vba code. Note: AddItem method adds an item to the first column in a multi-column ListBox or ComboBox, and to add an item further to the first column, use the List or Column property specifying the item’s row and column number. More than one row can also be added at a time to a ListBox or ComboBox by using the List or Column properties (AddItem adds one row at a time). This means that you can copy a two-dimensional array of values to a ListBox or ComboBox, using List or Column properties rather than adding each individual element using the AddItem method. Note: Using the Column property to copy a two-dimensional array of values to a ListBox or ComboBox, transposes the array contents and equates myArray(iRow, iColumn) to ListBox1.Column(iCol, iRow). List property copies an array without transposing it and myArray(iRow, iColumn) equates to ListBox1.List(iRow, iColumn). Refer Image 13 for example.
BoundColumn Property:
Specifies the column from which value is to be stored in a multicolumn ComboBox or ListBox, when a row is selected by the user. First column has a BoundColumn value of 1, second column has a value of 2, and so on. Setting the BoundColumn value to 1 will assign the value from column 1 to the ComboBox or ListBox, and so on. BoundColumn property lets the user to store a different set of values per specified column while TextColumn property displays one set of values, viz. use the Text property to return the value from the first column (specified in the TextColumn property) containing the names and the BoundColumn property can specify another column containing height wherein on selecting a particular person’s name in the ListBox, his height will get returned or stored (refer Image 10). The ColumnWidths property of a column can be set to zero to not display it in the ListBox. Setting the BoundColumn value to 0 assigns the value of the ListIndex property (which is the number of the selected row) as the value of the control (ComboBox or ListBox). This setting is useful if you want to determine the row of the selected item in a ComboBox or ListBox. BoundColumn Property can be set in the Properties window and can also be used with a macro or vba code. Note: Where the ControlSource mentions =Sheet3!D2 (vba code: .ControlSource = «=Sheet3!D2»), the value in the BoundColumn of the selected row will get stored in cell D2, Sheet3.

Example 1: Setting the BoundColumn value to 0 assigns the value of the ListIndex property (which is the number of the selected row) as the value of the control (in a Single Selection ListBox) — refer Image 7
Private Sub UserForm_Initialize()
‘set ListBox properties on initialization of UserForm
With ListBox1
.ColumnHeads = True
.ColumnCount = 2
‘ColumnWidths property of the second column is set to zero to not display it in the ListBox.
.ColumnWidths = «50;0»
.RowSource = «=Sheet3!A2:B6»
.MultiSelect = fmMultiSelectSingle
.BoundColumn = 0
End With
End Sub
Private Sub CommandButton1_Click()
‘BoundColumn value is set as 0 which assigns the value of the ListIndex property (which is the number of the selected row) as the value of the control. Note: MultiSelect Property is set to fmMultiSelectSingle which allows only single selection.
If ListBox1.Value <> «» Then
TextBox1.Value = ListBox1.Value + 2
End If
End Sub
Clear Method:
Removes all items in a ComboBox or ListBox. Syntax: Control.Clear. Clear method will not work if ComboBox or ListBox is bound to data, hence RowSource data should be cleared before use. Clear method can only be used with a macro or vba code.
Column Property:
Refers to a specific column, or column and row combination, in a multiple-column ComboBox or ListBox. Syntax: Control.Column(iColumn, iRow). Column property can only be used with a macro or vba code and is not available at design time. iColumn specifies the column number wherein iColumn = 0 means the first column in the List. iRow specifies the row number wherein iRow = 0 means the first row in the List. Both iColumn and iRow are integer values ranging from 0 to number of columns and rows (respectively) in the list minus 1. Specifying both column and row numbers will refer to a specific item, and specifying only the column number will refer to a specific column in the current row viz. ListBox1.Column(1) refers the second column. You can copy a two-dimensional array of values to a ListBox or ComboBox, using Column (or List) property rather than adding each individual element using the AddItem method. Column property can be used to assign the contents of a ComboBox or ListBox to another control, viz. TextBox (refer Image 8). Note: Using the Column property to copy a two-dimensional array of values to a ListBox or ComboBox, transposes the array contents and equates myArray(iRow, iColumn) to ListBox1.Column(iCol, iRow). List property copies an array without transposing it and myArray(iRow, iColumn) equates to ListBox1.List(iRow, iColumn). Refer Image 13 for example.

Example 2: Load ListBox using AddItem method and List & Column properties; and use Column property to assign the contents of ListBox to TextBox — refer Image 8
Private Sub UserForm_Initialize()
‘set ListBox properties on initialization of UserForm
With ListBox1
.ColumnCount = 3
.ColumnWidths = «50;50;50»
.ColumnHeads = False
.RowSource = «=Sheet2!A2:B6»
.MultiSelect = fmMultiSelectMulti
End With
‘clearing the TextBox if it is not empty
TextBox1 = «»
End Sub
Private Sub CommandButton1_Click()
‘Add items in ListBox using AddItem method to add new rows; use List & Column properties to add items in columns beyond the first column; and use Column property to assign the contents of ListBox to TextBox
‘AddItem method will not work if ListBox is bound to data, hence RowSource is cleared if it had been set
ListBox1.RowSource = «»
‘Create a new row with AddItem
ListBox1.AddItem «banana»
‘add item in second column of this first row, using List property
ListBox1.List(0, 1) = «tuesday»
‘adding items in the 3 columns of the first row — this will become the second row in the end
ListBox1.List(0, 2) = «day 2»
ListBox1.AddItem «orange»
‘add item in second column of this second row, using Column property
ListBox1.Column(1, 1) = «wednesday»
‘adding items in the 3 columns of the second row — this will become the third row in the end
ListBox1.Column(2, 1) = «day 3»
‘Create a new row with AddItem and position as row number 1
ListBox1.AddItem «apple», 0
ListBox1.List(0, 1) = «monday»
‘adding items in the 3 columns and positioning this row as the first row — this will push down the above two rows
ListBox1.List(0, 2) = «day 1»
‘item in column number 3 and row number 2 of ListBox
TextBox1.Value = ListBox1.Column(2, 1)
End Sub
ColumnCount Property:
Specifies the number of columns to be displayed in a ComboBox or ListBox. A ColumnCount value of 0 does not display any column and a setting of -1 displays all columns. ColumnCount property can be set in the Properties window and can also be used with a macro or vba code.
ColumnHeads Property:
A Boolean value (True/False) which determines display of column headings (in a single row) for ComboBox or ListBox. ColumnHeads property can be set in the Properties window and can also be used with a macro or vba code. Column Headings can be displayed only if ColumnHeads is set to True in Properties window (VBA code: ListBox1.ColumnHeads = True) and if you bind the ListBox to a range (ie. set RowSource to a range that includes headings). Note: AddItem method will not work if ListBox or ComboBox is bound to data, hence RowSource property should be cleared for using AddItem.
List Property:
List Property is used in conjunction with the ListCount and ListIndex properties to return items in a ListBox or ComboBox control. Syntax -> Control.List(iRow,iCol). Each item in a list has a row number and a column number, wherein row and column numbers start with zero. iRow specifies the row number wherein iRow = 2 means the third row in the List. iColumn specifies the column number wherein iColumn = 0 means the first column in the List. Omitting to specify the iColumn will retrieve the first column. Specify iColumn only for a multi-column ListBox or ComboBox. List Property can only be used with a macro or vba code and is not available at design time. Note: To copy a two-dimensional array of values to a ListBox or ComboBox, use List or Column properties. To add a one-dimensional array or to add an individual element, use the AddItem method. Items can be removed from a List using the RemoveItem method. List property is available only by using a macro or VBA.

Example 3: Use Selected & List properties to display multiple-selected ListBox items (choose any column to display) in TextBox, and link a worksheet cell with TextBox using ControlSource property — refer Image 9.
Private Sub UserForm_Initialize()
‘set ListBox properties on initialization of UserForm
With ListBox1
.ColumnHeads = True
.ColumnCount = 2
‘ColumnWidths property of the second column is set to zero to not display it in the ListBox.
.ColumnWidths = «50;0»
.RowSource = «=Sheet3!A2:B6»
.MultiSelect = fmMultiSelectMulti
.TextColumn = 1
End With
With TextBox1
.MultiLine = True
‘the text or value in the TextBox will get stored in the worksheet cell — Sheet3!F2
.ControlSource = «=Sheet3!F2»
‘if the cell Sheet3!F2 contains any text, this will not appear in the TextBox on initialization of UserForm
.Value = «»
End With
End Sub
Private Sub CommandButton1_Click()
‘Use Selected & List properties to display multiple-selected ListBox items (choose any column to display) in TextBox, and link a worksheet cell with TextBox using ControlSource property
TextBox1.Value = «»
‘check all items in a ListBox
For n = 0 To ListBox1.ListCount — 1
‘if a ListBox item is selected, it will display in TextBox
If ListBox1.Selected(n) = True Then
If TextBox1.Value = «» Then
‘ListBox1.List(n, 0) or ListBox1.List(n)displays the first column in TextBox, ListBox1.List(n, 1) displays the second column and so on
‘alternate code which displays the second column in TextBox: TextBox1.Value = Range(ListBox1.RowSource).Offset(n, 1).Resize(1, 1).Value
TextBox1.Value = ListBox1.List(n, 1)
Else
‘alternate code which displays the second column in TextBox: TextBox1.Value = TextBox1.Value & vbCrLf & Range(ListBox1.RowSource).Offset(n, 1).Resize(1, 1).Value
TextBox1.Value = TextBox1.Value & vbCrLf & ListBox1.List(n, 1)
End If
End If
Next n
End Sub
ListCount Property:
Determines the total number of rows in a ListBox or ComboBox. This property can only be used with a macro or vba code and is not available at design time. Note: The column headings row is also counted, if ColumnHeads are displayed. The ListCount property can be used with the ListRows property to specify the number of rows to display in a ComboBox.
ListIndex Property:
Determines which item is selected in a ComboBox or ListBox. The first item in a list has a ListIndex value of 0, the second item has a value of 1, and so on. Hence, it is an integer value ranging from 0 to the total number of items in a ComboBox or ListBox minus 1. ListIndex returns -1 when no rows are selected. This property can only be used with a macro or vba code and is not available at design time. Note: In a Multiple Selection enabled ListBox, ListIndex returns the index of the row that has focus, irrespective of whether that row is selected or not. Hence the Selected property of the ListBox (and not the ListIndex property) shoud be used here to return and set a selection. In a Single Selection enabled ListBox (viz. MultiSelect property setting of fmMultiSelectSingle), ListIndex returns the index of the selected item and hence ListIndex property should be used here to return and set a selection.
ListRows Property:
Specifies the maximum number of rows which will display in the list box portion of a ComboBox. The default value is 8. Note: If the actual number of list items exceed this maximum value of the ListRows property, a vertical scroll bar will appear in the list box portion of the ComboBox (and the excess list items can be viewed by scrolling down). The ListCount property can be used with the ListRows property to specify the number of rows to display in a ComboBox. ListRows property can be set in the Properties window and can also be used with a macro or vba code. ListRows Property is valid for ComboBox and not for ListBox.
Example 4: Using the ListCount property with the ListRows property, to set number of rows to display in ComboBox
Private Sub UserForm_Initialize()
‘this macro sets the ListRow value, on initialization of the UserForm
With ComboBox1
If .ListCount > 5 Then
.ListRows = 5
Else
.ListRows = .ListCount
End If
End With
End Sub
MultiSelect Property:
Specifies whether multiple selections are allowed. There are 3 settings: (i) fmMultiSelectSingle (value 0), the default setting, wherein only a single item can be selected; (ii) fmMultiSelectMulti (value 1) which allows multiple selections wherein an item can be selected or deselected by clicking mouse or pressing SPACEBAR; and (iii) fmMultiSelectExtended (value 2) which allows multiple selections, wherein by pressing SHIFT and simultaneously moving the up or down arrows (or pressing SHIFT and clicking mouse) continues selection from the previously selected item to the current selection (ie. a continuous selection); this option also allows to select or deselect an item by pressing CTRL and clicking mouse. MultiSelect property can be set in the Properties window and can also be used with a macro or vba code. Note: MultiSelect Property is valid for ListBox and not for ComboBox. When multiple selections are made (viz. fmMultiSelectMulti or fmMultiSelectExtended), the selected items can be determined only by using the Selected property (Selected property is available by using macro) of the ListBox. The Selected property will have values ranging from 0 to ListCount minus 1 and will be True if the item is selected and False if not selected. The Selected property determines the items you chose, and the List property returns the items.
Example 5: Determining selected item in a Single Selection ListBox, in VBA:
Private Sub CommandButton1_Click()
‘determine and display selected item in a ListBox which allows only a single selection (viz. MultiSelect Property is set to fmMultiSelectSingle)
‘you can also determine selected item in a ListBox which allows only a single selection, by using the Selected Property (as used in a Multiple Selection enabled ListBox)
‘alternatively: If ListBox1.ListIndex >= 0 Then
If ListBox1.Value <> «» Then
MsgBox ListBox1.Value
End If
End Sub
RemoveItem Method:
A specified row is removed from the list in a ComboBox or ListBox. Syntax: Control.RemoveItem(Row_Index). Row_Index is the row number which is specified to be removed, wherein the first row is numbered 0, and so on. RemoveItem method will not work if ComboBox or ListBox is bound to data, hence RowSource data should be cleared before use. RemoveItem method can only be used with a macro or vba code.
RowSource Property:
Specifies the source of a list (which could be a worksheet range in Excel), for a ComboBox or ListBox. RowSource property can be set in the Properties window and can also be used with a macro or vba code. To set RowSource property in Properties window, enter without inverted commas: «=Sheet2!A2:A6» which populates ComboBox or ListBox with values in cells A2:A6 in Sheet2. VBA code for this is: ListBox1.RowSource = «=Sheet2!A2:A6». It is not necessary to use the equal mark in «=Sheet2!A2:A6» while setting the property and ListBox1.RowSource = «Sheet2!A2:A6» will have the same effect.
Selected Property:
Specifies whether an item is selected in a ListBox control. Syntax: Control.Selected(Item_Index). Returns True/False if the item is Selected/NotSelected; Set to True/False to select the item or remove selection [viz. Control.Selected(ItemIndex) = True/False]. Item_Index is an integer value ranging from 0 to number of items in the list minus 1, indicating its relative position in the list, viz. ListBox.Selected(2) = True selects the third item in the list. Selected property is particularly useful when working with multiple selections. Selected Property can only be used with a macro or vba code and is not available at design time. Note1: In a Multiple Selection enabled ListBox, ListIndex returns the index of the row that has focus, irrespective of whether that row is selected or not. Hence the Selected property of the ListBox (and not the ListIndex property) shoud be used here to return and set a selection. In a Single Selection enabled ListBox (viz. MultiSelect property setting of fmMultiSelectSingle), ListIndex returns the index of the selected item and hence ListIndex property should be used here to return and set a selection. Note2: Selected Property is valid for ListBox and not for ComboBox.
Example 6: Determining selected items in a multiple-selection enabled ListBox using Selected & List properties:
Private Sub CommandButton1_Click()
‘display all selected items in a ListBox using the Selected property (valid for a ListBox with MultiSelect Property setting of either single-selection or multiple-selection)
‘check all items in a ListBox
For n = 0 To ListBox1.ListCount — 1
‘if a ListBox item is selected, it will display in MsgBox
If ListBox1.Selected(n) = True Then
‘display a selected item
MsgBox ListBox1.List(n)
End If
Next n
End Sub
Style Property:
Valid for ComboBox only, not for ListBox. This property determines choosing or setting the value of ComboBox. There are 2 settings: (i) fmStyleDropDownCombo (value 0). The user has both options of typing a custom value in the text area or select from the drop-down list. This is the default value.; (ii) fmStyleDropDownList (value 2). The user can only select from the drop-down list, like in ListBox. Style Property can be set in the Properties window and can also be used with a macro or vba code.
TextColumn Property:
Specifies the column of data in a ListBox that supplies data for its Text property — the TextColumn property determines the column whose value the Text property will return whereas the BoundColumn property determines the column whose value the Value property returns. The Text property returns the same as Value property if the TextColumn property is not set. First column has a TextColumn value of 1, second column has a value of 2, and so on. Setting the TextColumn value to -1 indicates that the first column with a ColumnWidths value greater than 0 will be displayed. TextColumn property enables display of one set of values to the user but store a different set of values (per column specified in the BoundColumn property) viz. use the Text property to return the value from the first column (specified in the TextColumn property) containing the names and the BoundColumn property can specify another column containing height wherein on selecting a particular person’s name in the ListBox, his name & height will be returned. The ColumnWidths property of any column can be set to zero to not display it in the ListBox. Setting the TextColumn value to 0 displays the ListIndex value (which is the number of the selected row) in TextColumn Property — this setting is useful if you want to determine the row of the selected item. TextColumn property can be set in the Properties window and can also be used with a macro or vba code. Note: In a ComboBox, when a user selects an item, the column specified in the TextColumn property will be displayed in the ComboBox’s text box portion.

Example 7: Display first column in the List and use the TextColumn & BoundColumn Properties to return values from first & third columns (in a Single Selection ListBox) — refer Image 10
Private Sub UserForm_Initialize()
‘set ListBox properties on initialization of UserForm
With ListBox1
.ColumnHeads = True
.ColumnCount = 3
‘set the ColumnWidths property of second & third columns to zero to not display them in the ListBox
.ColumnWidths = «40;0:0»
.RowSource = «=Sheet2!A2:C6»
.MultiSelect = fmMultiSelectSingle
‘specifies the column of data in a ListBox that supplies data for its Text property
.TextColumn = 1
.BoundColumn = 3
End With
End Sub
Private Sub CommandButton1_Click()
‘TextColumn value is set as 1 and BoundColumn value is set as 3.
‘works only if MultiSelect Property of ListBox is set to fmMultiSelectSingle which allows single selection.
If ListBox1.Value <> «» Then
‘use the ListBox Text property to return the value from the column specified in the TextColumn column, whereas the ListBox Value property returns the value from the column specified in the BoundColumn property
TextBox1.Value = ListBox1.Text & » — » & ListBox1.Value & » cms»
End If
End Sub
———————————————————————————————————————
Add Items/Data to (Populate) a ListBox or ComboBox
1. Setting the RowSource property of a ListBox or ComboBox in a UserForm
VBA code — if the list is static:
Me.ListBox1.RowSource = «Sheet1!A1:B6»
or
Me.ListBox1.RowSource = «=Sheet1!A1:B6»
VBA code — if the list is dynamic:
Me.ListBox1.RowSource = «Sheet1!A1:B» & Sheet1.Cells(Rows.Count, «B»).End(xlUp).Row
Note: You can set the RowSource property of a ListBox or ComboBox in the Properties Window (without using vba code), by entering -> Sheet1!A1:B6

Example 8: Populate ComboBox by setting the RowSource property to a named list — refer Image 11
Private Sub UserForm_Initialize()
‘populate ComboBox by setting the RowSource property to a named list
With ComboBox1
.ColumnCount = 2
.ColumnWidths = «50;50»
.ColumnHeads = True
‘For a named list (viz. “HeightList” in Range A2:B6), the RowSource property can be set to Sheet1!HeightList
.RowSource = «Sheet1!HeightList»
End With
End Sub
2. Populate a ComboBox or ListBox from an Array:
VBA code — populate single column in ListBox:
ListBox1.List = Array(«RowOne», «RowTwo», «RowThree», «RowFour»)
VBA code — populate single column in ComboBox:
ComboBox1.List = Array(«Apples», «Bananas», «Oranges», «Pears»)
VBA code — populate ListBox from array named myArray:
Dim myArray As Variant
myArray = Array(«Adidas», «Nike», «Reebok»)
Me.ListBox1.List = myArray
VBA code — Populate single column ComboBox:
Dim i As Integer
Dim myArray As Variant
myArray = Array(«Adidas», «Nike», «Reebok», «Puma», «Polo»)
For i = LBound(myArray) To UBound(myArray)
Me.ComboBox1.AddItem myArray(i)
Next
Example 9 — Populate a multi-column Listbox directly with Worksheet Range — multiple rows added at one time using the List property:
Private Sub UserForm_Initialize()
‘set ListBox properties on initialization of UserForm
With ListBox1
.ColumnCount = 3
.ColumnWidths = «50;50;50»
.ColumnHeads = False
End With
‘Load Worksheet Range directly to a ListBox
Dim rng As Range
Set rng = Sheet1.Range(«A1:C6»)
Me.ListBox1.List = rng.Cells.Value
End Sub
Example 10 — Populate a multi-column Listbox directly with Worksheet Range — multiple rows added at one time using the List property:
Private Sub UserForm_Initialize()
‘set ListBox properties on initialization of UserForm
With ListBox1
.ColumnCount = 3
.ColumnWidths = «50;50;50»
.ColumnHeads = False
End With
‘Load Worksheet Range directly to a ListBox:
Dim var As Variant
var = Sheet1.Range(«A1:C6»)
Me.ListBox1.List = var
End Sub

Example 11: Load Worksheet Range to a multi-column ListBox, after placing Range data in a 2-dimensional Array — refer Image 12
Option Base 1
——————————————
Private Sub UserForm_Initialize()
‘Load Worksheet Range to a ListBox, after placing data in an Array
Dim rng As Range
Dim cell As Range
Dim totalRows As Integer, totalColumns As Integer
Dim iRow As Integer, iCol As Integer
Dim myArray() As Variant
Set rng = Sheet1.Range(«A1:C6»)
totalRows = Sheet1.Range(«A1:C6»).Rows.Count
totalColumns = Sheet1.Range(«A1:C6»).Columns.Count
‘if Option Base 1 was not set, this line of code should be: ReDim myArray(1 To totalRows, 1 To totalColumns)
ReDim myArray(totalRows, totalColumns)
‘place worksheet range data in an Array:
For Each cell In rng
For iRow = 1 To totalRows
For iCol = 1 To totalColumns
myArray(iRow, iCol) = rng.Cells(iRow, iCol)
Next iCol
Next iRow
Next
‘set ListBox properties and load Array to ListBox
With ListBox1
.ColumnCount = 3
.ColumnWidths = «50;50;50»
.ColumnHeads = False
.List = myArray
End With
End Sub

Example 12: Load a 2-dimensional array to ListBox using the List property (copies an array without transposing it) and Column property (which transposes the contents of the array) — refer Image 13
Private Sub UserForm_Initialize()
‘set ListBox properties on initialization of UserForm
With ListBox1
.ColumnCount = 3
.ColumnWidths = «50;50;50»
.ColumnHeads = False
End With
With ListBox2
.ColumnCount = 3
.ColumnWidths = «50;50;50»
.ColumnHeads = False
End With
End Sub
Private Sub CommandButton1_Click()
‘create a 2-dimensional array and load to ListBox using the List property (copies an array without transposing it) and Column property (which transposes the contents of the array)
‘Declaring the array and its dimensions. The array has been named myArray, of size 3 by 3 (three rows by three columns). Note: When you populate an array with data, the array will start at zero, and if you include Option Base 1 the array will start at 1.
Dim myArray(3, 3)
‘populate column 1 of myArray, with numbers
For n = 0 To 2
myArray(n, 0) = n + 1
Next n
‘populate column 2 of myArray
myArray(0, 1) = «R1C2»
myArray(1, 1) = «R2C2»
myArray(2, 1) = «R3C2»
‘populate column 3 of myArray
myArray(0, 2) = «R1C3»
myArray(1, 2) = «R2C3»
myArray(2, 2) = «R3C3»
‘copy data to ListBox1 (using List property) and ListBox2 (using Column property):
‘copies an array without transposing it
ListBox1.List() = myArray
‘transposes the contents of the array
ListBox2.Column() = myArray
End Sub
3. Populate a ComboBox or ListBox with AddItem method
Example 13: Populate a single-column ListBox from worksheet range
Private Sub UserForm_Initialize()
‘set ListBox properties on initialization of UserForm
With ListBox1
.ColumnCount = 1
.ColumnWidths = «50»
.ColumnHeads = False
‘AddItem method will not work if ListBox is bound to data, hence RowSource is cleared if it had been set
.RowSource = «»
End With
‘populating a single-column ListBox with AddItem method
Dim cell As Range
Dim rng As Range
Set rng = Sheet1.Range(«A1:A6»)
For Each cell In rng.Cells
Me.ListBox1.AddItem cell.Value
Next cell
End Sub
Example 14: Populate a single-column ListBox with values from 1 to 500
Private Sub UserForm_Initialize()
‘set ListBox properties on activation of UserForm
With ListBox1
.ColumnCount = 1
.ColumnWidths = «50»
‘AddItem method will not work if ListBox is bound to data, hence RowSource is cleared if it had been set
.RowSource = «»
End With
‘populate a single-column ListBox with values from 1 to 500, and «N/A»
With ListBox1
.AddItem «N/A»
For i = 1 To 500
.AddItem i
Next i
End With
End Sub

Example 15: Create a new row with AddItem and specify its row number — refer Image 14
Private Sub UserForm_Initialize()
‘set ListBox properties on initialization of UserForm
With ListBox1
.ColumnCount = 1
.ColumnWidths = «50»
.ColumnHeads = False
‘AddItem method will not work if ListBox is bound to data, hence RowSource is cleared if it had been set
.RowSource = «»
End With
‘using AddItem method to populate single-column ListBox:
ListBox1.AddItem «banana»
ListBox1.AddItem «orange»
‘Create a new row with AddItem and position as row number 1 — this will push down the above two rows
ListBox1.AddItem «apple», 0
‘Create a new row with AddItem and position as row number 2 — this will push down the above two rows to no. 3 and 4
ListBox1.AddItem «pears», 1
End Sub

Example 16: Populate a ComboBox with the 12 months in a year — Refer Image 15
Private Sub UserForm_Initialize()
‘set ComboBox properties on initialization of UserForm
With ComboBox1
.ColumnCount = 1
.ColumnWidths = «50»
.ColumnHeads = False
‘AddItem method will not work if ComboBox is bound to data, hence RowSource is cleared if it had been set
.RowSource = «»
End With
‘populates ComboBox with the 12 months in a year
For n = 1 To 12
ComboBox1.AddItem Format(DateSerial(2011, n, 1), «mmmm»)
Next n
End Sub
4. Populate a multi-column ComboBox or ListBox using AddItem method and List & Column properties

Example 17: refer Image 16
Private Sub UserForm_Initialize()
‘set ComboBox properties on initialization of UserForm
With ComboBox1
.ColumnCount = 3
.ColumnWidths = «50;50;50»
.ColumnHeads = False
‘AddItem method will not work if ComboBox is bound to data, hence RowSource is cleared if it had been set
.RowSource = «»
End With
‘Populating a multi-column ListBox using AddItem method and List & Column properties:
‘Create a new row with Additem
ComboBox1.AddItem «banana»
‘add item in second column of this first row, using List property
ComboBox1.List(0, 1) = «tuesday»
‘adding items in the 3 columns of the first row — this will become the second row in the end
ComboBox1.List(0, 2) = «day 2»
ComboBox1.AddItem «orange»
‘add item in second column of this second row, using Column property
ComboBox1.Column(1, 1) = «wednesday»
‘adding items in the 3 columns of the second row — this will become the third row in the end
ComboBox1.Column(2, 1) = «day 3»
‘Create a new row with Additem and position as row number 1
ComboBox1.AddItem «apple», 0
ComboBox1.List(0, 1) = «monday»
‘adding items in the 3 columns and positioning this row as the first row — this will push down the above two rows
ComboBox1.List(0, 2) = «day 1»
End Sub
5. Populate a multi-column ListBox from a worskheet range, using AddItem method and List property

Example 18: refer Image 17
Private Sub UserForm_Initialize()
‘set ListBox properties on initialization of UserForm
With ListBox1
.ColumnCount = 3
.ColumnWidths = «50;50;50»
‘AddItem method will not work if ListBox is bound to data, hence RowSource is cleared if it had been set
.RowSource = «»
End With
End Sub
Private Sub CommandButton1_Click()
‘populate a multi-column ListBox from a worskheet range, using AddItem method and List property
Dim counter As Long
Dim totalRows As Long
‘determine total number of rows in column A
totalRows = Sheet4.Cells(Rows.Count, «A»).End(xlUp).Row
counter = 0
‘ListBox gets populated with all rows in column A:
Do
With Me.ListBox1
counter = counter + 1
‘create a new row with Additem
.AddItem Sheet4.Cells(counter, 1).Value
‘add item in second column of a row
.List(.ListCount — 1, 1) = Sheet4.Cells(counter, 1).Offset(0, 1).Value
‘add item in third column of a row
.List(.ListCount — 1, 2) = Sheet4.Cells(counter, 1).Offset(0, 2).Value
End With
Loop Until counter = totalRows
End Sub
6. Add a new item/row to the list if ComboBox is bound to data in a worksheet.


Example 19: refer Images 18a & 18b
Private Sub UserForm_Initialize()
‘set ComboBox properties on initialization of UserForm
With ComboBox1
.ColumnCount = 3
.ColumnWidths = «50;50;50»
.ColumnHeads = True
.BoundColumn = 1
‘a named-range (name: «cbRange») has been created in Sheet3 of the workbook, using the Name Manager: «=Sheet3!$A$2:$C$6»
.RowSource = «cbRange»
End With
End Sub
Private Sub CommandButton1_Click()
‘add a new item/row to the list if ComboBox is bound to data in a worksheet
Dim colNo As Long
‘determine first column of the named-range «cbRange»
colNo = Range(«cbRange»).Column
‘create a new single-column named-range (name: «cbRangeTemp»), populated with only the first column of the named-range «cbRange».
Range(«cbRange»).Resize(Range(«cbRange»).Rows.Count, 1).Name = «cbRangeTemp»
‘checks if ComboBox1.Value is already existing in column 1 of named-range «cbRange»
If Application.CountIf(Range(«cbRangeTemp»), ComboBox1.Value) = 0 Then
‘resizing the named-range «cbRange», to add another worksheet row at the end, wherein the ComboBox1.Value will get posted:
Range(«cbRange»).Resize(Range(«cbRange»).Rows.Count + 1).Name = «cbRange»
ComboBox1.RowSource = «cbRange»
‘posting columns of the new row with values from ComboBox1, TextBox1 & TextBox2:
Sheet3.Cells(Range(«cbRange»).Rows.Count + 1, colNo) = ComboBox1.Value
Sheet3.Cells(Range(«cbRange»).Rows.Count + 1, colNo).Offset(0, 1) = TextBox1.Text
Sheet3.Cells(Range(«cbRange»).Rows.Count + 1, colNo).Offset(0, 2) = TextBox2.Text
Else
MsgBox «Item already in List»
End If
ComboBox1.Value = «»
TextBox1.Text = «»
TextBox2.Text = «»
End Sub
——————————————————————————————————————————————-
Extract ListBox & ComboBox Items, with VBA
VBA code — Display selected ComboBox item in TextBox:
‘the text area of ComboBox shows the item entered by user of his own choice or that selected from list items, and this item gets displayed in TextBox
TextBox1.Value = ComboBox1.Value
Note: VBA code-> TextBox1.Value = ListBox1.Value, or TextBox1.Text = ListBox1.Value, will work only in case MultiSelect property of ListBox is set to fmMultiSelectSingle, ie. in case of a single-selection enabled ListBox. It will copy the selected item (value in BoundColumn) from the list.
VBA code — Copy selected ComboBox item to a worksheet range:
‘the text area of ComboBox shows the item entered by user of his own choice or that selected from list items, and this item is copied to the worksheet range
Sheet1.Range(«G4»).Value = ComboBox1.Value
Note: VBA code-> Sheet4.Range(«G4»).Value = ListBox1.Value, will work only in case MultiSelect property of ListBox is set to fmMultiSelectSingle, ie. in case of a single-selection enabled ListBox. It will copy the selected item (value in BoundColumn) from the list.
VBA code — Copy ComboBox item determined by its position, to a worksheet range:
‘an existing ComboBox item, determined by its position (row 4, column 1), posted to a worksheet cell
Sheet1.Range(«F2»).Value = ComboBox1.List(3, 0)
Note: VBA code for ListBox -> Sheet1.Range(«F2»).Value = ListBox1.List(3, 0)

Example 20: Extracting ListBox items (of multi-column ListBox) to a worksheet range — refer Image 19
Private Sub UserForm_Initialize()
‘set ListBox properties on initialization of UserForm
With ListBox1
.ColumnCount = 3
.ColumnWidths = «50;50;50»
.ColumnHeads = True
.RowSource = «Sheet2!A2:C6»
.MultiSelect = fmMultiSelectMulti
End With
End Sub
Private Sub CommandButton1_Click()
‘Use Selected & List properties to copy multiple-selected ListBox items (of multi-column ListBox) to a worksheet range
‘check all items/rows in a ListBox
For r = 0 To ListBox1.ListCount — 1
‘if a ListBox row is selected, it will get copied to the worksheet range
If ListBox1.Selected(r) = True Then
‘copying multi-column ListBox rows to corresponding/matching worksheet rows & columns:
For c = 1 To ListBox1.ColumnCount
Sheet1.Cells(r + 1, c).Value = ListBox1.List(r, c — 1)
Next c
End If
Next r
End Sub

Example 21: Extract multiple items in a row from a single-selection enabled & multi-column ListBox, and copy to worksheet range — refer Image 20
Private Sub UserForm_Initialize()
‘set ListBoxBox properties on initialization of UserForm
With ListBox1
.ColumnCount = 3
.ColumnWidths = «50;50;50»
.ColumnHeads = True
.BoundColumn = 1
.MultiSelect = fmMultiSelectSingle
.RowSource = «Sheet3!A2:C6»
End With
End Sub
Private Sub CommandButton1_Click()
‘extract multiple items in a row from a single-selection enabled & multi-column ListBox, and copy to worksheet range
‘ListIndex property is used to return and set a selection in a single-selection ListBox, but not in a multi-selection ListBox
‘ListBox1.Value will work only in case of a single-selection ListBox. It will copy the selected item (value in BoundColumn) from the list.
Dim rng As Range
Set rng = Sheet3.Cells(9, 1)
If ListBox1.Value <> «» Then
rng.Value = ListBox1.Value
rng.Offset(0, 1).Value = ListBox1.List(ListBox1.ListIndex, 1)
rng.Offset(0, 2).Value = ListBox1.List(ListBox1.ListIndex, 2)
End If
End Sub

Example 22: Select or enter name in ComboBox, and lookup its corresponding Grade in a worksheet range — refer Image 21
Private Sub UserForm_Initialize()
‘set comboBox properties on initialization of UserForm
With ComboBox1
.ColumnCount = 1
.ColumnWidths = «50»
.ColumnHeads = True
.RowSource = «Sheet3!A2:B6»
End With
‘disallow manual entry in TextBox
With TextBox1
.Enabled = False
End With
End Sub
Private Sub CommandButton1_Click()
‘select or enter name in ComboBox, and lookup its corresponding Grade in a worksheet range — use ComboBox, TextBox & CheckBox properties and worksheet functions Vlookup and Countif
Dim totalRows As Long
‘determine total number of rows in column B
totalRows = Sheet3.Cells(Rows.Count, «B»).End(xlUp).Row
Me.ComboBox1.ControlTipText = «Select Name»
Me.CommandButton1.ControlTipText = «Click to get Grade»
‘Name selected in ComboBox is posted to TextBox
TextBox1.Text = ComboBox1.Value
‘Grade will be searched only if a name is selected and the CheckBox is selected:
If CheckBox1 = True And TextBox1.Text <> «» Then
‘check if name selected or entered in ComboBox is present in the lookup range:
If Application.CountIf(Sheet3.Range(«A1:A» & totalRows), TextBox1.Text) > 0 Then
‘lookup Grade of selected Name, in the worksheet range
Sheet3.Cells(1, 4).Value = TextBox1.Text & «‘s grade is » & Application.VLookup(TextBox1.Text, Sheet3.Range(«A1:B» & totalRows), 2, False)
Else
MsgBox «Name not found!»
End If
End If
End Sub
——————————————————————————————————————————————-
Delete ListBox rows using the RemoveItem Method


Example 23: Use RemoveItem method to delete a ListBox row. The below code deletes the row from the ListBox and also deletes the row items (or rows) in the worksheet — refer Images 22a and 22b.
Private Sub UserForm_Initialize()
‘set ListBox properties on initialization of UserForm
With ListBox1
.ColumnCount = 3
.ColumnWidths = «50;50;50»
.ColumnHeads = False
.MultiSelect = fmMultiSelectMulti
End With
Dim totalRows As Long
‘determine total number of rows in column A
totalRows = Sheet3.Cells(Rows.Count, «A»).End(xlUp).Row
‘load a dynamic worksheet range to a ListBox
Dim rng As Range
Set rng = Sheet3.Range(«A2:C» & totalRows)
Me.ListBox1.List = rng.Cells.Value
‘removes all items in ListBox
‘ListBox1.Clear
End Sub
Private Sub CommandButton1_Click()
‘use RemoveItem method to delete a ListBox row. The below code deletes the row from the ListBox and also deletes the row items (or rows) in the worksheet
Dim n As Long, i As Long
Dim var As Variant
‘deleting row from ListBox using RemoveItem method:
‘check all items in a ListBox; reverse order (Step -1) is used because rows are being deleted from ListBox.
For n = ListBox1.ListCount — 1 To 0 Step -1
If ListBox1.Selected(n) = True Then
‘item to be deleted is stored in the variable named var
var = ListBox1.List(n, 0)
ListBox1.RemoveItem (n)
‘determine row number in which items are to be deleted; Note: value of variable named var is derived from first column, hence Range(«A:A») is searched in the Match formula.
i = Application.Match(var, Sheet3.Range(«A:A»), 0)
‘delete all 3 columns of the determined row in the worksheet:
Sheet3.Cells(i, 1) = «»
Sheet3.Cells(i, 1).Offset(0, 1) = «»
Sheet3.Cells(i, 1).Offset(0, 2) = «»
‘use this code instead of the preceding 3-lines, to delete the determined row in the worksheet
‘Sheet3.Rows(i).Delete
End If
Next n
End Sub
Example 24: Delete all rows in ListBox, using RemoveItem method
Private Sub UserForm_Initialize()
‘set ListBoxBox properties on initialization of UserForm
With ListBox1
.ColumnCount = 3
.ColumnWidths = «50;50;50»
.BoundColumn = 1
.MultiSelect = fmMultiSelectMulti
‘RemoveItem method will not work if ListBox is bound to data, hence RowSource is cleared if it had been set
ListBox1.RowSource = «»
End With
For n = 2 To 6
With Me.ListBox1
‘create a new row with Additem
.AddItem Sheet3.Cells(n, 1).Value
‘add item in second column of a row
.List(.ListCount — 1, 1) = Sheet3.Cells(n, 1).Offset(0, 1).Value
‘add item in third column of a row
.List(.ListCount — 1, 2) = Sheet3.Cells(n, 1).Offset(0, 2).Value
End With
Next n
End Sub
Private Sub CommandButton1_Click()
‘delete all rows in ListBox, using RemoveItem method
Dim n As Integer
For n = 1 To ListBox1.ListCount
‘Note: «ListBox1.RemoveItem 0» is the same as «ListBox1.RemoveItem (0)»
‘alternate code: ListBox1.RemoveItem 0
ListBox1.RemoveItem ListBox1.ListCount — 1
Next n
End Sub
What This VBA Code Does
The below code will show you how to utilize an Excel Table Object to populate a VBA Userform ComboBox. Tables are a great way to store data in the background for userforms and load from while initializing (loading) a userform up for the user.
VBA Code:
Using VBA Code Found On The Internet
Now that you’ve found some VBA code that could potentially solve your Excel automation problem, what do you do with it? If you don’t necessarily want to learn how to code VBA and are just looking for the fastest way to implement this code into your spreadsheet, I wrote an article (with video) that explains how to get the VBA code you’ve found running on your spreadsheet.
Getting Started Automating Excel
Are you new to VBA and not sure where to begin? Check out my quickstart guide to learning VBA. This article won’t overwhelm you with fancy coding jargon, as it provides you with a simplistic and straightforward approach to the basic things I wish I knew when trying to teach myself how to automate tasks in Excel with VBA Macros.
Also, if you haven’t checked out Excel’s latest automation feature called Power Query, I have put together a beginner’s guide for automating with Excel’s Power Query feature as well! This little-known built-in Excel feature allows you to merge and clean data automatically with little to no coding!
How Do I Modify This To Fit My Specific Needs?
Chances are this post did not give you the exact answer you were looking for. We all have different situations and it’s impossible to account for every particular need one might have. That’s why I want to share with you: My Guide to Getting the Solution to your Problems FAST! In this article, I explain the best strategies I have come up with over the years to get quick answers to complex problems in Excel, PowerPoint, VBA, you name it!
I highly recommend that you check this guide out before asking me or anyone else in the comments section to solve your specific problem. I can guarantee that 9 times out of 10, one of my strategies will get you the answer(s) you are needing faster than it will take me to get back to you with a possible solution. I try my best to help everyone out, but sometimes I don’t have time to fit everyone’s questions in (there never seem to be quite enough hours in the day!).
I wish you the best of luck and I hope this tutorial gets you heading in the right direction!
Chris
Founder, TheSpreadsheetGuru.com
Excel VBA ComboBox
Combo Box is the UserForm feature in VBA. They are different from the text boxes as text boxes used to contain only text. We allow the user to input any data, but by using combo boxes, we limit users to the desired response type. Thus, the data is in an orderly fashion. It is similar to the list data validation in Excel.
Combo Box can be compared to a dropdown list in Excel in worksheets. We used data validation to provide a dropdown. But in VBA, a UserForm feature provides a dropdown in any UserForm. But, if we want to use a combo box in Excel, we can access it from the “Developer” section. From there, we can create combo boxes for individual or multiple cells.
Combo Box is very similar to the dropdown list we have in an excel worksheet. With the combo box, we can store predetermined values so that users make the selection from the list available from the combo box. The combo box is generally used with UserForms to get the users’ input.
UserForms are useful but having other tools on the user form is what makes the user form so special. One of the tools that we often use as a tool for UserForm is “Combo Box.”
Table of contents
- Excel VBA ComboBox
- Top 2 Ways of Creating a VBA ComboBox
- #1 – Using Direct Coding
- #2 – Using UserForm
- Things to Remember
- Recommended Articles
- Top 2 Ways of Creating a VBA ComboBox
You are free to use this image on your website, templates, etc, Please provide us with an attribution linkArticle Link to be Hyperlinked
For eg:
Source: VBA ComboBox (wallstreetmojo.com)
Top 2 Ways of Creating a VBA ComboBox
You can download this VBA Combo Box Excel Template here – VBA Combo Box Excel Template
#1 – Using Direct Coding
First, we will see how to use Combo Box with the worksheetCombo Box in Excel is a type of data validation tool that can create a dropdown list for the user to select from the pre-determined list. It is a form control which is available in the insert tab of the developer’s tab.read more. Next, open any worksheets in the Excel workbook, and go to the Developer tabEnabling the developer tab in excel can help the user perform various functions for VBA, Macros and Add-ins like importing and exporting XML, designing forms, etc. This tab is disabled by default on excel; thus, the user needs to enable it first from the options menu.read more. Under this tab, we have a tool called “Insert.” Click on this, and under this, we have two options Active X Controls and Form Controls in excelExcel Form Controls are objects which can be inserted at any place in the worksheet to work with data and handle the data as specified. These controls are compatible with excel and can create a drop-down list in excel, list boxes, spinners, checkboxes, scroll bars.read more.

From “Active X Controls,” choose “Combo Box.”

Now you can draw this object on any of the worksheets.

Right-click on the combo box and choose the “Properties” option.
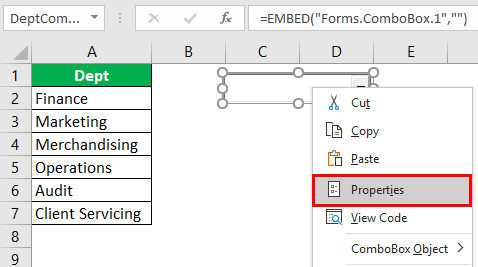
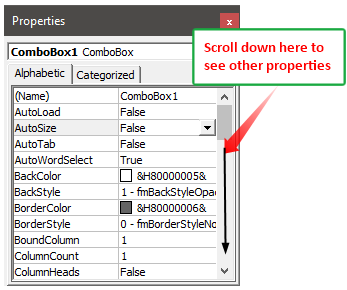
When you choose properties, it will open up a huge list of combo box properties.
We will give a list of department names for this combo box, so change the name property of the combo box to “DeptComboBox.”

This combo box will be referred to by the name “DeptComboBox.” We need to give pre-determined department names, so here I have a list of department names.

Now we need to add these values to the combo box list. We can do this in two ways, through coding or name managerThe name manager in Excel is used to create, edit, and delete named ranges. For example, we sometimes use names instead of giving cell references. By using the name manager, we can create a new reference, edit it, or delete it.read more.

Double click on the combo box, which will take you to the VBA macroVBA Macros are the lines of code that instruct the excel to do specific tasks, i.e., once the code is written in Visual Basic Editor (VBE), the user can quickly execute the same task at any time in the workbook. It thus eliminates the repetitive, monotonous tasks and automates the process.read more procedure.

But we need to see these department names when the workbook opens up, so double click on “ThisWorkbook.”

From the dropdown list, choose “Workbook.”

From the options, choose “Open.”

Now it will create a blank like the one below.

Inside this macro, enter the below code.
Code:
Private Sub Workbook_Open()

With Worksheets("Sheet1").DeptComboBox
.AddItem "Finance"
.AddItem "Marketing"
.AddItem "Merchandising"
.AddItem "Operations"
.AddItem "Audit"
.AddItem "Client Servicing"
End With

End Sub

Now save and close the workbook. When you reopen the workbook, we can see its department names.
#2 – Using UserForm
Another way to add values to the combo box is using the UserForm. First, give a name to cells as “Department.”

Next, enter Visual Basic EditorThe Visual Basic for Applications Editor is a scripting interface. These scripts are primarily responsible for the creation and execution of macros in Microsoft software.read more and insert “UserForm” from the “INSERT” option.

Now, it has created the new UserForm.

Next to the UserForm, we can see “Toolbox” from this toolbox. Then, finally, we can insert “ComboBox.”

Now, the combo box is embedded in the UserForm. To open the properties option, select the combo box and press the F4 key to open the properties window.

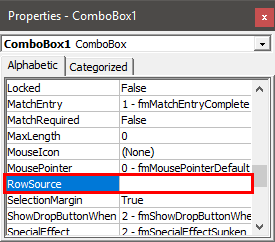
Scroll down the “Properties” tab and choose “RowSource.”
For this “RowSource,” enter the name we had given to department name cells.
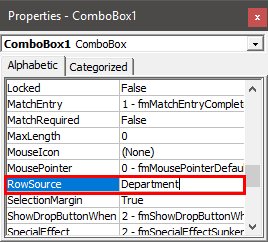
Now, this combo box holds the reference of the name “Department.”
Now, run the UserForm by using the “Run” button.

Now, we can see a list of department names in the combo box on the UserForm.

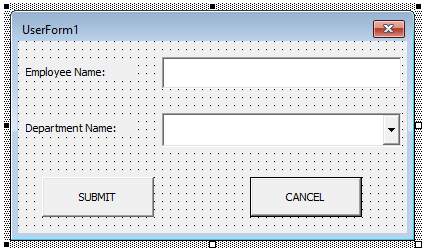
Practically UserForm is associated with a combo box, text box, and many other tools. Therefore, we will create a simple data entry UserForm with a text box and combo box.
Create a UserForm like the one below.

Create two “Command” buttons.
Double click on the “SUBMIT” button. It will open up below the macro.

Inside this macro, add the below code.
Code:
Private Sub CommandButton1_Click()

Dim LR As Long

LR = Cells(Rows.Count, 1).End(xlUp).Row + 1

Cells(LR, 1).Value = TextBox1.Value
Cells(LR, 2).Value = ComboBox1.Value

End Sub

Now, double-click the “CANCEL” button and add the code below.

Now, in the worksheet, create a template like the one below.

Now, run the UserForm. It will open up like this.

Enter the employee name and pick the department name from the combo list.
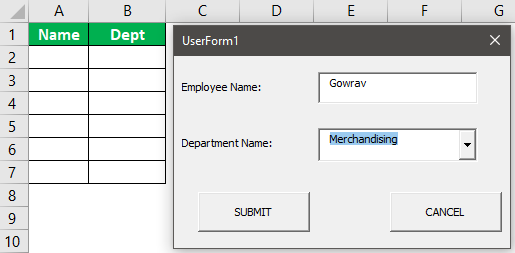
Click on the “SUBMIT” button and see the magic.

We got the values entered in the table format we have created.
Things to Remember
- The COMBO BOX has its properties as well.
- Adding values to the list comes in two ways. One is a coding way, and another is a range name reference.
- The COMBO BOX is usually part of the UserForm.
Recommended Articles
This article has been a guide to VBA Combo Box. Here, we discuss how to insert and use a combo box using VBA coding in Excel along with the downloadable template. Below you can find some useful Excel VBA articles: –
- List Box in Excel
- Name Box in Excel
- VBA InputBox
- Examples of Checkbox in Excel
Create a ComboBox
In an Excel UserForm, you can create drop down lists by using the ComboBox control. In this example, the UserForm has two ComboBox controls, one for Part ID, and one for Location.
A ComboBox can have a single column, like this list of location names.

Or a ComboBox can have multiple columns, like this parts list that shows both the Part ID and a Part Description.

This Excel VBA example is based on the instructions for Creating an Excel UserForm With ComboBoxes.
On that page, the Excel VBA code is listed, but not explained in detail. In this tutorial, we’ll look at how the Excel ComboBox code works. First, we’ll create VBA code for a single column ComboBox list, and then we’ll create Excel VBA code for a ComboBox with two columns.
Single Column ComboBox
This Excel UserForm has a ComboBox named cboLocation. We want this ComboBox to show all the locations from a named range — LocationList — on the LookupLists worksheet.

There is only one column in the list on the worksheet, so we’ll only need one column in the ComboBox.
We’d like the ComboBox lists to be created automatically, when someone opens our UserForm. To do that, we’ll use the Initialize event for the UserForm.
- In the Visual Basic Editor (VBE), select the UserForm, and on the Menu bar, click View, then click Code.
- In the dropdown at the top left of the VBE, select UserForm (it may be selected already).
- From the Procedure dropdown, at the top right, choose Initialize

- The Initialize event code is added to the Excel VBA code module, with Sub and End Sub lines only. The cursor is flashing between the first and last line of code.


Define the Variables
Where the cursor is flashing in the Initialize procedure, we’ll define two variables to be used in the procedure:
Private Sub UserForm_Initialize()

Dim cLoc As Range
Dim ws As Worksheet
Set ws = Worksheets("LookupLists")

End Sub
The cLoc variable is a Range object, and we’ll use it to refer to a cell in the LocationList range on the worksheet.
The ws variable is a Worksheet object, and we Set it to the LookupLists worksheet, where the Location list is stored.
Add a Loop
Next, we’ll add a For Each…Next loop, that will visit each cell in the LocationList range on the LookupLists worksheet.
Private Sub UserForm_Initialize()
Dim cLoc As Range
Dim ws As Worksheet
Set ws = Worksheets("LookupLists")

For Each cLoc In ws.Range("LocationList")

Next cLoc

End Sub
Add the With…End With
Next, we’ll add a With…End With statement, that refers to the Location ComboBox, which is named cboLocation. This code is on the UserForm module, so Me refers to the UserForm.
For Each cLoc In ws.Range("LocationList")
  With Me.cboLocation

  End With
Next cLoc
Add the List Items
Finally, inside the With…End With, we’ll put the code to add the list items. The AddItem method adds an item to the ComboBox, and our code tell Excel to use the value from the current cell (cLoc) in the LocationList range.
For Each cLoc In ws.Range("LocationList")
  With Me.cboLocation
    .AddItem cLoc.Value
  End With
Next cLoc
If you test the UserForm with this Initialize code, the Location ComboBox will have a single column drop down, showing all four locations from the LocationList range. The Part ComboBox will have an empty drop down list, because we haven’t added any items to it yet.
![]()
Multiple Column ComboBox
Next, we’ll add items to the Part ComboBox, which is named cboPart. It will show the Part IDs from a named range — PartIDList — on the LookupLists worksheet.
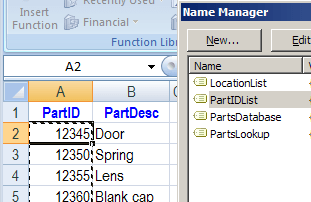
There are two columns in the Parts list on the worksheet, so we’ll need two columns in the ComboBox, with Part ID in the first column, and Part Description in the second column.
Add a Variable
At the top of the Initialize procedure, we’ll add another variable, for the cells in the Part ID list on the worksheet.
Private Sub UserForm_Initialize()

Dim cPart As Range
Dim cLoc As Range
Dim ws As Worksheet
Set ws = Worksheets("LookupLists")
The cPart variable is a Range object, and we’ll use it to refer to a cell in the PartIDList range on the worksheet.
Add a Loop
Next, we’ll add a For Each…Next loop, that will visit each cell in the PartIDList range on the LookupLists worksheet.
Private Sub UserForm_Initialize()
Dim cLoc As Range
Dim ws As Worksheet
Set ws = Worksheets("LookupLists")

For Each cPart In ws.Range("PartIDList")

Next cPart
Add the With…End With
Next, we’ll add a With…End With statement, that refers to the Part ComboBox, which is named cboPart. This code is on the UserForm module, so Me refers to the UserForm.
For Each cPart In ws.Range("PartIDList")
  With Me.cboPart

  End With
Next cPart
Add the List Items
Next, inside the With…End With, we’ll put the code to add the list items. The AddItem method adds a row to the ComboBox, with the value from the current cell (cPart) in the PartIDList range in the first column of the drop down.
For Each cPart In ws.Range("PartIDList")
  With Me.cboPart
    .AddItem cPart.Value
  End With
Next cPart
Add the Second Column Values
Next, below the AddItem code, we’ll put the code to add the values in the second column, using the List property. Our code will tell Excel which row and column of the drop down to use. The ListCount property is the number of items in the drop down list.
For the List property, both the Row and Column counts start at zero. So, if there is 1 item in the drop down list, it is in Row 0. That’s why we subtract 1 from the ListCount, to get the Row number.
We want our Part Description in the second column. The first column is 0, so the second column is Column 1.
For Each cPart In ws.Range("PartIDList")
  With Me.cboPart
    .AddItem cPart.Value
    .List(.ListCount - 1, 1) = cPart.Offset(0, 1).Value
  End With
Next cPart
The cPart cell is in column A, and we want the Part Description from column B in the same row. So, we use the Offset property to get the value that is 0 rows down, and 1 column to the right.
Change the ComboBox Properties
For ComboBoxes with multiple columns, change the ComboBox properties, to increase the number of columns, and set the column widths. You can also show column headings, if you’d like.

The Completed Excel VBA Code
Here’s the completed Excel VBA code for the UserForm Initialize procedure. It adds the single column list in the Location ComboBox, and the two column list in the Part ComboBox.
Private Sub UserForm_Initialize()
Dim cPart As Range
Dim cLoc As Range
Dim ws As Worksheet
Set ws = Worksheets("LookupLists")

For Each cPart In ws.Range("PartIDList")
  With Me.cboPart
    .AddItem cPart.Value
    .List(.ListCount - 1, 1) = cPart.Offset(0, 1).Value
  End With
Next cPart

For Each cLoc In ws.Range("LocationList")
  With Me.cboLocation
    .AddItem cLoc.Value
  End With
Next cLoc

Me.txtDate.Value = Format(Date, "Medium Date")
Me.txtQty.Value = 1
Me.cboPart.SetFocusEnd Sub
At the end, the Excel VBA code puts the current date in the Date text box, and the number 1 in the Quantity text box.
The SetFocus method moves the cursor to the Part ComboBox, so it’s ready for the user to select a part.
http://www.contextures.com/Excel-VBA-ComboBox-Lists.html