
Home / VBA / How to Insert a Row using VBA in Excel
In this tutorial, we will look at how to insert a row or a column using a VBA code in Excel. We will also explore what are the different ways to write a macro for this.
To insert a row using a VBA code, you need to use the “Entire Row” property with the “Insert” method. With the entire row property, you can refer to the entire row using a cell and then insert a new row there. By default, it will insert a single row before the cell that you have mentioned.

- First, specify a cell using the range object.
- Now, enter a dot (.) to get the list of properties and methods.
- After that, select the “Entire Row” property or type it.
- In the end, again enter a dot (.) and select the “Insert” method or type it.
Range("A1").EntireRow.InsertYour code is ready here to insert a row. Now when you run this code, it will instantly insert a new row before cell A1.
Insert Multiple Rows
There are two ways to insert multiple rows in a worksheet that I have found. The first is the same insert method that we have used in the above example.
With this, you need to specify a range whose count is equivalent to the count of rows you want to insert. Now let’s say you want to insert 5 rows after, in that case, you can use a code like the following.

To be honest, I haven’t found this method quite useful because you need to change the range if you want to change the count of the rows.
So here’s the second method.
Dim iRow As Long
Dim iCount As Long
Dim i As Long

iCount = InputBox(Prompt:="How many rows you want to add?")
iRow = InputBox _
(Prompt:="After which row you want to add new rows? (Enter the row number")

For i = 1 To iCount
    Rows(iRow).EntireRow.Insert
Next i
When you run this code, it asks you to enter the number of rows that you want to add and then the row number where you want to add all those rows. It uses a FOR LOOP (For Next) to loop that number of times and insert rows one by one.
Insert Rows Based on the Cell Values
If you want to insert rows based on a cell value, then you can use the following code.
Dim iRow As Long
Dim iCount As Long
Dim i As Long

iCount = Range("A1").Value
iRow = Range("B1").Value

For i = 1 To iCount
    Rows(iRow).EntireRow.Insert
Next i
When you run this macro, it takes the count of rows from cell A1 and the row where you want to add rows from cell B1.
Insert a Row without Formatting
When you insert a row where the above row has some specific formatting, in that case, the row will also have that formatting automatically. And the simplest way to deal with this thing is to use clear formats. Consider the following code.
Rows(7).EntireRow.Insert
Rows(7).ClearFormats
When you run the above code, it inserts a new row before the 7th row. Now, what happens, when you insert a row before the 7th row that new row becomes the 7th row, and then the second line of code clears the formats from that row.
Insert Copied Row
You can also use the same method to copy a row and then insert it somewhere else. See the following code.
Application.CutCopyMode = False

With Worksheets("Data")

.Rows(5).Copy
.Rows(9).Insert Shift:=xlShiftDown

End With

Application.CutCopyMode = True
More Tutorials
- Count Rows using VBA in Excel
- Excel VBA Font (Color, Size, Type, and Bold)
- Excel VBA Hide and Unhide a Column or a Row
- Excel VBA Range – Working with Range and Cells in VBA
- Apply Borders on a Cell using VBA in Excel
- Find Last Row, Column, and Cell using VBA in Excel
- Merge Cells in Excel using a VBA Code
- Select a Range/Cell using VBA in Excel
- SELECT ALL the Cells in a Worksheet using a VBA Code
- ActiveCell in VBA in Excel
- Special Cells Method in VBA in Excel
- UsedRange Property in VBA in Excel
- VBA AutoFit (Rows, Column, or the Entire Worksheet)
- VBA ClearContents (from a Cell, Range, or Entire Worksheet)
- VBA Copy Range to Another Sheet + Workbook
- VBA Enter Value in a Cell (Set, Get and Change)
- VBA Insert Column (Single and Multiple)
- VBA Named Range | (Static + from Selection + Dynamic)
- VBA Range Offset
- VBA Sort Range | (Descending, Multiple Columns, Sort Orientation
- VBA Wrap Text (Cell, Range, and Entire Worksheet)
- VBA Check IF a Cell is Empty + Multiple Cells
⇠ Back to What is VBA in Excel
Helpful Links – Developer Tab – Visual Basic Editor – Run a Macro – Personal Macro Workbook – Excel Macro Recorder – VBA Interview Questions – VBA Codes
In this Article
- Insert a Single Row or Column
- Insert New Row
- Insert New Column
- Insert Multiple Rows or Columns
- Insert Multiple Rows
- Insert Multiple Columns
- Insert – Shift & CopyOrigin
- Other Insert Examples
- Insert Copied Rows or Columns
- Insert Rows Based on Cell Value
- Delete Rows or Columns
This tutorial will demonstrate how to use VBA to insert rows and columns in Excel.
To insert rows or columns we will use the Insert Method.
Insert a Single Row or Column
Insert New Row
To insert a single row, you can use the Rows Object:
Rows(4).InsertOr you can use the Range Object along with EntireRow:
Range("b4").EntireRow.InsertInsert New Column
Similar to inserting rows, we can use the Columns Object to insert a column:
Columns(4).InsertOr the Range Object, along with EntireColumn:
Range("b4").EntireColumn.InsertInsert Multiple Rows or Columns
Insert Multiple Rows
When inserting multiple rows with the Rows Object, you must enter the rows in quotations:
Rows("4:6").InsertInserting multiple rows with the Range Object works the same as with a single row:
Range("b4:b6").EntireRow.InsertInsert Multiple Columns
When inserting multiple columns with the Columns Object, enter the column letters in quotations:
Columns("B:D").InsertInserting multiple columns with the Range Object works the same as with a single column:
Range("b4:d4").EntireColumn.InsertVBA Coding Made Easy
Stop searching for VBA code online. Learn more about AutoMacro — A VBA Code Builder that allows beginners to code procedures from scratch with minimal coding knowledge and with many time-saving features for all users!

Learn More
Insert – Shift & CopyOrigin
The Insert Method has two optional arguments:
- Shift – Which direction to shift the cells
- CopyOrigin – Which cell formatting to copy (above, below, left, or right)
The Shift argument is irrelevant when inserting entire rows or columns. It only allows you to indicate to shift down or shift to the right:
- xlShiftDown – Shift cells down
- xlShiftToRight – Shift cells to the right
As you can see, you can’t shift up or to the left.
The CopyOrigin argument has two potential inputs:
- xlFormatFromLeftorAbove – (0) Newly-inserted cells take formatting from cells above or to the left
- xlFormatFromRightorBelow (1) Newly-inserted cells take formatting from cells below or to the right.
Let’s look at some examples of the CopyOrigin argument. Here’s our initial data:
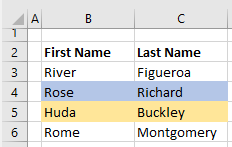
This example will insert a row, taking the formatting from the above row.
Rows(5).Insert , xlFormatFromLeftOrAbove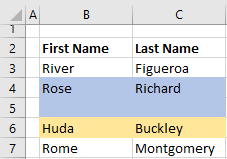
This example will insert a row, taking the formatting from the below row.
Rows(5).Insert , xlFormatFromRightOrBelow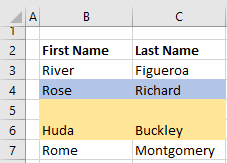
Other Insert Examples
Insert Copied Rows or Columns
If you’d like to insert a copied row, you would use code like this:
Range("1:1").Copy
Range("5:5").Insert
Here we copy Row 1 and Insert it at Row 5.
VBA Programming | Code Generator does work for you!
Insert Rows Based on Cell Value
This will loop through a range, inserting rows based on cell values:
Sub InsertRowswithSpecificValue()

Dim cell As Range

For Each cell In Range("b2:b20")
    If cell.Value = "insert" Then
        cell.Offset(1).EntireRow.Insert
    End If
Next cell

End Sub
Delete Rows or Columns
To delete rows or columns, simply use the Delete method.
Rows(1).Delete

Range("a1").EntireRow.Delete

Columns(1).Delete

Range("a1").EntireColumn.DeleteI have an excel which serves to record the food you ingest for a specific day and meal. I hav a grid in which each line represent a food you ate, how much sugar it has, etc.
Then i’ve added an save button to save all the data to a table in another sheet.
This is what i have tried
    Public Sub addDataToTable(ByVal strTableName As String, ByRef arrData As Variant)
    Dim lLastRow As Long
    Dim iHeader As Integer
    Dim iCount As Integer

    With Worksheets(4).ListObjects(strTableName)
        'find the last row of the list
        lLastRow = Worksheets(4).ListObjects(strTableName).ListRows.Count

        'shift from an extra row if list has header
        If .Sort.Header = xlYes Then
            iHeader = 1
        Else
            iHeader = 0
        End If
    End With

    'Cycle the array to add each value
    For iCount = LBound(arrData) To UBound(arrData)
        **Worksheets(4).Cells(lLastRow + 1, iCount).Value = arrData(iCount)**
    Next iCount
End Sub
but i keep getting the same error on the highlighted line:
Application-defined or object-defined error
What i am doing wrong?
Thanks in advance!
![]()
asked Sep 6, 2012 at 10:11
![]()
Miguel TeixeiraMiguel Teixeira
7731 gold badge10 silver badges29 bronze badges
You don’t say which version of Excel you are using. This is written for 2007/2010 (a different apprach is required for Excel 2003 )
You also don’t say how you are calling addDataToTable and what you are passing into arrData.
I’m guessing you are passing a 0 based array. If this is the case (and the Table starts in Column A) then iCount will count from 0 and .Cells(lLastRow + 1, iCount) will try to reference column 0 which is invalid.
You are also not taking advantage of the ListObject. Your code assumes the ListObject1 is located starting at row 1. If this is not the case your code will place the data in the wrong row.
Here’s an alternative that utilised the ListObject
Sub MyAdd(ByVal strTableName As String, ByRef arrData As Variant)
    Dim Tbl As ListObject
    Dim NewRow As ListRow

    ' Based on OP
    ' Set Tbl = Worksheets(4).ListObjects(strTableName)
    ' Or better, get list on any sheet in workbook
    Set Tbl = Range(strTableName).ListObject
    Set NewRow = Tbl.ListRows.Add(AlwaysInsert:=True)

    ' Handle Arrays and Ranges
    If TypeName(arrData) = "Range" Then
        NewRow.Range = arrData.Value
    Else
        NewRow.Range = arrData
    End If
End Sub
Can be called in a variety of ways:
Sub zx()
    ' Pass a variant array copied from a range
    MyAdd "MyTable", [G1:J1].Value
    ' Pass a range
    MyAdd "MyTable", [G1:J1]
    ' Pass an array
    MyAdd "MyTable", Array(1, 2, 3, 4)
End Sub
answered Sep 6, 2012 at 11:06
![]()
chris neilsenchris neilsen
52.2k10 gold badges84 silver badges122 bronze badges
6
Tbl.ListRows.Add doesn’t work for me and I believe lot others are facing the same problem. I use the following workaround:
    'First check if the last row is empty; if not, add a row
    If table.ListRows.count > 0 Then
        Set lastRow = table.ListRows(table.ListRows.count).Range
        For col = 1 To lastRow.Columns.count
            If Trim(CStr(lastRow.Cells(1, col).Value)) <> "" Then
                lastRow.Cells(1, col).EntireRow.Insert
                'Cut last row and paste to second last
                lastRow.Cut Destination:=table.ListRows(table.ListRows.count - 1).Range
                Exit For
            End If
        Next col
    End If

    'Populate last row with the form data
    Set lastRow = table.ListRows(table.ListRows.count).Range
    Range("E7:E10").Copy
    lastRow.PasteSpecial Transpose:=True
    Range("E7").Select
    Application.CutCopyMode = False
Hope it helps someone out there.
answered Mar 25, 2013 at 10:22
![]()
1
I had the same error message and after lots of trial and error found out that it was caused by an advanced filter which was set on the ListObject.
After clearing the advanced filter .listrows.add worked fine again.
To clear the filter I use this — no idea how one could clear the filter only for the specific listobject instead of the complete worksheet.
Worksheets("mysheet").ShowAllData
answered Dec 4, 2014 at 17:18
![]()
1
I actually just found that if you want to add multiple rows below the selection in your table
Selection.ListObject.ListRows.Add AlwaysInsert:=True works really well. I just duplicated the code five times to add five rows to my table
answered Sep 28, 2015 at 20:16
![]()
I had the same problem before and i fixed it by creating the same table in a new sheet and deleting all the name ranges associated to the table, i believe whene you’re using listobjects you’re not alowed to have name ranges contained within your table hope that helps thanks
answered Jun 25, 2017 at 20:13
![]()
0
Ran into this issue today (Excel crashes on adding rows using .ListRows.Add).
After reading this post and checking my table, I realized the calculations of the formula’s in some of the cells in the row depend on a value in other cells.
In my case of cells in a higher column AND even cells with a formula!
The solution was to fill the new added row from back to front, so calculations would not go wrong.
Excel normally can deal with formula’s in different cells, but it seems adding a row in a table kicks of a recalculation in order of the columns (A,B,C,etc..).
Hope this helps clearing issues with .ListRows.Add
![]()
answered Sep 4, 2018 at 12:35
![]()
As using ListRow.Add can be a huge bottle neck, we should only use it if it can’t be avoided.
If performance is important to you, use this function here to resize the table, which is quite faster than adding rows the recommended way.
Be aware that this will overwrite data below your table if there is any!
This function is based on the accepted answer of Chris Neilsen
Public Sub AddRowToTable(ByRef tableName As String, ByRef data As Variant)
    Dim tableLO As ListObject
    Dim tableRange As Range
    Dim newRow As Range

    Set tableLO = Range(tableName).ListObject
    tableLO.AutoFilter.ShowAllData

    If (tableLO.ListRows.Count = 0) Then
        Set newRow = tableLO.ListRows.Add(AlwaysInsert:=True).Range
    Else
        Set tableRange = tableLO.Range
        tableLO.Resize tableRange.Resize(tableRange.Rows.Count + 1, tableRange.Columns.Count)
        Set newRow = tableLO.ListRows(tableLO.ListRows.Count).Range
    End If

    If TypeName(data) = "Range" Then
        newRow = data.Value
    Else
        newRow = data
    End If
End Sub
answered Apr 25, 2017 at 23:41
![]()
Jonas_HessJonas_Hess
1,8241 gold badge20 silver badges32 bronze badges
1
Just delete the table and create a new table with a different name. Also Don’t delete entire row for that table. It seems when entire row containing table row is delete it damages the DataBodyRange is damaged
answered Jun 11, 2016 at 13:19
![]()
Bhanu SinhaBhanu Sinha
1,51612 silver badges10 bronze badges
Вставка диапазона со сдвигом ячеек вправо или вниз методом Insert объекта Range. Вставка и перемещение строк и столбцов из кода VBA Excel. Примеры.
Range.Insert – это метод, который вставляет диапазон пустых ячеек (в том числе одну ячейку) на рабочий лист Excel в указанное место, сдвигая существующие в этом месте ячейки вправо или вниз. Если в буфере обмена содержится объект Range, то вставлен будет он со своими значениями и форматами.
Синтаксис
|
Expression.Insert(Shift, CopyOrigin) |
Expression – выражение (переменная), возвращающее объект Range.
Параметры
| Параметр | Описание | Значения |
|---|---|---|
| Shift | Необязательный параметр. Определяет направление сдвига ячеек. Если параметр Shift опущен, направление выбирается в зависимости от формы* диапазона. | xlShiftDown (-4121) – ячейки сдвигаются вниз; xlShiftToRight (-4161) – ячейки сдвигаются вправо. |
| CopyOrigin | Необязательный параметр. Определяет: из каких ячеек копировать формат. По умолчанию формат копируется из ячеек сверху или слева. | xlFormatFromLeftOrAbove (0) – формат копируется из ячеек сверху или слева; xlFormatFromRightOrBelow (1) – формат копируется из ячеек снизу или справа. |
* Если диапазон горизонтальный или квадратный (количество строк меньше или равно количеству столбцов), ячейки сдвигаются вниз. Если диапазон вертикальный (количество строк больше количества столбцов), ячейки сдвигаются вправо.
Примеры
Простая вставка диапазона
Вставка диапазона ячеек в диапазон «F5:K9» со сдвигом исходных ячеек вправо:
|
Range(«F5:K9»).Insert Shift:=xlShiftToRight |
Если бы параметр Shift не был указан, сдвиг ячеек, по умолчанию, произошел бы вниз, так как диапазон горизонтальный.
Вставка вырезанного диапазона
Вставка диапазона, вырезанного в буфер обмена методом Range.Cut, из буфера обмена со сдвигом ячеек по умолчанию:
|
Range(«A1:B6»).Cut Range(«D2»).Insert |
Обратите внимание, что при использовании метода Range.Cut, точка вставки (в примере: Range("D2")) не может находится внутри вырезанного диапазона, а также в строке или столбце левой верхней ячейки вырезанного диапазона вне вырезанного диапазона (в примере: строка 1 и столбец «A»).
Вставка скопированного диапазона
Вставка диапазона, скопированного в буфер обмена методом Range.Copy, из буфера обмена со сдвигом ячеек по умолчанию:
|
Range(«B2:D10»).Copy Range(«F2»).Insert |
Обратите внимание, что при использовании метода Range.Copy, точка вставки (в примере: Range("F2")) не может находится внутри скопированного диапазона, но в строке или столбце левой верхней ячейки скопированного диапазона вне скопированного диапазона находится может.
Вставка и перемещение строк
Вставка одной строки на место пятой строки со сдвигом исходной строки вниз:
Вставка четырех строк на место пятой-восьмой строк со сдвигом исходных строк вниз:
Вставка строк с использованием переменных, указывающих над какой строкой осуществить вставку и количество вставляемых строк:
|
1 2 3 4 5 6 7 8 9 10 11 12 13 14 15 16 17 18 19 20 21 22 |
Sub Primer1() Dim n As Long, k As Long, s As String ‘Номер строки, над которой необходимо вставить строки n = 8 ‘Количесто вставляемых строк k = 4 ‘Указываем адрес диапазона строк s = n & «:» & (n + k — 1) ‘Вставляем строки Rows(s).Insert End Sub ‘или то же самое с помощью цикла Sub Primer2() Dim n As Long, k As Long, i As Long n = 8 k = 4 For i = 1 To k Rows(n).Insert Next End Sub |
Перемещение второй строки на место шестой строки:
|
Rows(2).Cut Rows(6).Insert |
Вторая строка окажется на месте пятой строки, так как третья строка заместит вырезанную вторую строку, четвертая встанет на место третьей и т.д.
Перемещение шестой строки на место второй строки:
|
Rows(6).Cut Rows(2).Insert |
В этом случае шестая строка окажется на месте второй строки.
Вставка и перемещение столбцов
Вставка одного столбца на место четвертого столбца со сдвигом исходного столбца вправо:
Вставка трех столбцов на место четвертого-шестого столбцов со сдвигом исходных столбцов вправо:
Перемещение третьего столбца на место седьмого столбца:
|
Columns(3).Cut Columns(7).Insert |
Третий столбец окажется на месте шестого столбца, так как четвертый столбец заместит вырезанный третий столбец, пятый встанет на место четвертого и т.д.
Перемещение седьмого столбца на место третьего столбца:
|
Columns(7).Cut Columns(3).Insert |
В этом случае седьмой столбец окажется на месте третьего столбца.
VBA Add row to Table in Excel. We can add a single row or multiple rows and data to table. Default new rows added at the end of the table. In this tutorial we have explained multiple examples with explanation. We also shown example output screenshots. We have specified three examples in the following tutorial. You can change table and sheet name as per your requirement. We also specified step by step instructions how to run VBA macro code at the end of the session.
Table of Formats:
- Objective
- Syntax to Add Row to Table using VBA in Excel
- Example to Add New Row to Table on the Worksheet in Excel
- Add Multiple Rows to Table in Excel using VBA
- Add Row & Data to Table on the Worksheet in Excel
- Instructions to Run VBA Macro Code
- Other Useful Resources
Syntax to Add Row to Table using VBA in Excel
Here is the syntax to add new row to table on the worksheet using VBA in Excel.
expression.Add(Position, AlwaysInsert)
Where expression represents the ListRows.
Position is an optional parameter. It represents the relative position of the new row. Accepts the Integer value.
AlwaysInsert is an optional parameter. It represents the cells to be shifted to down or not, based on Boolean value. Accepts the Boolean value either True or False.
Note: If position is not specified, default adds new row at the end of the table.
Example to Add New Row to Table on the Worksheet
Let us see the example to add new row to table on the worksheet. The sheet name defined as ‘Table‘. And we use table name as ‘MyDynamicTable‘. You can change these two as per your requirement. We Add method of the ListObject object.
 'VBA Add New Row to Table
Sub VBAF1_Add_Row_to_Table()

    'Declare Variables
    Dim oSheetName As Worksheet
    Dim sTableName As String
    Dim loTable As ListObject

    'Define Variable
    sTableName = "MyDynamicTable"

    'Define WorkSheet object
    Set oSheetName = Sheets("Table")

    'Define Table Object
    Set loTable = oSheetName.ListObjects(sTableName)

    'Add New row to the table
    loTable.ListRows.Add

End Sub
Output: Here is the following output screenshot of above example macro VBA code.

Add Multiple Rows to Table in Excel using VBA
Here is another example to add multiple rows to table. In this example we add five(5) rows to the table. You can specify the number of rows count in the for loop.
'VBA Add Multiple Rows to Table
Sub VBAF1_Add_Multiple_Rows_to_Table()

    'Declare Variables
    Dim oSheetName As Worksheet
    Dim sTableName As String
    Dim loTable As ListObject
    Dim iCnt As Integer

    'Define Variable
    sTableName = "MyDynamicTable"

    'Define WorkSheet object
    Set oSheetName = Sheets("Table")

    'Define Table Object
    Set loTable = oSheetName.ListObjects(sTableName)

    For iCnt = 1 To 5 'You can change based on your requirement
        'Add multiple rows to the table
        loTable.ListRows.Add
    Next

End Sub
Output: Let us see the following output screenshot of above example macro VBA code.

Add Row & Data to Table on the Worksheet in Excel
Let us see how to add new row and data to the table using VBA in Excel. In the below example we add new row and data of 5 columns.
 'VBA Add Row and Data to Table
Sub VBAF1_Add_Row_And_Data_to_Table()

    'Declare Variables
    Dim oSheetName As Worksheet
    Dim sTableName As String
    Dim loTable As ListObject
    Dim lrRow As ListRow

    'Define Variable
    sTableName = "MyDynamicTable"

    'Define WorkSheet object
    Set oSheetName = Sheets("Table")

    'Define Table Object
    Set loTable = oSheetName.ListObjects(sTableName)

    'Add New row to the table
    Set lrRow = loTable.ListRows.Add

    'Add Data to recently added row
    With lrRow
        .Range(1) = 20
        .Range(2) = 30
        .Range(3) = 40
        .Range(4) = 50
        .Range(5) = 60
    End With

End Sub
Output: Here is the following output screenshot of above example VBA macro code.

Instructions to Run VBA Macro Code or Procedure:
You can refer the following link for the step by step instructions.
Instructions to run VBA Macro Code
Other Useful Resources:
Click on the following links of the useful resources. These helps to learn and gain more knowledge.
VBA Tutorial VBA Functions List VBA Arrays in Excel VBA Tables and ListObjects
VBA Editor Keyboard Shortcut Keys List VBA Interview Questions & Answers Blog