
Всем привет, сегодня мы поговорим о том, как можно выгрузить данные из Access в такие приложения как Word и Excel. Но не о стандартном способе, который есть в Access (связь с Office), а о способе, который позволяет выгружать данные в заданный шаблон как в Word, так и в Excel.
Другими словами, это нужно тогда, когда создать отчет в Access по шаблону, который уже существует, например, в Word, невозможно или слишком трудоемко. Как Вы знаете, отчет в Access может выводиться просто коряво или, самый распространенный вариант, это когда много текста, который в отчете Access не так хорошо форматируется как в Word, а данных не так много, но отчет необходимо автоматизировать, например это какие-то договора, заявления и так далее.
Использование слияния из самого Word-а не очень удобно, поэтому сегодня я расскажу, как можно заполнять такие шаблоны напрямую из Access, путем нажатия на одну кнопку.
Кроме выгрузки в шаблон Word, иногда возникает и необходимость выгрузки в шаблон Excel, и этот способ мы тоже сегодня рассмотрим.
Содержание
- Экспорт данных из Access в шаблон Word
- Код VBA для выгрузки данных в шаблон Word
- Экспорт данных из Access в шаблон Excel
- Код VBA для выгрузки данных в шаблон Excel
Вся разработка делится на две части, это:
- Настройка шаблона Word;
- Настройка выгрузки данных в шаблон.
Суть настройки шаблона заключается в том, чтобы проставить необходимые поля в тех местах шаблона, где нужно выводить те или иные данные. Это делается с помощью полей формы.
Примечание! Я использую Microsoft Word 2003.
Открываем шаблон Word, для начала добавим необходимую панель инструментов, для этого нажимаем «Вид -> Панель инструментов» и ставим галочку «Формы». Теперь у Вас отобразилась панель инструментом «Формы». Все, что осталось сделать — это вставить в местах, в которых необходимо выводить данные, элементы «Текстовое поле», которые доступны на только что добавленной панели инструментов.
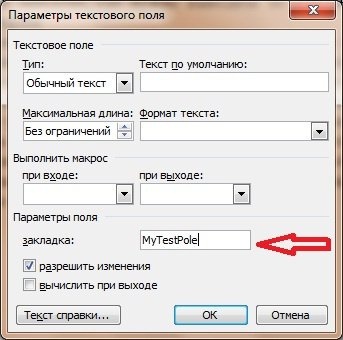
После добавления поля, у Вас появится серая область, которая свидетельствует о том, что поле добавлено. Теперь необходимо задать имя этого поля, для того чтобы потом из access вставлять в него значения (стандартное названия не очень удобное). Для этого щелкните правой кнопкой мыши по полю и нажмите «Свойства». В поле закладка напишите желаемое имя этого поля, я в примере назвал его MyTestPole.


Создайте столько полей, сколько Вам нужно.
На этом настройка шаблона закончена, рекомендую сделать этот шаблон только для чтения, а то пользователь возьмет, сформирует документ и сохранит его, и шаблон тем самым потеряется, а если сделать его только для чтения, то у него такой возможности не будет, только сохранять через «Сохранить как».
Переходим к более интересной задачи, это к реализации самой выгрузки из Access в этот шаблон на VBA.
Примечание! Я использую Access в связке с MS SQL 2008, поэтому и данные буду брать от туда.
Код VBA для выгрузки данных в шаблон Word
Допустим, у Вас есть форма, сделайте на ней кнопку (я назвал ее testbutton) и в событие нажатие кнопки вставьте следующий код VBA:
   Private Sub testbutton_Click()

   'Объявляем переменные
   Dim FileDialog As FileDialog
   Dim rsd As ADODB.Recordset
   Dim strSQL As String
   Dim WordApOb As Object
   Dim WordOb As Object
   Dim path As String
   Set rsd = New ADODB.Recordset

   'запрос к базе данных для получения необходимых данных
   strSQL = "select * from dbo.table where KOD = " & Me.kod & ""
   rsd.open strSQL, CurrentProject.Connection

  'Выбираем шаблон
   Set FileDialog = Application.FileDialog(msoFileDialogOpen)

   'убираем множественный выбор, он нам не нужен
   FileDialog.AllowMultiSelect = False

  'очистим и установим фильтры
   FileDialog.Filters.Clear
   FileDialog.Filters.add "Word", "*.doc"

   'установим фильтр по умолчанию
   FileDialog.FilterIndex = 1

   'проверяем, что сделал user, если выбрал шаблон, то начинаем работу
   If FileDialog.Show = False Then
     'Если нет, то выходим
     Set dlgFile = Nothing
     Exit Sub
   End If

   'получаем путь к файлу
   path = Trim(FileDialog.SelectedItems(1))

   'Очистим переменную
   Set FileDialog = Nothing
   If path <> "" Then

   'Будем отслеживать ошибки
   On Error GoTo Err_testbutton_Click

   'Создаем объект Word
   Set WordOb = CreateObject("Word.document")

   'Задаем нашему документу значение из шаблона
   Set WordOb = GetObject(path)

   'Задаем значение объекту word.Application
   Set WordApOb = WordOb.Parent

   'делаем приложение word видимым
   WordApOb.Visible = True

   'ищем наше поле в шаблоне
   WordOb.Bookmarks("mytestpole").Select

   'задаем ему новое значение из нашего Recordset
   WordApOb.Selection.TypeText Text:=Nz(rsd.Fields("field").Value, " ")
   'и так далее по всем полям

   'в конце перейдем на начало нашего документа
   WordApOb.Selection.Goto wdGoToFirst
   'и активируем его
   WordApOb.Activate

   'Очистим переменные
   Set WordOb = Nothing
   Set WordApOb = Nothing

   Exit_testbutton_Click:
     Exit Sub

   Err_testbutton_Click:
     MsgBox Err.Description
     'в случае ошибки будем делать следующие
     'закроем word без сохранения
     WordOb.Close (wddonotsavechanges)
     WordApOb.Quit
    'и также очистим переменные
     Set WordOb = Nothing
     Set WordApOb = Nothing
     Resume Exit_testbutton_Click
    End If

   End Sub
Код прокомментирован, поэтому сложностей возникнуть не должно. Здесь весь смысл сводится к созданию объекта word.document и word.application. А после мы уже работаем с нашими объектами, т.е. заполняем их.
Экспорт данных из Access в шаблон Excel
В шаблоне Excel уже не нужно создавать поля как в Word, так как здесь мы уже будем ориентироваться по адресам ячеек.
Существует несколько способов, как заполнять Excel шаблон, я опишу два, первый — это тогда, когда Вам просто необходимо проставить несколько полей, т.е. в источнике данных будет всего одна строка с несколькими столбцами. Второй — это когда строк будет уже несколько, причем Вы не знаете, сколько именно (в зависимости от каких то условий). В шаблоне по умолчанию отведено для этого все пару строк, поэтому мы будем нужные нам строки добавлять, для того чтобы наши данные не накладывалась на строки ниже (допустим там примечание, подпись руководителя и т.д.). И совет, я здесь, для примера, использую всего один источник данных, а Вы, если Вам необходимо заполнить шапку, примечание и некое количество строк (т.е. область данных), можете использовать несколько источников (Recordset).
Код VBA для выгрузки данных в шаблон Excel
Сначала добавьте кнопку на форму (я ее назвал testexcel) и вставьте следующий код в событие «Нажатие кнопки».
   Private Sub testexcel_Click()

   'Объявляем переменные
   Dim XL As Object
   Dim XLT As Object
   Dim newrow As Object
   Dim rsd As ADODB.Recordset
   Dim strSQL As String
   Set rsd = New ADODB.Recordset

   'Запрос к базе данных
   strSQL = "select * from dbo.table where kod = " & Me.kod & ""
   rsd.open strSQL, CurrentProject.Connection

   'Создаем необходимые объекты
   Set XL = CreateObject("Excel.Application")
   'для примера показываю, как можно сразу загружать шаблон без выбора
   Set XLT = XL.Workbooks.open("C:testfile.xls")

   '1 способ - если в источнике данных всего одна строка
   With XLT.Worksheets("Лист1")
              .[a1] = rsd.Fields("field1")
              .[b1] = rsd.Fields("field2")
              .[c1] = rsd.Fields("field3")
              .[d1] = rsd.Fields("field4")
            End With

   '2 способ - если строк в источнике несколько
   'причем мы учтем то, что у нас есть шапка и примечание в Excel
   'и мы не знаем, сколько строк у нас вставится
   'и поэтому строки будем добавлять в случае необходимости
   'зададим, с какой строки будем начинать вставлять данные
   Rowss = 10
   'для нумерации
   numrow = 1
   'запускаем цикл, он будет работать до тех пор, пока не закончатся строки в нашем источнике
   While Not (rsd.EOF)
      'смотрим, если строк больше чем мы задали в шаблоне
      If Rowss >= 12 Then
          'то добавляем строку
         XLT.Worksheets("Лист1").Rows(Rowss).Insert
          'Запомним нашу строку
         Set newrow = XLT.Worksheets("Лист1").Rows(Rowss)
          'и вставим туда копию предыдущей строки
          'для того если вдруг у вас там есть объединенные ячейки или какие-то нужные данные
          'так как новая строка создастся без всяких объединений и значений
         XLT.Worksheets("Лист1").Rows(Rowss - 1).Copy newrow
          'это просто для примера как можно очистить некий диапазон внутри документа
       'XLT.Worksheets("Лист1").Range("A10:F10").ClearContents
       'динамически формируем адрес нужной ячейки
          cell = "a" & Rowss
          'и задаем ей значение
         XLT.Worksheets("Лист1").Range(cell) = numrow
         cell = "b" & Rowss
         XLT.Worksheets("Лист1").Range(cell) = rsd.Fields("field5").Value
         'переходим на следующую строку
          Rowss = Rowss + 1
          'переходим на следующую строку в источнике данных
         rsd.MoveNext
      Else
          'а это выполняется до тех пор, пока не закончатся заданные строки в шаблоне
          'т.е. если строк в источнике всего 1, то в код, который выше мы даже не попадем
         cell = "a" & Rowss
         XLT.Worksheets("Лист1").Range(cell) = numrow
         cell = "b" & Rowss
         XLT.Worksheets("Лист1").Range(cell) = rsd.Fields("field5").Value
         Rowss = Rowss + 1
         rsd.MoveNext
      End If

        'для нумерации
        numrow = numrow + 1
   'конец цикла
   Wend

   'это просто пример как можно удалить строку целиком
   'XLT.Worksheets("Лист1").Rows(20).Delete

   'делаем Excel видимым
   XL.Visible = True

   'Очищаем переменные
   Set XL = Nothing
   Set XLT = Nothing
   Set newrow = Nothing

   End Sub
Здесь я также все подробно прокомментировал, но если есть вопросы, то задавайте их в комментариях к данной статье.
Для сведения, я здесь при создании объекта и Word.Application и Excel.Application использовал позднее связывание, для того чтобы не добавлять необходимые библиотеки и обеспечить совместимость.
Надеюсь, мои примеры Вам помогут!
Similarily to my post regarding exporting records to MS Excel, below is some sample code that illustrates how one can export data into a new Word document (in a table structure). The code determines the necessary rows and columns based on the table or query passed to it and then does the rest. You can easily from this simple example get into formatting fonts, etc…
'---------------------------------------------------------------------------------------
' Procedure : Export2DOC
' Author    : Daniel Pineault, CARDA Consultants Inc.
' Website   : http://www.cardaconsultants.com
' Purpose   : Export a recordset to a MS Word table in a new document
' Note      : Overwrites file if it already exists without any warning, so you may wish
'               to add a check prior to calling this function
' Copyright : The following is release as Attribution-ShareAlike 4.0 International
'             (CC BY-SA 4.0) - https://creativecommons.org/licenses/by-sa/4.0/
' Req'd Refs: Uses Late Binding, none required
'
' Input Variables:
' ~~~~~~~~~~~~~~~~
' sQuery        : Name of the Table or Query to Export the data from
' sFileName     : Path and Filename to save the Word Document as
' bOpenDocument : Leave the document open to the users or not (close after generating)
'
' Usage:
' ~~~~~~
' Export2DOC "Contacts", "C:Temptesting01.docx"
' Export2DOC "IncomingOrders", "C:Temporders.docx", True
'
' Revision History:
' Rev       Date(yyyy/mm/dd)        Description
' **************************************************************************************
' 1         2012-Apr-23             Initial Release
' 2         2020-04-08              Updated proc header
'                                   Added sFileName and bOpenDocument arguments
'                                   Added PageSetup.Orientation to proc
'                                   Fixed a bug in the table row count
'                                   Updated and expanded the error handler
'---------------------------------------------------------------------------------------
Function Export2DOC(sQuery As String, _
                    sFileName As String, _
                    Optional bOpenDocument As Boolean = False)
    Dim oWord                 As Object
    Dim oWordDoc              As Object
    Dim oWordTbl              As Object
    Dim bWordOpened           As Boolean
    Dim db                    As DAO.Database
    Dim rs                    As DAO.Recordset
    Dim iCols                 As Integer
    Dim iRecCount             As Integer
    Dim iFldCount             As Integer
    Dim i                     As Integer
    Dim j                     As Integer
    Const wdPrintView = 3
    Const wdWord9TableBehavior = 1
    Const wdAutoFitFixed = 0
    '    Const wdOrientPortrait = 0
    Const wdOrientLandscape = 1

    'Start Word
    On Error Resume Next
    Set oWord = GetObject("Word.Application")    'Bind to existing instance of Word

    If Err.Number <> 0 Then    'Could not get instance of Word, so create a new one
        Err.Clear
        On Error GoTo Error_Handler
        Set oWord = CreateObject("Word.application")
        bWordOpened = False
    Else    'Word was already running
        bWordOpened = True
    End If
    On Error GoTo Error_Handler
    oWord.Visible = False   'Keep Word hidden until we are done with our manipulation
    Set oWordDoc = oWord.Documents.Add   'Start a new document
    'Not strictly necessary, but for larger tables switching to Landscape can be very beneficial!
    '   so the next line demonstrates how that can easily be done
    oWordDoc.PageSetup.Orientation = wdOrientLandscape

    'Open our SQL Statement, Table, Query
    Set db = CurrentDb
    Set rs = db.OpenRecordset(sQuery, dbOpenSnapshot)
    With rs
        If .RecordCount <> 0 Then
            .MoveLast   'Ensure proper count
            iRecCount = .RecordCount    'Number of records returned by the table/query
            .MoveFirst
            iFldCount = .Fields.Count   'Number of fields/columns returned by the table/query

            'Switch to print preview mode (not req'd just a personal preference)
            oWord.ActiveWindow.View.Type = wdPrintView
            'Create the basic table
            oWord.ActiveDocument.Tables.Add oWord.selection.Range, _
                                            iRecCount + 1, _
                                            iFldCount, _
                                            wdWord9TableBehavior, _
                                            wdAutoFitFixed

            Set oWordTbl = oWordDoc.Tables(1)
            'Build our Header Row
            For i = 0 To iFldCount - 1
                oWordTbl.Cell(1, i + 1) = rs.Fields(i).Name
            Next i
            'Build our data rows
            For i = 1 To iRecCount
                For j = 0 To iFldCount - 1
                    oWordTbl.Cell(i + 1, j + 1) = Nz(rs.Fields(j).Value, "")
                Next j
                .MoveNext
            Next i
        Else
            MsgBox "There are no records returned by the specified queries/SQL statement.", _
                   vbCritical + vbOKOnly, "No data to generate an Word spreadsheet with"
            GoTo Error_Handler_Exit
        End If
    End With

    oWordDoc.SaveAs (sFileName)   'Save and close
    If bOpenDocument = False Then
        oWordDoc.Close

        '    Close Word if is wasn't originally running
        If bWordOpened = False Then
            oWord.Quit
        End If
    End If

Error_Handler_Exit:
    On Error Resume Next
    rs.Close
    Set rs = Nothing
    Set db = Nothing
    oWord.Visible = True   'Make Word visible to the user
    Set oWordTbl = Nothing
    Set oWordDoc = Nothing
    Set oWord = Nothing
    Exit Function

Error_Handler:
    If Err.Number = 5148 Then
        MsgBox "Your Table/Query contains a total of " & iFldCount & " fields/columns, but Word tables can only support a maximum of 63.  " & _
               "Please change your Table/Query to only supply a maximum of 63 fields/columns and try again.", _
               vbCritical Or vbOKOnly, "Operation Aborted"
    Else
        MsgBox "The following error has occurred" & vbCrLf & vbCrLf & _
               "Error Number: " & Err.Number & vbCrLf & _
               "Error Source: Export2DOC" & vbCrLf & _
               "Error Description: " & Err.Description & _
               Switch(Erl = 0, "", Erl <> 0, vbCrLf & "Line No: " & Erl) _
               , vbOKOnly + vbCritical, "An Error has Occurred!"
    End If
    Resume Error_Handler_Exit
End Function
You may also wish to review my MS Access Sample- Export Data to Excel and/or Word.
Всем привет, сегодня мы поговорим о том, как экспортировать данные из Access в такие приложения, как Word и Excel. Но не о стандартном способе доступа (подключение к Office), а о том, как он позволяет загружать данные в определенный шаблон как в Word, так и в Excel.
Другими словами, это необходимо, когда невозможно или занимает слишком много времени, чтобы создать отчет в Access с использованием уже существующего шаблона, например, в Word. Как вы знаете, отчет в Access может отображаться просто неудобно или, что наиболее распространенный вариант, возникает, когда в отчете Access много текста, который не отформатирован так сильно, как в Word, и данных не так много, но отчеты должны быть автоматизированы, например, некоторые контракты, банковские выписки и так далее.
Использование слияния из самого Word не очень удобно, поэтому сегодня я расскажу вам, как заполнять такие шаблоны прямо из Access, нажав кнопку.
Помимо загрузки в шаблон Word, иногда возникает необходимость загрузить в шаблон Excel, и сегодня мы рассмотрим и этот метод.
Вся разработка разделена на две части, это:
- Настройка шаблона Word;
- Настройка загрузки данных по модели.
Суть настройки шаблона заключается во вставке необходимых полей в те места в шаблоне, где должны отображаться определенные данные. Это делается с помощью полей формы.
Примечание! Я использую Microsoft Word 2003.
Откройте шаблон Word, сначала добавьте необходимую панель инструментов, для этого нажмите «Вид -> Панель инструментов» и установите флажок «Формы». Вы открыли панель с инструментом «Формы». Все, что остается, — это вставить в те точки, где вы хотите просмотреть данные, элементы «Текстовое поле», доступные на недавно добавленной панели инструментов.
После добавления поля у вас будет серая область, указывающая на то, что поле было добавлено. Теперь вам нужно задать имя этого поля, а затем вставить значения из доступа (стандартное имя не очень удобно). Для этого щелкните поле правой кнопкой мыши и выберите «Свойства». В поле закладки напишите желаемое имя для этого поля, в примере я назвал его MyTestPole.
На этом настройка шаблона завершена, я рекомендую сделать этот шаблон доступным только для чтения, в противном случае пользователь возьмет, сформирует документ и сохранит его, а затем шаблон будет утерян, а если вы сделаете его доступным только для чтения, он не будет есть возможность сохранить только через «Сохранить как».
Перейдем к более интересной задаче, это реализация той же загрузки из Access в этом шаблоне в VBA.
Примечание! Я использую Access в сочетании с MS SQL 2008, поэтому я буду получать данные оттуда.
Код VBA для выгрузки данных в шаблон Word
Допустим, у вас есть форма, создайте на ней кнопку (я назвал ее testbutton) и вставьте следующий код VBA в событие нажатия кнопки:
Private Sub testbutton_Click () ‘Объявить переменные Dim FileDialog As FileDialog Dim rsd As ADODB.Recordset Dim strSQL As String Dim WordApOb As Object Dim WordOb As Object Dim path As String Set rsd = New ADODB.Recordset’ запрашивает необходимые данные в базе данных strSQL = «select * from dbo.table where KOD =» & Me.kod & «» rsd.open strSQL, CurrentProject.Connection ‘Выбрать шаблон Set FileDialog = Application.FileDialog (msoFileDialogOpen)’ удалить множественный выбор, он мне не нужен FileDialog .AllowMultiSelect = False ‘очистить и установить фильтры FileDialog.Filters.Clear FileDialog.Filters.add «Word», «* .doc»‘ установить фильтр по умолчанию FileDialog.FilterIndex = 1 ‘проверить, что пользователь, если он выбрал шаблон, затем начать работу Если FileDialog.Show = False Then ‘Если нет, то выйти Set dlgFile = Nothing Exit Sub End If’ получить путь к пути к файлу = Trim (FileDialog.SelectedItems (1)) ‘Удалить переменную Set FileDial og = Nothing If path «» Then ‘Построить график ошибок при ошибке GoTo Err_testbutton_Click’ Создать объект Word Set WordOb = CreateObject («Word.document») ‘Установить для нашего документа значение из шаблона Set WordOb = GetObject (path) ‘Установите значение для слова. Application Object Set WordApOb = WordOb.Parent’ сделайте слово приложения видимым WordApOb.Visible = True ‘найдите наше поле в шаблоне WordOb.Bookmarks («mytestpole»). Выберите «установить новое значение из нашего набора записей WordApOb.Selection.TypeText Text: = Nz (rsd.Fields (» field «). Value,» «)» и так далее для всех полей «в конце перейдите к начало нашего документа WordApOb.Selection.Goto wdGoToFirst ‘и активируйте его WordApOb.Activate’ Удалите переменные Set WordOb = Nothing Set WordApOb = Nothing Exit_testbutton_Clicktest: Exit Sub Err_testbutton MsgBox.Description ‘в случае ошибки мы сделаем следующее без сохранения WordOb.Close (wddonotsavechanges) WordApOb.Quit ‘, а также удалить переменные Set WordOb = Nothing Set WordApOb = Nothing Resume Exit_testbutton_Click End End Sub
Код закомментирован, поэтому сложностей возникнуть не должно. Дело здесь сводится к созданию объекта word.document и word.application. И тогда мы уже работаем с нашими объектами, например, их компилируем.
Экспорт данных из Access в шаблон Excel
В шаблоне Excel больше не нужно создавать поля, как в Word, так как здесь мы уже будем руководствоваться адресами ячеек.
Существует несколько способов заполнения шаблона Excel, я опишу два из них, первый — когда вам просто нужно вставить несколько полей, то есть в источнике данных будет только одна строка с несколькими столбцами. Второй — когда строк будет несколько, и вы не знаете, сколько именно (в зависимости от некоторых условий). В шаблоне по умолчанию для этого зарезервированы все несколько строк, поэтому мы добавим нужные нам строки, чтобы наши данные не перекрывали строки ниже (допустим, есть примечание, подпись обработчика, и так далее). И я рекомендую здесь, например, использовать только один источник данных, и если вам нужно вставить заголовок, заметку и определенное количество строк (например, область данных), вы можете использовать несколько источников (набор записей).
Код VBA для выгрузки данных в шаблон Excel
Сначала добавьте кнопку в форму (я назвал ее testexcel) и вставьте следующий код в событие Button Click».
Private Sub testexcel_Click () ‘Объявить переменные Dim XL As Object Dim XLT As Object Dim newrow As Object Dim rsd As ADODB.Recordset Dim strSQL As String Set rsd = New ADODB.Recordset’ Query database strSQL = «select * from dbo table where kod = «& Me.kod &» «rsd.open strSQL, CurrentProject.Connection ‘Создание необходимых объектов Set XL = CreateObject (» Excel.Application «)’ Например, я показываю, как загрузить шаблон сразу, не выбирая Set XLT = XL. Workbooks.open («C: testfile.xls») ‘1 способ — если источник данных имеет только одну строку с XLT.Worksheets («Sheet1»). [A1] = rsd.Fields («field1»). [B1] = rsd.Fields («field2»). [c1] = rsd.Fields («поле3»). [d1] = rsd.Fields («field4») Заканчивается на ‘2 способ — если в источнике несколько строк’ и мы учтем, что у нас есть заголовок и заметка в Excel ‘и мы не знаем сколько строк мы вставим ‘а затем мы добавим строки, если необходимо’ мы установим, с какой строки мы начнем вставлять данные Rows = 10 ‘для нумерации и numrow = 1’ мы запускаем цикл, он будет работать, пока мы не запустим вне строк в нашем источнике While Not (rsd.EOF) ‘посмотрите, есть ли больше строк, чем мы установили в модели If Rowss> = 12 Then’, затем добавьте строку XLT.Worksheets («Sheet1»). Rows (Rowss) .Insert ‘Помните нашу строку Set newrow = XLT.Worksheets («Sheet1»). Rows (Rowss) ‘и поместите туда копию предыдущей строки’, если вдруг появятся объединенные ячейки или потребуются некоторые данные, «потому что новая строка будет создана без каких-либо объединений и значений XLT». XLT.Worksheets («Sheet1»). Диапазон («A10: F10»). ClearContents ‘динамически формирует адрес желаемой ячейки cell = «a» & Rowss’ и устанавливает для него значение XLT.Worksheets («Sheet1»). Range (cell) = numrow cell = «b» & Rowss XLT.Worksheets («Sheet1» Range (cell) = rsd.Fields («field5»). Value ‘перейти к следующей строке Rows = Rows + 1’ перейти к следующей строке in — это источник данных rsd.MoveNext Else ‘, и это выполняется до указанных строк в шаблоне’, т.е если в источнике есть только 1 строка, мы даже не будем входить в код выше cell = «a» и Rowss XLT.Worksheets («Sheet1»). Range (cell) = numrow cell = «b» и Rowss XLT.Worksheets («Sheet1»). Range (cell) = rsd.Fields («field5»). Value Rowss = Rowss + 1 rsd.MoveNext End If ‘для нумерации numrow = numrow + 1’ конец цикла Wend ‘- это просто пример того, как вы можете полностью удалить строку’ XLT.Worksheets («Sheet1»). Rows (20) .Delete ‘делает Excel XL visible .Visible = True ‘Очистить переменные Set XL = Nothing Set XLT = Nothing Set newrow = Nothing End subtitle
Здесь я тоже все подробно прокомментировал, но если есть вопросы, задавайте их в комментариях к этой статье.
Для информации я использовал позднее связывание при создании объектов Word.Application и Excel.Application, чтобы не добавлять необходимые библиотеки и обеспечить совместимость.
Надеюсь, мои примеры вам помогут!
There are plenty of ways to print Access data without getting into VBA. The usual method is to just create a report from the Access database window. You can also use the Microsoft Word Mail Merge Wizard to print form letters, envelopes, labels, and catalogs from any Access table or query. There’s no VBA involved in any of that. Just learn to use Word’s Mail Merge feature, and you’re on your way.
Yet a third approach would be to create a general Word template that contains bookmarks (placeholders) for data to be filled in later. Then, use VBA in Access to replace the bookmarks with data from an Access table. This is particularly handy when you want to be able to click a button on a form in Access to print one Microsoft Word form letter.
Creating the Word template
The first step to merging data from Access into a Word document is to create a Word document template (DOT file). Start with any blank Word document and type your form letter (or whatever you wish) as you normally would in Word. You can use any and all Word features — fonts, pictures, tables, WordArt, whatever.
Wherever you want VBA to insert data from an Access table, create a Word bookmark. A bookmark (in Word) is just a placeholder. Bookmarks are usually hidden, so before you add any bookmarks to the document, choose ToolsO Options from the Word menu bar. In Word’s Options dialog box that opens, click the View tab, select Bookmarks, and then click OK.
You can insert bookmarks however you wish. Here’s how I usually do it:
1. Move the cursor to where you want VBA to insert data from Access.
2. Type a short, simple name for the bookmark.
The name cannot contain spaces nor punctuation, and it must start with a letter.
3. Select (double-click) the name you just typed and then press Ctrl+C to copy it.
4. Choose InsertOBookmark from the Word menu bar.
5. Press Ctrl+V to paste the typed name as the bookmark name.
6. Click the Add button.
You’ll need to go through those steps for each item of data that you want VBA to insert later. In the example shown in Figure 14-7, I add three bookmarks to the document. Note that the square brackets around each bookmark’s name are visible because the Show Bookmarks option is on. I didn’t type any of those square brackets.
The bookmark names in the sample document template get data from Access and VBA as follows:
1 TodaysDate: VBA will replace this bookmark with the current date.
1 AddressLines: VBA will replace this line with as many lines as necessary to show the recipient’s address.
1 Salutation: VBA will replace this with the customer’s first name or just Sirs if the first name is Null (empty) in the record being printed.
When you finish typing your document and all your bookmarks are in place, follow these steps to save the document as a Word template:
1. Choose FileOSave As from Word’s menu bar.
2. From the Save As Type option at the bottom of the Save As dialog box, choose Document Template (*.dot).
3. Use the Save In drop-down list to navigate to the folder in which you want to store the document template.
Your best bet would be to put it in the same folder as your database MDB file, but you can use any folder you wish — provided that you know the full path to the document. For example, if you put the Word template in your Shared Documents folder, the path to that document is C:Documents and SettingsAll UsersDocuments.
4. Name the document (but don’t change the .dot extension) and click the Save button.
I name my document template WordFormLetter.dot, but you can name yours however you wish.
5. Close Microsoft Word.
So that takes care of the Word document. The rest of the action takes place in Access and VBA.
Bookmarks
Figure 14-7:
Word document template with bookmarks to later accept Access data.
WordFormLetter.dot (Read
Only) — Microsoft Word
File Edit View insert
Normal + Arial I t Arial Narrow
(format lools Table Window Help Type a question for help tsfflnraii^Elir — © _
— 12 — B I D m m m ■ t= — =E :E it □ — S — A — .
File Edit View insert
Normal + Arial I t Arial Narrow
(format lools Table Window Help Type a question for help tsfflnraii^Elir — © _
— 12 — B I D m m m ■ t= — =E :E it □ — S — A — .
|
1234-Arbitrary Highway Randomville, CA 98765 |
|
|
TodaysDate — AddressUneE Dear Salutation — The main body of th Each Item In the squ shown inside the bre Customers table. |
e letter starts here, and can contain any text, fonts, and pictures you want, are brackets above is a bookmark, defined in this document with the name ckets. Access will replace each bookmark with data from a record in its |
At 1,4″ Ln 5 Col 11 PEC TRK EXT OVR English (U,5 Q3C
At 1,4″ Ln 5 Col 11 PEC TRK EXT OVR English (U,5 Q3C
Creating the Access form
For this example, I create a simple form that’s bound to a table named Customers, with the usual name and address fields that you’d expect to find in such a table. Figure 14-8 shows a sample form in Form view. The controls that are relevant to the form letter start at the one containing the name Tori. Starting at that field, and reading down and to the right, the names of the controls are:
FirstName
LastName
Company
Address1
Address2
City
State
In the VBA code to follow, you’ll see them referred to with square brackets — [FirstName], [LastName], [Company], and so forth. The e-mail address control, near the bottom, isn’t really relevant to the topic at hand. The dropdown list near the top of the control provides the user with a means of choosing a customer. The Merge to Word Letter button is named MergeBttn.
Figure 14-8:
Create a form to display one customer’s name and address at a time.
Figure 14-8:
Create a form to display one customer’s name and address at a time.

To use the form, a person chooses a name from the Choose a Customer combo box and then clicks the Merge to Word Letter button. That button executes VBA code to open the document template, replaces each bookmark with data from the current record in the form, prints the document, and then closes Word.
Writing the merge code
For this example, I place the code in the form shown in Figure 14-8 by attaching it to the MergeBttn control’s On Click event. The VBA code is shown in its entirety in Listing 14-2.
Listing 14-2: Merge Code
Private Sub MergeBttn_Click()
‘Declare variables for storing strings (text). Dim AddyLineVar, SalutationVar As String
‘Start building AddyLineVar, by dealing with blank ‘LastName and Company fields (allowed in this table). If IsNull([LastName]) Then AddyLineVar = [Company] ‘Just set SalutationVar to generic «Sirs». SalutationVar = «Sirs» Else
AddyLineVar = [FirstName] + » » + [LastName]
‘If the Company isn’t blank, tack that on after name.
If Not IsNull([Company]) Then
AddyLineVar = AddyLineVar + vbCrLf + [Company] End If
‘Salutation will be customer’s first name. SalutationVar = [FirstName] End If
‘Add line break and Addressl
AddyLineVar = AddyLineVar + vbCrLf + [Addressl]
‘If Address2 isn’t null, add line break and Address2 If Not IsNull([Address2]) Then
AddyLineVar = AddyLineVar + vbCrLf + [Address2] End If
‘Tack on line break then City, State Zip. AddyLineVar = AddyLineVar + vbCrLf + [City] + «, » AddyLineVar = AddyLineVar + [State] + » » + [ZIP]
‘Declare an instance of Microsoft Word. Dim Wrd As New Word.Application
Set Wrd = CreateObject(«Word.Application»)
‘Specify the path and name to the Word document. Dim MergeDoc As String
MergeDoc = Application.CurrentProject.Path MergeDoc = MergeDoc + «WordFormLetter.dot»
‘Open the document template, make it visible. Wrd.Documents.Add MergeDoc Wrd.Visible = True
‘Replace each bookmark with current data. With Wrd.ActiveDocument.Bookmarks
.Item(«TodaysDate»).Range.Text = Date .Item(«AddressLines»).Range.Text = AddyLineVar .Item(«Salutation»).Range.Text = SalutationVar End With
‘Letter is ready to print, so print it. ‘Wrd.ActiveDocument.PrintOut
‘All done. Close up (no need to save document) Wrd.ActiveDocument.Close wdDoNotSaveChanges Wrd.Quit
End Sub
Like all procedures, this one is just a series of small steps carried out in a specific order to achieve some goal. The first line tells you that this procedure will execute any time a user clicks the MergeBttn button.
Private Sub MergeBttn_Click()
The next two lines declare two string variables named AddyLineVar and SalutationVar. Each of those variables will become a string of text to be substituted into the document template in place of the AddressLines and Salutation bookmarks:
‘Declare variables for storing strings (text). Dim AddyLineVar, SalutationVar As String
In the Customers table I use for this example, the Addressl, City, State, and ZIP code fields are required, but the user can leave the FirstName, Company, and Address2 fields empty (Null). The code that follows builds the variable AddyLineVar as needed for whatever information is available in the current record. The first big If…End If block, shown next, starts out by saying, If the LastName field for this record is empty, make the first line of the AddyLineVar the company name and make SalutationVar into the general title, Sirs:.
‘Start building AddyLineVar, by dealing with blank ‘LastName and Company fields (allowed in this table). If IsNull([LastName]) Then AddyLineVar = [Company] ‘Just set SalutationVar to generic «Sirs». SalutationVar = «Sirs»
If the LastName field for this record is not null, the following code adds the customer’s first and last names to AddyLineVar. Note that vbCrLf is the Access VBA constant for a carriage return/linefeed. Each vbCrLf in AddyLineVar translates to the end of the line in the Word document. Note, too, that SalutationVar gets its value from the FirstName field in the following code:
Else
AddyLineVar = [FirstName] + » » + [LastName]
‘If the Company isn’t blank, tack that on after name. If Not IsNull([Company]) Then
AddyLineVar = AddyLineVar + vbCrLf + [Company] End If
‘Salutation will be customer’s first name. SalutationVar = [FirstName] End If
Because Addressl is a required field, you can assume that it is not null. The following code adds a vbCrLf and the contents of the Addressl field to AddyLineVar:
‘Add CRLF and Addressl
AddyLineVar = AddyLineVar + vbCrLf + [Addressl]
The next If…End If block adds a line break and the contents of the Address2 field to AddyLineVar but only if the Address2 field isn’t empty:
‘If Address2 isn’t null, add CRLF and Address2 If Not IsNull([Address2]) Then
AddyLineVar = AddyLineVar + vbCrLf + [Address2] End If
Because the City, State, and ZIP fields are required in the Customers table, the next lines of code just add another vbCrLf to AddyLineVar, followed by the City, a comma and blank space (, ), the State, two blank spaces, and then the ZIP:
‘Tack on line break then City, State Zip. AddyLineVar = AddyLineVar + vbCrLf + [City] + «, » AddyLineVar = AddyLineVar + [State] + » » + [ZIP]
At this point in the code, the AddyLineVar and SalutationVar variables both contain the data to be plugged into the form letter. Now you can start writing the code to open Word and replace its bookmarks with some actual data. First, use the standard syntax described earlier in this chapter to declare and open an instance of Microsoft Word:
The VBA editor won’t accept the statements that follow if you haven’t already selected the Microsoft Word Object Library in your References dialog box.
‘Declare an instance of Microsoft Word.
Dim Wrd As New Word.Application
Set Wrd = CreateObject(«Word.Application»)
From this point in the code, the object variable named Wrd refers to an open instance of Microsoft Word (and its entire Application object, which exposes all of Microsoft Word to VBA.)
The next step is to open the document template that contains the bookmarks and text. The syntax for opening a Word document from Access VBA
is objVar .Documents.Add path. The objVar must match the object variable used in the Dim and Set statements (Wrd in this example).
The path must be the complete path to the Word document. In my example, I place the Word document in the same folder as the database MDB file (which makes it easy to find). In Access, you can use Application. CurrentProject.Path to get the path to the currently open database. I name my Word document WordFormLetter.dot. The following statements create a string variable named MergeDoc that contains the full path and filename of that Word document template:
‘Specify the path and name to the Word document. Dim MergeDoc As String
MergeDoc = Application.CurrentProject.Path MergeDoc = MergeDoc + «WordFormLetter.dot»
If WordFormLetter.dot were in some other folder, I couldn’t use Application.CurrentProject.Path to get its path. I’d have to specify the path literally in the code. For example, in Windows XP, if your user account name is Bobo, and your form letter is named MyFormLetter. dot and is stored in your My Documents folder, the following statement will work just fine provided that you type it into the Code window as one long line.
Wrd.Documents.Add «C:Documents and SettingsBoboMy DocumentsMyFormLetter.dot»
Normally, when VBA opens an instance of Word, the program window is invisible, and all activity takes place behind the scenes. For testing and debugging purposes, though, you’ll probably want to make Word visible so you can see what’s happening. To make the window visible, set its Visible property to True, as shown here:
Wrd.Visible = True
When Word and a document are both open, VBA can refer to the document as objVar .ActiveDocument (where, once again, objVar matches the object variable name, which is Wrd in this example). The ActiveDocument object, in turn, contains a Bookmarks collection, which contains a list of all the bookmarks in the document.
The following statement begins a With…End With block that defines the current document’s Bookmarks collection (Wrd.ActiveDocument.Bookmarks) as the item to which all properties to follow (up to End With) will be applied:
‘Replace each bookmark with current data. With Wrd.ActiveDocument.Bookmarks
Within the With…End With block, you can refer to any bookmark by name by using the syntax .ItemibookmarkName) where bookmarkName is the name of the bookmark as defined in the Word document. Each bookmark has a .Range property, which refers to everything that’s contained within the bookmark. The .Range property in turn has a .Text property, which refers specifically to the text within the bookmark. Thus, the statement
.Item(«Addressl_ines»).Range.Text = AddyLineVar says, Change whatever text is currently in the bookmark named AddressLines to whatever is currently in the variable named AddyLineVar.
In the following code, I change the TodaysDate bookmark to the current date, the AddressLines bookmark to the contents of the AddyLineVar variable, and the Salutation bookmark to whatever is in the variable named
SalutationVar:
|
.Item( |
«TodaysDate») |
.Range.Text = |
Date |
|
.Item( |
«AddressLines |
«).Range.Text |
= AddyLineVar |
|
.Item( |
«Salutation») |
.Range.Text = |
SalutationVar |
|
End With |
Onscreen, the document template now contains the complete form letter with all the right information. This next statement prints the form letter:
‘Print the letter. Wrd.ActiveDocument.PrintOut
The following statement closes the letter without saving it. (There’s no need to save the letter after it’s printed because you’ll always have the document template to work with.)
‘All done. Close up (no need to save document) Wrd.ActiveDocument.Close wdDoNotSaveChanges
These two lines close Microsoft Word and end the procedure:
Wrd.Quit End Sub
Figure 14-9 shows an example of using the procedure. There I chose a customer named Tori Pines from the Access form and then clicked the Merge to Word Letter button. The form letter that you see in the background is the result, with the date, address lines, and salutation all in place. The code is written to actually print the letter, so you’d never actually see the form on top of the Word document. (I had to superimpose the form there.) However, you would get a printed copy of the letter shown in the figure.
Figure 14-9:
Record from the form merged into a form letter.
Figure 14-9 shows an example of using the procedure. There I chose a customer named Tori Pines from the Access form and then clicked the Merge to Word Letter button. The form letter that you see in the background is the result, with the date, address lines, and salutation all in place. The code is written to actually print the letter, so you’d never actually see the form on top of the Word document. (I had to superimpose the form there.) However, you would get a printed copy of the letter shown in the figure.

Continue reading here: Interacting with Microsoft Excel
Was this article helpful?
Всем привет, сегодня поговорим о выгрузки данных из Access в такие приложения как Word и Excel. Но не о стандартном способе, который есть в Access (связь с Office), а о способе, который позволяет выгружать данные в заданный шаблон как в Word, так и в Excel.
Другими словами это нужно тогда когда создать отчеты в Access по шаблону, который уже существует, например, в Word, невозможно или слишком трудоемко или как Вы знаете, может получаться просто коряво или самый распространенный вариант это когда много текста, который в отчете Access не так хорошо форматируется как в Word, а данных не так много, но необходимо автоматизировать, например это какие-то договора, заявления и так далее. Использование слияния из самого Word-а не очень удобно, поэтому я расскажу сегодня, как можно заполнять такие шаблоны напрямую из Access, путем нажатия на одну кнопку. Также как и необходимость выгрузки в шаблон Word, существует и необходимость выгрузки в шаблон Excel, и этот способ мы тоже сегодня рассмотрим.
Начнем с Word.
Вся разработка делится на две части это:
• Настройка шаблона Word;
• Настройка выгрузки данных в шаблон.
Суть настройки шаблона заключается в том, что необходимо проставить необходимые поля в тех местах шаблона, где нужно выводить то или иное поле. Это делается с помощью полей формы.
Открываем шаблон Word, для начала добавим необходимую панель инструментов, для этого нажимаем вид->панель инструментов и ставим галочку «формы». Теперь у вас отобразилась панель инструментом «Формы» все, что осталось сделать это встать на то место где необходимо добавить нужное поле и на панели выбрать «Текстовое поле». После в том месте у Вас появится серая область, которая свидетельствует о том, что поле добавлено. Теперь необходимо задать имя этого поля, для того чтобы потом из access вставлять в него значения (стандартное названия не очень удобное). Для этого щелкните правой кнопкой мы по полю и нажмите «Свойства». В поле закладка напишите желаемое имя этого поля, я в примере назвал его MyTestPole
Создайте столько полей, сколько Вам нужно.
Ну и настройка шаблона закончена, только единственное сделайте этот шаблон только для чтения, а то пользователь возьмет, сформирует документ и сохранит его, и шаблон тем самым потеряется, а если сделать только для чтения, то у него такой возможности не будет только сохранять через «Сохранить как».
Переходим к более интересной задачи это к реализации самой выгрузки из Access в этот шаблон.
Примечание! Я использую Access в связке с MS Sql 2008 поэтому и данные буду брать от туда.
Допустим у Вас есть форма, сделайте на ней кнопку (я назвал ее testbutton) и в событие нажатие кнопки вставьте следующий код:
Private Sub testbutton_Click()
‘Объявляем переменные
Dim FileDialog As FileDialog
Dim rsd As ADODB.Recordset
Dim strSQL As String
Dim WordApOb As Object
Dim WordOb As Object
Dim path As String
Set rsd = New ADODB.Recordset
‘запрос к базе данных для получения необходимых данных
strSQL = «select * from dbo.table where KOD = » & Me.kod & «»
rsd.open strSQL, CurrentProject.Connection
‘Выбираем шаблон
Set FileDialog = Application.FileDialog(msoFileDialogOpen)
‘убираем множественный выбор, он нам не нужен
FileDialog.AllowMultiSelect = False
‘очистим и установим фильтры
FileDialog.Filters.Clear
FileDialog.Filters.add «Word», «*.doc»
‘установим фильтр по умолчанию
FileDialog.FilterIndex = 1
‘проверяем, что сделал user если выбрал шаблон, то начинаем работу
If FileDialog.Show = False Then
‘Если нет то выходим
Set dlgFile = Nothing
Exit Sub
End If
‘получаем путь к файлу
path = Trim(FileDialog.SelectedItems(1))
‘Очистим переменную
Set FileDialog = Nothing
If path <> «» Then
‘Будем отслеживать ошибки
On Error GoTo Err_testbutton_Click
‘Создаем объект Word
Set WordOb = CreateObject(«Word.document»)
‘Задаем нашему документу значение из шаблона
Set WordOb = GetObject(path)
‘Задаем значение объекту word.Application
Set WordApOb = WordOb.Parent
‘делаем приложение word видимым
WordApOb.Visible = True
‘ищем наше поле в шаблоне
WordOb.Bookmarks(«mytestpole»).Select
‘задаем ему новое значение из нашего Recordset
WordApOb.Selection.TypeText Text:=Nz(rsd.Fields(«field»).Value, » «)
‘и так далее по всем полям
‘в конце перейдем на начало нашего документа
WordApOb.Selection.Goto wdGoToFirst
‘и активируем его
WordApOb.Activate
‘Очистим переменные
Set WordOb = Nothing
Set WordApOb = Nothing
Exit_testbutton_Click:
Exit Sub
Err_testbutton_Click:
MsgBox Err.Description
‘в случае ошибки будем делать следующие
‘закроем word без сохранения
WordOb.Close (wddonotsavechanges)
WordApOb.Quit
‘и также очистим переменные
Set WordOb = Nothing
Set WordApOb = Nothing
Resume Exit_testbutton_Click
End If
End Sub
Код прокомментирован, поэтому сложностей возникнуть не должно. Здесь весь смысл сводится к созданию объекта word.document и word.application, конечно же. А после мы уже работаем с нашими объектами, т.е. заполняем их.
Теперь перейдем к Excel.
В шаблоне Excel уже ненужно создавать поля как в Word, так как здесь мы уже будем ориентироваться по адресам ячеек.
Существует несколько способов, как заполнять Excel шаблон, я опишу два, первый это тогда когда Вам просто необходимо проставить несколько полей, т.е. в источнике данных будет всего одна строка с несколькими полями и второй это когда строк будет уже несколько, причем Вы не знаете, сколько именно (в зависимости от каких то условий), но в шаблоне по умолчанию отведено для этого все пару строк, поэтому мы будем нужные нам строки добавлять, для того чтобы наши данные не накладывалась на строки ниже (допустим там примечание, подпись руководителя и т.д.). И совет, я здесь для примера использую всего один источник данных, а вы, если Вам необходимо заполнить шапку, примечание и некое количество строк (т.е. область данных) то для этих задач используйте несколько источников (Recordset).