
VB.Net provides support for interoperability between the COM object model of Microsoft Excel 2010 and your application.
To avail this interoperability in your application, you need to import the namespace Microsoft.Office.Interop.Excel in your Windows Form Application.
Creating an Excel Application from VB.Net
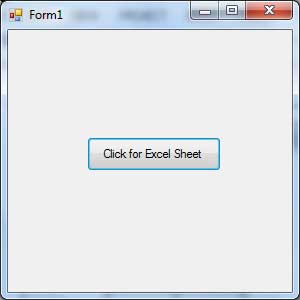
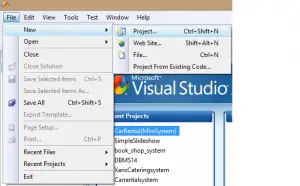
Let’s start with creating a Window Forms Application by following the following steps in Microsoft Visual Studio: File → New Project → Windows Forms Applications
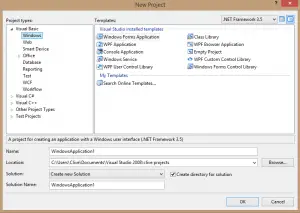
Finally, select OK, Microsoft Visual Studio creates your project and displays following Form1.
Insert a Button control Button1 in the form.
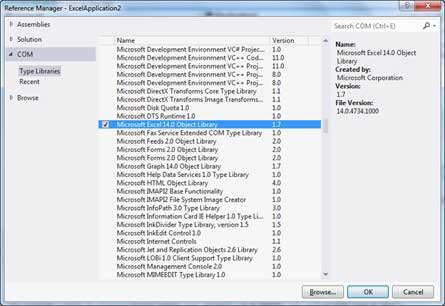
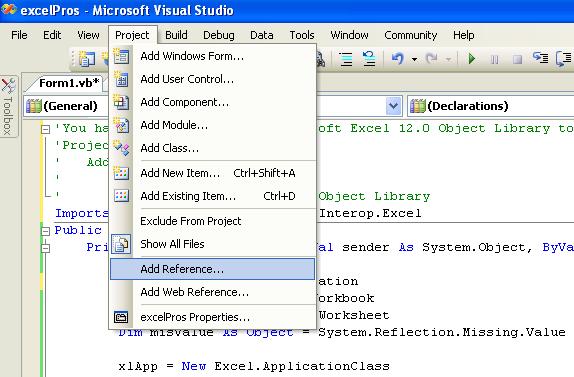
Add a reference to Microsoft Excel Object Library to your project. To do this −
-
Select Add Reference from the Project Menu.

-
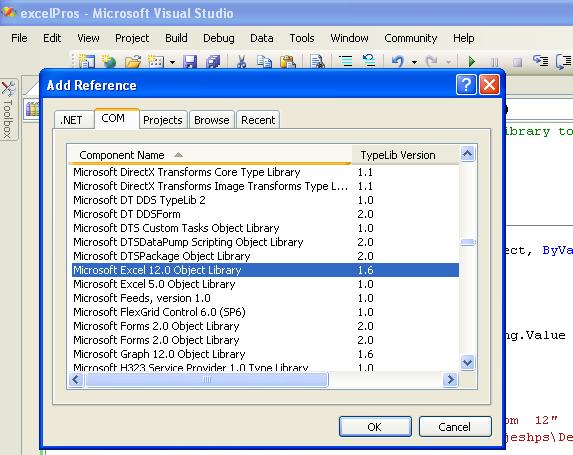
On the COM tab, locate Microsoft Excel Object Library and then click Select.
-
Click OK.
Double click the code window and populate the Click event of Button1, as shown below.
'  Add the following code snippet on top of Form1.vb
Imports Excel = Microsoft.Office.Interop.Excel
Public Class Form1
   Private Sub Button1_Click(sender As Object, e As EventArgs) Handles Button1.Click
      Dim appXL As Excel.Application
      Dim wbXl As Excel.Workbook
      Dim shXL As Excel.Worksheet
      Dim raXL As Excel.Range

      ' Start Excel and get Application object.
      appXL = CreateObject("Excel.Application")
      appXL.Visible = True

      ' Add a new workbook.
      wbXl = appXL.Workbooks.Add
      shXL = wbXl.ActiveSheet

      ' Add table headers going cell by cell.
      shXL.Cells(1, 1).Value = "First Name"
      shXL.Cells(1, 2).Value = "Last Name"
      shXL.Cells(1, 3).Value = "Full Name"
      shXL.Cells(1, 4).Value = "Specialization"

      ' Format A1:D1 as bold, vertical alignment = center.
      With shXL.Range("A1", "D1")
         .Font.Bold = True
         .VerticalAlignment = Excel.XlVAlign.xlVAlignCenter
      End With

      ' Create an array to set multiple values at once.
      Dim students(5, 2) As String
      students(0, 0) = "Zara"
      students(0, 1) = "Ali"
      students(1, 0) = "Nuha"
      students(1, 1) = "Ali"
      students(2, 0) = "Arilia"
      students(2, 1) = "RamKumar"
      students(3, 0) = "Rita"
      students(3, 1) = "Jones"
      students(4, 0) = "Umme"
      students(4, 1) = "Ayman"

      ' Fill A2:B6 with an array of values (First and Last Names).
      shXL.Range("A2", "B6").Value = students

      ' Fill C2:C6 with a relative formula (=A2 & " " & B2).
      raXL = shXL.Range("C2", "C6")
      raXL.Formula = "=A2 & "" "" & B2"

      ' Fill D2:D6 values.
      With shXL
         .Cells(2, 4).Value = "Biology"
         .Cells(3, 4).Value = "Mathmematics"
         .Cells(4, 4).Value = "Physics"
         .Cells(5, 4).Value = "Mathmematics"
         .Cells(6, 4).Value = "Arabic"
      End With

      ' AutoFit columns A:D.
      raXL = shXL.Range("A1", "D1")
      raXL.EntireColumn.AutoFit()

      ' Make sure Excel is visible and give the user control
      ' of Excel's lifetime.
      appXL.Visible = True
      appXL.UserControl = True

      ' Release object references.
      raXL = Nothing
      shXL = Nothing
      wbXl = Nothing
      appXL.Quit()
      appXL = Nothing
      Exit Sub
Err_Handler:
      MsgBox(Err.Description, vbCritical, "Error: " & Err.Number)
   End Sub
End Class
When the above code is executed and run using Start button available at the Microsoft Visual Studio tool bar, it will show the following window −
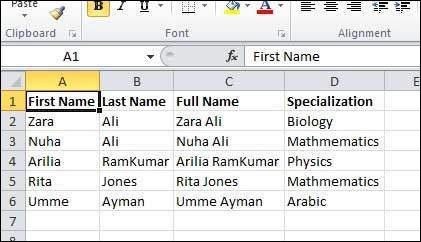
Clicking on the Button would display the following excel sheet. You will be asked to save the workbook.
VB.Net обеспечивает поддержку взаимодействия между объектной моделью COM Microsoft Excel 2010 и вашим приложением.
Чтобы использовать эту совместимость в вашем приложении, вам необходимо импортировать пространство имен Microsoft.Office.Interop.Excel в ваше приложение Windows Form.
Создание приложения Excel из VB.Net
Давайте начнем с создания приложения Window Forms, выполнив следующие шаги в Microsoft Visual Studio: Файл → Новый проект → Приложения Windows Forms.
Наконец, нажмите OK, Microsoft Visual Studio создаст ваш проект и отобразит следующую форму Form1 .
Вставьте элемент управления Button1 в форму.
Добавьте ссылку на библиотеку объектов Microsoft Excel в свой проект. Для этого –
-
Выберите Добавить ссылку в меню проекта.
Выберите Добавить ссылку в меню проекта.
-
На вкладке COM найдите библиотеку объектов Microsoft Excel и нажмите «Выбрать».
На вкладке COM найдите библиотеку объектов Microsoft Excel и нажмите «Выбрать».

-
Нажмите ОК.
Нажмите ОК.
Дважды щелкните окно кода и заполните событие Click для Button1, как показано ниже.
'  Add the following code snippet on top of Form1.vb
Imports Excel = Microsoft.Office.Interop.Excel
Public Class Form1
   Private Sub Button1_Click(sender As Object, e As EventArgs) Handles Button1.Click
      Dim appXL As Excel.Application
      Dim wbXl As Excel.Workbook
      Dim shXL As Excel.Worksheet
      Dim raXL As Excel.Range

      ' Start Excel and get Application object.
      appXL = CreateObject("Excel.Application")
      appXL.Visible = True

      ' Add a new workbook.
      wbXl = appXL.Workbooks.Add
      shXL = wbXl.ActiveSheet

      ' Add table headers going cell by cell.
      shXL.Cells(1, 1).Value = "First Name"
      shXL.Cells(1, 2).Value = "Last Name"
      shXL.Cells(1, 3).Value = "Full Name"
      shXL.Cells(1, 4).Value = "Specialization"

      ' Format A1:D1 as bold, vertical alignment = center.
      With shXL.Range("A1", "D1")
         .Font.Bold = True
         .VerticalAlignment = Excel.XlVAlign.xlVAlignCenter
      End With

      ' Create an array to set multiple values at once.
      Dim students(5, 2) As String
      students(0, 0) = "Zara"
      students(0, 1) = "Ali"
      students(1, 0) = "Nuha"
      students(1, 1) = "Ali"
      students(2, 0) = "Arilia"
      students(2, 1) = "RamKumar"
      students(3, 0) = "Rita"
      students(3, 1) = "Jones"
      students(4, 0) = "Umme"
      students(4, 1) = "Ayman"

      ' Fill A2:B6 with an array of values (First and Last Names).
      shXL.Range("A2", "B6").Value = students

      ' Fill C2:C6 with a relative formula (=A2 & " " & B2).
      raXL = shXL.Range("C2", "C6")
      raXL.Formula = "=A2 & "" "" & B2"

      ' Fill D2:D6 values.
      With shXL
         .Cells(2, 4).Value = "Biology"
         .Cells(3, 4).Value = "Mathmematics"
         .Cells(4, 4).Value = "Physics"
         .Cells(5, 4).Value = "Mathmematics"
         .Cells(6, 4).Value = "Arabic"
      End With

      ' AutoFit columns A:D.
      raXL = shXL.Range("A1", "D1")
      raXL.EntireColumn.AutoFit()

      ' Make sure Excel is visible and give the user control
      ' of Excel's lifetime.
      appXL.Visible = True
      appXL.UserControl = True

      ' Release object references.
      raXL = Nothing
      shXL = Nothing
      wbXl = Nothing
      appXL.Quit()
      appXL = Nothing
      Exit Sub
Err_Handler:
      MsgBox(Err.Description, vbCritical, "Error: " & Err.Number)
   End Sub
End Class
Когда приведенный выше код будет выполнен и запущен с использованием кнопки « Пуск» , доступной на панели инструментов Microsoft Visual Studio, появится следующее окно:

При нажатии на кнопку отобразится следующий лист Excel. Вам будет предложено сохранить рабочую книгу.
Содержание
- How to create Excel file in VB.Net
- Excel Library
- How to use COM Interop to Create an Excel Spreadsheet
- How to create an Excel Document Programmatically
- Save Excel file (SaveAs() method)t
- How to properly clean up Excel interop objects
- VB.Net — Excel Sheet
- Creating an Excel Application from VB.Net
- VB.Net – Excel Sheet
- Создание приложения Excel из VB.Net
- Excel Sheet in VB.net – How to Create an Excel File Using VB.net
- Table of contents
- What is Visual Basic’s purpose?
- What is Excel Sheet in VB.net?
- How to Create an Excel File Using VB.net
- Program Output:
- Download the Source Code:
- Summary
- Vb net лист excel
How to create Excel file in VB.Net

Automation to Excel allows you to perform actions such as creating a new workbook, adding data to the workbook, or creating charts etc. The following VB.Net code example shows how to use COM interop to create an Excel file. Before going to create new Excel file programmatically in VB.Net, you must have Excel installed on your system for this code to run properly.
Excel Library
In order to access the object model from Visual VB.NET, you have to add the Microsoft Excel 12.0 Object Library to your current project.
Create a new project and add a Command Button to your VB.Net Form.
How to use COM Interop to Create an Excel Spreadsheet
Form the following images you can find how to add Excel reference library in your VB.Net project.
Select reference dialogue from Project menu.
How to create an Excel Document Programmatically
First we have to initialize the Excel application Object in your VB.Net application.
Before creating new Excel Workbook, you should check whether Excel is installed in your system.
Then create new Workbook
After creating the new Workbook, next step is to write content to worksheet
In the above code we write the data in the Sheet1, If you want to write data in sheet 2 then you should code like this.
Save Excel file (SaveAs() method)t
After write the content to the cell, next step is to save the excel file in your system.
How to properly clean up Excel interop objects

Finally, we have to properly clean up Excel interop objects or release Excel COM objects. Here we write a function to clean up the Excel Application, Excel Workbook and Excel Worksheet Objects.
Creating an Excel Spreadsheet Programmatically
Источник
VB.Net — Excel Sheet
VB.Net provides support for interoperability between the COM object model of Microsoft Excel 2010 and your application.
To avail this interoperability in your application, you need to import the namespace Microsoft.Office.Interop.Excel in your Windows Form Application.
Creating an Excel Application from VB.Net
Let’s start with creating a Window Forms Application by following the following steps in Microsoft Visual Studio: File → New Project → Windows Forms Applications
Finally, select OK, Microsoft Visual Studio creates your project and displays following Form1.
Insert a Button control Button1 in the form.
Add a reference to Microsoft Excel Object Library to your project. To do this −
Select Add Reference from the Project Menu.

On the COM tab, locate Microsoft Excel Object Library and then click Select.

Double click the code window and populate the Click event of Button1, as shown below.
When the above code is executed and run using Start button available at the Microsoft Visual Studio tool bar, it will show the following window −

Clicking on the Button would display the following excel sheet. You will be asked to save the workbook.
Источник
VB.Net – Excel Sheet
VB.Net обеспечивает поддержку взаимодействия между объектной моделью COM Microsoft Excel 2010 и вашим приложением.
Чтобы использовать эту совместимость в вашем приложении, вам необходимо импортировать пространство имен Microsoft.Office.Interop.Excel в ваше приложение Windows Form.
Создание приложения Excel из VB.Net
Давайте начнем с создания приложения Window Forms, выполнив следующие шаги в Microsoft Visual Studio: Файл → Новый проект → Приложения Windows Forms.
Наконец, нажмите OK, Microsoft Visual Studio создаст ваш проект и отобразит следующую форму Form1 .
Вставьте элемент управления Button1 в форму.
Добавьте ссылку на библиотеку объектов Microsoft Excel в свой проект. Для этого –
Выберите Добавить ссылку в меню проекта.
Выберите Добавить ссылку в меню проекта.
На вкладке COM найдите библиотеку объектов Microsoft Excel и нажмите «Выбрать».
На вкладке COM найдите библиотеку объектов Microsoft Excel и нажмите «Выбрать».
Дважды щелкните окно кода и заполните событие Click для Button1, как показано ниже.
Когда приведенный выше код будет выполнен и запущен с использованием кнопки « Пуск» , доступной на панели инструментов Microsoft Visual Studio, появится следующее окно:
При нажатии на кнопку отобразится следующий лист Excel. Вам будет предложено сохранить рабочую книгу.
Источник
Excel Sheet in VB.net – How to Create an Excel File Using VB.net
Excel Sheet in VB.net – VB.net makes it possible for the COM object model of Microsoft Excel 2010 to work with your application.
To use this interoperability in your application, you need to add the namespace Microsoft.Office.Interop.Excel to your Windows Form Application.
Today I will teach you about How to Create an Excel File Using VB.net. Create an Excel File Using Visual Basic.Net provides support for interoperability between the COM object model of Microsoft Excel and your application.
Table of contents
We have learned how to use the Regular Expression in VB.net in the previous lesson. In this lesson we shall learn How To Write a Program for Excel Sheet in VB.net.
What is Visual Basic’s purpose?
The third-generation programming language was created to aid developers in the creation of Windows applications. It has a programming environment that allows programmers to write code in.exe or executable files.
They can also utilize it to create in-house front-end solutions for interacting with huge databases. Because the language allows for continuing changes, you can keep coding and revising your work as needed.
However, there are some limits to the Microsoft Visual Basic download. If you want to make applications that take a long time to process, this software isn’t for you.
That implies you won’t be able to use VB to create games or large apps because the system’s graphic interface requires a lot of memory and space.
Furthermore, the language is limited to Microsoft and does not support other operating systems.
What is Excel Sheet in VB.net?
In Excel documents, a Worksheet is a group of cells that are set up in rows and columns. It is the part of the computer you use to enter data.
Each worksheet has 1048576 rows and 16384 columns, making it a big table that you can use to organize information.
So let’s get started:
How to Create an Excel File Using VB.net
Steps in Creating an Excel Application from VB.net.
Time needed: 5 minutes.
Creating an Excel Application from VB.net
- Step 1: Create New Project
First is open the Visual Basic, Select File on the menu, then click New and create a new project.
Step 2: Name your Project
Then a New Project Dialog will appear. You can rename your project, depending on what you like to name it. After that click OK
Step 3: Design your Windows Form
Then design your form like this just like what I’ve shown you below
Add a Button from the toolbox.
Step 4: Add Reference
After that, Add a Reference to Microsoft Excel Object Library to your project.
To do this:
*Select add reference from the project menu.
Step 5: Locate Microsoft Excel Object Library
On the COM tab, Locate Microsoft Excel Object Library and then click select.
Step 6: Add Following Code
Double click the code window and add this following code to the top of Public Class Form1.
Imports Excel = Microsoft.Office.Interop.Excel
Step 7: Double click the Button and add this following code
Then, Go back to Design View and Double click the Button and add this following code.
Private Sub Button1_Click(ByVal sender As System.Object, ByVal e As System.EventArgs) Handles Button1.Click
Dim appXL As Excel.Application
Dim wbXl As Excel.Workbook
Dim shXL As Excel.Worksheet
Dim raXL As Excel.Range
appXL = CreateObject(“Excel.Application”)
appXL.Visible = True
wbXl = appXL.Workbooks.Add
shXL = wbXl.ActiveSheet
shXL.Cells(1, 1).Value = “FIRST NAME”
shXL.Cells(1, 2).Value = “LAST NAME”
shXL.Cells(1, 3).Value = “FULL NAME”
shXL.Cells(1, 4).Value = “SUBJECTS”
With shXL.Range(“A1”, “D1”)
.Font.Bold = True
.VerticalAlignment = Excel.XlVAlign.xlVAlignCenter
End With
Dim pupils(5, 2) As String
pupils(0, 0) = “Markfil”
pupils(0, 1) = “Baldomero”
pupils(1, 0) = “Juvy”
pupils(1, 1) = “Aral”
pupils(2, 0) = “Andrew”
pupils(2, 1) = “Braza”
pupils(3, 0) = “Carlie”
pupils(3, 1) = “Golez”
pupils(4, 0) = “Jesriel”
pupils(4, 1) = “Agita”
shXL.Range(“A2”, “B6”).Value = pupils
raXL = shXL.Range(“C2”, “C6”)
raXL.Formula = “=A2 & “” “” & B2″
With shXL
.Cells(2, 4).Value = “English”
.Cells(3, 4).Value = “Algebra”
.Cells(4, 4).Value = “Physics”
.Cells(5, 4).Value = “Trigonometry”
.Cells(6, 4).Value = “Theology”
End With
raXL = shXL.Range(“A1”, “D1”)
raXL.EntireColumn.AutoFit()
appXL.Visible = True
appXL.UserControl = True
raXL = Nothing
shXL = Nothing
wbXl = Nothing
appXL.Quit()
appXL = Nothing
Exit Sub
Err_Handler:
MsgBox(Err.Description, vbCritical, “Error: ” & Err.Number)
End Sub
Step 8: Click F5 to run the program.
Finally, Click F5 to run the program.
Program Output:
Download the Source Code:
Summary
This article shows how to make an Excel sheet and how to fill a range of cells with a number of different values. This article also shows how to get a range of cells as an array of cells.
Источник
Vb net лист excel

Получить доступ к листу Excel и прочитать данные — Visual Basic .NET
Dim SelectedSheet As String
Public Sub OpenSheet(ByVal Grid As DataGridView)
Dim OpenDialog As New OpenFileDialog, FileName As String = «»
.Title = «Открыть документ Excel»
.Filter = «Документы Excel|*.xls;*.xlsx»
If .ShowDialog = Windows.Forms.DialogResult.OK Then
FileName = .FileName : Application.DoEvents()
‘ Подключение к Excel.
Dim connection As OleDb.OleDbConnection, connectionString As String
connectionString = «Provider=Microsoft.ACE.OLEDB.12.0; Data Source=» + FileName + «; Extended Properties=»»Excel 12.0 Xml;HDR=YES»»;»
connection = New OleDb.OleDbConnection(connectionString)
Catch ex12 As Exception
‘Для более ранних версий
connectionString = «Provider=Microsoft.Jet.OLEDB.4.0;Data Source=» + FileName + «; Extended Properties=»»Excel 8.0;HDR=Yes;IMEX=1″»;»
connection = New OleDb.OleDbConnection(connectionString)
Catch ex11 As Exception
MsgBox(«Неизвестная версия Excel или файл имеет неизвестный формат!», MsgBoxStyle.Exclamation)
‘Отобразить форму выбора листов
If SelectedSheet Is Nothing Then Return
Dim command As OleDb.OleDbCommand = connection.CreateCommand()
command.CommandText = «Select * From [» & SelectedSheet & «$]»
Dim Adapter As New OleDb.OleDbDataAdapter(command), Table As New DataTable
.Visible = False : .Parent.Cursor = Cursors.WaitCursor
.DataSource = Table : SetGridSettings(Grid)
.Visible = True : .Parent.Cursor = Cursors.Default
Private Function GetExcelSheetNames(ByVal connection As OleDb.OleDbConnection) As String()
Dim Table As DataTable
Table = connection.GetOleDbSchemaTable(OleDb.OleDbSchemaGuid.Tables, New Object() )
If Table Is Nothing Then Return Nothing
Dim i As Integer = 0, SheetsArray() As String = Nothing, s As String
For n As Integer = 0 To .Rows.Count — 1
s = .Rows(n).Item(«TABLE_NAME»).ToString.Trim(New Char() <«‘»>)
If Strings.Right(s, 1) = «$» Then
ReDim Preserve SheetsArray(i)
SheetsArray(i) = s.Trim(New Char() <«$»>)
Table.Dispose() : Return SheetsArray
Catch ex As Exception
Private Sub ShowSelectForm(ByVal Sheets() As String, ByVal FileName As String)
If Sheets Is Nothing Then SelectedSheet = Nothing : Return
Dim F As New Form, T As New TreeView, I As New ImageList, P As New Panel, B1, B2 As New Button
.ImageSize = New Size(16, 16)
.Images.Add(«Книга», My.Resources.Images16x16.Excel) ‘рисунок 16×16 px для названия файла excel
.Images.Add(«Документ», My.Resources.Images16x16.Документ) ‘рисунок 16×16 px для названия листа excel
.ImageList = I : .Font = New Font(«Arial», 10, FontStyle.Bold)
.ShowPlusMinus = False : .ShowLines = False : .ShowRootLines = False
Dim N As TreeNode = .Nodes.Add(«Книга», FileIO.FileSystem.GetName(FileName), 0, 0)
Dim nn As TreeNode
For ni As Int16 = 0 To Sheets.Length — 1
nn = N.Nodes.Add(«Лист» & ni.ToString, Sheets(ni), 1, 1)
nn.NodeFont = New Font(.Font, FontStyle.Regular)
.Text = » Документ Excel»
.Height = .Height * 1.3
.AcceptButton = B1 : .CancelButton = B2
.Name = «P» : .Parent = F
AddHandler .NodeMouseDoubleClick, AddressOf T_NodeDoubleClick
.Parent = P : .Top = 5
.Left = P.Width — .Width — 5
AddHandler .Click, AddressOf B2_Click
.Parent = P : .Top = 5
.Left = B2.Left — .Width — 5
.Font = New Font(.Font, FontStyle.Bold)
AddHandler .Click, AddressOf B1_Click
P.Height = B1.Height + 10
AddHandler .Load, AddressOf F_Load
Private Sub SetGridSettings(ByVal Grid As DataGridView)
.ReadOnly = False : .MultiSelect = False
For n As Integer = 0 To .ColumnCount — 1
Private Sub F_Load(ByVal sender As Form, ByVal e As EventArgs)
Dim T As TreeView = sender.Controls(«T»)
If .Nodes(0).Nodes.Count > 0 Then .SelectedNode = .Nodes(0).Nodes(0)
Private Sub B1_Click(ByVal sender As Button, ByVal e As EventArgs)
Dim F As Form = sender.Parent.Parent, T As TreeView = F.Controls(«T»)
If Strings.Left(T.SelectedNode.Name, 4) = «Лист» Then
SelectedSheet = T.SelectedNode.Text : F.Close()
MsgBox(«Необходимо выбрать лист.», MsgBoxStyle.Exclamation)
Private Sub B2_Click(ByVal sender As Button, ByVal e As EventArgs)
Dim F As Form = sender.Parent.Parent
SelectedSheet = Nothing : F.Close()
Private Sub T_NodeDoubleClick(ByVal sender As TreeView, ByVal e As TreeNodeMouseClickEventArgs)
Источник
In this tutorial, I will teach you how to read an excel file in Visual basic.net (VB.Net).
This tutorial can be integrated to your personalized vb.net project.
What is Visual Basic’s purpose?
The third-generation programming language was created to aid developers in the creation of Windows applications. It has a programming environment that allows programmers to write code in.exe or executable files. They can also utilize it to create in-house front-end solutions for interacting with huge databases. Because the language allows for continuing changes, you can keep coding and revising your work as needed.
However, there are some limits to the Microsoft Visual Basic download. If you want to make applications that take a long time to process, this software isn’t for you. That implies you won’t be able to use VB to create games or large apps because the system’s graphic interface requires a lot of memory and space. Furthermore, the language is limited to Microsoft and does not support other operating systems.
So let’s get started:
Step How to Read an Excel file in Visual Basic.Net
- Step 1: First is open the Visual Basic, Select File on the menu, then click New and create a new project.
- Step 2: Then a New Project Dialog will appear. You can rename your project, depending on what you like to name it. After that click OK
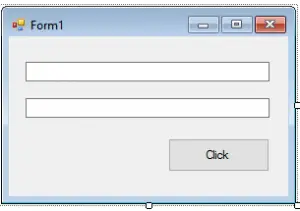
- Step 3: Design your form like this just like what I’ve shown you below.
Add a 2 Textbox and a Button
- Step 4: After designing your form. Add a reference to Microsoft Excel 12.0 Object Library
In your project menu click on Project– Add Reference – go to COM tab
Add Microsoft Excel 12.0 Object Library
- Step 5: Then, go to the code page and add the following declarations:
Imports Excel = Microsoft.Office.Interop.Excel
Public Class Form1
Dim APP As New Excel.Application
Dim worksheet As Excel.Worksheet
Dim workbook As Excel.Workbook
- Step 6: Add this following code to Form_Load Event
Private Sub Form1_Load(ByVal sender As System.Object, ByVal e As System.EventArgs) Handles MyBase.Load
workbook = APP.Workbooks.Open("C:UsersCliveDocumentsVisual Studio 2008clive projectswriteandreadwriteandreadbinDebugsales.xlsx")
worksheet = workbook.Worksheets("sheet1")
End Sub
Step 7: To get the value from Excel cell to TextBox. Add this following code to the Button Click Event.
Private Sub Button1_Click(ByVal sender As System.Object, ByVal e As System.EventArgs) _
Handles Button1.Click
TextBox1.Text = worksheet.Cells(1, 1).Value
TextBox2.Text = worksheet.Cells(1, 2).Value
End Sub
Step 8: Then finally, add this code to save the Excel file and closes it.
Private Sub Form1_FormClosed(ByVal sender As System.Object, _
ByVal e As System.Windows.Forms.FormClosedEventArgs) _
Handles MyBase.FormClosed
workbook.Save()
workbook.Close()
App.Quit()
End Sub
- Step 9: Click F5 to run the program.
Inquiries
If you have any questions or suggestions about How to Read an Excel file using Visual Basic.Net please contact me through our contact page or simply leave a comment below.
Download the Code Below
Download How to Read an Excel file using Visual Basic.Net Source code here.
Readers might read also:
- How to Export DataGridView Data to Excel using VB.Net
- How to Create an Excel File Using Visual Basic.Net
- Basic Calculator Using Visual Basic.Net
If you want to get started with a little bit of advance topic in VB.Net you may start your lesson here on how to connect access database to vb.net. Watch the video here below.
Получить доступ к листу Excel и прочитать данные — Visual Basic .NET
http://www.cyberforum.ru/vb-net/thread453716.html
Module mdlExcel
Dim SelectedSheet As String
Public Sub OpenSheet(ByVal Grid As DataGridView)
Dim OpenDialog As New OpenFileDialog, FileName As String = «»
With OpenDialog
.Title = «Открыть документ Excel»
.Filter = «Документы Excel|*.xls;*.xlsx»
If .ShowDialog = Windows.Forms.DialogResult.OK Then
FileName = .FileName : Application.DoEvents()
Else
Return
End If
End With
‘ Подключение к Excel.
Dim connection As OleDb.OleDbConnection, connectionString As String
Try
‘Для Excel 12.0
connectionString = «Provider=Microsoft.ACE.OLEDB.12.0; Data Source=» + FileName + «; Extended Properties=»»Excel 12.0 Xml;HDR=YES»»;»
connection = New OleDb.OleDbConnection(connectionString)
connection.Open()
Catch ex12 As Exception
Try
‘Для более ранних версий
connectionString = «Provider=Microsoft.Jet.OLEDB.4.0;Data Source=» + FileName + «; Extended Properties=»»Excel 8.0;HDR=Yes;IMEX=1″»;»
connection = New OleDb.OleDbConnection(connectionString)
connection.Open()
Catch ex11 As Exception
MsgBox(«Неизвестная версия Excel или файл имеет неизвестный формат!», MsgBoxStyle.Exclamation)
Return
End Try
End Try
‘Отобразить форму выбора листов
ShowSelectForm(GetExcelSheetNames(connection), FileName)
If SelectedSheet Is Nothing Then Return
‘Выборка данных
Dim command As OleDb.OleDbCommand = connection.CreateCommand()
command.CommandText = «Select * From [» & SelectedSheet & «$]»
Dim Adapter As New OleDb.OleDbDataAdapter(command), Table As New DataTable
Adapter.Fill(Table) : connection.Close()
With Grid
.Visible = False : .Parent.Cursor = Cursors.WaitCursor
.DataSource = Table : SetGridSettings(Grid)
.Visible = True : .Parent.Cursor = Cursors.Default
End With
End Sub
Private Function GetExcelSheetNames(ByVal connection As OleDb.OleDbConnection) As String()
Dim Table As DataTable
Try
Table = connection.GetOleDbSchemaTable(OleDb.OleDbSchemaGuid.Tables, New Object() {Nothing, Nothing, Nothing, «TABLE»})
If Table Is Nothing Then Return Nothing
With Table
Dim i As Integer = 0, SheetsArray() As String = Nothing, s As String
For n As Integer = 0 To .Rows.Count — 1
s = .Rows(n).Item(«TABLE_NAME»).ToString.Trim(New Char() {«‘»})
If Strings.Right(s, 1) = «$» Then
ReDim Preserve SheetsArray(i)
SheetsArray(i) = s.Trim(New Char() {«$»})
i += 1
End If
Next
Table.Dispose() : Return SheetsArray
End With
Catch ex As Exception
MsgBox(ex.Message, MsgBoxStyle.Exclamation)
Return Nothing
End Try
End Function
Private Sub ShowSelectForm(ByVal Sheets() As String, ByVal FileName As String)
If Sheets Is Nothing Then SelectedSheet = Nothing : Return
Dim F As New Form, T As New TreeView, I As New ImageList, P As New Panel, B1, B2 As New Button
With I
.ColorDepth = ColorDepth.Depth32Bit
.ImageSize = New Size(16, 16)
.Images.Add(«Книга», My.Resources.Images16x16.Excel) ‘рисунок 16×16 px для названия файла excel
.Images.Add(«Документ», My.Resources.Images16x16.Документ) ‘рисунок 16×16 px для названия листа excel
End With
With T
.Name = «T»
.ImageList = I : .Font = New Font(«Arial», 10, FontStyle.Bold)
.ShowPlusMinus = False : .ShowLines = False : .ShowRootLines = False
Dim N As TreeNode = .Nodes.Add(«Книга», FileIO.FileSystem.GetName(FileName), 0, 0)
Dim nn As TreeNode
For ni As Int16 = 0 To Sheets.Length — 1
nn = N.Nodes.Add(«Лист» & ni.ToString, Sheets(ni), 1, 1)
nn.NodeFont = New Font(.Font, FontStyle.Regular)
Next
.ExpandAll()
End With
With F
.Text = » Документ Excel»
.ShowInTaskbar = False
.StartPosition = FormStartPosition.CenterParent
.FormBorderStyle = FormBorderStyle.FixedToolWindow
.Height = .Height * 1.3
.AcceptButton = B1 : .CancelButton = B2
With P
.Name = «P» : .Parent = F
.Dock = DockStyle.Bottom
End With
With T
.Parent = F
.Dock = DockStyle.Fill
.BringToFront()
AddHandler .NodeMouseDoubleClick, AddressOf T_NodeDoubleClick
End With
With B2
.Name = «B2»
.Text = «Отмена»
.Parent = P : .Top = 5
.Left = P.Width — .Width — 5
AddHandler .Click, AddressOf B2_Click
End With
With B1
.Name = «B1»
.Text = «Открыть»
.Parent = P : .Top = 5
.Left = B2.Left — .Width — 5
.Font = New Font(.Font, FontStyle.Bold)
AddHandler .Click, AddressOf B1_Click
End With
P.Height = B1.Height + 10
AddHandler .Load, AddressOf F_Load
.ShowDialog()
End With
End Sub
Private Sub SetGridSettings(ByVal Grid As DataGridView)
With Grid
.ReadOnly = False : .MultiSelect = False
.SelectionMode = DataGridViewSelectionMode.CellSelect
.RowTemplate.Resizable = DataGridViewTriState.False
.RowHeadersWidthSizeMode = DataGridViewRowHeadersWidthSizeMode.DisableResizing
For n As Integer = 0 To .ColumnCount — 1
With .Columns(n)
.Resizable = DataGridViewTriState.False
.AutoSizeMode = DataGridViewAutoSizeColumnMode.AllCells
.SortMode = DataGridViewColumnSortMode.NotSortable
End With
Next
End With
End Sub
Private Sub F_Load(ByVal sender As Form, ByVal e As EventArgs)
Dim T As TreeView = sender.Controls(«T»)
With T
.Select()
If .Nodes(0).Nodes.Count > 0 Then .SelectedNode = .Nodes(0).Nodes(0)
End With
SelectedSheet = Nothing
End Sub
Private Sub B1_Click(ByVal sender As Button, ByVal e As EventArgs)
Dim F As Form = sender.Parent.Parent, T As TreeView = F.Controls(«T»)
Application.DoEvents()
If Strings.Left(T.SelectedNode.Name, 4) = «Лист» Then
F.DialogResult = DialogResult.OK
SelectedSheet = T.SelectedNode.Text : F.Close()
Else
MsgBox(«Необходимо выбрать лист.», MsgBoxStyle.Exclamation)
T.Select()
End If
End Sub
Private Sub B2_Click(ByVal sender As Button, ByVal e As EventArgs)
Dim F As Form = sender.Parent.Parent
F.DialogResult = DialogResult.Cancel
SelectedSheet = Nothing : F.Close()
End Sub
Private Sub T_NodeDoubleClick(ByVal sender As TreeView, ByVal e As TreeNodeMouseClickEventArgs)
If e.Node.Name = «Книга» Then sender.ExpandAll()
B1_Click(sender.Parent.Controls(«P»).Controls(«B1»), Nothing)
End Sub
End Module