
|
63 / 10 / 0 Регистрация: 27.01.2013 Сообщений: 1,023 |
|
|
1 |
|
Нет списка последних файлов26.02.2019, 16:06. Показов 12570. Ответов 1
Использую «Оффис 2016» (может быть 2019 — не написано), и «Windows 10», и там не показывается список последних используемых файлов. Сообщения в настройках следующие:
Как включить эту настройку?
0 |

|
235 / 146 / 41 Регистрация: 26.01.2019 Сообщений: 542 |
|
|
28.02.2019, 10:04 |
2 |
|
Как включить эту настройку? Параметры — Персонализация — Пуск Должно помочь. Миниатюры
0 |

|
IT_Exp Эксперт 87844 / 49110 / 22898 Регистрация: 17.06.2006 Сообщений: 92,604 |
28.02.2019, 10:04 |
|
2 |
How do I find recent documents in Word
«The recent files list was always there whenever I open the File > Open option in Microsoft Office Word on Windows 10. However, not this time.
The Excel, Notepad, and PowerPoint are all fine, whereas the Word 2016 is not showing recent documents anymore. I don’t know what happened and I need help to restore the disappeared recent list so that I could continue using this function again.»
| Workable Solutions | Step-by-step Troubleshooting |
|---|---|
| Method 1. Sign In with MS Account | Open a blank Word file > Sign in with email > Enter your password…Full steps |
| Method 2. Disable and Re-enable Recent Documents | Disable Recent Documents > Open Advanced feature > Set the number…Full steps |
The Recent Documents option is regarded as quick access for Microsoft Office users to get their saved documents, excel, or powerpoint, etc. files. When you can’t find a Word document on your local PC drive, the Recent Documents option can also help you quickly locate and access it.
However, according to some MS Office Word users, the Recent Document option may not show up in the Word application. If you happen to have this incident on your Windows PC, don’t worry. In the following, you’ll learn the causes that make Word Recent Documents option disappeared and how to recover it in Word 2016/2013.
Why is recent documents list not showing in Word
To bring the missing recent documents back to its list in the Windows operating system, you must figure out the exact causes in the first place. Mostly, there are three reasons that may disable the recent documents list showing up in Word application:
# 1. Recent Word files were manually removed from the Recent Documents list
Microsoft Office allows users to remove an individual file from the recently used file list with the option «Remove from list». In fact, you don’t remove the file from your entire system unless you pressed «Delete».
If you have manually removed or deleted the recently opened or edited word documents from the Recent Documents list, you’ll have to find and open your Word files one by one on your local drive or external storage devices.
# 2. Microsoft Office Word is logged out with no MS account
Sometimes, if you used to sign in with a Microsoft Office account in Word 2013, 2016 while editing documents, the Word application would record all the operations and changes that you have made into your MS account.
As a result, when you sign out with your MS Account in MS Word, you may lose some recordings, such as the Recent Document list recordings.
# 3. The Recent Documents list was disabled
Usually, the MS Office Word Recent Document list was enabled by default. However, due to false operation or personal needs, some users may disable this feature to speed up Microsoft Office Word on their computers. If it’s so, the workarounds towards this issue are available in the next part to help.
Continue reading to check and apply a suitable solution to make the recent Word files re-appear in the list.
How to recover recent documents in Word on Windows 10/8/7
In this part, we’re going to illustrate some practical solutions that you can pick up to bring the disappeared Recent Documents list back on your Word 2013/2016. The provided methods can also be applied to other versions of Microsoft Office applications like MS Excel, PPT, Word 2010, etc.
Fix 1. Sign In with MS Account to Make Recent Documents Show Up in Word
If you are currently logged out of your MS account, you can retry to sign in with your Microsoft Office account to bring the disappeared Recent Document list show up:
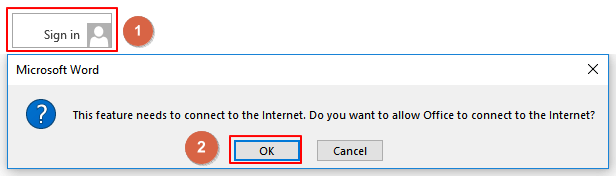
Step 1. Open a blank new Word file, click «Sign in» at the right top corner and select «Yes» to allow Office connect to the Internet.
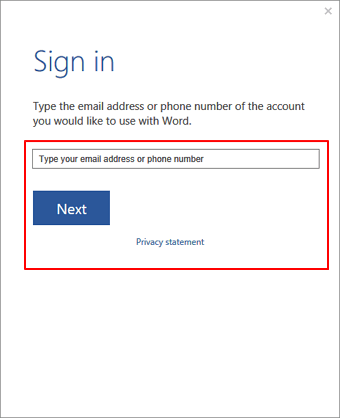
Step 2. Sign in with your email address or phone number, click «Next» to continue.
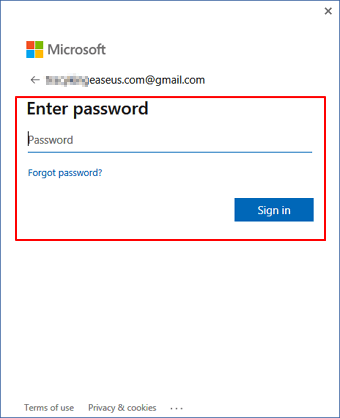
Step 3. Enter your password and click «Sign in» to log in to your MS account.
Step 4. Now, you can open a new Word file, go to File > Open > Check the Recent Document list under Open.
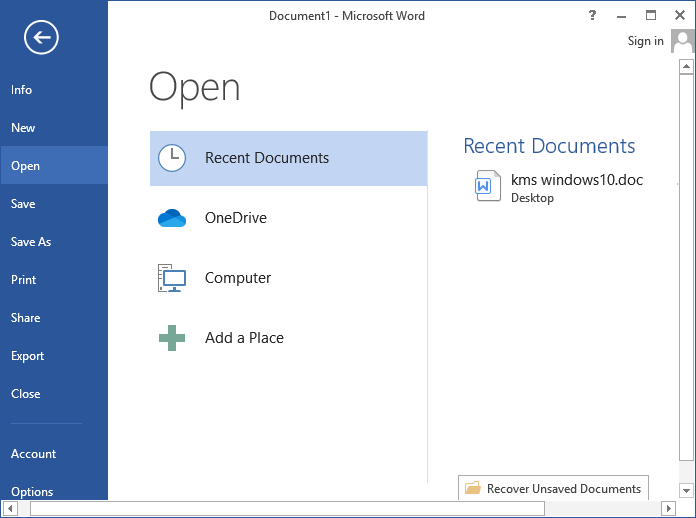
If the recent Word files show up on the list, congratulations. You can directly access and open these files through this list. If nothing appears, follow the next fix to enable the Recent Documents list feature.
Fix 2. Disable and re-enable Recent Documents feature
If the Recent Document feature is disabled, you won’t be able to view anything under the Open column in MS Word 2013, 2016. You can first try to disable this feature and then re-enable it with new settings in Word:
Step 1. Disable Recent Documents feature in Word
1. Open Word 2013/2016, click File -> Options -> Advanced.
2. Under Display, set «Show this number of Recent Documents» to «0» and uncheck the box of «Quickly access this number of Recent Documents».
Step 2. Re-enable Recent Documents in MS Word
1. Open Advanced feature in Word by opening a new Word file, go to File > Options > Advanced.
2. Set the number «0» to «10» «15» «25» or other numbers as you like next to «Show this number of Recent Documents». If this number is set to zero, undoubtedly, you don’t see a single recent document showing in this area.
3. Check the box of «Quickly access this number of Recent Documents» and change the number «0» to «10» «15» «25» or other numbers as you like.
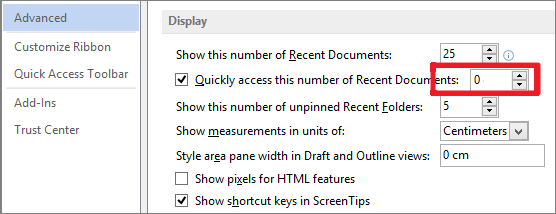
Step 3. Click «OK» to keep all the changes, restart the Word application.
After this, you can open a new Word file, go to File > Open > Recent Documents to check your missing Word files from the list.
Bonus Tip: Restore Missing or Lost Word Documents
After making Word document files show up in the Recent Documents list, you can quickly access and open your files through this list. If MS Word doesn’t bring up your desired Word file, don’t worry. You can first try to search the document name on your PC, or check the Recycle Bin to see if you can find the file.
If nothing is found, the Word file is probably lost or missing. At this moment, reliable Office file recovery software is the best choice to bring your recently lost or missing documents back.
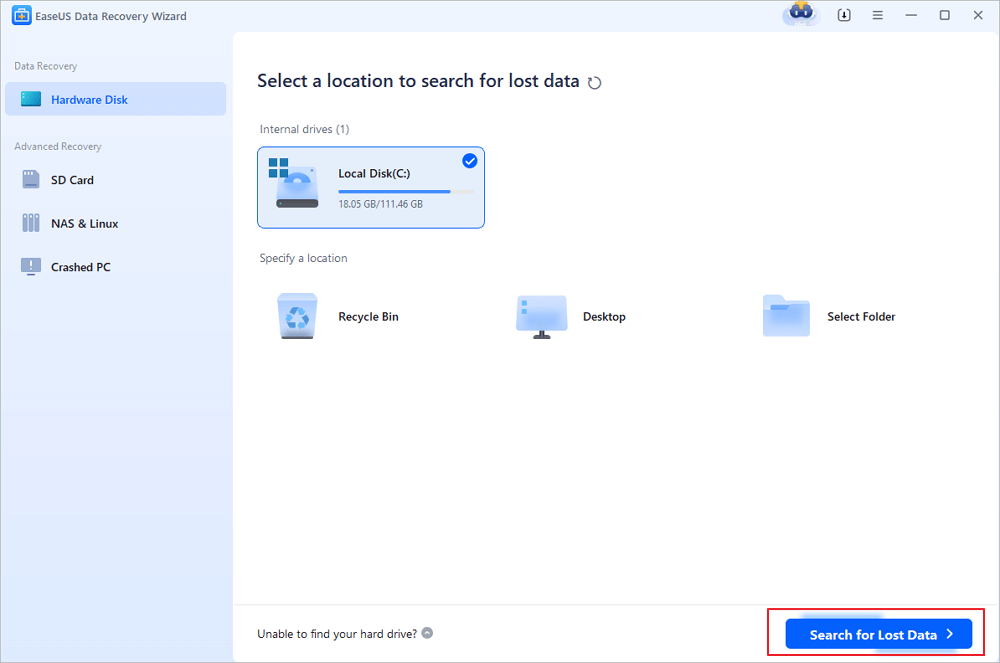
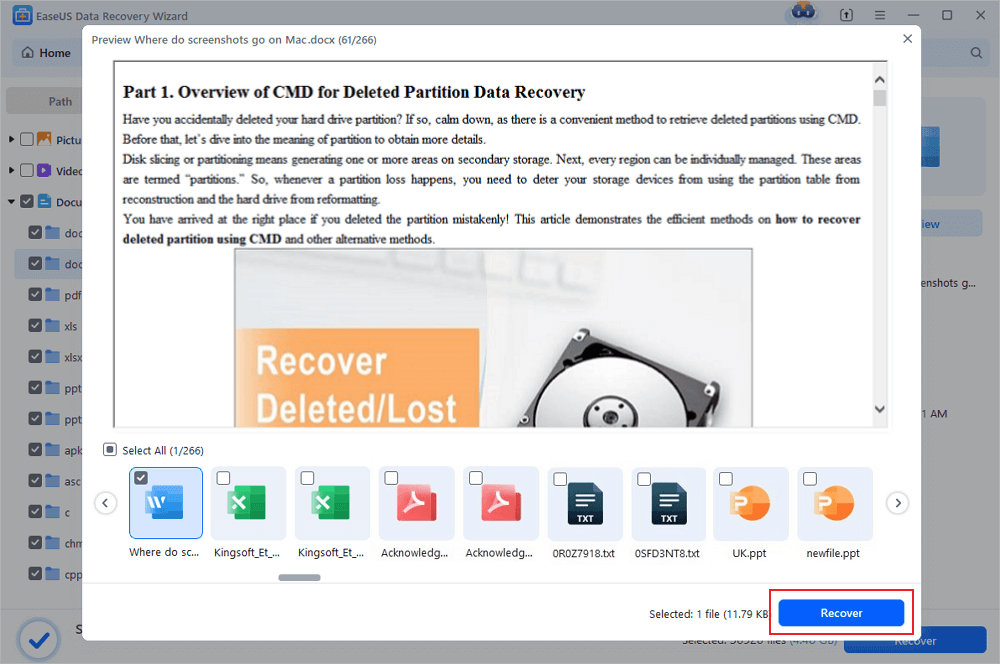
EaseUS Data Recovery Wizard is able to help. No matter how you lost your files, it takes only 3 steps to scan and bring your lost files back:
Step 1. Choose the Word file location
Choose the drive or a specific folder and click the «Scan» button.
Step 2. Locate your Word files
The software will start immediately scanning all lost data on the selected drive. After the scan, click the «Documents» option in the left panel. Choose «Word» from the category bar. Then, click «Preview».
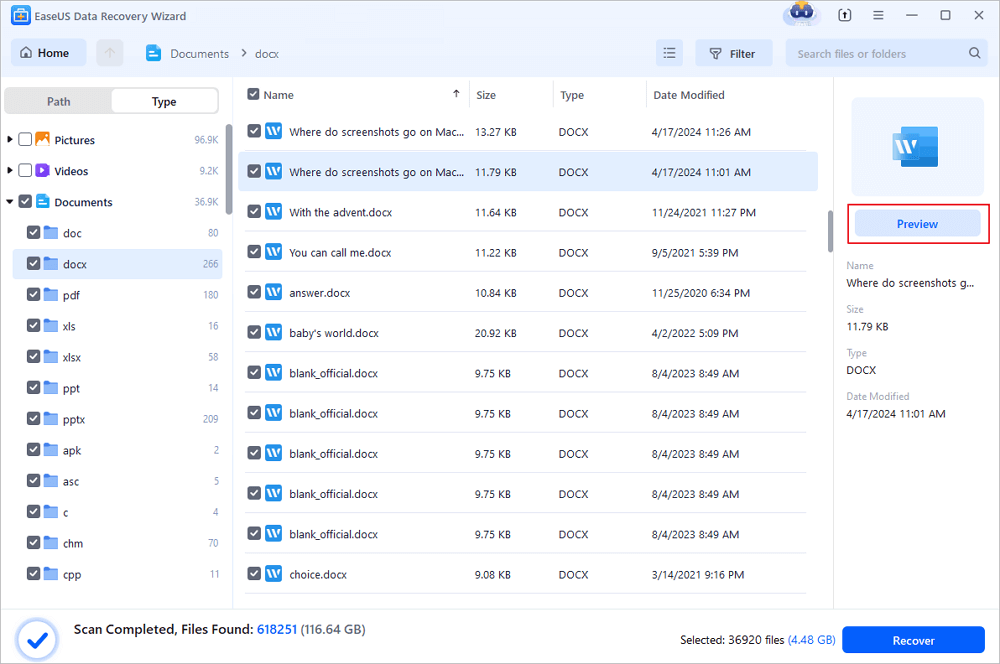
Step 3. Recover Word files
After previewing the lost Word files, select the desired Word files and click «Recover». Then, select a folder to store the Word files.
Further Word FAQs
On this page, we included two fixes of making Recent Documents show up in Word 2013, 2016. We also introduce a bonus tip to help you recover lost or deleted Word document on your computer.
Here, we also gathered some frequently asked questions about the MS Word document. If you are interested in one of them, continue reading and you may find a desired answer or satisfying solution toward your issues:
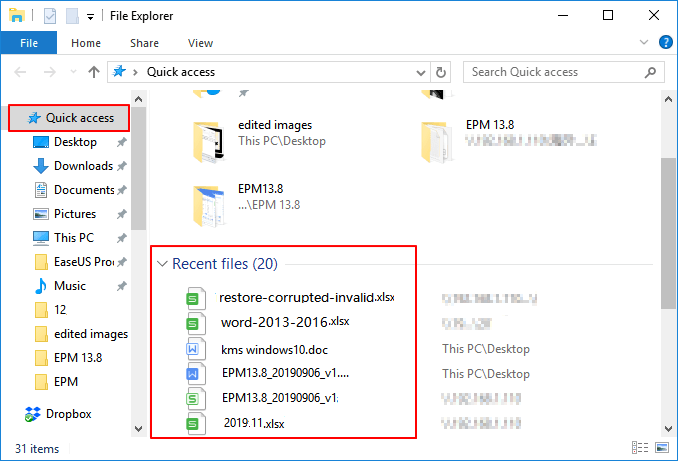
Question 1: How do I find my recent documents in Windows 10?
Answer: The recent documents option has been removed from Windows 10. However, you can still access all your recent files via Quick access on your PC.
Press Windows Key + E > Open File Explorer > Select «Quick access» > Check all your recently viewed files or documents under Recent files.
Question 2: How do I find recent documents in Word?
Answer: Your Recent Documents list is under the File menu in Word. To open it, you need to launch the Word application, go to File > Open > Click «Recent Documents» and then you will see a list of your recent documents.
You can simply click the document to open it. If you don’t see anything below the Recent Document list, try the provided solutions on this page to fix it.
Question 3. How do I recover an unsaved Word document?
Answer: Microsoft Office has added this feature to automatically keep the unsaved document when you accidentally closed the Word or Excel application. To restore the unsaved Word file, you can simply relaunch Word app > Go to File > Open > Click «Recover Unsaved Document» > Select the unsaved file and save it as .doc or .docx on another secure location.
If you have further questions on restoring lost or closed Word file without saving, refer to this link for more detailed solutions: 3 Ways to Recover Unsaved Word Document in Windows 10.
If you have more questions, try the Search options on our website (https://www.easeus.com) or go to the How-To tips page to find more solutions.
- Remove From My Forums
-
Question
-
I recently had to re-install Office 365 to my computer because something got corrupted. Now I get the message «Your administrator has turned off the recent documents list. Pick a place to browse for a document.» every time I open
one of the office programs. I am the administrator and cannot find anywhere to change this option. I am using Windows 8.1 preview on both of my computers. It is only affecting the computer I had to re-install Office on. My laptop still has
«recent workbooks list». I am the only user on this account.
Answers
-
Hi,
We noticed that you had posted a same thread in Microsoft Answers Forum.
«I logged in with a different account and «recent files history» is available. The only network this computer is connected to is «HOMEGROUP». I left the homegroup and still no «recent files».»
Based on my understand about your reply, Other user account is fine.
Please logon with this account, try this:
- Go to search and lookup «taskbar». (Located in Settings)
- Click on «Taskbar»
- Uncheck «Store and display recently opened items in Jump Lists.
Then located to %systemdrive%Users%username%AppDataRoamingMicrosoftWindowsRecent to see if there are some lists in there.
Karen Hu
TechNet Community Support
-
Marked as answer by
Monday, September 30, 2013 1:16 AM

1: принять слово в качестве примера краткое введение

2: Сначала откройте прогон или нажмите «Win + R», чтобы войти: GPDITIT.MSC Enter, откройте редактор политики локальной группы.

3: Выберите пользовательскую настройку — шаблон управления — «Пуск» и MENU TADINGBAR, дважды щелкните, чтобы открыть.

4: Найти «Не хранить запись недавно открытого документа», нажмите на левую, чтобы планировать настройки.

5: Выберите отключено, нажмите OK.

6: Открытое слово, опция — Advanced — Дисплей. Согласно вашему привычкам, это нормально ~

Закрепление файла в списке последних использованных документов
-
Откройте вкладку Файл.
-
Выберите пункт Открыть, чтобы просмотреть список последних использованных файлов.
-
Наведите указатель мыши на файл, который вы хотите закрепить, и выберите пункт Закрепить этот элемент в списке
 (справа от списка файлов).
Если файл закреплен в списке, значок булавки выглядит так: В более старых версиях Office он выглядит так:
 (справа от списка файлов).
 В более старых версиях Office он выглядит так:
Совет: Чтобы открепить файл, щелкните значок булавки еще раз.
Файлы, закрепленные в списке, выводятся в обратном хронологическом порядке (начиная с новых записей).
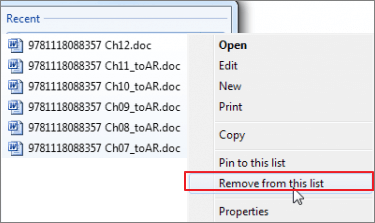
Удаление отдельного файла из списка недавно использовавшихся файлов
Если вы хотите удалить какие-либо файлы из списка, просто щелкните их правой кнопкой мыши и выберите команду Удалить из списка.
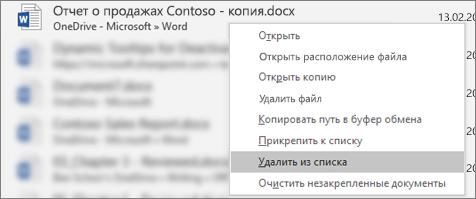
Внимание: Обязательно нажмите кнопку Удалить из списка, а не Удалить файл, если вы не хотите удалить сам файл из системы.
Изменение количества файлов, отображаемых в списке последних использованных файлов
-
Откройте вкладку Файл.
-
Выберите пункт Параметры.
-
Выберите пункт Дополнительно.
-
В группе Отображение в списке Число документов в списке последних файлов: выберите необходимое количество отображаемых файлов.
Совет: Чтобы не отображать файлы в списке последних использованных файлов, выберите в списке Число документов в списке последних файлов значение, равное нулю.
Удаление незакрепленных файлов из списка последних использованных файлов
-
Откройте вкладку Файл.
-
Нажмите кнопку Открыть.
-
Щелкните правой кнопкой мыши файл в списке и выберите команду Очистить незакрепленные документы.
-
Нажмите кнопку ДА, чтобы очистить список.
Почему в списке недавно использовавшихся файлов появились файлы, которые давно (или вообще) не открывались?
Начиная с Office 2013 список последних использовавшихся файлов синхронизируется с учетной записью Майкрософт. Это удобно, так как если вы используете несколько устройств (например, компьютер и ноутбук), в обоих списках будут одни и те же файлы.
Однако если у вас есть старый компьютер, который вы давно не включали, при его подключении к сети он может синхронизироваться, из-за чего некоторые документы их старого списка могут попасть в новый.
Кроме того, иногда это происходит, если кто-то другой — например, член вашей семьи — пользуется вашим компьютером. Если они вошли с вашей учетной записью, все документы, над которыми они работали, появятся в списке.
Лучший способ удалить такие файлы из списка — выполнить процедуру, описанную выше в разделе «Удаление отдельного файла из списка недавно использовавшихся файлов». Щелкните правой кнопкой мыши ненужные файлы и выберите команду Удалить из списка.
Закрепление файла в списке последних использованных документов
-
Откройте вкладку Файл.
-
Выберите пункт Последние, чтобы просмотреть список последних использованных файлов.
-
Щелкните правой кнопкой мыши файл, который вы хотите закрепить, а затем выберите команду Прикрепить к списку или щелкните значок булавки
.Когда файл закреплен в списке, значок булавки выглядит как приколотая булавка при взгляде сверху:
. -
Чтобы открепить файл, щелкните значок булавки еще раз.
 .
.-
Откройте вкладку Файл.
-
В группе Справка выберите команду Параметры.
-
Нажмите кнопку Дополнительно.
-
В группе Отображение в списке Число документов в списке последних файлов: выберите необходимое количество отображаемых файлов.
Примечание: Эти инструкции не относятся к InfoPath 2010.
-
Откройте вкладку Файл.
-
Выберите пункт Последние.
-
Установите флажок Число документов в списке последних файлов и укажите требуемое значение.
-
Ссылки в эти файлы будут отображаться над сведениями на панели навигации независимо от вашего местонахождения в представлении Backstage.
Примечание: Чтобы удалить список, снимите флажок.
-
Откройте вкладку Файл.
-
Выберите пункт Последние.
-
Щелкните правой кнопкой мыши файл в списке и выберите команду Очистить неприкрепленные элементы.
-
Нажмите кнопку Да, чтобы очистить список.
Примечание: Если задать количество последних использованных файлов равным нулю, список также будет очищен. Чтобы снова включить эту функцию, введите число, отличное от нуля. Обновите список, повторно открыв файлы и сбросив закрепленные элементы.