For a Microsoft Word 2000 version of this article, see
209227.
For a Microsoft Word 97 version of this article, see
181816.
For a Microsoft Word 7.0 version of this article, see
106388.
Summary
This article describes how to store and retrieve document variables while you are using Microsoft Word.
More Information
Microsoft provides programming examples for illustration only, without warranty either expressed or implied. This includes, but is not limited to, the implied warranties of merchantability or fitness for a particular purpose. This article assumes that you are familiar with the programming language that is being demonstrated and with the tools that are used to create and to debug procedures. Microsoft support engineers can help explain the functionality of a particular procedure, but they will not modify these examples to provide added functionality or construct procedures to meet your specific requirements.
For more information about how to use the sample code in this article, click the article number below to view the article in the Microsoft Knowledge Base:
290140 OFFXP: How to Run Sample Code from Knowledge Base Articles
You can use the Microsoft Visual Basic for Applications Variables collection to set and retrieve the contents of a string variable in a Word document or template.
Also, you can use the DocVariable field to retrieve the value of a document variable after it has been set to display within a Word document.
How to Set and Retrieve the Value of a Document Variable
The following sample macro uses the Variables property to store and then retrieve the value of a string variable named «FullName» with the current document.
Sub GetSetDocVars()Dim fName As String
fName = "Jeff Smith"
' Set contents of variable "fName" in a document using a document
' variable called "FullName".
ActiveDocument.Variables.Add Name:="FullName", Value:=fName
' Retrieve the contents of the document variable.
MsgBox ActiveDocument.Variables("FullName").ValueEnd Sub
NOTE: The following error message appears if the Variable name is already set in the document:
Run-Time Error «5903»: The Variable name already exists.
You must delete the name or just reset the value argument.
How to Delete a Document Variable
The following sample macro uses the Variables property to first set and retrieve the value of a document variable and then delete the variable from the active document.
Sub GetSetDeleteDocVars()Dim fName As String
fName = "Jeff Smith"
' Set contents of variable "fName" in a document using a document
' variable called "FullName."
ActiveDocument.Variables.Add Name:="FullName", Value:=fName
' Retrieve the contents of the document variable.
MsgBox ActiveDocument.Variables("FullName").Value
' Delete the variable.
ActiveDocument.Variables("FullName").DeleteEnd Sub
How to Retrieve the Value of a Document Variable by Using the DocVariable Field
The following sample macro uses the Variables property to set a document variable. Following the sample macro are steps to use the DocVariable field to retrieve the value into the contents of the same document.
Sub GetSetDocVars()Dim fName As String
fName = "Jeff Smith"
' Set contents of variable "fName" in a document using a document
' variable called "FullName."
ActiveDocument.Variables.Add Name:="FullName", Value:=fNameEnd Sub
To use the DocVariable field, follow these steps:
-
On the Insert menu, click Field.
Note In Microsoft Office Word 2007, click Quick Parts in the Text group on the Insert tab, and then click Field.
-
In the Categories box, select Document Automation.
-
In the Field names list, select DocVariable.
-
In the New Name box, under Field properties, type the name of the document variable.
NOTE: If you see Advanced field properties instead of
Field properties, click Hide Codes. -
Click OK.
If you need to preserve a value between sessions of a macro, you can store values by using any of the following methods:
-
Use the PrivateProfileString property to store values to a private settings file.
For more information about the PrivateProfileString property, in the Visual Basic Editor, click Microsoft Visual Basic Help on the Help menu, type PrivateProfileString Property in the Office Assistant or the Answer Wizard, and then click Search to view the topic.
-
Use the Variables property to store values in a document.
For more information about the Variables property, in the Visual Basic Editor, click Microsoft Visual Basic Help on the Help menu, type Variables property in the Office Assistant or the Answer Wizard, and then click Search to view the topic.
-
Use the Visual Basic for Applications Input/Output statements to write to a text file (for example, a Write statement or Print statement).
For more information about writing data to files, in the Visual Basic Editor, click Microsoft Visual Basic Help on the Help menu, type writing data to files in the Office Assistant or the Answer Wizard, and then click Search to view the topic.
-
Use the AutoTextEntry object to store values in an AutoText entry.
For more information about the AutoTextEntry object, in the Visual Basic Editor, click Microsoft Visual Basic Help on the Help menu, type AutoTextEntry object in the Office Assistant or the Answer Wizard, and then click Search to view the topic.
Need more help?
Want more options?
Explore subscription benefits, browse training courses, learn how to secure your device, and more.
Communities help you ask and answer questions, give feedback, and hear from experts with rich knowledge.
You can’t just type in Help+Manual variables as plain text as you can in a PDF template. To use Help+Manual variables in your Word DOCX templates you need to enter the variable in a Word field.
You can enter Help+Manual variables in any Word fields that get resolved to text. Help+Manual will find them and replace them with the variable value when you publish with the DOCX template. However, there are a two field types that you will probably find most useful: Comment fields and document properties.
Comment fields
These fields are best for inserting variables inside paragraphs or other items. Don’t confuse them with the Word comments feature! That is for peer review and is completely different – variables entered in Word comments won’t work.
To enter a comment field with a Help+Manual variable in Word:
1.Open the DOCX template in Word and click in the place where you want to insert the variable.
2.Select the tab in Word, then in the group select to open the Field dialog.
3.Select Comments in the box, then type in the Help+Manual variable in the box, using the format <%VARIABLE_NAME%>.
Document properties fields
You can see examples of these fields in some of the standard DOCX templates included with Help+Manual. They are used for the Title, Author, Year, Abstract and Company Information items displayed on the cover page, for example.
To enter a document properties field with a Help+Manual variable in Word:
1.Open the DOCX template in Word and click in the place where you want to insert the variable.
2.Select the tab in Word, then in the group select and then the property you want to insert.
3.This inserts the property item as a box on the page containing a field. Then type in the Help+Manual variable in the empty field, using the format <%VARIABLE_NAME%>.
Insert Fields in a Microsoft Word Document to Display Variable Content
by Avantix Learning Team | Updated January 10, 2021
Applies to: Microsoft® Word® 2010, 2013, 2016, 2019 or 365 (Windows)
You can insert built-in or custom fields in Word documents to display variable content that will change when you update the fields. Some fields (like page numbers, merge fields or cross-references) are inserted automatically when you use Microsoft Word features. If you want to insert custom fields, you will need to create custom document properties.
By default, Word displays the result of a field rather than its field codes. You can right-click a field and select Toggle Field Codes to display field codes or field results.
Recommended article: How to Hide Comments in Word (or Display Them)
Do you want to learn more about Microsoft Word? Check out our virtual classroom or live classroom Word courses >
If you are working with fields in Microsoft Word, you will be using quite a few function keys (such as F9). On some laptops, you will need to press the Fn key on your keyboard to enable your function keys. For example, instead of pressing F9 to update a field or fields, you would press Fn + F9.
Inserting built-in fields
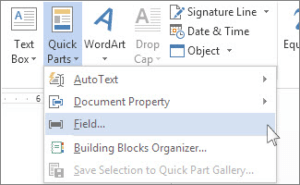
To insert a field, click Quick Parts in the Text group on the Insert tab in the Ribbon. The Field command appears in the Quick Parts drop-down menu as follows:
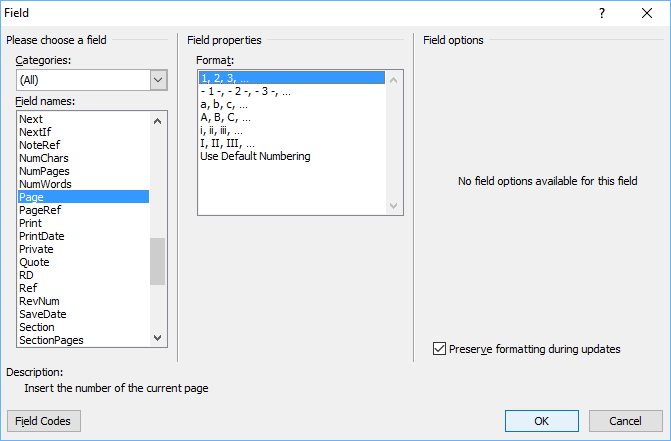
Below is the Field dialog box in Microsoft Word with Page selected:
To insert a built-in field using the Field dialog box:
- Navigate to the location in the Word document where you want to insert a field.
- Click the Insert tab in the Ribbon and then click Quick Parts in the Text group. A drop-down menu appears.
- Select Field. A dialog box appears.
- In the list of Field names, select a field. You can filter the list by clicking the down arrow in the Categories list and selecting a category first. Select All to display all fields.
- Under Field properties, select any properties or options you want.
- To view the codes for a field in the Field box, click Field Codes. For some fields, this button is clicked by default.
- Ensure that Preserve Formatting During Updates is checked so that formatting you apply is not removed when the fields are updated.
- Click OK. The field is inserted into the document.
Format the field results by applying text formatting to the field using the Home tab in the Ribbon.
You can view or hide all field codes in your document by pressing Alt + F9. Field codes appear between braces or curly brackets { } and you cannot type these braces. Be sure to hide the field codes again by pressing Alt + F9.
To edit a built-in field in the Field dialog box:
- Right-click the field and then click Edit Field. A dialog box appears.
- Change the field properties and options.
- Click OK.
Understanding Word document properties
There are 3 different types of document properties in Word:
- Standard document properties (also called built-in document properties)
- Custom document properties
- Document library properties
Word documents contain a set of standard document properties such as Title, Author, Keywords and Comments. These properties are used to store metadata about your document. You cannot change the name of standard properties but you can edit the value of some of them (such as Title). Other standard properties that cannot be edited store data that is updated automatically (such as Size or Last Modified).
Document library properties are related to documents that are stored in a document library on a website or in a public folder (such as files in SharePoint).
In addition to the standard properties, you can create your own custom document properties. These properties can be created to store additional information in a document other than the standard document properties. For example, custom document properties could be created for Product1, Product2, Product3, Sponsor, Project Manager, Cell Phone or Disclaimer. Each custom document property must be assigned a name, a data type and a value. The four data types are Text, Date, Number and Yes or No.
After you create custom document properties for your Word document, you can then insert them as custom fields.
Adding a custom document property
To add a custom document property:
- Open the Word document in which you want to add a custom document property.
- Click the File tab in the Ribbon and then click Info on the left. Info is usually selected by default.
- On the right side of screen, click Properties. A drop-down menu appears.
- Select Advanced Properties. A dialog box appears.
- Click the Custom tab in the dialog box.
- Type a name for the custom document property in the Name box. You can also choose one of the other properties that appear in the drop-down list.
- Select Text, Date, Number or Yes or No as the data type for the custom property.
- Enter a value for the property in the Value box.
- Click Add. The custom property appears in the list at the bottom of the dialog box.
- Click OK.
After you have added a custom document property, you will be able to insert it into your document as a field.
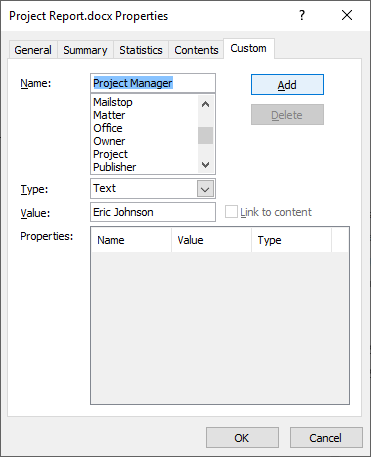
In the example below, we’re adding a field for Project Manager:
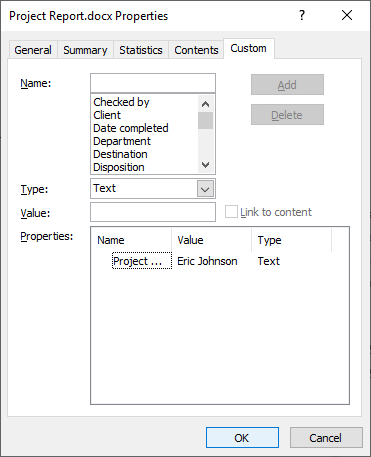
After you click Add, the custom field appears in the Properties list:
Inserting custom document property fields
The value of a custom document property can be inserted in a Word document using DocProperty fields. Custom document properties that have been added to a document are saved with the document whether they are inserted as a DocProperty field or not. You can insert DocProperty fields multiple times in a document.
To insert a custom document property field using the Field dialog box:
Navigate to the location in the Word document where you want to insert a field.
- Click the Insert tab in the Ribbon and then click Quick Parts in the Text group. A drop-down menu appears.
- Select Field. A dialog box appears.
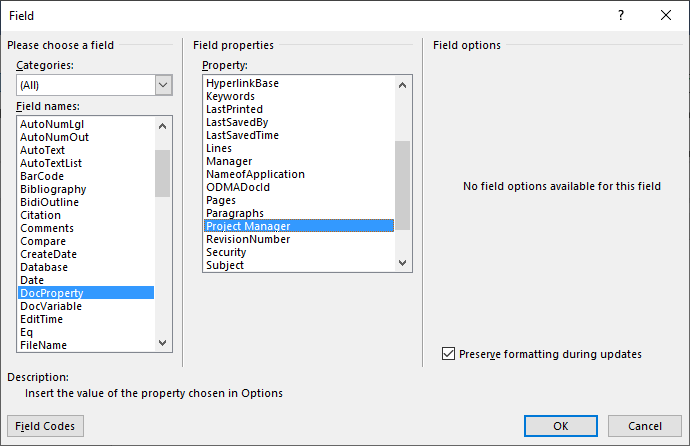
- In the list of Field names on the left, select DocProperty.
- Under Field properties, select a property name.
- To view the codes for a field in the Field box, click Field Codes. For some fields, this button is clicked by default.
- Ensure that Preserve Formatting During Updates is checked so that formatting you apply is not removed when the fields are updated.
- Click OK. The field is inserted into the document.
In the example below, we’re inserting the custom Project Manager field we created in Advanced Properties:
Updating built-in and custom fields
Word should automatically update fields when a document is opened. Many fields are also updated automatically when you go to Print Preview (click the File tab and then click Print). If you prefer, you can update fields manually.
To update a field manually, right-click the field and then click Update Field or press F9.
To update all fields manually in the main body of a document, press Ctrl + A to select all and then press F9.
Some fields in headers, footers or text boxes must be updated separately. Click in the header, footer or text box, press Ctrl + A to select all and then press F9. Page fields do not need to be updated manually because they update when you go the Print Preview.
If you want to edit a custom DocProperty field, you will need to edit it in the Advanced Properties dialog box.
Subscribe to get more articles like this one
Did you find this article helpful? If you would like to receive new articles, join our email list.
More resources
How to Create, Save, Edit and Use Templates in Word
How to Insert, Format and Update Cross-References in Word
5 Ways to Insert the Division Symbol in Word (Type or Insert ÷)
10 Microsoft Word Tips, Tricks and Shortcuts for Selecting in Tables
How to Create a Table of Contents in Word (Insert, Format and Update a TOC)
Related courses
Microsoft Word: Intermediate / Advanced
Microsoft Excel: Intermediate / Advanced
Microsoft PowerPoint: Intermediate / Advanced
Microsoft Word: Long Documents Master Class
Microsoft Word: Styles, Templates and Tables of Contents
Microsoft Word: Designing Dynamic Word Documents Using Fields
VIEW MORE COURSES >
Our instructor-led courses are delivered in virtual classroom format or at our downtown Toronto location at 18 King Street East, Suite 1400, Toronto, Ontario, Canada (some in-person classroom courses may also be delivered at an alternate downtown Toronto location). Contact us at info@avantixlearning.ca if you’d like to arrange custom instructor-led virtual classroom or onsite training on a date that’s convenient for you.
Copyright 2023 Avantix® Learning
Microsoft, the Microsoft logo, Microsoft Office and related Microsoft applications and logos are registered trademarks of Microsoft Corporation in Canada, US and other countries. All other trademarks are the property of the registered owners.
Avantix Learning |18 King Street East, Suite 1400, Toronto, Ontario, Canada M5C 1C4 | Contact us at info@avantixlearning.ca
Certain types of documents, such as Agreements, Orders, Invoices, etc., often use the same titles, names, addresses, etc. through the document. For simplicity and convenience of working in Word, you can rely on AutoText entries and AutoCorrect feature, but you can’t update auto-corrected text later. Fortunately, you can create custom variables (custom document properties) to insert them into your document.
Specify, or modify custom variables
To specify, modify, or remove the document information, do the following:
1. On the File tab, click Info.
2. On the Info pane, click the Properties dropdown list, then click Advanced Properties:

3. In the Advanced Properties dialog box, on the Custom tab:
- Choose any of the predefined variables or type a new name of your new variable,
- Choose a type from Text, Date, Number,
Yes or No, - Enter a value:
- Click the Add button.
For example:
- the pre-defined variable:
- custom variable:
Use document information in the document
To use the document properties, do the following:
1. Position the cursor where you want to add the document information.
2. On the Insert tab, in the Text group, click the Quick Parts button, then click Field…:

or

3. In the Fields dialog box:
- In the Field names list, choose the DocProperty field,
- In the Property list, choose the property you want to insert:

- Click OK.
For example:

We have a template in Word, where we find and replace variables. e.g:Client Name.
Is there a way to autofill the variables with the content entered. I explored through mail merge and template/form fields. But did not get a user friendly material for a novice.
Kindly let me know if there is an walkthrough for the same.
asked Aug 27, 2012 at 19:01
1
I think you can do it with some fields. I recently had to overcome some of the limitations of Word’s mail merge features by creating local variables.
You can create local variables in word by doing the following
{ SET localClientName { MERGEFIELD ClientName }}
The above creates a local variable called localClientName which can be referenced anywhere in the document by the following:
{ localClientName }
You just need to be sure to use the matched quotes. These are created by pressing ‘ctr + F9.’ It will not work if you use normal curly braces.
I hope this helps.
answered Nov 7, 2012 at 21:18
bweaver2bweaver2
612 silver badges3 bronze badges
You can set variables like this:
{ SET someTextToRepeat "Here's some plain text" }
{ SET paymentDetails "Payment Details: { MERGEFIELD Invoice.Total }" }
And you can reference paymentDetails like this
{ paymentDetails }
Remember not to just type the {} but press Ctrl-F9 to create them.
answered Jul 4, 2019 at 13:30
noelicusnoelicus
14.3k2 gold badges91 silver badges109 bronze badges

