
Практически на каждом компьютере установлен пакет Microsoft Office, в состав которого входит ряд специализированных программ. Каждая из этих программ предназначена для различных целей, но многие функции у них схожи. Так, к примеру, создавать таблицы можно не только в Excel, но и в Word, а презентации не только в PowerPoint, но и в Ворде тоже. Точнее, в этой программе можно создать основу для презентации.
Урок: Как в Word сделать таблицу
Во время подготовки презентации предельно важно не погрязнуть во всей красоте и обилии инструментов PowerPoint, которые вполне могут запутать малоопытного пользователя ПК. Первым делом следует сосредоточиться на тексте, определив содержание будущей презентации, создав ее костяк. Как раз все это и можно сделать в Ворде, как раз об этом мы и расскажем ниже.
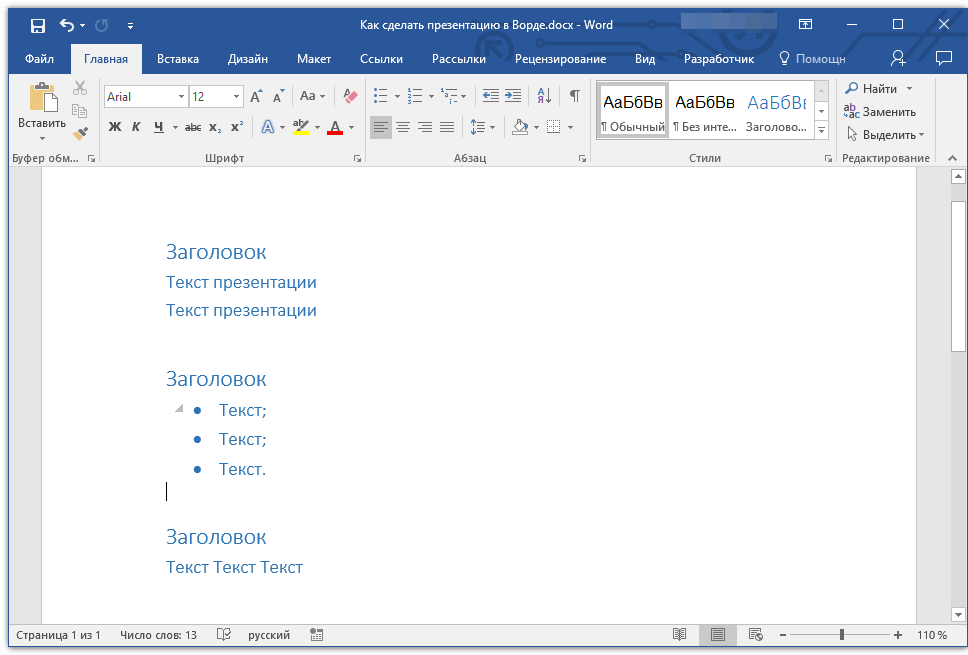
Типичная презентация — это набор слайдов, которые, помимо графических компонентов, имеют название (заголовок) и текст. Следовательно, создавая основу презентации в Word, следует упорядочить всю информацию в соответствии с логикой ее дальнейшего представления (показа).
Примечание: В Ворде можно создать заголовки и текст для слайдов презентации, изображение же лучше вставлять уже в PowerPoint. В противном случае графические файлы будут отображаться некорректно, а то и вовсе будут недоступны.
1. Определитесь с тем, сколько у вас будет слайдов в презентации и отдельной строкой пропишите в документе Word заголовок для каждого из них.
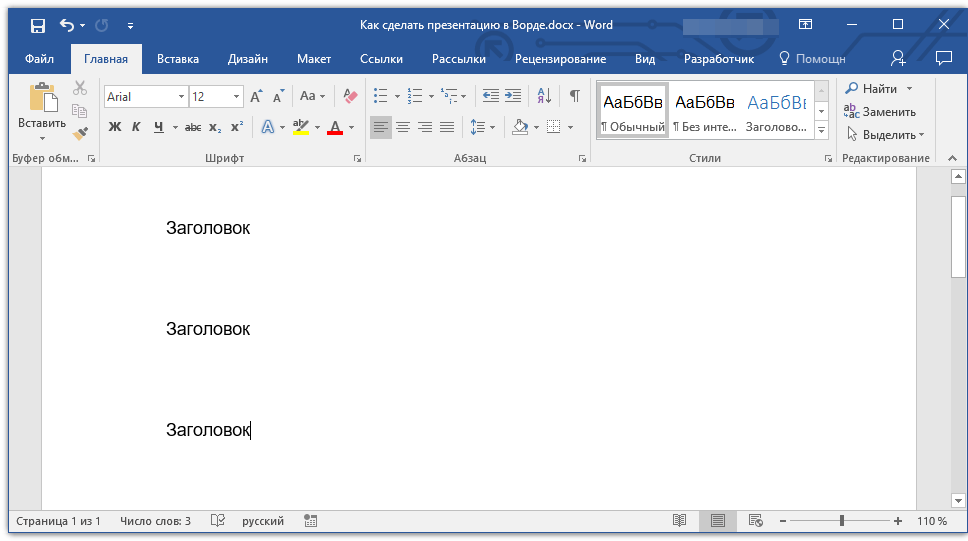
2. Под каждым заголовком впишите необходимый текст.
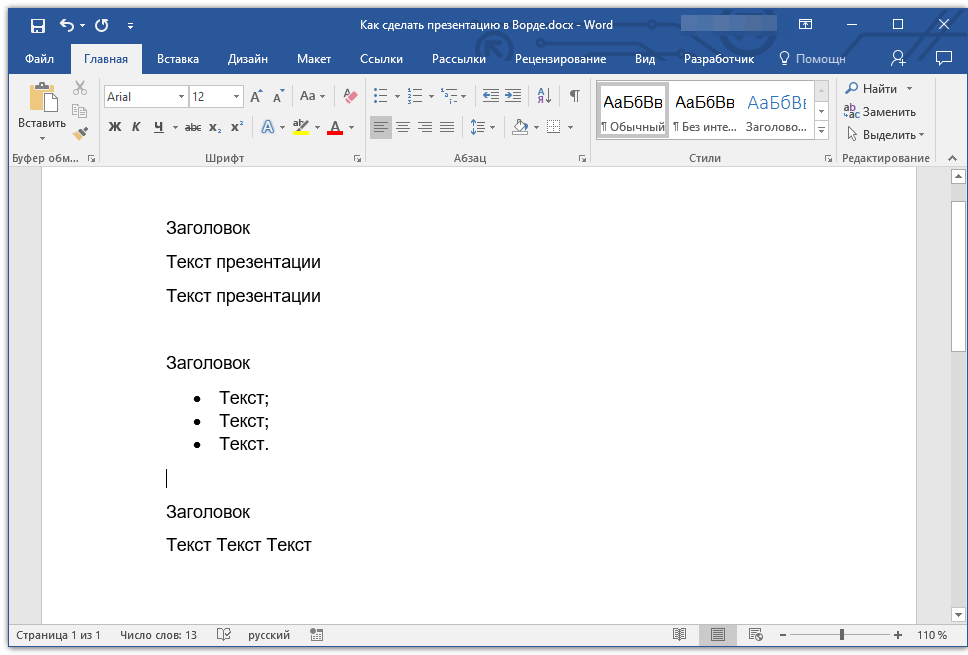
Примечание: Текст под заголовками может состоять из нескольких пунктов, в нем могут присутствовать маркированные списки.
Урок: Как в Ворде сделать маркированный список
- Совет: Не делайте слишком объемные записи, так как это усложнит восприятие презентации.
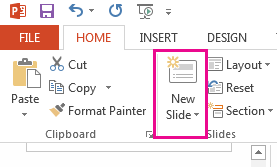
3. Измените стиль заголовков и текста под ними, чтобы PowerPoint смог автоматически расположить каждый фрагмент по отдельным слайдам.
- Поочередно выделите заголовки и примените для каждого из них стиль «Заголовок 1»;
- Поочередно выделите текст под заголовками, примените для него стиль «Заголовок 2».
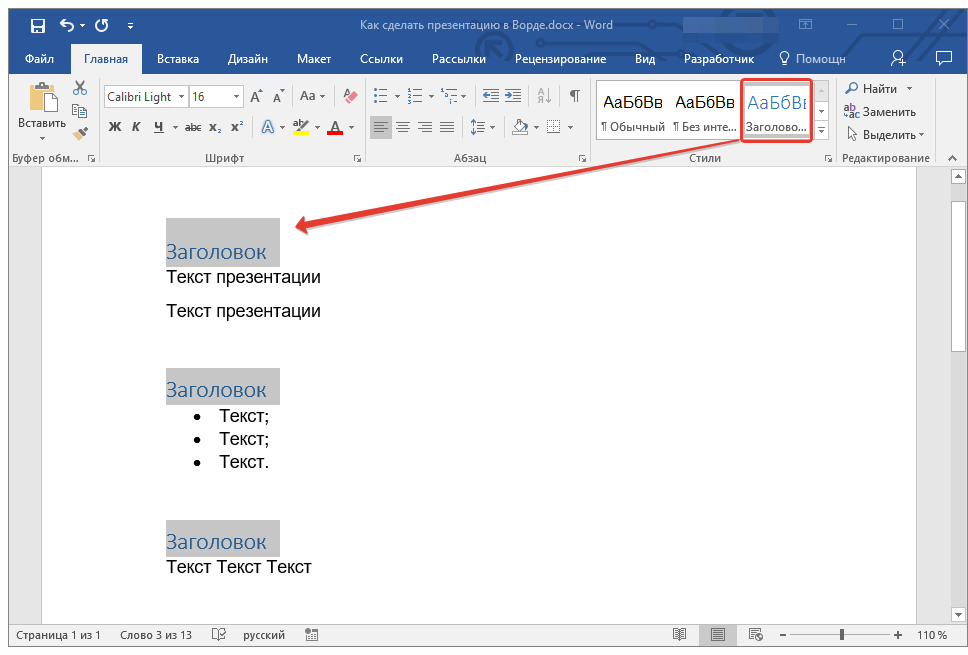

Примечание: Окно выбора стилей для текста находится во вкладке «Главная» в группе «Стили».
Урок: Как в Word сделать заголовок
4. Сохраните в удобном месте документ в стандартном формате программы (DOCX или DOC).
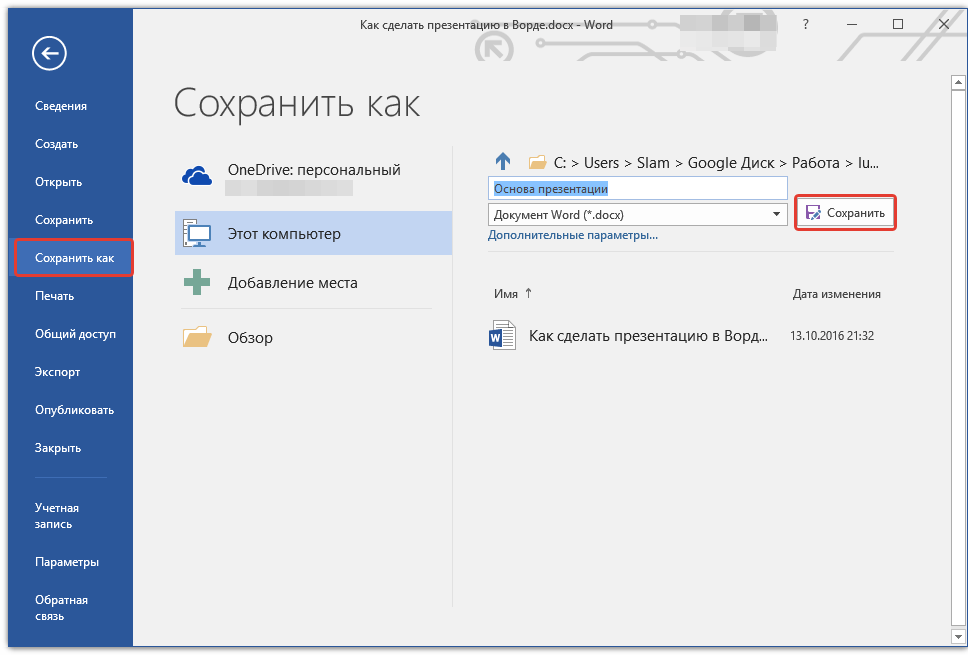
Примечание: Если вы используете старую версию Майкрософт Ворд (до 2007 года), при выборе формата для сохранения файла (пункт «Сохранить как»), можно выбрать формат программы PowerPoint — PPTX или PPT.
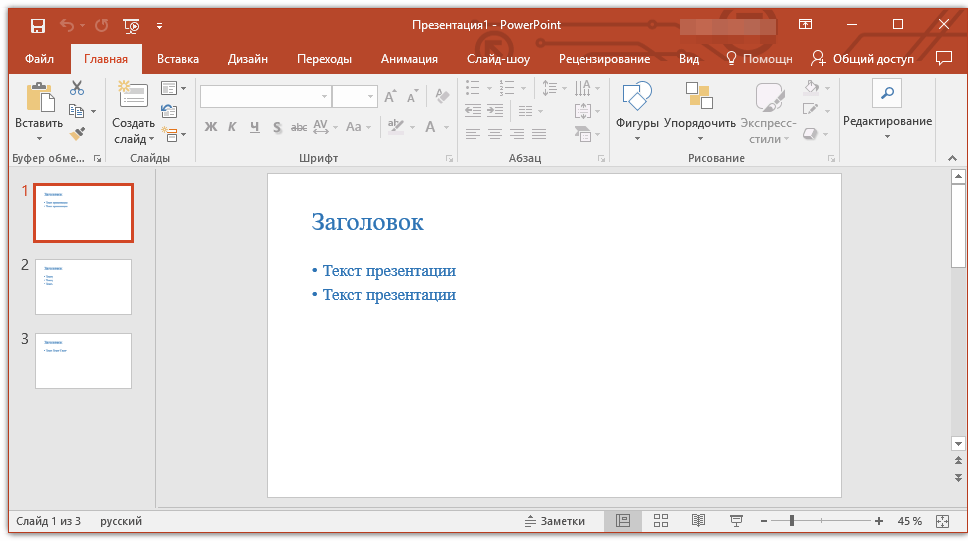
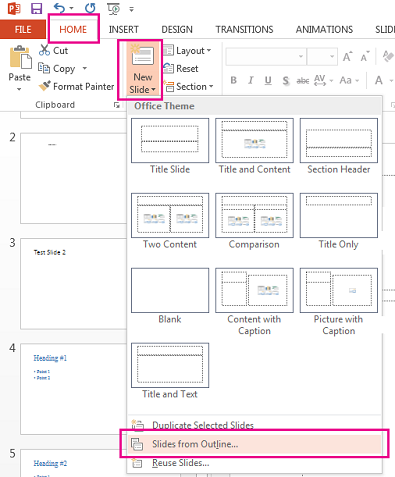
5. Откройте папку с сохраненной основой презентации и кликните по нему правой кнопкой мышки.

6. В контекстном меню нажмите «Открыть с помощью» и выберите PowerPoint.

Примечание: Если программа не представлена в списке, найдите ее через пункт «Выбор программы». В окне выбора программы убедитесь в том, что напротив пункта «Использовать выбранную программу для всех файлов такого типа» не установлена галочка.
- Совет: Помимо открытия файла через контекстное меню, вы также можете сначала открыть PowerPoint, а затем уже открыть в нем документ с основой для презентации.
Основа презентации, созданная в Word, будет открыта в PowerPoint и разделена на слайды, количество которых будет идентично количеству заголовков.
На этом мы закончим, из этой небольшой статьи вы узнали, как сделать основу презентации в Ворде. Качественно преобразить ее и улучшить поможет специализированная программа — PowerPoint. В последнюю, к слову, можно еще и таблицы добавлять.
Урок: Как вставить таблицу Word в презентацию
Еще статьи по данной теме:
Помогла ли Вам статья?
PowerPoint for Microsoft 365 PowerPoint 2021 PowerPoint 2019 PowerPoint 2016 PowerPoint 2013 More…Less
Embed Word content directly into your PowerPoint presentation. You can import a Word document as an object, which inserts a static snapshot of the document. This is useful when the Word document is a single page and has pictures. Another option is to use a Word outline as the foundation for a presentation.
In this article:
-
Export a Word document to PowerPoint
-
Insert a Word document as an object
-
Use a Word document as an outline to build your presentation
Export a Word document to PowerPoint

-
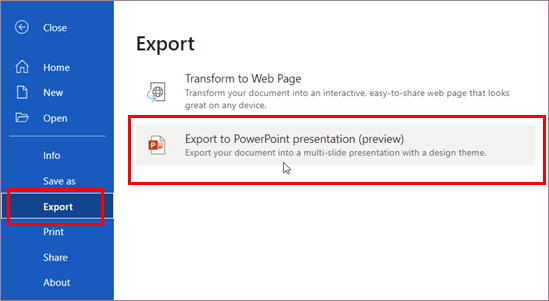
Open the document you want to transform into a presentation in Word for the web. Make sure that it contains only text. The headings in the document will become the slide headings in the presentation.
-
Go to File > Export > Export to PowerPoint presentation.

-
In the Export to presentation window, choose a design theme for your presentation, and then select Export.
-
Word exports and transforms the document, applying the design theme you chose.
-
After the transformation is complete, select Open presentation to review the results in PowerPoint for the web.
Word for the web saves the transformed presentation to the root folder of your OneDrive.
This feature is only available for Word for the web. For more information, see Export Word documents to PowerPoint presentations.
Top of Page
Insert a Word document as an object
The easiest way to insert a Word document is to first create your document in Word, then add it to your presentation.
-
Select the slide in which you want to place the Word document.
-
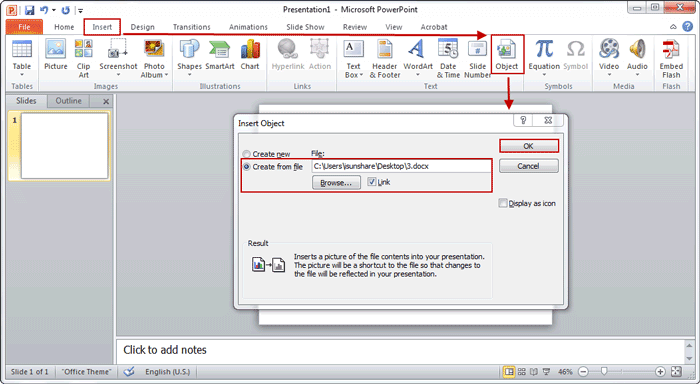
Click Insert > Object.
-
If the Word document already exists, in the Insert Object dialog box, select Create from file.
-
Click Browse to locate the Word document you want to insert. Select your Word document, and click OK.
-
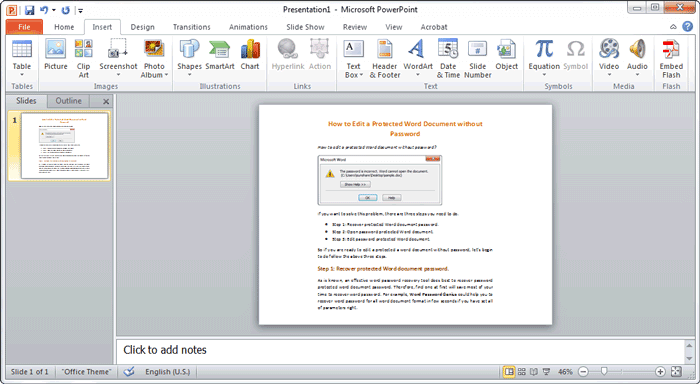
Make sure the Link and Display as icon check boxes are clear. Click OK to insert the contents of your Word document as an object.
Note: If you prefer to have your Word document open in Word instead of in PowerPoint, select the Display as icon check box to insert an icon into the presentation. Clicking the icon will open the document in Word.
Tip: You can also insert a linked object. Select the Link check box to make your object a shortcut to the Word document you imported.
Top of Page


Use a Word document as an outline to build your presentation
Discover more PowerPoint training at LinkedIn Learning
-
In your Word document, click Home.
-
Use Styles to format the content in your Word document.
-
Highlight the content you want to use as a slide title, and select Heading 1 in Styles.
-
Highlight the content you want to use as the slide text, and select Heading 2 in Styles.
-
-
In the Word document, click File > Save, and then click File > Close.
Note: Your Word document must be closed to insert it into a PowerPoint presentation.
-
Open PowerPoint, and click Home > New Slide.
-
Select Slides from Outline.
-
Find and select the Word document in the Insert Outline dialog box, and click Insert. A new slide will be created for each Heading 1 in you document.
Note: If your Word document contains no Heading 1 or Heading 2 styles, PowerPoint will create a slide for each paragraph in your content.
Top of Page
See also
Understand the differences between linked objects and embedded objects
Change linked or embedded objects
Discover more courses like this at LinkedIn Learning
Need more help?
Want more options?
Explore subscription benefits, browse training courses, learn how to secure your device, and more.
Communities help you ask and answer questions, give feedback, and hear from experts with rich knowledge.
Most Microsoft Office apps play nicely together, and Word and PowerPoint are no exception. In this lesson, you’ll learn how to insert a Word document into your PowerPoint presentation.
We also have a helpful complement to this tutorial. Download our FREE eBook: The Complete Guide to Making Great Presentations. Grab it now before you read on.


Note: In this tutorial we use the Simphony template. You can find more great PPT presentation templates on Envato Elements or GraphicRiver or in our Ultimate Guide to the Best Microsoft PowerPoint Templates.
How to Insert Word Documents Into PowerPoint Quickly
Note: Watch this short tutorial screencast or follow the quick steps below, that complement this video.
1. Insert Word Document File Into PowerPoint
The first way that you can add a Word document to your PowerPoint presentation is to go to the Insert tab and choose Object. Let’s choose Create from file, and then browse to where our Word document is stored.
.jpg)
.jpg)
.jpg)
For our first example, let’s tick this Display as icon and then press OK. Now, you can see there’s a Word document icon here in the presentation. This file is actually inside the PowerPoint file now. And you can double click it to open it up inside of Word.
.jpg)
.jpg)
.jpg)
Even if you send this presentation to someone else, the Word document file is still inside and they can access it.
2. Insert Word Document Text Into PowerPoint
Another way that you can work with a Word document is to insert some of the content from inside it into the presentation. Let’s follow the same steps here, but this time we won’t check the Display as icon option.
.jpg)
.jpg)
.jpg)
When we press OK, we’ll actually see a text box with content from inside the Word file itself. The text might need some reformatting or reworking, but it’s still far faster than re-creating it from scratch.
Finishing Up!
You’ve just learned how to insert a Word document into PowerPoint using two different options. Don’t forget these options when you need to work with Word and PowerPoint documents in tandem.
More Envato Tuts+ PowerPoint Presentation
Learn more in our PowerPoint tutorials and quick video tutorials on Envato Tuts+. We’ve got an assortment of PowerPoint material to help you work better with images in your presentations:
You can also find great PowerPoint presentation templates with premium designs on GraphicRiver or Envato Elements. Or, browse through our selection of the best Microsoft PowerPoint designs:
Make Great Presentations (Free PDF eBook Download)
We also have the perfect complement to this tutorial, which will walk you through the complete presentation process. Learn how to write your presentation, design it like a pro, and prepare it to present powerfully.


Download our new eBook: The Complete Guide to Making Great Presentations. It’s available for free with a subscription to the Tuts+ Business Newsletter.
The Microsoft Office package contains popular programs for a wide range of applications suited to the office and everyday life. The Word software, for example, is ideal for creating and editing texts. However, the word processing program is not as suited for presenting what’s been written. For this purpose, Microsoft offers the presentation software PowerPoint.
If you only need to use a short section of text from Word in your presentation, the copy and paste function is usually enough. For longer texts, Microsoft offers two practical options for adding a Word document to PowerPoint. We’ll explain the two options step by step.
Contents
- Insert Word document into PowerPoint as an object: here’s how
- Step 1: Open “Insert object” window
- Step 2: Select Word file
- Step 3: Edit object
- Insert formatted Word document in PowerPoint: step-by-step instructions
- Step 1: Adjust Word format
- Step 2: Save changes and close Word
- Step 3: Insert Word document into PowerPoint
- Step 4: Change text format
Insert Word document into PowerPoint as an object: here’s how
Inserting a Word file into PowerPoint as an object is ideal when things have to get done quickly. It allows you to insert short texts on a slide of your presentation with just a few clicks. Splitting up the text into several slides is done manually. In the following, we explain step by step how to insert your Word document as an object in PowerPoint.
Tip
The fastest way to create a new slide for a “Word object” is through a shortcut. To do this, press down the keys [Ctrl] + [M] at the same time. Find out about other PowerPoint shortcuts in our article “The best PowerPoint shortcuts”.
Step 1: Open “Insert object” window
Open an empty or existing PowerPoint presentation. Select the “Insert” tab from the menu. Then, under “Text” in the menu ribbon, click on the icon for objects:
Step 2: Select Word file
The window “Insert object” will now open. With your left mouse, select the option “From file” and then click on “Search.” Using the file path, select your Word document and confirm by clicking on “OK.”
Note
Make sure that the option “Display as icon” is deactivated.

Step 3: Edit object
PowerPoint inserts the Word file into the selected slide. You then have the option of moving the object or adjusting its size. To do this, select it with the left side of your mouse. Keep it pressed and drag the object to the desired position or format.

To make changes to the text, select the object by double clicking on it. You now have the option to adjust the text as usual in PowerPoint.

Tip
PowerPoint and Word can be purchased at a great price with the Microsoft 365 package through IONOS. Use the popular Office programs on up to five devices per user!
Insert formatted Word document in PowerPoint: step-by-step instructions
The second way to add a Word document to PowerPoint requires that you adjust the formatting in the Word file. The advantage of this option is that PowerPoint automatically splits the content across several slides. With the appropriate formatting, you specify how the splitting is done. Follow the step-by-step instructions to insert a formatted Word file into PowerPoint.
PowerPoint with Microsoft 365 and IONOS!
Use Powepoint to create presentations that stand out using modern designs — included in all Microsoft 365 packages!
![]() Office Online
Office Online
![]() OneDrive with 1TB
OneDrive with 1TB
![]() 24/7 support
24/7 support
Note
You don’t have time to adjust the format of your Word document? Then you can start with step 3 and follow the instructions from there. In this case, PowerPoint will create a new slide in the presentation for each paragraph.
Step 1: Adjust Word format
Open your Word document and go to the “Start” tab. Under the “Formatting” section you’ll find various format templates. To insert the text with formatting into your PowerPoint presentation, you only need to use two format templates:
- PowerPoint generates the slide titles of your presentation from text sections with the format template “Heading 1”
- PowerPoint generates text on the slides from sections with the format “Heading 2”

Step 2: Save changes and close Word
Save and close the file before inserting the Word document into PowerPoint. To do this, select the path “File” > “Save” from the menu and then “File” > “Close.”

Step 3: Insert Word document into PowerPoint
Open your PowerPoint presentation. On the “Insert” tab, select “New slide” from the drop-down menu. Here, click on the “Slides from outline” option and then open the Word document using the corresponding file path.

Step 4: Change text format
PowerPoint inserts the Word file and splits the text over several slides. Later, you have the option to adjust the font as usual.

Tip
Using PowerPoint Macros can make frequent tasks and actions easier. In this way, you can save keystroke and mouse click sequences and use them at any time.

Word documents: how to save as a PDF file
If you want to send a Word document or prepare it for printing, it’s recommended you know how to save it as a PDF file. This way, you can be sure that the formatting of your document won’t change and that others will not be able to edit it without permission. For simple conversion tasks, the save function in Word is often sufficient. However, there are some dedicated tools which offer a wider…
Word documents: how to save as a PDF file

How to remove a watermark in Word
Watermarks are a handy way to label documents in Microsoft Word. You can insert a watermark so that your text or your company logo sits discreetly in the background of the page. However, sometimes you might not be happy with how the watermark looks, or you don’t need the watermark at all anymore. We’ll show you two ways to remove a watermark in Word.
How to remove a watermark in Word

PowerPoint: Set portrait orientation – how it works
The standard orientation for PowerPoint slides is horizontal, as this format provides the best foundation for most presentations to portray information. There is also content, however, for which a portrait orientation would be the better choice. Find out in this article what you have to do to change your presentation or individual PowerPoint slides to portrait view.
PowerPoint: Set portrait orientation – how it works

The PowerPoint Slide Master in detail
The PowerPoint “Slide Master” view allows you to create what is known as a master slide. This master slide then acts as a template for all the other slides in the presentation. The advantage of this is that all of the items in the template are automatically transferred to all of the other slides, so you don’t need to copy images, logos, designs or font formats onto each slide one by one.
The PowerPoint Slide Master in detail
Download PC Repair Tool to quickly find & fix Windows errors automatically
Microsoft Word has been specifically built keeping in mind users’ needs. As a result, three new presentation features have been included in the Office product. These features allow every Word user to focus on the content presented as well as be in control of their views.
![]()
Let’s take a look at three of the Word presentation features.
1] Attendee Independent Navigation:

Sometimes, it so happens the person who is presenting the content moves on before the person whom he is sharing the content with has finished reading. This interrupts the reader and prevents him from reading any further.
As a solution to this problem, Word has included a temporary alert feature that alerts a reader/attendees they are no longer following the presenter. A status bar at the bottom of the Word file informs attendees they are no longer following the presenter and that they are independently reading through the document using their mouse, keyboard, or touch input.
The mode, however, can be reversed at any given time and a reader can invariably switch back to Follow Presentation mode, whenever required. All he needs to do is click the Follow Presenter button located in the top toolbar. Once enabled, it allows attendees to easily go back to the same place the presenter is presenting.
Read: How to view Notes in PowerPoint with Presenter view
2] Presenter Edits:
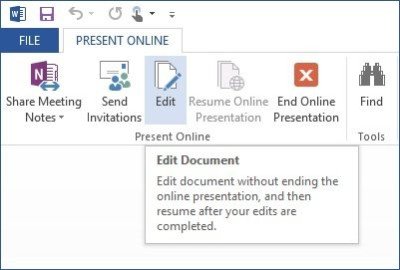
No one is perfect! So, while reading a document together, you might come across certain typos or minor edits, such as correcting the spelling of someone’s name, etc. To beat this problem, an editing feature that allows presenters to quickly make changes and update the document for attendees has been provided. See the screen-shot.
3] Download and Distribute:
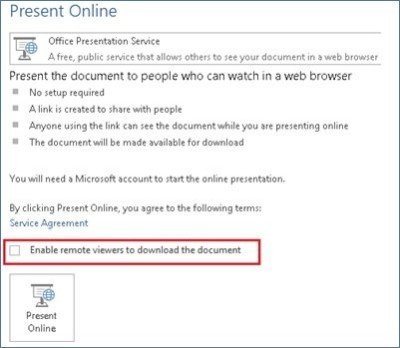
Word makes the process of distributing a document with the attendees extremely smooth. How? It will support a ‘Enable remote viewers’ option to help readers/attendees download the document when starting the presentation.
Hope this helps.
Now read: Wrong Email alias showing in Outlook.
A post-graduate in Biotechnology, Hemant switched gears to writing about Microsoft technologies and has been a contributor to TheWindowsClub since then. When he is not working, you can usually find him out traveling to different places or indulging himself in binge-watching.

When we are editing a PowerPoint presentation, probably some contents in Word document need to be imported into presentation. If we directly copy content from word document and then paste them in presentation, probably lots of time will be wasted. But suppose we can directly insert Word document into presentation, it would save most of time to do other things.
By inserting a Microsoft Word document into your PowerPoint presentation, you can include large amounts of information without using dozens of separate slides. If you choose to link to the document instead of embedding it, changes to the document are automatically reflected in PowerPoint. Alternatively, you can insert only a part of the document into the presentation.
- Section 1: Insert an entire Word document into presentation with link
- Section 2: Insert a portion of Word document into presentation
Section 1: Insert an Entire Word Document into PowerPoint Presentation
There are two ways available for you to insert entire word document into presentation, directly embedding documents in presentation or linking to word document in presentation.
Step 1: Open the presentation in PowerPoint, select the slide from the left pane and then switch to the Insert tab.
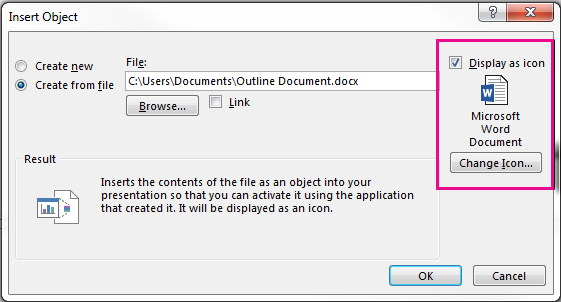
Step 2: Click the Object button in the Text group and Insert Object dialog appears. Click the Create from file radio button and then click the Browse button, and select the Word document in Browse window.
Step 3: Check the Link box or not. If you want to link to the document instead of embedding it, check it and when you edit linked Word document, the changes are inserted in PowerPoint automatically.
Additionally, check the Display as icon box to display the object as an icon instead of displaying the first page of the document on the slide.
Step 4: Click OK to embed or link to the Word document and then save the changes by pressing Ctrl + S.
Tips: You can open and edit the document from PowerPoint if you have Microsoft Word installed on your computer. Deleting, renaming or moving a linked Word document may cause errors in the presentation. PowerPoint may not be able to find and display the document.
Section 2: Insert a Portion of Word Document into PowerPoint Presentation
Besides insert entire word document into presentation, you also could insert only a portion of the Word document into PowerPoint by using the Paste Special option.
Step 1: Select the section you want to copy from Word document and copy it to the clipboard.
Step 2: In PowerPoint, click the arrow below Paste in the Clipboard group on the Home tab and select Paste Special.
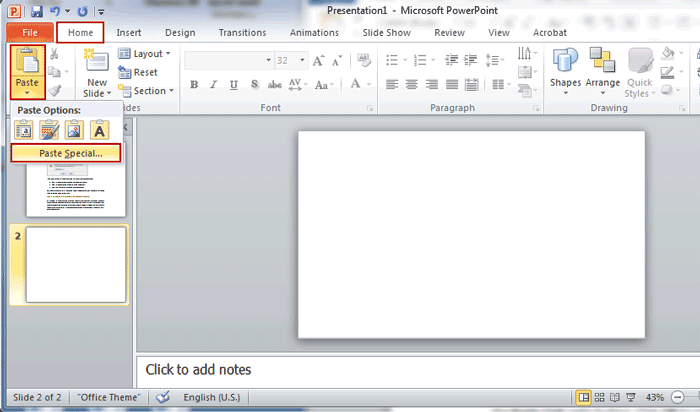
Step 3: In Paste Special dialog, select Microsoft Word Document Object from the Paste As box. Click OK to paste the data from the clipboard into a new object on the slide.
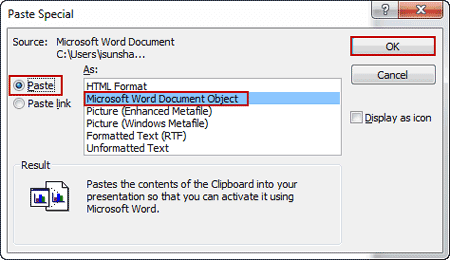
If you want to create a link to the Word document, click the Paste Link radio button. Click OK to create the Word document object.
Related Articles:
- 8 Methods to Recover Lost or Deleted Word Document
- How to Convert PDF File to a Word Document Online
- How to Recover Word Password
- How to Unlock Password Protected PowerPoint Presentation
For many people, creating and holding a presentation involves a great deal of effort. It even leads to buck fever. To make matters worse, if the presentation has to be given in English, it often entails double the effort for native German speakers. We want to make your next presentation a bit more effortless by introducing the most useful phrases and expressions for an English-language performance.
Presentations have the advantage that many standard phrases can be used at various points. Perhaps you wish to welcome the audience, introduce the speaker and the topic, outline the structure, offer a summary, or deal with questions. In all these situations, you can apply a number of useful expressions that will make your presentation a linguistic success.
Welcome
At the beginning of each presentation, you should welcome your audience. Depending on who you are addressing, you should extend a more or less formal welcome.
Good morning/afternoon/evening, ladies and gentlemen/everyone.
On behalf of “Company X”, allow me to extend a warm welcome to you.
Hi, everyone. Welcome to “Name of the event”.
Introducing the speaker
The level of formality of your welcome address will also apply to how you introduce yourself. Customize it to match your audience.
Let me briefly introduce myself. My name is “John Miller” and I am delighted to be here today to talk to you about…
First, let me introduce myself. My name is “John Miller” and I am the “Position” of “Company X”.
I’m “John” from “Company Y” and today I’d like to talk to you about…
Introducing the topic
After the welcome address and the introduction of the speaker comes the presentation of the topic. Here are some useful introductory phrases.
Today I am here to talk to you about…
What I am going to talk about today is…
I would like to take this opportunity to talk to you about…
I am delighted to be here today to tell you about…
I want to make you a short presentation about…
I’d like to give you a brief breakdown of…
Explanation of goals
It is always recommended to present the goals of your presentation at the beginning. This will help the audience to understand your objectives.
The purpose of this presentation is…
My objective today is…
Structure
After presenting the topic and your objectives, give your listeners an overview of the presentation’s structure. Your audience will then know what to expect in detail.
My talk/presentation is divided into “x” parts.
I’ll start with…/First, I will talk about…/I’ll begin with…
…then I will look at…
…next…
and finally…
Starting point
After all this preparation, you can finally get started with the main part of the presentation. The following phrases will help you with that.
Let me start with some general information on…
Let me begin by explaining why/how…
I’d like to give you some background information about…
Before I start, does anyone know…
As you are all aware…
I think everybody has heard about…, but hardly anyone knows a lot about it.
End of a section
If you have completed a chapter or section of your presentation, inform your audience, so that they do not lose their train of thought.
That’s all I have to say about…
We’ve looked at…
So much for…
Interim conclusion
Drawing interim conclusions is of utmost importance in a presentation, particularly at the end of a chapter or section. Without interim conclusions, your audience will quickly forget everything you may have said earlier.
To sum up…
Let’s summarize briefly what we have looked at.
Here is a quick recap of the main points of this section.
I’d like to recap the main points.
Well, that’s about it for this part. We’ve covered…
Transition
Use one of the following phrases to move on from one chapter to the next.
I’d now like to move on to the next part…
This leads me to my next point, which is…
Turning our attention now to…
Let’s now turn to…
Examples
Frequently, you have to give examples in a presentation. The following phrases are useful in that respect.
For example,…
A good example of this is…
As an illustration,…
To give you an example,…
To illustrate this point…
Details
In a presentation, you may often need to provide more details regarding a certain issue. These expressions will help you to do so.
I’d like to expand on this aspect/problem/point.
Let me elaborate further on…
Links
If you want to link to another point in your presentation, the following phrases may come in handy.
As I said at the beginning,…
This relates to what I was saying earlier…
Let me go back to what I said earlier about…
This ties in with…
Reference to the starting point
In longer presentations, you run the risk that after a while the audience may forget your original topic and objective. Therefore, it makes sense to refer to the starting point from time to time.
I hope that you are a little clearer on how we can…
To return to the original question, we can…
Just to round the talk off, I want to go back to the beginning when I…
I hope that my presentation today will help with what I said at the beginning…
Reference to sources
In a presentation, you frequently have to refer to external sources, such as studies and surveys. Here are some useful phrases for marking these references.
Based on our findings,…
According to our study,…
Our data shows/indicates…
Graphs and images
Presentations are usually full of graphs and images. Use the following phrases to give your audience an understanding of your visuals.
Let me use a graphic to explain this.
I’d like to illustrate this point by showing you…
Let the pictures speak for themselves.
I think the graph perfectly shows how/that…
If you look at this table/bar chart/flow chart/line chart/graph, you can see that…
Emphasis
To ensure that your presentation does not sound monotonous, from time to time you should emphasize certain points. Here are some suggestions.
It should be emphasized that…
I would like to draw your attention to this point…
Another significant point is that…
The significance of this is…
This is important because…
We have to remember that…
Paraphrase
At times it might happen that you expressed yourself unclearly and your audience did not understand your point. In such a case, you should paraphrase your argument using simpler language.
In other words,…
To put it more simply,…
What I mean to say is…
So, what I’m saying is….
To put it in another way….
Questions during the presentation
Questions are an integral part of a presentation. These phrases allow you to respond to questions during a presentation.
Does anyone have any questions or comments?
I am happy to answer your questions now.
Please feel free to interrupt me if you have questions.
If you have any questions, please don’t hesitate to ask.
Please stop me if you have any questions.
Do you have any questions before I move on?
If there are no further questions at this point, I’d like to…
Questions at the end of a presentation
To ensure that a presentation is not disrupted by questions, it is advisable to answer questions at the very end. Inform your audience about this by using these phrases.
There will be time for questions at the end of the presentation.
I’ll gladly answer any of your questions at the end.
I’d be grateful if you could ask your questions after the presentation.
Inquiries
After answering a question from the audience, check that the addressee has understood your answer and is satisfied with it.
Does this answer your question?
Did I make myself clear?
I hope this explains the situation for you.
Unknown answer
Occasionally, it may happen that you do not have an answer to a question. That is not necessarily a bad thing. Simply use one of the following phrases to address the fact.
That’s an interesting question. I don’t actually know off the top of my head, but I’ll try to get back to you later with an answer.
I’m afraid I’m unable to answer that at the moment. Perhaps, I can get back to you later.
Good question. I really don’t know! What do you think?
That’s a very good question. However, I don’t have any figures on that, so I can’t give you an accurate answer.
Unfortunately, I’m not the best person to answer that.
Summary and conclusion
At the end of the presentation, you should summarize the important facts once again.
I’d like to conclude by…
In conclusion, let me sum up my main points.
Weighing the pros and cons, I come to the conclusion that…
That brings me to the end of my presentation. Thank you for listening/your attention.
Thank you all for listening. It was a pleasure being here today.
Well, that’s it from me. Thanks very much.
That brings me to the end of my presentation. Thanks for your attention.
Handing over
If you are not the only speaker, you can hand over to somebody else by using one of these phrases.
Now I will pass you over to my colleague ‘Jerry’.
‘Jerry’, the floor is yours.
Conclusion
We hope that our article will help you in preparing and holding your next presentation. It goes without saying that our list is just a small extract from the huge world of expressions and phrases. As always, the Internet is an inexhaustible source of further information. Here are the links to two websites that we would recommend to you in this context.
usingenglish
BBC
If you need to create a PowerPoint presentation but currently have the information saved as a Word document, this quick …
If you need to create a PowerPoint presentation but currently have the information saved as a Word document, this quick tutorial will show you how to transform your Word document into a PowerPoint presentation. If you use these steps, you’ll finish in no time.
Make a Note of These Limitations Before You Begin
 The easy conversion process created by Microsoft does have its limitations. Note these before you get started on any conversion process:
- Microsoft currently only offers this for English users.
- You can only complete this process via Word for the web.
- The service does not work when using Internet Explorer or Safari.
- The larger the file, the longer the processing time during conversion.
- Not all fonts and styles will transfer.
Use These 4 Easy Steps To Convert Your Word Document to PowerPoint
Manually converting a Word file into a slide is a time-consuming process. Using Microsoft Office’s built-in function offers a far more efficient solution.
1. Prepare the Document
Because Microsoft recommends using text-only Word documents for the conversion process, it may need some editing. The tech company also explains that once you complete the conversion, the slide headings of your PowerPoint presentation will match the headings in your document. Consider completing the following steps:
- Create a copy of the Word document for editing.
- Reorganize the headers to reduce subheaders and wordiness.
- Shorten paragraphs and remove some introduction paragraphs.
- Remove all non-text media, such as photos or graphs.
- If you used a custom font, reformat it to a default font.
2. Open Word for the Web
Microsoft offers one primary way to transform Word Documents into PowerPoint slides. It sometimes mentions importing, but the option only exports from Word. If you don’t already have one, download and install a compatible browser, such as Chrome. If you use a company PC, you may need admin permissions or IT assistance.
If you do not receive IT assistance or admin permission in time, you might feel tempted to proceed via a personal device. Before doing so, consider the level of confidentiality of the document. Using a personal device to transfer company data could pose a security risk.
Once completed, go to File > Export > Export to PowerPoint presentation.
3. Export to Presentation
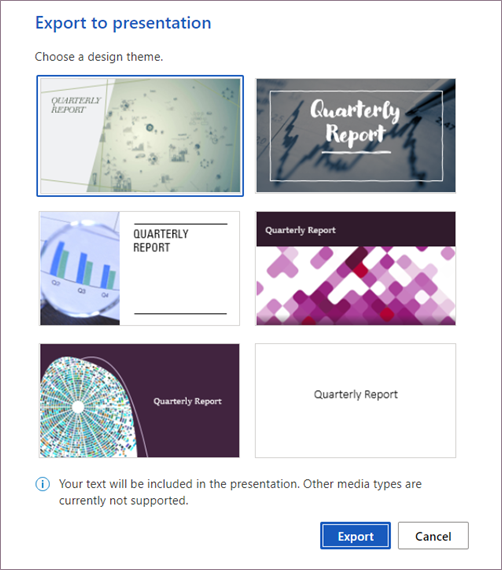
When this window launches, it will ask you to choose an aesthetic for your presentation. This stage is where a lot of people get stuck on creating presentations. The most important thing to consider is the format of your Word document and the expected form of the PowerPoint document. For example, are you creating a presentation or a report? Choose accordingly.
Also, consider the audience when choosing an aesthetic. Flowers or watercolor paint might look great for presentations at social events, but they might not work as well to pitch to business clients. That is, of course, unless you work within the art and gardening industry. Once you select a theme, the conversion process begins.
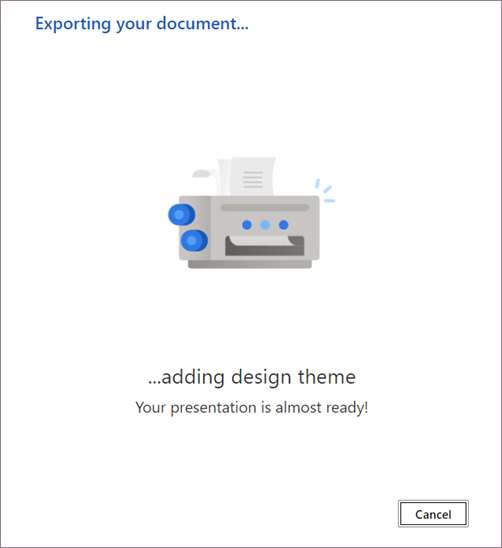
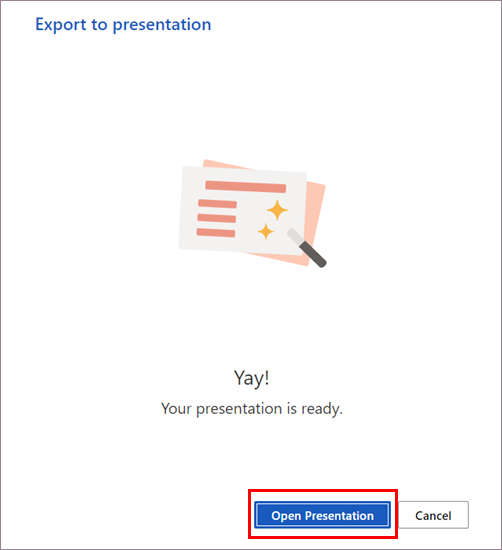
4. Open Presentation
Your computer usually saves the PowerPoint presentation to your OneDrive root folder. However, finding it is easy via the Open Presentation button once completed. This button opens the presentation in a new tab. Click on the default name provided to rename it. If you would like to add photos, graphs or animation, this is when to do so.
If you’d like to find out more about bringing cloudficiency to your project, reach out to us.

Know When To Convert a Word Document Into a Presentation
PowerPoint slides are often much easier to follow than Word Documents. However, they do not provide excellent conversion solutions for wordy documents. Consequently, it’s essential to determine whether a conversion or complete repurposing of the Word file is what will get you the results you seek.
Below are some examples of company information that might work better as a PowerPoint slide:
- Training documents, especially for new hires
- Tutorials created to reduce learning curves after tech upgrades or process changes
- Company progress reports, especially for busy executives
- Business plans, when accompanying the detailed Word file
- Business proposals, especially for complex projects with large budget requests
Find Out How Cloudficient Can Help
Anyone with a compatible web browser can access Word for the web. However, to access the entire web and cloud experience of Microsoft Office, you need cloud computing capabilities. If you find the document conversion helpful, you’ll love the arsenal of productivity tools made available to cloud customers.
Would you like to see what lies beyond the impressive Word document conversion in the cloud? Work with our experienced migration specialists at Cloudficient to get started.
With unmatched next generation migration technology, Cloudficient is revolutionizing the way businesses retire legacy systems and transform their organization into the cloud. Our business constantly remains focused on client needs and creating product offerings that match them. We provide affordable services that are scalable, fast and seamless.
If you would like to learn more about how to bring Cloudficiency to your migration project, visit our website, or contact us.