
Word 2016 is designed to help you create professional-quality documents. Word can also help you organize and write documents more efficiently.
When you create a document in Word, you can choose to start from a blank document or let a template do much of the work for you. From then on, the basic steps in creating and sharing documents are the same. And Word’s powerful editing and reviewing tools can help you work with others to make your document great.
Start a document
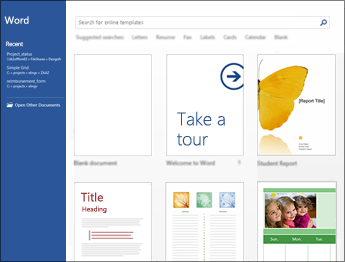
It’s often easier to create a new document using a template instead of starting with a blank page. Word templates come ready-to-use with pre-set themes and styles. All you need to do is add your content.
Each time you start Word, you can choose a template from the gallery, click a category to see more templates, or search for more templates online.
For a closer look at any template, click it to open a large preview.
If you’d rather not use a template, click Blank document.
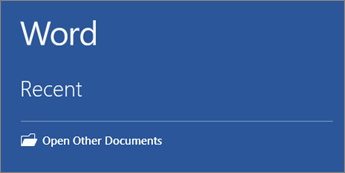
Open a document
Every time you start Word, you’ll see a list of your most recently used documents in the left column. If the document you’re looking for isn’t there, click Open Other Documents.
If you’re already in Word, click File > Open and then browse to the file’s location.
When you open a document that was created in earlier versions of Word, you see Compatibility Mode in the title bar of the document window. You can work in compatibility more or you can upgrade the document to use Word 2016.
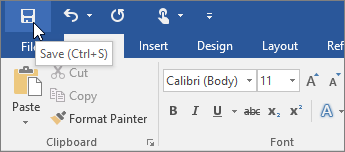
Save a document
To save a document for the first time, do the following:
-
On the File tab, click Save As.
-
Browse to the location where you’d like to save your document.
Note: To save the document on your computer, choose a folder under This PC or click Browse. To save your document online, choose an online location under Save As or click Add a Place. When your files are online, you can share, give feedback and work together on them in real time.
-
Click Save.
Note: Word automatically saves files in the .docx file format. To save your document in a format other than .docx, click the Save as type list, and then select the file format that you want.
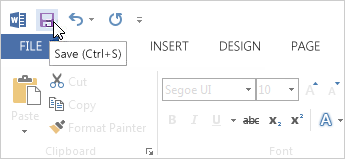
To save your document as you continue to work on it, click Save in the Quick Access Toolbar.
Read documents
Open your document in Read Mode to hide most of the buttons and tools so you can get absorbed in your reading without distractions.
-
Open the document you want to read.
Note: Some documents open in Read Mode automatically, such as protected documents or attachments.
-
Click View > Read Mode.
-
To move from page to page in a document, do one of the following:
-
Click the arrows on the left and right sides of the pages.
-
Press page down and page up or the spacebar and backspace on the keyboard. You can also use the arrow keys or the scroll wheel on your mouse.
-
If you’re on a touch device, swipe left or right with your finger.
Tip: Click View > Edit Document to edit the document again.
-
Track changes
When you’re working on a document with other people or editing a document yourself, turn on Track Changes to see every change. Word marks all additions, deletions, moves, and formatting changes.
-
Open the document to be reviewed.
-
Click Review and then on the Track Changes button, select Track Changes.

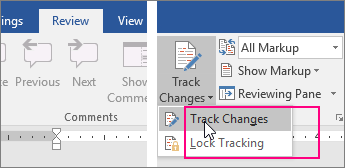
Read Track changes to learn more.
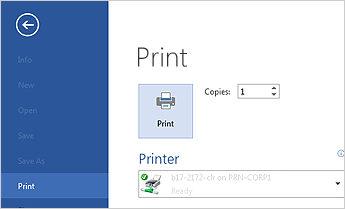
Print your document
All in one place, you can see how your document will look when printed, set your print options, and print the file.
-
On the File tab, click Print.
-
Do the following:
-
Under Print, in the Copies box, enter the number of copies you want.
-
Under Printer, make sure the printer you want is selected.
-
Under Settings, the default print settings for your printer are selected for you. If you want to change a setting, just click the setting you want to change and then select a new setting.
-
-
When you’re satisfied with the settings, click Print.
For details, see Print a document.
Beyond the basics
For more on the fundamentals of using Word, see What’s new in Word 2016.
Top of Page
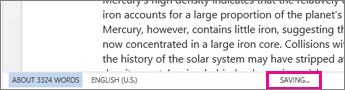
With Word for the web, you use your web browser to create, view, and edit the personal documents that you store on OneDrive. If your organization or college has a Microsoft 365 plan or SharePoint site, start using Word for the web by creating or storing documents in libraries on your site.Save changes
Word saves your changes automatically. Look on the status bar at the bottom left corner of Word for the web. It will either show Saved or Saving.
Share documents online
Because your document is online, you can share it by sending a link instead of an email attachment. People can read it in their web browser or mobile device.
Click File > Share > Share with People.

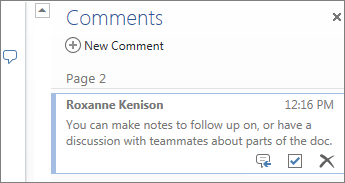
Comment in the browser
A comment balloon shows where comments have been made in the doc.

Reply to comments, and check off items you’ve addressed.
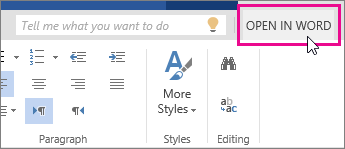
Edit in the browser
If you try to type in the document and nothing happens, you’re probably in Reading view. Switch to Editing view: click Edit Document > Edit in Word for the web.

Type and format text, add pictures, adjust the layout of the page, and more. For more advanced editing, click Open in Word.
Work together on the same doc
To work together in Word for the web, you edit a document as you normally would. If others are also editing it, Word for the web alerts you to their presence. You can see everyone who is currently working in the document by clicking in the ribbon.

Clicking on an author’s name jumps you to where they’re working in the doc. And you’ll see the changes they make as they’re happening. They can be working in Word for the web, Word 2010 or later, or Word for Mac 2011.
Add a header or footer
Go to Insert > Header & Footer to add headers and footers to your document.
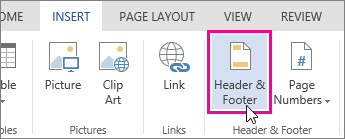
Click Options to choose how you’d like them to appear.

Add page numbers
Click Insert > Page Numbers and then choose from the gallery where you’d like the page numbers to appear.
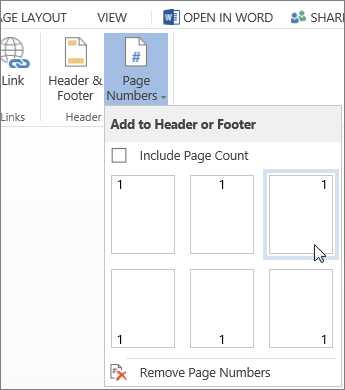
Select Include Page Count to show the current page number along with the total number of pages (page X of Y).
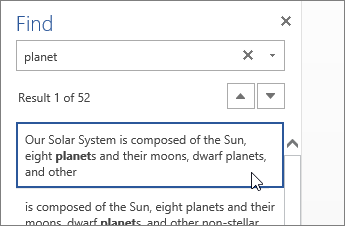
Find and replace text
Quickly search for every occurrence of a specific word or phrase in your document by clicking Home > Find (or type Ctrl+F). Results appear next to your document so you can see the term in context. Clicking on a search result jumps you to that occurrence.
Click Replace (or type Ctrl+H) to find and replace text.
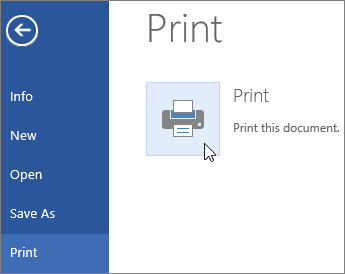
Print in Word for the web
Go to File > Print. Word for the web creates a PDF preview of your document that keeps all the layout and formatting of your document. Send the PDF to your printer and it will print the way you expect.
Microsoft Word 2013 is a word-processing program designed to help you create professional-quality documents. Word helps you organize and write your documents more efficiently.
Your first step in creating a document in Word 2013 is to choose whether to start from a blank document or to let a template do much of the work for you. From then on, the basic steps in creating and sharing documents are the same. Powerful editing and reviewing tools help you work with others to make your document perfect.
Choose a template
It’s often easier to create a new document using a template instead of starting with a blank page. Word templates are ready to use with themes and styles. All you need to do is add your content.
Each time you start Word 2013, you can choose a template from the gallery, click a category to see the templates it contains, or search for more templates online. (If you’d rather not use a template, just click the Blank document.)
For a closer look at any template, just click it to open a large preview.
Top of Page
Open a document
Every time you start Word, you’ll see a list of your most recently used documents in the left column. If the document you’re looking for isn’t there, click Open Other Documents.

If you’re already in Word, click File > Open and then browse to the file’s location.
When you open a document that was created in earlier versions of Word, you see Compatibility Mode in the title bar of the document window. You can work in compatibility more or you can upgrade the document to use features that are new or enhanced in Word 2013.
Top of Page
Save a document
To save a document for the first time, do the following:
-
Click the File tab.
-
Click Save As.
-
Browse to the location where you’d like to save your document.
Note: To save the document on your computer, choose a folder under Computer or click Browse. To save your document online, choose a location under Places or Add a Location. When your files are online, you can share, give feedback and work together on them in real time.
-
Click Save.
Note: Word automatically saves files in the .docx file format. To save your document in a format other than .docx, click the Save as type list, and then select the file format that you want.
To save your document as you continue to work on it, click Save in the Quick Access Toolbar.
Top of Page
Read documents
Open your document in Read Mode to hide most of the buttons and tools so you can get absorbed in your reading without distractions.
-
Open the document you want to read.
Note: Some documents open in Read Mode automatically, such as protected documents or attachments.
-
Click View > Read Mode.
-
To move from page to page in a document, do one of the following:
-
Click the arrows on the left and right sides of the pages.
-
Press page down and page up or the spacebar and backspace on the keyboard. You can also use the arrow keys or the scroll wheel on your mouse.
-
If you’re on a touch device, swipe left or right with your finger.
Tip: Click View > Edit Document to edit the document again.
-
Top of Page
Track changes
When you’re working on a document with other people or editing a document yourself, turn on Track Changes to see every change. Word marks all additions, deletions, moves, and formatting changes.
-
Open the document to be reviewed.
-
Click Review and then on the Track Changes button, select Track Changes.

Read Track changes to learn more.
Top of Page
Print your document
All in one place, you can see how your document will look when printed, set your print options, and print the file.
-
Click the File tab and then click Print.
-
Do the following:
-
Under Print, in the Copies box, enter the number of copies you want.
-
Under Printer, make sure the printer you want is selected.
-
Under Settings, the default print settings for your printer are selected for you. If you want to change a setting, just click the setting you want to change and then select a new setting.
-
-
When you’re satisfied with the settings, click Print.
For details, see Print and preview documents.
Beyond the basics
Go beyond the basics with your documents by creating a table of contents or saving a document as a template.
Top of Page
Important:
Office 2010 is no longer supported. Upgrade to Microsoft 365 to work anywhere from any device and continue to receive support.
Upgrade now
In this article
-
What is Word?
-
Find and apply a template
-
Create a new document
-
Open a document
-
Save a document
-
Read documents
-
Track changes and insert comments
-
Print your document
What is Word?
Microsoft Word 2010 is a word-processing program, designed to help you create professional-quality documents. With the finest document-formatting tools, Word helps you organize and write your documents more efficiently. Word also includes powerful editing and revising tools so that you can collaborate with others easily.
Top of Page
Find and apply a template
Word 2010 allows you to apply built-in templates, to apply your own custom templates, and to search from a variety of templates available on the web.
To find and apply a template in Word, do the following:
-
On the File tab, click New.
-
Under Available Templates, do one of the following:
-
To use one of the built-in templates, click Sample Templates, click the template that you want, and then click Create.
-
To reuse a template that you’ve recently used, click Recent Templates, click the template that you want, and then click Create.
-
To use your own template that you previously created, click My Templates, click the template that you want, and then click OK.
-
To find a template on Office.com, under Office.com Templates, click the template category that you want, click the template that you want, and click Download to download the template from Office.com to your computer.
-
Note: You can also search for templates on Office.com from within Word. In the Search Office.com for templates box, type one or more search terms, and then click the arrow button to search.
Top of Page
Create a new document
-
Click the File tab and then click New.
-
Under Available Templates, click Blank Document.
-
Click Create.
For more information about how to create a new document, see Create a document.
Top of Page
Open a document
-
Click the File tab, and then click Open.
-
In the left pane of the Open dialog box, click the drive or folder that contains the document.
-
In the right pane of the Open dialog box, open the folder that contains the drawing that you want.
-
Click the document and then click Open.
Top of Page
Save a document
To save a document in the format used by Word 2010 and Word 2007, do the following:
-
Click the File tab.
-
Click Save As.
-
In the File name box, enter a name for your document.
-
Click Save.
To save a document so that it is compatible with Word 2003 or earlier, do the following:
-
Open the document that you want to be used in Word 2003 or earlier.
-
Click the File tab.
-
Click Save As.
-
In the Save as type list, click Word 97-2003 Document. This changes the file format to .doc.
-
In the File name box, type a name for the document.
-
Click Save.
For more information about how to create a document that is compatible with Word 2003 or earlier versions, see Create a document to be used by previous versions of Word.
Top of Page
Read documents
-
Open the document that you want to read.
-
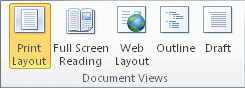
On the View tab, in the Document Views group, click Full Screen Reading
-
To move from page to page in a document, do one of the following:
-
Click the arrows in the lower corners of the pages.
-
Press PAGE DOWN and PAGE UP or SPACEBAR and BACKSPACE on the keyboard.
-
Click the navigation arrows at the top center of the screen.
Tip: Click View Options, and then click Show Two Pages
to view two pages, or screens, at a time.
-
 to view two pages, or screens, at a time.
For more information about how to view documents, see Read documents in Word.
Top of Page
Track changes and insert comments
-
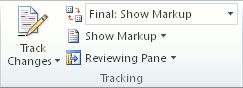
To turn on change tracking, on the Review tab, in the Tracking group, click Track Changes.
-
To insert a comment, on the Review tab, in the Comments group, click New Comment.
For more information about how to track changes made while revising, see Track changes and insert comments.
Top of Page
Print your document
-
Click the File tab and then click Print.
-
Do the following:
-
Under Print, in the Copies box, enter the number of copies that you want to print.
-
Under Printer, make sure that the printer that you want is selected.
-
Under Settings, the default print settings for your printer are selected for you. If you want to change a setting, click the setting you want to change and then select the setting that you want.
-
-
When you are satisfied with the settings, click Print.
For more information about how to print a file, see Preview and print a file.
Top of Page
As part of the Microsoft Office Suite, MS Word is one of the most popular office productivity tools in the world.
In this guide, you’ll learn the basics of how to use Microsoft’s word processing software. Whether you’re just getting started with Word or have years of experience, you’ll find this guide helpful.

With Microsoft Word, you’ll be creating useful business documents in no time. Also, many other file formats can be converted to MS Word (.doc) format. And Word documents can be saved as .pdf files.
How to Use Microsoft Word to Create Professional Business Documents
One of the best and easiest ways to create an effective business document with Word is to use a template. There are hundreds of professional Word templates you can use available through Envato Elements and GraphicRiver. Here are just some of them:
-
25 Microsoft MS Word Business Proposal Templates to Make Deals in 2022
-
25 Free Creative Resume Templates (Word & PSD Downloads for 2022)
-
20 Best Free Microsoft Word Resume CV Cover Letter Templates 2022


How to Use This Tutorial Guide
Learn how to work with Word’s tools to make great business documents quickly. We’ll explore everything from formatting basic text styles to making awesome page layout designs to using headers and footers.
Note: Be sure to bookmark this Microsoft Word tutorial guide to start working through each tutorial at your own pace.
Things You Should Know
- To create a basic document, choose a template from the list provided or start with a blank document.
- Use the File tab to open, save, and start documents, and the Insert tab to add any images, symbols, or other media to your document.
- Highlight your text and play around with formatting options in the «Home» tab. You can change the font, italicize/bold/underline your words, and play around with font size.
-
1
Open the Microsoft Word application. Do this by double-clicking the Microsoft Word icon.
-
2
Review the available templates. On the right side of the screen, you’ll see several templates of interest:
- Blank document — A blank document with default formatting.
- Creative Resume/Cover Letter — A clean, pre-formatted resume (and accompanying cover letter) document.
- Student Report with Cover Photo — A document format geared toward an academic demographic.
- Fax Cover Sheet — A document to preface fax reports.
- You can also search for specific templates online from within Word by using the search bar at the top of this screen.
Advertisement
-
3
Choose a template. Doing so will open the template in Word with whatever pre-determined formatting applies to it. Now that your document is open, you’re ready to review your Toolbar options.
- When in doubt, open a blank document.


Advertisement
-
1
Click the File tab. It’s in the top left side of the screen (or in the menu bar for Mac users). From here, you have several useful options on the far left side of your screen:
- Info (PC only) — Click this to review the documents statistics, such as when it was last modified, as well as any potential issues with the document.
- New — Click this to bring up the «New Document» page that lists all of the pre-formatted templates. Opening a new document will prompt you to save your old one.
- Open — Click this to review a list of recently-opened documents. You can also select a directory (e.g., «This PC») in which to search.
- Save — Click this to save your document. If this is your first time saving this particular document, you’ll be prompted to enter a name, save location, and preferred file format as well.
- Save As — Click this to save your document «as» something (e.g., a different name or file format).
- Print — Click this to bring up your printer settings.
- Share — Click this to view sharing options for this document, including email and cloud options.
- Export — Click this to quickly create a PDF or change the file type.
-
2
Click ← in the top left corner of your screen. If you’re using a Mac, you won’t have this option—simply click your document to exit the «File» menu.
-
3
Review the Home tab to see your formatting options. At the top of your screen—from left to right—are five sub-sections of this tab:
- Clipboard — Whenever you copy text, it is saved on your clipboard. You can view copied text by clicking the Clipboard option here.
- Font — From this section, you can change your font style, size, color, formatting (e.g., bold or italic), and highlighting.
- Paragraph — You can change aspects of your paragraph formatting—such as line spacing, indentation, and bullet formatting—from this section.
- Styles — This section covers different types of text for various situations (e.g., headings, titles, and subtitles). You’ll also see the popular «No Spacing» option here, which removes excess spaces between lines of text.
- Editing — A couple of commonly-used tools—such as «Find and Replace», which allows you to quickly replace all appearances of one word with another—live here.
-
4
Click the Insert tab to review the types of media you can place in your document. Insert is to the right of the Home tab. The Insert tab allows you to add things like graphics and page numbers to your document. From left to right, a couple of notable options include the following:
- Table — Clicking this option will allow you to create an Excel-style table right in your document.
- Pictures — Use this feature to insert a picture into your document.
- Header, Footer, and Page Number — These options are all essential for writing in MLA- or APA-style formatting. The Header places a space at the top of the document for comment, while the Footer goes at the bottom—page numbers are customizable.
- Equation/Symbol — These options use special formatting to accurately display simple equations. You can select these equations or symbols from the pertinent drop-down menu.
-
5
Click the Design tab to create your own template. It’s to the right of the Insert tab.
- The Design tab contains pre-designed themes and formats listed across the top of the page.
-
6
Click the Layout tab to customize your page’s formatting. This tab contains options for changing the following aspects of your document:
- Margins
- Page orientation (vertical or horizontal)
- Page size
- Number of columns (defaults to one)
- Location of page breaks
- Indentation
-
7
Click the References to manage your citations. If you have a bibliography page, you can also manage it from here.
- For quick bibliography formatting, click the Bibliography drop-down menu and select a template.
- In the «Citations & Bibliography» group of options, you can change your bibliography formatting from APA to MLA (or other citation styles).
- The «Captions» group has an option to insert a table of figures. This is useful for scientific review papers or similar documents in which statistical data is prioritized over quotations.
-
8
Click the Mailings tab to review your document sharing options. You can review your email settings and share your documents from within this section.
- You can also print an envelope or label template by clicking the pertinent option in the top left corner of your screen.
- The Select Recipients drop-down menu allows you to choose Outlook contacts as well as an existing contact list within Word.
-
9
Click the Review tab. The Review section is geared towards editing, so it includes options for marking up documents and proofreading. A couple of important options include:
- Spelling & Grammar — Click this option (far left corner) to underline any spelling or grammatical errors.
- The «Changes» section — This is to the far right of the toolbar. From here, you can enable the «Track Changes» feature which automatically formats any additions or deletions you make in a document to appear in red print.
-
10
Decide on the set of options that best apply to your work. If you’re a student, for example, you’ll likely use the Insert and References tab often. Now that you’re familiar with the toolbar options, you can format your first Word document.


Advertisement
-
1
Open a new Blank Document in Word. If you have an existing document, you can open that instead.
-
2
Enter text. Do this by clicking on the blank section of the document and typing away.
- If you opened an existing document, be sure to save your work before re-formatting.
-
3
Highlight a section of text. To do this, click and drag your cursor across your writing, then let go when you’ve highlighted the section you wish to edit.
-
4
Consider what you want to do to the writing. Some potential options include:
- Quickly format your writing. Do this by right-clicking (or two-finger clicking) your highlighted text and then selecting an option from the right-click menu.
- Change the font of your selection. You can do this by clicking the drop-down bar at the top of the «Font» section (Home tab) and then selecting a new font.
- Bold, italicize, or underline your highlighted section. To do this, click the B, I, or U in the «Font» section of the Home tab.
- Change your document’s spacing. This is easiest to accomplish by right-clicking your selected text, clicking Paragraph, and modifying the «Line Spacing» value in the bottom right corner of this window.
-
5
Continue working with Word. Your preferred options for your documents will differ based on the intention behind creating them, so the more you work within your own particular format, the more proficient you’ll become.


Advertisement
Add New Question
-
Question
How do I copy and paste?

To copy a certain piece of text, highlight it and press Ctrl + C. Then click the spot you want to place the copied text and press Ctrl + V to paste.
-
Question
How do I place a logo in MS Word?
Press the Insert tab and then press the Pictures button. You will then be allowed to select the image.
-
Question
How can I save a document to a specific location?
Click File —> Save As… and you’ll be allowed to select the destination location (and filename and format) of the file.
Ask a Question
200 characters left
Include your email address to get a message when this question is answered.
Submit
Advertisement
-
A red line under a word means the word is misspelled, a green underline suggests a grammatical error, and a blue underline pertains to formatting.
-
If you right-click (or two-finger click) an underlined word, you’ll see a replacement suggestion at the top of the right-click menu.
-
You can quick-save your document by holding down Control (or Command on Mac) and tapping S.
Thanks for submitting a tip for review!
Advertisement
-
Don’t forget to save your work before closing Word.
Advertisement
About This Article
Article SummaryX
1. Create blank documents or from templates.
2. Format text colors, fonts, and sizes.
3. Insert media like photos and animations.
4. Insert data like tables, page numbers, headers, and equations.
5. Customize the on-screen and print layouts.
6. Add references and citations.
Did this summary help you?
Thanks to all authors for creating a page that has been read 213,472 times.
Is this article up to date?
Whether you’re collaborating with your team on a Microsoft Word Document or you’ve ended up with two versions of your own work, you are now trying to find the best way to compare these two documents in a swift and easy manner.
Luckily, there are 4 different ways that you can compare Microsoft Word Documents. Each coming with some pretty huge positives and negatives, some are better suited to the individual and others to large businesses.
In this post, we will breakdown each option and leave you well equipt to decide which best suits your task or team.
1. Use a dedicated collaboration tool
With so many of us facing the same issues when trying to compare Microsoft Word Documents, dedicated collaboration tools such as Simul Docs were built with collaboration in mind.
With Simul, you can easily compare two documents. Upload the documents from your computer or from cloud storage services like Sharepoint, OneDrive, Dropbox, Box or Google Drive.
Simul will then highlight the differences between the documents, allowing you to accept or reject each change.
Once you have reviewed the documents, simple press ‘Merge’ and the two documents seamlessly become one new version.

The only downside in using a collaboration tool is the additional cost. Most tools charge a fee per month or per user and while often a small fee, this may not fit within all companies budgets.
On the plus side, these tools make collaborating and comparing Microsoft Documents as simple as a click of a button. They not only save you time but provide solutions to other common problems such as version control and collaboration. Simul Docs also allows you to share and compare documents with people outside of your company with ease.
2. Use a dedicated compare tool
Many professionals require a dedicated tool to compare word documents. Tools such as Workshare and ComparePro are tools that allow you to compare two or more Word Documents and more.
Workshare, for example, offers you the ability to compare two Powerpoint presentations, excel documents and PDF files. Workshare also has other functionality that comes as a part of your subscription, such as Metadata, a metadata management solution and more.
Similar to the dedicated collaboration tools such as Simul Docs, compare tools make comparing work documents easy and were built with this issue in mind.
The main difference between two two is the price and the additional functions, Workshare provides security functions while Simul provides a full set of functions that assist you with seamless collaboration.

The Con of a comparison tool such as Workshare or ComparePro is the price. They offer subscriptions per user, not per document so you pay the full $300/annum to access the tool. This doesn’t provide much value for the occasional user.
Did we mention that the $300/annum only gives you access to the compare function as well, you pay for each tool separately which can add up quickly for any business!
The Pros of a comparison tool are that they were purpose build to help you compare documents and offer comparisons on more than just Word. They also offer other tools such as security and transaction assistance if your company required it.
3. Use Microsoft Word’s default ‘Compare’ feature
Because this is a problem so many of us face, Microsoft created a built in feature that allows you to compare two-word documents, ‘Compare’.
By opening a blank word document, then clicking through the Tool bar > Review > Compare > Compare. Word will place both documents side by side within Word and allow you to review any differences or changes.
Work picks up on all changes, highlights them and lets you know how many ‘differences’ there are between the documents.
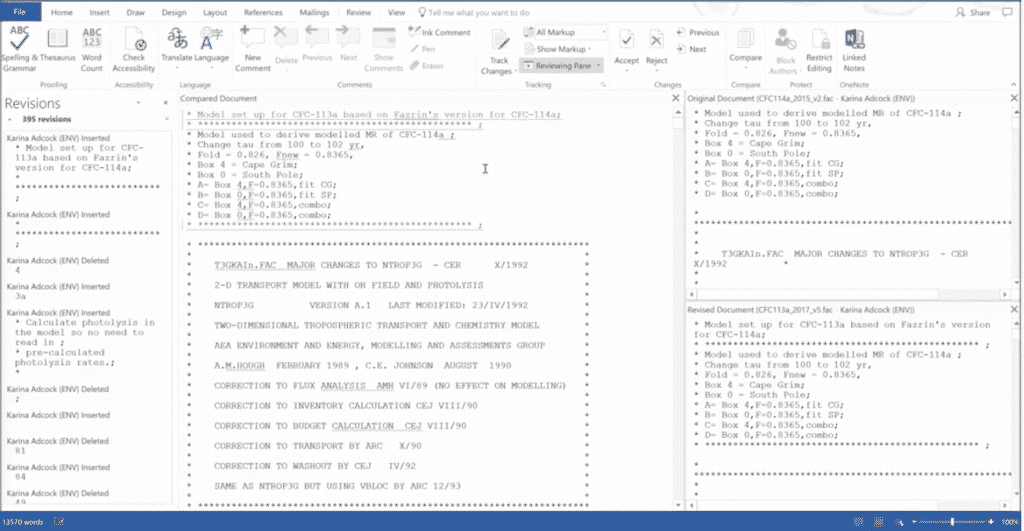
The challenging parts of using Word Compare is its clunky and doesn’t provide a very user-friendly experience. When you have the two documents open next to each other, Word shows this on a split screen and creates a Master document in the centre – there is a lot going on in front of you and changes aren’t easy to see and accept.
The positive is its free and already inbuilt into Microsoft Word.
4. Manually compare documents
Stripping it right back, you may opt to compare the documents manually. Open the two documents, place them side by side and review each line or sentence one at a time and manually highlight the differences or make changes.

The Cons of this approach is time and user error. Depending on how many changes were made between the two documents you are comparing this could take hours. Manually comparing the two documents without the assistance of a tool can also result in changes being missed or overlooked. This option works best when you know there are only a few changes and are very familiar with the document yourself.
The Pros of a manual comparison is its free!
To Sum it up…
There are some fantastic tools and options available to you when trying to diff two Microsoft Word Documents. What’s best for your team will come down to how often you are trying to compare documents, the size of your team and your budget.
Dedicated comparison tools such as Simul Docs offer a free document trial, so it’s worth trying at least once to help you make the right decision. With Microsoft Compare already built into your Microsoft Word and the old fashion manual comparison free, you can try 3 of the 4 options above at no cost.
Regardless of how often you find yourself needing to diff two Word Documents, this doesn’t have to be a time consuming, frustrating issue anymore. Take your time, try the WordCompare tool and give the free trial at Simul Docs a go, as a starting point.
- Download source — 698.6 KB
- Download OpenXMLPractice EXE
Introduction
Are you looking for a way to use Word automation? Want to deal with Word documents programmatically? Go through this tip, it will help you to deal with Word Automation without Interop using C# and OpenXML.
After going through this tip, you can tell:
- What is Open XML
- Why to use Open XML
- How to use OpenXML to create Word documents using C# and OpenXML API
- Create Word table using OpenXML and C#
Background
I have seen many developers struggling to deal with Word documents programmatically, There are couple of ways to deal with Word documents:
- Using COM interop object (Winword instance) (For interop sample code, check this article)
- Using OpenXML API (Do not have to install Word on machine)
Using the Code
Things We Need


Before starting with the OpenXML cooking, we need the following things to be ready with us:
- C# Visual Studio (2005+ version)
- OpenXML API (can be downloaded from here Open XML SDK 2.5 for Microsoft Office)
That’s it. (Wow!!! No word installation needed)
Getting Started with OpenXML
Now a days, DOCX files are getting popular day by day, due to them being very light and faster in processing, DOCX is the magical result of ZIP and XML combination. So it is clear that if we able to manage XMLs, we will be able to manage DOCX too. For managing WordXML, we need some API and that API is known as Open XML SDK for Microsoft Office, MSDN Says «API simplifies the task of manipulating Open XML packages and the underlying Open XML schema elements within a package. The Open XML SDK encapsulates many common tasks that developers perform on Open XML packages, so that you can perform complex operations with just a few lines of code.«
Open XML Advantages over Interop
- Open XML is an open standard for Word-processing documents, presentations, and spreadsheets that can be freely implemented by multiple applications on different platforms
- The purpose of the Open XML standard is to de-couple documents created by Microsoft Office applications so that they can be manipulated by other applications independent of proprietary formats and without the loss of data.
- As it is light weight, the processing is faster than interop objects
- It has good Interoprability, Backwards Compatibility and Programmability
- As it is Smaller File Size, it is to manage all variety of document stores, including Exchange servers, SharePoint, and of course network file storage.
- It’s a IS29500 standard, free for all to use, and extremely well documented
You can unzip DOCX file
Do you know you can unzip DOCX file? DOCX is the combination of several well structured .XML file, An Open XML file is stored in a ZIP archive for packaging and compression. You can view the structure of any Open XML file using a ZIP viewer, Open XML document is built of multiple document parts. The relationships between the parts are themselves stored in document parts, each typical DOCX file has the following different parts.
See the below image to know the different XML parts:

Body is the main part of the document and it has many different parts as shown in the above figure.
Working with Paragraphs (First Assignment)
Paragraphs is the most basic unit of block-level content within a WordprocessingML document, paragraphs are stored using the <p> element, Paragraph different sub elements like ParagraphProperties (Optional), Run and Text.
Paragraph Properties
Paragraph properties are used for the formatting of the text, some of the examples of paragraph properties are alignment, border, hyphenation override, indentation, line spacing, shading, text direction. The OXML SDK Paragraph properties class represents the <pPr> element.
Run
The run element is provided to demarcate a region of text. The OXML SDK Run class represents the <r> element.
Text
This element contains actual Text of a document, With the <r> element, the text (<t>) element is the container for the text that makes up the document content.
Start with the Code (Create new word document and write in it)
Open Visual Studio and start with the first OpenXML assignment.
Create new Project/Application and add DLL reference (DLL should exist in Installed OpenXML API folder, e.g., C:Program FilesOpen XML SDKV2.0lib).
1. DocumentFormat.OpenXml
See the below snippet where we are creating new Word document with the help of OpenXML.
using (WordprocessingDocument doc = WordprocessingDocument.Create
("D:\test11.docx", DocumentFormat.OpenXml.WordprocessingDocumentType.Document))
       {

           MainDocumentPart mainPart = doc.AddMainDocumentPart();


           mainPart.Document = new Document();
           Body body = mainPart.Document.AppendChild(new Body());
           Paragraph para = body.AppendChild(new Paragraph());
           Run run = para.AppendChild(new Run());


           run.AppendChild(new Text("New text in document"));
       }
In the above simple snippet:
- We have use
'WordProcessingDocument'class for creating new document - Add
MainDocumentPartin document - Then append
Bodyto main document part - Then add
ParagraphtoBodyelement - Then add
RuntoParagraphelement - Then add
TexttoRunelement
That’s it. No need to save document anymore.
Now if you go and check for ‘test11.docx‘, then you can see it contains text ‘New text in document’.
Now try to unzip that Docx file, you will get below folder structure, you will get folders _rels, docsProps, word and [Content_Types].xml file.
Open Word folder and check document.xml. You will see the below snap:
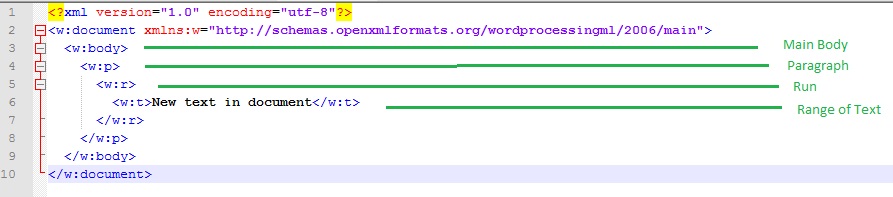
In the above image, you can see <w:body>represents MainBody of the document, <w:p> is the paragraph element, <w:r>is the run element, <w:t>is the text element.
This is how OpenXML works.
Points of Interest
OpenXML is really an amazing thing, it fluently works with spreadsheets, charts, presentations, and Word processing documents. The Open XML file formats are useful for developers because they use an open standard and are based on well-known technologies: ZIP and XML.
References and Book of Facts
Following are the referral links for OpenXML:
- https://msdn.microsoft.com/EN-US/library/office/bb456488.aspx
- https://msdn.microsoft.com/EN-US/library/office/bb456487.aspx
- http://blogs.msdn.com/b/ericwhite/archive/2008/10/20/eric-white-s-blog-s-table-of-contents.aspx
Thanks
OpenXML is not a single cup of tea, I am continuing with a different assignment on OpenXML in the next version of this article. Till then, enjoy this stuff. Suggestions and queries are always welcome.

Posted on Wednesday, August 7th, 2013 at 7:32 am by .
Microsoft Word is about the authoring of documents. Documents contain pages, paragraphs, sentences and more. Today, I want to wade into the waters of manipulating Word document content. The plan is to get your feet wet by providing an overview of the key objects along with code samples.
Continuing the fine tradition of all Office applications (OneNote being the exception), Word has an extensive and mature object model. My goal is to show “a way” to accomplish some tasks in Microsoft Word. These samples are not necessarily, “the way” to do it. There is more than one way to achieve the same results.
Today, we are concerned with the structure of a Word document… not its stylings and presentation (I’ll concern ourselves with that topic next).
- Word document content objects
- Accessing document content objects with code
- Working with familiar Word content objects
Document content objects
Let’s look at the objects that combine together to construct a Word document.
- Document :: The document represents a single, solitary Word document. This is the parent object for all content within a Word document file. It lives in an appropriately named collection called Documents. I covered the document object in a previous article – Word application and base objects.
- Section :: Documents can contain multiple sections. This is how you apply different formatting, layout, and header/footer options to a Word document… by creating sections and formatting them differently.
- Page :: Represents a single page within a document. A page can reside within a Range.
- Paragraph :: A single paragraph of content. A paragraph can reside within a Selection, Document, or Range and is accessible via the Paragraphs collection object. Paragraphs also contain the formatting for content residing above it. Don’t ponder over that last sentence too much, I will explain it further in my next article.
- Sentence :: This object does not exist… strange as that might seem. Instead, there is the Paragraphs collection object. This collection contains a collection of Range objects, which in turn, contain all the sentences for the Range. Confused? The code samples will help bring focus to the picture.
- Selection :: This object contains the content selected either by the user or via code. It also is the insertion point if no selection exists. The insertion point is where the cursor blinks in the Word UI to inform the user of their location within the document.
- Range :: Think of this object like real-estate. It contains a contiguous section of a document. Perhaps its two most popular properties are Start and End. They contain ranges starting and ending character positions within the Word document.
There are more “content” objects than these but the list above are the major objects that provide access to everything else.
Accessing Word document content objects with code
I want to give you a lot of VB.NET code samples today. I’ll start with the Range object and keep going as long as I have paper. By the end of the samples, my hope is you will have a general idea of how to access and edit content within a Word document.
The Range object
The Word object model is extensive and more than a little complex. The best way to figure out how to make things happen via code is to learn to think like Word thinks. The quickest way to achieve this goal is to master the Range and the Selection objects. I covered the selection object in this article so I will focus on the Range object. Just know that together, these two objects allow you to select and find Word content.
Enumerate paragraphs in a range
This method loops through all the paragraphs in the active document and reverses their order in a new document.
Private Sub EnumerateParagraphs()
    Dim curDoc As Word.Document = WordApp.ActiveDocument
    Dim newDoc As Word.Document
    Dim rng As Word.Range
    Dim str As String = ""
    Dim i As Integer

    rng = curDoc.Content
    i = rng.Paragraphs.Count()

    Do Until i = 0
        str = str & rng.Paragraphs.Item(i).Range.Text & vbCrLf
        i = i - 1
    Loop

    newDoc = WordApp.Documents.Add
    newDoc.Range().Text = str

    Marshal.ReleaseComObject(rng)
    Marshal.ReleaseComObject(curDoc)
    Marshal.ReleaseComObject(newDoc)
The key is the use of the Range object and all the document content. The code first grabs all the document content and assigns it to a Range variable (rng). Then the code finds out how many paragraphs exist and loops backwards to create a string. This string is then inserted into a new document. It’s a good bar trick that only works in nerd bars.
Select the current page range
In this sample, we use a Range object that’s buried deeper in the Word object model. The reason for this sample is that I want to point out that the Range object is darn near everywhere within Word.
Private Sub SelectedPageRange()
    Dim curDoc As Word.Document
    curDoc = WordApp.ActiveDocument

    curDoc.Bookmarks("page").Range.Select()

    Marshal.ReleaseComObject(curDoc)

End Sub
In this procedure, I employ the predefined “page” bookmark. This is a standard Word bookmark that always exists and allows easy selection of the page containing the current focus (or selection).
You can learn more about predefined bookmarks at MSDN.
Enumerate sentences in a range
This one is similar to paragraphs but we switch sentences for paragraphs. The idea is the same… create a new document that contains the sentences in reverse order.
Private Sub EnumerateSentences()
    Dim curDoc As Word.Document = WordApp.ActiveDocument
    Dim newDoc As Word.Document
    Dim rng As Word.Range
    Dim str As String = ""
    Dim i As Integer

    rng = curDoc.Content
    i = rng.Sentences.Count()

    Do Until i = 0
        str = str & rng.Sentences.Item(i).Text
        i = i - 1
    Loop

    newDoc = WordApp.Documents.Add
    newDoc.Range().Text = str.ToUpper

    Marshal.ReleaseComObject(rng)
    Marshal.ReleaseComObject(curDoc)
    Marshal.ReleaseComObject(newDoc)
End Sub
To mix it up, the final document’s text is upper case. I know, this is dazzling trickery.
The takeaway is that the Range object contains a section of the Word document. Within it are major items like paragraphs and sentences.
The Section object
Documents can contain multiple sections. Sections allow you to define different page layouts and header/footer schemes.
Enumerate sections
You can loop through document sections by accessing the Sections collection. This collection resides directly beneath the Document object.
Private Sub EnumerateSections()
    Dim curDoc As Word.Document
    Dim newDoc As Word.Document
    Dim str As String = ""
    Dim i As Integer

    curDoc = WordApp.ActiveDocument

    For i = 1 To curDoc.Sections.Count
        str = str & "SECTION " & i & vbCr
        str = str & vbTab & "start = " & curDoc.Sections(i).Range.Start
        str = str & vbTab & "end = " & curDoc.Sections(i).Range.End & vbCrLf
    Next

    newDoc = WordApp.Documents.Add
    newDoc.Range().Text = str

    Marshal.ReleaseComObject(curDoc)
    Marshal.ReleaseComObject(newDoc)
End Sub
This procedure builds a string that 1) lists each document section and 2) contains the section’s Start and End character position. Notice the use of the Range object to read this information.
Create a new section
When building Word documents via code, you will likely need to create a new section. This procedure will do the trick.
Private Sub CreateSection()
    Dim curDoc As Word.Document
    curDoc = WordApp.ActiveDocument

    curDoc.Sections.Add(WordApp.Selection.Range)

    Marshal.ReleaseComObject(curDoc)
End Sub
This sample inserts a section break at the current selection (or cursor) location. Again, notice the use of the Range property. You can easily grab a different range within the document and pass it as the location of the page break.
The Page object
The page object resides in a “funny” location. Not “ha ha” funny… more like “why the hell is it here?” funny. You access document pages via the Document.ActiveWindow.Panes collection. Why? Because these are the rules.
Enumerate pages
Someday you might want to loop through all document pages and perform some very specific business logic on them. This code does exactly that.
Private Sub EnumeratePages()
    Dim curDoc As Word.Document
    Dim newDoc As Word.Document
    Dim pgs As Word.Pages
    Dim str As String = ""
    Dim i As Integer

    curDoc = WordApp.ActiveDocument
    pgs = curDoc.ActiveWindow.Panes(1).Pages

    For i = 1 To pgs.Count
        str = "PAGE " & i & vbCr
        str = str & vbTab & "height = " & pgs.Item(i).Height
        str = str & vbTab & "width = " & pgs.Item(i).Width & vbCrLf
    Next

    newDoc = WordApp.Documents.Add
    newDoc.Range().Text = str

    Marshal.ReleaseComObject(pgs)
    Marshal.ReleaseComObject(curDoc)
    Marshal.ReleaseComObject(newDoc)
End Sub
Here, the business logic is to create a string that contains the height and width of each page and then display it in a new document. Your business logic will probably be more complex than this. Consider this procedure a starter kit for processing document pages.
Insert a page break
To create a page, you create a page break.
Private Sub InsertPageBreak()
    Dim sel As Word.Selection
    sel = WordApp.Selection

    sel.InsertBreak(Type:=Word.WdBreakType.wdPageBreak)

    Marshal.ReleaseComObject(sel)
End Sub
I start by referencing the current insertion point via the Selection object. I then invoke the InsertBreak method and specify a page break. Walla! We have a new page.
Working with familiar (some) Word content objects
Now that you know the basics of working with the Range, Section, and Page objects, let’s look at working with typical Word content like tabless, comments, & text.
Insert a table
I use tables all the time. I can see how it would be useful to have a procedure that inserts a table exactly how I like it.
Private Sub InsertTable(rowCount As Integer, columnCount As Integer)
    Dim curDoc As Word.Document = WordApp.ActiveDocument
    Dim table As Word.Table

    table = curDoc.Tables.Add(WordApp.Selection.Range, rowCount, columnCount)
    table.Cell(1, 1).Range.Text = "Hello Table"

    Marshal.ReleaseComObject(table)
    Marshal.ReleaseComObject(curDoc)
End Sub
In this case, I like a table with 1 column and 7 rows and 0 formatting. The Tables collection resides under the Document object. To add a new table, you call the collection’s Add method and specify its location (via a Range object), number of rows, and number of columns.
Enumerate comments
Authoring a quality document of any type (blog, article, report, proposal, etc.) is a collaborative effort. Comments are key to the collaborative process. If you receive your document after this process and it is littered with helpful comments for improving it… the following code will come in handy.
Private Sub EnumerateComments()
    Dim curDoc As Word.Document = WordApp.ActiveDocument

    For i = 1 To curDoc.Comments.Count
        curDoc.Comments.Item(i).Range.Text = _
            curDoc.Comments.Item(i).Range.Text & vbCrLf & _
            "Corrected. It's all good now!"
    Next

    Marshal.ReleaseComObject(curDoc)
End Sub
Here, I loop through the Comments collection. This collection also resides directly under the Document object. For each comment, I insert a comment below the existing comment text.
Create a comment
Creating a comment is straight-forward. The approach below utilizes the current selection’s range as the insertion point.
Private Sub CreateComment(commentText As String)
    WordApp.Selection.Comments.Add(WordApp.Selection.Range, commentText)
End Sub
The text for the comment needs to be passed as the procedure’s parameter.
You can also create comments by calling Document.Comments.Add. If you do that, you need to pass a Range to specify where to insert the comment.
Delete all comments
Deleting all comments is delightfully easy. There is a method that takes care of them.
Private Sub DeleteComments()
    Dim curDoc As Word.Document = WordApp.ActiveDocument

    curDoc.DeleteAllComments()

    Marshal.ReleaseComObject(curDoc)
End Sub
There is no need to loop through the Comments collection.
Insert text
To insert text, you can utilize the Selection and Range objects.
Private Sub InsertText(textToInsert As String)
    WordApp.Selection.InsertAfter(textToInsert)
    'WordApp.Selection.InsertBefore(textToInsert)
    'WordApp.ActiveDocument.Range.InsertAfter(textToInsert)
End Sub
In this sample, I utilize the current selection to insert the passed string after the current selection. I’ve include commented code to show how you can chose to InsertBefore. Also, I’ve shown how to do the same with the Range object.
Find text
Finding text is a core competency in Word solution development. This sample performs search and replace.
Private Sub FindText()
    Dim rng As Word.Range
    rng = WordApp.ActiveDocument.Content

    With rng.Find
        .ClearFormatting()
        .Execute(FindText:="Hello Table", _
                 ReplaceWith:="Found Table", _
                 Replace:=Word.WdReplace.wdReplaceAll)
    End With

    Marshal.ReleaseComObject(rng)
End Sub
The procedure sets a Range object that contains all document Content. It then executes a Find & Replace action to replace the text inserted in the InsertTable method from earlier.
Copy and paste text
If you have text in a Word document, you will need to move it around.
Private Sub CopyAndPasteText()
    Dim curDoc As Word.Document = WordApp.ActiveDocument
    Dim rng As Word.Range
    'Dim sel As Word.Selection
    rng = curDoc.Range(curDoc.Paragraphs(1).Range.Start, _
                       curDoc.Paragraphs(3).Range.End)
    rng.Copy()
    'sel = curDoc.Range(curDoc.Paragraphs(1).Range, _
    '                    curDoc.Paragraphs(3).Range.End)
    'sel.Copy()

    WordApp.Selection.GoTo(What:=Word.WdGoToItem.wdGoToBookmark, _
                           Name:="EndOfDoc")
    WordApp.Selection.Paste()

    Marshal.ReleaseComObject(rng)
    Marshal.ReleaseComObject(curDoc)
End Sub
This method stores the first 3 paragraphs in a Range object, copies them, moves to the end of the document, and pastes the paragraphs. I’ve included commented code that shows how you could perform the copy using a Selection object.
***
We have now delved into the waters of Word document content manipulation. We’ll continue looking at scenarios in future articles!
Available downloads:
This sample Word add-in was developed using Add-in Express for Office and .net:
VB.NET Word Document Content add-in
Word add-in development in Visual Studio for beginners:
- Part 1: Word add-in development – Application and base objects
- Part 2: Customizing Word UI – What is and isn’t customizable
- Part 3: Customizing Word main menu, context menus and Backstage view
- Part 4: Creating custom Word ribbons and toolbars: VB.NET, C#
- Part 5: Building custom task panes for Word 2013 – 2003
- Part 6: Working with Word document content objects
- Part 8: Working with multiple Microsoft Word documents
- Part 9: Using custom XML parts in Word add-ins
- Part 10: Working with Word document properties, bookmarks, content controls and quick parts
- Part 11: Populating Word documents with data from external sources
- Part 12: Working with Microsoft Word templates
Image by Mohylek – Some Rights Reserved
In a recent post, I extolled the virtues of a wonderful OSS library I had found for working with Excel data programmatically, LinqToExcel. In that post, I also mentioned a fantastic library for working with Word docs as well, and promised to discuss it in my next post. This is that post.
The big pain point in working with MS Word documents programmatically is . . . the Office Interop. To get almost anything done with Word (including simply pulling the text out of the document, you pretty much need to use Interop, which also means you have to have Word installed on the local machine which is consuming your application. Additionally, my understanding is that there are issues with doing Word automation on the server side.
Interop is essentially a giant wrapper around the ugliness that is COM, and the abstraction layer is thin indeed. If you need to automate MS Office applications, Interop (or going all the way down to the COM level) is pretty much the only way to do it, and obviously, you need to have Office installed on the client machine for it to work at all.
Often times though, we don’t so much need to automate the office application directly so much as get at the contents of Office file (such as Word or Excel files). Dealing with all that Interop nastiness makes this more painful than it needs to be.
Thankfully, the open source DocX library by Cathal Coffey solves both problems nicely, and unlike Interop, presents an easy-to-use, highly discoverable API for performing myriad manipulations/extractions against the Word document format (the .docx format, introduced as of Word 2007). Best of all, DocX does not require that Word or any other Office dependencies be installed on the client machine! The full source is available from Coffey’s Codeplex repo, or you can add DocX to your project using Nuget.
In this post, we will look at a few of the basics for using this exceptionally useful library. Know that under the covers and with a little thought, there is a lot of functionality here beyond what we will look at in this article.
- Getting Started – Create a Word Document Using the DocX Library
- Use DocX to Add Formatted Paragraphs
- Find and Replace Text Using DocX -Merge Templating, Anyone?
- DocX Exposes Many of the Most Useful Parts of the Word Object Model
- Additional Resources/Items of Interest
Add DocX to your project using Nuget
As with LinqToExcel, you can add the DocX library to your Visual Studio solution using the Nuget Package Manager Console by doing:
Install DocX using the Nuget Package Manager Console:
PM> Install-Package DocX
Alternatively, you can use the Solution Explorer. Right-click on the Solution, select “Manager Nuget Packages for Solution,” and type “DocX in the search box (make sure you have selected “Online” in the left-hand menu). When you have located the DocX package, click Install:
Install DocX using the Nuget Package Manager GUI in VS Solution Explorer:

Getting Started – Create a Word Document Using the DocX Library
Wanna Quickly create a Word-compatible, .docx format document on the fly from your code? Do this (I am assuming you have Word installed on your local machine):
(Note – change the file path to reflect your own machine)
A Really Simple Example:
using Novacode;
using System;
using System.Diagnostics;

namespace BlogSandbox
{
    public class DocX_Examples
    {
        public void CreateSampleDocument()
        {
            // Modify to siut your machine:
            string fileName = @"D:UsersJohnDocumentsDocXExample.docx";

            // Create a document in memory:
            var doc = DocX.Create(fileName);

            // Insert a paragrpah:
            doc.InsertParagraph("This is my first paragraph");

            // Save to the output directory:
            doc.Save();

            // Open in Word:
            Process.Start("WINWORD.EXE", fileName);
        }
    }
}
Note in the above we need to add using Novacode; to our namespace imports at the top of the file. The DocX library is contained within this namespace. If you run the code above, a word document should open like this:
Output of Really Simple Example Code:

What we did in the above example was:
- Create an in-memory instance of a
DocXobject with a file name passed in as part of the constructor. - Insert a
DocX.Paragraphobject containing some text. - Save the result to disc as a properly formatted .docx file.
Until we execute the Save() method, we are working with the XML representation of our new document in memory. Once we save the file to disc, we find a standard Word-compatible file in our Documents directory.
Use DocX to Add Formatted Paragraphs – A More Useful Example
A slightly more useful example might be to create a document with some more complex formatted text:
Create Multiple Paragraphs with Basic Formatting:
public void CreateSampleDocument()
{
    string fileName = @"D:UsersJohnDocumentsDocXExample.docx";
    string headlineText = "Constitution of the United States";
    string paraOne = ""
        + "We the People of the United States, in Order to form a more perfect Union, "
        + "establish Justice, insure domestic Tranquility, provide for the common defence, "
        + "promote the general Welfare, and secure the Blessings of Liberty to ourselves "
        + "and our Posterity, do ordain and establish this Constitution for the United States of America.";

    // A formatting object for our headline:
    var headLineFormat = new Formatting();
    headLineFormat.FontFamily = new System.Drawing.FontFamily("Arial Black");
    headLineFormat.Size = 18D;
    headLineFormat.Position = 12;

    // A formatting object for our normal paragraph text:
    var paraFormat = new Formatting();
    paraFormat.FontFamily = new System.Drawing.FontFamily("Calibri");
    paraFormat.Size = 10D;

    // Create the document in memory:
    var doc = DocX.Create(fileName);

    // Insert the now text obejcts;
    doc.InsertParagraph(headlineText, false, headLineFormat);
    doc.InsertParagraph(paraOne, false, paraFormat);

    // Save to the output directory:
    doc.Save();

    // Open in Word:
    Process.Start("WINWORD.EXE", fileName);
}
Here, we have created some DocX.Formatting objects in advance, and then passed them as parameters to the InsertParagraph method for each of the two paragraphs we create in our code. When the code executes, Word opens and we see this:
Output from Creating Multiple Formatted Paragraphs

In the above, the FontFamily and Size properties of the Formatting object are self-evident. The Position property determines the spacing between the current paragraph and the next.
We can also grab a reference to a paragraph object itself and adjust various properties. Instead of creating a Formatting object for our headline like we did in the previous example, we could grab a reference as the return from the InsertParagraph method and muck about:
Applying Formatting to a Paragraph Using the Property Accessors:
// Insert the Headline and do some formatting:
Paragraph headline = doc.InsertParagraph(headlineText);
headline.Color(System.Drawing.Color.Blue);
headline.Font(new System.Drawing.FontFamily("Comic Sans MS"));
headline.Bold();
headline.Position(12D);
headline.FontSize(18D);
This time, when the program executes, we see THIS:

OH NO YOU DID NOT!
Yes, yes I DID print that headline in Comic Sans. Just, you know, so you could see the difference in formatting.
There is a lot that can be done with text formatting in a DocX document. Headers/Footers, paragraphs, and individual words and characters. Importantly, most of the things you might go looking for are easily discoverable – in other words, the author has done a great job building out his API.
Find and Replace Text Using DocX – Merge Templating, Anyone?
Of course, one of the most common things we might want to do is scan a pre-existing document, and replace certain text. Think templating here. For example, performing a standard Word Merge is not very doable on your web server, but using DocX, we can accomplish the same thing. The following example is simple due to space constraints, but you can see the possibilities:
First, just for kicks, we will create an initial document programmatically in one method, then write another method to find and replace certain text in the document:
Create a Sample Document:
private DocX GetRejectionLetterTemplate()
{
    // Adjust the path so suit your machine:
    string fileName = @"D:UsersJohnDocumentsDocXExample.docx";

    // Set up our paragraph contents:
    string headerText = "Rejection Letter";
    string letterBodyText = DateTime.Now.ToShortDateString();
    string paraTwo = ""
        + "Dear %APPLICANT%" + Environment.NewLine + Environment.NewLine
        + "I am writing to thank you for your resume. Unfortunately, your skills and "
        + "experience do not match our needs at the present time. We will keep your "
        + "resume in our circular file for future reference. Don't call us, we'll call you. "
        + Environment.NewLine + Environment.NewLine
        + "Sincerely, "
        + Environment.NewLine + Environment.NewLine
        + "Jim Smith, Corporate Hiring Manager";

    // Title Formatting:
    var titleFormat = new Formatting();
    titleFormat.FontFamily = new System.Drawing.FontFamily("Arial Black");
    titleFormat.Size = 18D;
    titleFormat.Position = 12;

    // Body Formatting
    var paraFormat = new Formatting();
    paraFormat.FontFamily = new System.Drawing.FontFamily("Calibri");
    paraFormat.Size = 10D;
    titleFormat.Position = 12;

    // Create the document in memory:
    var doc = DocX.Create(fileName);

    // Insert each prargraph, with appropriate spacing and alignment:
    Paragraph title = doc.InsertParagraph(headerText, false, titleFormat);
    title.Alignment = Alignment.center;

    doc.InsertParagraph(Environment.NewLine);
    Paragraph letterBody = doc.InsertParagraph(letterBodyText, false, paraFormat);
    letterBody.Alignment = Alignment.both;

    doc.InsertParagraph(Environment.NewLine);
    doc.InsertParagraph(paraTwo, false, paraFormat);

    return doc;
}
See the %APPLICANT% placeholder? That is my replacement target (a poor-man’s merge field, if you will). Now that we have a private method to generate a document template of sorts, let’s add a public method to perform a replacement action:
Find and Replace Text in a Word Document Using DocX:
public void CreateRejectionLetter(string applicantField, string applicantName)
{
    // We will need a file name for our output file (change to suit your machine):
    string fileNameTemplate = @"D:UsersJohnDocumentsRejection-Letter-{0}-{1}.docx";

    // Let's save the file with a meaningful name, including the applicant name and the letter date:
    string outputFileName = string.Format(fileNameTemplate, applicantName, DateTime.Now.ToString("MM-dd-yy"));

    // Grab a reference to our document template:
    DocX letter = this.GetRejectionLetterTemplate();

    // Perform the replace:
    letter.ReplaceText(applicantField, applicantName);

    // Save as New filename:
    letter.SaveAs(outputFileName);

    // Open in word:
    Process.Start("WINWORD.EXE", """ + outputFileName + """);
}
Now, when we run the code above, our output is thus:

Obviously, the preceding example was a little contrived and overly simple. But you can see the potential . . . If our letter contained additional “merge fields, we could just as easily pass in a Dictionary<string, string>, where the Dictionary contains one or more Key Value Pairs containing a replacement target and a replacement value. Then we could iterate, using the Dictionary Keys as the search string, and replace with the Dictionary values.
DocX Exposes Many of the Most Useful Parts of the Word Object Model
In this quick article, we have only scratched the surface. DocX exposes most of the stuff we commonly wish we could get to within a Word document (Tables, Pictures, Headers, Footers, Shapes, etc.) without forcing us to navigate the crusty Interop model. This also saves us from some of the COM de-referencing issues which often arise when automating Word within an application. Ever had a bunch of “orphaned” instances of Word (or Excel, etc.) running in the background, visible only in the Windows Task Manager? Yeah, I thought so . . .
If you need to generate or work with Word documents on a server, this is a great tool as well. No dependencies on MS Office, no need to have Word running. You can generate Word documents on the fly, and/or from templates, ready to be downloaded.
I strongly recommend you check out the project on Codeplex. Also, the project author, Cathal Coffey, discusses much of the DocX functionality on his own blog. If you dig DocX, drop by and let him know. He’s really done a fantastic job.
Additional Resources/Items of Interest
- C#: Query Excel and .CSV Files Using LinqToExcel
- Splitting and Merging Pdf Files in C# Using iTextSharp
- Working with Pdf Files in C# Using PdfBox and IKVM
- Customizing Routes in ASP.NET MVC
- Routing Basics in ASP.NET MVC
- Building Out a Clean, REST-ful Web Api Service with a Minimal Web Api Project
- Creating a Clean, Minimal-Footprint ASP.NET WebAPI Project with VS 2012 and ASP.NET MVC 4

There was a time when you had to have Microsoft Office installed to create, edit, or even view a Microsoft Word document. Thankfully, that’s no longer the case. There are a number of free alternatives for working with those Word documents people occasionally send you.
Word Online

Word Online is Microsoft’s own cloud-based solution for working with Word files. It’s part of the Microsoft Office Online suite, and you can access it without a subscription. You just have to sign in with a free Microsoft account.
The interface of the Word Online is similar to the desktop version of Microsoft Word, so if you’re familiar with Word, you’ll feel right at home.
Documents you create with Word Online are saved automatically to your OneDrive folders. Word Online also integrates with the desktop version of Microsoft Word, and you can seamlessly switch to the desktop app with the click of a button. All the changes you make to one version are automatically synced to the other. However, you cannot work in the web-app and the desktop app simultaneously.
Word Online also features real-time collaboration that lets multiple people work on the same document at the same time. This feature works with Word Online, the Windows and Mac desktop apps, and the mobile apps. The iOS and Android app are also free and allow you to view and edit documents on the go.
Word Online is probably your best bet for working with Word documents (other than actually using the desktop app), because it does a good job of maintaining the original formatting of the Word documents. For viewing and editing documents, it’s a great solution.
That said, there are a few disadvantages. You have to be online for it to work; there’s no way to edit a local file offline. Not all the features of the desktop version of Word are present, either. All the basics are there, but you won’t be able to some of the more advanced stuff like create captions and bibliographies, create or apply styles, or use advanced reviewing tools. You can view all those things if they’re already present in the document; you just can’t work with them.
Word Online also has a few restrictions on printing, and you might not be able to fine-tune your prints as you would in the desktop app.
Google Docs
Much like Word Online, Google Docs works in your browser. You can use it to create new document files and collaborate with other users. By default, you can’t work directly with a Word file in Google Docs. Instead, you have to upload the file to Google Drive, and then open it in Google Docs—a process that converts it to a Google Docs file.
For simple, mostly text documents, that might be fine, especially if the document is something you’re just going to be using yourself. However, Google Docs doesn’t do a great job at retaining most formatting that can go along with a Word document. And, if it’s a document you need to edit and return to someone else that uses Word, converting it and then reconverting it isn’t ideal.
The good news is that if you use the Chrome browser, Google makes an extension that lets you open Microsoft Office files (Word, Excel, and PowerPoint) directly into their Google counterparts (Docs, Sheets, and Slides) without converting them. The extension is named Office Editing for Docs, Sheets, and Slides—a bit on the nose, but whatever—and it’s free from the Chrome Web Store.
Unfortunately, that leaves users of other browsers out in the cold, unless they can install Chrome extensions. If you need to edit Word documents semi-regularly and want to use Google Docs to do it, it might be worth installing Chrome just for that purpose.
RELATED: How to Install Any Chrome Extension in Firefox
On the features front, Google Docs does fall a bit behind Word Online, but only power users will feel the pinch.
By default, Google Docs works only when you are online. If you want offline access, then you’ll need to install a Chrome extension that enables offline viewing and editing of files. For mobile access, Google offers apps for both iOS and Android devices. Both platforms’ apps support offline file access with editing features, as well.
Zoho Writer
If you’re not a fan of using Word Online or Google Docs, but still want an online solution, Zoho Writer is a free online word processor that lets you import Word documents, without needing to convert them. The only real catch with Zoho Writer is that you can only upload Word documents up to 10 MB in size. That’s big enough to accommodate most documents, but if you’ve got something larger than that, you’ll need another solution.
Zoho Writer supports all the recent Word file formats, and it does a really good job of maintaining the layout of the original Word file. You can also save and export the document to many other formats, such as ODT, RTF, txt, HTML, ePub, and PDF.
Apart from the web app, Zoho also offers mobile apps for Writer which are available for Android and iOS. Both apps also support collaboration and offline editing features.
Libre Office
So far, we’ve looked at several free online services for working with Word documents. LibreOffice is a full desktop app suite that aims to be a free, open source replacement for Microsoft Office. And it’s a capable app. It’s not quite as full-featured as Word itself, but it’s easily out-features any of the online solutions we’ve talked about. It’s available for Windows, Mac, and Linux operating systems.
While LibreOffice is primarily designed to work with local documents, it does support services that you can use to edit remote documents, as well.
Unless you’re a real Word power user (in which case, you’d likely have Word, anyway) or you have very specific needs, you should find that LibreOffice can do almost all of what you need when editing a Word document. It even retains formatting pretty well, and supports native Word formats—so, no conversion needed. That said, it can sometimes have issues with image placement in Word documents, especially those documents created in the newer versions of Word.
Libre Office does have a mobile app, but only for Android, and it can only be used to view documents. The app is rough around the edges, so expect some bugs and user experience issues.
Of course, there are other alternatives out there that you can use to to edit Word Documents, but these are the ones that we believe offer the most diverse feature set. If you prefer a specific application, do let us know!
READ NEXT
- › How to Automatically Save Microsoft Word Documents to OneDrive
- › How to Turn Off Dark Mode in Microsoft Word
- › How to Save a Microsoft Word Document as a Web Page
- › How to Turn Off Track Changes in Word
- › Spotify Is Shutting Down Its Free Online Game
- › Why Your Phone Charging Cable Needs a USB Condom
- › This 64 GB Flash Drive From Samsung Is Just $8 Right Now
- › Save Hundreds on Elegoo’s New PHECDA Laser Engraver Through Kickstarter