Create a vector with an arrow above
Word offers different ways how to create a vector in the document:
I. Using the Equation:
This way is perfect if you do not need to care about the format and compatibility with previous versions of Microsoft Office (a recommended approach for physical science and mathematics that require a lot of math in the text with consistent fonts for all equations and symbols):
1. In the paragraph where you want to insert the vector, then click Alt+= to insert the equitation block:
2. In the equitation block, type the vector magnitude and select it. It can be one letter, several letters, or even an expression.
For example: .
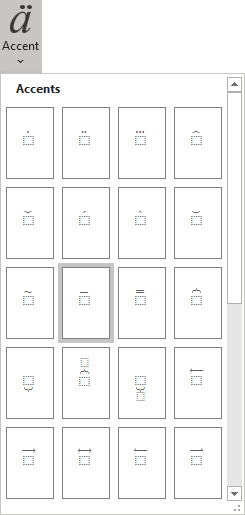
3. On the Equation tab, in the Structures group, click the Accent button:

In the Accent list, choose Bar or Rightwards Arrow Above:
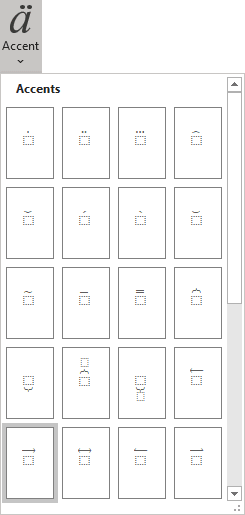
Note: If you want to continue working with this equation, click the right arrow twice to exit the box below the vector: →
→
. So, to continue working with the equation, it should not have any selected data:
II. Using AutoCorrect for Math:
When you work with many documents and often need to paste a single special symbol, you do not need to insert an equation each time. Microsoft Word offers a helpful feature named AutoCorrect. The AutoCorrect options in Microsoft Word propose two different ways to add any special character quickly, or even large pieces of text:
- Using the Replace text as you type function of the AutoCorrect options.
- Using the Math AutoCorrect options:
Using this method, you can benefit from the Math AutoCorrect options without inserting an equation. To turn on or turn off the AutoCorrect of the Math symbols, do the following:
1. On the File tab, click Options:

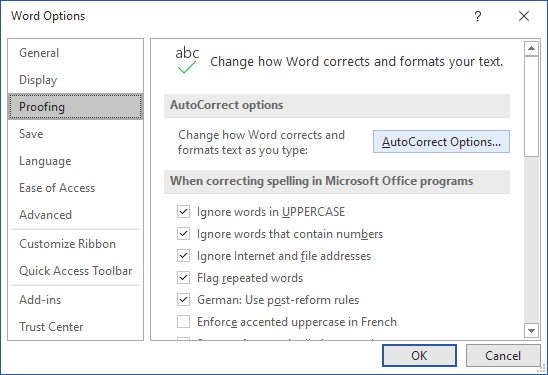
2. In the Word Options dialog box, on the
Proofing tab, click the AutoCorrect Options… button:
3. In the AutoCorrect dialog box, on the Math AutoCorrect tab, select the Use Math AutoCorrect rules outside of the math regions option:
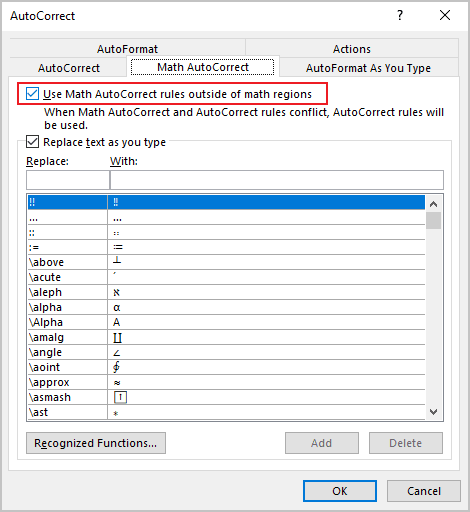
After clicking OK, you can use any of the listed Names of symbols, and Microsoft Word will replace them with the appropriate symbols:
Note: If you do not need the last replacement, click Ctrl+Z to cancel it.
III. Using a Symbol dialog box:
Microsoft Word offers a convenient ability to combine two characters (see
Superimposing characters). To add some element to a symbol, such as a bar, apostrophe, etc., enter a symbol and immediately insert a vector mark from the Combining Diacritical Marks for Symbols subset of any font (if it exists).
To combine an element with the entered symbol, open the Symbol dialog box:
On the Insert tab, in the Symbols group, select the Symbol button, and then click More Symbols…:

On the Symbol dialog box:
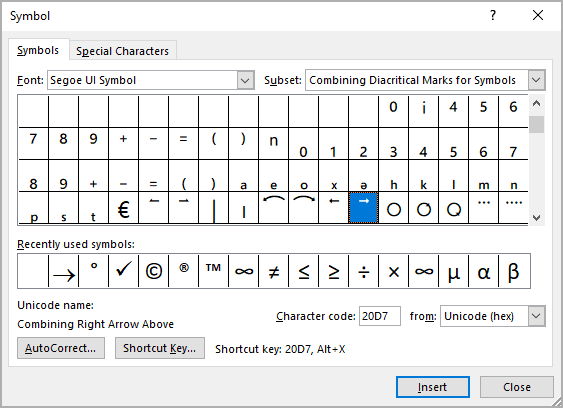
- In the Font list, select the Segoe IU Symbol font,
- Optionally, to find symbols faster, in the Subset list, select the Combining Diacritical Marks for Symbols subset,
- Select the symbol:
- Click the Insert button to insert the symbol,
- Click the OK button to close the Symbol dialog box.
Create a vector with a tilde under the letter
As for regular vector sign, word offers several ways how to create a vector with a tilde underneath a letter:
I. Using the Equation:
1. In the paragraph where you want to insert the vector, then click Alt+= to insert the equitation block:
2. In the equitation block, type one by one:
- the vector variable, for example, the letter a,
- type below:
- type the tilde symbol ~. Word automatically changes the command below to the appropriate symbol:
After pressing a space bar, Word displays the letter with the tilde under it:
II. Using a Symbol dialog box:
To combine an element with the entered symbol (for example, the letter a), open the Symbol dialog box:
1. On the Insert tab, in the Symbols group, select the Symbol button, and then click More Symbols….
2. On the Symbol dialog box:
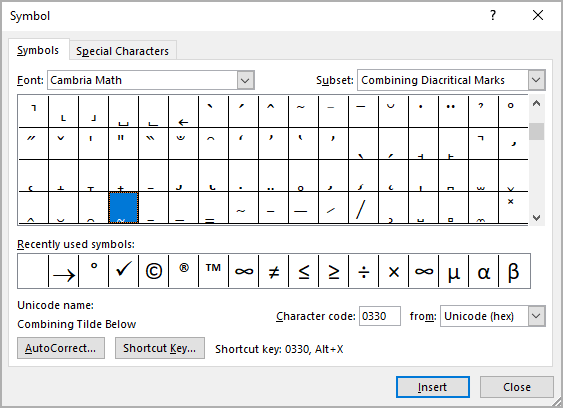
- In the Font list, select the Cambria Math or Lucinda Sans Unicode font,
- Optionally, to find symbols faster, in the Subset list, select the Combining Diacritical Marks subset,
- Select the symbol:
- Click the Insert button to insert the symbol,
- Click the OK button to close the Symbol dialog box.
I’m working on a calculation program which creates graphs from input data with ZedGraph. My client would like to embed those graphics into Microsoft Word and the publish the document as PDF. Both PNGs and enhanced metafiles produce badly rastered results in the PDF.
I’ve tested this with Office 2007 and the «built-in» PDF publisher.
Can you recommend any workflow that leads to not breaking the vectorized data on the way to PDF?
Update
Thanks for all answers. It turned out, that .net actually doesn’t create metafiles when writing to disk. See the respective question. Once I started using P/Invoke to create real metafiles on disk (instead of the automatic PNG fallback) the quality of the generated PDFs and prints improved vastly.
asked Jun 29, 2009 at 17:11
David SchmittDavid Schmitt
57.9k26 gold badges121 silver badges165 bronze badges
2
What about embedding Excel graphs?
answered Jun 29, 2009 at 17:20
richardtallentrichardtallent
34.5k14 gold badges82 silver badges123 bronze badges
If all else fails, you might try creating your PNG files at crazy-high resolution. This might make the rasterization fine-grained enogh to not be noticeable.
answered Jun 29, 2009 at 17:32
RolandTumbleRolandTumble
4,6132 gold badges32 silver badges37 bronze badges
1
I don’t know anything about ZedGraph, but if you can export to (or somehow get to) an EPS file, that should work.
I often need to get vector artwork out of a PDF for use in Word, and to do this I usually go via Adobe Illustrator to save as an EPS. [Illustrator just happens to be something that I have available — I’m not saying there’s anything magical about it; you may be able to create EPS files via another route.]
I see you’re using Office 2007 and I can’t say I have much experience with that, but the situation with Word 2003 is that you can insert an EPS that was exported from Adobe Illustrator if you choose «Illustrator 8.0» format when exporting from Illustrator. Newer versions of Illustrator seem to create files that Word 2003 can’t handle. (Word 2007 may be better in this respect).
answered Jul 7, 2009 at 10:50
Gary McGillGary McGill
26k25 gold badges117 silver badges200 bronze badges
The advantage of a scalable vector graphics over bitmap images (JPG, PNG, GIF, etc.), is that they can be resized and still look sharp. An added advantage is that they require less storage space. So the Word document with SVG graphics embedded will also be smaller.
Word 2019 (and Office 365) allow for direct importing of SVG files, so you can import files directly without using an intermediate graphics format. Importing SVG files from Inkscape for example does not require you to export to EMF (Windows Enhanced Metafile) anymore before loading the image in Word.
Insert SVG as Picture in Word
Learn how to insert a scalable vector graphics in Microsoft Word 2019 with these steps:
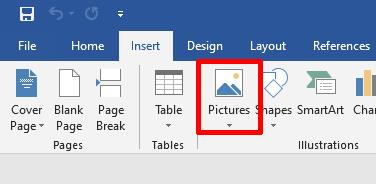
- In the Ribbon in Word, select the Insert tab and then click Pictures.
- In the drop-down menu, select This Device…
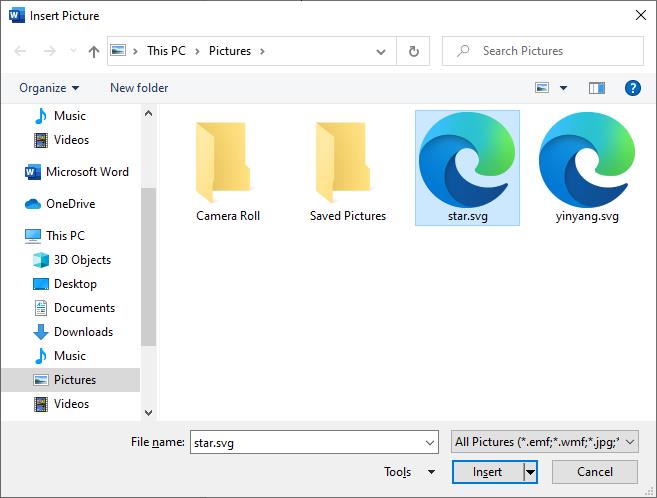
This allows you to browse to the SVG file on your computer. - Next, navigate to the location of the SVG file, select it and click the Insert button.
Note: You can use this same method to insert SVG files into other Office 2019 applications (e.g. Excel, PowerPoint).
After inserting the SVG into Word, you can use the Format options to change some of the display and rendering options. To actually change the SVG itself, you need an editor for scalable vector graphics, like Adobe Illustrator, or Inkscape.
Copy & Paste SVG in Word
In addition to the method described above to insert an SVG in Word, it is also possible to use the Windows copy + paste function to insert an SVG image into Word. For this to work, you do need to have an SVG viewer installed that allows you to copy the SVG image to the clipboard. By default, Windows will use a browser to view SVG files. This will not support a simple copy + paste operation. Neither Edge, Chrome, nor Firefox allows you to copy + paste an opened SVG file.
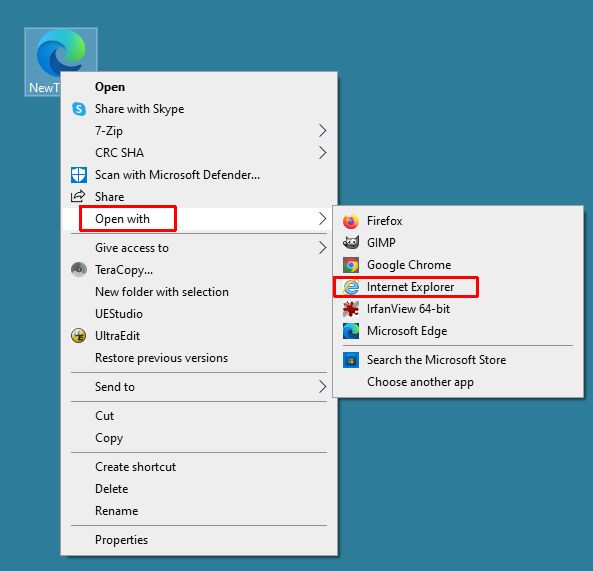
In Internet Explorer (IE) it is still possible, simply open the SVG file by right-clicking the file and then use the Open with option to select Internet Explorer.
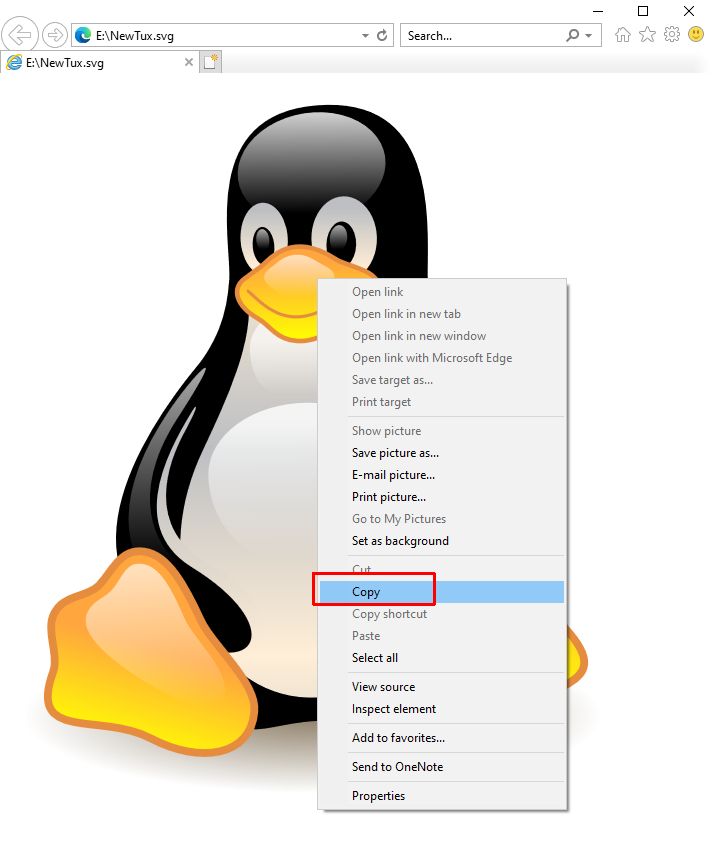
Once the SVG file is loaded in IE and displayed in the browser window, you can right-click the image, and select the Copy option in the popup menu.
Now, you can switch to MS Word and paste the SVG into the document.
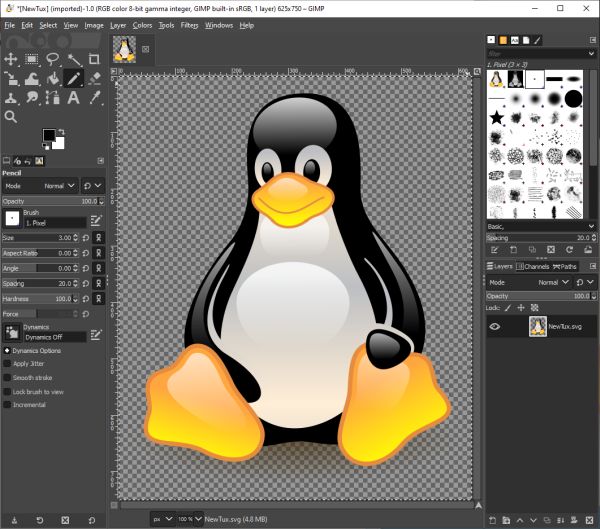
As an example, I also used some of my favorite image programs, Irfanview, and GIMP, to load and view an SVG file. Once loaded, I can select the image and copy it. Switch to MS Word, select the location for the SVG image, and paste it (Ctrl + V).
As is visible from the examples below, this can have some side effects. Irfanview loads and dsiplays the SVG with a different rendering than the original. The copy + paste result from Irfanview is exactly what we see in Irfanview itself (which is not correct).
You can see that the horizontal lines do not belong in the image, and the beak and eyes are also different.
If we try the same with GIMP, the result is better.
In short, the option to use copy + paste to insert an SVG in Word will work, but it is important to use an SVG viewer that properly supports and renders the SVG image. In the example IE, Irfanview and GIMP were used, but there are other solutions to do this as well.
Solve SVG import problems in Word
The problem with the SVG format is that they are not all created the same. So, importing an SVG file into MS Word might not always give you the desired result. We have seen examples in the earlier sections. But if there is really no way to get the SVG image looking like the original in MS Word 2019, there are a few other things you can try.
- Use an alternative intermediate format. In the example of Inkscape, we already mentioned the Windows Enhanced Metafile format. Exporting your SVG file into another vector file format allows the drawing to the edited in Word after importing the image. Other examples of such formats are Adobe Illustrator (.ai) and Encapsulated PostScript (EPS). These are all vector formats that keep the original quality of the graphic.
- Open and save the SVG file in another editor. If the origin of your SVG is unknown, you can try opening the SVG file in a graphic editor that supports SVG, check it, and then save it as a copy. Try importing the copy into MS Word.
- Export the graphics to a bitmap file format (also referred to as a pixel or raster format). This will ensure that the graphic is captured and imported exactly as shown. The drawback, in this case, is that it does not scale and is not editable anymore.
FAQs
What is SVG?
SVG stands for scalable vector graphics. It is a file format that is based on XML and is used for online graphics. The SVG specification is maintained by the W3C.
Can Word read SVG files?
No, Microsoft Word does not recognize the SVG file extension. Word cannot open an SVG file directly to show its contents.
Can Word save SVG files?
No, Word does not have an export filter for SVG. Since it is a graphics file format, a graphics program is needed to create SVG files.
What can open an SVG?
The SVG file format is a vector format. To open an SVG file, a graphics program with support for SVG is required. Adobe Illustrator and a few other Adobe graphics programs can open SVG files. Other options are CorrelDRAW and InkScape.
What is SVG used for?
Scalable Vector Graphics (SVG) files are used for two dimensional images online. Since it is a descriptive format rather than a binary format, it is well suited for lossless compression.
SVG Image Attribution: lewing@isc.tamu.edu Larry Ewing and The GIMP
This book is about the Math Builder (officially called as Equation Editor) tool in Microsoft Word and Outlook 2007 and higher. It also applies to Microsoft PowerPoint and Excel 2010 and higher. Note that this is a different tool than the legacy tool Equation Editor 3.0 (which is still available on 32-bit Office versions until the January 2018 update[1]) and MathType.
Typesetting mathematics on a computer has always been a challenge. The mathematical community almost universally accepts a typesetting language called LaTeX. Math Builder is a much easier to use tool that has less functionality than LaTeX but more than typical document processing. Microsoft call this hybrid language the Office Math Markup Language, or OMML for short. It is an appropriate tool for:
- Typing any document whose focus is not itself mathematics.
- Typing a short math document quickly.
- A stepping stone between word processing (MS Word) and typesetting (LaTeX)
Note that Math Builder does not perform any mathematics; it is a tool for displaying it.
|
|
There is a serious bug on Word versions up to and including Word 2013 that causes the first letter of small equations to disappear randomly after some time. The only way to mitigate this problem is to upgrade to Word 2016, which does not have this problem. This has not been verified with Equation Editor or Word for Mac. |
Pros and Cons[edit | edit source]
Pros:
- Math Builder is WYSIWYG: after typing an equation you see immediately what it looks like.
- It’s easy to get started: it’s already built in to Microsoft Word. Common symbols have point-and-click icons.
- It’s easy to use: Common symbols have keyboard shortcuts so that a veteran user need not use a mouse at all.
- Nearly all symbols use the same commands as LaTeX.
- The format used is non-proprietary and given in Unicode Technical Note #28.
- It can be used in Outlook to easily write equations in emails; it renders as images to the recipent.
Cons:
- Some uncommon symbols are not listed in the menu and require knowing the keyboard shortcut. Typically this is the LaTeX code for the symbol.
- There are differences between Math Builder and LaTeX code: advanced functionality that requires more than just a symbol tend to follow the same flavor but have slightly different syntax. Math Builder code tends to be shorter than LaTeX code and disappears upon completion to the WYSIWYG output. Examples here are matrices, multiple aligned equations, and binomial coefficients.
- No LaTeX typesetting tools such as labels and references are implemented.
- No highly advanced LaTeX tools such as graphing, commutative diagrams, or geometric shapes are implemented. (Note:- Geometric shapes are otherwise available in the Insert ribbon)
- Students studying mathematics might not be motivated to learn LaTeX because they might be able to get by with Equation Builder in Word to satisfy the vast majority of their needs. However, when such a student reaches the limits, unlike LaTeX there is absolutely no recourse to expand the program to satisfy it.
Inserting an equation[edit | edit source]
Microsoft Word has two different typing environments: text and math. To obtain the math environment, click on «Equation» on the «Insert» ribbon on Windows or Word for Mac ’16, or in «Document Elements» on Word for Mac ’11. The keyboard shortcut is «alt»+ «=». For a Mac system, the shortcut is control + «=». Everything you type in this environment is considered math: all automatic formatting of text is disabled. To exit the math environment, click on any text outside the math environment. One easy way to do this is by pressing the right arrow key.
Common Mathematics[edit | edit source]
Fractions[edit | edit source]
There are multiple ways to display a fraction. The default is vertically aligned as illustrated below. Obtain this by typing the fraction and pressing space: 1/2

Linear fraction (resp. skewed fraction) is obtained using ldiv (resp. sdiv) and pressing space (twice) or by typing 1 ldiv 2 (resp. 1 sdiv 2) and pressing space. While you can also do this by right-clicking on the equation and clicking Linear, this affects the whole equation and not just the fraction.

Parenthesis, brackets, and braces[edit | edit source]
Grouping symbols will automatically size to the appropriate size. These symbols include «(), {}, [], ||». For instance, the expression below can be obtained with (1/2(x+1)):

Be careful to press space after the «2» to render the fraction, otherwise Word might put «x+1» in the denominator. Also press space after typing every closing parenthesis «)», which will adjust both the opening and closing parentheses size to fit the group’s contents. Because the 1/2 fraction is is quite tall, the outer parentheses need to be adjusted to enclose the fraction appropriately. To be exact, the key presses required to reproduce the equation above are ( 1 / 2 space ( x + 1 ) space ) space.
Exponents and subscripts[edit | edit source]
Exponents can be obtained by using «^» and subscripts by «_». The monomial below can be obtained by typing x_2^5 or x^5_2 and pressing space.

Symbols:  etc[edit | edit source]
These are all common symbols. The easiest thing to do would be to find a LaTeX reference sheet. A few of those symbols are shown here:
| code | output |
| neq or /= | 
|
| leq or <= (resp. geq or >= ) |  (resp (resp  ) )
|
| subseteq | 
|
| vee | 
|
| rightarrow | 
|
| Rightarrow | 
|
| times | 
|
| div | 
|
| pm | 
|
| infty | 
|
| otimes (resp. oplus) |  (resp. (resp.  ) )
|
| hbar | 
|
| partial | 
|
Greek, Script, and Fraktur letters[edit | edit source]
The math environment implements 3 fronts in addition to the default.
Blackboard Bold letters[edit | edit source]
Blackboard bold letters can be obtained by typing «» followed by «double» followed by the letter. doubled doubleD produces 
Mathematical Physics[edit | edit source]
Vectors[edit | edit source]
A vector is often denoted by an overhead right arrow, which can be obtained by following a letter variable with «vec»: 


Newtonian Dot Notation[edit | edit source]
Dot notation for time derivatives (e.g. 
can be obtained by following a letter variable with «dot» for a first derivative and «ddot» for a second derivative.
Vector Products[edit | edit source]
The dot product (inner product) can be displayed using the centered dot symbol «cdot» e.g. the divergence 

Matrices[edit | edit source]
Matrices are obtained with the «matrix» symbol. Use parentheses to start and end the matrix. Use «@» to separate rows, and «&» to separate columns. The matrix below can be created by typing [matrix(1&2&3@4&5&6)].

Multiple Aligned Equations[edit | edit source]
Aligning equations can be obtained with the «eqarray» symbol. Use parentheses to start and end the matrix. Use «@» to separate equations. Use «&» to specify alignment and whitespace. The first «&» and then every other occurrence is alignment. The second and then every other occurrence is white space. The equations below can be obtained by typing the following text:
eqarray(2&x+&3&y=5@&x+&&y=7)

(The math environment here seems to be adding excess space between the alignments that doesn’t occur in Word)
Radicals[edit | edit source]
Radicals are obtained using the «sqrt» symbol, followed by the index, then «&», then the radicand.
For example: sqrt(a&b) will output ![{displaystyle {sqrt[{a}]{b}}}](https://wikimedia.org/api/rest_v1/media/math/render/svg/dbca8db0e209ad6de78291169d19044dcb2ad34e)
Additionally, sqrt(x) will simply output 
Integrals[edit | edit source]
| code | output |
int
|

|
int_a^b |

|
iint_a^b |

|
iiint_a^b |

|
oint_a |

|
oiint_a |
∯ Double oriented integral (No corresponding Wikibooks math symbol) |
oiiint_a |
∰ Triple oriented integral (No corresponding Wikibooks math symbol) |
coint_a |
∲ Clockwise oriented integral (No corresponding Wikibooks math symbol) |
Integrals are obtained by inserting the desired integral symbol (see above table), and then pressing space twice.[2]
For example: int_a^b space space 1/x space dx will output 
Inline versus Display[edit | edit source]
Equations have two forms. Inline specifies that the equation is to be in line with text. This affects a few expressions to make them appear smaller. For instance fractions will use a smaller font. Summations and integrals will place the endpoints to the right of the symbol instead of below it.
Display specifies to use as much space as needed. Display mode equations must appear on their own line.
Modifying and creating shortcuts[edit | edit source]
Everything in Math Builder requires special symbols that the computer knows how to interpret. These symbols are constructed with all the commands starting with «» as illustrated in the above sections. This is implemented via math autocorrect which you can modify. For instance, you might like to use ra instead of rightarrow. You can do this by adding the command to the math autocorrect directory.
References[edit | edit source]
- ↑ https://support.office.com/en-us/article/Equation-Editor-6eac7d71-3c74-437b-80d3-c7dea24fdf3f
- ↑ Lua error in package.lua at line 80: module ‘Module:Citation/CS1/Suggestions’ not found.
This post provides an introduction to “word embeddings” or “word vectors”. Word embeddings are real-number vectors that represent words from a vocabulary, and have broad applications in the area of natural language processing (NLP).
If you have not tried using word embeddings in your sentiment, text classification, or other NLP tasks, it’s quite likely that you can increase your model accuracy significantly through their introduction. Word embeddings allow you to implicitly include external information from the world into your language understanding models.
The contents of this post were originally presented at the Python Pycon Dublin conference in 2017, and at the Dublin Chatbot and Artificial Intelligence meet up in December 2017. At my work with EdgeTier, we use word embeddings extensively across our Arthur agent assistant technology, and in all of our analysis services for customer contact centres.
The core concept of word embeddings is that every word used in a language can be represented by a set of real numbers (a vector). Word embeddings are N-dimensional vectors that try to capture word-meaning and context in their values. Any set of numbers is a valid word vector, but to be useful, a set of word vectors for a vocabulary should capture the meaning of words, the relationship between words, and the context of different words as they are used naturally.
There’s a few key characteristics to a set of useful word embeddings:
- Every word has a unique word embedding (or “vector”), which is just a list of numbers for each word.
- The word embeddings are multidimensional; typically for a good model, embeddings are between 50 and 500 in length.
- For each word, the embedding captures the “meaning” of the word.
- Similar words end up with similar embedding values.
All of these points will become clear as we go through the following examples.
Simple Example of Word Embeddings
One-hot Encoding
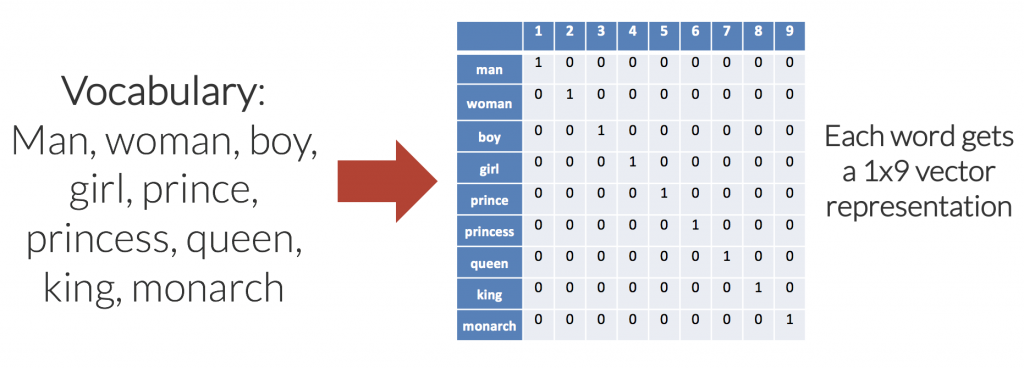
The simplest example of a word embedding scheme is a one-hot encoding. In a one-hot encoding, or “1-of-N” encoding, the embedding space has the same number of dimensions as the number of words in the vocabulary; each word embedding is predominantly made up of zeros, with a “1” in the corresponding dimension for the word.
A simple one-hot word embedding for a small vocabulary of nine words is shown in the diagram below.
There are a few problems with the one-hot approach for encoding:
- The number of dimensions (columns in this case), increases linearly as we add words to the vocabulary. For a vocabulary of 50,000 words, each word is represented with 49,999 zeros, and a single “one” value in the correct location. As such, memory use is prohibitively large.
- The embedding matrix is very sparse, mainly made up of zeros.
- There is no shared information between words and no commonalities between similar words. All words are the same “distance” apart in the 9-dimensional (each word embedding is a [1×9] vector) embedding space.
Custom Encoding
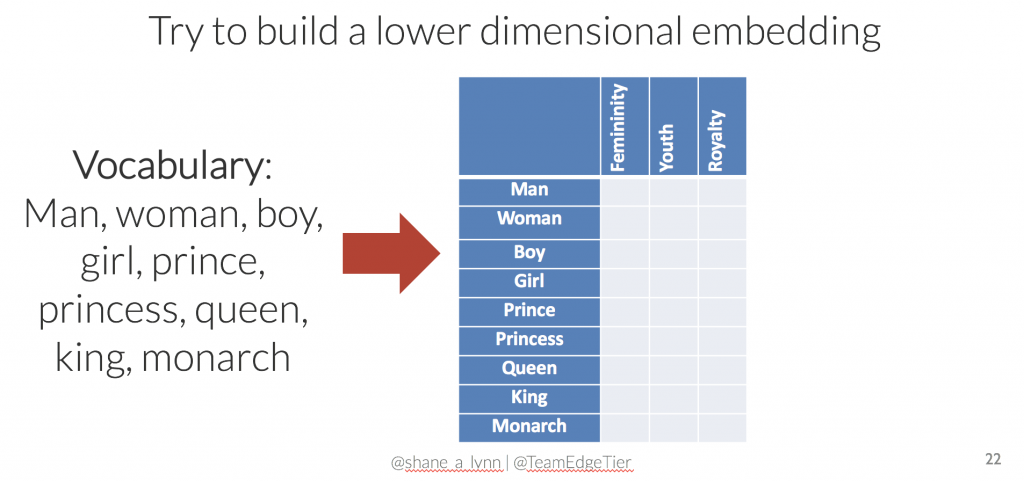
What if we were to try to reduce the dimensionality of the encoding, i.e. use less numbers to represent each word? We could achieve this by manually choosing dimensions that make sense for the vocabulary that we are trying to represent. For this specific example, we could try dimensions labelled “femininity”, “youth”, and “royalty”, allowing decimal values between 0 and 1. Could you fill in valid values?
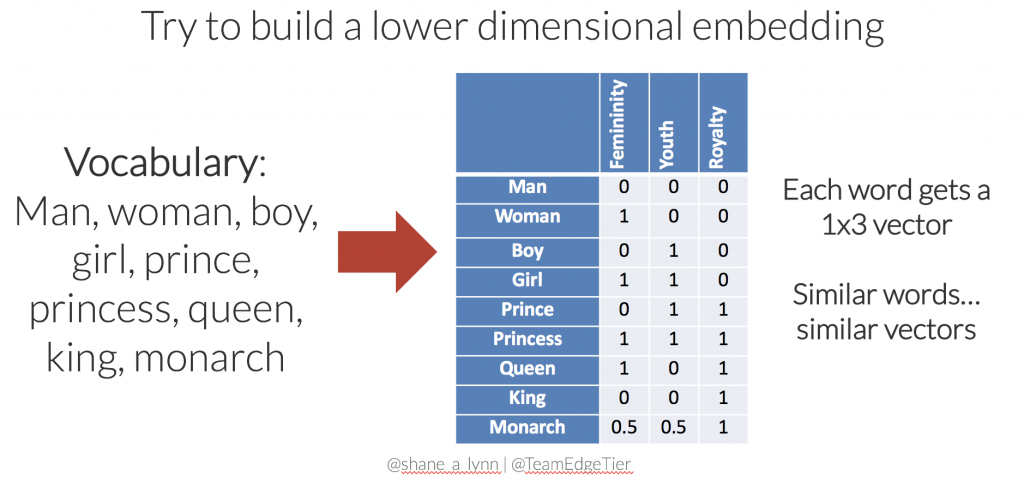
With only a few moments of thought, you may come up with something like the following to represent the 9 words in our vocabulary:
This new set of word embeddings has a few advantages:
- The set of embeddings is more efficient, each word is represented with a 3-dimensional vector.
- Similar words have similar vectors here. i.e. there’s a smaller distance between the embeddings for “girl” and “princess”, than from “girl” to “prince”. In this case, distance is defined by Euclidean distance.
- The embedding matrix is much less sparse (less empty space), and we could potentially add further words to the vocabulary without increasing the dimensionality. For instance, the word “child” might be represented with [0.5, 1, 0].
- Relationships between words are captured and maintained, e.g. the movement from king to queen, is the same as the movement from boy to girl, and could be represented by [+1, 0, 0].
Extending to larger vocabularies
The next step is to extend our simple 9-word example to the entire dictionary of words, or at least to the most commonly used words. Forming N-dimensional vectors that capture meaning in the same way that our simple example does, where similar words have similar embeddings and relationships between words are maintained, is not a simple task.
Manual assignment of vectors would be impossibly complex; typical word embedding models have hundreds of dimensions. and individual dimensions will not be directly interpretable. As such, various algorithms have been developed, some recently, that can take large bodies of text and create meaningful models. The most popular algorithms include the Word2Vec algorithm from Google, the GloVe algorithm from Stanford, and the fasttext algorithm from Facebook.
Before examining these techniques, we will discuss the properties of properly trained embeddings.
Word Embeddings Properties
A complete set of word embeddings exhibits amazing and useful properties, recognises words that are similar, and naturally captures the relationships between words as we use them.
Word Similarities / Synonyms
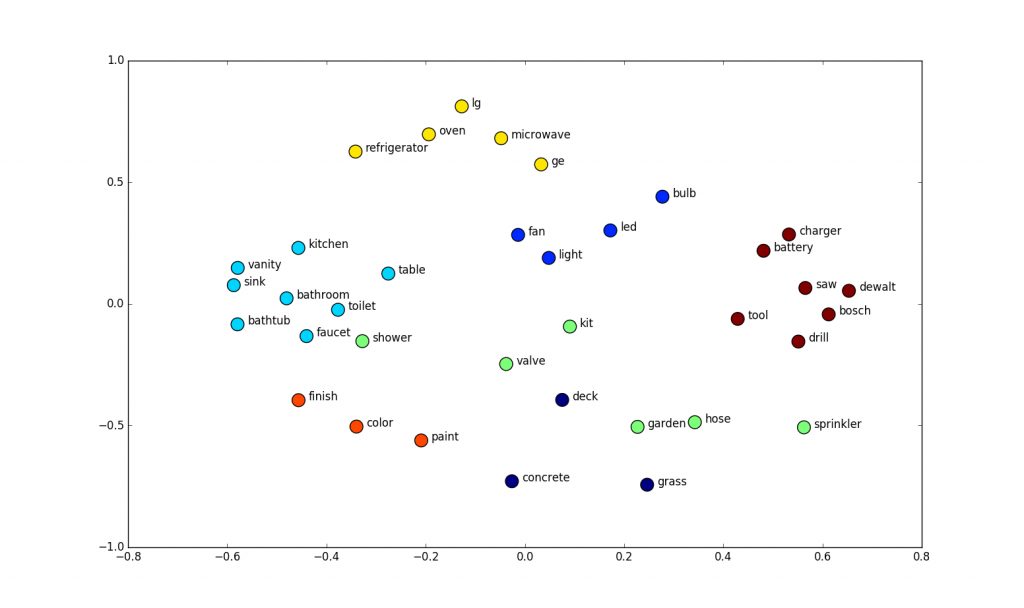
In the trained word embedding space, similar words converge to similar locations in N-D space. In the examples above, the words “car”, “vehicle”, and “van” will end up in a similar location in the embedding space, far away from non-related words like “moon”, “space”, “tree” etc.
“Similarity” in this sense can be defined as Euclidean distance (the actual distance between points in N-D space), or cosine similarity (the angle between two vectors in space).
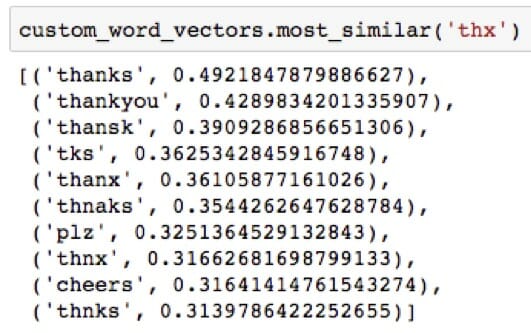
When loaded into Python, this property can be seen using Gensim, where the nearest words to a target word in the vector space can be extracted from a set of word embeddings easily.
For machine learning applications, the similarity property of word embeddings allows applications to work with words that have not been seen during their training phase.
Instead of modelling using words alone, machine learning models instead use word vectors for predictive purposes. If words that were unseen during training, but known in the word embedding space, are presented to the model, the word vectors will continue to work well with the model, i.e. if a model is trained to recognise vectors for “car”, “van”, “jeep”, “automobile”, it will still behave well to the vector for “truck” due to the similarity of the vectors.
In this way, the use of word embeddings has implicitly injected additional information from the word embedding training set into the application. The ability to handle unseen terms (including misspellings) is a huge advantage of word embedding approaches over older popular TF-IDF / bag-of-words approaches.
Linguistic Relationships
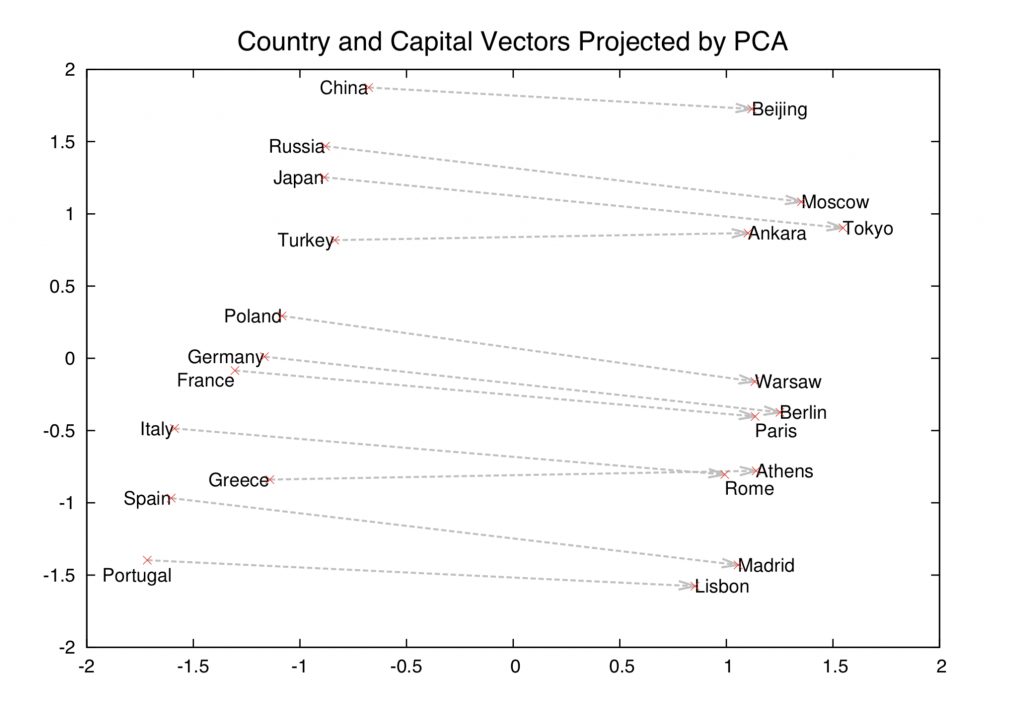
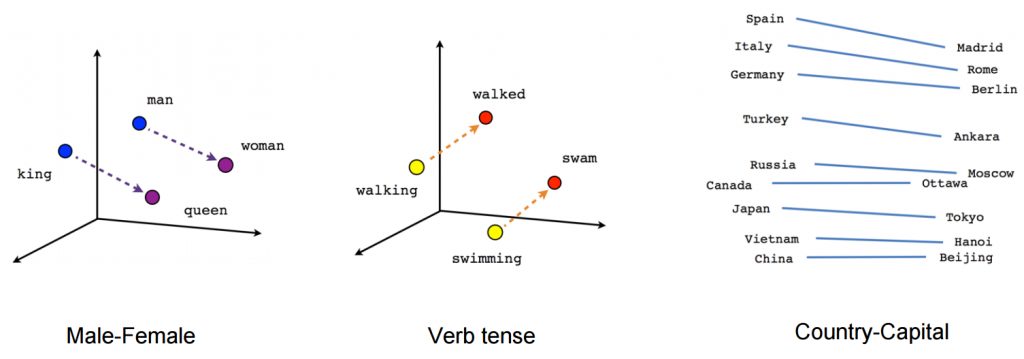
A fascinating property of trained word embeddings is that the relationship between words in normal parlance is captured through linear relationships between vectors. For example, even in a large set of word embeddings, the transformation between the vector for “man” and “woman” is similar to the transformation between “king” and “queen”, “uncle” and “aunt”, “actor” and “actress”, generally defining a vector for “gender”.
In the original word embedding paper, relationships for “capital city of”, “major river in”, plurals, verb tense, and other interesting patterns have been documented. It’s important to understand that these relationships are not explicitly presented to the model during the training process, but are “discovered” from the use of language in the training dataset.
Another example of a relationship might include the move from male to female, or from past tense to future tense.
These linear relationships between words in the embedding space lend themselves to unusual word algebra, allowing words to be added and subtracted, and the results actually making sense. For instance, in a well defined word embedding model, calculations such as (where [[x]] denotes the vector for the word ‘x’)
[[king]] – [[man]] + [[woman]] = [[queen]]
[[Paris]] – [[France]] + [[Germany]] = [[Berlin]]
will actually work out!
Word Embedding Training Algorithms
Word Context
When training word embeddings for a large vocabulary, the focus is to optimise the embeddings such that the core meanings and the relationships between words is maintained. This idea was first captured by John Rupert Firth, an English linguist working on language patterns in the 1950s, who said:
“You shall know a word by the company it keeps” – Firth, J.R. (1957)
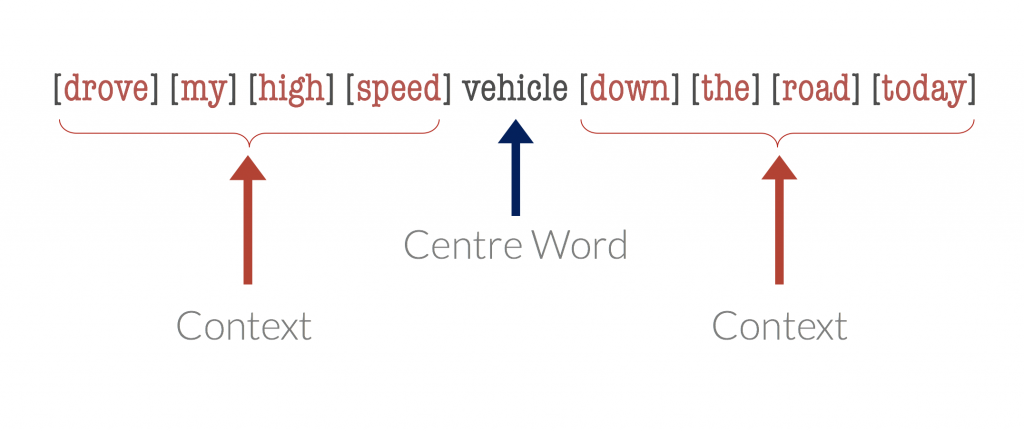
Firth was referring to the principal that the meaning of a word is somewhat captured by its use with other words, that the surrounding words (context) for any word are useful to capture the meaning of that word.
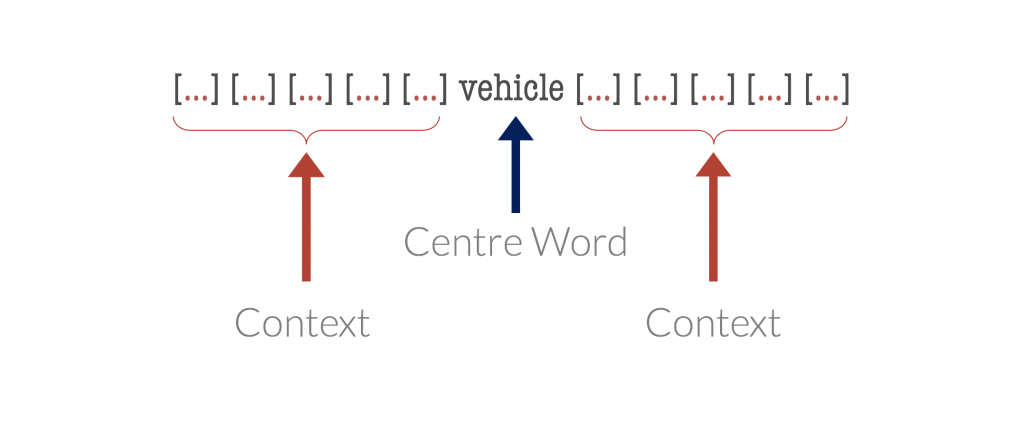
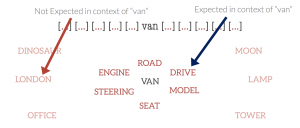
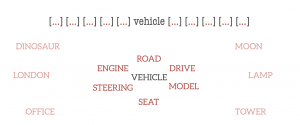
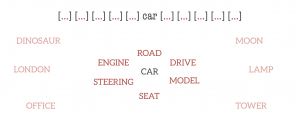
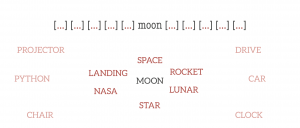
Suppose we take a word, termed the centre word, and then look at “typical” words that may surround it in common language use. The diagrams below show probable context words for specific centre words. In this example, the context words for “van” are supposed to be “tyre”, “road”, “travel” etc. The context words for a similar word to van, “car” are expected to be similar also. Conversely, the context words for a dissimilar word, like “moon”, would be expected to be completely different.
Word Vector Training
This principle of context words being similar for centre words of similar meaning is the basis of word embedding training algorithms.
There are two primary approaches to training word embedding models:
- Distributed Semantic Models: These models are based on the co-occurance / proximity of words together in large bodies of text. A co-occurance matrix is formed for a large text corpus (an NxN matrix with values denoting the probability that words occur closely together), and this matrix is factorised (using SVD / PCA / similar) to form a word vector matrix. Word embedding modelling tTechniques using this approach are known as “count approaches”.
- Neural Network Models: Neural network approaches are generally “predict approaches”, where models are constructed to predict the context words from a centre word, or the centre word from a set of context words.
Predict approaches tend to outperform count models in general, and some of the most popular word embedding algorithms, Skip Gram, Continuous Bag of Words (CBOW), and Word2Vec are all predict-type approaches.
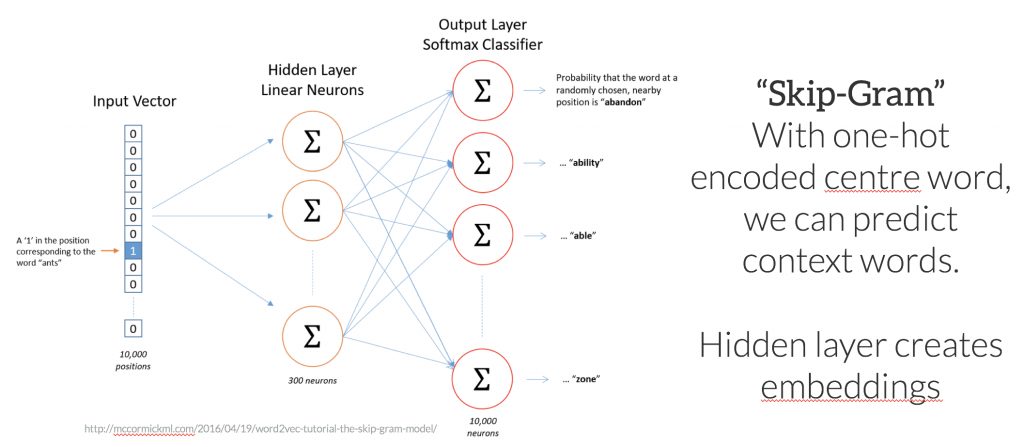
To gain a fundamental understanding of how predict models work, consider the problem of predicting a set of context words from a single centre word. In this case, imagine predicting the context words “tyre”, “road”, “vehicle”, “door” from the centre word “car”. In the “Skip-Gram” approach, the centre word is represented as a single one-hot encoded vector, and presented to a neural network that is optimised to produce a vector with high values in place for the predicted context words – i.e values close to 1 for words – “tyre”, “vehicle”, “door” etc.
The internal layers of the neural network are linear weights, that can be represented as a matrix of size <(number of words in vocabulary) X (number of neurons (arbitrary))>. If you can imagine, if the output vector of the network for the words “car”, “vehicle”, and “van” need to be similar to correctly predict similar context words, the weights in the network for these words tend to converge to similar values. Ultimately, after convergence, the weights of the hidden network layer form the trained word embeddings.
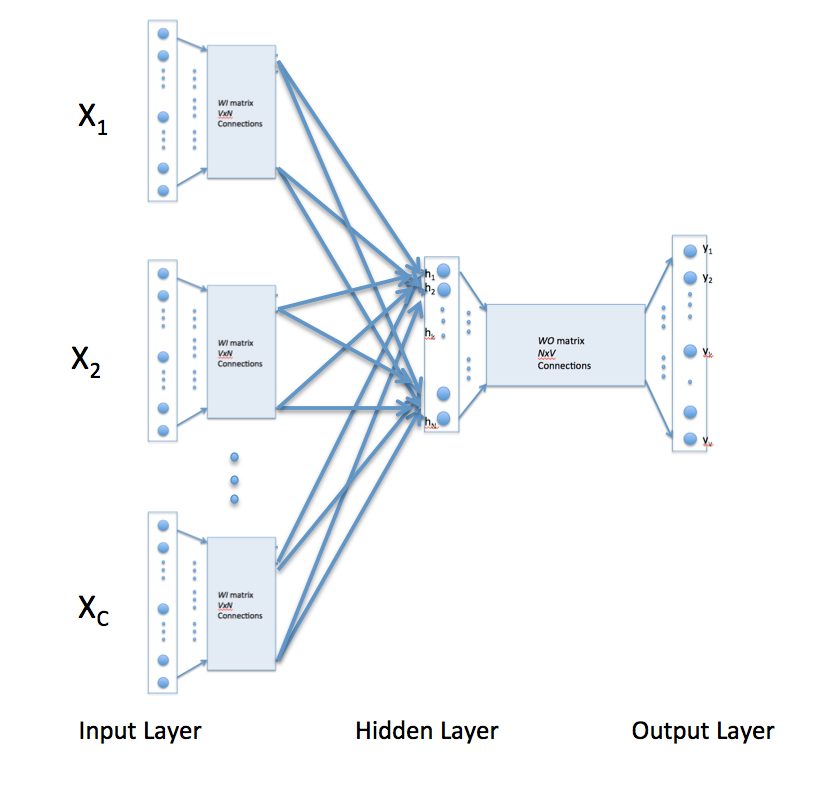
A second approach, the Continuous Bag of Words (CBOW) approach, is the opposite structure – the centre word one-hot encoding is predicted from multiple context words.
Popular Word Embedding Algorithms
One of the most popular training method “Word2Vec“, was developed by a team of researchers at Google, and, during training, actually uses CBOW and Skip-Gram techniques together. Other training methods have also been developed, including the “Global Vectors for Word Representations” (GloVe) from a team at Stanford, and the fasttext algorithm created by Facebook.
The quality of different word embedding models can be evaluated by examining the relationship between a known set of words. Mikolev et al (2013) developed an approach by which sets of vectors can be evaluated. Model accuracy and usefulness is sensitive to the training data used, the parameterisation of the training algorithm, the algorithm used, and the dimensionality of the model.
Using Word Embeddings in Python
There’s a few options for using word embeddings in your own work in Python. The two main libraries that I have used are Spacy, a high-performance natural language processing library, and Gensim, a library focussed on topic-modelling applications.
Pre-trained sets of word embeddings, created using the entire Wikipedia contents, or the history of Google News articles can be downloaded directly and integrated with your own models and systems. Alternatively, you can train your own models using Python with the Genesis library if you have data on which to base them – a custom model can outperform standard models for specific domains and vocabularies.
As a follow up to this blog post, I will post code examples and an introduction to using word-embeddings with Python separately.
Word Embeddings at EdgeTier
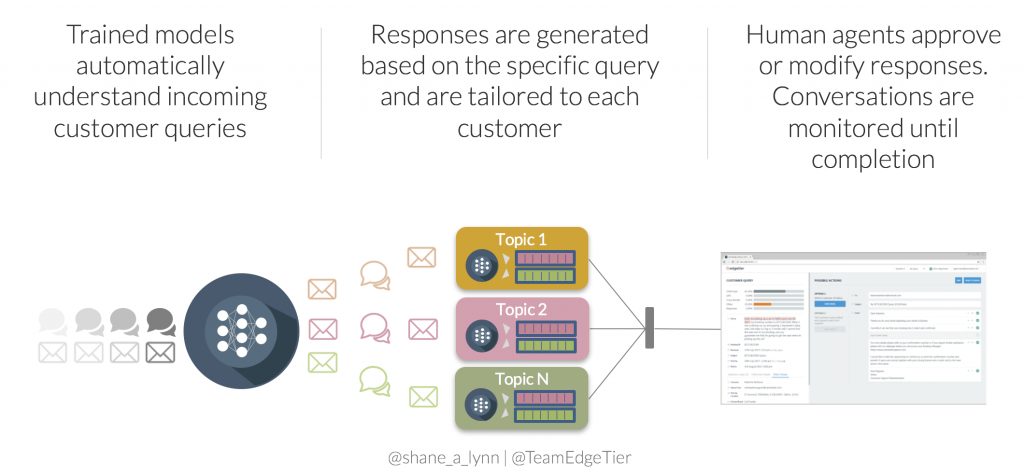
At our company, EdgeTier, we are developing an artificially-intelligent customer service agent-assistant tool, “Arthur“, that uses text classification and generation techniques to pre-write responses to customer queries for customer service teams.
Customer service queries are complex, freely written, multi-lingual, and contain multiple topics in one query. Our team uses word-embeddings in conjunction with deep neural-network models for highly accurate (>96%) topic and intent classification, allowing us to monitor trends in incoming queries, and to generate responses for the commonly occurring problems. Arthur integrates tightly with our clients CRM, internal APIs, and other systems to generate very specific, context-aware responses.
Overall, word embeddings lead to more accurate classification enabling 1000’s more queries per day to be classified, and as a result the Arthur systems leads to a 5x increase in agent efficiency – a huge boost!
Word Embedding Applications
Word embeddings have found use across the complete spectrum of NLP tasks.
- In conjunction with modelling techniques such as artificial neural networks, word embeddings have massively improved text classification accuracy in many domains including customer service, spam detection, document classification etc.
- Word embeddings are used to improve the quality of language translations, by aligning single-language word embeddings using a transformation matrix. See this example for an explanation attempting bilingual translation to four languages (English, German, Spanish, French)
- Word vectors are also used to improve the accuracy of document search and information retrieval applications, where search strings no longer require exact keyword searches and can be insensitive to spelling.
Further reading
If you want to drive these ideas home, and cement the learning in your head, it’s a good idea to spend an hour going through some of the videos and links below. Hopefully they make sense after reading the post!
- Coursera Deep Learning course video on Word Embeddings.
- Google Tensorflow Tutorial on Word Embeddings.
- Excellent break down for Skip-Gram algorithm.
- Chris McCormick – The Skip-Gram Model
- “The amazing power of word vectors” – Adrian Colyer

