
![]()
Download Article
![]()
Download Article
This wikiHow teaches you how to select or create a template in Microsoft Word for Windows and Mac. Templates are pre-formatted documents designed for specific purposes, such as invoices, calendars, or résumés.
-

1
Open Microsoft Word. Double-click the Word icon, which resembles a white «W» on a dark-blue background.
-
2
Search for a template. Scroll through the Microsoft Word home page to find a template you like, or type word into the search bar at the top of the page to search for matching templates.
- For example, if you wanted to find budget-related templates, you would type «budget» into the search bar.
- You must be connected to the Internet in order to search for templates.
Advertisement
-
3
Select a template. Click a template that you want to use. This will open it in a window where you can take a closer look at the template.
-
4
Click Create. It’s to the right of the template preview. Doing so opens the template in a new Word document.
-
5
Edit the template. Most templates have sample text; you can replace this text by deleting it and typing in your own.
- You can also edit most templates’ formatting (e.g., font, color, and text size) without ruining the template itself.
-
6
Save your document. Click File in the upper-left side of the page, click Save As, double-click a save location, enter your document’s name, and click Save.
- You can re-open this document by going to the folder where you saved it and double-clicking it.


Advertisement
-
1
Open Microsoft word. Double-click the Word icon, which resembles a white «W» on a dark-blue background. Depending on your Word settings, this will either open a new document or bring up the Word home page.
- If the Word home page opens, skip to the «search for a template» step.
-
2
Click File. It’s a menu item in the top-left side of the screen. A drop-down menu will appear.
-
3
Click New from Template. You’ll find this option near the top of the File drop-down menu. Clicking it opens the template gallery.
-
4
Search for a template. Scroll through the available templates to see pre-set options, or type a search term into the search bar in the top-right side of the page.
- For example, to find invoice-related templates, you might type «invoice» into the search bar.
- You must be connected to the Internet in order to search for templates.
-
5
Select a template. Click a template to open a preview window with the template displayed.
-
6
Click Open. It’s in the preview window. This will open the template as a new document.
-
7
Edit the template. Most templates have sample text; you can replace this text by deleting it and typing in your own.
- You can also edit most templates’ formatting (e.g., font, color, and text size) without ruining the template itself.
-
8
Save your document. Click the File menu item, click Save As, enter a name for your document, and click Save.


Advertisement
-
1
Open your Microsoft Word document. Double-click the document to which you want to apply your template.
- This will only work for recently-opened templates. If you haven’t recently opened the template you want to use, open the template and then close it before continuing.
-
2
Click File. It’s in the upper-left side of the page.
-
3
Click Options. You’ll find this in the bottom-left side of the «File» page.
-
4
Click the Add-ins tab. It’s on the left side of the Options window.
-
5
Click the «Manage» drop-down box. This box is at the bottom of the Add-Ins page. A drop-down menu will appear.
-
6
Click Templates. It’s near the middle of the drop-down menu.
-
7
Click Go…. This button is to the right of the «Manage» drop-down box.
-
8
Click Attach…. It’s in the upper-right side of the page.
-
9
Select a template. Click a template that you want to use.
-
10
Click Open. It’s at the bottom of the Template window. This will open your template.
-
11
Check the «Automatically update document styles» box. You’ll find this box below the template’s name near the top of the page.
-
12
Click OK. It’s at the bottom of the window. Doing so will apply your template’s formatting to the document.
-
13
Save your document. Click File in the upper-left side of the page, click Save As, double-click a save location, enter your document’s name, and click Save.


Advertisement
-
1
Open your Microsoft Word document. Double-click the document you want to open.
- This will only work for recently-opened templates. If you haven’t recently opened the template you want to use, open the template and then close it before continuing.
-
2
Click Tools. This menu item is on the left side of the Mac’s menu bar. Clicking it prompts a drop-down menu.
- If you don’t see Tools, click your Microsoft Word window to make it appear.
-
3
Click Templates & Add-Ins…. It’s an option near the bottom of the drop-down menu. Doing so opens a window.
-
4
Click Attach. You’ll find this in the Templates & Add-Ins window.
-
5
Select a template. Click a template that you want to apply to your document.
-
6
Click Open. Doing so will apply the template’s formatting to your document.
-
7
Save your document. Click the File menu item, click Save As, enter a name for your document, and click Save.


Advertisement
-
1
Open Microsoft Word. Double-click the Word icon, which resembles a white «W» on a dark-blue background.
- If you want to create a template from an existing document, double-click the document itself and skip to the «edit your document» step.
-
2
Click the «Blank document» template. It’s in the upper-left side of the Word window.
-
3
Edit your document. Any formatting changes you make (e.g., spacing, text size, font) will be parts of your template.
- If you’re creating a template from an existing document, you might not need to edit anything.
-
4
Click File. It’s a tab in the upper-left side of the page.
-
5
Click Save As. This option is near the top of the File pop-out window.
-
6
Select a save location. Double-click a save folder or location here to set it as the template’s storage spot.
-
7
Enter a name for your template. Type in the name you want to use for your template.
-
8
Click the «Save as type» drop-down box. It’s below the file name text box. A drop-down menu will appear.
-
9
Click Word Template. This option is near the top of the drop-down menu.
- You can also click Word Macro-Enabled Template here if you put macros in your document.
-
10
Click Save. It’s in the bottom-right side of the window. Doing so saves your template.
- You’ll be able to apply the template to other documents if you want to.


Advertisement
-
1
Open Microsoft Word. Double-click the Word icon, which resembles a white «W» on a dark-blue background.
- If you want to create a template from an existing document, double-click the document itself and skip to the «edit your document» step.
-
2
Click the New tab. It’s in the upper-left side of the home page.
- If there isn’t a home page, click the File tab and then click New from Template first.
-
3
Click the «Blank Document» template. It’s a white box. This will create a new Word document.
-
4
Edit your document. Any formatting changes you make (e.g., spacing, text size, font) will be parts of your template.
- If you’re creating a template from an existing document, you might not need to edit anything.
-
5
Click File. It’s a menu item in the top-left side of the page.
-
6
Click Save As Template. You’ll see this option in the File drop-down menu.
-
7
Enter a name for your template. Type in the name you want to use for your template.
-
8
Click the «File Format» drop-down box. It’s near the bottom of the window. A drop-down menu will appear.
-
9
Click Microsoft Word template. This option is in the drop-down menu, and has the «.dotx» extension next to it.
- You can also select Microsoft Word Macro-Enabled template if you put macros in your document.
-
10
Click Save. It’s the blue button at the bottom of the window. Doing so will save your template.
- You’ll be able to apply the template to other documents if you want to.


Advertisement
Add New Question
-
Question
How do I save an edited template as a default template in Word?

You can open HTML window in editor and you can place your code there. It will work if your editor has an edit HTML option.
-
Question
How can I use a template in Outlook?
Prepare your template and save it as .oft (Outlook template). Next time you need it, go to the Home tab and select New Items / More Items / Choose Form / Look in: User Templates in File System and select your template.
-
Question
How do I add lines inside the text box?
Draw them using the line tool in the box. On updated computers, go to insert>illustrations>shapes. On non-updated computers, go to insert>shape. You can also underline text by highlighting it, then going to home>underline text.
See more answers
Ask a Question
200 characters left
Include your email address to get a message when this question is answered.
Submit
Advertisement
-
Templates are extraordinarily helpful when invoicing or creating pamphlets.
Thanks for submitting a tip for review!
Advertisement
-
You shouldn’t have to pay for templates.
Advertisement
About This Article
Thanks to all authors for creating a page that has been read 331,457 times.
Is this article up to date?
If you frequently create a certain type of document, such as a monthly report, a sales forecast, or a presentation with a company logo, save it as a template so you can use that as your starting point instead of recreating the file from scratch each time you need it. Start with a document that you already created, a document you downloaded, or a new Microsoft template you customized.
Save a template
-
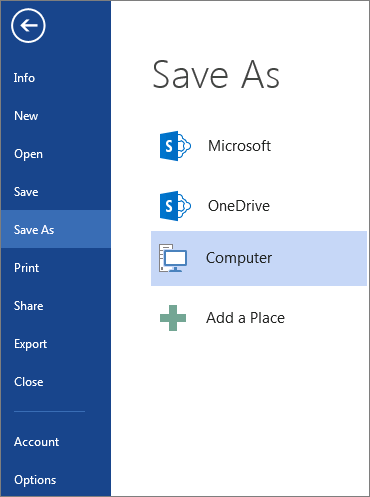
To save a file as a template, click File > Save As.
-
Double-click Computer or, in Office 2016 programs, double-click This PC.
-
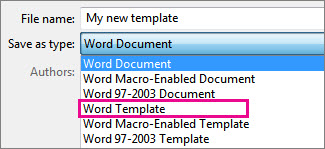
Type a name for your template in the File name box.
-
For a basic template, click the template item in the Save as type list. In Word for example, click Word Template.
If your document contains macros, click Word Macro-Enabled Template.
Office automatically goes to the Custom Office Templates folder.
-
Click Save.
Tip: To change where your application automatically saves your templates, click File > Options > Save and type the folder and path you want to use in the Default personal templates location box. Any new templates you save will be stored in that folder, and when you click File > New > Personal, you’ll see the templates in that folder.
Edit your template
To update your template, open the file, make the changes you want, and then save the template.
-
Click File > Open.
-
Double-click Computer or This PC.
-
Browse to the Custom Office Templates folder that’s under My Documents.
-
Click your template, and click Open.
-
Make the changes you want, then save and close the template.
Use your template to make a new document
To start a new file based on your template, click File > New > Custom, and click your template.
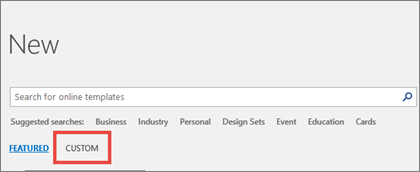
Note: If you’re using Office 2013, this button may say Personal instead of Custom.
Use your templates from earlier versions of Office
If you made templates in an earlier version of Office, you can still use them in Office 2013 and 2016. The first step is to move them into the Custom Office Templates folder so your application can find them. To move your templates quickly, use the Fix it tool.
Word
-
Open the Word document that you want to save as a template.
-
On the File menu, click Save as Template.
-
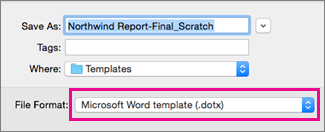
In the Save As box, type the name that you want to use for the new template.
-
(Optional) In the Where box, choose a location where the template will be saved.
-
Next to File Format, click Microsoft Word template (.dotx), or, if your document contains macros, click Microsoft Word Macro-Enabled template (.dotm).
-
Click Save.
Unless you select a different location, the template is saved in /Users/username/Library/Group Containers/UBF8T346G9.Office/User Content/Templates.
To change where Word automatically saves your templates, on the Word menu, click Preferences, and then under Personal Settings, click File Locations. Under File Locations, select User templates from the list, and then click Modify. Type the new folder and path you want to use, and Word will save any new templates in that folder.
You can customize an existing template to make it even more useful. Add static information to the existing template, and then save the file again (as a template).
-
On the File menu, click New from Template.
-
Click a template that is similar to the one you want to create, and then click Create.
Note: If you can’t find a template, you can search for it based on keywords in the Search All Templates box.
-
Add, delete, or change any text, graphics, or formatting, and make any other changes that you want to appear in all new documents that you base on the template.
-
On the File menu, click Save as Template.
-
In the Save As box, type the name that you want to use for the new template.
-
(Optional) In the Where box, choose a location where the template will be saved.
-
Next to File Format, click Microsoft Word template (.dotx), or, if your template contains macros, click Microsoft Word Macro-Enabled template.
-
Click Save.
Unless you select a different location, the template is saved in /Users/username/Library/Group Containers/UBF8T346G9.Office/User Content/Templates.
To change where Word automatically saves your templates, on the Word menu, click Preferences, and then under Personal Settings, click File Locations. Under File Locations, select User templates from the list, and then click Modify. Type the new folder and path you want to use, and Word will save any new templates in that folder.
To start a new document based on your template, on the File menu, click New from Template, and then select the template you want to use.
-
In the Finder, open /Users/username/Library/Group Containers/UBF8T346G9.Office/User Content/Templates.
-
Drag the templates that you want to delete to the Trash.
PowerPoint
-
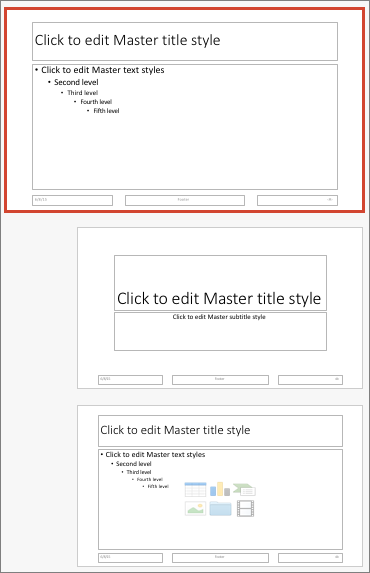
Open a blank presentation, and then on the View tab, click Slide Master.
The slide master is the largest slide image at the top of the slide thumbnail list. Associated layouts are positioned beneath it.
-
To make changes to the slide master or layouts, on the Slide Master tab, do any of these:
-
To add a colorful theme with special fonts, and effects, click Themes, and pick a theme.
-
To change the background, click Background Styles, and pick a background.
-
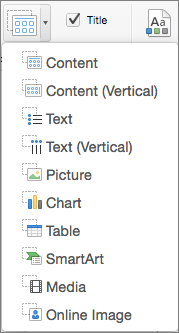
To add a placeholder for text, picture, chart, and other objects, in the thumbnail pane, click the slide layout that you want to hold the placeholder. From Insert Placeholder, pick the type of placeholder you want to add, and drag to draw the placeholder size.
-

-
Open the presentation that you want to save as a template.
-
On the File tab, click Save as Template.
-
In the Save As box, type the name that you want to use for the new template.
-
(Optional) In the Where box, choose a location where the template will be saved.
-
Next to File Format, click PowerPoint Template (.potx), or, if your presentation contains macros, click PowerPoint Macro-Enabled Template (.potm).
-
Click Save.
Unless you select a different location, the template is saved in /Users/username/Library/Group Containers/UBF8T346G9.Office/User Content/Templates.
You can customize an existing template to make it even more useful. Add static information to the existing template, and then save the file again (as a template).
-
On the File menu, click New from Template.
-
Click a template that is similar to the one you want to create, and then click Create.
Note: If you can’t find a template, you can search for it based on keywords in the Search All Templates box.
-
Add, delete, or change any text, graphics, or formatting, and make any other changes that you want to appear in all new presentations that you base on the template.
-
On the File menu, click Save as Template.
-
In the Save As box, type the name that you want to use for the new template.
-
(Optional) In the Where box, choose a location where the template will be saved.
-
Next to File Format, click PowerPoint Template (.potx), or, if your template contains macros, click PowerPoint Macro-Enabled Template (.potm).
-
Click Save.
Unless you select a different location, the template is saved in /Users/username/Library/Group Containers/UBF8T346G9.Office/User Content/Templates.
To start a new presentation based on a template, on the File menu, click New from Template, and then select the template you want to use.
-
In the Finder, open /Users/username/Library/Group Containers/UBF8T346G9.Office/User Content/Templates.
-
Drag the templates that you want to delete to the Trash.
Excel
-
Open the workbook that you want to save as a template.
-
On the File menu, click Save as Template.
-
In the Save As box, type the name that you want to use for the new template.
-
(Optional) In the Where box, choose a location where the template will be saved.
-
Next to File Format, click Excel Template (.xltx), or, if your workbook contains macros, click Excel Macro-Enabled Template (.xltm).
-
Click Save.
Unless you select a different location, the template is saved in /Users/username/Library/Group Containers/UBF8T346G9.Office/User Content/Templates.
You can customize an existing template to make it even more useful. Add static information to the existing template, and then save the file again (as a template).
-
On the File menu, click New from Template.
-
Click a template that is similar to the one you want to create, and then click Create.
Note: If you can’t find a template, you can search for it based on keywords in the Search All Templates box.
-
Add, delete, or change any content, graphics, or formatting, and make any other changes that you want to appear in all new workbooks that you base on the template.
-
On the File menu, click Save as Template.
-
In the Save As box, type the name that you want to use for the new template.
-
(Optional) In the Where box, choose a location where the template will be saved.
-
Next to File Format, click Excel Template (.xltx), or, if your template contains macros, click Excel Macro-Enabled Template (.xltm).
-
Click Save.
Unless you select a different location, the template is saved in /Users/username/Library/Group Containers/UBF8T346G9.Office/User Content/Templates.
To start a new workbook based on a template, on the File menu, click New from Template, and then select the template you want to use.
-
In the Finder, open /Users/username/Library/Group Containers/UBF8T346G9.Office/User Content/Templates.
-
Drag the templates that you want to delete to the Trash.
See also
Differences between templates, themes, and Word styles
Word
-
Open the document.
-
Add, delete, or change any text, graphics, or formatting, and make any other changes that you want to appear in all new documents that you base on the template.
-
On the File menu, click Save As.
-
On the Format pop-up menu, click Word Template (.dotx).
-
In the Save As box, type the name that you want to use for the new template, and then click Save.
Unless you select a different location, the template is saved in /Users/username/Library/Application Support/Microsoft/Office/User Templates/My Templates.
-
On the File menu, click Close.
To organize templates, use the Finder to create a new folder in /Users/username/Library/Application Support/Microsoft/Office/User Templates/My Templates, and then save your template in the new folder.
Note: If you are using Mac OS X 7 (Lion), the Library folder is hidden by default. To show the Library folder, in the Finder, click the Go menu, and then hold down OPTION.
You can customize an existing template to make it even more useful. Add static information to the existing template, and then save the file again (as a template).
-
On the Standard toolbar, click New from template
. -
In the left navigation pane, under TEMPLATES, click All.
Note: If you can’t find a template, you can search for it based on keywords in the Search box.
-
Click a template that is similar to the one that you want to create, and then click Choose.
-
Add, delete, or change any text, graphics, or formatting, and make any other changes that you want to appear in all new documents that you base on the template.
-
On the File menu, click Save As.
-
On the Format pop-up menu, click Word Template (.dotx).
-
In the Save As box, type the name that you want to use for the new template, and then click Save.
Unless you select a different location, the template is saved in /Users/username/Library/Application Support/Microsoft/Office/User Templates/My Templates.
To organize templates, use the Finder to create a new folder in /Users/username/Library/Application Support/Microsoft/Office/User Templates/My Templates, and then save your template in the new folder.
Note: If you are using Mac OS X 7 (Lion), the Library folder is hidden by default. To show the Library folder, in the Finder, click the Go menu, and then hold down OPTION.
 .
.-
On the Standard toolbar, click New from template
. -
In the left navigation pane, under TEMPLATES, click My Templates.
Note: If you created folders to organize your templates, the folders are displayed under My Templates. You need to click the folder to see the templates.
-
Click the template that you created, and then click Choose.
-
In the Finder, open /Users/username/Library/Application Support/Microsoft/Office/User Templates/My Templates.
Note: If you are using Mac OS X 7 (Lion), the Library folder is hidden by default. To show the Library folder, in the Finder, click the Go menu, and then hold down OPTION .
-
Drag the templates that you want to delete to the Trash.
PowerPoint
-
Open the presentation that you want to create the new template from.
-
Add, delete, or change any text, graphics, or formatting, and make any other changes that you want to appear in all new presentations that you base on the template.
-
On the File menu, click Save As.
-
On the Format pop-up menu, click PowerPoint Template (.potx).
-
In the Save As box, type the name that you want to use for the new template, and then click Save.
Unless you select a different location, the template is saved in /Users/username/Library/Application Support/Microsoft/Office/User Templates/My Templates.
To organize templates, use the Finder to create a new folder in /Users/username/Library/Application Support/Microsoft/Office/User Templates/My Templates, and then save your template in the new folder.
Note: If you are using Mac OS X 7 (Lion), the Library folder is hidden by default. To show the Library folder, in the Finder, click the Go menu, and then hold down OPTION.
You can customize an existing template to make it even more useful. Add static information to the existing template, and then save the file again (as a template).
-
On the Standard toolbar, click New from template
. -
In the left navigation pane, under TEMPLATES, click All.
Note: If you can’t find a template, you can search for a template based on keywords in the Search box.
-
Click a template that is similar to the one that you want to create, and then click Choose.
-
Add, delete, or change any text, graphics, or formatting, and make any other changes that you want to appear in all new documents that you base on the template.
If you want to make one change to replicate it in several slide layouts, rather than changing each layout or slide individually, you can edit slide masters.
-
On the File menu, click Save As.
-
On the Format pop-up menu, click PowerPoint Template (.potx).
-
In the Save As box, type the name that you want to use for the new template, and then click Save.
Unless you select a different location, the template is saved in /Users/username/Library/Application Support/Microsoft/Office/User Templates/My Templates.
To organize templates, use the Finder to create a new folder in /Users/username/Library/Application Support/Microsoft/Office/User Templates/My Templates, and then save your template in the new folder.
Note: If you are using Mac OS X 7 (Lion), the Library folder is hidden by default. To show the Library folder, in the Finder, click the Go menu, and then hold down OPTION.
-
On the Standard toolbar, click New from template
. -
In the left navigation pane, under TEMPLATES, click My Templates.
Note: If you created folders to organize your templates, the folders are displayed under My Templates. You need to click the folder to see the templates.
-
In the right navigation pane, you can select the colors, font, and slide size for the template.
-
Click the template that you created, and then click Choose.
-
In the Finder, open /Users/username/Library/Application Support/Microsoft/Office/User Templates/My Templates.
Note: If you are using Mac OS X 7 (Lion), the Library folder is hidden by default. To show the Library folder, in the Finder, click the Go menu, and then hold down OPTION .
-
Drag the templates that you want to delete to the Trash.
Excel
-
Open the workbook that you want to create the new template from.
-
Add, delete, or change any text, graphics, or formatting, and make any other changes that you want to appear in all new documents that you base on the template.
-
On the File menu, click Save As.
-
On the Format pop-up menu, click Excel Template (.xltx).
-
In the Save As box, type the name that you want to use for the new template, and then click Save.
Unless you select a different location, the template is saved in /Users/username/Library/Application Support/Microsoft/Office/User Templates/My Templates.
To organize templates, use the Finder to create a new folder in /Users/username/Library/Application Support/Microsoft/Office/User Templates/My Templates, and then save your template in the new folder.
Note: If you are using Mac OS X 7 (Lion), the Library folder is hidden by default. To show the Library folder, in the Finder, click the Go menu, and then hold down OPTION.
You can customize an existing template to make it even more useful. Add static information to the existing template, and then save the file again (as a template).
-
On the Standard toolbar, click New from template
. -
In the left navigation pane, under TEMPLATES, click All.
Note: If you can’t find a template, you can search for a template based on keywords in the Search box.
-
Click a template that is similar to the one that you want to create, and then click Choose.
-
Add, delete, or change any text, graphics, or formatting, and make any other changes that you want to appear in all new documents that you base on the template.
-
On the File menu, click Save As.
-
On the Format pop-up menu, click Excel Template (.xltx).
-
In the Save As box, type the name that you want to use for the new template, and then click Save.
Unless you select a different location, the template is saved in /Users/username/Library/Application Support/Microsoft/Office/User Templates/My Templates.
To organize templates, use the Finder to create a new folder in /Users/username/Library/Application Support/Microsoft/Office/User Templates/My Templates, and then save your template in the new folder.
Note: If you are using Mac OS X 7 (Lion), the Library folder is hidden by default. To show the Library folder, in the Finder, click the Go menu, and then hold down OPTION.
-
On the Standard toolbar, click New from template
. -
In the left navigation pane, under TEMPLATES, click My Templates.
Note: If you created folders to organize your templates, the folders are displayed under My Templates. You need to click the folder to see the templates.
-
Click the template that you created, and then click Choose.
-
In the Finder, open /Users/username/Library/Application Support/Microsoft/Office/User Templates/My Templates.
Note: If you are using Mac OS X 7 (Lion), the Library folder is hidden by default. To show the Library folder, in the Finder, click the Go menu, and then hold down OPTION .
-
Drag the templates that you want to delete to the Trash.
See also
Modify a slide master
Customize how Excel starts in Excel for Mac
Differences between templates, themes, and Word styles
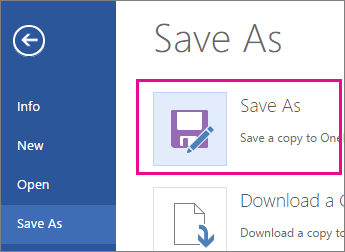
If you think of your current document as a template, you can save it with a different name to create a new document that’s based on the current one. Whenever you want to create a document like that, you’ll open your document in Word for the web, go to File > Save As, and create a document that’s a copy of the one you started with.
On the other hand, if you’re thinking of the kind of templates you see by going to File > New, then no: you can’t create those in Word for the web.
Instead, do this:
If you have the Word desktop application, use the Open in Word command in Word for the web to open the document in Word on your desktop.

From there, create a template. When you go to File > New in the Word desktop application, you’ll be able to use your template for new documents. And if you store the documents online, you can edit them in Word for the web.
See Also
Microsoft Templates and Themes
Download free, pre-built templates
Free background templates for PowerPoint
Edit templates
Create, Save, Edit and Use Templates in Microsoft Word
by Avantix Learning Team | Updated February 14, 2021
Applies to: Microsoft® Word® 2013, 2016, 2019 or 365 (Windows)
You can create, save, use and edit templates in Microsoft Word for frequently-used documents such as letters, reports, proposals and manuals. Templates include basic character, paragraph and page formatting and may include text, custom styles, tables, images, macros, sections, headers and footers. If you save a document as a custom template, you can create a new document based on that template.
Recommended article: How to Check Word Count in Microsoft Word (4 Ways)
Do you want to learn more about Microsoft Word? Check out our virtual classroom or live classroom Word courses >
A document can be saved as a Word Template (dotx file) or a Word Macro-Enabled Template (dotm file).
In this article, we’ll take a look at 3 types of templates in Microsoft Word:
- Normal template (the default global template)
- Custom user templates
- Microsoft ready-made templates
Understanding the Normal template
Unless you select a different template, Word bases new documents on the Normal template by default. The Normal template is named Normal.dotm and its default style is the Normal style. It also includes built-in heading styles such as Heading 1, Heading 2 and so on.
Specifying a location for custom user templates
In Word 2013 and later versions, if you want to create your own custom user templates, you will need to specify a location for the templates so you can easily access them.
Custom user templates are typically stored in the following location (in 2013 and later versions):
C:Users[UserName]DocumentsCustom Office Templates
You will need to specify a path to the Custom Office Templates folder (which should be created automatically when you install Microsoft Office) in your Documents folder as the default storage location. If you want, you can select a different folder but this folder is easy to find and use.
To specify the default storage location for your custom user templates in Word 2013 and later versions:
- Create a folder in your Documents folder called Custom Office Templates if it does not already exist (assuming you are going to use this folder as the default personal templates location).
- In Word, click the File tab in the Ribbon.
- Click Options.
- In the left panel, click Save.
- Enter a path for the Default Personal Templates location (see the Options dialog box below).
- Click OK.
For example,
C:UsersNancyDocumentsCustom Office Templates
Note the path for the Default Personal Templates in the Options dialog box:

Some users may prefer to set the default personal templates location as the Templates or User Templates folder in the Appdata folder.
Creating a custom user template in Word
You can create your own custom user template by creating a document and then saving it as a template. If you have created a document based on an existing template, you can modify it and save it as a new template.
To save an existing document as a custom user template in the Custom Office Templates folder:
- In Word, click the File tab in the Ribbon.
- Select Save As.
- Enter a name for the template.
- Double-click This PC or Computer and then navigate to the Custom Office Templates folder (or the folder you specified as the default personal templates location).
- Select Word Template in the Save as type list. You can select Word Macro-Enabled Template if you have created macros in the file.
- Click Save.
Creating a new document based on a custom user template
If you have saved a template in the Custom Office Templates folder, you can easily create a new document based on that template.
To create a new document based on a custom user template you have created and saved in the Custom Office Templates folder:
- In Word, click the File tab in the Ribbon and then click New.
- In Word 2013 and later versions, click Personal. You must have set the file path in the Options dialog box first.
- If necessary double-click the Custom Office Templates folder.
- Double-click the desired template. Word creates a new document based on the template that you can modify.
Understanding the relationship between a Word document and its template
Every Microsoft Word document is based on a template. If you create a new, blank document, Word uses the Normal template.
When a Word document is created, it includes three elements from its template:
- Styles such as Normal, Heading 1, Heading 2 and so on
- Content such as text, tables and images
- Page settings such as margins, page breaks, section breaks, headers and footers
Once a document is created, it is no longer connected to its template so the styles, content and page settings can be modified or deleted.
A template also makes the following available in the document:
- Building Blocks such as QuickParts
- User interface customizations (including Ribbon customizations)
- Keyboard shortcuts
- Macros (if created) and the template was saved as a Macro-Enabled Template
Editing a custom user template
To edit a custom user template:
- In Word, click the File tab in the Ribbon and then click Open.
- Double-click This PC or Computer and navigate to the Custom Office Templates folder.
- Double-click the template you want to edit.
- Make changes to the template.
- Close and save the template.
Creating a document based on a Microsoft ready-made template
You can create new documents based on hundreds of Microsoft ready-made templates. These templates are normally accessed online so you must be connected to the internet to use them. There are templates for all kinds of documents including letters, brochures, flyers, reports and proposals. Templates may differ depending on your version of Microsoft Word.
To create a new document based on one of Microsoft’s ready-made templates:
- In Word, click the File tab in the Ribbon and click New.
- In the Office area, click the suggested searches or enter search criteria in the Search box and press Enter.
- Scroll through the templates.
- Double-click the template you want to use. Word creates a new document based on the template that you can modify.
In the following example, we selected New and then Business in the suggested searches (using Word 365):

Templates can be a huge timesaver, particularly if you are working on long documents like reports and proposals.
Subscribe to get more articles like this one
Did you find this article helpful? If you would like to receive new articles, join our email list.
More resources
How to Insert a Check Mark in Word (5 Ways)
How to View Word Count in Microsoft Word (4 Ways)
How to Keep a Microsoft Word Table Together on One Page
How to Insert or Type an Em Dash in Word (4 Ways with Shortcuts)
10+ Great Microsoft Word Navigation Shortcuts for Moving Around Quickly in Your Documents
Related courses
Microsoft Word: Intermediate / Advanced
Microsoft Excel: Intermediate / Advanced
Microsoft PowerPoint: Intermediate / Advanced
Microsoft Word: Long Documents Master Class
Microsoft Word: Styles, Templates and Tables of Contents
Microsoft Word: Designing Dynamic Word Documents Using Fields
VIEW MORE COURSES >
Our instructor-led courses are delivered in virtual classroom format or at our downtown Toronto location at 18 King Street East, Suite 1400, Toronto, Ontario, Canada (some in-person classroom courses may also be delivered at an alternate downtown Toronto location). Contact us at info@avantixlearning.ca if you’d like to arrange custom instructor-led virtual classroom or onsite training on a date that’s convenient for you.
Copyright 2023 Avantix® Learning
Microsoft, the Microsoft logo, Microsoft Office and related Microsoft applications and logos are registered trademarks of Microsoft Corporation in Canada, US and other countries. All other trademarks are the property of the registered owners.
Avantix Learning |18 King Street East, Suite 1400, Toronto, Ontario, Canada M5C 1C4 | Contact us at info@avantixlearning.ca
-
Home
- Computing
- Guides

Once is often more than enough, particularly when creating a lengthy or comprehensive template. Each template, though differing in format and layout, is essentially a pre-constructed document in which users can input their own information in lieu of repeatedly designing the page themselves. They’re incredibly convenient and time-saving — likely the reason why most versions of Microsoft Word come pre-loaded with a venerable swath of the framed documents — while delivering robust layout options for all manners of copy, whether you’re looking to create that knockout resume, hefty business brochure or real tearjerker of a card reserved for that special someone in your life. Thankfully, the American tech giant has made implementing Word templates a simple, three-click process (though the same can’t always be said for creating and saving them for later use in Word).
Here’s our straightforward guide on how to use document templates in Microsoft Word, regardless of whether you’re simply opening a preexisting document or looking to create your own from scratch. Also, check out our top picks for the best Microsoft Office alternatives if you’re looking for a non-Microsoft workaround. There’s also our guide on how to convert a PDF file to Word if you need a simple means of converting PDF files to a more accessible format on either Windows or Mac OS X.
Skip ahead to creating a Microsoft Word template.
Opening and using a Microsoft Word template
Step 1: Launch Microsoft Word — Open Word from the dock or main Applications folder in Mac OS X or launch the software using the main Taskbar or Start menu in Windows. Alternatively, search and launch the program using either operating system’s search utility, dubbed Spotlight and Windows Search, respectively.

Step 2: Select a template — Depending on which version of Microsoft Word you’re using, you may be presented with a pop-up window presenting the various template choices available at your disposal. If using Mac OS X, click the File menu in the application Taskbar, select New from Template near the top of the resulting drop-down menu, and select your desired template from the resulting list of options prior to clicking the gray Choose button in the bottom-right corner of the window. If using Windows, click the File menu in the application toolbar, select the New panel on the left-hand side and double-click your desire template from the resulting list of options. Regardless of your OS, each version of Word should present a healthy selection of template options culled from assorted categories including Calendars, Stationary, Newsletters, Resumes, Proposals, and the like.

Step 3: Input your own copy — Each individual template serves a different purpose, but almost each one operates as a blank slate within a specified framework. Whether you previously chose a simple resume template, a more elaborate brochure template or a different option entirely, you’ll have the option to edit the content within. Change the images, font, colors, or any other facet of the template, and replace the default placeholder text or instructions with information of your own. Keep in mind the changes will not affect the original template, and when done, name and save the file as you would any other blank Word document.

Creating a Microsoft Word template
Step 1: Launch Microsoft Word — Open Word from the dock or main Applications folder in Mac OS X or launch the software using the main Taskbar or Start menu in Windows. Alternatively, search and launch the program using either operating system’s innate search utility, dubbed Spotlight and Windows Search, respectively.

Step 2: Open a blank document — Open a blank document once Word launches. If using Mac OS X, click the File menu in the application taskbar, select New Blank Document at the top of the resulting drop-down menu. If using Windows, click the File menu in the application toolbar, select the New panel on the left-hand side and double-click Blank document near the top of the resulting section, directly above the slew of available templates.

Step 3: Create the template — There’s no one way to create a Word template. Like the Microsoft-culled templates already available within the software, each template you create will likely serve a different purpose and fit your individual aesthetics. However, whether you’re creating a business newsletter or resume, it’s important you initially format the document so you’ll be able to quickly alter its content for whatever occasion it may warrant. A template should be specifically designed to be void of specifics, while keeping it as generic and clear as possible so you can later add the tailored content in the appropriate spot. For instance, avoid inserting specific dates and addresses as they may frequently change. Instead, stick with something like “[Date]” and “[Street Address],” while incorporating placeholder text to better visualize the template’s overall appearance without delving into the specifics. Remember, it’s intended to be bare bones.

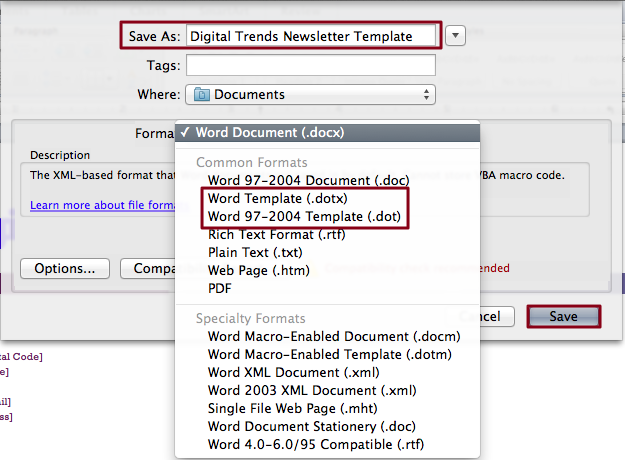
Step 4: Save the template — If using Mac OS X, click the File menu in the application Taskbar and select Save As near the middle of the resulting drop-down menu. If using Windows, click the File menu in the application toolbar and select Save As from the left-hand column. Afterward, appropriately name the file, chose a save location, and select the template format suited best for your particular software suite. Word Template (.dotx) will suffice in most cases, but you may want to consider saving the template as either a Word 97-2003 Document (.dot) or Word 97-2004 Document (.doc) if you plan on utilizing the template on an older system. When finished, click the Save button in the bottom-right corner of the window. The newly-minted template will be available in either the My Templates or Personal sections depending on which incarnation of Word you’re using to open the new document from a template.
What do you think of our simple guide on how to use document templates in Microsoft Word? Still perplexed by any one facet of our article? Let us know in the comments below.
Editors’ Recommendations
-
How to factory reset Windows 10 or Windows 11
-
How to use Bing Image Creator to generate AI images for free
-
Microsoft’s Bing Chat waitlist is gone — how to sign up now
-
Microsoft continues its unabashed embrace of ChatGPT and AI
-
Microsoft Word vs. Google Docs
-
Deals
Best Microsoft Office deals for January 2023

Mircosoft Office is so ubiquitous these days that it’s practically a necessity for anyone who writes, manages spreadsheets or gives presentations for a living. Surely you’ve heard of Microsoft Office, even if you’ve never had the pleasure (if you’d call it that) of using it yourself. The Office suite has a lot more to offer than just Word, Excel, and PowerPoint, though, so if you need help finding the right package for your needs, our roundup of the best Microsoft Office deals can make things a bit easier — and hopefully save you some cash.
Today’s best Microsoft Office deals
Microsoft 365 Personal (1-year) — $59, was $70
This license includes a 12-month subscription to Microsoft 365 Personal for a single user, allowing access to the entire Office Suite, including Word, Excel, PowerPoint, Outlook, and more. You’ll also get up to 1TB of OneDrive cloud storage space — so you can move files seamlessly between your local devices and the cloud. It’s compatible with both PC and Mac. It is a great option for students, professionals working from home, and anyone that needs access to the Microsoft Office Suite from a personal computer.
Read more
-
Computing
Microsoft might put ChatGPT into Outlook, Word, and PowerPoint

Microsoft is currently testing the GPT AI language that was developed by the technology brand OpenAI to potentially be used in its Office suite of products, including Word, Outlook, and PowerPoint.
OpenAI’s intuitive technology products, including ChatGPT and Dall-E 2, have become internet sensations for their text- and image-generating prowess. Many have speculated about how ChatGPT can practically and morally be used. However, Microsoft is looking to use the company’s AI models in a more functional manner. The company has already implemented a version of the OpenAI GPT text-generator model as an update to its autocomplete feature, according to The Information.
Read more
-
Deals
Microsoft Word Free Trial: Get a month of service for free

Windows may be a staple Microsoft product, but even as a software company it delivers far more than the popular operating system. Microsoft also dominates the enterprise software space with its Office app suite, which is relied on by millions of professionals, students, and average folks around the world every single day. One of the more renowned Office apps is Microsoft Word, a versatile and capable word processor that’s essential for typing and editing written documents, among other things (and there’s a lot of things you probably didn’t know you could do in Microsoft Word). Microsoft Office is paid software, however, Word included, and for some, the cost may seem high even with some of the best Microsoft Office deals floating around. So, if you’re wondering if there’s a Microsoft Word free trial or any other way to get it for free, read on to find out.
Is there a Microsoft Word free trial?
Microsoft Word is actually part of the company’s wider Office app suite. Now known simply as Microsoft 365 (formerly Microsoft Office), Microsoft’s enterprise software is available in a number of different packages that are now subscription-based; the company has retired the older bundles that were available for a one-time payment. That means if you want a Microsoft Word free trial, you’ll need to sign up for the Microsoft 365 trial, which includes the Word app along with Excel, PowerPoint, Outlook, Teams, OneDrive, and Editor.
Read more
A template is a document type that creates a copy of itself when you open it. For example, a business plan is a common document that is written in Word. Instead of creating the structure of the business plan from scratch, you can use a template with predefined page layout, fonts, margins, and styles.
Contents
- 1 Why do we use templates?
- 2 What is the difference between a document and a template in Word?
- 3 How do I use a template in Word?
- 4 What is difference between template and style?
- 5 What exactly is a template?
- 6 What is a template and a document?
- 7 What is a DOCX template?
- 8 How do I edit a Word template?
- 9 How do I create a template in Word?
- 10 What are the two methods to create a template in Word?
- 11 What are the steps to create a template?
- 12 What does template design mean?
- 13 How do you create a template in Outlook?
- 14 How do templates work?
- 15 What are the different types of templates?
- 16 How do I open a Word template?
- 17 What is normal template?
- 18 How do I save a Word document as a template?
- 19 How do I delete a template from Word?
Why do we use templates?
Templates basically enforce overall consistency by having a pre-determined structure and layout. All documents made using a template will match its layout exactly. When it comes to your document’s content, Word’s Styles tool is a great way to maintain consistent formatting.
What is the difference between a document and a template in Word?
Revv templates contain boilerplate, generic content, and structure that you can adapt to create multiple documents.In contrast, a document is intended for a single-use. You can create a document from a template, or you can create one on your own from scratch.
How do I use a template in Word?
Load templates or add-ins
- In Word 2010, 2013, or 2016, select File > Options > Add-Ins.
- In the Manage list, select Word Add-ins, and then click Go.
- Click the Templates tab.
- Under Global templates and add-ins, select the check box next to the template or add-in that you want to load.
What is difference between template and style?
Styles keep your formatting consistent within a document. Themes keep your look and feel consistent across multiple documents. Templates allow you to re-use text, and keep your look and feel consistent across multiple documents.
What exactly is a template?
A template is a form, mold, or pattern used as a guide to making something. Here are some examples: A ruler is a template when used to draw a straight line. A document in which the standard opening and closing parts are already filled in is a template that you can copy and then fill in the variable parts.
What is a template and a document?
A template is a pre-created document that already has some formatting. Rather than starting from scratch to format a document, you can use the formatting of a template to save yourself a lot of time. You can use a template that comes with Word, download one from the internet, or create your own.
What is a DOCX template?
A DOCX template is a HotDocs template you create in Microsoft Word using the Author tab that appears on the Word ribbon. A DOCX template differs from a plain text template from which HotDocs assembles a final document that lacks any textual formatting. You create and edit a plain text template with HotDocs Composer.
How do I edit a Word template?
Edit templates
- Click File > Open.
- Double-click This PC. (In Word 2013, double-click Computer).
- Browse to the Custom Office Templates folder that’s under My Documents.
- Click your template, and click Open.
- Make the changes you want, then save and close the template.
How do I create a template in Word?
Click the File tab, and then click New. Under Available templates, click New from existing. Click a template or a document that is similar to the one that you want to create, and then click Create New. Make the changes you want to the margin settings, page size and orientation, styles, and other formats.
What are the two methods to create a template in Word?
There are two ways to create a template: You can open a new document, modify it as needed, and then save the file as a template file. You can save an existing . docx document that contains all the styles and structural components you want in the template as a template file.
What are the steps to create a template?
Create a template in Word document
- Step 1: Open the Word document.
- Step 2: Go to the File tab on the Ribbon and click on the New option.
- Step 3: Click on the Blank document.
- Step 4: Add the desirable content that you use further as a template.
- Browse the location where you want to save a file.
What does template design mean?
Design templates are pre-made designs and documents that can be customized. Templates are often designed to meet specific standards or specs so they’re consistent between users and mediums. You can use pre-designed templates from template libraries and websites or create custom templates for future use.
How do you create a template in Outlook?
How to create an email template in Outlook
- Open Outlook and log into your account, if needed.
- Click “New Message” in the top-left corner of the screen.
- Click the three dots in the lower menu of the new email.
- Select “Templates.”
- Click “+ Template.”
- Add your title and create the body copy for your template.
- Click “Save.”
How do templates work?
Follow these steps:
- Open the document that needs a new template attached.
- Click the File tab.
- On the File screen, choose the Options command.
- Choose Add-Ins from the left side of the Word Options dialog box.
- Choose Templates from the Manage drop-down list.
- Click the Go button.
- Click the Attach button.
What are the different types of templates?
What are the three types of templates?
- The office doc template. Examples of office doc templates include: Slide decks, letterhead, agreements, and policy templates.
- The digital template. Examples of digital templates include: Online advertisements, email banners, social banners, social posts.
- The print template.
How do I open a Word template?
Opening a Word template so that you can modify it
- On the File tab, choose Open. You see the Open window.
- Click This PC.
- Click the Browse button.
- In the Open dialog box, go to the Templates folder where you store templates.
- Select the template.
- Click the Open button. The template opens in the Word window.
What is normal template?
The Normal. dotm template opens whenever you start Microsoft Word, and it includes default styles and customizations that determine the basic look of a document. Note: Any changes that you make to Normal. dotm will be applied to documents that you create in the future.
How do I save a Word document as a template?
Save a document as a template
- Open the Word document that you want to save as a template.
- On the File menu, click Save as Template.
- In the Save As box, type the name that you want to use for the new template.
- (Optional) In the Where box, choose a location where the template will be saved.
How do I delete a template from Word?
Open the form template that contains the template part that you want to delete. On the form template, select the template part. Note: Template parts always appear inside section controls. Press DELETE.