
If you use forms at work, you’ll love the convenience of interactive or fillable forms in Microsoft Word. Forms that you can fill out make gathering information easy.


With a fillable form, all you’ve got to do is create a form in Word. Then you can use it over and over again. There’s nothing to print, so interactive forms are good for both your budget and the environment.
If you want a fillable form that also looks good, then begin with a template in Word. Form templates for Microsoft Word are available in Envato Elements and GraphicRiver.
In this tutorial, you’ll learn how to create a fillable form in Word, so you can reap all the benefits of an interactive form.
Find Great Form Templates on Elements
Fillable forms in Word have a variety of uses. Human resources use forms to capture employee and consultant information. Organizations use forms to register members, students, or clients. You also use forms to take orders for your products and services. Those are only a few examples of how useful fillable forms are.
Ideally, you want your Microsoft Word forms to be consistent with your branding. Well-designed forms reflect your credibility and professionalism. That’s why you want to avoid generic-looking forms. Want to know how to make a fillable form in Word that’s aligned with your visual brand?


The easiest way is by using templates for Word with pre-built tables or forms. One awesome source for Word templates is Envato Elements. Elements has an irresistible offer: for one low monthly fee, you get unlimited downloads of the millions of creative assets in its library. These include:
- Word templates
- fonts
- graphics
- photos
- and more
Whatever you need to make your forms look as good as possible, you can find in Elements.
If you need to create only one form, then a better source for Word templates is GraphicRiver. It’s got the same massive library of creative assets but on a pay-per-use basis. For the one-off project in Word, GraphicRiver is a terrific and budget-friendly option.
How to Create Fillable Forms in Word
You may be wondering, «How do I make a fillable form in Word?» Let me take you step-by-step through how to create a fillable form in Word.
Note: In the following tutorial, I’m using Microsoft Word for Mac version 16.48. If you’re using a different version, then the steps and interface may be different. But these steps should still be helpful for you.
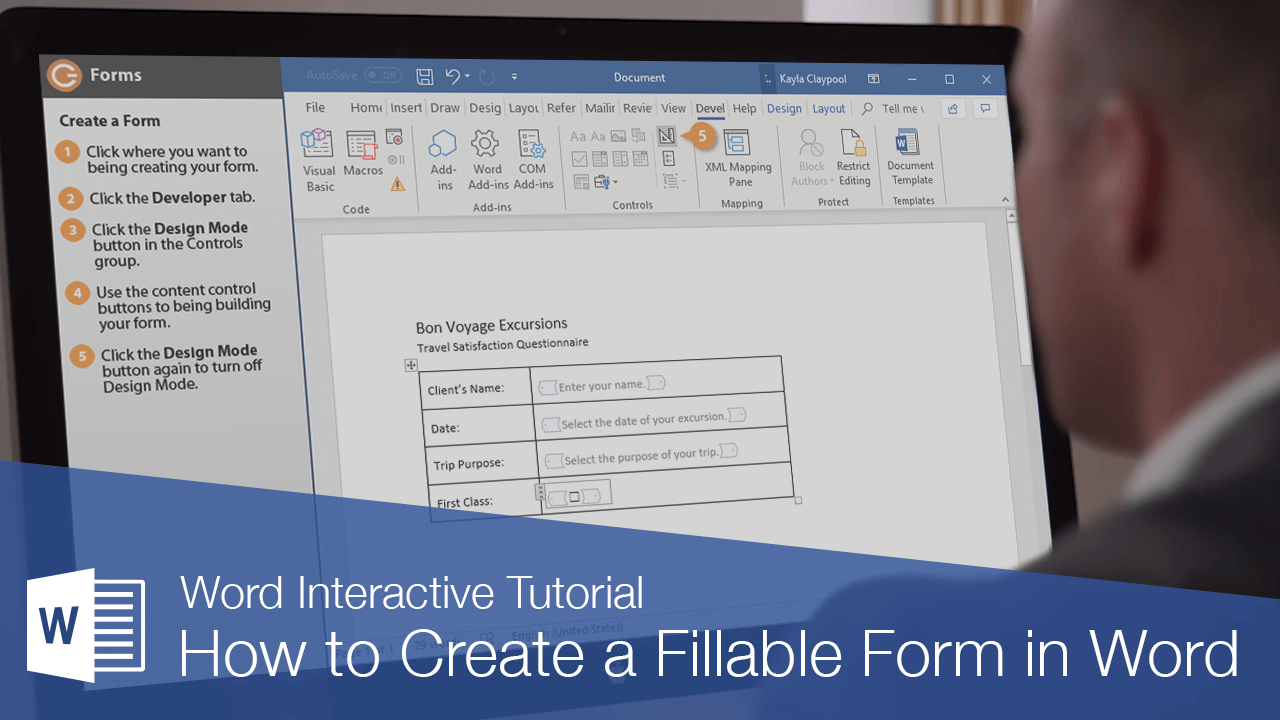
1. Show the Developer Tab
As a first step, make sure that the Developer tab is showing up for you. This may be hidden by default. If you don’t see the Developer tab, follow these steps:
Go to Word > Preferences.


The Word Preferences menu opens. Click on the Ribbon & Toolbar button.


The Ribbon & Toolbar menu pops up. Under Main Tabs, scroll down and check Developer. Click Save.


The Developer tab should now be visible.


2. Determine the Layout and Structure of the Form
The next step is to determine the layout and structure of the fillable form. This will depend on what information you want to capture. You may want to sketch this on a sheet of paper first.
When you know what the form will look like, create a table in Word. By creating your form as a table in Word, it’ll be easier for you to keep things aligned and organized. The cells of the table are the form fields. Keep this in mind as you create your interactive form. This tutorial shows you the steps for how to make a table in Word:
Another option is to use a Word template with a pre-built table as a form. This way, the form has already been professionally designed. All you’ve got to do is to customize the form in Word according to your needs. Remember that the form template must have been built as a table so that you can make the form interactive in Word.
In the steps that follow, I’m going to create a form from scratch by first creating a table in Word:


Now, it’s time to make this a fillable form in Word.
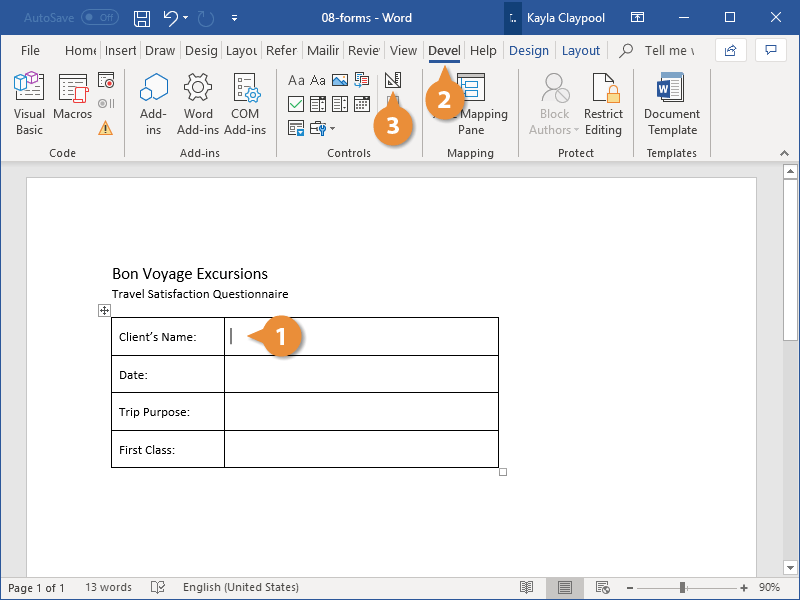
3. Add Form Fields With Content Controls
You create a fillable form in Word by adding form fields. There are different types of form fields with content controls, depending on the types of responses you’re looking for.
Under the Developer tab, you’ll see buttons for creating a Text Box, Check Box, and Combo Box (or drop-down form field).


Let me show you how to create each type of form field:
How to Add a Word Fillable Form Text Box
Place the cursor where you would like to create a text field. Click on the Developer tab, then the Text Box button.


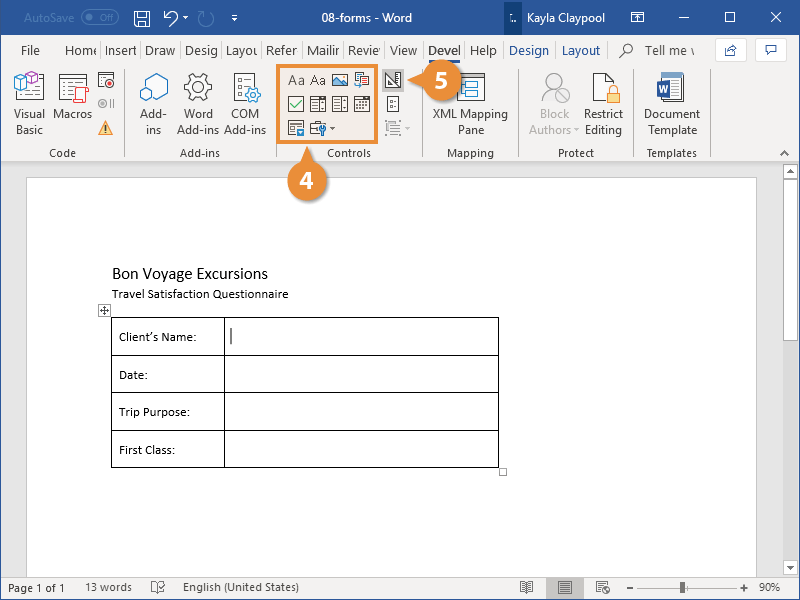
A text box is created. To change the text box settings, click on Options. The Text Form Field Options menu opens.


Here, choose various settings. For example, you’ve got several Text Types to choose from:
- Regular Text
- Number
- Date
- Current Date
- Current Time
- Calculation
Add a Default Text for the form field to guide respondents in filling out the form. You can also specify the Maximum Length and Text or Number Format.


When you’re happy with the settings, click OK. Repeat for each text box you want to create.


How to Add a Check Box to a Fillable Form in Word
Next, let’s make check boxes. First type the text for the check box items. Then, place your cursor in front of the first item. Go to Developer > Check Box.


A check box appears where your cursor was. Again, change the check box settings by clicking on the Options button.


The Check Box Form Field Options menu opens. Here you can determine whether the Default Value for the check box is Not Checked or Checked. Specify the Check Box Size and other options. When you’re done setting up the check box options, click OK.
Repeat these steps for the other check boxes.


How to Create a Drop-down Field in a Fillable Form in Word
Finally, let’s add a drop-down field in our form. Place the cursor where you want the drop-down menu to be, then go to Developer > Combo Box.


To add the drop-down menu items, click on the Options button. The Drop-Down Form Field Options menu opens.


Type a drop-down item, then click the + sign.


Repeat for each drop-down item you want to include in your fillable form. When you’re done, click OK.


Only the first drop-down item will appear. You’ll see the rest when you test the form.
4. Finalize the Form
Before using the fillable form in Word, it’s a good idea to first test it. To do this, click the Protect Form button on the Developer ribbon.


Now that the form is protected, fill the form fields like your respondents would. You’ll notice that the drop-down menu items appear when you click on the field or the arrow beside it.


When you’re happy with how the fillable form works, finalize the document by formatting the page. Click Protect Form again to un-protect it, so you can edit the document. Now’s the time to change fonts, colors, add logos, and format the form as you wish.
This is what my final fillable form looks like:


You may also decide to remove the shading for each form field. To do so, go to Developer > Shading.


I’m going to keep the Shading on, to make it clear to my respondents where they’re supposed to type in their answers. That’s because I deleted the borders of my table to give my form a cleaner appearance. If you keep the table borders, then it makes sense to switch off the form field Shading.
5. Use and Distribute Fillable Forms in Word
Once the fillable form in Word is completed, share it with your users or respondents. Do this by sharing the fillable form as an email attachment.
First, make sure that the form is protected. This ensures that other users won’t be able to edit the form when you share it with them.
Next, click on Share > Share a Copy.


In the menu that opens, click Email as Attachment.


This launches your default email application with the fillable form attached.


3 Top Form Templates for Word (Unlimited Downloads from Elements)
If you want a form with an impressive design, it’s best to start with a form template for Word. Templates with built-in forms are designed by professional graphic designers. This means the biggest—and hardest—design decisions have already been made for you. By customizing the colors and fonts and adding your logo, you can make the template truly your own.
Below are a few form templates for Word that look great:
1. Clean Business Registration Form Template


The Clean Business Registration Form template for Word allows you to gather basic personal information and contact details. It’s useful for registering employees, clients, members, vendors, and more. This form template comes in A4 size. You’ve got the option of customizing it with your branding colors. The template comes in Microsoft Word files, as well as files for InDesign, Adobe Illustrator, and Photoshop.
2. Order Form


Receive orders for your products or services with this Order Form for Word. This A4-sized template uses paragraph styles, making it easy to edit in Microsoft Word. It also comes in Adobe InDesign files, if you’re more comfortable editing in that application. A file guide is included to help you customize this template.
3. Client Questionnaire


Impress your clients with this Client Questionnaire template that looks anything but generic. Editable in both Microsoft Word and Adobe InDesign, this form template comes in A4 size. A 34-page guide walks you through how to edit and use the template files.
More of the Best Word Templates for Your Business or Organization
Now you know how to create a fillable Word document. But aside from fillable forms, your business or organization needs other types of documents. Using templates for MS Word helps you create professional-looking documents quickly. Premium Word templates are designed to be easy to customize, so you end up with materials that are coherent with your brand.
Here are more Word templates you can customize to easily create impressive documents for your business or organization:
Learn More About Using Microsoft Word for Your Business and Personal Needs
Whether for personal or business use, MS Word lets you create various kinds of documents. But with power comes complexity, so it can take time to learn how to use its robust features.
The best place to start is with our ultimate guide, Learn How to Use Microsoft Word (Beginner Tutorial Guide). It takes you from the basics of opening and creating Word files, to more advanced skills like comparing and merging two Word documents.
These Word tutorials will also help:
Enhance Your Workflow With Fillable Forms in Word
You’ve seen how convenient it is to use an interactive, fillable form. And now, you know how to create your own fillable form in Word.
Take it up a notch by starting with a Word template, such as those from Elements or GraphicRiver. These professionally-designed templates for Word are sure to impress your clients, employees, or members.
For unlimited downloads of Word templates, take your pick of the vast options in Envato Elements. For one small monthly subscription, you get unlimited downloads of anything you want in its massive library. These include photos, fonts, graphics, as well as sound effects, music, and stock video. If you create many marketing and communication materials, Elements gives you massive value.
For one-off projects, GraphicRiver is another massive library of Word templates and other creative elements. But with GraphicRiver, you pay only for each single use of each item. It’s an affordable way of getting the same professional results.
Many documents present some data in the form of figures or tables. Creating tables is often more efficient than describing the data in the paragraph text, especially when the data is numerical or large. The tabular data presentation makes it easier to read and understand.
A table is a collection of information or data, usually represented by horizontal rows and vertical columns. Each column and each row can have a header. Some tables have only column headings or only row headings. The box at the junction of each column and row is a cell that contains data such as text, numeric information, or images. Some cells can be merged or split (see more about formatting tables). E.g.:

Microsoft Word has many features that make working with tables simple and convenient.
Create a table
There are several ways how to insert or create a table:
- Create a blank table of up to 10 columns and 8 rows,
- Create a blank table with more than 10 columns or more than 8 rows,
- Create a blank table manually (Draw a table),
- Create a table using predefined templates (Quick Tables),
- Create a table from the existing data (Convert Text to Table),
- Insert a Microsoft Excel spreadsheet.
To create a blank table in a Word document, do the following:
1. Place your cursor where you want to insert the table.
2. On the Insert tab, in the Tables group, click the Table button:

3. Do one of the following:
Create a blank table of up to 10 columns and 8 rows
- To create a table of up to 10 columns and 8 rows, move the cursor right (to select columns) and down (to select rows) the grid to select as many cells as you need. E.g., the table of 5 columns and 3 rows (selected cells will turn orange):

Click on a cell in the grid with the expected number of rows and columns (or press Enter) to insert an empty table to fit the width of the text (paragraph).
The table has the specified number of single-line text rows in the current paragraph and equal-width columns. E.g., the table of 3 rows and 5 columns:


Create a blank table with more than 10 columns or more than 8 rows
- To create a table with more than 10 columns or more than 8 rows, do one of the following:
- Create a table with exactly 10 columns or 8 rows, then add as many columns or rows as you need (see below how to customize table).
- Click the Insert Table… option:
In the Insert Table dialog box:

- In the Table size group, specify the number of columns and rows,
- In the AutoFit behavior group, specify the width of the table and its columns:
- Select the Fixed column width option to customize width in the appropriate field: select Auto (used by default) or specify width. E.g., 0.75″:

- Select the AutoFit contents option to adjust cell sizes to the document content. E.g.:

- Select the AutoFit to window option to adjust the table’s width to the document content width. E.g.:

- Select the Remember dimension for new tables check box if you want to create tables with the same options later. Word will remember your customization.


Create a blank table manually
- To manually create an empty table, click the Draw Table option:
After clicking that option, the cursor changes to the pencil
 that allows drawing cells directly in the Word document to create a table:
Click anywhere in a document but the table itself by the pencil to stop drawing a table.
Notes:
- To draw additional lines, select a table, then on the Table Layout tab, in the Draw group, click the Draw Table button:

- If you draw a line in the wrong position, click the Eraser button in the Draw group of the Table Layout tab:
- We recommend displaying the rulers or gridlines to help you place the lines correctly.
- To draw additional lines, select a table, then on the Table Layout tab, in the Draw group, click the Draw Table button:


Create a table using predefined templates
To create a table using predefined Word templates of tables and calendars, do the following:
1. Place your cursor where you want to insert the table.
2. On the Insert tab, in the Tables group, click the Table dropdown list, then select Quick Tables list:

3. From the Quick Tables gallery, select the template you prefer.
For example:

Create a table from the existing data
To create a table from the existing data in a document data (either as regular text or as a tabbed list), do the following:
1. Select the document data you want to shape into a new table.
2. On the Insert tab, in the Tables group, click the Table dropdown list, then select Convert Text to Table…:

3. In the Convert Text to Table dialog box:

- In the Table size group, specify the number of columns,
- In the AutoFit behavior group, specify whether the width of the columns should be fixed (see details above),
- In the Separate text at group, select the character that separates text into columns in the selected text: paragraph marks, commas, tabs, or some other character.
E.g.:

Insert a Microsoft Excel spreadsheet
Note: It is possible to insert a Microsoft Excel spreadsheet in a document. To do so, on the Insert tab, in the Tables group, click the Table dropdown list, then select Excel Spreadsheet:

Word opens the Excel spreadsheet where you can enter the data. You can use Excel features such as functions and formulas to create or manipulate the data. Note that it is not a Word table.
Add rows and columns
To add a row and a column to a table, do the following:
1. Position the cursor:
- to a cell in a row above or below which you need to insert a row,
- to a cell in a column left or right which you need to insert a column.
2. Do one of the following:
- Click the Insert dropdown list in the Mini toolbar:

- On the Table Layout tab, in the Rows & Columns group:

- Click the Insert Above button to insert a row above the row with the cursor,
- Click the Insert Below button to insert a row below the row with the cursor,
- Click the Insert Left button to insert a column left to the column with the cursor,
- Click the Insert Right button to insert a column right to the column with the cursor.
- Right-click and select the Insert list:


Notes:
- To insert rows or columns, move the mouse over the table or left of the table until you see the Insertion indicator, then click the icon:
 and
and
- You can choose the option Insert -> Insert Cells… from the popup menu; Word opens the Insert Cells dialog box:

After selecting the option and clicking the OK button, Word adds an entire row or column, not a cell. Word just moves cells according to the selection.
 and
and 

Delete a table element
To delete a table element, do the following:
1. Select the cell, multiple cells, the entire column or multiple columns, the entire row, or multiple rows.
2. Do one of the following:
- Click the Delete dropdown list in the Mini toolbar:

- On the Table Layout tab, in the Rows & Columns group, click the Delete dropdown list, then select one of the options:


3. Select one of the proposed options:
- Delete Cells… opens the Delete Cells dialog box, in which select the option you need:
- Delete Columns
- Delete Rows
- Delete Table

Note: You can select the element you want to delete, right-click on the selection and select the appropriate item in the popup menu. For example, if the entire table is selected or the column is selected:
 and
and

Convert a table into text
To convert a table into text in Word, follow the next steps:
1. Click anywhere in the table.
2. On the Layout tab, in the Format group, click the Convert to Text button:

3. In the Convert Table to Text dialog box, select the charter to separate cells data in the text:

4. Click OK.
You can use Word to create interactive digital forms that other people can fill out on their computers before printing or sending them back to you. It takes a little preparation but keeps you from having to decipher messy handwriting! Some of the tools you will use when creating a form include:
- Templates: Forms are normally saved as templates so that they can be used again and again.
- Content controls: The areas where users input information in a form.
- Tables: Tables are often used in forms to align text and form fields, and to create borders and boxes.
- Protection: Users can complete the form fields without being able to change the form’s text and/or design.
Show the Developer Tab
Before you can create a form, you’ll need to turn on the Developer tab to get access to the advanced tools.
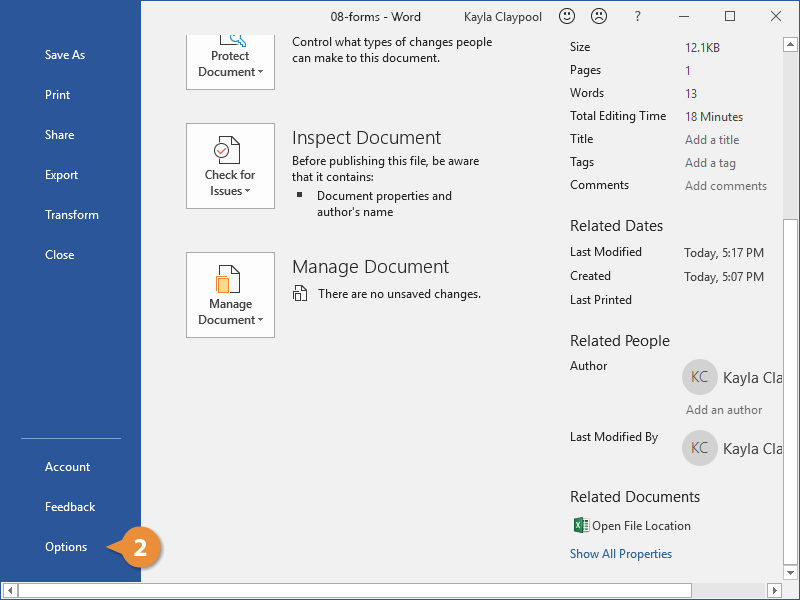
- Click the File tab.

- Select Options.

The Word Options window opens.
- Click the Customize Ribbon tab on the left.
The column on the right controls which ribbon tabs are enabled.
- Check the Developer check box.
- Click OK.
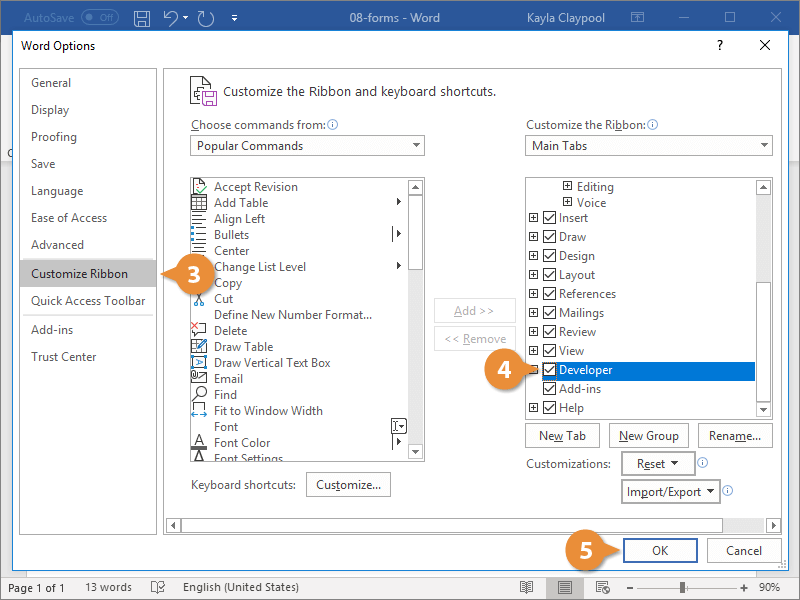
The Developer tab now appears on the ribbon. In addition to advanced tools for macro recording, add-ins, and document protection, we now have access to form controls.
Create a Form
Once you’ve enabled the Developer tab, and created the layout and structure of the form, you can start adding form fields to your document with Content Controls.
- Place the text cursor where you want to insert the form field.
- Click the Developer tab on the ribbon.
The Controls group contains the different kinds of content controls you can add to a form, as well as the toggle button for Design Mode.
- Click the Design Mode button in the controls group.
While Design Mode is active, controls you insert won’t be active, so clicking a check box to move it around won’t also check it. You can also customize placeholder text for some controls.
- Click a Content Control buttons to insert the selected type of control.
The content control is inserted.
Select a form field and click the Properties button on the ribbon to edit a control’s options. Depending on the type of control you’ve inserted, you can change its appearance, set up the options in a list, or lock the control once edited.
- When you’re done, click the Design Mode button again to exit Design Mode.
You leave Design Mode, and the content controls that you’ve inserted can now be used.
Types of Form Controls
There are many different types of form controls you can add to a form that will allow people to add different types of responses.
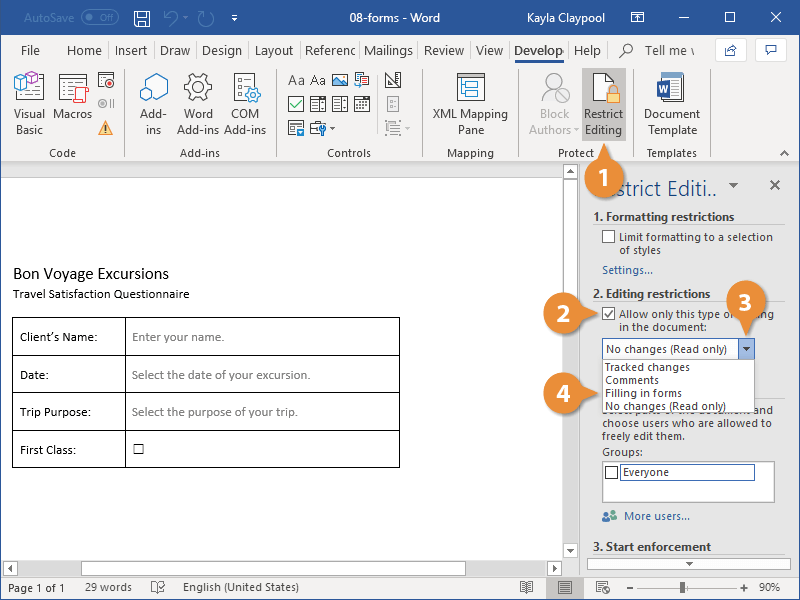
Finalize a Form
When you’re ready to distribute a form so others can fill it out, you can restrict the form so that content controls cannot be removed or changed by those filling it out.
- Click the Restrict Editing button on the Developer tab.
The Restrict Editing pane appears on the right.
- Check the Editing restrictions check box.
- Click the Editing restriction list arrow.
- Select Filling in forms.
When this option is enabled, the only change that anyone else can make to this document is the filling in of form fields. They won’t be able to move, delete, or edit the fields themselves until protection is turned off.
- Click the Yes, Start Enforcing Protection button.
A password is not required to start enforcing protection, but you can add one if you’d like to prevent just anyone from turning this protection off.
- Enter a password (optional), then click OK.
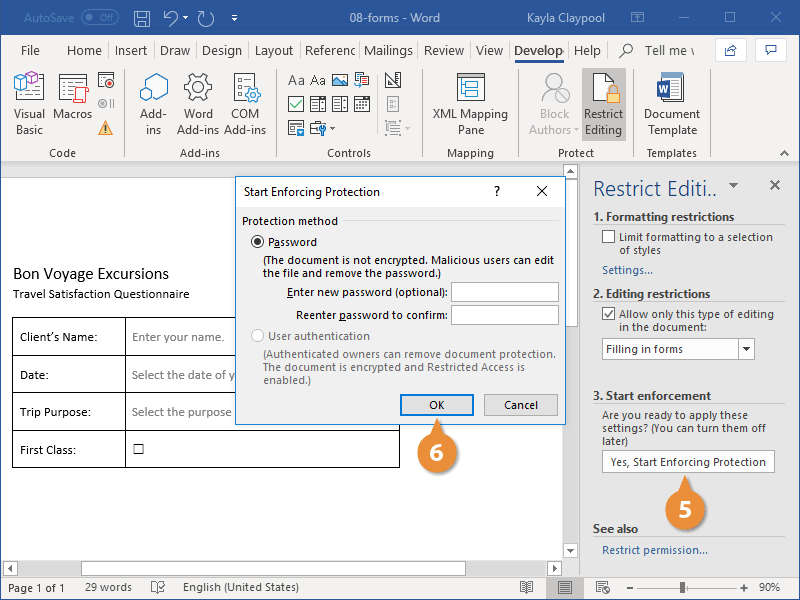
The document is now restricted, and anyone you send it to will only be able to fill in the forms.

FREE Quick Reference
Click to Download
Free to distribute with our compliments; we hope you will consider our paid training.
Microsoft Word or MS-WORD is a graphical word processing program that users can type with. It allows the users to type and save documents very similar to other word processors. There are many versions of MS-word in market, which the user can install as per te. In this tutorial, we will learn about the tables in MS-Word.
Tables in MS Word are made up of rows and columns with an organized arrangement of text. These tables can be used to align numbers in columns and then various operations can be performed on them. Tables can also be used to create page layouts. Rows in a table are series of data banks laid out horizontally in a table or spreadsheet. Columns are vertical series of cells in a chart, table, or spreadsheet.
How to Create a Table?
Tables in MS Word can be created in the following two ways:
1. Using the Grid
2. Using Table Dialogue Box
Using the Grid
Following are the steps of creating a table using the Grid provided in MS Word:
Step 1: Go to the Insert tab and click on the Table button.

Step 2: In the dropdown menu, select the number of rows and columns from the Grid.

Using Table Dialogue Box
Following are the steps of creating a table using Table Dialogue Box in MS Word:
Step 1: Go to the Insert tab and click on the Table button.
Step 2: Under the grid, you will see an Insert Table button. Click on it.

Step 3: In the Insert Table Dialogue box, mention the number of rows and number of columns as per the requirement and click on OK button.

How to Modify a Table?
We can also edit/modify a table to make it more creative. Multiple operations can be performed on a table like changing the layout, splitting of cells, merging the cells, applying borders, etc. Here, we will see some of the operations performed on a table in MS Word.
Changing Layout of a Table
Changing the layout of a table can be done with the help of the following steps:
Step 1: Select the table for which the layout is to be changed. Go to the design tab.

Step 2: Click on the dropdown menu to get various different types of layouts for your table.

Step 3: Select any layout as per the need.

Splitting the Cell
Splitting of a cell can be done with the help of the following steps:
Step 1: Select the cell that you want to split into multiple cells. Then go to the Layout tab and click on the Split Cells button.

Step 2: In the dialogue box, mention the new dimensions as per the requirement.

Step 3: Click on the Ok button.

Merging the Cells
Merging of various cells can be done by the following steps:
Step 1: Select all the cells that are to be merged into a single cell. Then go over the layout tab, and you will see a Merge Cell button.

Step 2: Now click on the Merge Cell button and the selected cells will be merged.

Applying Borders and Styles on a Table
Borders and styles can also be applied to a table in a similar way as the layout of a table is changed. Go through the following steps to do the same:
Step 1: Select the entire table and go over the design tab.

Step 2: Select the style that you want to apply to your table.

Converting Text to a Table
MS Word allows the conversion of existing text into a table with the help of the following steps:
Step 1: Select the text that is to be converted into the table. Now go to the Insert Tab and you will see a Table button.

Step 2: Click on the Insert Table button and in the drop-down menu, click on the Convert Text to Table button.

Step 3: In the dialogue box, mention the dimensions of the required table and other data that is required.

Step 4: Click on the OK button and the selected text will be converted to a Table.

Inserting Images in a Table
MS Word allows adding images inside the table cells. To insert an image in a table, go through the following steps:
Step 1: Select the cell in which you want to add the Image. Go to the Insert tab and select the Pictures button.

Step 2: You can either choose a picture from your device or select one online.
Step 3: Choose a picture from the browser window and click on the Insert button.

Step 4: Selected Image will be added in the cell selected.

Performing Calculations in a Table
Mathematical calculations can also be performed on the values present in the table. Microsoft provides various formulas to perform these operations. By default, the sum of the values lying in the rows to the left or column lying above are calculated by Word. Following are the steps to do the same:
Step 1: Select the cell in which the result of the mathematical operations is required.

Step 2: Now go to the Layout tab and select the formula button.

Step 3: In the dialogue box, define the formula for the mathematical operation, the default formula is the sum of the values to the left or above.

Step 4: After defining the formula, click on the OK button to apply the formula on the cells given in the formula.

Creating tables in Microsoft Word used to be so annoying that most people just did it in Excel, then imported it into Word. It’s worth giving Word 2013’s table tools a try, though, because the process is easier, and there are some new graphical options.
Seven ways to create tables
Microsoft now provides five different methods for creating tables: the Graphic Grid, Insert Table, Draw Table, insert a new or existing Excel Spreadsheet table, and Quick Tables, plus an option for converting existing text into a table. To start, open a blank Word document from the Home/New page. Position your cursor in the document where you want the table inserted.
Graphic Grid/Select Table from Graph
Under the Insert tab, click the Table button. The Insert Table dialog box will open, showing a basic grid pattern as well as traditional menu options below it. Place your cursor on the first cell in the grid and slide it down and over until you highlight (for this example) four columns and five rows, then click once.
Notice that once the table is created, a new option called Table Tools appears on the Ribbon bar with two new tabs: Design and Layout. See the Layout and Design section below for details regarding these options.
Create a new table using the graphical grid.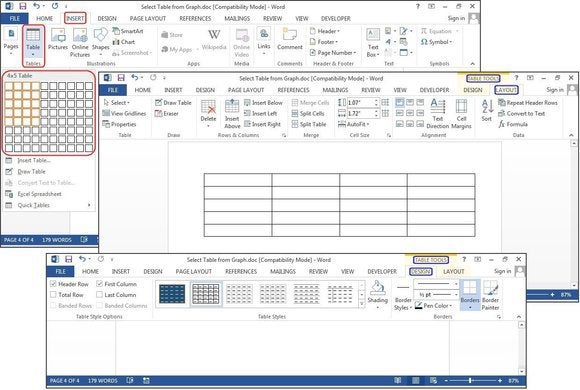
Insert Table
Click Insert > Tables > Insert Table from the dropdown menu. In the Insert Table dialog box, enter the number of columns and rows you want in this table (four columns and five rows). In the AutoFit Behavior panel, select Auto, or click the down arrow to choose a specific size. You can also choose AutoFit to Contents (produces narrow columns that expand as you add data) or AutoFit to Window (expands the table to fit the document size). Check the Remember Dimensions for New Tables box if you want the sizes you’re entering now to become your defaults for future tables.
Create a new table using Insert Table.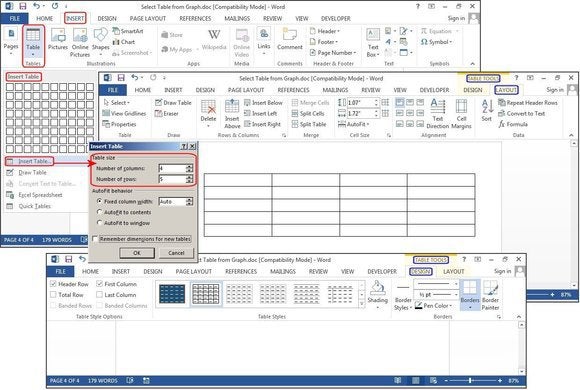
Draw Table
Click Insert> Tables > Draw Table. The cursor turns into a pencil, which you drag down and across to draw a box. Don’t worry about the exact dimensions; you can modify it any time.
Once the box is created, position the cursor inside the box and draw lines over and down for the columns and rows (one at a time). Don’t worry about crooked lines, either—Word straightens them as you draw.
To add or remove columns and/or rows later, click anywhere inside the table, then select the Design tab under Table Tools. Click the Draw Table button to add or continue drawing lines with your pencil cursor, or click the Eraser button to remove lines with the eraser cursor. To remove a line, just touch the line with the eraser cursor, and the line disappears.
Create a new table using Draw Table.
Excel Spreadsheet (create In Word)
Click Insert > Tables > Excel Spreadsheet. An Excel spreadsheet inserts at your cursor location. You can continue using Excel and its menus and commands, but after you enter your data it converts to a non-editable graphic.
If you want to add, delete, or modify the spreadsheet, right-click anywhere inside the worksheet graphic, select Worksheet Object from the dropdown menu, then click Edit. The original spreadsheet reappears for editing. Notice the top menu has changed to an Excel menu for edits.
Also from the Worksheet Object dropdown menu, you can click Open to open the spreadsheet in Excel, so you can manipulate it in that program. Or click Convert to view a Windows dialog box that lists file-conversion options.
Create a new table using Excel Spreadsheet.
Excel Spreadsheet (copy and paste existing worksheet)
In the old days, Excel spreadsheets had to be imported into Word. Now you can just copy and paste. Open Excel, highlight the spreadsheet, and copy it. Then open Word, position your cursor at the desired location, and select Paste > Keep Source Formatting.
The other options on the Paste dialog menu are Merge Formatting, which changes the text format to match the file into which you pasted the spreadsheet, and Keep Text Only, which pastes the text without the Excel grid, meaning you will likely have to realign your columns with tabs.
Copy and paste an existing table from Excel.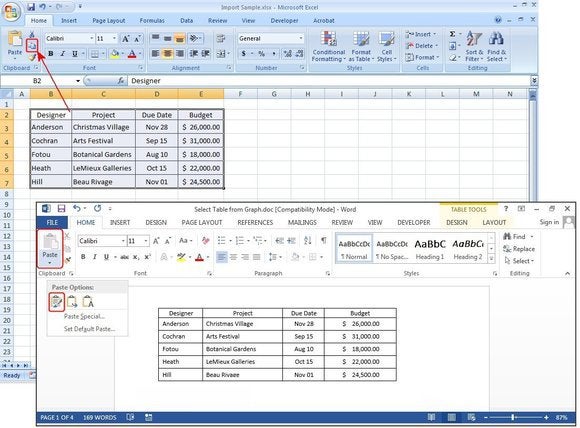
Quick Tables
Quick Tables are Word’s table templates. In addition to the nine templates provided, you can create your own designs and save them to the Quick Tables Gallery to use later. Click Insert > Tables > Quick Tables. Select a table template from the Quick Tables menu, then modify it to fit your project.
Create a new table using Quick Tables.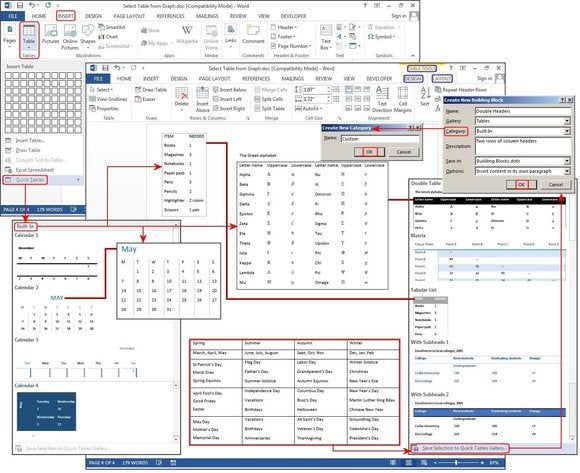
Convert Text to Table
The table tools can also make lists a lot easier to customize and even reorganize later. For our example, we’ll turn a classic contact list into a table, using a list of names—first, middle, last—plus the city, state, region, and profession of each person on the list.
For eons, people have used tabs to separate the fields, adding a tab or two to accommodate longer strings of data. But if you do this, when you convert the table to text, it misplaces all the data.
With the Convert Text to Table feature, you can separate the fields (Name, City, State, etc.) with paragraphs, tabs, commas, or other separator character, but use only one separator between each field.
Convert an existing block of text to a table.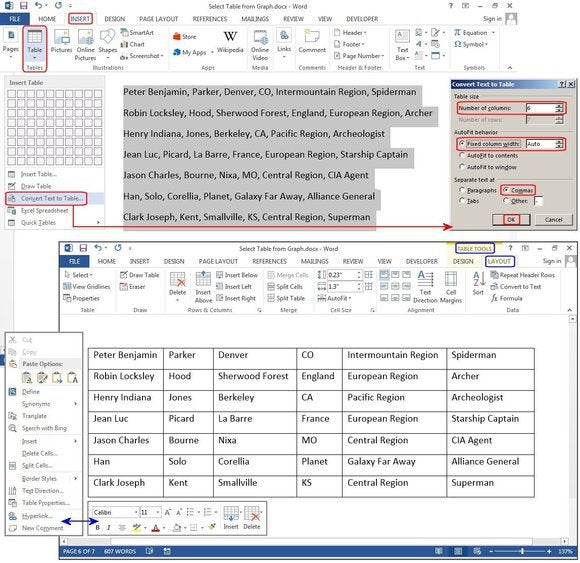
Layout and Design
There are three options to modify and/or decorate tables:
1. Use the Table Tools > Design—or—Table Tools > Layout commands on the Ribbon menu.
2. Right-click and use the Shortcut popup menus.
3. Use the keyboard shortcuts, which become visible when you press the ALT key on your keyboard.
All of these methods are fast and easy, but using a combination of all three will always be quicker. For example, use your mouse to highlight, then right-click to copy with your right hand; then arrow down to the new location and press CTRL-V to paste with your left hand.
Layout tab
The Layout tab lets you modify the structure of the table. The menu is fairly self-explanatory, and you can roll your cursor over a feature to get further clarification.
Roll your mouse over each button to view how each feature works.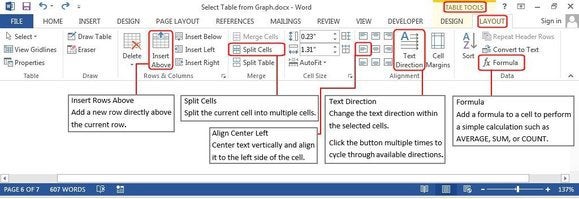
The dialog boxes below also illustrate each feature. Click Table Tools > Layout > Insert or Delete (from Rows and Columns group) to add or remove them; Merge or Split Cells or Split a Table (from the Merge group); or Text Direction (from the alignment group) to rotate the text inside the table.
Menu options to modify a table structure.
Other features include Table Properties, which provides several options for aligning the table with the text or wrapping text around your table. Select Cell Margins to change the margins inside each cell. With the table still highlighted, click Table Tools > Layout > Data > Sort to sort the table data alphabetically or numerically, just like in Excel. You can sort by column numbers or by column headers, and it provides two sort levels. For example, you can sort by Last Name, then by First Name. The table below is sorted by Last Name.
You can also convert your table back to a text block. Just choose the separator you prefer, so when the table grid disappears, the data isn’t all jumbled together.
You can even insert formulas to calculate your numeric data. I added a Salary column to the table below and entered some dollars, plus a new row at the bottom for the salary totals. To calculate the total salaries, position your cursor in the last row and the last column cell, and click the Formula button under the Data group. In the Formula dialog box type the SUM() formula [or Count() or Average()] in the Formula field box. If you are unfamiliar with the formulas Word provides, click the down arrow under the Paste Function field, and choose a formula from the list.
Type Above between the parentheses, choose a format under Number Format such as dollars, percent, or general, then click OK. Word calculates the column of numbers and places the calculation in the target cell (where your cursor resides). Review the Formula Format table in the graphic below for the correct commands that tell Word which direction to calculate (these go inside the parentheses).
Wrap text around a table, change cell margins, convert table back to text, sort the table data, and/or add formulas.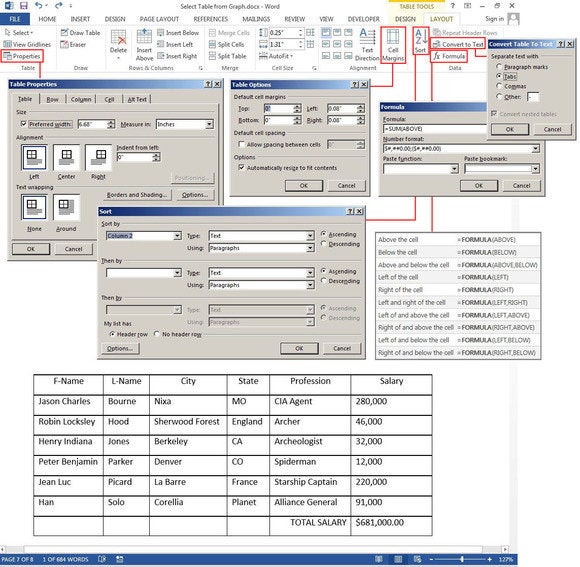
Design tab
The Design tab is for adding borders, shading, styles, and customizing the header columns and rows. Highlight your table, then select Table Tools > Design> Table Styles, Shading, Border Styles, Borders, or Border Painter (see the graphic below for ideas). There’s no learning curve, just play with the features and see what happens. If you don’t like a feature you’ve added, just click the Undo button or press CTRL-Z.
There’s also an option to add artwork borders to your pages. Select Table Tools > Design > Borders > Border Painter, and click the Page Border tab in the Borders and Shading dialog box. Click the down arrow in the field box under Art, then choose a border—mostly simple clip art—from the list.
Make your table pop with Table Styles, Shading, Border Styles, Borders, or Border Painter.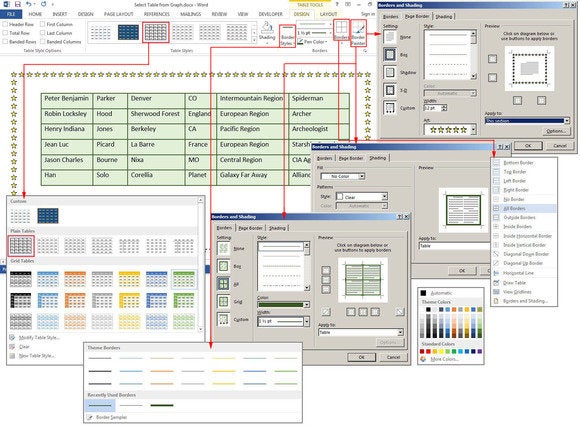
The table below uses one of the many preset styles that comes with Word. Select Table Tools > Design > Table Styles, then scroll through the gallery of styles. If you want to change the font or customize the paragraphs inside the table, use the Format Shortcut menu. Right-click anywhere inside the table, and this small menu pops up adjacent to the longer Table Options menu. If the formatting feature you need is not on the Shortcut menu (which is fairly limited), click the Home Tab and select the features you need from the Font or Paragraph group. All of the buttons and groups on the Home tab are available for formatting tables as well as documents. The options are endless.
Choose a Table Style with Banded Rows (i.e., every other row is different for easier viewing), then customize the fonts and paragraph spacing.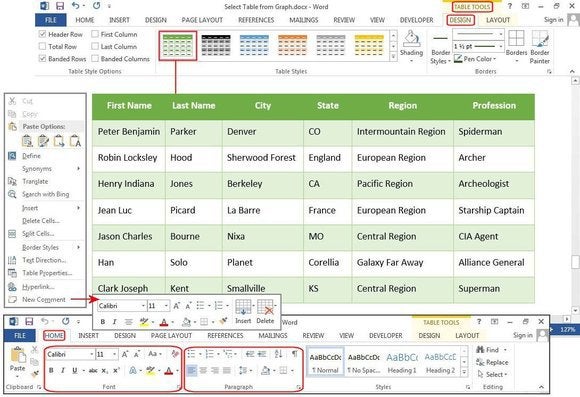
Stay tuned for more articles on getting the most out of Word 2013.