
Красиво оформленные абзацы, выравнивание текста по какому-либо краю, разделение списка чертой или точкой, другие элементы стандартного форматирование – все это использование табуляции в Ворде 2007/2010/2013. Она широко используется в форматировании текста.
Что это такое
Табуляция происходит от латинского слова «табула» – доска, таблица. Это универсальный компонент в программе Word, позволяющий структурировать и выравнивать текст по горизонтали.
Данный элемент пакета Microsoft Office является обязательным для любой модификации программы. С помощью инструмента оформляются научные работы и электронные документы, поскольку знак принят ГОСТом как деловой.
Создается с помощью отступа абзаца, занимает 8 знакомест (пробелов), шаг в 1,25 см. Вводиться клавишей табуляцией «Tab», расположенной на клавиатуре слева.
На рисунке ниже показано, как выглядит в обычном тексте абзац с табуляцией в Ворде.
Включить символ табуляции
Чтобы включить знак, нужно:
После нажатия кнопки, в тексте отобразятся все знаки, которые до этого были невидимыми. Если в тексте были лишние пробелы или абзац был сделан без табулирования, это станет заметно.
Второй способ включения – нажать сочетание клавиш «Ctrl + *».
Установка позиций табуляции
Сделать табуляцию в Ворде можно двумя способами:
- с помощью линейки;
- через инструмент «табуляция».
Рассмотрим оба способа подробнее.
Используем линейку
Линейка – это инструмент, помогающий выравнивать содержание документа Word. Если она не отображается в верхней части, то ее можно настроить. Для этого зайти во вкладку «Вид» и поставить галочку перед словом «линейка».
Чтобы установить позицию символа с помощью линейки нужно выполнить ряд действий:
- Выбрать тип. Вверху слева расположена кнопка, отображающая тип табулирования. Нажимая на этот значок можно выбрать необходимый отступ (по центру, по краю, с чертой).

- Чтобы узнать, каким знаком обозначается тот или иной тип достаточно навести на него курсором мышки. В таблице ниже указаны типы подобных символов.

- Можно установить размер линейкой. Для этого просто кликнуть мышкой на нужную цифру.

- Если необходимо изменить установленный размер, нужно зажать значок на линейке левой кнопкой мышки и перетащить до изменяемого значения.
- Остается нажать клавишу «Tab», расположенную на клавиатуре слева. После чего можно писать текст с указанного места.


Параметры табуляции
В таблице выше были указаны типы табуляции. Их значения – это параметры индикатора табулирования.
Используем инструмент «Табуляция»
Чтобы использовать инструмент, нужно вызвать его через диалоговое окно. Сначала нужно открыть вкладку «Главная» и выбрать строку «абзац». Затем нажать вызов диалогового окна — маленькая стрелочка внизу строки.
После этого всплывет окно «Абзац». Внизу окна кликабельная одноименная кнопка. Необходимо на нее нажать.
Теперь можно приступить непосредственно к настройкам параметров.
Для этого в строке «позиция» указываем размер в сантиметрах, оставляя при этом строку «по умолчанию» без изменений.
В пункте «Выравнивание» выбрать нужное. Далее наживаем кнопку «установить» и ОК.
Пункт «Заполнитель» понадобится, если необходимо добавить тип табулирования с точками. Например, в научной работе требуется содержание и указания на страницы.
Диалоговое окно используется, когда необходимо задать точные параметры.
Изменение стандартных интервалов между позициями
Изменить интервал между позициями, заданными по умолчанию, можно также через диалоговое окно. В строке «По умолчанию» нужно задать требующееся расстояние. После чего нажать кнопку ОК.
Для ввода значений можно использовать стрелки «вверх» и «вниз»
Как удалить табуляцию
Удаление возможно двумя способами:
- С линейки. Для этого нужно захватить курсором мышки установленный значок табуляции и зажать левой кнопкой. Затем потянуть вниз на любое пустое место.

- Через диалоговое окно. Уже известным способом вызываем диалоговое окно через раздел «Абзац». Программа позволяет удалить как отдельные типы, так и все отметки табулирования.


После того, как выбор сделан (например, удалить все), нужно нажать на значок ОК.
Важно отметить, что после удаления параметров, текст смещается на позицию по умолчанию (1,25 см).
Итак, табуляция – универсальный инструмент Word, позволяющий форматировать текст согласно заданным параметрам.
 When you press the Tab key while working in Microsoft Word, your cursor moves to a specific location called a tab stop. Tabs can be used to indent paragraphs, but they can also be used for other purposes including creating single- and multi-column lists. This tutorial shows (1) how to change Word’s default tab and (2) how to create, change, and delete tabs in Word on the ruler.
Important Note: Although tabs can be used to indent paragraphs, Word’s built-in indent options are more efficient and reliable for longer documents. See “Three Ways to Indent Paragraphs in Microsoft Word” for more information.
Before starting the tutorial, let’s look at the different types of tab stops you can use in Word.
Five Types of Tab Stops in Word
Word includes five different tab stops:
- The left tab places left-aligned text to the right of the tab stop. (This is the most common tab stop.)
- The center tab centers text on the tab stop.
- The right tab places right-aligned text to the left of the tab stop.
- The decimal tab aligns text based on the first decimal placed on the tab stop.
- The bar tab creates a vertical line at the tab stop. (Technically, this is not a tab; it is for formatting multi-column lists.)
This tutorial is available as a YouTube video showing all the steps in real time.
Watch more than 150 other writing-related software tutorials on my YouTube channel.
The images below are from Word for Microsoft 365. The steps also apply to Word 2021, Word 2019, Word 2016, Word 2013, and Word 2010.
How to Change Word’s Default Tab
By default, Word moves your cursor half an inch to the right when you press the Tab key on your keyboard. However, you can change the length of your default left tab stop without creating a new tab.
The following steps only affect your current document. If you want to change the default tab for all future documents, you have to modify your normal.dotm template. We will cover that advanced topic in a separate tutorial.
- Select the Home tab in the ribbon.

- Select the dialog box launcher in the Paragraph group.

- Select the Tabs button in the Paragraph dialog box.

- Use the increment arrows to adjust the default tab stop in the Tabs dialog box. Alternatively, you can type a new number directly into the text box.

- Select the OK button to close the Tabs dialog box.

The steps below use the ruler. You can also create and adjust tabs using the Tabs dialog box. However, that process is less user-friendly than the ruler method, so it will be presented in a separate, advanced tutorial.
How to Create Tabs on the Ruler
Skip to step 3 if your ruler is already visible.
- Select the View tab in the ribbon.

- Select Ruler in the Show group.

- Press Ctrl + A on your keyboard to select your entire document or select the portion of your document to which you want to apply the tab.
If you don’t select all or part of your document before creating your new tab, it will only apply to the paragraph your cursor is currently in or newly created content.
- Click the tab selector button until it changes to the symbol representing the tab you want. (Hover your pointer over each symbol in the tab selector for a tooltip explaining each symbol.)

- Click the location on the ruler where you would like to place the tab stop. The tab symbol will then appear on the ruler.

Note that you can place multiple tab stops on the ruler. Each time you press the Tab key, your cursor will move to the next stop.
How to Change Tabs on the Ruler
- [Optional step] If you want to change the location of a tab stop and update all the text formatted with that tab, select only that text.
- Slide the cursor symbol to a new location on the ruler. If your cursor is currently in a paragraph formatted with that tab, it will automatically update.
How to Delete Tabs on the Ruler
- Ensure that no text or other content is selected.
- Pull the tab symbol downward and release it. It will be removed from the ruler.
Pro Tip: If you accidentally delete a tab, immediately press Ctrl + Z on your keyboard to undo the deletion.
Related Resources
How to Create and Customize Headings in Microsoft Word
Three Ways to Insert Accent Marks in Microsoft Word
How to View the Word Count in Microsoft Word
Updated April 13, 2022
![]()
Download Article
![]()
Download Article
Setting tabs on your Microsoft Word document will let you align the text on a page. This will organize your text so it has a uniform look to it. You can set tabs to the right or left or even both sides of the document, and doing so is very easy and straightforward.
Steps
-

1
Open Microsoft Word. On your desktop, double-click the Microsoft Word icon to launch the application.
-
2
Make the ruler visible. By default, the ruler at the top of the document should already be visible. In the case that it is not, click the View option at the very top of the screen, and a window will drop-down. Click on “Ruler” to display it at the top of the document.
Advertisement
-
3
Click the tab selector. At the top-left corner of the document, you can see the tab selector. It should be exactly on the left side of the ruler. Click it and you will be able to select the type of tab you want.
-
4
Set the tab position. Now click anywhere at the bottom edge of the ruler to set where you want the tab.
-
5
Adjust the tab. If you need some more adjusting to your tab, simply drag the tab you set left or right along the ruler.


Advertisement
Add New Question
-
Question
How do I change tabs?

To move left, press Ctrl + Tab; to move right, press Ctrl + Shift + Tab. Or you can just click on the tab you want.
-
Question
Can I set tabs when I have already made a Word document?
Yes you can. Your Word document just needs to be aligned in paragraph format, then you are able to drag the tabs where you would like them.
-
Question
How do I delete a tab in a Word document?
Click the tab stop on the ruler and drag down. Also, you can double-click the tab stop, select the position of the tab stop you want to delete, click clear, and click OK.
Ask a Question
200 characters left
Include your email address to get a message when this question is answered.
Submit
Advertisement
Thanks for submitting a tip for review!
About This Article
Thanks to all authors for creating a page that has been read 195,046 times.
Is this article up to date?
Начнем с вопроса «что такое табуляция в word». Табуляция – это инструмент MS Word, который отвечает как за отступы, так и за выравнивание.
Использование табуляции в ворде намного упрощает форматирования текста. Некоторые пользователи, например, используют пробелы, чтобы перенести текст в правый угол документа. Но существуют определенные требования к оформлению некоторых электронных документов, и использование огромного количества пробелов в таких документах недопустимо. В этой статье мы рассмотрим, как сделать табуляцию в ворде.
Для ввода табуляции в ворде используется клавиша Tab. Если вы включите режим непечатаемых символах, то вы увидите, что табуляция отображается как символ  . По умолчанию шаг табуляции составляет 1,25 см, то есть при нажатии клавиши Tab курсор сместится на расстояние шага табуляции.
Если вы находитесь внутри таблицы, то клавиша Tab используется для перемещения в ячейках таблицы. Чтобы создать табуляцию в таблице Word используйте сочетание клавиш Ctrl+Tab.
Управлять табуляцией в ворде нам поможет горизонтальная линейка.
Если линейка не отображается, то перейдите во вкладку «ВИД» и установите флаг для пункта «Линейка».

Табуляция в Word – Линейка и кнопка табуляции
У левого края горизонтальной линейки находится кнопка табуляции, которая отображает какой тип табуляции будет применен. При повторном нажатии на кнопку табуляции, будет изменяться значок типа табуляции. Существуют несколько типов табуляции:
 |
По левому краю |
 |
По центру |
 |
По правому краю |
 |
По разделителю |
 |
Непрерывная вертикальная черта через выделенный текст |
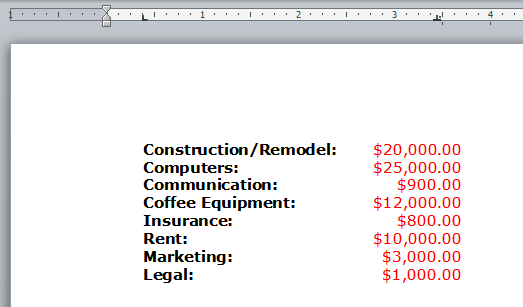
Для того чтобы поставить табуляцию в ворде, достаточно кликнуть мышкой по необходимому месту на горизонтальной линейке. На линейке определенными маркерами будут отмечаться все установленные позиции табуляции и выглядеть это будет примерно так:

Табуляция в Word – Линейка и маркеры табуляции
Для изменения положения позиции табуляции просто перетащите маркер табуляции влево или вправо на линейке. Для того чтобы убрать табуляцию в ворде, просто перетащите маркер табуляции за пределы линейки.
Если настройка позиций табуляции с помощью линейки не обеспечивает необходимую точность или перед позицией табуляции требуется вставить специальный символ (заполнитель), воспользуйтесь диалоговым окном «Табуляция».
На вкладке «ГЛАВНАЯ» или «РАЗМЕТКА СТРАНИЦЫ» нажмите кнопку вызова диалогового окна «Абзац».

Табуляция в Word – Кнопка вызова диалогового окна «Абзац»
В открывшемся диалоговом окне в нижнем правом углу щелкните кнопку «Табуляция».

Табуляция в Word – Диалоговое окно «Абзац»
Существует второй способ открыть окно настройки табуляции в Word. Достаточно дважды кликнуть на любом маркере табуляции на линейке.

Табуляция в Word – Окно «Табуляция»
В поле «Позиции табуляции» введите расположение, где требуется установить позицию табуляции.
В группе «Выравнивание» выберите нужный тип позиции табуляции.
Чтобы добавить позиции табуляции с точками или другим заполнителем, выберите нужный параметр в группе «Заполнитель». Нажмите кнопку «Установить», а затем кнопку «ОК».
Теоретическую часть мы рассмотрели, теперь перейдем к практическим примерам.
Чаще всего используются три типа табуляции: позиция табуляции по левому краю, позиция табуляции по правому краю, позиция табуляции по центру.

Табуляция в Word – Пример табуляции с выравниванием по правому краю, по левому краю и по центру
На изображении пунктирные линии показывают, как работают табуляции с выравниванием.
Рассмотрим следующий пример позиции табуляции по разделителю.

Табуляция в Word – Пример табуляции по разделителю
В данном случае табуляция по разделителю выравнивает числа по целой и дробной части. То есть все числа выравнены по запятой.
Следующий тип табуляции, который мы рассмотрим на примере, это табуляция «С чертой».

Табуляция в Word – Пример табуляции с чертой
При помощи табуляции с чертой можно создать непрерывную вертикальную черту через выделенный текст. У табуляции «С чертой» есть особенность – для ее добавления не нужно использовать клавишу Tab, она добавляется в текст сразу после установки ее на линейке.
И перейдем к последнему примеру – табуляция с заполнением в Word.

Табуляция в Word – Пример табуляции с заполнителем
В данном случае мы используем табуляцию, чтобы создать черту для подписи. Для этого мы используем две табуляции. Первую с выравниванием по левому краю (позиция 11 см), для того чтобы отступить от текста «Руководитель:». И вторую также с выравниванием по левому краю (позиция 14,5 см), но еще и с заполнителем, чтобы создать подчеркивание определенной длины.
Многие пользователи MS Word используют табуляцию точками для создания оглавления. Но этот способ очень неудобен и непрактичен, поэтому советуем создать автоматическое оглавление.
На этом все. Надеюсь, что теперь вы знаете, что такое табуляция в Word, как сделать табуляцию в ворде, как ее настроить и как убрать.
Lesson 8: Using Indents and Tabs
/en/word2010/printing/content/
Introduction

There are several ways you can indent text in Word; however, it’s important to use these tools appropriately to indent correctly each time. This helps the editing process go smoothly, thus saving you time.
In this lesson, you will learn how to use the tab selector and the horizontal ruler to set tabs and indents, as well as how to use the Increase Indent and Decrease Indent commands.
Indents and tabs
Indents and tabs are useful tools for making your text more readable. Indenting text adds structure to your document by allowing you to separate information. Depending on your needs, you can use tabs and indents to move a single line or an entire paragraph.
Optional: You can download this example for extra practice.
Indenting text
In many types of documents, you may want to indent only the first line of each paragraph. This helps to visually separate paragraphs from one another. It’s also possible to indent every line except the first line, which is known as a hanging indent.
 First Line Indent
 Hanging Indent
To indent using the Tab key:
A quick way to indent is to use the Tab key. This will create a first-line indent of 1/2 inch.
- Place the insertion point at the very beginning of the paragraph you want to indent.
Placing the insertion point
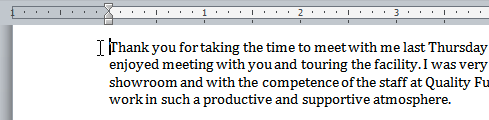
- Press the Tab key. On the ruler, you should see the first-line indent marker move to the right by 1/2 inch.
Pressing the Tab key
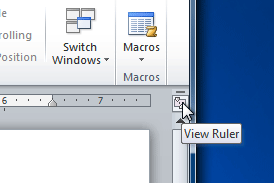
If you can’t see the ruler, click the View Ruler icon over the scrollbar to display it.
 Hiding and viewing the Ruler
To create or adjust a first-line indent or hanging indent:
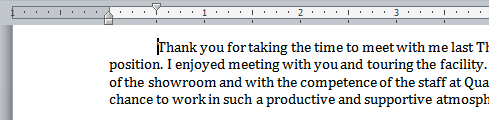
- Place the insertion point anywhere in the paragraph you want to indent, or select one or more paragraphs.
- To adjust the first-line indent, drag the first-line indent marker on the ruler.
- To adjust the hanging indent, drag the hanging indent marker.
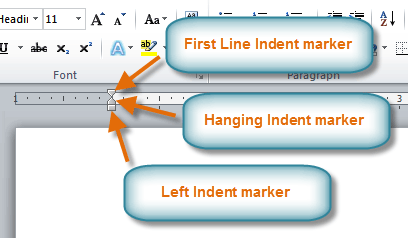
- To move both markers at the same time, drag the left indent marker. This will indent all lines in the paragraph.
The three indent markers
To use the Indent commands:
If you want to indent all lines in a paragraph, you can use the Indent commands on the Home tab.
- Select the text you want to indent.
- Make sure you are on the Home tab.
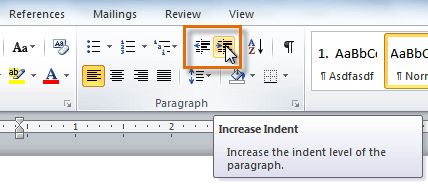
- Click the Increase Indent command to increase the indent by increments of 1/2 inch.
Increasing the indent
- Click the Decrease Indent command to decrease the indent by increments of 1/2 inch.
If you would prefer to type your indent amounts, you can use the Indent fields on the Page Layout tab.
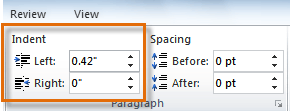 Typing an indent amount
Tabs
Tabs are often the best way to control exactly where text is placed. By default, each time you press the Tab key, the insertion point will move 1/2 inch to the right. By adding tab stops to the ruler, you can change the size of the tabs, and you can even have more than one type of alignment in a single line. For example, you could left-align the beginning of the line and right-align the end of the line by adding a right tab.
 Using two types of alignment
Pressing the Tab key can either add a tab or create a first-line indent, depending on where the insertion point is. Generally, if the insertion point is at the beginning of an existing paragraph it will create a first-line indent; otherwise, it will create a tab.
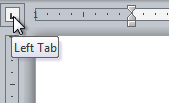
The tab selector
The tab selector is above the vertical ruler on the left. Hover over the tab selector to see the name of the type of tab stop that is active.
 The tab selector
Types of tab stops include:
Although Bar Tab, First Line Indent, and Hanging Indent appear on the tab selector, they’re not technically tabs.
To add tab stops:
- Select the paragraph or paragraphs you want to add tab stops to. If you don’t select any paragraphs, the tab stops will apply to the current paragraph and any new paragraphs you type below it.
- Click the tab selector until the tab stop you want to use appears.
- Click the location on the horizontal ruler where you want your text to appear (it helps to click the bottom edge of the ruler). You can add as many tab stops as you want.
Adding a Decimal tab stop
- Place the insertion point where you want to add the tab, then press the Tab key. The text will jump to the next tab stop.
Using the Tab key to move the text to each tab stop
- To remove a tab stop, drag it off of the Ruler.

Click the Show/Hide ¶ command on the Home tab in the Paragraph group. This will allow you to see nonprinting characters such as the spacebar, paragraph (¶), and Tab key markings.
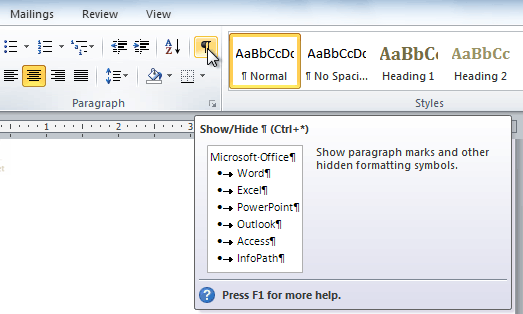 The Show/Hide ¶ command
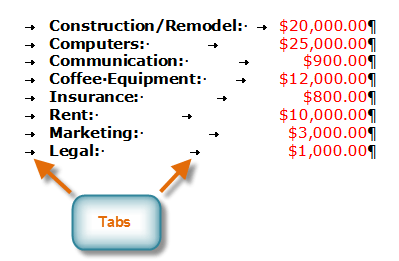 Tab markings
Challenge!
- Open an existing Word document. If you want, you can use this example.
- Practice using the Tab key to indent the first line of a paragraph.
- Select some text, and use the Increase Indent and Decrease Indent commands to see how they change the text.
- Explore the tab selector and all of the tab stops. Practice using each one.
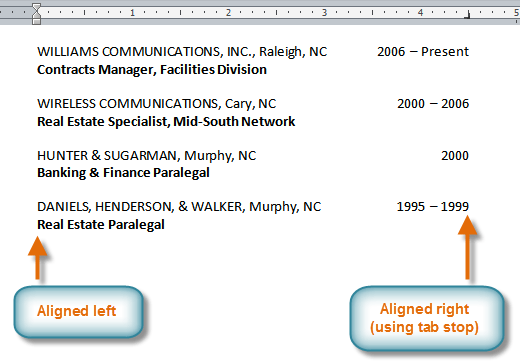
- If you’re using the example, add tab stops and tabs in the Work History section so all of the jobs line up with the most recent one.
/en/word2010/line-and-paragraph-spacing/content/