Download Article
Download Article
Want to create an outline around certain letters in your Word document? There are two easy ways you can surround words and phrases with colored outlines in Word—using Text Effects, and using Word Art. We’ll show you how to make any font in your Microsoft Word document stand out by outlining it in color.
-
1
Type the word or phrase you want to outline. The lines around your text will look better on larger characters, so make your font a bit larger than the rest of your text.
- You can make the letters any color you want before creating an outline around them. Just highlight the word or phrase, and then select a color from the «Font» panel at the top of Word.
-
2
Highlight the text you want to outline. Just click and drag the mouse around the text to select it.
Advertisement
-
3
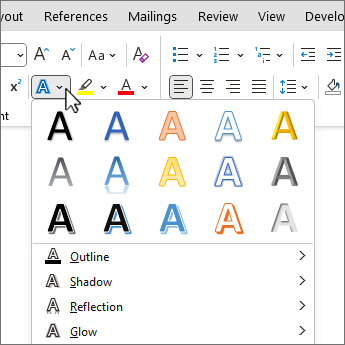
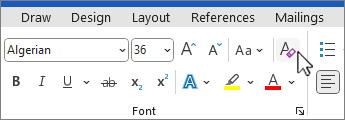
Click the Text Effects and Typography tool. This is the «A» surrounded by a blue glowing outline in the «Font» panel at the top of Word.
- If you don’t see this icon, click the Home tab at the top of Word.
-
4
Select the Outline menu. Now you’ll see all of the options you can use to create an outline around the selected letters.
-
5
Select an outline color. To choose the color of the line that surrounds your text, choose one of the colors displayed on the menu, or select More Outline Colors… to select a custom color.
-
6
Use the Weight menu to select the thickness of the outline. The larger the number, the thicker the outline around the letters.
- If you go too thick, you might make the text unreadable. You can always undo the last action in word by pressing Control + Z (PC) or Command + Z (Mac).
-
7
Use the Dashes menu to stylize the outline. If you’d rather have a dotted, dashed, or otherwise stylized line around your word or phrase instead of a solid line, you can select any of the options in this menu.
Advertisement
-
1
Click the Insert tab at the top of Word. WordArt is a tool that can help you create all types of vibrant text designs, including color outlines. You’ll find it on the Insert tab.
-
2
Click the WordArt menu. It’s the icon of a tiled blue «A» on the Insert tab in Word. A menu with several text styles will appear.[1]
-
3
Select an outline style. Not all WordArt styles have outlines, but several do. Don’t worry about the colors you see in the sample—you’ll be able to change those if you don’t like them. Once you click a style, you’ll see some sample text appear on the page.
-
4
Replace the sample text with your own. The text you type will appear in the selected outline style.
-
5
Select the Shape Format tab. It’ll appear at the top of the screen while you’re editing WordArt. This tab should already be active, but if it’s not, click it now.
-
6
Click the small arrow at the bottom-right corner of the WordArt Styles panel. It’s at the top of Word. This expands the «Format Shape» panel on the right side of Word.
-
7
Click the Text Fill and Outline icon. It’s the «A» with a line under it in the right panel.
-
8
Click Text Fill to select a color. When you choose this option, you’ll be able to choose the color of the actual text—you can choose an outline color separately.
-
9
Click Text Outline to design your outline. On this menu option, you can select a color, width, and even pattern (such as dotted or dashed) for the lines that surround your letters.
Advertisement
Add New Question
-
Question
How do I outline text in Windows 10?
Under WordArt Tools, on the Format tab, in the WordArt Styles group, click Shape Outline, and then do one of the following: To add or change an outline color, click the color that you want. To choose no color, click No Outline.
Ask a Question
200 characters left
Include your email address to get a message when this question is answered.
Submit
Advertisement
Thanks for submitting a tip for review!
About This Article
Article SummaryX
1. Create or Open a Word document.
2. Type the text you want in outline.
3. Highlight the text.
4. Click on the «Text Effects» tool.
5. Click on Outline.
6. Customize the Outline effect.
Did this summary help you?
Thanks to all authors for creating a page that has been read 498,291 times.
Is this article up to date?
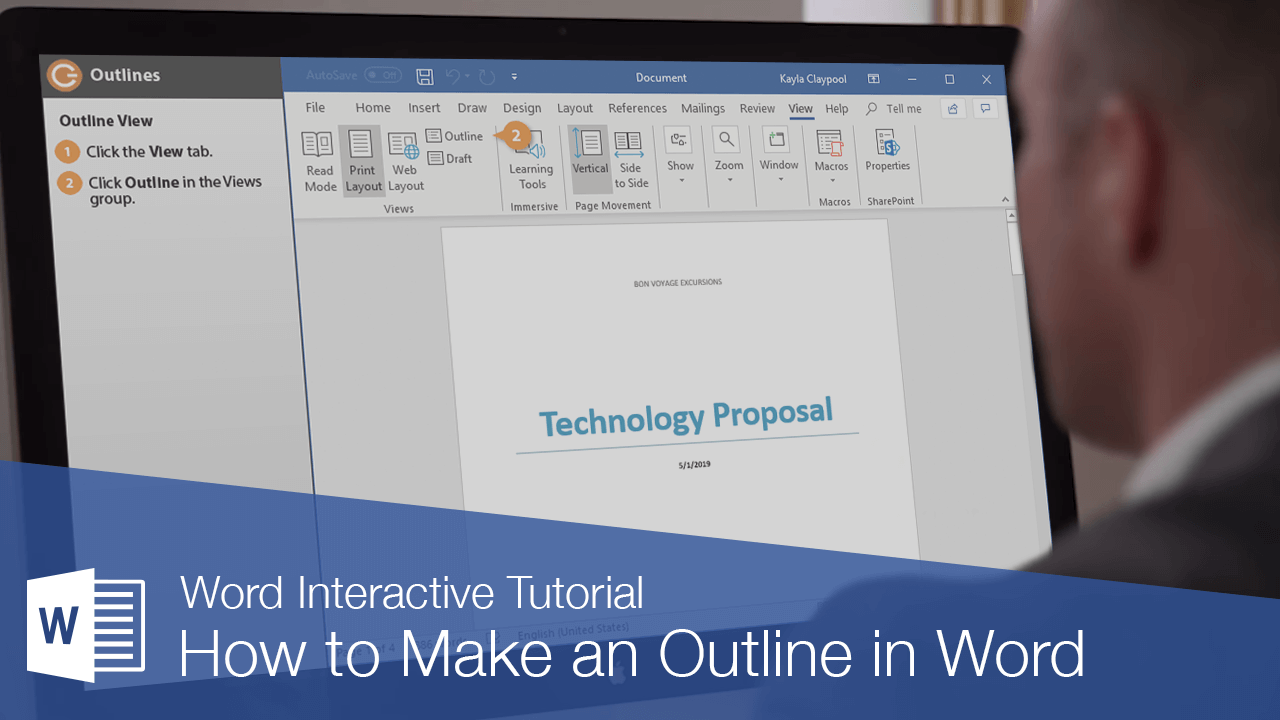
When you’re working with a long document, the Outline view helps you arrange your text. It creates an outline based on the styles you use, so it’s easy to see and organize all your headings and subheadings.
Outline View
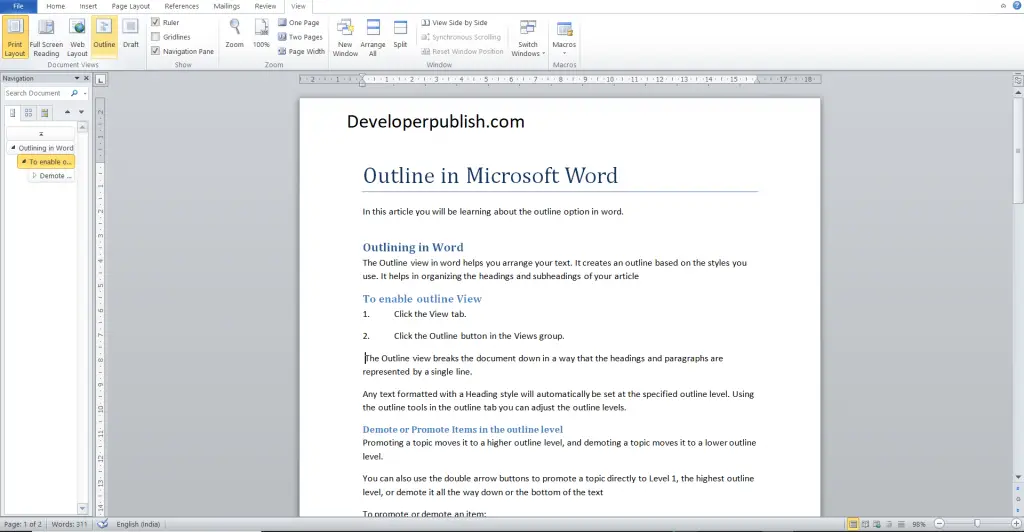
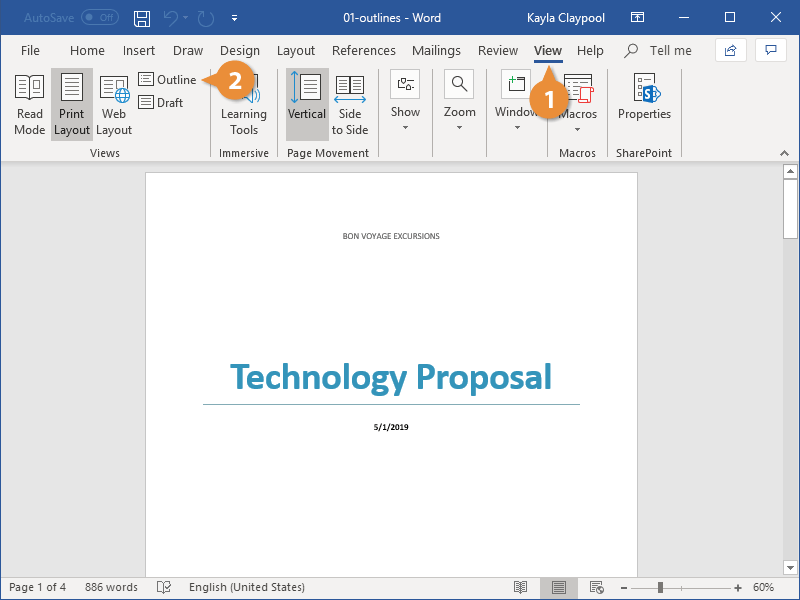
- Click the View tab.
- Click the Outline button in the Views group.
The Outline view breaks the document down so that each heading and paragraph is represented by a single line.
Any text formatted with a Heading style will automatically be set at the specified outline level, but you can adjust a line’s outline level manually using the tools on the Outlining tab that appears in Outline view.
Demote or Promote Items
Outline view makes it very easy to adjust the outline level of a heading.
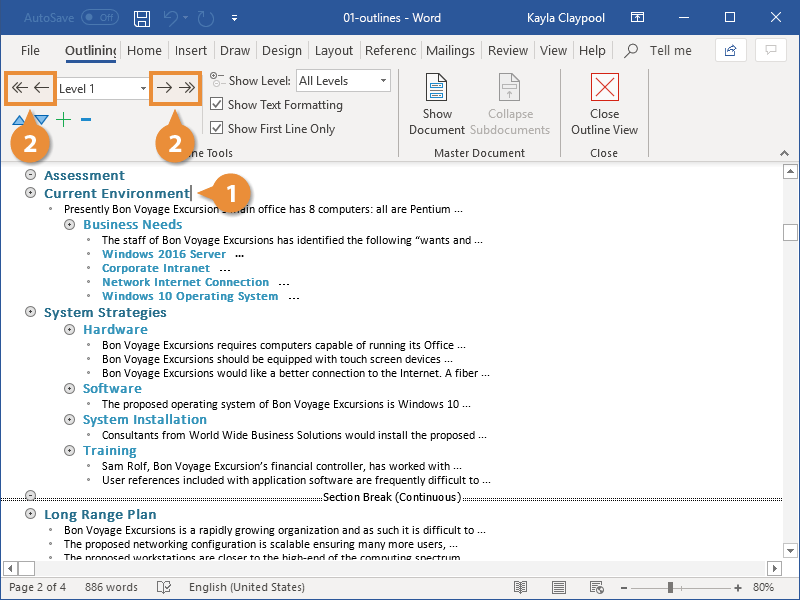
- Click the item in your document that you want to promote or demote.
- Click a Promote or Demote option from the Outline Tools group.
Promoting a topic moves it to a higher outline level, moving it one spot to the left, while demoting a topic moves it to a lower outline level, one spot to the right.
You can also use the double arrow buttons to promote a topic directly to Level 1, the highest outline level, or demote it all the way to body text.
Collapse and Expand Headings
You can collapse the contents of a heading in Outline view to make it easier to see the rest of a document.
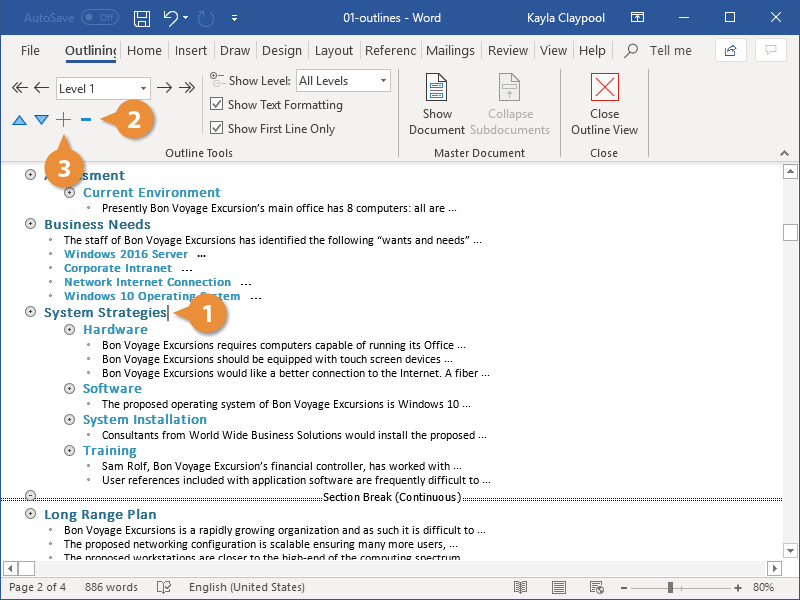
- Click the item in your document that you want to minimize.
- To collapse a section, click the Collapse button in the Outline Tools group.
- To expand a section, click the Expand button in the Outline Tools group.
That heading, along with all its subheadings and body text, is collapsed down to a single line.
That section is expanded once again, displaying all the subheadings and body text.
You can choose which outline levels are displayed by clicking the Show Level list arrow and selecting a level. Only sections of that outline level and higher will be displayed.
FREE Quick Reference
Click to Download
Free to distribute with our compliments; we hope you will consider our paid training.
Word for Microsoft 365 Word 2021 Word 2019 Word 2016 Word 2013 More…Less
Change the look of your text or WordArt by changing its fill or outline, or by adding an effect, such as a shadow, reflection, or glow.
-
Select your text or WordArt.
-
On the Home tab, select
Text Effects.
-
Choose the effect you want.
For more choices, point to Outline, Shadow, Reflection, or Glow, and then select the effect to use.
To remove the effect, select the text again, and then go to the Home tab and choose 
Need more help?
Want more options?
Explore subscription benefits, browse training courses, learn how to secure your device, and more.
Communities help you ask and answer questions, give feedback, and hear from experts with rich knowledge.
From within Word:
- Click Home and, in the Paragraph group, click the arrow next to Multilevel List.
- Choose an outline style from the List Library.
- Start typing to begin the list.
- To start a new list level, press the Tab key and begin typing.
- Press Enter to return to the previous list level.
Contents
- 1 How do you make an outline on Microsoft Word?
- 2 How do you outline a document?
- 3 Is there an outline template in Microsoft Word?
- 4 How do you do an outline in Word on a Mac?
- 5 Why is my Outline not working in Word?
- 6 What are outline levels in Word?
- 7 What is a document outline?
- 8 How do you make a Powerpoint outline in Word?
- 9 How do I switch to outline?
- 10 How do you do an outline?
- 11 How do I turn on the Tab key in Word?
- 12 Where can I find proofing in Word?
- 13 Why are my bullet points not indenting?
- 14 How do you add an outline to a shape in paint?
- 15 How do I create an outline in Word 2010?
- 16 What is an outline made up of?
- 17 How do I change the outline level in Word style?
- 18 How do you insert a document into an outline?
- 19 What is HTML outline?
- 20 How do you outline in Google Docs?
How do you make an outline on Microsoft Word?
Add an outline, shadow, reflection, or glow text effect
- Select your text or WordArt.
- Click Home > Text Effects.
- Click the effect you want. For more choices, point to Outline, Shadow, Reflection, or Glow, and then click the effect you want.
How do you outline a document?
The outline detects and lists headings from your text to help organize your document.
Open a document outline
- Open a document in Google Docs.
- Select text for an outline heading.
- At the top, click Normal text.
- Click a heading style. The heading will be added to the outline.
Is there an outline template in Microsoft Word?
Beginning on the next page is an outline template (in Microsoft Word format), which is filled in with a sample to show you what a final outline looks like. Here is how to fill in your own outline: Triple click on a sentence to highlight it.
How do you do an outline in Word on a Mac?
To get started, you simply enable outline view by going to the View tab and selecting “Outline” in the Views section of the ribbon. Unlike print or web layout view in Word, outline view comes with its own set of tools in the ribbon.
Why is my Outline not working in Word?
If the Outlining tab is missing from the ribbon, see if resetting the ribbon fixes the problem. Go to File | Options | Customize Ribbon. Once you have switched to Outline view, the options on the Outlining tab should be available.
What are outline levels in Word?
The “Outline Level” really means the Heading level, or in other words, the level at which the paragraph appears in Outline View. It is the property that you see in the Format + Paragraph dialog, under Outline Level.
What is a document outline?
What are document outlines?The document outline is the structure of a document, generated by the document’s headings, form titles, table titles, and any other appropriate landmarks to map out the document.
How do you make a Powerpoint outline in Word?
Create an outline in Word
- Select a bulleted item.
- In the Outline Level box, select a heading Level 1 for slide titles, Level 2 for bullet points on that slide.
- When finished or to edit your document, select Close Outline View.
How do I switch to outline?
To enter Outline view, click the View tab, and in the Views group, click the Outline button. The document’s presentation changes to show Outline view, and the Outlining tab appears on the Ribbon, as shown. A typical outline.
How do you do an outline?
An outline is a tool used to organize written ideas about a topic or thesis into a logical order. Outlines arrange major topics, subtopics, and supporting details. Writers use outlines when writing their papers in order to know which topic to cover in what order.
How do I turn on the Tab key in Word?
Set Tab Stops
- On the Home tab, in the Paragraph group, choose Paragraph Settings.
- Click the Tabs button.
- Set the Tab stop position, choose the Alignment and Leader options, and then click Set and OK.
Where can I find proofing in Word?
Proofing Options
- StepsActions.
- Click the File Tab. A menu will open.
- At the bottom of the menu, click the Word Options button.
- Select Proofing. A dialog box will open, showing the available proofing options.
- Select the options you want to modify.
- Click OK.
Why are my bullet points not indenting?
4 Answers. For 2007 it’s: Office button → “Word Options” → “Proofing” → “AutoCorrect Options” → “AutoFormat As You Type” Check the “Set left- and first-indent with tabs and backspaces” box.
How do you add an outline to a shape in paint?
Paint’s Shape tool will frame your picture with a border on all four sides. Select the “Rectangle” shape and then draw the outline from the upper left corner of your image to the lower-right corner. You can choose the thickness of your border, as well as its color.
How do I create an outline in Word 2010?
From within Word:
- Click Home and, in the Paragraph group, click the arrow next to Multilevel List.
- Choose an outline style from the List Library.
- Start typing to begin the list.
- To start a new list level, press the Tab key and begin typing.
- Press Enter to return to the previous list level.
What is an outline made up of?
An outline is a list of items organized according to a consistent principle. Each item may be divided into additional sub-items or sub-points. A preparation outline consists of three main sections, which includes the introduction, body, and conclusion. It also includes the title of the speech.
How do I change the outline level in Word style?
Right-click the paragraph that you want to change and choose Paragraph from the context menu. On the Indents and Spacing tab, specify the desired “Outline level.” Click OK.
How do you insert a document into an outline?
Google Docs will automatically add headings to an outline, but you can also add them manually.
- Open a document in the Google Docs app.
- Tap Edit .
- Select the text you want to make a heading.
- Tap Format .
- Tap TEXT. Style.
- Tap a heading style.
- Tap Done. . The heading will be added to the outline.
What is HTML outline?
The outline for an HTML document shows the structure of the content on the page. This is useful for user agents, who can use the outline to create, for example, a table of contents for the document. This can then be used by screen readers to help people better navigate the page.
How do you outline in Google Docs?
Head to Google Docs, sign in to your account, and open your document. You can display the Document Outline in just two clicks. Click View > Show Document Outline from the menu to put a checkmark next to it. You’ll then see the Outline display on the left side of your document.
Microsoft’s word processor is a leading application worldwide, with a wide range of functions that go far beyond writing documents, so it is always convenient to have a good understanding of all its ins and outs, something that is not easy. Within its characteristics, it has the possibility of making diagrams, in order to keep all the content of a document organized and simplified.
By default, Word takes care of using “Print Layout” when presenting the document. From this option, both the size of the paper and its margins are shown, as well as information about the font. It also has the “Reading Mode”, the “Web Design”, the “Draft” and “Outline”. The latter is the one that we will see in depth in this article.
What is the use of making an outline in Word
The outline is a very useful feature with which to create extensive tutorials, business documents or even books. With this we can summarize the content of a writing to make it more understandable and less extensive, so it is a highly recommended feature for both professionals and students. Outlines are made up of topics and subtopics. The themes are the main ideas; subtopics describe details.
In order to carry it out, it is necessary to have a clear idea of the type we want to carry out, since each idea requires its own design, although the objective will always be the same: to locate the main ideas that will be explained later in the text that we want to present.
The Outline view of Word is capable of presenting a document in a unique way taking advantage of the different heading styles that the word processor has, with which to be able to group and organize different thoughts, sections or ideas in a hierarchical way.
This tool makes it easy for us to randomly reproduce topics, subtopics, and text combinations to help us organize ourselves better. That is why whatever our level of creativity and knowledge we can use them to create lists or work on different projects. This feature works the same in all modern versions of Word : 2010, 2013, 2016, 2019 and is also included in the Microsoft 365 package.
Use Outline view
If we are working with a large document, the so-called Outline view can help us keep our text well organized. Thanks to this function we can create schemes based on different styles with which to keep all titles and subtitles distributed, making them easier to read.
To begin, just click on the “View” tab on the toolbar, where we will find the “Scheme” button within the “Views” group. By clicking on it we will see how the document is divided in an organized way so that each title and paragraph are represented by a single line.
Unlike what happens in other sections of the “Views” group such as “Print Design” or “Web Design”, the “Scheme” comes with its own set of characteristics within the ribbon itself, allowing us to work with different levels and the ability to embed any document. Thus, any text with a title style format will appear automatically at the specified outline level, and can be graduated manually.
Outline tools
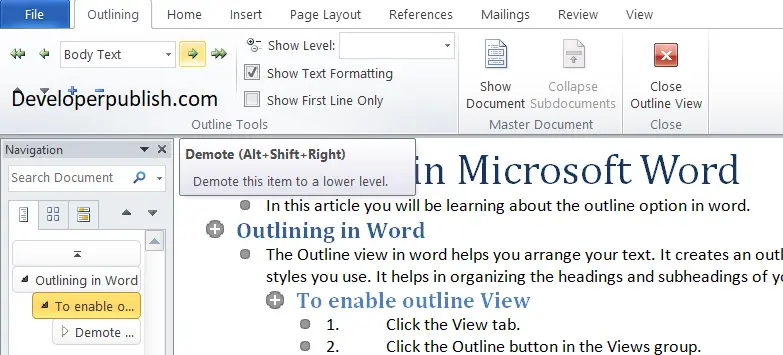
When you click on the Scheme button, your own ribbon appears. By default, it begins with Level 1 in the “Schematic tools” section, from where we can always know which level we are using. If we click on the drop-down we can change the current level from 1 to 9. The main topics are formatted in Title 1, the subtopics in Title 2, and so on. On each side of the level we find arrows. The simple arrow on the right allows to decrease a level or with the double date to demote a level as body text.
Just below we have the buttons that will allow us to organize the different elements. With down and up arrows it will be possible to move them in the direction we need so that we can rearrange them without problem. With the plus (+) and minus (-) signs we can expand and group levels so that the scheme is not too long, so that we can expand it when we need them.
On the right we find the “Show level” tool, from which, as its name indicates, we can see the different levels , hiding the rest. For example, if we choose level 5, we will see 1, 2, 3, 4 and 5, with the rest being hidden, from 6 to 9. We also find the option to “Show text format”, which we can uncheck if we prefer to see the scheme with a simpler appearance. Also, we can check the box “Show only the first line”, in case we have long elements within the different levels and we only want to see the first line.
Master documents
From this second section that we find on the right side, we can include subdocuments by clicking on the “Show documents” button so that we can expand the available options ribbon.
If we click on “Create” to obtain a new document or on “Insert” to add a saved file. Once added, all you have to do is press the “Collapse” subdocuments button to group all its content and show only one link to it. Later the name of the button will change to “Expand subdocuments” to carry out the opposite action that allows us to see all the content.
Among the rest of the options we find “Unlink”, which is responsible for removing the link from the subdocument to copy the text in the original document. With “Combine” we can merge the content of each subdocument in the first subdocument. We also find the option to “Divide”, to be able to separate the content of a subdocument in several documents. Finally, the option to “Lock document” will help us to prevent changes from being made.
As soon as we want to exit the outline view, we can close it at any time by pressing the Close Outline view button, which we find within the “Close” section in the last block on the right. By doing this we can see the default view of the document at any time.
MS-Word / General Formatting
Working with Outlines
Word has built-in outlining tools that are handy whether you like to create
detailed outlines in advance or you just want to check occasionally on the
overall structure of your document to see how it’s evolving. If you use Word to
create reports or proposals or other types of documents that have a sense
of structure to them, you owe it to yourself to find out the basics of working with outlines.
Switching to Outline view
You have two ways to switch to Outline view. You can
- Click the Outline button in the Document Views group on the View tab on the Ribbon.
- Click the Outline button that’s second from the right in the group of buttons
next to the Zoom slider in the lower-right area of the screen.
Understanding Outline view
The key to understanding Word’s Outline view is realizing that an outline
is just another way of looking at a document. The outline isn’t a separate
entity from the document. Instead, when you switch to Outline view, Word
presents the headings from your document in the form of an outline. Any
changes you make to your document while in Outline view automatically
reflect in the document when you return to Print Layout view, and any
changes you make in Print Layout view automatically appear when you
switch to Outline view. The reason is that Print Layout and Outline view are
merely two ways of displaying the contents of your document.
Note some important concepts about Outline view:
- The outline is made up of the headings and body text of the document.
Any paragraph formatted with a built-in heading style (Heading 1,
Heading 2, or Heading 3, for example) is considered to be a heading; any
other paragraph is considered body text. - When you switch to Outline view, a new tab appears on the Ribbon,
and the ruler (which isn’t needed in Outline view) disappears. This tab,
appropriately named the Outlining tab, contains buttons for performing
routine outlining tasks. - When you first switch to Outline view, your document may not appear
dramatically different from the way it does in Print Layout view. In the
following sections, you see how you view your document quite differently
in Outline view from the way you view it in Print Layout view. - While Word is in Outline view, you can type new text or edit existing text
just as you do in Print Layout view. You can also apply character formatting,
such as bold or italic, and you can apply styles to paragraphs.
However, it’s best not to apply direct paragraph formats, such as indentation,
tab stops, and alignment in Outline view, because you can’t see the results of those changes there. (They show up when you switch back to Print Layout view.)
Outline view has its own set of keyboard shortcuts to help you move things along.
Keyboard Shortcuts for Outline View
Keyboard Shortcut 		What It Does
Ctrl+Alt+O 		Switches to Outline view
Ctrl+Alt+P 		Switches back to Print Layout view
Ctrl+Alt+N 		Switches back to Draft view
Alt+Shift+A 		Collapses or expands all text
Alt+Shift+- 		(hyphen) Collapses the selection
Alt+Shift++ 		(plus) Expands the selection
Alt+Shift+1 		Collapses or expands to Heading 1
Alt+Shift+(number) 	Collapses or expands to specified
                        heading level
/ (on numeric keypad) 	Hides or shows formatting
Shift+Tab 		Promotes selection
Alt+Shift+← 		Promotes selection
Tab 			Demotes selection
Alt+Shift+→		Demotes the selection
Ctrl+Shift+N 		Demotes selection to body text
Alt+Shift+↑ 		Moves selection up, similar to cutting
                                and pasting it
Alt+Shift+↑		Moves selection down, similar to cutting
                                and pasting it
Showing and hiding formatting
Before you spend too much time working in Outline view, you may want
to hide the formatting from the outline so that you can concentrate more
closely on the document’s structure. Hiding the formatting in Outline view
doesn’t remove the formatting from your text; it just temporarily hides it.
To show the text formatting in the outline, select the Show Text Formatting check box.
Keep these tips in mind when using the Show Text Formatting check box:
- To hide formatting, deselect the Show Text Formatting check box.
- You need no formatting to distinguish among heading levels because the
headings are indented for you. I usually work in Outline view with formatting turned off. - When you hide formatting, you’re doing just that — hiding it. You’re not
removing it. When you deselect the Show Text Formatting check box or
return to Print Layout or Draft view, all the formatting you so carefully applied to your document is restored.
Collapsing and expanding the outline
One main reason for working in Outline view rather than in Print Layout or
Draft view is so that you can get a handle on the overall structure of your
documents. The secret is in collapsing a document’s outline so that the portions
of your document you’re not interested in are hidden.
The Outline Tools group includes a Show Level drop-down list that lets you
collapse or expand the entire outline to a specific heading level. For example,
if you want to see just the top two heading levels (paragraphs formatted
with the Heading 1 or Heading 2 style), select Level 2 in the Show Level dropdown list.
Here are some important features to note about working with collapsed text in Outline view:
- Some headings have fuzzy lines under them, to represent collapsed body text.
- Each heading in Outline view has a large plus sign or minus sign next to
it. Headings with plus signs have other headings or body text subordinate
to them. Headings with minus signs do not.
You can double-click the plus and minus signs to show and hide text. - If you’re good with keyboard shortcuts, keep in mind that pressing
Alt+Shift+A quickly toggles between Show Level 9 and Show All Levels.
This handy shortcut quickly shows or hides all body text in an outline.
Promoting and demoting paragraphs
To promote a paragraph means to move it up one level in the outline. If you
promote a Heading 2 heading, it becomes a Heading 1 heading. You do this
by placing the insertion point on the line you want to promote and clicking
the Promote button in the Outline Tools group on the Outlining tab on the
Ribbon. You can’t promote a Heading 1 paragraph; it’s already as high as it
can get. If you promote a body text paragraph, it becomes a heading paragraph
at the same level as the heading it is subordinate to. Thus, if you promote
a body text paragraph that follows a Heading 2, the body text paragraph becomes a Heading 2.
To demote a paragraph is to move the paragraph down one level in the outline.
You demote a paragraph by placing the insertion point on the line you
want to demote and clicking the Demote button in the Outline Tools group
on the Outlining tab on the Ribbon. If you demote a Heading 1 heading, it
becomes a Heading 2 heading. Demote the heading again, and it becomes
Heading 3. You cannot demote a body text paragraph, but you can demote
any heading to a body text paragraph.
Tip: You can drag and drop collapsed sections in Outline view to rearrange them.
The body text paragraphs that fall under the heading always go along for the
ride. You don’t need to worry about losing a heading’s body text.
Printing an outline
You can’t directly print an outline from Word. You can display the outline
onscreen, and it seems like it might print, but when you print it, the entire
document prints, not just the Outline view. (Here’s a clue: when you choose
File → Print and check out the preview, it shows the entire document.) That’s
because Word prints based on the document itself, not based on the view you are using.
Here’s a workaround: Generate a table of contents that includes all the heading
levels, and then print just the page(s) of the document that contain the TOC.
In this post, you’ll learn about the feature called Outline in Microsoft Word and how this option can help the users in their Word document.
Outlining in Word
The Outline view in word helps you arrange your text. It creates an outline based on the styles you use. It helps in organizing the headings and subheadings of your article
How to Enable Outline View in Word?
Follow the below steps to enable Outline View in Word.
- Click the View tab.
- Click the Outline button in the Views group.
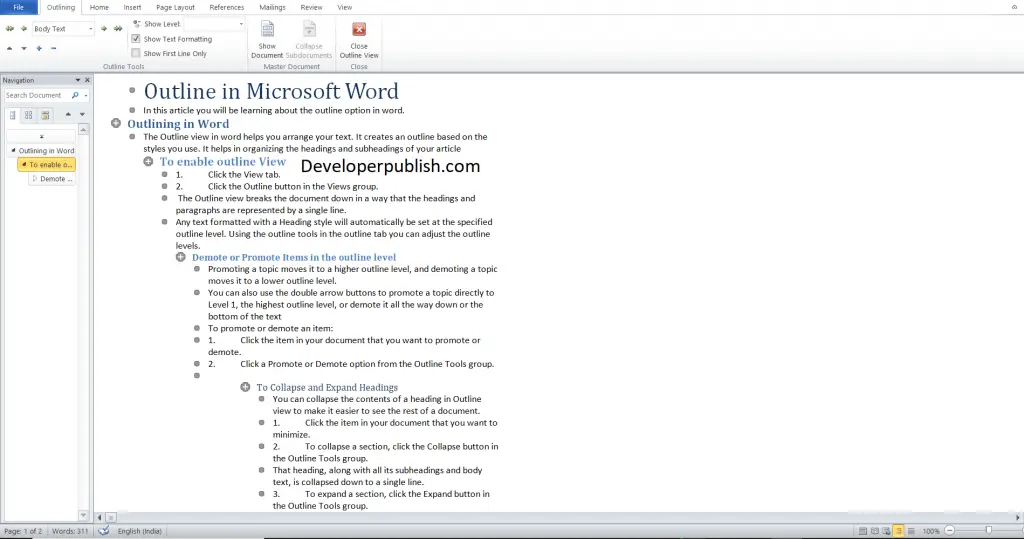
The Outline view breaks the document down in a way that the headings and paragraphs are represented by a single line.
Any text formatted with a Heading style will automatically be set at the specified outline level. Using the outline tools in the outline tab you can adjust the outline levels.
How to Demote or Promote Items in the outline level?
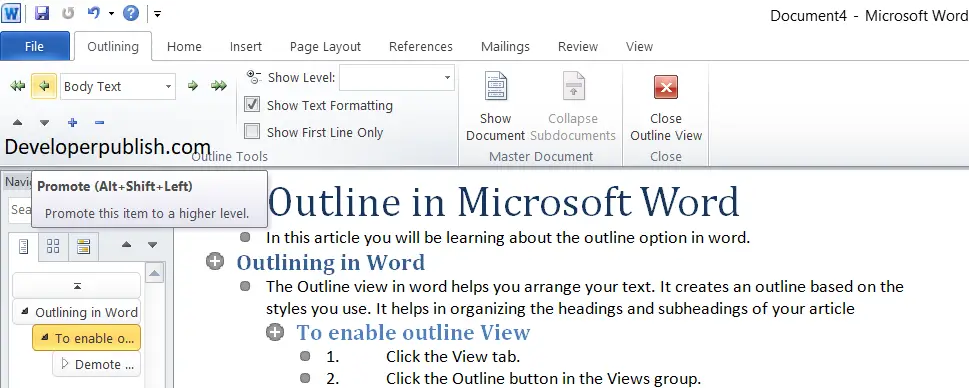
Promoting a topic moves it to a higher outline level, and demoting a topic moves it to a lower outline level.
You can also use the double arrow buttons to promote a topic directly to Level 1, the highest outline level, or demote it all the way down or the bottom of the text.
To promote or demote an item:
- Click the item in your document that you want to promote or demote.
- Click a Promote or Demote option from the Outline Tools group.
How to Collapse and Expand Headings in Word ?
You can collapse the contents of a heading in Outline view to make it easier to see the rest of a document.
- Click the item in your document that you want to minimize.
- To collapse a section, click the Collapse button in the Outline Tools group.
That heading, along with all its subheadings and body text, is collapsed down to a single line.
- To expand a section, click the Expand button in the Outline Tools group.
That section is expanded once again, displaying all the subheadings and body text.
Microsoft Word is one of the most used programs around the world on a daily basis. Millions of people use it, both for their work and for their studies. It is a program where we have a multitude of functions, which make it a very versatile tool. Among the functions available in Word we have the possibility of making an outline.
This is something that may be necessary on many occasions, although many users don’t know how to make an outline in Microsoft Word. If you have doubts about the way in which you can do this, then we will tell you how it is possible to do one. Since this is something that you may need at some point, when you have to deliver a project or work.
As we said, Word is a very versatile program, where we have many functions available. Among them we find this possibility of creating all kinds of schemes, something that can undoubtedly be very helpful in some work or project that we have to deliver, it can contribute to a better visualization of the data or the levels that are in it. . We also tell you how we can create a concept map in a document, something that may also interest many users in Word.
Related article:
The most useful keyboard shortcuts for Word
Aspects to consider
An outline is something that will allow us to have a structured summary of the content of a document that we are creating in the office suite. As with the index, the document will have to be organized in levels, which can be divided into a few main points. This scheme in Word is something that we can use whenever we want, although it is something that may be of special interest or use in documents that are very extensive.
Something that generates doubts among many users is when to use this scheme. If it is better to do it before writing the entire document or if it is just better to do it later. In the case of doing it before writing, this outline is something that can be used as a kind of guide to write the document in question in Word. So it can be helpful to see the points we want to develop, if we have already thought or prepared them. It is also possible to do this at the end, when we have finished writing that document, because we already have the contents and points of the document in front of us. So for some it may be more comfortable.
Thus, when to introduce this scheme is something every user should consider. Both options are going to be equally valid, so it is more a matter of preferences for each one when writing, if you want to have the outline as a guide or if you want to add it at the end. The steps that we are going to do in any case are the same.
Related article:
How to make a plan in Word: step by step
Create outline in Word
In many cases, this scheme is entered in Word at the end, once the document has been written. The advantage here is that we can see now the levels that we have created in this document, so it may be more comfortable for many users. Although it does not matter when it is done, since the steps to follow will be the same. The steps we have to follow in this case are the following:
- Open the document in Word where you want to enter that outline.
- Place yourself at the point in the document where you are going to put this outline.
- Go to the View menu at the top.
- Look for the Scheme option.
- Click on it.
- The text is already displayed in the outline format. Now we have to write the titles that we are going to use in the document, and then assign the level that corresponds to each of them.
- If you had already created the text, then assign the levels. Word normally assigns that level based on the type of heading you’ve used, so we applied the level manually in this case.
With these steps we have created this scheme in Word, as you will have already seen in the document itself. Each user will be able to choose the type of scheme to use, in addition to assigning the levels to their liking, so this will depend on the type of document that you have created. Although in all cases this scheme is intended to be a way of summarizing information, which helps to better understand or read this document in the office suite.
Create a concept map
In reality we have different types of schemes, such as the conceptual map. Many people may want to have one of these in their Word document. The good news is that this is possible, so if a concept map is something you find more interesting or think works better visually in a Word document, then you can create that too. The document editor gives us this possibility.
The Concept Map allows us to draw arrows between one box and another. The process of creating this type of scheme is somewhat longer, because it is a somewhat more complex design, although we obtain good results, with a design that is visually very interesting. These are the steps we have to follow to do it:
- Open the Word document in question.
- Place yourself at the point where you want to enter this outline.
- Go to the Insert section at the top of the screen.
- Choose the Shapes option.
- Choose the shape you would like to use on your map.
- Hold down on the shape and choose its size.
- Select the color of the background, shape outline, or shape fill.
- Right click on this shape with the mouse.
- In the drop-down menu choose the Add text option.
- Choose the format of the text.
When we have created the first box of this concept map, we just have to repeat this process, until we have all the ones we need in this concept map. The best thing is to copy the rectangle in question and place it elsewhere, so that little by little we create this map that we are going to use in the Word document. We will only have to change the text, or change the color of this box, as a way to show the various levels within it, for example.
The process itself is not complicated, but it is somewhat longer, as you can see. While a concept map is a good alternative to a traditional outline in Word. In addition, for many users it is something that works better visually, so it is worth carrying out this process. Once this is done, we can add the braces that end this concept map. This is the way it is done:
- Go to the Insert in the document section.
- Go to Shapes.
- Choose the key you want to use.
- Insert the key into the concept map.
- Adjust the size at each level.
- Paste the key in all cases where it should be.
If you have created a concept map that you like, the best you can do is to save this design in a document, so that you will use it in the future in others. Thus, you will only have to change the name in each box or the colors, but the longest part has already been completed in this way. It will allow you to save time in this sense, every time you are going to use one in a document.
Templates
Of course, we don’t always have to create an outline or concept map ourselves in Word. We also have at our disposal a large number of templates, which we will be able to use in these cases. Using a template is not a bad thing, since it saves us time in the creation process and we also know that we already have a suitable design, which is a scheme or map that we can already use in this Word document, because ready.
We met with web pages where we have templates available for all kinds of elements in Word. So we also find schematic templates or conceptual maps that we can use in our case. In addition, we have many designs available in this regard, so it will only be a matter of choosing the design that we consider best fits the document that we are writing in this case.
When using a template, the only thing we are going to have to do is introduce the titles or texts that we want to use in this scheme. That is, the names of the levels that we have in the document. So the process is simpler, as it is simply a title or level that we are going to have to enter in it. So if you think that creating an outline in Word is something complex, or you just don’t want to get down to it, you can resort to templates. A good website in this sense is Smile Template, where we have many available designs that will help us in this regard, we can find a scheme that we are going to use in the document.
The content of the article adheres to our principles of editorial ethics. To report an error click here!.



 Text Effects.