
This article is for people with visual or cognitive impairments who use a screen reader program such as Microsoft’s Narrator, JAWS, or NVDA with Microsoft 365 products. This article is part of the Microsoft 365 screen reader support content set where you can find more accessibility information on our apps. For general help, visit Microsoft Support home.
Use Word with your keyboard and a screen reader to quickly do all essential basic tasks, such as open, create, and read a document or add page numbers. We have tested it with Narrator, JAWS, and NVDA, but it might work with other screen readers as long as they follow common accessibility standards and techniques.
Notes:
-
New Microsoft 365 features are released gradually to Microsoft 365 subscribers, so your app might not have these features yet. To learn how you can get new features faster, join the Office Insider program.
-
To learn more about screen readers, go to How screen readers work with Microsoft 365.
In this topic
-
Open Word
-
Sign in to your Microsoft account
-
Open a recent document
-
Create a new blank document
-
Save a document
-
Read a document
-
Apply styles
-
Navigate by headings
-
Search a document
-
Add page numbers
-
Print documents
-
Change the app theme to increase contrast
Open Word
-
Press the Windows logo key, type word, and then press Enter. Word opens.
You can now start a new blank document to add your text and other content or create your document using a template with predesigned formatting. For instructions, refer to Create a new blank document or Use a screen reader to work with templates in Word.
Sign in to your Microsoft account
Sign in to your Microsoft account to get the most out of the Word features and to take your documents with you wherever you go. You can also open Word without signing in.
Note: If you are using an account in an organization, the sign-in steps might be slightly different. For example, you might need to use a PIN or smartcard to complete the sign-in.
Tip: If you did not sign out of Word the last time you used it, the app opens without prompting you to sign in.
-
Do one of the following:
-
Open Word. Press the Tab key until you hear «Sign in to get the most out of Microsoft 365,» and then press Enter.
-
If you’re already editing a document and want to sign in, press Alt+F to open the File menu. Then press D, S. You hear: “Accounts.”
-
-
Type your email or phone number, press Enter, and then press the Tab key. You hear: “Password.”
-
Type your password, and press Enter.
Open a recent document
All documents you have recently worked on can be found in one place so you can quickly pick up where you left off.
-
Do one of the following:
-
Open Word, and then press Shift+Tab until you hear the name of a recent document.
-
If you’re already editing a document and want to open another one, press Alt+F to open the File menu, and then press Shift+Tab until you hear the name of a recent document.
-
-
Press the Up or Down arrow key until you hear the name of the document you want, and press Enter to open it.
Create a new blank document
-
Do one of the following:
-
Open Word. The focus is on the option to create a new, blank document and you hear: «Blank document.»
-
If you’re already editing a document and want to start a new one, press Alt+F to open the File menu, and then press the Tab key until you hear: «Blank document.»
-
-
To select and open the blank document, press Enter. You hear the default name of the document, followed by «Editing.» The focus moves to the editing area in the document body.
You can now start adding text and other content to the document. For instructions on how to insert and format text in a document, refer to Use a screen reader to insert and change text in Word.
Save a document
Word automatically saves your document to OneDrive or SharePoint when AutoSave is turned on. For instructions on how to turn on AutoSave, refer to Turn on AutoSave.
If AutoSave is not turned on or if you want to save the document with another name, to another location, or using another format, you can save your document manually to your computer, for example. For instructions, refer to Save a document locally. Alternatively, you can manually save your document to an online location. For instructions, refer to Save a document to OneDrive or SharePoint.
For instructions on how to save a document as a PDF, refer to Save a document as a PDF.
For instructions on how to use other saving options, refer to Use a screen reader to save a document in Word.
Read a document
To use the text reading keyboard shortcuts, place the focus to the document body area.
-
To start reading from where your cursor is with Narrator, press the SR key+Ctrl+R or the SR key+Down arrow key. With JAWS, press the SR key+Page up. With NVDA, press the SR key+Down arrow key.
-
To read the current page with Narrator, press the SR key+Ctrl+I.
-
To read the current paragraph with Narrator, press the SR key+Ctrl+K. With JAWS, press Ctrl+5 on the numeric keypad.
-
To read the next line with Narrator, press the SR key+O. With JAWS and NVDA, press the Down arrow key.
-
To read the previous line with Narrator, press the SR key+U. With JAWS and NVDA, press the Up arrow key.
-
To read the next word with Narrator, press the SR key+L or SR key+Ctrl+Right arrow key. With JAWS, press the SR key+Right arrow key. With NVDA, press Ctrl+Right arrow key.
-
To read the previous word with Narrator, press the SR key+J or SR key+Ctrl+Left arrow key. With JAWS, press the SR key+Left arrow key. With NVDA, press Ctrl+Left arrow key.
-
To stop reading, press Ctrl.
For the detailed lists of the keyboard shortcuts for reading text, refer to the user guidance of your screen reader. With Narrator, refer to Chapter 4: Reading text. With JAWS, refer to JAWS Reading Commands. With NVDA, refer to NVDA User Guide.
Apply styles
Use the built-in styles to give your document a consistent look. Using styles can also improve the accessibility and usability of your document. Use the built-in heading styles if you want to insert a table of contents to the document.
-
Place the cursor where you want to apply a style to.
-
To open the Styles menu, press Alt+H, L.
-
Use the arrow keys to browse the list of available styles.
-
When you hear the style you want, press Enter to apply it to your document.
Navigate by headings
If you’ve used the heading styles in your document, you can use the Navigation Pane to quickly move from heading to heading.
-
To turn on the Navigation Pane, press Alt+W, K. You hear: «Navigation, Search document.»
-
Press the Tab key until you hear the currently selected tab, for example, «Pages.» Press the Left arrow key until you hear «Headings.»
-
Press the Tab key or Shift+Tab to browse the list of headings. Your screen reader announces the headings as you move.
-
To move to the heading in the document body, press Enter. The focus moves to the beginning of the heading row.
Search a document
Use search to quickly find a certain word or element such as a graphic in your document.
Search for a word
-
Press Ctrl+F. You hear: «Navigation, Search document.»
-
Type your search words. The list of search results is updated as you type.
-
Press the Tab key until you hear «Search results list,» followed by the first search result.
-
Press the Down arrow key to move through the list of results. Your screen reader announces the results.
-
When you hear the search result you want, press Enter to move the focus to the document body where the searched word can be found.
Search for an element
Search for a specific element, for example, a graphic, table, or comment from a specific person.
-
Press Ctrl+F. You hear: «Navigation, Search a document.»
-
Press the Tab key until you hear «Search, split button,» and then press Alt+Down arrow key to expand the menu.
-
Press the Down arrow key until you hear the element you want, for example, «Graphic,» and then press Enter to select.
If the element has a submenu, you hear the element, followed by «Collapsed, menu item.» Press the Right arrow key to expand the menu, and then press the Up or Down arrow keys to browse the submenu.
-
The focus moves to the next result button. Press Enter repeatedly to move through the results.
Add page numbers
-
Press Alt+N, N, U. You hear: «Top of page.» The Page Number menu opens, and the focus is on the first option.
-
To browse the menu, press the Down arrow key until you hear the option you want, and then press Enter. A list of page number styles opens.
-
Press the Down arrow key until you hear the option you want, and then press Enter.
-
If you chose to add the page numbers at the top or bottom of the page, or in the page margin, the Header or Footer pane opens. To exit the pane and return to the document editing mode, press Esc.
Print documents
If you need hard copies of your Word documents, you can easily print them. If you don’t have immediate access to a printer, you can print the document to PDF and save it on your computer.
Print a document using a printer
-
Press Ctrl+P. The Print dialog box opens. Do one of the following:
-
To print with the default settings, press Enter.
-
To change the print settings, press the Tab key to move through the options. To open an options list, press Spacebar. To move in an options list, press the arrow keys. To select an option, press Enter. To print with the new settings, press the Tab key until you hear «Print button,» and then press Enter.
-
Print a document to PDF
-
Press Ctrl+P. The Print dialog box opens.
-
Press the Tab key until you hear «Printer, Which printer,» and press Spacebar to expand the Printer menu. Press the Up or Down arrow key until you hear «Microsoft, Print to PDF,» and press Enter.
-
Press Shift+Tab until you hear «Print button,» and press Enter.
-
The Save Print Output As dialog box opens. The focus is on the File name text field. Type a name for your document. Then use the Tab key and the arrow keys to navigate to the location where you want to save the print output. When you’re on the right location, press Alt+S to save the file as a PDF.
Change the app theme to increase contrast
You might find Word easier to use if you adjust the theme to one that provides more contrast.
Note: Changing the app theme affects all your Microsoft 365 applications.
-
In Word, press Alt+F, D, Y, and then 2. The focus moves to the Office Theme list in the File menu. You hear “Office theme,” followed by the currently selected theme.
-
Press the Down arrow key until you find the theme you want, and press Enter. For the highest contrast, select Dark Gray.
-
To exit the Files menu and return to the document body, press Esc.
See also
Use a screen reader to insert and change text in Word
Use a screen reader to insert a picture or image in Word
Use a screen reader to check spelling and grammar in Word
Keyboard shortcuts in Word
Keyboard shortcuts for the File menu in Microsoft 365 for Windows
Set up your device to work with accessibility in Microsoft 365
Use a screen reader to explore and navigate Word
Use Word for Mac with your keyboard and VoiceOver, the built-in Mac OS screen reader, to quickly do all essential basic tasks, such as open, create, and read a document or add page numbers.
Notes:
-
New Microsoft 365 features are released gradually to Microsoft 365 subscribers, so your app might not have these features yet. To learn how you can get new features faster, join the Office Insider program.
-
This topic assumes that you are using the built-in macOS screen reader, VoiceOver. To learn more about using VoiceOver, go to VoiceOver Getting Started Guide.
-
We recommend you read and edit documents in Print Layout View. VoiceOver might not work reliably in other view modes.
In this topic
-
Open Word for Mac
-
Sign in to your Microsoft account
-
Open a recent document
-
Create a new blank document
-
Save a document
-
Read a document
-
Navigate by headings
-
Search a document
-
Add page numbers
-
Print documents
Open Word for Mac
-
To go to the Applications list in Finder, press Shift+Command+A.
-
Type M to go straight to applications that start with an «M,» and then press the Tab key until you hear: «Microsoft Word application.»
-
To open Word for Mac, press Command+Down arrow key.
You can now start a new blank document to add your text and other content or create your document using a template with predesigned formatting. For instructions, refer to Create a new blank document or Use a screen reader to work with templates in Word.
Sign in to your Microsoft account
Sign in to your Microsoft account to get the most out of the Word for Mac features and to take your documents with you wherever you go. You can also open Word without signing in.
Note: If you are using an account in an organization, the sign-in steps might be slightly different. For example, you might need to use a PIN or smartcard to complete the sign-in.
Tip: If you did not sign out of Word the last time you used it, the app opens without prompting you to sign in.
-
Do one of the following:
-
Open Word for Mac.
-
If you’re already editing a document and want to sign in, press Shift+Command+P. You hear: «New from template.»
-
-
You land in the templates view. Press the Tab key until you hear: «Sign in, account settings, menu button.»
-
Press Spacebar. The Sign in dialog box opens. You hear: “Type your email or phone number.”
-
Type your email or phone number, and then press Return. VoiceOver announces: “Password, secure edit text.”
-
Type your password, and press Return. If you hear “Start using Word button,” press Spacebar to go to the application.
Open a recent document
All documents you have recently worked on can be found in one place so you can quickly pick up where you left off.
-
Do one of the following:
-
Open Word for Mac.
-
If you’re already editing a document and want to open another one, press Shift+Command+P. You hear: «New from template.»
-
-
You land in the templates view. Press the Tab key until you hear «Recent, radio button,» and then press Control+Option+Spacebar to open the Recent list.
-
Press the Tab key until you hear “Entering recent files table,” followed by the name and details of the first document in the list. If the first document is not the one you want, press the Down arrow key until you find the right one.
-
Press Return to open the selected document.
Create a new blank document
-
Do one of the following:
-
Open Word for Mac.
-
If you’re already editing a document and want to start a new one, press Shift+Command+P. You hear: «New from template.»
-
-
Press the Tab key until you hear: “Entering collection, collection one item selected, blank document.”
-
Press Control+Option+Shift+Down arrow key, and then press Control+Option+Spacebar. The blank document opens, and the focus moves to the editing area in the document body.
You can now start adding text and other content to the document. For instructions on how to insert and format text in a document, refer to Use a screen reader to insert and change text in Word.
Save a document
Word automatically saves your document to OneDrive or SharePoint when AutoSave is turned on.
For instructions on how to save a copy of a document to your computer or as a PDF, refer to Use a screen reader to save a document in Word.
Read a document
To use the text reading commands, the focus must be in the document body area.
-
To read all text from the cursor location to the end, press Control+Option+A.
-
To read the current paragraph, press Control+Option+P.
-
To read the next or previous line, press the Down or Up arrow key.
-
To read the next or previous word, press the Right or Left arrow key.
For the detailed list of keyboard shortcuts for reading text, refer to Chapter 4. Working with Text.
Navigate by headings
If you’ve used the heading styles in your document, you can use the Navigation Pane to quickly move from heading to heading.
Turn on the Navigation Pane
-
Press Command+F6 until you hear the name of the current tab, for example, «Home, selected, tab.»
-
Press Control+Option+Right arrow key until you hear «View, tab,» and then press Control+Option+Spacebar.
-
Press the Tab key until you hear «Navigation pane, toggle button,» and then press Control+Option+Spacebar to turn on the pane.
Use the Navigation Pane
-
To move the focus to the navigation pane, press Command+F6 until you hear: «Thumbnails pane, selected.»
-
Press Control+Option+Right arrow until you hear «Document map, tab,» and then press Control+Option+Spacebar to open the document map.
-
Press Control+Option+Right arrow key until you hear «Table,» and then press Control+Option+Shift+Down arrow key to open the headings table.
-
To move between headings, press the Down or Up arrow keys until you find the heading you want, and then press Control+Option+Spacebar to move the focus to the beginning of the heading in the document body.
Search a document
Use search to quickly find a certain word or element such as a graphic in your document.
Search for a word
-
Press Shift+Command+H. You hear: «Search document, combo box.»
-
Type your search word. The list of search results is updated as you type.
-
Press the Tab key until you hear «Matches, result,» and then press Control+Option+Down arrow key to move the focus to the results list.
-
To move through the list of search results, press the Up or Down arrow key.
-
When you hear a search result that you want to modify in the document, press the Tab key to move the focus to the document body and make your changes.
Search for an element
-
Press Shift+Command+H. You hear: «Search document, combo box.»
-
To open the search menu, press the Down arrow key.
-
Press the Down arrow key until you hear the element you want, for example, «Graphic,» and then press Spacebar. The matching elements are highlighted in the document.
-
To move the focus back to the document body, press the Tab key until VoiceOver starts to read the document content.
Add page numbers
-
Press Command+F6 until you hear the name of the current tab, for example, «Home, selected, tab.»
-
Press Control+Option+Right arrow key until you hear «Insert, tab,» and then press Control+Option+Spacebar.
-
Press the Down arrow key until you hear «Page numbers, menu button,» and then press Control+Option+Spacebar. You hear: «Page number.» Press Control+Option+Spacebar.
-
The Page Numbers dialog box opens. The focus is on the Position menu. To set the position of the page number on the page, press the Down arrow key until you hear the option you want, and then press Spacebar.
-
To set the alignment of the page number, press the Tab key until you hear the current alignment, followed by «Alignment.» Press the Down arrow key until you hear the option you want, and then press Spacebar.
-
Press the Tab key until you hear: «Show number on first page, checked checkbox.» If you don’t want the page number to show on the first page of your document, press Spacebar.
-
To add the page numbers to the document, press the Tab key until you hear «OK button,» and then press Control+Option+Spacebar. The page numbers are added, and the focus moves to the document body.
Print documents
If you need hard copies of your Word documents, you can easily print them. If you don’t have immediate access to a printer, you can print the document to PDF and save it on your computer.
Print a document using a printer
-
Press Command+P. The Print dialog box opens. Do one of the following:
-
To print with the default settings, press the Tab key until you hear «Print button,» and press Control+Option+Spacebar.
-
To change the print settings, press the Tab key to move through the options. To open an options list, press Spacebar. To move in an options list, press the arrow keys. To select an option, press Control+Option+Spacebar. To print with the new settings, press the Tab key until you hear «Print button,» and then press Control+Option+Spacebar.
-
Print a document to PDF
-
Press Command+P. The Print dialog box opens.
-
Press the Tab key until you hear «PDF menu button,” and press Control+Option+Spacebar. Press the Down arrow key until you hear «Save as PDF,» and press Control+Option+Spacebar.
-
You hear “Save As,” followed by the document name. Press the Tab key until you hear “Where,” and press Control+Option+Spacebar.
-
Press the Up or Down arrow key until you hear the location where you want to save the print output, and then press Control+Option+Spacebar.
-
Press the Tab key until you hear “Save button,” and press Control+Option+Spacebar to save the file as a PDF.
See also
Use a screen reader to insert and change text in Word
Use a screen reader to insert a picture or image in Word
Use a screen reader to check spelling and grammar in Word
Keyboard shortcuts in Word
Set up your device to work with accessibility in Microsoft 365
Use a screen reader to explore and navigate Word
Use Word for iOS with VoiceOver, the built-in iOS screen reader, to do all essential basic tasks, such as open, create, and read a document or add page numbers.
Notes:
-
New Microsoft 365 features are released gradually to Microsoft 365 subscribers, so your app might not have these features yet. To learn how you can get new features faster, join the Office Insider program.
-
This topic assumes that you are using the built-in iOS screen reader, VoiceOver. To learn more about using VoiceOver, visit Apple accessibility.
-
We recommend you read and edit documents in Print Layout View. VoiceOver might not work reliably in other view modes.
In this topic
-
Open Word for iOS
-
Sign in to your Microsoft account
-
Open a recent document
-
Create a new blank document
-
Save a document
-
Read a document
-
Search a document
-
Add page numbers
-
Print documents
Open Word for iOS
-
On your iPhone, locate the button for the Word for iOS app, and double-tap the screen. Word opens with the focus on the New tab.
You can now start a new blank document to add your text and other content or create your document using a template with predesigned formatting. For instructions, refer to Create a new blank document or Use a screen reader to work with templates in Word.
Sign in to your Microsoft account
Sign in to your Microsoft account to get the most out of the Word for iOS features and take your documents with you wherever you go. You can also open Word without signing in.
Note: If you are using an account in an organization, the sign-in steps might be slightly different. For example, you might need to use a PIN or smartcard to complete the sign-in.
Tip: If you did not sign out of Word the last time you used it, the app opens without prompting you to sign in.
-
Do one of the following:
-
Open Word for iOS.
-
If you’re already editing a document and want to sign in, swipe left or right until you hear «Close file,» and then double-tap the screen. If you have unsaved changes, you’re prompted to save your document. For instructions on how to save a document, refer to Use a screen reader to save a document in Word.
-
-
Swipe left until you hear «Signed out, Navigation pane, button,» and then double-tap the screen.
-
You hear: «Sign in.» Double-tap the screen. Tap near the top of the screen with four fingers and swipe right until you hear: «Email, phone, or Skype, text field, required.»
-
Double-tap the screen, and then use the on-screen keyboard to type your email address, phone number, or Skype address.
-
Tap near the top of the screen with four fingers, swipe right until you hear «Next button,» and double-tap the screen. You hear «Enter password» or «Secure text field.»
-
Double-tap the screen, and then use the on-screen keyboard to type your password.
-
Tap near the top of the screen with four fingers, swipe right until you hear «Sign in,» and double-tap the screen.
Open a recent document
All documents you have recently worked on can be found in one place so you can quickly pick up where you left off.
-
Do one of the following:
-
Open Word for iOS. You hear: «New heading.» Tap near the bottom of the screen with four fingers, swipe left until you hear «Home tab,» and then double-tap the screen.
-
If you’re already editing a document and want to open another one, swipe left or right until you hear «Close file,» and then double-tap the screen. If you have unsaved changes, you’re prompted to save your document. For instructions on how to save a document, go to Use a screen reader to save a document in Word. You hear: «Home heading.»
-
-
Swipe right until you hear the name of the document you want, and double-tap the screen to open it.
Create a new blank document
-
Do one of the following:
-
Open Word for iOS. You hear: «New heading.»
-
If you’re already editing a document and want to start a new one, swipe left or right until you hear «Close file,» and then double-tap the screen. If you have unsaved changes, you’re prompted to save your document. For instructions on how to save a document, go to Use a screen reader to save a document in Word. You hear: «Home heading.» Tap near the bottom of the screen with four fingers, swipe right or left until you hear «New tab,» and double-tap the screen. You hear: «New heading.»
-
-
Swipe right until you hear «Blank document,» and double-tap the screen. The new blank document opens. The focus is on the document body. You hear: «Page one content.» The on-screen keyboard opens.
You can now start adding text and other content to the document. For instructions on how to insert and format text in a document, refer to Use a screen reader to insert and change text in Word.
Save a document
Word automatically saves your document to OneDrive or SharePoint when AutoSave is turned on.
For instructions on how to save a copy of a document to your phone or as a PDF, refer to Use a screen reader to save a document in Word.
Read a document
To use the text reading gestures in the Editing view, place the focus to the document body area.
-
To read all text on a page, swipe right until you hear «Page,» followed by the current page number and «Content,» for example, «Page one, Content.» VoiceOver starts reading the whole page.
-
To read lines, place one finger on a page and drag it down. VoiceOver reads a line as you land on it.
-
To change how the text is read, activate Rotor, and select, for example, Words or Characters. To read the text one word or character at a time, swipe up or down.
-
To stop reading, tap the screen once with two fingers.
For the detailed list of gestures for reading text, refer to Learn VoiceOver gestures on iPhone.
Search a document
-
Tap near the top of the screen with four fingers, swipe right until you hear «Find button,» and double-tap the screen. You hear: «Search, text field, is editing.» The on-screen keyboard opens.
-
Use the on-screen keyboard to type your search words. VoiceOver announces the number of matches.
-
To move between the search results, tap near the top of the screen with four fingers, swipe right until you hear «Previous search result» or «Next search result,» and then double-tap the screen.
-
To close the Search bar and move the focus to the search result in the document body, use two fingers to swipe a Z gesture. You hear: «Leaving search.»
Add page numbers
-
Tap near the top of the screen with four fingers, swipe right until you hear «Show ribbon,» and double-tap the screen. You hear the currently selected tab, for example, «Home tab.»
-
Double-tap the screen, swipe left or right until you hear «Insert, tab,» and double-tap the screen.
-
Swipe right until you hear «Page numbers, button,» and double-tap the screen.
-
Swipe right you hear the page number option you want, and then double-tap the screen.
-
The header and footer pane opens with the on-screen keyboard activated. If you want to edit the page number, type the new page number. To exit the pane, swipe left or right until you hear VoiceOver read the document content, and then double-tap the screen.
Print documents
Print your Word documents directly from your iPhone to a printer that supports AirPrint. To learn more about AirPrint and the supported printers, refer to Use AirPrint to print from your iPhone, iPad, or iPod touch.
If you don’t have immediate access to a printer, you can print the document to PDF and save it on your phone.
Print a document using a printer
Before you start, make sure that your iPhone and printer are connected to the same Wi-Fi network.
-
Tap near the top of the screen with four fingers, swipe right until you hear «File button,» and double-tap the screen. The File menu opens.
-
Swipe right until you hear «Print button,» and double-tap the screen. You hear: «Air print button.»
-
Double-tap the screen. The Printer Options dialog box opens.
-
Swipe until you hear: «Printer, select printer button.» Double-tap the screen. The list of available AirPrint printers opens. Swipe right until you hear the printer you want to select, and then double-tap the screen.
-
To print using the default settings, in Printer Options menu, swipe right or left until you hear «Print button,» and then double-tap the screen.
Print a document to PDF
-
Tap near the top of the screen with four fingers, swipe right until you hear «File button,» and double-tap the screen. The File menu opens.
-
Swipe right until you hear «Print button,» and double-tap the screen. You hear: «Air print button.»
-
Swipe right until you hear «Open in another app,» and double-tap the screen. You hear the name of the document followed by «PDF document.»
-
Swipe right until you hear «Save to files,» and double-tap the screen.
-
To save the document as a PDF file to your phone, swipe right until you hear «Save button,» and double-tap the screen.
See also
Use a screen reader to insert and change text in Word
Use a screen reader to insert a picture or image in Word
Use a screen reader to check spelling and grammar in Word
Set up your device to work with accessibility in Microsoft 365
Use a screen reader to explore and navigate Word
Use Word for Android with TalkBack, the built-in Android screen reader, to do all essential basic tasks such as open, create, and read a document or add page numbers.
Notes:
-
New Microsoft 365 features are released gradually to Microsoft 365 subscribers, so your app might not have these features yet. To learn how you can get new features faster, join the Office Insider program.
-
This topic assumes that you are using the built-in Android screen reader, TalkBack. To learn more about using TalkBack, go to Android accessibility.
In this topic
-
Open Word for Android
-
Sign in to your Microsoft account
-
Open a recent document
-
Create a new blank document
-
Save a document
-
Read a document
-
Search a document
-
Add page numbers
-
Print documents
Open Word for Android
-
On your phone, locate the button for the Word for Android app, and double-tap the screen. Word opens with the focus on the Recent tab.
You can now start a new blank document to add your text and other content or create your document using a template with predesigned formatting. For instructions, refer to Create a new blank document or Use a screen reader to work with templates in Word.
Sign in to your Microsoft account
Sign in to your Microsoft account to get the most out of the Word for Android features and take your documents with you wherever you go. You can also open Word without signing in.
Note: If you are using an account in an organization, the sign-in steps might be slightly different. For example, you might need to use a PIN or smartcard to complete the sign-in.
Tip: If you did not sign out of Word the last time you used it, the app opens without prompting you to sign in.
-
Do one of the following:
-
Open Word for Android.
-
If you’re already editing a document and want to sign in, swipe left or right until you hear «Back button,» and double-tap the screen. If you have unsaved changes, you’re prompted to save your document. For instructions on how to save a document, go to Use a screen reader to save a document in Word.
-
-
Swipe left until you hear «Sign in,» and then double-tap the screen.
Tip: If you’re prompted to accept terms and conditions, swipe right or left until you hear «Accept,» and then double-tap the screen.
-
You hear: «Get things done on the go, sign in.» Swipe right until you hear «Sign in button,» and double-tap the screen.
-
Swipe right until you hear: «Edit box, Email, phone, or Skype.» Double-tap the screen, and then use the on-screen keyboard to type your email address, phone number, or Skype address. To close the on-screen keyboard, swipe down-then-left.
-
Swipe right until you hear «Next button,» and double-tap the screen. You hear: «Password.»
-
Swipe right until you hear «Editing, password,» double-tap the screen, and then use the on-screen keyboard to type your password. To close the on-screen keyboard, swipe down-then-left.
-
Swipe right until you hear «Sign in,» and then double-tap the screen.
Open a recent document
All documents you have recently worked on can be found in one place so you can quickly pick up where you left off.
-
Do one of the following:
-
Open Word for Android.
-
If you’re already editing a document and want to open another one, swipe left or right until you hear «Back button,» and then double-tap the screen. If you have unsaved changes, you’re prompted to save your document. For instructions on how to save a document, go to Use a screen reader to save a document in Word.
-
-
Swipe right until you hear the name of the document you want, and double-tap the screen to open it.
Create a new blank document
-
Do one of the following:
-
Open Word for Android.
-
If you’re already editing a document and want to create a new one, swipe left or right until you hear «Back button,» and then double-tap the screen. If you have unsaved changes, you’re prompted to save your document. For instructions on how to save a document, go to Use a screen reader to save a document in Word.
-
-
Swipe right until you hear «New button,» and double-tap the screen.
-
Swipe right until you hear «Blank document,» and double-tap the screen.
-
The new document opens. The focus is on the document body, and the on-screen keyboard is displayed. Use the on-screen keyboard to type text in your document. When you have finished, swipe down-then-left to close the keyboard.
For instructions on how to format text in a document, go to Use a screen reader to insert and change text in Word.
Save a document
Word automatically saves your document to OneDrive when AutoSave is turned on.
For instructions on how to save a copy of a document to your phone, refer to Use a screen reader to save a document in Word.
Read a document
To use the text reading gestures in the Editing view, place the focus to the document body area.
-
To read all content on a page, swipe right to move to the first text box, image, or link of the page. TalkBack starts reading the content.
-
To read the next text box, image, or link, swipe right.
-
To change how the text is read, swipe up-then-down or down-then-up until you hear, for example, «Words» or «Characters.» To read the text a word or a character at a time, swipe left or right.
-
To stop reading, tap the screen once with one finger.
For the detailed list of all gestures for reading text, refer to Use the TalkBack menu & reading controls.
Search a document
-
Swipe left or right until you hear «Find button,» and double-tap the screen. You hear: «Editing, find, three periods.» The on-screen keyboard opens.
-
Use the on-screen keyboard to type your search word or phrase. You hear the number of matching instances as you type. To close the on-screen keyboard, swipe down-then-left.
-
To move between the search results, swipe left until you hear «Find previous button» or «Find next button,» and double-tap the screen.
-
To close the Find bar, swipe right or left until you hear «Close Find bar, button,» and then double-tap the screen.
Add page numbers
-
Swipe left or right until you hear «More option button,» and double-tap the screen. You hear: «Tab menu,» followed by the currently selected tab, for example, «Home, selected.»
-
Double-tap the screen. The tab menu opens. Swipe right or left until you hear «Insert tab,» and double-tap the screen.
-
Swipe right until you hear «Page number menu,» and double-tap the screen.
-
Swipe right until you hear the position for the page number you want, and then double-tap the screen.
-
The Header & Footer menu opens. If you want to change the page number options, swipe right until you hear «Page number menu,» and double-tap the screen. Swipe right until you hear the option you want, and then double-tap the screen.
-
To close the Header & Footer menu, swipe left or right until you hear «Close header and footer, button,» and double-tap the screen. To return to the document body, swipe left until TalkBack starts to read the document content.
Print documents
Print your document directly from your Android phone to a Wi-Fi printer. If you don’t have immediate access to a printer, you can print the document to PDF and save it on your computer.
Print a document using a printer
Before you start, make sure your phone and the printer are connected to the same Wi-Fi network.
-
Swipe right or left until you hear «More options menu,» and double-tap the screen.
-
Swipe right until you hear «Print button,» and double-tap the screen.
Note: If this is the first time you’re printing a Word document from your phone, a dialog box opens asking for your permission to connect to an online service that prepares the file for printing. To continue, swipe right until you hear «Allow button,» and double-tap the screen. The printer dialog box opens, and TalkBack announces: «Print dialog.»
-
Swipe left until you hear «Drop-down list, Select a printer,» and double-tap the screen.
-
Swipe left or right until you hear the name of the printer you want, and double-tap the screen. The printer is selected, and the focus moves to the Print dialog box.
-
To print the document, swipe right until you hear «Print document,» and then double-tap the screen. The document is printed, and the focus returns to the document body.
Print a document to PDF
-
Swipe right or left until you hear «More options menu,» and double-tap the screen.
-
Swipe right until you hear «Print button,» and double-tap the screen.
-
Swipe left until you hear «Drop-down list, Select a printer,» and double-tap the screen.
-
Swipe right or left until you hear «Save as PDF,» and double-tap the screen.
-
Swipe right until you hear «Save to PDF,» and double-tap the screen.
-
The Downloads folder in the Files app opens. Swipe right until you hear «Save button,» and double-tap the screen to save the print output as a PDF file.
See also
Use a screen reader to insert and change text in Word
Use a screen reader to insert a picture or image in Word
Use a screen reader to check spelling and grammar in Word
Set up your device to work with accessibility in Microsoft 365
Use a screen reader to explore and navigate Word
Use Word for the web with your keyboard and a screen reader to quickly do all essential basic tasks, such as open, create, and read a document or add page numbers. We have tested it with Narrator in Microsoft Edge and JAWS and NVDA in Chrome, but it might work with other screen readers and web browsers as long as they follow common accessibility standards and techniques.
Notes:
-
If you use Narrator with the Windows 10 Fall Creators Update, you have to turn off scan mode in order to edit documents, spreadsheets, or presentations with Microsoft 365 for the web. For more information, refer to Turn off virtual or browse mode in screen readers in Windows 10 Fall Creators Update.
-
New Microsoft 365 features are released gradually to Microsoft 365 subscribers, so your app might not have these features yet. To learn how you can get new features faster, join the Office Insider program.
-
To learn more about screen readers, go to How screen readers work with Microsoft 365.
-
When you use Word for the web with a screen reader, switch to the full screen mode. Press F11 to toggle the full screen mode on and off.
-
When you use Word for the web, we recommend that you use Microsoft Edge as your web browser. Because Word for the web runs in your web browser, the keyboard shortcuts are different from those in the desktop program. For example, you’ll use Ctrl+F6 instead of F6 for jumping in and out of the commands. Also, common shortcuts like F1 (Help) and Ctrl+O (Open) apply to the web browser – not Word for the web.
In this topic
-
Open Word for the web and sign in
-
Open a recent document
-
Open a document in the full version of Word
-
Switch to the Editing view to make changes
-
Create a new blank document
-
Save a document
-
Read a document
-
Navigate by headings
-
Search a document
-
Add page numbers
-
Print documents
Open Word for the web and sign in
Sign in to Word for the web and take your documents with you wherever you go.
-
In your browser, go to Office.com. The sign-in page opens.
-
Press the Tab key until you hear «Sign-in to your account,» and then press Enter. The Pick an account menu opens.
-
Do one of the following:
-
To use an existing account to sign in, press the Tab key until you hear the account you want, and then press Enter.
-
To add a new account, press the Tab key until you hear «Use another account, button,» and then press Enter. Type your email address, phone number, or Skype address, and then press Enter. Type your password, and press Enter.
-
-
The Microsoft Office Home page opens. Press the Tab key until you hear «App launcher,» and then press Enter.
-
Press the Tab key until you hear «Link, Word,» and press Enter.
-
Word for the web opens. You hear: «Link, create a new blank document.» The focus is on the New blank document button.
You can now start a new blank document to add your text and other content or create your document using a template with predesigned formatting. For instructions, refer to Create a new blank document or Use a screen reader to work with templates in Word.
Open a recent document
All documents you have recently worked on can be found in one place so you can quickly pick up where you left off.
-
Do one of the following:
-
Open Word, and then press the Tab key until you hear «Open,» followed by the name of the recent document you want, and press Enter to open it.
-
If you’re already editing a document and want to open another one, press Alt+Windows logo key+F to open the File menu, and then press Shift+Tab until you hear «Recent,» followed by the name of a recent document. Press the Down arrow key until you hear the name of the document you want, and press Enter to open it.
-
-
Do one of the following:
-
If you hear «Document contents, editing,» you can start adding your content to the document.
-
If you hear «Reading view» or «Not intended for user action» instead of «Document contents, editing,» the document has opened in the Reading view where you can’t make changes. To edit the document, you need to switch to the Editing view. For instructions, refer to Switch to the Editing view to make changes.
-
Open a document in the full version of Word
If you have the full desktop version of Word, it gives you many more options when working with your files. It’s easy to open the full version from Word for the web.
-
Press Alt+Windows logo key+Z, M, and then O. The document opens in the desktop version.
-
Navigate back to Word for the web, and then press Ctrl+W to close the browser tab.
Switch to the Editing view to make changes
Sometimes Word for the web opens a document in the Reading view. Before you can make changes to the document, you need to switch to the Editing view.
-
In the Reading view, press Ctrl+F6 until you hear «Accessibility mode,» press the Tab key until you hear «Edit document, button collapsed,» and then press Spacebar.
-
Press the Down arrow key until you hear «Edit document. Make quick changes right here using Word,» and press Enter. The document opens in the Editing view, and you can start adding your content to the document.
Create a new blank document
-
Do one of the following:
-
Open Word for the web. The focus is on the option to create a new, blank document.
-
If you’re already editing a document and want to start a new one, press Alt+Windows logo key+F to open the File menu, and then press the Tab key until you hear: «New blank document.»
-
-
To select and open the blank document, press Enter. You hear the default name of the document, followed by «Editing.» The focus moves to the editing area in the document body.
You can now start adding text and other content to the document. For instructions on how to insert and format text in a document, refer to Use a screen reader to insert and change text in Word.
Tip: To quickly create a new document in Word for the web, open your browser, type Word.new in the address bar, and then press Enter.
Save a document
Word for the web automatically saves your document to OneDrive as you work so you don’t have to worry about saving. For instructions on how to rename your document or save a copy of the document to your device, refer to Use a screen reader to save a document in Word.
Read a document
To use the text reading keyboard shortcuts in the Editing view, place the focus to the document body area.
-
To start reading from where your cursor is with Narrator, press the SR key+Ctrl+R or the SR key+Down arrow key. With JAWS, press the SR key+Page up. With NVDA, press the SR key+Down arrow key.
-
To read the current page with Narrator, press the SR key+Ctrl+I.
-
To read the current paragraph with Narrator, press the SR key+Ctrl+K. With JAWS, press Ctrl+5 on the numeric keypad.
-
To read the next line with Narrator, press the SR key+O. With JAWS and NVDA, press the Down arrow key.
-
To read the previous line with Narrator, press the SR key+U. With JAWS and NVDA, press the Up arrow key.
-
To read the next word with Narrator, press the SR key+L or SR key+Ctrl+Right arrow key. With JAWS, press the SR key+Right arrow key. With NVDA, press Ctrl+Right arrow key.
-
To read the previous word with Narrator, press the SR key+J or SR key+Ctrl+Left arrow key. With JAWS, press the SR key+Left arrow key. With NVDA, press Ctrl+Left arrow key.
-
To stop reading, press Ctrl.
For detailed lists of the keyboard shortcuts for reading text, refer to the user guidance of your screen reader. With Narrator, refer to Chapter 4: Reading text. With JAWS, refer to JAWS Reading Commands. With NVDA, refer to NVDA User Guide.
Navigate by headings
If you’ve used the heading styles in your document, you can use the Navigation Pane to quickly move from heading to heading.
-
To turn on the Navigation Pane, press Alt+Windows logo key+W, K. You hear: «Navigation, Search for.»
-
Press Shift+Tab until you hear the currently selected tab, for example, «Find.» Press the Left arrow key until you hear «Headings.»
-
Press the Tab key to browse the list of headings. Your screen reader announces the headings as you move.
-
To move to the heading in the document body, press Enter. The focus moves to the beginning of the heading row.
Search a document
-
Press Ctrl+F. You hear: «This file results tab selected.» The focus is on the search text field. Type your search words and press Enter.
-
To move the focus to the list of search results, press the Tab key until you hear «Showing this file, results for,» followed by your search words.
-
To browse the list of results, use the arrow keys. Your screen reader announces each matching result as you move on the list.
Add page numbers
-
Press Alt+Windows logo key+N, N, U. The Add to Header or Footer menu opens.
-
Press the Tab key until you hear the page number style option you want, and then press Enter.
-
The header and footer editing area opens. To exit the area and return to the document body, press Esc.
Print documents
If you need hard copies of your Word documents, you can easily print them. If you don’t have immediate access to a printer, you can print the document to PDF and save it on your computer.
Print a document using a printer
-
Press Ctrl+P. The Print dialog box opens. Do one of the following:
-
To print with the default settings, press Shift+Tab until you hear «Print button,» and press Enter.
-
To change the print settings, press Shift+Tab to move through the options. To open an options list, press Spacebar. To move in an options list, press the arrow keys. To select an option, press Enter. To print with the new settings, press the Tab key until you hear «Print button,» and then press Enter.
-
Print a document to PDF
-
Press Ctrl+P. The Print dialog box opens.
-
Press the Tab key until you hear «Printer,» followed by the current printer, and press Spacebar to expand the Printer menu. Press the Up or Down arrow key until you hear «Microsoft Print to PDF,» and press Enter.
-
Press the Tab key until you hear «Print button,» and press Enter.
-
The Save Print Output As dialog box opens. The focus is on the File name text field. Type a name for your document. Then use the Tab key and the arrow keys to navigate to the location where you want to save the print output. When you’re on the right location, press Alt+S to save the file as a PDF.
See also
Use a screen reader to insert and change text in Word
Use a screen reader to insert a picture or image in Word
Use a screen reader to check spelling and grammar in Word
Keyboard shortcuts in Word
Use a screen reader to explore and navigate Word
Technical support for customers with disabilities
Microsoft wants to provide the best possible experience for all our customers. If you have a disability or questions related to accessibility, please contact the Microsoft Disability Answer Desk for technical assistance. The Disability Answer Desk support team is trained in using many popular assistive technologies and can offer assistance in English, Spanish, French, and American Sign Language. Please go to the Microsoft Disability Answer Desk site to find out the contact details for your region.
If you are a government, commercial, or enterprise user, please contact the enterprise Disability Answer Desk.
With the recent release of Windows 10, much of the talk is about Cortana, Microsoft’s new voice assistant. But if you are (wisely) going to wait to upgrade your primary office PC to Windows 10, you can still take advantage of the voice technology features built into Windows 8. Using tips from the excellent site How-To Geek, here’s how to use Narrator with Word:
- In your Word file, click on the small arrow located in the Quick Access Toolbar in the upper left corner and find the More Commands option.
- In the Word Options dialog box, click on the drop-down menu that says Popular Commands and switch it to All Commands.
- Scroll down until you find a command called Speak, click on it once to highlight it, and press the Add>> button on the right.
If you look at the Quick Access Toolbar you will notice that there is now a small message box with a gray arrow:

Now simply highlight the portion of the document you want Word to read to you. You can also have Word read the entire document by pressing Control and “A” at the same time (Ctrl+A). Once you have highlighted the text you want Word to read, simply click on the new Speak button you added to your Quick Access Toolbar.
If you don’t like the way Word speaks to you, adjustments are easy. Press the Windows Start button in the lower left corner of your screen, type Narrator, and click on the icon that shows up. Next, click on the Voice Settings button and edit the speed, volume, and pitch until you get a voice you like. Once you are done, press OK.
Why have Word read to you? Sometimes your eyes are tired and you can’t take another minute in front of your screen. Or your back hurts and you need to stand up and walk around your office.
I like it for proofreading documents. My eyes don’t always «see» errors on screen. When I don’t have an editor/proofreader available, I can often catch more errors and correct them if I hear the documents read to me. Try having Word read documents to you and you may find your own favorite uses.
Permalink
Can Microsoft Word read to me? Yes, it can. There are three ways to accomplish this task: The Speak and Read Aloud features in Word, or the Narrator feature in Windows.
The Speak feature was incorporated into Microsoft Office (Word, Outlook, PowerPoint, etc.) back in version 2003. It was called Text to Speech (TTS) then, and it functioned much the same as it does now. Fortunately, it’s a very simple procedure to set up and use, so you can get started immediately.
1. Click the Customize arrow on the Quick Access Toolbar.
2. From the dropdown menu, select More Commands.
3. Go to Word Options >Customize the Quick Access Toolbar and locate the Choose Commands From box. Scroll down to the Speak command.
4. Select the Speak command, click the Add button in the middle of the screen, then click OK.
5. Word adds the Speak command to the Quick Access Toolbar at the end, and you’re ready to go.
Add Speak button to Quick Access Toolbar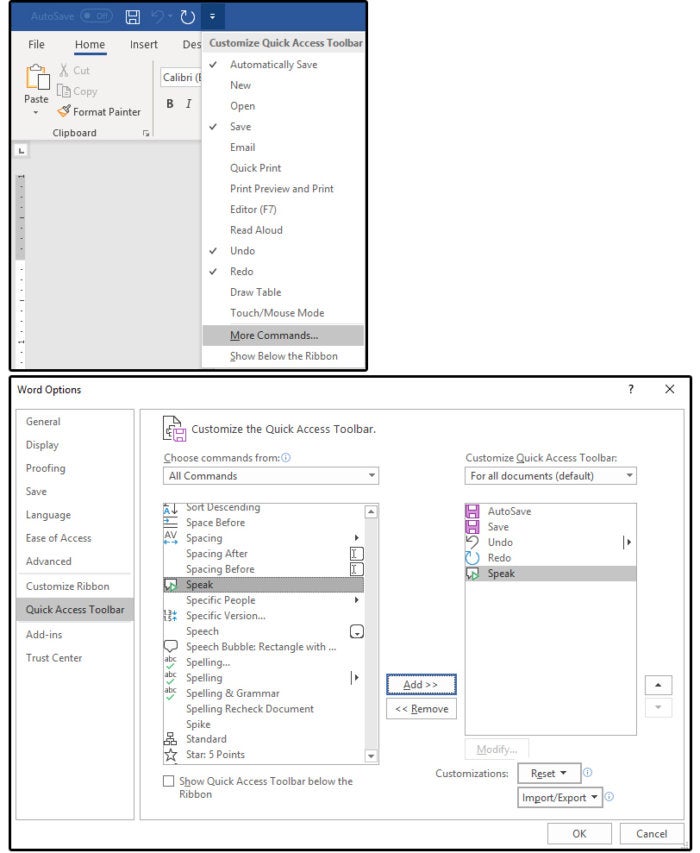 JD Sartain / IDG Worldwide
Click the Speak button to listen to your text
1. Ensure that your system’s speakers or sound devices are turned on.
2. Highlight a paragraph of text, then click the Speak command button.
3. Word reads any text that’s highlighted, even the entire document. Press Ctrl+ A to select the entire document.
4. Click the Speak command button once to begin the reading session, then click it again to stop. There is no pause-and-continue option at this time, but many users have requested this feature, so we hope to see it in future versions.
Select the Read Aloud command
1. Another way to have your text read aloud in Word is to select the Review tab > Read Aloud button.
The greatest benefit of Read Aloud as opposed to the Speak command is…
(a) You don’t have to highlight the text. Just position your cursor where you want the reading aloud to begin and click the Read Aloud button.
And (b), when you click the Read Aloud button a second time, it stops. Click the button again to continue from that point on. So, essentially, you have a Pause feature with Read Aloud that is not available with Speak.
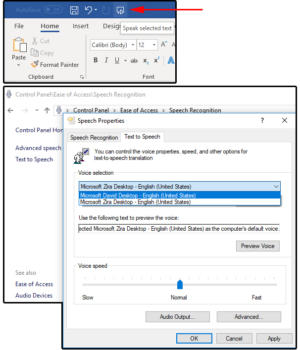
Change the Speak preferences in the Windows Control Panel
The Speak preferences are defined in Widows, not in Word specifically.
1. Click Start > Windows System > Control Panel
2. Select Ease of Access > Speech Recognition > Text to Speech, and the Speech Properties dialog window opens on the Text to Speech tab.
 JD Sartain / IDG Worldwide
3. Under Voice Selection, choose MS David Desktop for a male voice or MS Zira Desktop for a female voice.
4. Click the Preview button to listen to each voice, then make your selection.
5. Use the slider under Voice Speed to adjust the pace (slow, normal, or fast) of the reader.
6. Click the Audio Output button to define the Sound preferences.
7. Click the Advanced button to select or change the output device.
Using Windows 10 Narrator in Word and beyond
Windows 10 Narrator is an accessibility feature designed for vision-impaired users, however, anyone can use it. It reads everything onscreen: documents, websites, comments, page instructions, commands, and more. It’s also not restricted to Word, as the Speak feature is.
Using Narrator is really easy, though learning all the commands may take some time. See Microsoft’s “Complete guide to Windows Narrator” for full information. (If you search elsewhere online for WIndows 10 Narrator help, check the date of the article and the Windows version before you start memorizing commands.)
There are two keyboard layouts available: Standard and Legacy. The default is Standard. Follow these instructions to change the keyboard (which changes how the commands function). For more information, go to Microsoft’s support page about Narrator keyboard layouts.
1. Right-click the Windows Start button and select Settings.
2. Select Ease of Access.
3. Click Narrator in the left panel.
4. Browse to Choose Keyboard Setting.
5. From the Select Keyboard Layout field box, choose Standard or Legacy.
6. Next, select your Narrator Modifier key (that is the key used to activate the Narrator commands). Options include Caps Lock, Insert, or Caps Lock and Insert. I chose the Caps Lock key, because its location on the keyboard is more efficient.
7. Once you have chosen the Narrator Modifier key, the instructions here and on the web will refer to that key as the Narrator key (or, in some cases, the SR key).
8. Exit the Settings menu.
Windows Narrator keyboard settings.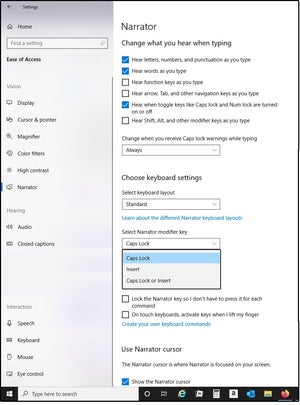 JD Sartain / IDG
The basics for using Narrator are this:
1. Press Windows logo key + Ctrl +Enter (simultaneously) to access or exit Narrator.
2. If you have not memorized all the “reader” keystrokes yet, the easiest method to read text is to place your cursor on the target word/sentence/paragraph and press Narrator key + Down Arrow. Press Narrator key (by itself) to stop, then Narrator key + Down Arrow to continue. There are other keys that perform this same function, but these are the easiest.
3. Most important: For a list of all the Narrator commands, press Narrator + F1.
4. For reading the current paragraph, press Narrator + Ctrl + K.
5. For the next paragraph, press Narrator + Ctrl + L.
6. For the current page, press Narrator + Ctrl + I.
7. For the next page, press Narrator + Ctrl + O.
The list goes on and on. In addition to the complete guide above, check out the support pages for Windows 10 Narrator keyboard commands and touch gestures, and Windows 10 narrator reading text.
Windows has accessibility options that include Narrator, a built-in program that reads text out loud. You can combine Narrator with Microsoft Word, a word processing program from the Microsoft Office suite, to hear any typed text spoken out loud, which can help you multi-task if you’re pressed for time putting together a business presentation. There are options both to hear text as you write it and to hear text that’s already been written in a document. You can even change the voices if the default choice isn’t to your liking.
-
Click on the Start button, click on «All Programs,» choose «Accessibility» and «Ease of Access.»
-
Click on «Narrator.»
-
Open your Microsoft Word document by double-clicking on the icon or searching for the title in the Start menu and clicking on the file name.
-
Press «Insert-F8» to make Narrator read the Microsoft Word document out loud.
Posted by Craig Mill on the 16th September, 2020

Windows Narrator has been a Windows accessibility feature as far back as Windows 2000. Narrator was designed to open up accessibility as a screen reader for visually impaired users, but sadly lacked the power and features of its contemporaries such as JAWS and the now-defunct Windows Eyes.
With the release of Windows 10 (version 1903) in May 2019, a new updated, fully-fledged Narrator screen reader was included as part of the release.
Like most screen readers, Narrator requires a knowledge of keyboard shortcuts to maximise its use, particularly for navigating the desktop and accessing folders, files and documents.
However, with a bit of tinkering with Narrator’s Settings, you can use it as a free and effective text reader, which will read aloud as you type or read content in Word and other Microsoft applications such as PowerPoint as well as Office 365 online applications, even with a simple mouse click.
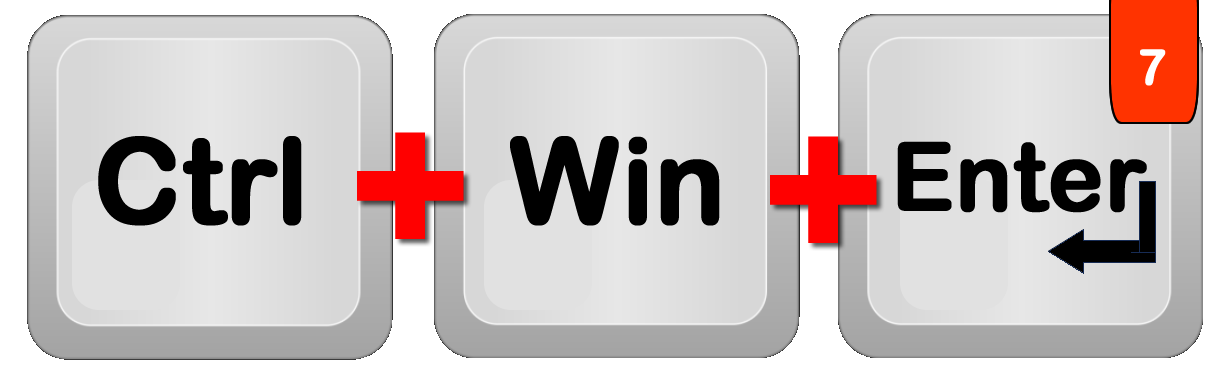
Once everything is set up in Narrator’s Settings you can use a quick keystroke ‘Ctrl + Win + Enter’ to open and close Narrator. You only need to make the following adjustments once and everything is located in the same panel, just scroll down, following each of the 8 stages until you come to the end, then finally close the panel.
1. Adjusting Narrator’s Settings
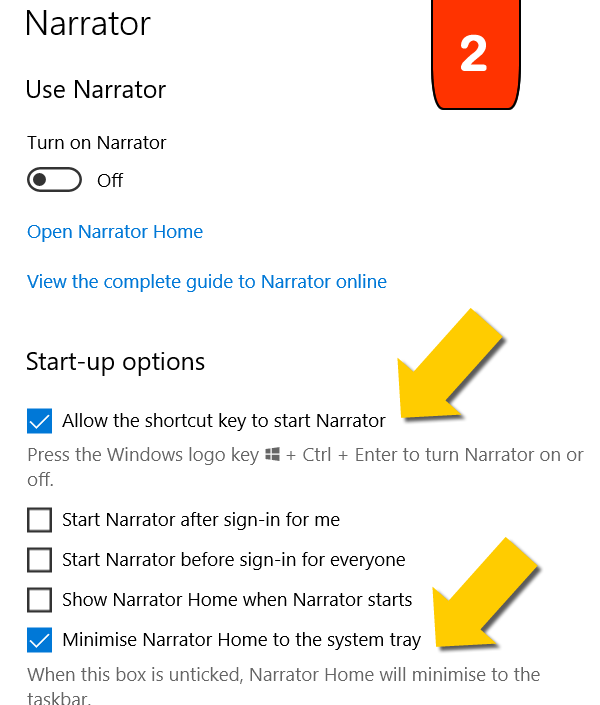
To get started the first thing to do is to open Narrator’s Settings Panel and adjust the Settings.
- Narrator’s Settings Panel is opened by pressing and holding the keyboard keys Ctrl + Win + N.

2. Start-up options
The next stage is to set up the Settings in a similar way to the illustrations below. Do not turn on Narrator until all the settings have been adjusted.
- Ensure Narrator is Off
- Tick the ‘Allow the shortcut key to start Narrator’
- Tick ‘Minimise Narrator Home to the system tray’
3. Personalise Narrator’s voice
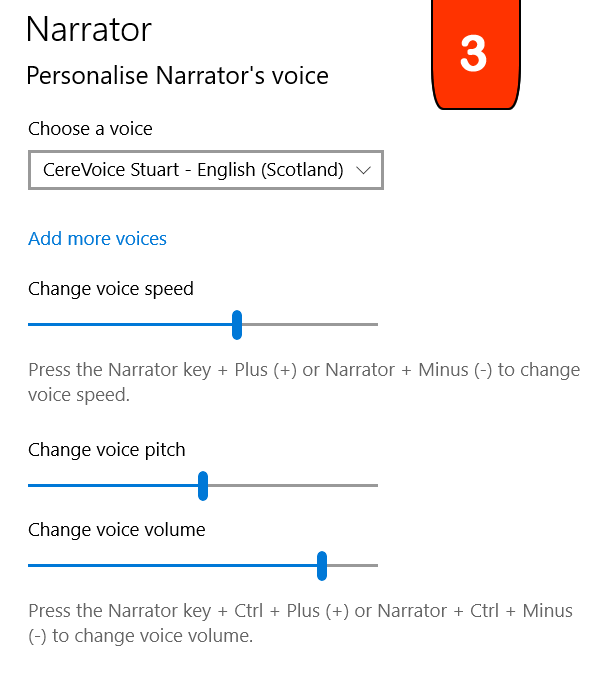
Scroll down until you come to the section ‘Personalise Narrator’s voice’ Here you can choose a voice (including any of the Scottish voices) and set the voice speed, pitch and volume.
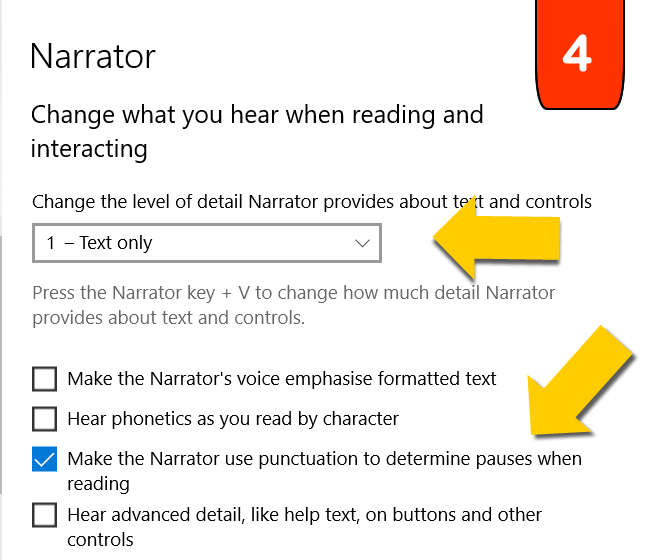
4. Change what you can hear when reading and interacting
Scroll down to the next section ‘Change what you hear when reading and interacting’. Narrator can be adjusted to read different amounts of information, for example, when used as a screen reader by a visually impaired or blind learner the level of detail can be set to ‘All Controls’ thereby allowing the user to navigate by voice alone.
- Set the level of detail to ‘1-Text only’
- Uncheck all the boxes except ‘Make the Narrator use punctuation to determine pauses when reading’. This will ensure that information on web pages and documents is read more naturally.
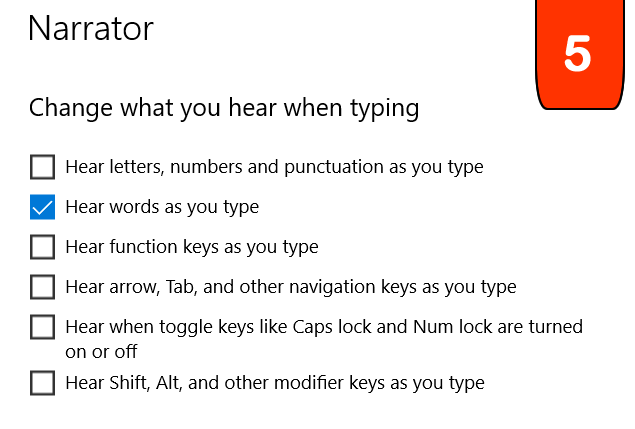
5. Change what you hear when typing
Scroll down until you come to ‘Change what you hear when typing’. Here you can choose what the learner will hear when typing; individual characters, words etc. You should set this to meet the needs of your learner. You can always go back and change the settings if you wish.
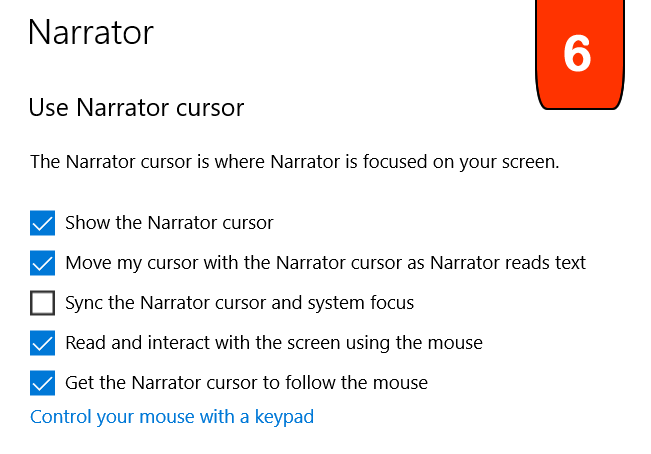
6. Use Narrator cursor
Scroll down until you come to ‘Use Narrator cursor. Narrator cursor is a blue box that follows the focus of words which are either typed or read aloud. Narrator cursor may help those who have difficulties with concentration to focus on individual words in sync with the voice.
You should experiment with this section to see what setup best suits your learner. You can always adjust as required. However, I recommend that ‘Read and interact with the screen using the mouse’ is ticked as this allows learners to click to hear the words spoken aloud.
After completing this stage close the Narrator Settings Panel.
7. Practice turning Narrator on and off using the keyboard shortcut
Now you are all set to go. Press and hold the keys Ctrl + Win + Enter to turn on Narrator and turn it off. Practice this a couple of times, but make sure you turn Narrator off before moving to stage 8.
8. Open a Word document and turn on Narrator
Open a new Word document and when you see the cursor flashing at the beginning of document turn on Narrator using the shortcut keys Ctrl + Win + Enter – now try typing some text.
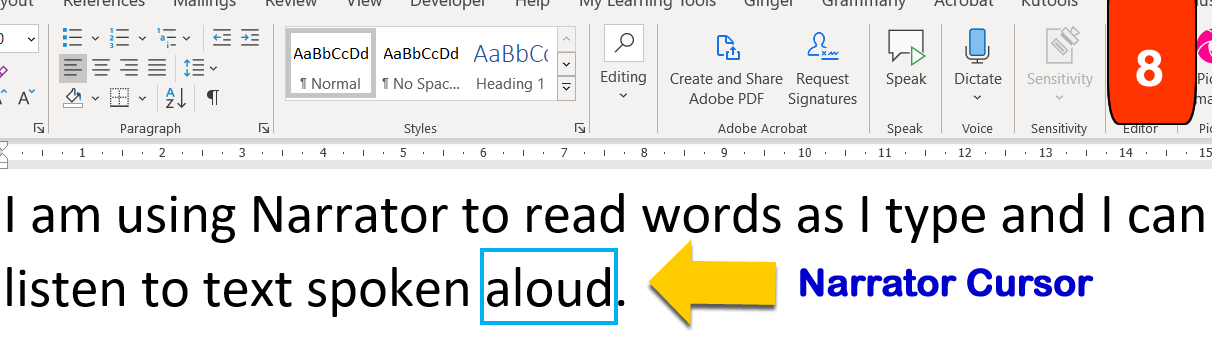
You can also use Narrator to read aloud existing documents or webpages by clicking the sections you want to be read aloud. Narrator will highlight words and sections with the blue Narrator cursor.
Narrator may struggle to read PDF documents but you can open PDF files in Word or Edge instead, right-click on the PDF file and choose ‘Open With’ and select ‘Edge’ from the available choices or simply open the PDF from within Word.
Asked by: Mr. Ulices Ledner
Score: 4.6/5
(58 votes)
Read text by word
To read the current word, press Narrator + K or Narrator + Ctrl + 5 (numeric keypad). When you press either command twice in a row, Narrator will spell the word.
Can a Word document be read aloud?
Read Aloud is only available for Office 2019 and Microsoft 365. On the Review tab, select Read Aloud. To play Read Aloud, select Play in in the controls. To pause Read Aloud, select Pause.
How do I get voice to read documents?
Hear text read aloud
- At the bottom right, select the time. Or press Alt + Shift + s.
- Select Settings .
- At the bottom, select Advanced.
- In the «Accessibility» section, select Manage accessibility features.
- Under «Text-to-Speech,» turn on Enable ChromeVox (spoken feedback).
How do I listen to a Word document?
Fortunately, it’s a very simple procedure to set up and use, so you can get started immediately.
- Add the Speak button to the Quick Access Toolbar. …
- Click the Speak button to listen to your text. …
- Select the Read Aloud command. …
- Change the Speak preferences in the Windows Control Panel.
Can my Mac read a Word document to me?
You can use the Text to Speech feature to hear selected text read aloud in a Microsoft Office for Mac file. … Click Accessibility > Speech. Select the voice that you want to use. Tip: You can change the speed at which words are read by moving the Speaking Rate slider.
23 related questions found
How do I convert a Word document to audio?
How to convert a DOC to a MP3 file?
- Choose the DOC file you want to convert.
- Click on «Start conversion» to convert your file from DOC to MP3.
- Download your MP3 file.
What is read Mode in Word?
If you’re reading a document, not writing or major editing, click or tap View > Read Mode to hide the writing tools and menus and to leave more room for the pages themselves. Read Mode automatically fits the page layout to your device, using columns and larger font sizes, both of which you can adjust.
Why is read aloud not working on word?
Select the ‘Ease Of Access’ category from the left. There, under the ‘Ease Of Access’ category, locate ‘Applications Display Options’ and under its heading, activate ‘Show Read Aloud’ feature by checking the box marked against it.
How do I turn on voice typing in Word?
In Microsoft Word, make sure you’re in the «Home» tab at the top of the screen, and then click «Dictate.» 2. You should hear a beep, and the dictate button will change to include a red recording light. It’s now listening for your dictation.
How do I get my computer to read text aloud?
How to get Word to read a document aloud
- In Word, open the document you want to be read aloud.
- Click «Review.»
- Select «Read Aloud» in the ribbon. …
- Click where you want to start reading.
- Hit the Play button in the Read Aloud controls.
- When you’re done, click «X» to close the Read Aloud controls.
Why is my Microsoft edge not reading aloud?
Enabling the Read Aloud feature is easy but you must update your Microsoft Edge to its latest version. … On the address bar, type the following: edge://flags/#edge-read-aloud-pdf. Look for Read Aloud in PDF and click to open a drop-down menu. Click Enabled.
Why do my Word documents become read only?
The content is in protected view
This is also commonly the case with email attachments or files you’ve downloaded. To help protect your computer, files from these potentially unsafe locations are opened in Protected View. By using Protected View, you can read a file and see its contents while reducing the risks.
How do I open a Word document not in read only mode?
Right-click the Word document that opens only in ‘Read-only’ mode and select ‘Properties’. Un-check the box marked against ‘Read-only’ option.
How do I edit a Word document that is read only?
Restrict editing
- Click Review > Restrict Editing.
- Under Editing restrictions, check Allow only this type of editing in the document, and make sure the list says No changes (Read only).
- Click Yes, Start Enforcing Protection.
Can you convert text audio?
Convert your text to speech with this simple online tool that can be used in your web browser. Paste your text into the box above and download the audio as MP3.
Is there an app that will convert text to voice?
Another popular text-to-speech app on Android is TK Solution’s Text to Speech. The app works well and hosts the usual selection of features, including exportable WAV files, an area where you can type your own text and make the app read it aloud, and a variety of supported languages.
How do I make a file not read only?
Read-only Files
- Open Windows Explorer and navigate to the file you want to edit.
- Right-click the file name and select «Properties.»
- Select the «General» tab and clear the «Read-only» check box to remove the read-only attribute or select the check the box to set it.
How do I change a file from read only to edit?
To change the read-only attribute, follow these steps:
- Right-click the file or folder icon.
- Remove the check mark by the Read Only item in the file’s Properties dialog box. The attributes are found at the bottom of the General tab.
- Click OK.
What is the purpose of read only?
Read-only is a file system permission that only allows a user to read or copy stored data, but not write new information or edit the data. A file, folder, or an entire disk may be set as read-only to prevent accidentally changing the file’s contents. A read-only object may also be referred to as write-protected.
How do I protect a Word document from editing and copying?
Click File > Info > Protect Document and select Restrict Editing. Your document then displays a Restrict Editing pane on the right-hand side of the document for formatting and editing restrictions. Here, you can give people permission to read your document, select what parts they can edit, and choose how they do it.
Why are my Word documents locked?
The file might be locked because: The file is shared and another user is currently editing it. An instance of the Office app is running in the background with the file already opened. The file has been marked as Final and can no longer be updated.
How do I enable read aloud in Microsoft Edge 2020?
Using the Microsoft Edge Read Aloud Feature. First, here is a look at reading a webpage. Launch Edge and highlight a section of text on a page where you want it to start reading. Then right-click and choose the Read aloud option from the menu.
How do I enable read aloud in Microsoft edge?
Enter reading mode using Immersive Reader
To enter reading mode, go to the website you want to read in Microsoft Edge and select Enter Immersive Reader in the address bar or use the keyboard shortcut F9. To exit Immersive reader, click Exit Immersive Reader in the address bar or use the keyboard shortcut F9.
How do I use narrator to read a PDF?
Start by pressing the “Start” button and typing “Narrator” and clicking on the icon that shows up. Next, you will click on the “Voice Settings” button and edit the Speed, Volume, and Pitch till you get a voice you like. Once you are done, press “OK.”
Word 2016 for Windows includes accessibility features that make it easy for people with disabilities, such as limited dexterity or low vision to work with files. This means you can use keyboard shortcuts, a screen reader such as Narrator or JAWS, and Windows Speech Recognition. For more information about accessibility settings and features that work with your platform, see Set up your device to work with accessibility in Office 365.
Notes:
-
New Office 365 features are released gradually to Office 365 subscribers, so your app might not have these features yet. To learn how you could get new features faster, visit When do I get the newest features in Office 2016 for Office 365?.
-
For keyboard shortcuts, go to Keyboard shortcuts for Microsoft Word on Windows.
-
This topic assumes that you are using the built-in Windows screen reader, Narrator. To learn more about using Narrator, go to Get started with Narrator.
-
This topic assumes you are using this app with a PC. Some navigation and gestures might be different for a Windows phone or tablet.
In this topic
-
Get to know the Word layout
-
Navigate in Word for Windows
-
Special considerations in Word
-
Use Tell Me
Get to know the Word layout
In Word, the name of your document is centered at the top of the screen. App controls, such as Minimize and Close, are at the upper-right corner. By default, the Quick Access Toolbar resides at the upper left of the screen. This toolbar can be customized and contains commonly used commands, such as Save, Undo, and Redo.
Below this line is a set of ribbon tabs. It includes tabs such as Insert, Design, and Review. The ribbon sits below this row of tabs. Selecting a tab brings up a tab-specific ribbon that includes commands organized in groups. For example, the Insert tab switches to a ribbon that lets you pick different items to insert into your document, such as hyperlinks or pictures.
Document content appears under the ribbon and makes up the majority of the page. Some commands, such as Review or Find, open panes to the right or left of the document body.
Navigate in Word for Windows
To navigate in Word, press the Tab key (forward) or Shift+Tab (backward).
-
To select an item, press Enter.
-
To browse within menus or lists, press the Up Arrow key or the Down Arrow key, and then, to make a selection, press Enter.
-
To exit a menu or mode, press Esc.
Tip: To quickly move the focus to the first floating shape such as a text box or an image, press Ctrl+Alt+5. Then, to cycle through the floating shapes, press the Tab key. To return to the normal navigation, press Esc.
For more navigation options, see Keyboard shortcuts for Microsoft Word on Windows.
You can use Narrator, the built-in screen reader in Windows, or a third-party screen reader, such as JAWS. For information on using Word with a screen reader, refer to Basic tasks using a screen reader with Word.
Special considerations in Word
Word offers a number of special accessibility features that can help you use it.
Zoom to magnify or shrink what you see
You can use keyboard shortcuts to zoom in to get a close-up view of your document or zoom out to see more of the page at a reduced size.
-
Press Alt+W, Q. If using a screen reader, you hear «Zoom dialog» or «Zoom window.»
-
Tab to the Percent spin box, and then type a percentage or use the Up Arrow key or the Down Arrow key to select a percentage.
-
Tab to the OK button and press Enter.
Use Read Mode
Read Mode improves the resolution and display of text, making it easier to read on the screen. You can start using Read Mode by using keyboard shortcuts.
-
Press Alt+W, F. If using a screen reader, you hear «Reading layout.» (In Narrator, you hear the file name.)
-
To return to Print Layout, press Alt+W, E. You hear «Print edit.»
Increase contrast by changing the theme
You may find Word easier to use if you adjust the theme to one that provides more contrast.
Tip: This change affects all of your Office 365 applications.
-
In Backstage view, open Office Account by pressing Alt+F, D. If you’re using a screen reader, you hear «Account tab» and the focus moves to the Office Theme box.
-
To open the Office Theme box, press Y, 1. You hear the name of the currently selected theme.
-
Select a theme and press Enter. The Dark Gray theme provides the greatest contrast.
Tip: You may also want to choose a higher-contrast theme in Windows or use other accessibility settings. Go to Make your PC easier to use for more information.
Turn off click and type
If you are using adaptive technology that doesn’t work well with the click-and-type feature of Word, you can turn the feature off.
-
To open , In Backstage view, open the Word Options dialog box by pressing Alt+F, T. If you’re using a screen reader, you hear «Word Options, Categories list box» or «Word Options.»
-
To open the Advanced options, press A and then the Tab key. You hear «Advanced» and the name of the first option.
-
To move to the Enable click and type check box, press C. Then, press Spacebar to select or clear the check box.
-
To close the Word Options dialog box, press Enter.
Use Tell Me
To find a command quickly, use Tell Me. To learn more about the Tell Me feature, watch this video: Using Tell Me to get things done quickly with a screen reader and keyboard.
To use Tell Me to find a command, follow these steps:
-
Select the cell or range of cells where you want to perform an action.
-
Jump to the Tell Me edit field by pressing Alt+Q.
-
Type the command that you want. For example, type «bullets».
-
Use the Down Arrow key to browse through the results, press Enter to select one.
See also
Use a screen reader to insert and change text in Word
Use a screen reader to insert a picture or image in Word
Keyboard shortcuts for Microsoft Word on Windows
Basic tasks using a screen reader with Word
Set up your device to work with accessibility in Office 365
Make your Word documents accessible
Word 2016 for Mac includes accessibility features that make it easy for people with disabilities, such as limited dexterity or low vision to work with documents. This means you can use keyboard shortcuts and a screen reader to work with Word. For more information about accessibility settings and features that are platform-specific, refer to Set up your device to work with accessibility in Office 365.
Notes:
-
New Office 365 features are released gradually to Office 365 subscribers, so your app might not have these features yet. To learn how you could get new features faster, visit When do I get the newest features in Office 2016 for Office 365?.
-
For keyboard shortcuts, go to Keyboard shortcuts in Word for Mac.
-
This topic assumes that you are using the built-in Mac OS screen reader, VoiceOver. To learn more about using VoiceOver, go to VoiceOver Getting Started Guide.
In this topic
-
Get to know the Word 2016 for Mac layout
-
Navigate using the keyboard
Get to know the Word 2016 for Mac layout
When you have a document open in Word, the name of your document is centered at the top of the screen. App controls, such as Minimize and Close, are at the upper left corner. By default, the Quick Access Toolbar resides next to them at the upper left of the screen. This toolbar can be customized and contains commonly used commands, such as Save, Undo, and Redo. The Search field and the Share button are at the upper right of the screen.
Below this row is a set of ribbon tabs. It includes tabs such as Insert, Design, and Review. Selecting a tab brings up a tab-specific ribbon that includes commands organized in groups. The ribbon sits below the row of tabs. For example, the Insert tab switches to a ribbon that lets you pick different items to insert into your document, such as hyperlinks or pictures.
Document content appears under the ribbon and makes up the majority of the page. Some commands, such as Review or Find, open panes to the right or left of the document body.
Navigate using the keyboard
To cycle through the main areas of Word 2016 for Mac, press Control+Option+arrow keys, F6 (forward) or Shift+F6 (backward). From top to bottom, these are the main areas:
-
Toolbar
-
Ribbon tabs
-
Document content
-
Status bar
To interact with items, press Control+Option+Shift+Down arrow key.
To stop interacting with items, press Control+Option+Shift+Up arrow key.
To browse within the toolbar or ribbon tabs, press Left or Right arrow key. You hear the name of the current button or tab. To select, press Control+Option+Spacebar. To browse the commands on the selected ribbon, press the Tab key (forward) or Shift+Tab key (backward). You hear the name of each command as you land on it, and if you wait a moment, VoiceOver also tells you how you can interact with the current command.
When focus is on the document body, press Control+Option+Shift+Down arrow to interact with the content:
-
To move one line down or up, press the Down or Up arrow key.
-
To move one word left or right, press the Left or Right arrow key.
-
To move to the first line of the next or previous paragraph, press Control+Option+Down or Up arrow.
To select text, press Shift+an arrow key in the direction of the text you want to select.
Tip: When focus is on the document body, press Command+F to use the Search field.
Navigate using the navigation pane
You can quickly move between whole pages with the help of the navigation pane, which opens to the left of the document body.
-
Press Control+Option+Left or Right arrow key until you hear the name of the tab you’re on, for example, «Home, selected, tab.»
-
To interact with the ribbon, press Control+Option+Shift+Down arrow key.
-
Press Control+Option+Right arrow key until you hear «View, tab,» and then press Control+Option+Spacebar.
-
Press Control+Option+Right arrow key until you hear «Navigation pane, unchecked, checkbox,» and then press Control+Option+Spacebar to turn the pane on.
-
Press the Control+Option+Shift+Up arrow key until you hear: «Out of view, ribbon.»
-
To move the focus to the navigation pane, press Control+Option+Right arrow key «Sidebar, task pane,» and then press Control+Option+Shift+Down arrow key.
-
Press the Control+Option+Right arrow until you hear «Document thumbnails,» and then press Control+Option+Shift+Down arrow. VoiceOver tells you how many pages there are and which page you’re on.
-
To move between pages, press the Control+Option+Down or Up arrow key until you hear the page you want, and then press Control+Option+Spacebar to navigate to it.
The focus moves to the text of the selected page.
See also
Use a screen reader to insert and change text in Word
Use a screen reader to insert a picture or image in Word
Keyboard shortcuts in Word for Mac
Basic tasks using a screen reader with Word
Set up your device to work with accessibility in Office 365
Make your Word documents accessible
Word for iOS includes accessibility features that make it easier for people with disabilities to work with their iPhone or iPad devices using VoiceOver, Speak Selection, Zoom, Invert Colors, and Increase Contrast.
Notes:
-
New Office 365 features are released gradually to Office 365 subscribers, so your app might not have these features yet. To learn how you could get new features faster, visit When do I get the newest features in Office 2016 for Office 365?.
-
This topic assumes that you are using the built-in iOS screen reader, VoiceOver. To learn more about using VoiceOver, visit Apple accessibility.
In this topic
-
Get to know the Word for iPad or iPhone layout
-
Navigate using touch
-
Navigate using keyboard shortcuts
-
Special considerations for working with Word for iPad or iPhone
Get to know the Word for iPad or iPhone layout
When you have a document open in Word, the name of your document is centered at the top of the screen. App controls, such as Minimize and Close, are at the upper left corner. By default, the Quick Access Toolbar resides next to them at the upper left of the screen. This toolbar can be customized and contains commonly used commands, such as Save, Undo, and Redo. The Search field and the Share button are at the upper right of the screen.
Below this row is a set of ribbon tabs. It includes tabs such as Insert, Design, and Review. Selecting a tab brings up a tab-specific ribbon that includes commands organized in groups. The ribbon sits below the row of tabs. For example, the Insert tab switches to a ribbon that lets you pick different items to insert into your document, such as hyperlinks or pictures.
Document content appears under the ribbon and makes up the majority of the page. Some commands, such as Review or Find, open panes to the right or left of the document body.
Navigate using touch
VoiceOver rotor: Use the VoiceOver rotor to choose how you want to move through a document when you swipe up or down. For example, if you choose Words, your insertion point moves through the document word by word with each swipe.
Scrolling: Move three fingers up or down to scroll through a document. When you lift your fingers from the screen, VoiceOver identifies the page you are on.
Ribbon: Tap, and then double-tap the Home tab on the ribbon.
-
To move to another tab, swipe right or left with one finger to move through the tabs. Double-tap a tab to bring it in to focus.
-
To choose a button beneath a tab that is in focus, swipe right or left to move through the tab’s button options.
-
To hide the ribbon, double-tap the ribbon, and then double-tap again.
Navigate using keyboard shortcuts
If you use VoiceOver with an external keyboard and you want to use keyboard shortcuts, make sure QuickNav is turned off. On your external keyboard, press the left and right arrow keys at the same time. VoiceOver announces that QuickNav is turned off. Press the arrow keys again to turn QuickNav on.
For a list of keyboard shortcuts, see Use keyboard shortcuts with an external keyboard in Word for iPad.
Special considerations for working with Word for iPad or iPhone
Use VoiceOver in Word
Use VoiceOver to hear verbal tips about what appears onscreen. When your cursor focuses on an item onscreen, VoiceOver announces the item’s name or describes it.
Note: If you use VoiceOver with an external keyboard and you want to use keyboard shortcuts, make sure QuickNav is turned off. On your external keyboard, press the left and right arrow keys together. VoiceOver announces that QuickNav is turned off. Press the arrow keys again to turn QuickNav on.
Change document view
Use Page Layout view to increase the amount of text on a page, making it easier to read, edit text, and add comments on your phone’s small screen. At the top of the document, swipe left or right to move focus to the Page Layout button, and then double-tap it.
Connect to a cloud storage service
Connect to your OneDrive, OneDrive for Business, or Dropbox accounts. Once connected, you can get to your files stored in these accounts right from your iPhone.
-
Open Word. Tap, then double-tap Account on the bottom-left of the File Open screen to open the Account screen. The Account screen provides your current login information, followed by a list of your Connected Services, and an option to Add a Service at the bottom of the screen
Note: If you have a Word file open and want to return to the File Open screen, use the Save and Close button in the top-left corner of the application.
-
Tap, then double-tap Add a Service. The Add a Service screen lists available services in this order: OneDrive, OneDrive for Business, and Dropbox.
-
Tap, then double-tap the service you’d like to add, and then follow the login instructions.
-
Return to the Account menu, and your new service will be listed under Connected Services.
Connect to SharePoint
Use your work or school account to access team sites on SharePoint.
-
Open Word. Tap, and then double-tap Account at the bottom left of the File Open screen and sign in to the app.
-
In the Account screen, tap, and then double-tap your team site from the list of your Connected Services.
See also
Use a screen reader to insert and change text in Word
Use keyboard shortcuts with an external keyboard in Word for iPad
Use keyboard shortcuts in Word for iPhone
Basic tasks using a screen reader with Word
Set up your device to work with accessibility in Office 365
Make your Word documents accessible
Word for Android includes accessibility features that make it easier for people with disabilities like limited dexterity or low vision to work with documents. For more information about accessibility settings and features that are platform-specific, refer to Set up your device to work with accessibility in Office 365.
Notes:
-
New Office 365 features are released gradually to Office 365 subscribers, so your app might not have these features yet. To learn how you could get new features faster, visit When do I get the newest features in Office 2016 for Office 365?.
-
For touch capabilities in Word for Android, go to Word for Android touch guide.
-
This topic assumes that you are using the built-in Android screen reader, TalkBack. To learn more about using TalkBack, go to Android accessibility.
-
This topic assumes you are using this app with an Android phone. Some navigation and gestures might be different for an Android tablet.
In this topic
-
Use TalkBack screen reader, touch gestures, and external keyboard shortcuts
-
Use global and local context menus
Use TalkBack screen reader, touch gestures, and external keyboard shortcuts
Word for Android works with the built-in Android screen reader, TalkBack. When TalkBack is on, you hear a spoken description of whatever you select or activate on your device. This includes commands, locations, lists, and buttons, in addition to the contents of Word screens, menus, and pop-up windows.
If you’re using an external keyboard, for instructions, refer to Use TalkBack keyboard shortcuts.
Use global and local context menus
As you navigate using TalkBack, two context menus are available to help you find settings and controls. The global context menu contains commands that work anywhere. The local context menu commands depend on the item in focus.
To learn more about the global and local context menu, refer to Use global and local context menus.
See also
Use a screen reader to insert and change text in Word
Use a screen reader to check spelling and grammar in Word
Basic tasks using a screen reader with Word
Set up your device to work with accessibility in Office 365
Make your Word documents accessible
The Word Mobile app for Windows 10 includes accessibility features that make it easier for people with disabilities to create and edit documents. For example, people who are blind or who have low vision can use screen readers to have information about the user interface (UI) read aloud to them. This topic covers accessibility features available in the Word Mobile app for many types of disabilities.
Notes:
-
For information on the touch capabilities in Word Mobile, refer to Word Mobile for Windows 10 touch guide.
-
This topic assumes that you are using the built-in Windows screen reader, Narrator. To learn more about using Narrator, go to Get started with Narrator.
-
This topic assumes you are using this app with a Windows phone. Some navigation and gestures might be different for a tablet or PC.
In this topic
-
Get to know the Word Mobile in Windows 10 for Office 365 layout
-
Navigate using the keyboard
Get to know the Word Mobile in Windows 10 for Office 365 layout
Using the Word Mobile for Windows 10 app, you can create, update, and review documents, just as you can in the Word desktop app (although the desktop app has more features). For more information on the features included with Word Mobile or to download the app, go to Word Mobile in the Microsoft Store or refer to Word Mobile for Windows 10 Help.
When you start Word Mobile, a navigation pane is displayed in the left side of the app window and a list of templates is displayed in the right side of the window. After you select a template or open an existing file from the navigation pane, you can use the main areas of the app.
On the top bar of the app, you’ll find these tabs: and buttons:
-
Ribbon tabs (in order): File, Home, Insert, Draw, Layout, Review, and View
-
Tell me button
-
Read button
-
Undo and Redo buttons
-
Share button
Below the top bar is the main body of the document.
Navigate using the keyboard
The following are some frequently used keyboard shortcuts for Word Mobile.
-
To move forward through UI elements, press the Tab key. To move back, press Shift+Tab. For some elements, you can also use the arrow keys.
-
To select the currently displayed tab on the ribbon, press Alt. Immediately after you press Alt, to move directly to the File menu, press Shift+Tab. To move between tabs on the ribbon, press the Left Arrow and Right Arrow keys or press Ctrl+Tab. To move to the options for each tab, press the Down Arrow key and, to move back to the tab, press the Up Arrow key. To select an option, press Enter or Spacebar.
-
To display the shortcut menu for an object, press Shift+F10.
For information on keyboard shortcuts for Word Mobile, go to Use keyboard shortcuts with an external keyboard in Word Mobile for Windows 10. For information about using a screen reader with Word Mobile, refer to Basic tasks using a screen reader with Word.
See also
Use a screen reader to insert and change text in Word
Use a screen reader to create bulleted or numbered lists with Word
Use keyboard shortcuts with an external keyboard in Word Mobile for Windows 10
Basic tasks using a screen reader with Word
Make your Word documents accessible
Word Online includes accessibility features that make it easy for people with disabilities, such as limited dexterity or low vision to work with files. This means you can use Keyboard shortcuts in Word Online, a screen reader, or a speech recognition tool to work with Word Online.
Notes:
-
New Office 365 features are released gradually to Office 365 subscribers, so your app might not have these features yet. To learn how you could get new features faster, visit When do I get the newest features in Office 2016 for Office 365?.
-
For keyboard shortcuts, go to Keyboard shortcuts in Word Online.
-
This topic assumes that you are using the built-in Windows screen reader, Narrator. To learn more about using Narrator, go to Get started with Narrator.
-
This topic assumes you are using this app with a PC. Some navigation and gestures might be different for a Windows phone or tablet.
-
Because Word Online runs in your web browser, the keyboard shortcuts are different from those in the desktop program. For example, you’ll use Ctrl+F6 instead of F6 for jumping in and out of the commands. Also, common shortcuts like F1 (Help) and Ctrl+O (Open) apply to the web browser – not Word Online.
In this topic
-
Get to know the Word Online layout
-
Navigate using the keyboard
-
Special considerations for Word Online
-
Use Tell Me
Get to know the Word Online layout
Word Online runs in your web browser. It offers two views: Reading view and Editing view. Different commands are available depending on the view you are using.
In addition, in Reading view, Word Online offers Accessible Mode, which can make reading much easier for people who use a screen reader. In Accessibility Mode, Word Online presents a Portable Document Format (PDF) version of the file with tagging in your browser. Your screen reader reads the text and its formatting from the PDF version in the browser.
If you are using Narrator in Microsoft Edge, Word Online automatically switches to Accessibility Mode each time you open Reading view.
You can also switch to Accessibility Mode by using the keyboard.
Explore Reading view
-
In Reading view, you can view, share, print, and comment on the document. By default, Word Online opens in Reading view.
In Reading view, the name Word Online is listed in the title bar at the top of the window. If you’re using a screen reader, you’ll hear it read aloud. At the left edge of the title bar is the app launcher, the control that contains tiles that link to Microsoft services and Office Online applications, including Mail, Calendar, OneDrive, Excel, PowerPoint, and more.
Below the title bar is a toolbar that contains the name of your document in the center and a set of commands on the right: Edit Document, Print, Share, Comments, and more.
Switch to Accessibility Mode
-
In Reading view, tab to the Accessibility Mode button and then press Enter. You’ll hear, «Accessible reading mode.»
-
Word Online restarts and creates a PDF version of your document with accessibility tagging that works better with some screen readers. When Word Online and the document have restarted, focus is on your document in accessible PDF view.
-
To switch out of Accessibility Mode, go to the Accessibility Mode button and then press Enter.
To switch from Reading to Editing view
-
To switch from Reading view to Editing view, press F6 to reach the button on the toolbar. You hear «Tab, Toolbar, List of Microsoft Services button.»
-
Tab to the Edit document button and press Enter, and then select Edit in Word Online.
Editing view
-
In Editing view, you can enter text, format it, and make changes to your document.
In Editing view, the title bar at the top of the window includes the app launcher on the left. As you go from left to right on the title bar, you’ll find the application name (Word Online), the name of your document, and a Share button on the right.
-
Below the title bar is a toolbar organized into tabs: File, Home, Insert, Page Layout, Review, View, and Open in Word, which opens your document in the desktop version of Word. The ribbon sits below this row of tabs. When you select a tab, a tab-specific ribbon appears. Each ribbon includes commands organized in groups. For example, if you select the Insert tab, a ribbon appears. From that ribbon, you can pick different items, such as hyperlinks or pictures, to insert into your document.
In both Reading view and Editing view, document content appears under the ribbon and takes up the majority of the page. Some commands, such as Go To, Show Comments, or Find, open panes to the right or left of the document body. Others, like Zoom, open a pane in the center of the document body. And some, like Share, open a new window. If you’re using a screen reader, focus changes in a predictable way.
At the bottom of the Word Online window is the status bar, which indicates the page number and zoom level and, in Editing view, the number of words in the document, as well as the language.
Navigate using the keyboard
-
To navigate in Word Online and to cycle through screen elements, press the Tab key (forward) or Shift+Tab (backward).
-
To select an item, press Enter.
-
To browse within menus or lists, press the Up Arrow key or the Down Arrow key, and then, to make a selection, press Enter.
-
To exit a menu or mode, press Esc.
For more details, read Keyboard shortcuts in Word Online.
Special considerations for Word Online
Zoom by using keyboard shortcuts
-
To zoom in, press Ctrl+Plus Sign (+) or Alt+V, Z, and then I.
-
To zoom out, press Ctrl+Minus Sign (-) or Alt+V, Z, and then O.
-
To select a zoom percentage, press Alt+V, Z. If you are using a screen reader, you hear «Zoom in, Control Plus, I» or «Zoom in, Context menu.»
On the Zoom menu, use the Down Arrow to select the percentage you want, then press Enter.
Zoom from Editing view in Internet Explorer
-
Press Alt+Q to go to the Tell Me box. You hear «Tell me what you want to do,»
-
Type zoom and press Enter to open the Zoom dialog box opens. The current zoom percentage radio button (for example, 100%) and the OK button are button selected.
-
In the Zoom dialog box, press Shift+Tab to move to the Percentage options radio buttons.
-
To select the percentage you want, use the Down Arrow.
-
Tab to the OK button and press Enter.
Use the Zoom level button on the status bar
-
To move the focus to the status bar, press Ctrl+F6. You hear «Toolbar, Page 1 of x.»
-
Tab until you hear the current zoom percentage and «Button, Zoom level,» and then press Enter.
-
Tab until you hear the current zoom percentage and «Button, Zoom level,» and then press Enter.
-
When you hear «OK button,» press the Tab key until you hear «Zoom to, Full page» or «Zoom to, Page width.»
-
To select a zoom percentage, use the Up Arrow and Down Arrow keys.
-
When you hear the percentage you want, tab to the OK button and press Enter.
Use Tell Me
To find a command quickly, use Tell Me. To learn more about the Tell Me feature, watch this video: Using Tell Me to get things done quickly with a screen reader and keyboard.
To use Tell Me to find a command, follow these steps:
-
Select the cell or range of cells where you want to perform an action.
-
Jump to the Tell Me edit field by pressing Alt+Q.
-
Type the command that you want. For example, type «bullets».
-
Use the Down Arrow key to browse through the results, press Enter to select one.
See also
Use a screen reader to insert and change text in Word
Use a screen reader to download a document in Word Online
Keyboard shortcuts in Word Online
Basic tasks using a screen reader with Word
Make your Word documents accessible
Technical support for customers with disabilities
Microsoft wants to provide the best possible experience for all our customers. If you have a disability or questions related to accessibility, please contact the Microsoft Disability Answer Desk for technical assistance. The Disability Answer Desk support team is trained in using many popular assistive technologies and can offer assistance in English, Spanish, French, and American Sign Language. Please go to the Microsoft Disability Answer Desk site to find out the contact details for your region.
If you are a government, commercial, or enterprise user, please contact the enterprise Disability Answer Desk.
my project is text to speech project, here is my code,
string amma = myacess.Text;
// string[] words = Regex.Split(amma,"*");
char[] delimeter = new char[] { '*' };
string[] words = amma.Split(delimeter, StringSplitOptions.RemoveEmptyEntries);
for( int i = 0; i < words.Length; i++ ) {
    string audio = words[i];
    if( audio == "a" ) {
        SoundPlayer sndplayr = new SoundPlayer( WindowsFormsApplication1.Properties.Resources.aa );
        sndplayr.Play();

    }
    if( audio == "u" ) {
        SoundPlayer sndplayr = new SoundPlayer( WindowsFormsApplication1.Properties.Resources.i );
        sndplayr.Play();
    }
}
but enter text «au» it will play only «u» sound. but I put break point and press F11 then only it’s play a sound and u sound. What is the reason behind. please can you help me?
![]()
John Saunders
160k26 gold badges244 silver badges395 bronze badges
asked Aug 1, 2012 at 2:31
![]()
1
but I put break point and press F11 then only it’s play a sound and u
sound. What is the reason behind. please can you help me?
I think that the problem is that the for-loop is too fast.
So you can use a Timer (System.Windows.Forms.Timer) in this way:
private Timer timer;
private int i;
string amma = myacess.Text;
// string[] words = Regex.Split(amma,"*");
char[] delimeter = new char[] { '*' };
string[] words = amma.Split(delimeter, StringSplitOptions.RemoveEmptyEntries);

//...

timer = new Timer();
timer.Interval = 100; //milliseconds
timer.Tick = += new EventHandler(timer_Tick);
timer.Enabled = true; //start the timer

i = 0;
void timer_Tick(object sender, EventArgs e){
    if(i < word.Lenght){
       string audio = words[i];
       if( audio == "a" ) {
           SoundPlayer sndplayr = new SoundPlayer( WindowsFormsApplication1.Properties.Resources.aa );
           sndplayr.Play();
       }
       if( audio == "u" ) {
           SoundPlayer sndplayr = new SoundPlayer( WindowsFormsApplication1.Properties.Resources.i );
           sndplayr.Play();
       }

       i++; //increase i to change letter like in the loop
    }
    else{
       timer.Enabled = false; //stop the timer
       i = 0;
    }
}
answered Aug 1, 2012 at 3:59
![]()
OmarOmar
16.2k9 gold badges46 silver badges65 bronze badges
1
Use SoundPlayer.PlaySync Method instead of SoundPlayer.Play. by this you can start next sound after previous sound ended.
answered Aug 1, 2012 at 4:31
![]()
RiaRia
10.2k3 gold badges32 silver badges60 bronze badges
Loading