
Ниже приведены возможные случаи использования функции модуля ABS, как отдельно, так и в составе формулы.
Задача по математике на определение проекции отрезка на ось абсцисс (X) и ось ординат(Y). По условиям задания отрезок имеет координаты начала A(-17; -14) и конца B(-39;-56). Решение в Excel:
Подсчет расходов компании — здесь нужно сложить отрицательные значения по модулю.
Имеется набор финансовых операции компании за отчетный период. Нужно определить сумму трат предприятия. По условию расходы указываются со знаком минус:
Другие варианты получения абсолютного значения
Кроме ABS возможны и другие способы получения модуля числа в Эксель при помощи альтернативных функций.
Принцип основан на том, что отрицательные числа умножаются на -1, а положительные на 1. Выглядит это так:
На картинке действие производится над ячейкой A4.
КОРЕНЬ
Квадратный корень величины не может быть отрицательным. Поэтому исходное число возводится в квадрат, а потом извлекается корень.
Удобный способ. Если значение отрицательное, то оно умножается на -1, в противном случае ничего не происходит. Вот как это выглядит для ячейки A1:
Язык VBA
Во многих языках программирования модуль находится через ABS. В VBA команда будет выглядеть следующим образом: A=Abs(-7). Здесь Abs — команда для получения абсолютного значения. В данном случае объекту A будет присвоено число 7.
ABS и альтернативные варианты просты в исполнении. Умение применять их, облегчит работу и сэкономит время.
Источник
Функция «Модуль» в Microsoft Excel

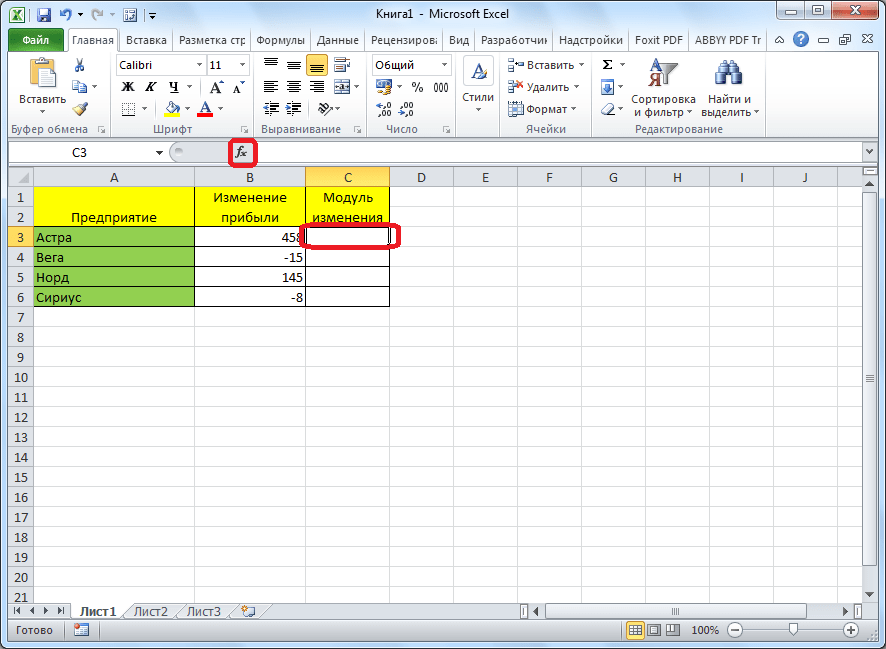
Модуль – это абсолютная положительная величина любого числа. Даже у отрицательного числа модуль будет всегда положительным. Давайте выясним, как рассчитать величину модуля в Microsoft Excel.
Функция ABS
Для расчета величины модуля в Excel существует специальная функция под названием «ABS». Синтаксис этой функции очень простой: ABS(число) . Либо формула может принимать такой вид: ABS(адрес_ячейки_с_числом) . Чтобы рассчитать, например, модуль от числа -8, нужно вбить в строку формул или в любую ячейку на листе следующую формулу: «=ABS(-8)».

Для выполнения расчета жмем на Enter — программа выдает в ответ положительное значение.

Существует еще один способ расчета модуля. Он подойдет для тех пользователей, которые не привыкли держать в голове различные формулы.
- Кликаем по ячейке, в которой хотим, чтобы хранился результат. Жмем на кнопку «Вставить функцию», размещенную слева от строки формул.

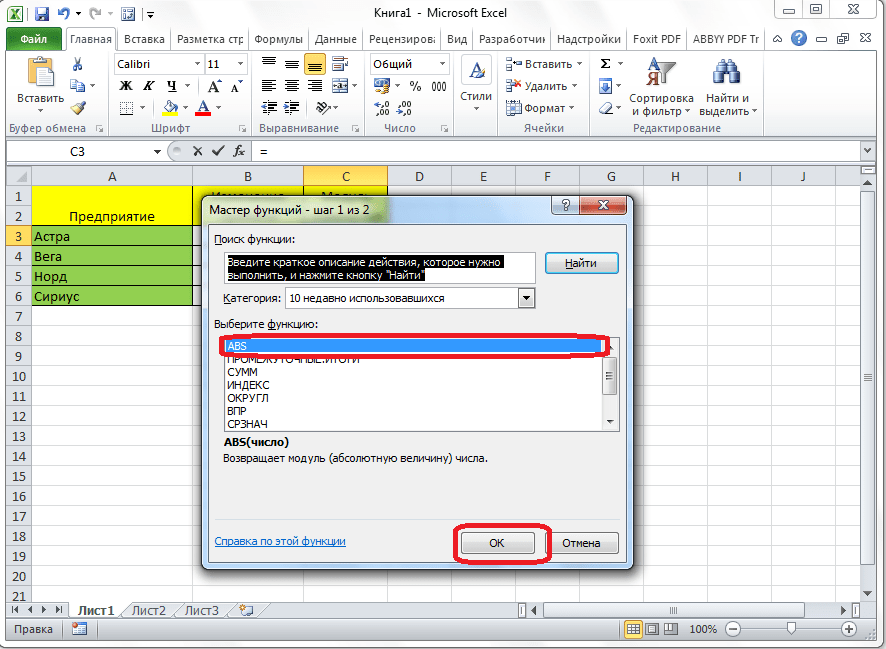
- Запускается окно «Мастера функций». В списке, который расположен в нем, найдите функцию ABS и выделите ее. Подтверждаем на «OK».
- Открывается окно аргументов функции. ABS имеет всего один аргумент — число, поэтому вводим его. Если же вы хотите взять число из данных, которые хранятся в какой-либо ячейке документа, нажмите на кнопку, размещенную справа от формы ввода.
- Окно свернется, а вам нужно кликнуть по ячейке, где содержится число, от которого хотите рассчитать модуль. После его добавления опять жмите на кнопку справа от поля ввода.


Важно заметить, что некоторые пользователи пытаются записать модуль, как это принято в математике, то есть |(число)|, например |-48|. Но в такой ситуации вместо ответа появится лишь ошибка, так как Excel не понимает подобный синтаксис.
В расчете модуля из числа через Microsoft Excel нет ничего сложного, так как данное действие выполняется с помощью простой функции. Единственное условие состоит в том, что данную функцию нужно просто знать.
Источник
What is a VBA Module?
In this Article
What is a VBA Module?
A VBA module is used to store any VBA code that you have written in the VBE (Visual Basic Editor).
The modules are contained within a VBA Project and when the file is saved – be it an Excel workbook, Word document or Access database, the module or modules are saved within that file – that file is essentially the parent application of the module.
Modules can also be exported out of the parent file and saved as their own individual files. This is useful when you want to re-use code in a different file, and therefore perhaps import that module into a new file.
Type of modules
The modules are organised into 3 different types.
- Standard modules – most of your code will go into this type of module. When you record a macro, it gets put into a standard module. When you write a general procedure to be used throughout your workbook, it also normally goes into a standard module.
- Objectmodules – these type of modules hold the code the is unique to that individual workbook or worksheet. Most of the code in these type of modules are known as EVENTS. An event can occur when a workbook is opened or closed for example, or when a sheet is clicked (the Click Event),. The module can also contain code that is written by yourself and used by the events. The module behind a custom form that you create is also an Object module.
- Class modules – this module is used to create objects at run time. Class module are used by Advanced VBA programmers and will be covered at a later stage.
When your write your VBA code, you will usually use more than one module. It is good coding practice to ‘group’ your code into relevant modules – for example put all the global variables in one module, all public functions in another module etc.
Inserting a module or form into your code
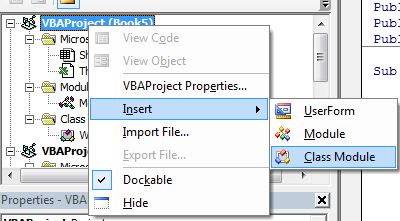
To insert a new module into your code, click on the Insert option on the menu bar, and click Module.
Or, click on the Insert Module button which you will find on the standard ribbon.
To insert a new user form into your code, select the UserForm option.
A new UserForm will appear in the Project Explorer and will be shown in the Code Window on the right.
You can also insert a Class Module
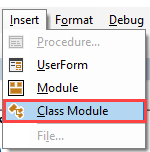
A class module is used to insert objects into your VBA project.

Entering Code into a VBA Module
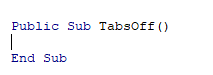
Once you have created your module, you will want to start typing your procedure. Most procedures are Sub Procedures.
A sub procedure begins with a Sub statement and ends with an End Sub statement. The procedure name is always followed by parentheses.
When entering a sub procedure, you only need to type “Sub” followed by the procedure name (no spaces). Then press enter and the VBA Editor will add the parenthesis and End Sub statement.
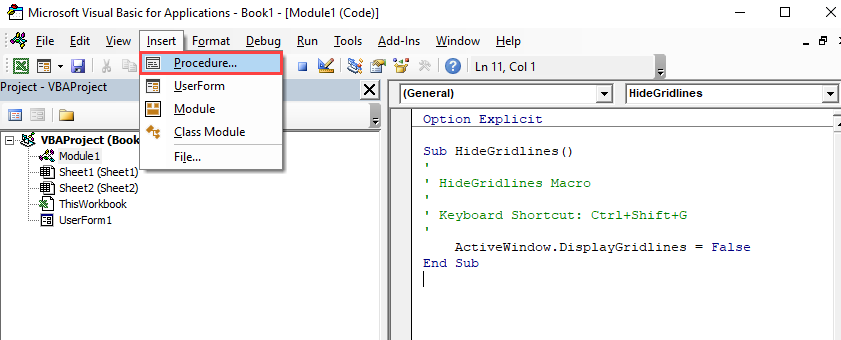
Creating a new procedure – Alternative Method
The easiest way to create a procedure is by typing directly into the Module Window, but if you forget how to create a procedure, you can go to Insert > Procedure instead:
The following dialog box will appear
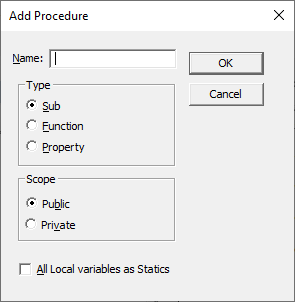
This dialog box is a good way to learn about the options for Procedures.
- Type the name of your new procedure in the name box – this must start with a letter of the alphabet and can contain letters and number and be a maximum of 64 characters.
- You can have a Sub procedure, a Function procedure or a Property procedure. (Properties are used in Class modules and set properties for ActiveX controls that you may have created).
- You can make the scope of the procedure either Public or Private. If the procedure is public (default), then it can be used by all the modules in the project while if the procedure is private, it will only be able to be used by this module.
- You can declare local variables in this procedure as Statics (this is to do with the Scope of the variable and makes a local procedure level variable public to the entire module). We will not use this option.
When you have filled in all the relevant details, click on OK.
You then type your code between the Sub and End Sub statements.
Sub vs Function Procedures
You may have noticed that there are 2 types of procedures you can create – a SUB PROCEDURE or a FUNCTION PROCEDURE.
If you have recorded a macro in Excel or Word, your macro will be put into a Standard module and will be put into a sub procedure. The macro recorder can only record sub procedures. A Sub procedure does things. They perform actions such as formatting a table, creating a pivot table, or changing the view settings of your active window. The majority of procedures written are Sub procedures. All macros are Sub procedures.
A Function procedure returns a value. This value may be a single value, an array, a range of cells or an object. Functions usually perform some type of calculation. Functions in Excel (UDFs) can be used with the Function Wizard.
Removing a module or form from the Project Explorer
Right-click on the module or form you wish to remove to show the right click short cut menu.
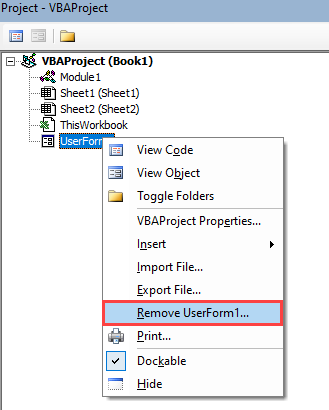
Click Remove (in this case UserForm1…)
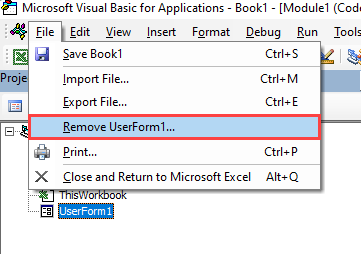
Click on the File menu, and then click on Remove (UserForm1).
A warning box will appear asking if you want to Export the form or module before you remove it. Exporting the form or module enables you to save it as an individual file for use in a different Excel project at some other time.
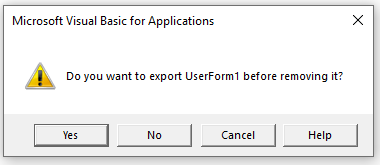
More often than not when you remove a module or form it is because you do not need it, so click No.
VBA Coding Made Easy
Stop searching for VBA code online. Learn more about AutoMacro — A VBA Code Builder that allows beginners to code procedures from scratch with minimal coding knowledge and with many time-saving features for all users!

Exporting a module or form from the Project Explorer
Right-click on the module or form you wish to export to show the right click short cut menu.
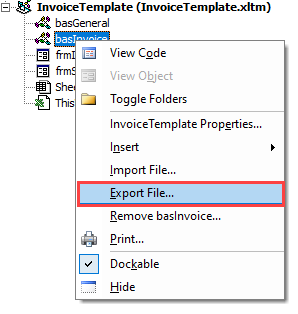
Select the module/form you wish to Export, and click on the File menu. Then select Export File.
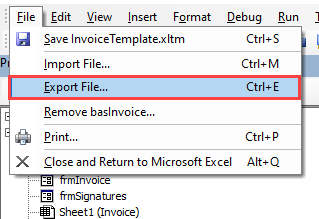
Select the location you wish to save the module to, and then click Save.
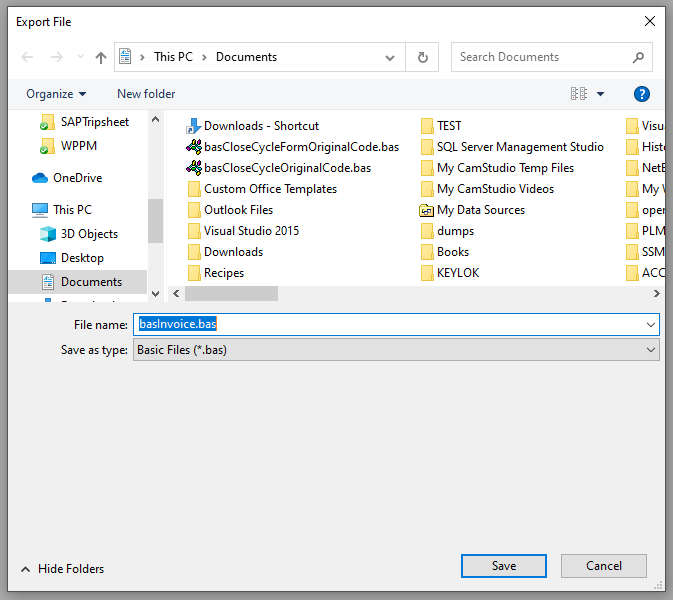
NOTE: when you Export a form or a module, it saves it as an individual file on your PC, but it DOES NOT remove it from your VBA Project.
Importing a VBA module or form into your VBA Project
Right click on your VBA Project and then click Import File.
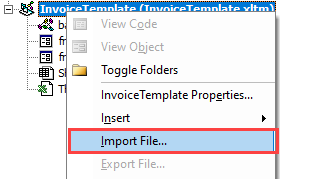
Select the file you wish to import, and click Open.
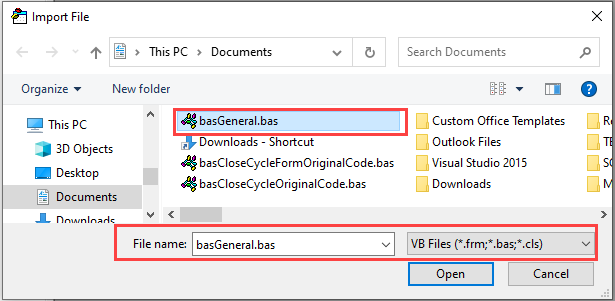
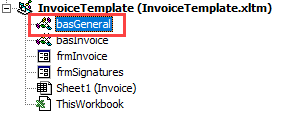
The module or form you have imported will now appear in your Project Explorer.

VBA Code Examples Add-in
Easily access all of the code examples found on our site.
Simply navigate to the menu, click, and the code will be inserted directly into your module. .xlam add-in.
Источник
What is a Class in VBA?
A class is a blueprint for an object to be created. A class itself does nothing but using classes you can create multiple identical objects that can perform operations or can be used as a data resource.
In real life, the model (design and functionalities) of a car is a class and the car itself is an object of that class. In the class, we define what the car has in it and what it can do. For example, a car has 4 wheels, 5 gears, steering wheel, etc. These are attributes/properties. We also define what a car can do, like moving forward, backward, turn, etc. These are functions of the car class. A car object created using car class, will have all these properties. If you define a car that has 5 wheels than a car created using this class will have 5 wheels. You get the point.
Enough of theory, now let’s see how you can use a class module in VBA.
Using Excel VBA class module
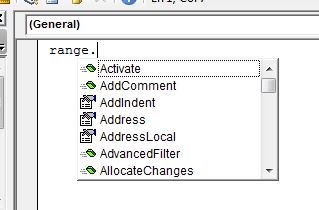
While working in VBA, you must have used Range(«A1»).select. The Range is pre-defined class in VBA. The select is one of the functions of Range class that select the specified range. Similarly, Debug is class in VBA and print and assert are it’s methods. Worksheets, Workbooks, Range, etc. all are VBA classes that we use in our subs.
Create your own class
First, we need to add a class module in VBA
Press ALT+F11 key combination to open excel VBA editor.
-
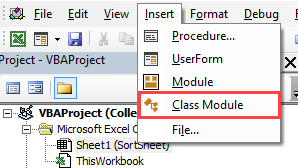
- Right-click on project explorer. Move the cursor to Insert—> Class module. Click on it. The same thing can be done from the Insert menu.
-
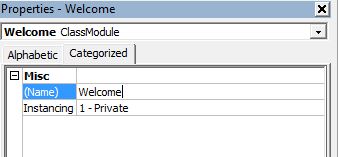
- The class will be added to the folder «Class module». The default name is like class1, class2, and so on. You can change the class name from the property window. Let’s name our class «Welcome».
- Now let’s create add some attributes to our class. Since I want these attributes to be available to the public, I have use accessibility operator public.
Public name As String
Public var1 As Integer
Public var2 As Integer
- Now let’s add a function to this class. I want a function that says Hi! to the user. To do so add a sub and name it sayHiTo.
Sub sayHiTo(user As String) name = user MsgBox ("Hi! " & name) End Sub - Now let’s use class in a module. Insert a new module if you don’t have any. Write a sub. I have named my sub Test.
Sub test()
 Dim wc As New Welcome 'Declared and initialized Welcome object
 wc.sayHiTo ("Jack") 'used sayHiTo method of Welcome Object.
End Sub
- Run this sub Test using F5 key. It will prompt «Hi! Jack» on excel workbook.

How does it work?
In sub Test, we have created is an object «wc» of Welcome class. An object is created in VBA in two methods. we run the code, Test sub creates an object wc of the Welcome class. This object has all the properties of the Welcome class. We use the sayHiTo method of the Welcome class to say hi to the user.
Object Creation in Excel VBA
-
- Instant creation
In Instant creation, we create an object while declaring the object with the «new» key. In our example above, we have used instant creation.
Dim wc As New Welcome
2. Delayed creation
In delayed creation, we first declare the object only. We don’t use the «new» keyword. In order to use the object, we need to initialize it with the «new» keyword.
Sub test()
 Dim wc As Welcome
 'wc.sayHiTo ("Jack") 'generates error since wc is not initialised yet
'initialising object
Set wc = New Welcome
wc.sayHiTo ("Cory") 'this will work.
End Sub
Accessing Variables of a Class
In the above examples, we have used public variables for class but it is wrong to practice. We should avoid using public variables in a class. Now the question is how would we access variables of the class. Earlier, we used subroutine to access name but VBA classes provide properties that are used to systematically update and retrieve private variable values of the class. The properties are more elegant than sub or function for updating and accessing private variables. Let’s see how.
Syntax of class property
Private name As String
Private var1 As Integer
Private var2 As Integer
Property Let MyName(nm As String)
name = nm
End Property

Property Get MyName() As String
MyName = name
End Property
Let’s use them in a module.
Sub test()
 'creating class object
 Dim wc As New Welcome
 Dim wc1 As New Welcome

 'using properties
 wc.MyName = "Exceltip.com"
 wc1.MyName = "ExcelForum.com"

 Debug.Print wc.MyName
 Debug.Print wc1.MyName

 End Sub
When you will run this test sub, you will get two names printed for two objects of the «Welcome» class.
How properties are different from sub and functions
In the above example, notice that we have used MyName property as a variable. We initialized the value of «Name» variable just by writing wc.MyName=»assdf». This line of command called the property called Property Get MyName() As String. We didn’t pass any value in parenthesis as we did in the beginning.
Similarly, to print the values of «Name» variable we used command Debug.Print wc.MyName. Isn’t it as simple as normal variable initialization? The only difference is that you can do a whole lot in the property segment. You put data validation, calculation, communication, etc. and user will only see the result.
Another difference is that we can use same name of the property to let and get part. This makes it easier and less confusing.
So yeah guys, this was a simple example of a class module in Excel VBA. This is just the tip of the iceberg, there’s a lot of juice in this topic that we will explore in later articles. We will explore each of them one by one in the easiest way possible. I hope I was explanatory enough to make you understand this. If you have any doubts regarding this topic or any other excel VBA topic, mention it in the comments section below.
Related Articles:
Import a module from a file using VBA in Microsoft Excel | Learn how to import entire module from another file using VBA.
Create a new module using VBA in Microsoft Excel | You can use a module to create another model in VBA. This can help you minimize the additional overhead work.
Add a procedure to a module using VBA in Microsoft Excel | To add procedures to modules automatically use this VBA code.
Popular Articles:
50 Excel Shortcuts to Increase Your Productivity | Get faster at your task. These 50 shortcuts will make you work even faster on Excel.
The VLOOKUP Function in Excel | This is one of the most used and popular functions of excel that is used to lookup value from different ranges and sheets.
COUNTIF in Excel 2016 | Count values with conditions using this amazing function. You don’t need filter your data to count specific value. Countif function is essential to prepare your dashboard.
How to Use SUMIF Function in Excel | This is another dashboard essential function. This helps you sum up values on specific conditions.
Знакомство с понятиями модуль, процедура, форма в VBA Excel. Модули разных типов. Создание пользовательской формы. Встроенные диалоговые окна.
Самый простой способ перейти в редактор VBA — при активном окне программы Excel нажать сочетание клавиш Alt+F11 (здесь используется левая клавиша Alt). Это сочетание работает во всех версиях программы. Если в открывшемся окне нет слева окна проводника «Project-VBAProject», вызовите его через главное меню, выбрав «View» — «Project Explorer». Внутренние окна в редакторе VBA можно перетаскивать и размещать в других местах главного окна.
Модули рабочей книги Excel представляют из себя файлы, предназначенные для создания и хранения программного кода в виде процедур (подпрограмм, функций и пользовательских свойств). Модули бывают нескольких типов: стандартные модули и модули классов (рабочих книг, рабочих листов, диаграмм, пользовательских форм).
Стандартный модуль
Стандартный модуль представляет из себя отдельный файл, встроенный в рабочую книгу Excel и принадлежащий всему проекту VBA (VBAProject) со всеми его объектами (ThisWorkbook, Worksheets, Charts, UserForms). Стандартный модуль можно экспортировать, импортировать или удалить. Его публичные процедуры с уникальными именами доступны во всех остальных модулях рабочей книги без дополнительной адресации. Для публичных процедур с неуникальными именами требуется указание имени модуля, из которого они вызываются.
Создание стандартного модуля:
- Откройте рабочую книгу Excel, в которую планируете добавить новый стандартный модуль, или создайте новую книгу в учебных целях.
- Откройте редактор VBA сочетанием клавиш Alt+F11.
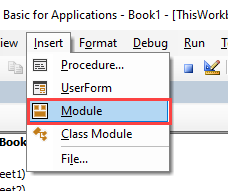
- В окне редактора VBA нажмите на пункт меню «Insert» и в открывшемся списке выберите «Module».
Таким образом, вы создали новый стандартный модуль. В проводнике справа появилась папка «Modules» и в ней файл «Module1» (или «Module» с другим номером, если в вашей книге модули уже были). Такие же модули создаются при записи макросов встроенным рекордером.
Открыть или перейти в окно открытого стандартного модуля можно, дважды кликнув по его имени в проводнике, или открыв на нем правой кнопкой мыши контекстное меню и выбрав «View Code». Кроме того, все уже открытые модули доступны во вкладке «Window» главного меню.
Важное примечание: в Excel 2007-2016 книги с программными модулями сохраняются как «Книга Excel с поддержкой макросов (.xlsm)». Если вы добавили модуль в книгу «Книга Excel (.xlsx)», то, при ее сохранении или закрытии, программа Excel предложит сохранить ее как «Книга Excel с поддержкой макросов (.xlsm)», иначе изменения (созданные или импортированные модули) не сохранятся.
Модули классов
К модулям классов относятся модули книг, рабочих листов, диаграмм и пользовательских форм.
Модуль книги
Модуль книги принадлежит только объекту Workbook (Рабочая книга). Открыть или перейти в окно открытого модуля книги можно, дважды кликнув в проводнике на пункте «ЭтаКнига», или открыв на нем правой кнопкой мыши контекстное меню и выбрав «View Code». Кроме того, открытый модуль доступен во вкладке «Window» главного меню.
Модуль листа
Модуль листа принадлежит только объекту Worksheet (Рабочий лист). Открыть модуль листа можно, дважды кликнув в проводнике по его имени, или открыв на нем правой кнопкой мыши контекстное меню и выбрав «View Code». Кроме того, перейти в модуль листа можно из рабочей книги, кликнув правой кнопкой мыши по ярлыку этого листа и выбрав в контекстном меню «Просмотреть код». Открытый модуль доступен во вкладке «Window» главного меню.
Модуль диаграммы
Модуль диаграммы принадлежит только объекту Chart (Диаграмма, вынесенная на отдельный лист рабочей книги). Открыть его можно так же, как и модуль рабочего листа.
Модуль формы
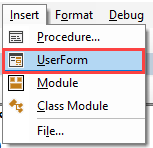
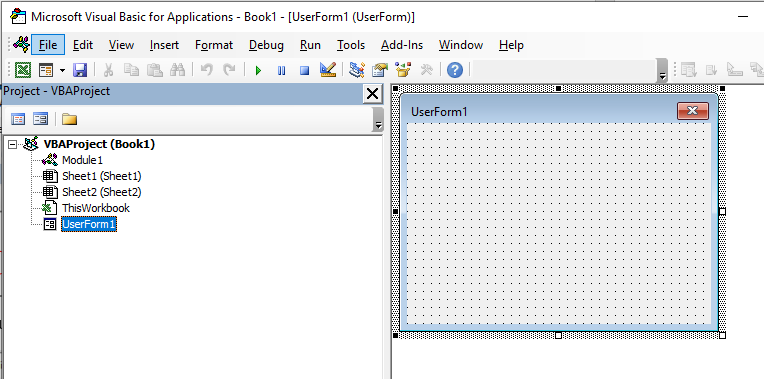
Модуль формы принадлежит только объекту UserForm (Пользовательская форма). Откройте редактор VBA сочетанием клавиш Alt+F11 и нажмите на пункт меню «Insert». В открывшемся списке выберите «UserForm». Таким образом вы создадите новую пользовательскую форму «UserForm1». В проводнике справа появилась папка «Forms» и в ней файл «UserForm1». Перейти в модуль формы можно, дважды кликнув по самой форме, или кликнув по имени формы в проводнике правой кнопкой мыши и выбрав в контекстном меню «View Code». Кроме того, открытый модуль доступен во вкладке «Window» главного меню.
Стандартных модулей в одной книге можно создать любое количество, модуль книги только один, модулей листов или форм только по одному для каждого экземпляра листа или формы.
Между открытыми окнами форм и модулей можно переходить, нажав в главном меню вкладку «Window», где перечислены все открытые модули и формы (активный объект отмечен галочкой).
Процедура
Процедуры VBA Excel, размещаемые в любом модуле, подразделяются на 3 типа:
- Sub (подпрограмма),
- Function (функция),
- Property (пользовательские свойства).
Главное отличие функции от подпрограммы заключается в том, что функция возвращает результат вычислений, а подпрограмма — нет. Процедура Property предназначена для создания пользовательских свойств и управления ими (используется не часто).
В редакторе VBA Excel перейдите в стандартный модуль и нажмите на пункт меню «Insert». В открывшемся списке выберите «Procedure…». Появится окно с предложением ввести название процедуры, выбрать тип и зону видимости. Создайте пару процедур с разной зоной видимости, пусть одна будет Sub, а другая — Function. В промежутке между началом и концом процедуры пишется программный код.
|
Private Sub Test() ‘Здесь пишется программный код End Sub |
Зона видимости Private означает, что эту процедуру можно вызвать только из того же модуля, в котором она записана.
Зона видимости Public означает, что эту процедуру можно вызвать не только из того же модуля, в котором она записана, но и из любого другого модуля этой книги и даже из модулей других книг.
Публичная процедура (Public) может быть записана и без явного указания видимости — зона видимости Public предполагается по умолчанию.
Первая запись:
и вторая запись:
равнозначны.
Форма
Формы в VBA Excel используются для создания диалоговых окон. Процедура создания новой формы описана в параграфе «Модуль формы». Обычно, вместе с новой формой открывается панель «ToolBox» с элементами управления, которые можно добавлять на форму. Если вы закрыли панель с элементами управлениями, отобразить ее снова можно через главное меню, выбрав «View» — «ToolBox».
Стоит добавить, что в VBA Excel есть два встроенных диалоговых окна — MsgBox и InputBox.
MsgBox — это окно для вывода информации с возвратом числового значения кнопки, нажатой пользователем.
InputBox — это окно с приглашением пользователя ввести какую-либо текстовую информацию. Есть еще расширенная версия этого окна — Application.InputBox, которую можно использовать для записи адреса выделяемого диапазона ячеек и не только для этого.
“Classes struggle, some classes triumph, others are eliminated. Such is history” – Chairman Mao
A Quick Guide to the VBA Class Module
| Item | Explanation |
|---|---|
| Class Module | Allows the user to create their own objects. |
| Method | A public function or sub in the class module. |
| Member variable | A variable declared in the class module. |
| Property | Special function/subs that behave like variables when used |
| Property types | Get, Set and Let. |
| Event — Initialize | Sub that automatically runs when the class module object is created. |
| Event — Terminate | Sub that automatically runs when the class module object is deleted. |
| Declaring and Creating — Static |
Dim o As New Class1 |
| Declaring and Creating — Dynamic | Dim o As Class1 Set o = New Class1 |
| Calling a class module sub | o.WriteValues Total |
| Calling a class module function | Amount = o.Calculate() |
| Using a class module property | o.Amount = 1 Total = o.Amount |
The Webinar
Members of the Webinar Archives can access the webinar for this article by clicking on the image below.
(Note: Archive members have access to the webinar archive.)

Introduction
VBA Class Modules allow the user to create their own objects. If you are not familiar with objects then I would highly recommend that you first check out my previous post VBA Objects – The Ultimate Guide.
In languages such as C# and Java, classes are used to create objects. Class Modules are the VBA equivalent of these classes. The major difference is that VBA Class Modules have a very limited type of Inheritance* compared to classes in the other languages. In VBA, Inheritance works in a similar way to Interfaces** in C#Java.
In VBA we have built-in objects such as the Collection, Workbook, Worksheet and so on. The purpose of VBA Class Modules is to allow us to custom build our own objects.
Let’s start this post by looking at why we use objects in the first place.
*Inheritance is using an existing class to build a new class.
**Interfaces are a form of Inheritance that forces a class to implement specifics procedures or properties.
Download the Source Code
Why Do We Use Objects
Using objects allows us to build our applications like we are using building blocks.
The idea is that the code of each object is self-contained. It is completely independent of any other code in our application.
This is similar to how things are built using Lego® bricks. There are many different types of Lego® components used. For example, a block, steering wheel, and laser are different items. They behave completely independently of each other. The wheel spins, the laser rotates etc. Yet we can connect them together to create a building, vehicle, space station and so on.
If you are still not clear about this then don’t worry. We’ll be breaking it all down into simple terms in the rest of this post.
Advantages of Using Objects
Treating parts of our code as blocks provide us with a lot of great advantages
- It allows us to build an application one block at a time.
- It is much easier to test individual parts of an application.
- Updating code won’t cause problems in other parts of the application.
- It is easy to add objects between applications.

Not a good look for your code © BigStockPhoto.com
Disadvantages of Using Objects
With most things in life there are pros and cons. Using VBA class modules is no different. The following are the disadvantages of using class module to create objects
- It takes more time initially to build applications*.
- It is not always easy to clearly define what an object is.
- People new to classes and objects can find them difficult to understand at first.
*If you create an application using objects it will take longer to create it initially as you have to spend more time planning and designing it. However, in the long run it will save you a huge amount of time. Your code will be easier to manage, update and reuse.
Creating a Simple Class Module
If you would like to see working examples of this code you can download the source code from the top of this post.
Let’s look at a very simple example of creating a class module and using it in our code.
To create a class module we right-click in the Project window and then select Insert and Class Module

Adding a Class Module
Our new class is called Class1. We can change the name in the Properties window as the following screenshot shows:

Let’s change the name of the class module to clsCustomer. Then we will add a variable to the class module like this:
Public Name As String

We can now use this class module in any module(standard or class) in our workbook. For example
' Create the object from the class module
Dim oCustomer As New clsCustomer

' Set the customer name
oCustomer.Name = "John"

' Print the name to the Immediate Window(Ctrl + G)
Debug.Print oCustomer.Name
Class Module versus Objects
People who are new to using classes and VBA class modules, often get confused between what is a class and what is an object.
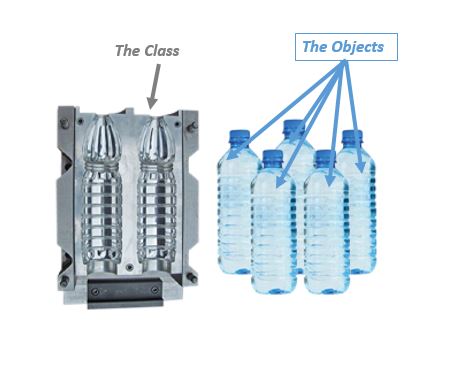
Let’s look at a real world example. Think of a mass produced item like a coffee mug. A design of the mug is created first. Then, thousands of coffee mugs are created from this design.
This is similar to how class modules and objects work.
The class module can be thought of as the design.
The object can be thought of as the item that is created from the design.
The New keyword in VBA is what we use to create an object from a class module. For example:
' Creating objects using new
Dim oItem As New Class1
Dim oCustomer1 As New clsCustomer
Dim coll As New Collection
Note: We don’t use New with items such as Workbooks and Worksheets. See When New is not required for more information.
VBA Class Modules Versus VBA Normal Modules
Writing code in a class module is almost the same as writing code in a normal module. We can use the same code we use in normal modules. It’s how this code is used which is very different.
Let’s look at the two main differences between the class and the normal module. These often cause confusion among new users.
Difference 1 – How the modules are used
If you want to use a sub/function etc. from a class module you must create the object first.
For example, imagine we have two identical PrintCustomer subs. One is in a class module and one is in a normal module…
' CLASS MODULE CODE - clsCustomer
Public Sub PrintCustomer()
    Debug.Print "Sample Output"
End Sub
' NORMAL MODULE CODE
Public Sub PrintCustomer()
    Debug.Print "Sample Output"
End Sub
You will notice the code for both is exactly the same.
To use the PrintCustomer sub from the class module, you must first create an object of that type
' Other Module
' https://excelmacromastery.com/
Sub UseCustomer()

    Dim oCust As New clsCustomer
    oCust.PrintCustomer

End Sub
To use PrintCustomer from the normal module you can call it directly
' Other Module
' https://excelmacromastery.com/
Sub UseCustomer()

    PrintCustomer

End Sub
Difference 2 – Number of copies
When you create a variable in a normal module there is only one copy of it. For a class module, there is one copy of the variable for each object you create.
For example, imagine we create a variable StudentName in both a class and normal module:
' NORMAL MODULE
Public StudentName As String
' CLASS MODULE called clsStudent
Public StudentName As String
For the normal module variable there will only be one copy of this variable in our application.
StudentName = "John"
For the class module, a new copy of the variable StudentName is created each time a new object is created.
Dim student1 As New clsStudent
Dim student2 As New clsStudent

student1.StudentName = "Bill"
student2.StudentName = "Ted"
When you fully understand VBA class modules, these differences will seem obvious.
The Parts of a Class Module
There are four different items in a class module. These are
- Methods – functions/subs.
- Member variables – variables.
- Properties– types of functions/subs that behave like variables.
- Events – subs that are triggered by an event.
You can see they are all either functions, subs or variables.
Let’s have a quick look at class that has examples of each of these:
' CLASS MODULE CODE from clsAccount
' https://excelmacromastery.com/vba-class-modules/

' Member variable
Private m_balance As Double

' Properties
Property Get Balance() As Double
    Balance = m_balance
End Property

Property Let Balance(value As Double)
    m_balance = value
End Property

' Event - triggered when class created
Private Sub Class_Initialize()
    m_balance = 100
End Sub

' Methods
Public Sub Withdraw(amount As Double)
    m_balance = m_balance - amount
End Sub

Public Sub Deposit(amount As Double)
    m_balance = m_balance + amount
End Sub
The following code demonstrates how this class could be used:
' This sub uses the clsAccount class
' The results are printed to the Immediate Window(Ctrl + G)
' https://excelmacromastery.com/vba-class-modules/
Sub Demo_clsAccount()

    Dim oAccount As New clsAccount

    ' Print the balance
    Debug.Print "Starting balance is: " & oAccount.Balance

    ' Deposit money
    oAccount.Deposit 25

    ' Print the balance
    Debug.Print "Balance after deposit is: " & oAccount.Balance

    ' Withdraw Money
    oAccount.Withdraw 100

    ' Print the balance
    Debug.Print "Balance after withdrawl is: " & oAccount.Balance

End Sub
If we run the code we will get the following:
Starting balance is: 100
Balance after deposit is: 125
Balance after withdrawl is: 25
Now that we have seen examples, let’s take a look at each of these in turn.
Class Module Methods
Methods refer to the procedures of the class. In VBA procedures are subs and functions. Like member variables they can be Public or Private.
Let’s look at an example:
' CLASS MODULE CODE for clsExample
' https://excelmacromastery.com/vba-class-modules/

' Public procedures can be called from outside the object
Public Sub PrintText(text As String)
    Debug.Print text
End Sub

Public Function Calculate(amount As Double) As Double
    Calculate = amount - GetDeduction
End Function

' private procedures can only be called from within the Class Module
Private Function GetDeduction() As Double
    GetDeduction = 2.78
End Function
We can use the clsExample class module like this:
' Sub used to demonstrate Class clsExample
' https://excelmacromastery.com/vba-class-modules/
Public Sub ClassMembers()

    Dim oSimple As New clsExample

    oSimple.PrintText "Hello"

    Dim total As Double
    total = oSimple.Calculate(22.44)

    Debug.Print total

End Sub
Class Module Member Variables
The member variable is very similar to the normal variable we use in VBA. The difference is we use Public or Private instead of Dim.
' CLASS MODULE CODE

Private Balance As Double
Public AccountID As String
Note: Dim and Private do exactly the same thing but the convention is to use Dim in sub/functions and to use Private outside sub/functions.
The Public keyword means the variable can be accessed from outside the class module. For example:
' This code will give an ERROR!!
Sub Demo_BankAccount()

    Dim oAccount As New clsBankAccount

    ' Valid - AccountID is public
    oAccount.AccountID = "499789"

    ' ERROR - Balance is private
    oAccount.Balance = 678.9

End Sub
In the above example, we cannot access Balance because it is declared as Private. We can only use a Private variable within the class module. We can use in a function/sub in the class module e.g.
' CLASS MODULE CODE
' https://excelmacromastery.com/
Private Balance As Double

Public Sub SetBalance()
    Balance = 100
    Debug.Print Balance
End Sub
It is considered poor practice to have public member variables. This is because you are allowing code outside the object to interfere with how the class works. The purpose of the using classes is so that we hide what is happening from the caller.
To avoid the user directly talking to our member variables we use Properties.
Class Module Properties
- Get – returns an object or value from the class
- Let – sets a value in the class
- Set – sets an object in the class
Format of VBA Property
The normal format for the properties are as follows:
Public Property Get () As Type
End Property

Public Property Let (varname As Type )
End Property

Public Property Set (varname As Type )
End Property
We have seen already that the Property is simply a type of sub. The purpose of the Property is to allow the caller to get and set values.
Why we use Properties
Why can’t we just make the variables Public and use them directly?
Let’s explain with some examples. Imagine we have a class that maintains a list of Countries. We could store the list as an array
' Use array to store countries
' https://excelmacromastery.com/
Public arrCountries As Variant

' Set size of array when class is initialized
' https://excelmacromastery.com/
Private Sub Class_Initialize()
    ReDim arrCountries(1 To 1000)
End Sub
When the user wants to get the number of countries in the list they could do this:
' NORMAL MODULE CODE
Dim oCountry As New clsCountry

' Get the number of items
NumCountries = UBound(oCountry.arrCountries) - LBound(oCountry.arrCountries) + 1
There are two major problems with the above code:
- To get the number of countries you need to know how the list is stored e.g. Array.
- If we change the Array to a Collection, we need to change all code that reference the array directly.
To solve these problems we can create a function to return the number of countries
' CLASS MODULE CODE - clsCountryList
' Array
Private arrCountries() As String

Public Function Count() As Long
    Count = UBound(arrCountries) + 1
End Function
We then use it like this:
' MODULE CODE
Dim oCountries As New clsCountries

Debug.Print "Number of countries is " & oCountries.Count
This code solves the two problems we listed above. We can change our Array to a Collection and the caller code will still work e.g.
' CLASS MODULE CODE
' Collection
' https://excelmacromastery.com/
Private collCountries() As Collection

Public Function Count() As Long
    Count = collCountries.Count
End Function
The caller is oblivious to how the countries are stored. All the caller needs to know is that the Count function will return the number of countries.
As we have just seen, a sub or function provides a solution to the above problems. However, using a Property can provide a more elegant solution.
Using a Property instead of a Function/Sub
Instead of the creating a Count Function we can create a Count Property. As you can see below they are very similar:
' Replace this
Public Function Count() As Long
    Count = UBound(m_countries) - LBound(m_countries) + 1
End Function

' With this
Property Get Count() As Long
    Count = UBound(m_countries) - LBound(m_countries) + 1
End Property
In this scenario, there is not a lot of difference between using the Property and using a function. However, there are differences. We normally create a Get and Let property like this:
' https://excelmacromastery.com/vba-class-modules/

Private m_totalCost As Double

Property Get totalCost() As Long
     totalCost = m_totalCost
End Property

Property Let totalCost(value As Long)
     m_totalCost = value
End Property
Using Let allows us to treat the property like a variable. So we can do this
oAccount.TotalCost = 6
The second difference is that using Let and Get allows us to use the same name when referencing the Get or Let property. So we can use the property like a variable. This is the purpose of using Properties over a sub and function.
oAccount.TotalCost = 6
value = oAccount.TotalCost
If we used a function and a sub then we cannot get the behaviour of a variable. Instead we have to call two different procedures e.g.
oAccount.SetTotalCost 6
value = oAccount.GetTotalCost
You can also see that when we used Let we can assign the value like a variable. When we use SetTotalCost , we had to pass it as a parameter.
The Property in a Nutshell
- The Property hides the details of the implementation from the caller.
- The Property allows us to provide the same behaviour as a variable.
Types of VBA Property
There are three types of Properties. We have seen Get and Let already. The one we haven’t looked at is Set.
Set is similar to Let but it is used for an object(see Assigning VBA Objects for more detail about this).
Originally in Visual Basic, the Let keyword was used to assign a variable. In fact, we can still use it if we like.
' These line are equivalent
Let a = 7
a = 7
So we use Let to assign a value to a variable and we use Set to assign an object to an object variable.
' Using Let
Dim a As Long
Let a = 7

' Using Set
Dim coll1 As Collection, coll2 As Collection
Set coll1 = New Collection
Set coll2 = coll1
- Let is used to assign a value to a basic variable type.
- Set is used to assign an object to an object variable.
In the following example, we use Get and Let properties for a string variable:
' CLASS MODULE CODE for clsPerson
' https://excelmacromastery.com/vba-class-modules/

' SET/LET PROPERTIES for a variable
Private m_name As String

' Get/Let Properties
Property Get name() As String
    name = m_name
End Property

Property Let name(name As String)
    m_name = name
End Property
We can then use the name properties like this:
' Testing Let and Set for the clsPerson Class
' https://excelmacromastery.com/vba-class-modules/
Sub TestLetSet()

    Dim name As String
    Dim oPerson As New clsPerson

    ' Let Property
    oPerson.name = "Bill"

    ' Get Property
    name = oPerson.name

End Sub
In the next example, we use Get and Set properties for an object variable:
' CLASS MODULE CODE for clsCurrency
' https://excelmacromastery.com/vba-class-modules/

Private m_Prices As Collection

' Get/Set Properties
Property Get Prices() As Collection
    Set Prices = m_Prices
End Property

Property Set Prices(newPrices As Collection)
    Set m_Prices = newPrices
End Property
We can then use the properties like this:
' The code below demonstrates how to use the LetSet properties with a class.
'
' 1. The sub creates a collection and adds value.
' 2. We then add it to the clsCurrency class object using the Set Property.
' 3. We then read it from the class object usiing the Get property.
'
' https://excelmacromastery.com/vba-class-modules/
Sub TestLetSet()

    ' Create a collection and add prices
    Dim Prices As New Collection
    Prices.Add 21.23
    Prices.Add 22.12
    Prices.Add 20.12

    Dim oCurrency As New clsCurrency

    ' Uses the Set property of clsCurrency to
    ' add the collection to the class
    Set oCurrency.Prices = Prices

    Dim PricesCopy As Collection
    ' Uses the Get property of clsCurrency
    ' to read the collection from the class
    Set PricesCopy = oCurrency.Prices

    ' Print the results to the Immediate Window(Ctrl + G)
    PrintCollection Prices, "Prices"
    PrintCollection PricesCopy, "Copy"

End Sub

' Print the contents of a Collection to the Immediate Window(Ctrl + G)
Sub PrintCollection(c As Collection, name As String)

    Debug.Print vbNewLine & "Printing " & name & ":"

    Dim item As Variant
    For Each item In c
        Debug.Print item
    Next item

End Sub
We use the Get property to return the values for both items. Notice that even though we use the Get Property to return the Collection, we still need to use the Set keyword to assign it.
One very important thing to understand is that when we use Set we are still referencing the same collection. Set is not creating a copy of the collection. You can read more about this here
Class Module Events
If you to see working examples of this code you can download the source code from the top of this post.
A class module has two events
- Initialize – occurs when a new object of the class is created.
- Terminate – occurrs when the class object is deleted.
In Object-Oriented languages like C++, these events are referred to as the Constructor and the Destructor. In most languages, you can pass parameters to a constructor but in VBA you cannot. We can use a Class Factory to get around this issue as we will see below.
Initialize
Let’s create a very simple class module called clsSimple with Initialize and Terminate events:
' CLASS MODULE CODE
' https://excelmacromastery.com/
Private Sub Class_Initialize()
    MsgBox "Class is being initialized"
End Sub

Private Sub Class_Terminate()
    MsgBox "Class is being terminated"
End Sub

Public Sub PrintHello()
    Debug.Print "Hello"
End Sub
In the following example, we use Dim and New to create the object.
In this case, oSimple is not created until we reference it for the first time e.g.
' https://excelmacromastery.com/
Sub ClassEventsInit2()

    Dim oSimple As New clsSimple

    ' Initialize occurs here
    oSimple.PrintHello

End Sub
When we use Set and New together the behaviour is different. In this case the object is created when Set is used e.g.
' https://excelmacromastery.com/
Sub ClassEventsInit()

    Dim oSimple As clsSimple

    ' Initialize occurs here
    Set oSimple = New clsSimple

    oSimple.PrintHello

End Sub
Note: For more information about the different between using New with Dim and using New with Set see Subtle Differences of Dim Versus Set
As I said earlier, you cannot pass a parameter to Initialize. If you need to do this you need a function to create the object first
' CLASS MODULE - clsSimple
' https://excelmacromastery.com/
Public Sub Init(Price As Double)

End Sub

' NORMAL MODULE
Public Sub Test()

    ' Use CreateSimpleObject function
    Dim oSimple As clsSimple
    Set oSimple = CreateSimpleObject(199.99)

End Sub

Public Function CreateSimpleObject(Price As Double) As clsSimple

    Dim oSimple As New clsSimple
    oSimple.Init Price

    Set CreateSimpleObject = oSimple

End Function
We will expand on this CreateSimpleObject in Example 2 to create a Class Factory.
Terminate
The Terminate event occurs when the class is deleted. This happens when we set it to Nothing
' https://excelmacromastery.com/
Sub ClassEventsTerm()

    Dim oSimple As clsSimple
    Set oSimple = New clsSimple

    ' Terminate occurs here
    Set oSimple = Nothing

End Sub
If we don’t set the object to Nothing then VBA will automatically delete it when it goes out of scope.
What this means is that if we create an object in a procedure, when that procedure ends VBA will delete any objects that were created.
' https://excelmacromastery.com/
Sub ClassEventsTerm2()

    Dim oSimple As New clsSimple

    ' Initialize occurs here
    oSimple.PrintHello

   ' oSimple is deleted when we exit this Sub calling Terminate
End Sub
Class Module Example 1
In this example, we are going to look at a very common use of a Class module.
Imagine we have the following data

We want to read the Albums based on a range of years and then create various reports.
We could use a 2D Array for this or a Collection of collections e.g.
' https://excelmacromastery.com/
For i = 2 To rg.Rows.Count

    Year = rg.Cells(i, 3)
    If startYear <= Year And endYear >= Year Then

        ' Create a new collection for each row
        Set rowColl = New Collect

        ' Add artist
        rowColl.Add rg.Cells(i, 1).Value
        ' Add Title
        rowColl.Add rg.Cells(i, 2).Value

        ' and so on

        ' Add row collection to main collection
        coll.Add rowColl

    End If

Next i
As you can imagine this code would get messy very quickly.

© BigStockPhoto.com
Lucky for us we have VBA class modules to make our life easier. We can create a class module to store the items.
' clsAlbum class module
Private m_sArtist As String
Private m_sTitle As String
Private m_sYear As String
Private m_sGenre As String
Private m_sSales As String

' Properties
' https://excelmacromastery.com/
Public Property Get Artist() As String
    Artist = m_sArtist
End Property
Public Property Let Artist(ByVal sArtist As String)
    m_sArtist = sArtist
End Property

' etc
Each time we want to add a record we can do it as follows:
' Declare the Variable
Dim oAlbum As clsAlbum

' Create new album
Set oAlbum = New clsAlbum

' Add the details
oAlbum.Artist = rg.Cells(i, 1)
oAlbum.Title = rg.Cells(i, 2)
oAlbum.Year = rg.Cells(i, 3)
oAlbum.Genre = rg.Cells(i, 4)
oAlbum.Sales = rg.Cells(i, 5)

' Add the album object to the collection
coll.Add oAlbum
You can see that this makes our code much more readable. It is clear what Artist, Title etc. are being used for.
We can then easily use this data to create reports, write to files etc.
' https://excelmacromastery.com/
Sub PrintAlbum(coll As Collection)

    Dim oAlbum As clsAlbum

    For Each oAlbum In coll
        ' Print out the title and artist for each album
        Debug.Print oAlbum.Title, oAlbum.Artist
    Next

End Sub
Below is the full code for this example:
' https://excelmacromastery.com/
Sub CreateReport()

    Dim coll As Collection
    ' read the data
    Set coll = ReadAlbums(1990, 2001)

    ' Print the album details
    PrintAlbum coll

    ' Print the total sales
    PrintTotalSales coll

End Sub

Function ReadAlbums(startYear As Long, endYear As Long) _
              As Collection

    Dim rg As Range
    Set rg = Sheet1.Range("A1").CurrentRegion

    ' Create a collection to store the albums
    Dim coll As New Collection
    Dim oAlbum As clsAlbum

    Dim i As Long, Year As Long
    For i = 2 To rg.Rows.Count

        Year = rg.Cells(i, 3)
        If startYear <= Year And endYear >= Year Then
            ' Create new album
            Set oAlbum = New clsAlbum
            ' Add the details
            oAlbum.Artist = rg.Cells(i, 1)
            oAlbum.Title = rg.Cells(i, 2)
            oAlbum.Year = Year
            oAlbum.Genre = rg.Cells(i, 4)
            oAlbum.sales = rg.Cells(i, 5)
            ' Add the album objecdt to the collection
            coll.Add oAlbum
        End If

    Next i

    Set ReadAlbums = coll

End Function

Sub PrintAlbum(coll As Collection)

    Dim oAlbum As clsAlbum
    For Each oAlbum In coll
        Debug.Print oAlbum.Title, oAlbum.Artist
    Next

End Sub

Sub PrintTotalSales(coll As Collection)

    Dim oAlbum As clsAlbum, sales As Double
    For Each oAlbum In coll
        sales = sales + oAlbum.sales
    Next

    Debug.Print "Total number sales is " & sales

End Sub
Class Module Example 2
In this example, we’re going to take things a bit further. We’re going to look at some neat tricks when using objects.
Imagine you have a list of products like in the image below.

The products have different fields so we need to use a different class module for each product type. One type for a Book row, one type for a Film row.
We’ll create our class modules first. As you can imagine the are very similar for both product types
' CLASS MODULE - clsBook
' https://excelmacromastery.com/
' Member variables
Private m_Title As String
Private m_Year As Long

' Properties
Property Get ItemType() As String
    ItemType = "Book"
End Property
Property Get Title() As String
    Title = m_Title
End Property
Property Get Year() As Long
    Year = m_Year
End Property

' Methods
Public Sub Init(rg As Range)
    m_Title = rg.Cells(1, 2)
    m_Year = CLng(rg.Cells(1, 4))
End Sub

Public Sub PrintToImmediate()
    Debug.Print ItemType, m_Title, m_Year
End Sub
' CLASS MODULE - clsFilm
' https://excelmacromastery.com/
' Member variables
Private m_Title As String
Private m_Year As Long

' Properties
Property Get ItemType() As String
    ItemType = "Film"
End Property
Property Get Title() As String
    Title = m_Title
End Property
Property Get Year() As Long
    Year = m_Year
End Property

' Methods
Sub Init(rg As Range)
    m_Title = rg.Cells(1, 2)
    m_Year = CLng(rg.Cells(1, 5))
End Sub

Public Sub PrintToImmediate()
    Debug.Print ItemType, m_Title, m_Year
End Sub
As you can see, the only real difference is the Init sub.
When we read each record we need to determine if it is a Book or Film. Then we create the appropriate object. You would imagine we would have to create a variable for each type e.g.
' One variable required for each type
Dim oBook As clsBook
Dim oFilm As clsFilm

' If book do this
Set oBook = New clsBook

' Else If film do this
Set oFilm = New clsFilm
If we had lots of different types this would get very messy indeed. The good news is we only need to use one variable!
In VBA we can declare a variable as a Variant. When we use a Variant we are essentially saying “We will decide the type of variable when the code is running”.
This is very useful when dealing with objects and allows us to get away with using one variable e.g.
' Only one variable required
Dim oItem As Variant

' If book set type to clsBook
Set oItem = New clsBook

' Else If film set type to clsFilm
Set oItem = New clsFilm
This is really useful as we only need one variable no matter how many objects we have.
A second advantage of using a Variant is this. If each Class Module has a sub/function with the same name and parameters, we can use the same variable to call it
So imagine clsBook has a function called InitBook and clsFilm has a function called InitFilm. We would need to do this:
' If clsBook
If Type = "Book" Then
    oItem.InitBook
ElseIf Type = "Film" Then
    oItem.InitFilm
However, if they have the same name, e.g. Init, we can replace the IfElseIf lines of code with one line:
    ' this will call the Init sub of whatever type oItem is set to
    oItem.Init
We can now create a function to create the appropriate object. In Object Oriented Programming, we have what is called a Class Factory. This is simply a function that creates an object based on a given type.
We saw earlier that the Initialize event does not take parameters. We can call Init in the Class Factory to get around this issue.
The full code for the ClassFactory function is here:
' https://excelmacromastery.com/
Function ClassFactory(rg As Range) As Variant

    ' Get product type
    Dim sType As String
    sType = rg.Cells(1, 1)

    ' Create an object based on the type
    Dim oItem As Variant
    Select Case sType

        Case "Book":
            Set oItem = New clsBook
        Case "Film":
            Set oItem = New clsFilm
        Case Else
            MsgBox "Invalid type"

    End Select

    ' Parse the fields to the correct class variables
    oItem.Init rg

    ' Return the product object
    Set ClassFactory = oItem

End Function
This following is our starting sub. In this sub, we read through the worksheet and pass the range to ClassFactory.
It creates the object, passes the range to the object Parse method. Then it returns the object which we add to our Collection.
' https://excelmacromastery.com/
Sub ReadProducts()

    ' Create the collection
    Dim coll As New Collection
    Dim product As Variant

    Dim rg As Range


    ' Read products from the worksheet
    Dim i As Long
    For i = 1 To 2
        Set rg = Sheet1.Range("A" & i & ":E" & i)
        Set product = ClassFactory(rg)
        coll.Add product
    Next

    ' Print the product details to the Immediate Window(Ctrl + G)
    PrintCollection coll

End Sub
We can also use the variant object to print the items. As long as both objects have a sub with the same name and parameters(e.g PrintToImmediate) we can call it using a Variant type.
' https://excelmacromastery.com/
Public Sub PrintCollection(ByRef coll As Collection)

    Dim v As Variant
    For Each v In coll
        ' Print items
        v.PrintToImmediate
    Next

End Sub
The source code for this post also includes this example using Inheritance(i.e. class interfaces). You can download the code here:
Conclusion
That concludes my post on the VBA Class Modules. In this post, we have looked at the parts of the VBA Class Module and two example cases where you would use them.
It’s important to understand that Classes and Objects is a vast topic. There are countless types of objects you can create and ways you can use them.
If you plan to use Class Modules then my advice is to start simple and get familiar with how to create a simple one. Once you have mastered the basics it will be much easier to move onto more challenging scenarios.
What’s Next?
Free VBA Tutorial If you are new to VBA or you want to sharpen your existing VBA skills then why not try out the The Ultimate VBA Tutorial.
Related Training: Get full access to the Excel VBA training webinars and all the tutorials.
(NOTE: Planning to build or manage a VBA Application? Learn how to build 10 Excel VBA applications from scratch.)
VBA Macro is for developers. In Excel, macro is a piece of code written in VBA and VBA is Microsoft’s programming language, it stands for Visual Basic for Applications. The module is a file with a .bcf extension that stores the code written in the Visual Basic for Applications editor. Let’s learn, how to run a code from a module in excel VBA.
Run a code from the Module in Excel VBA
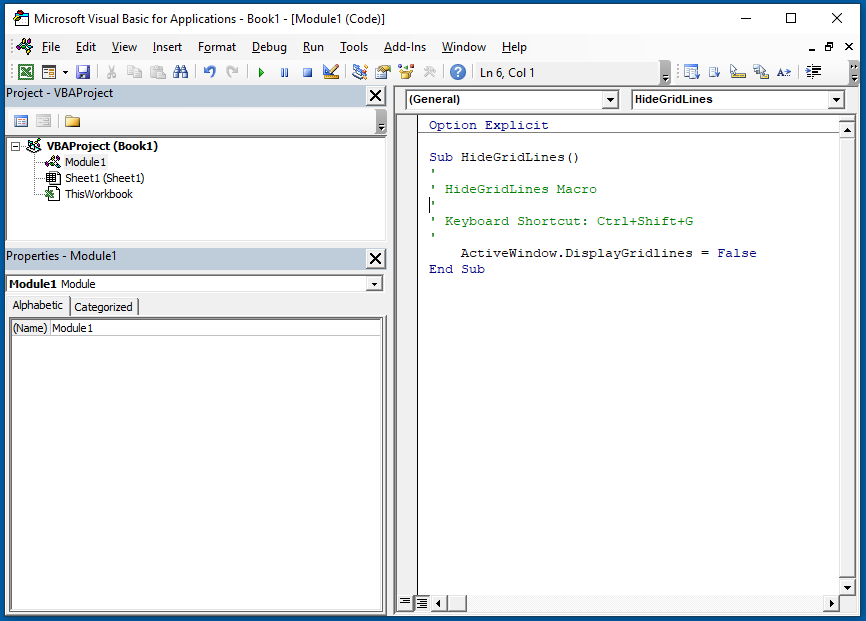
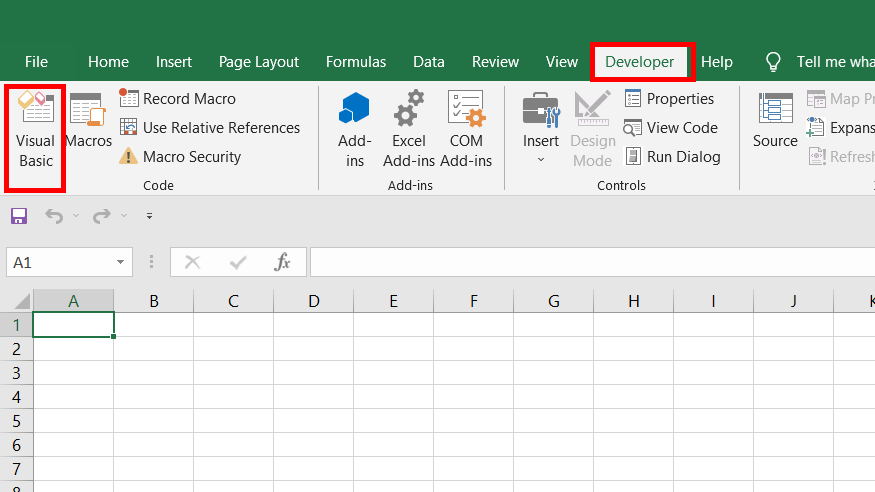
Step 1: Go to Developer Tab, under the code section you will find Visual basic. Now click on Visual Basic.
Step 2: Microsoft Visual Basic for Applications(VBA) dialogue box appears. In the Menu bar, go to Insert Tab, and click on Module.
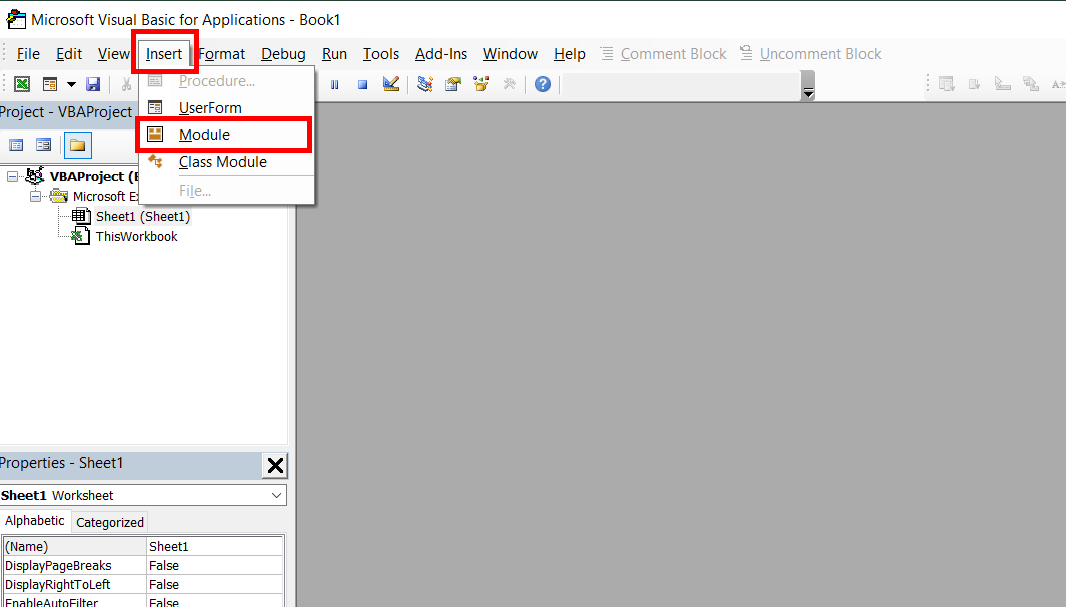
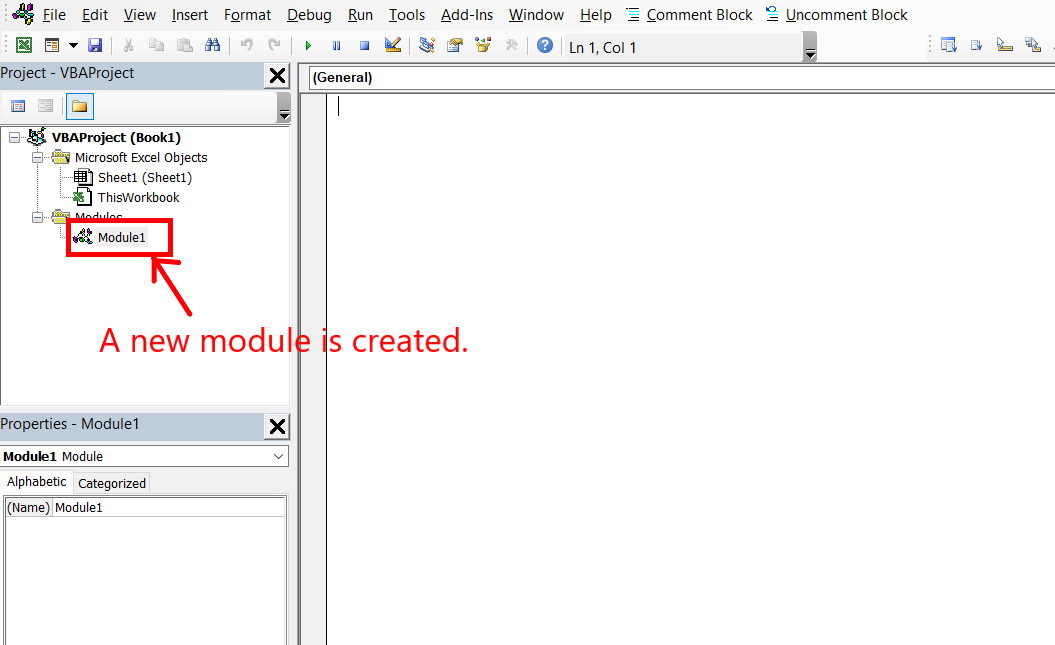
Step 3: A Module named Module1 is created under the VBA project.
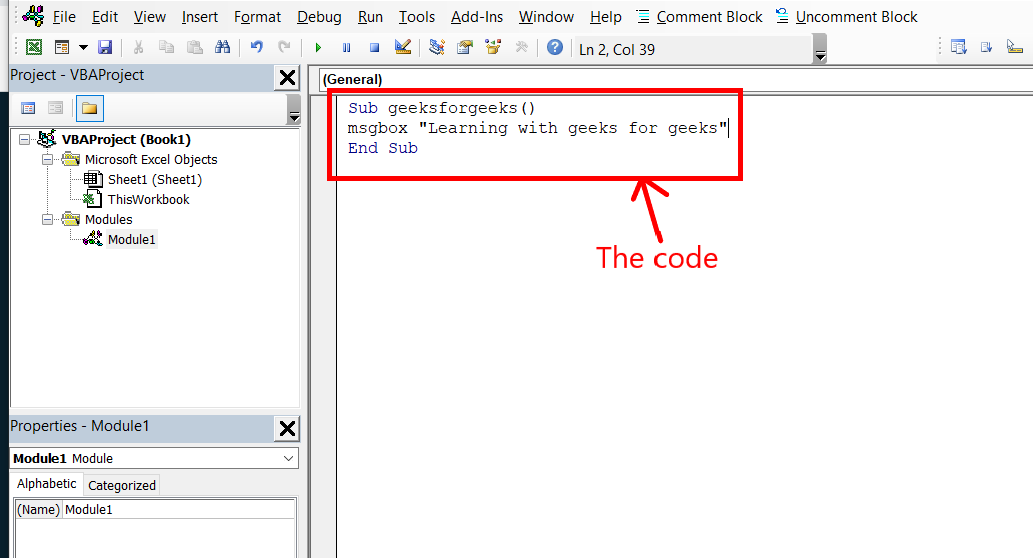
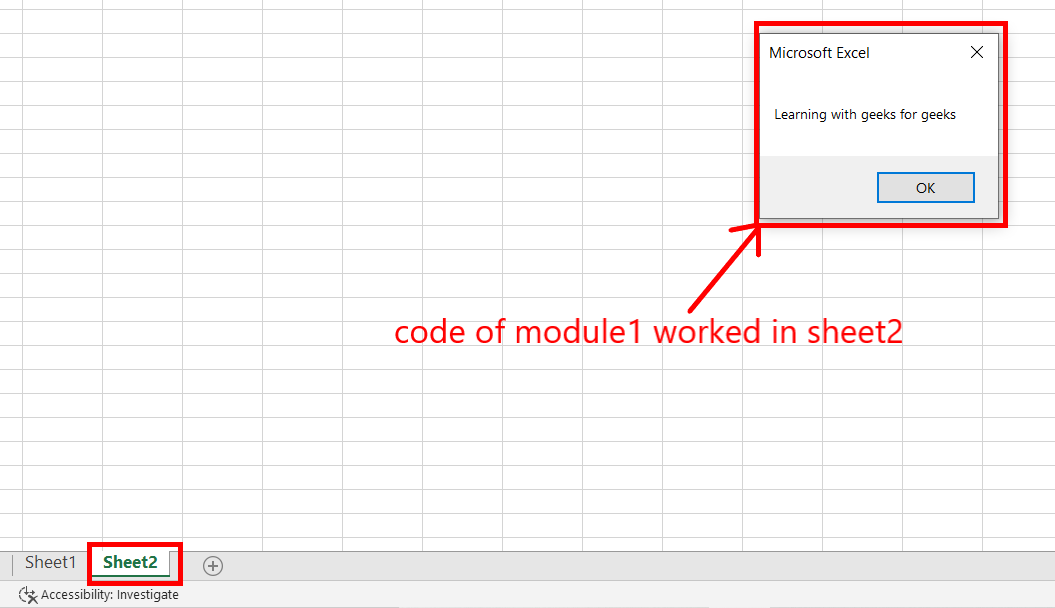
Step 4: Write the code you want to run in Microsoft excel. For example, a message box will appear stating “Learning geeks for geeks”.
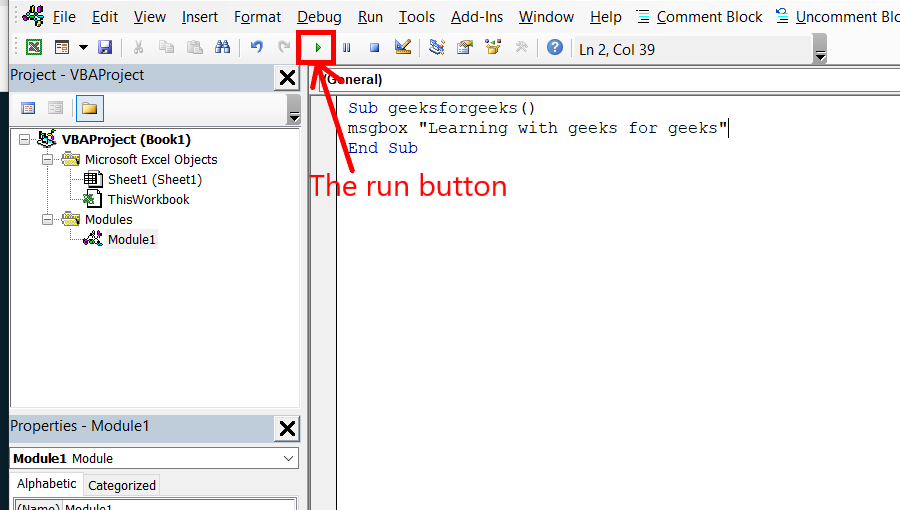
Step 5: In the Tools bar. Click on the run button. You can also press F4(Fn + f4) on your keyboard to run the module code.
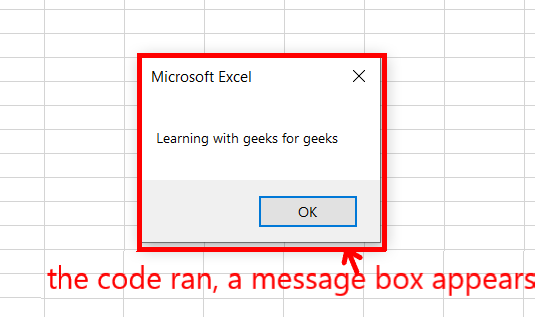
Step 6: The code pauses and the Microsoft VBA editor minimizes and a message box appears in the MS Excel worksheet. Click Ok. The code resumes and the Microsoft VBA editor maximizes again.
Scope of Module in VBA
The scope of the module in VBA is workbook level. You can use the written modules in different worksheets. You have created a module named module1 in shee1 above. A sub-procedure named geeksforgeeks() is also created. We will use this procedure to check the scope of a module in VBA. Following are the steps:
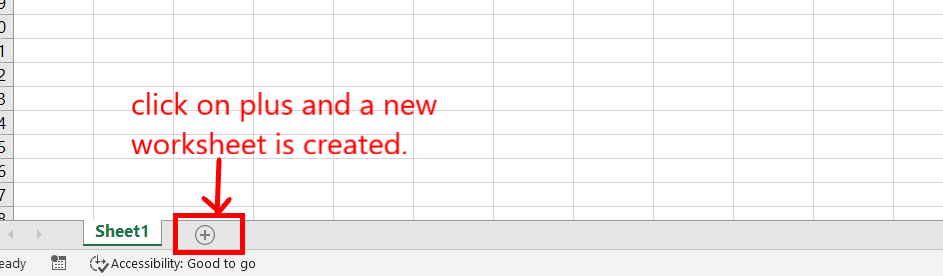
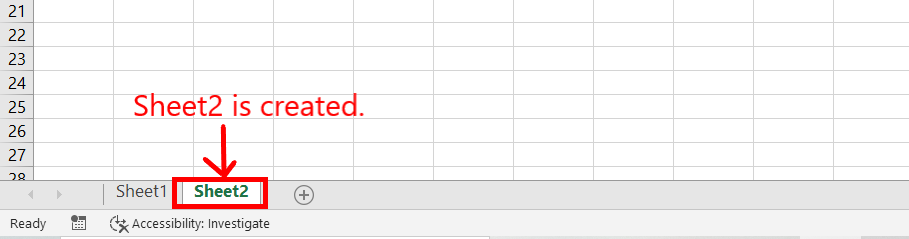
Step 1: Click on the plus and a new worksheet named sheet2 is created.
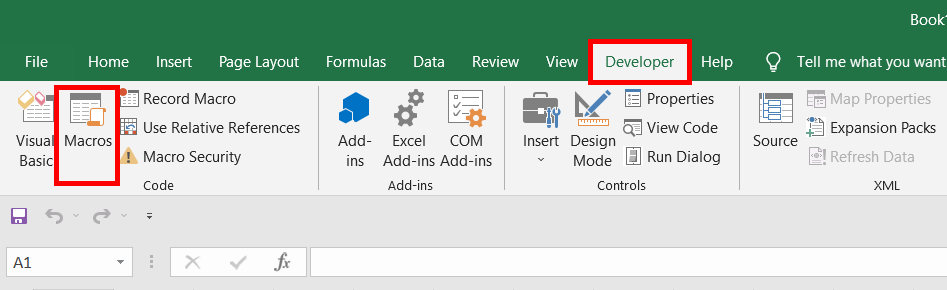
Step 2: Go to the Developer tab, and click on Macros.
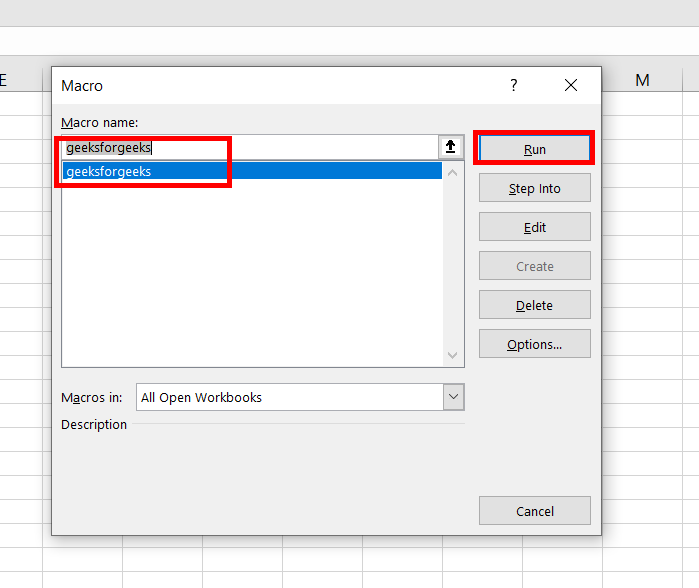
Step 3: A dialogue box named Macro appears. In the macro name, you will find a procedure name geeksforgeeks(). This was the procedure that we wrote in sheet1 of this workbook. This proved that the scope of the module is workbook level. Select it, and click on Run.
Step 4: The code written in the module1 sub procedure gets executed. A dialogue box appears.
Home / VBA / VBA Module | Insert, Remove, Restore, and BackUp
What is VBA Module
VBA module is a “.bcf” extension file that holds the code in the visual basic editor. Each module has its own code window where you can write. You can insert a new module, delete, backup, and import it. In simple words, it’s like a text file that you open in the notepad.
In this tutorial, we will learn all about using a module in VBA.
- First of all, open the Project Window if it’s not there already.
- Next, right-click on the project (Excel File) in which you want to insert a module.
- After that, go to the Insert and click on the “Module”.
- Once you do that, you will instantly get a new module and can open its code window to write the code.

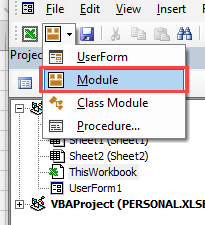
You can also go to the insert menu and then the module to insert it.

When you insert a new module, VBA creates a separate folder for all the modules that you have in the project.

Delete a VBA Module
- Click on the project from which you want to delete a module.
- Now right-click on the module that you want to delete and click “Remove”.
- After that, you need to confirm if you wish to back up the module before deleting it.
- In the end, click on “Yes” to delete it.

There’s one thing that you need to know here when you click on the remove option, it asks you to back up your module before removing it (if you want).

It’s a smart way to remind you to get the backup of the module.
Export and Import a VBA Module
You can also import and export a module from one Excel file to another instead of copy-pasting the codes. This is one of the best ways to share your codes with others. When you right-click on a module you have both options there.

As I said earlier, you can save a module as a “.bcf” file and import it in the future or some other Excel file.
Quick Tip: If you want to copy an entire module to a different project whose Excel file is open at the time. Drag and Drop that module to the project where you want to copy it.

Normal VBA Modules Vs. Class Modules
When you insert a new module, you can see an option to insert a class module. But there’s a slight difference between both modules. As you have understood all about the standard modules, class modules are special modules that can help you create your custom objects. You can also define methods, properties, and events for those objects. And when you create a new object from the class module, you can refer to it from the standard module as well.
In this Article
- VBA Class Modules – Introduction
- Class Modules vs. Modules
- Advantages of Using Class Modules
- Disadvantages of Using Class Modules
- Inserting a Class Module
- Creating an Object Item
- Creating a Collection
- Using Your New Object
- Summary of Creating an Object Using a Class Module
- Using a Class Module to Create a Variable Repository
- Turning Your Object into an Add-In
This tutorial will teach you about Class Modules in VBA. You’ll learn what they are and how to use them.
VBA Class Modules – Introduction
When you insert modules into the Visual Basic Editor (VBE) in order to enter your code, you may have noticed that you can also insert what is called a ‘Class Module’.
Class Modules vs. Modules
The class modules work in a very different way to the ordinary modules in that they facilitate creating a Component Object Model (COM) which can then be used within your normal VBA code
Effectively, you create an object which works in the same way as a built in Excel object such as ‘Worksheets’. In the Worksheets Object, you have a number of properties and methods which allow you to get the number of worksheets within a workbook or each individual name of a worksheet, or numerous other information
When you create a new Object in this way, you are creating a building block which can be used anywhere within VBA. The Object has a number of properties and methods that can be accessed by your VBA code from anywhere within the workbook without having to keep re-writing the code over again.
As well as referring to your new object from a standard VBA module, you can also use it in the code behind a UserForm that is part of your custom application
You can also use it where you have placed Active X controls onto a worksheet, such as a command button or a drop down. These controls all use VBA, and your new object can easily be incorporated into the event code for these controls.
You can also turn your object into an Excel add-in. Your object will automatically be available to other users who have that add-in loaded. This adds your own multi-tier architecture to your Excel application
Excel is a multi-tiered application. There is the client services layer, which drives the actual worksheet window that that the user is familiar with. The Excel object model is the next layer underneath. Press F2 in a VBA module and you will be able to see the huge number of objects and members of those objects that are the engine of Excel. Note that your new object will also be displayed here.
Finally, underneath all of this, you have the data services layer which holds all the data that you have entered into the worksheets and cells. Excel accesses this using the Excel Object model.

Creating a Class Module allows you to extend the Excel Object Module with your own custom objects and members
This article explains to you how you to create a simple hierarchy of objects using Class Modules.
Advantages of Using Class Modules
- You can develop a robust building block which can be used in any number of different Excel applications
- Once it is thoroughly tested, then is can be relied on to always produce the correct results in the same way as the built-in Excel objects
- If updates are made to code elsewhere in the application, the new object will still continue to work in the same way
- You can use your new object in other Excel applications as an add-in
- The objects can be re-used in other applications and helps in debugging
Disadvantages of Using Class Modules
- They can be difficult to create and understand.
- Naming conventions are very important because this is what you will see when use your object within a normal module.
- If you have not created a class module before, they can be difficult to understand and there is a steep learning curve
- Impossible to make changes at run-time – you have to re-set the project.
- If Properties and Private Variables have the same name then infinite loops can occur resulting in errors
Inserting a Class Module
Select Insert | Class Module from the VBE (Visual Basic Editor) menu. The new Class Module will automatically be called ‘Class 1’, but this needs to be changed immediately to the name that you are going to use for your object
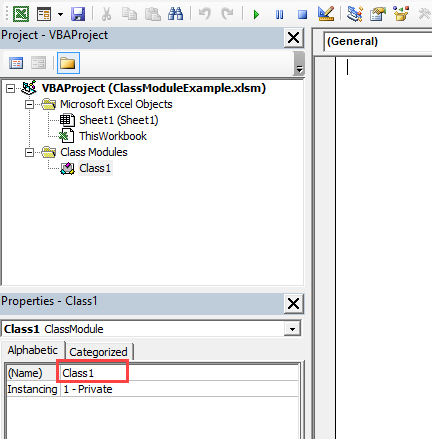
You change the name in the Properties window where the arrow is pointing. You simply type in your new name, and this will change in the Class Modules collection
If the Properties window is not visible, then select View | Properties on the VBE menu or press F4
Call your new class module ‘MyItem’ and double click the name in the tree-view in the Project Explorer to display the code window for it.
Creating an Object Item
This example will create a top-level object called ‘MyItems’ with a member object below it called ‘MyItem’ which will hold the individual data for each item. Once created it will work in the same way as a built in Excel Object. For example, there is an object called ‘Worksheets’ which is a collection of each worksheet within your workbook. There is also an object called ‘Sheet’ which represents each individual worksheet within your workbook, and holds all the properties and methods for each worksheet. This object relates to the ‘Worksheets’ collection object.
You can iterate through the ‘Worksheets’ collection, viewing each ‘Sheet’ in turn. In the same way you will be able to iterate through the ‘MyItems’ collection viewing the properties that you created in the ‘Myitem’ member.
The first thing to do is to create the sub object for the member level which will hold the actual items within the collection of the top-level object. This is the equivalent of the members (e.g. name, visible, count) within the ‘Sheet’ object in Excel. This code is entered into the class module called ‘MyItem’
Class modules have Properties and Methods. Properties are effectively like variables, in that they hold values of data like variables, and Methods are like sub routines or functions.
In the sub object we are going to create two properties for the object – Item and Detail
Initially two string variables need to be declared to hold the values for the properties:
Private mItem As String
Private mDetail As String
These need to be declared in the Declarations section at the top of the code for the class module so that they can be used in all sub routines throughout the module
They need to be given unique names to make them different from the properties that we are going to create, so an ‘m’ (for member) has been put in front of each name.
The variables are declared as Private so they cannot be seen by anyone using the object. They are working variables for use within the object code and are not there as part of the final object.
The next step is to set up code to give access to the two properties. You do this by means of a Property Let and a Property Get statement for each property. These must be Public otherwise the top-level object will not have any visible properties
Public Property Let Item(vdata As String)
      mItem = vdata
End Property

Public Property Get Item () As String
      Item = mItem
End Property

Public Property Let Detail (vdata As String)
      mDetail = vdata
End Property

Public Property Get Detail () As String
      Detail = mDetail
End Property
This code creates the means to read and write values to the two properties (Item and Detail) using the two private variables that were defined in the declarations section of the module.
The ‘vdata’ parameter is used to pass data to the property concerned.
It is important that each property has a ‘Let’ and ‘Get’ statement and that the property name is the same in each case. You could end up with two different properties if miss-spelt – one that you can read from and one that you can write to!
To help with creating this code, you can use Insert | Procedure on the VBE menu to create a code skeleton which will create the initial code for the ‘Get’ and ‘Let’ properties for a given property name
This will display a pop-up window where you type the property name in and select ‘Property’ on the radio buttons:

Click ‘OK’ and the skeleton code will be added into the class module:
Public Property Get MyProperty() As Variant

End Property

Public Property Let MyProperty(ByVal vNewValue As Variant)

End Property
This prevents any mistakes over names of properties. You simply add your code in between the ‘Public Property’ and ‘End Property’ statements.
You now have an object called ‘MyItem’ which will hold all the data for this exercise.
VBA Coding Made Easy
Stop searching for VBA code online. Learn more about AutoMacro — A VBA Code Builder that allows beginners to code procedures from scratch with minimal coding knowledge and with many time-saving features for all users!
Learn More
Creating a Collection
The next stage is to create a top-level object as a Collection object to give access to the properties that you have set up in the ‘MyItem’ object
Again, you need to define a working object to act as the collection object in the same way that you defined the two string variables in the ‘MyItem’ object.
Private mItems As CollectionAgain, this this has to have a unique name which is why there is an ‘m’ (member object) in front of the name, and it is also declared as ‘Private’ so that it does not appear when the new object is being used
Next, you need to populate the Class_Initialize code. This runs when you first use the object within your code, and it determines what values will be loaded into the object
You can access this sub routine by selecting ‘Class’ in the first drop down and ‘Initialize’ in the second drop down of the module window
Private Sub Class_Initialize()
Dim objItem As MyItem
Set mItems = New Collection
For n = 1 To 3
       Set objItem = New MyItem
       objItem.Item = Worksheets("Sheet1").Range("a" & n).Value
    objItem.Detail = Worksheets("Sheet1").Range("b" & n).Value
       mItems.Add objItem
Next n
End Sub
The code sets up an object called ‘objItem’ using the definition of ‘MyItem’ which we built as a class module earlier on.
It then creates a new Collection based on the ‘mItems’ object defined earlier
It iterates through values held on Sheet1 of the workbook and puts them into the properties that we created for the ‘MyItem’ object. Note that when you use ‘objitem’, a drop down appears showing the two properties, exactly as if you were using a built-in Excel object.
The item object is then added into the collection object which now holds all the data in the property values.
The input data does not have to be taken from a worksheet. It could be static values, or it could come from a connection to a database such as Microsoft Access or SQL Server, or it could come from another worksheet.
You then need to add a public function called ‘Item’
Public Function Item(index As Integer) As MyItem
      Set Item = mItems.Item(index)
End Function
This allows you to refer to individual objects within the collection object by their index number. This function provides a ‘mirror’ of what is going on in the ‘mMyItems’ collection in the background.
You will also need to add a property called ‘Count’ so that your code can establish how many ‘MyItem’ objects are in the ‘MyItems’ collection, should you wish to iterate through it.
Public Property Get Count() As Long
      Count = mItems.Count
End Property
In this case you only need a ‘Get’ property because it is read-only. It uses the mItems collection because this already has a count property built into it.
You now have an object (MyItems) with a full hierarchy defined by the object ‘MyItem’
To make the whole thing work, you now need to populate a worksheet (Sheet1) with data so that the Class Initialize routine can collect this into the object
Your spreadsheet should look like this:

Using Your New Object
You can now use your Collection object (MyItems) within a standard Excel VBA module. Enter the following code:
Sub test_object()
Dim MyClass As New MyItems, n As Integer
MsgBox MyClass.Count
For n = 1 To MyClass.Count
    MsgBox MyClass.Item(n).Item
    MsgBox MyClass.Item(n).Detail
Next n
End Sub
This code creates an object called ‘MyClass’ based on the collection object that you created called ‘MyItems’. This fire off the ‘Initialize’ routine that extracts all the data from the worksheet into the object.
It displays the number of items in the collection and then iterates through the collection showing the ‘Item’ text and the ‘Detail’ text. You will notice that when you refer to the ‘MyClass’ object in your code, you will see a list of the two member properties which helps in adding the correct property.
If you change the value of a cell in the input data on the spreadsheet, this will automatically be updated in the collection when you run the above code again, since when you dimension the object, the initialize routine runs and picks up all the new data
If you use the word ‘Static’ instead of ‘Dim’ the initialise routine does not run and the old values are kept, so long as the code is continuously running. If the data on the spreadsheet changes this will not be reflected in the object
Sub Test_Static()
Static Myclass As New MyItems, n As Integer
For n = 1 To Myclass.Count
       MsgBox Myclass.Item(n).Item
    MsgBox Myclass.Item(n).Detail
Next n
End Sub
Summary of Creating an Object Using a Class Module
As you have seen, creating a hierarchy of class modules to use as an object is quite a complicated business, even for a structure as simple as the example provided here. The scope for making mistakes is enormous!
However, it does have huge advantages in making your code more elegant and easier to read. It is also easier to share with other Excel applications and developers by turning it into an Add-In.
In this example of how to create an object to hold data, it would be a normal approach to create a multi-dimensional array to hold the multi-column spreadsheet data, and you would write a line of code to update or read each element in the array. This would probably end up being quite messy, and mistakes could easily be made in addressing the various elements.
With your new object, you can simply refer to it and the members that you have created below it to hold the data.
Also, if the data changes in the spreadsheet (or in a linked database if you have used this as a data source within your class module) whenever you use the ‘Dim’ statement the initialize routine will be called and the data will be instantly updated. No need to write code to re-populate your array.
VBA Programming | Code Generator does work for you!
Using a Class Module to Create a Variable Repository
When you write VBA code you use variables all over the place, all with different scopes. Some may only be defined for a particular procedure, some for a particular module, and some may be global variables that can be used all over the application
You can create a class module that will hold a large number of variables, and because it is an object, it can be used anywhere within your code, even on a user form or in an Active X control that you have placed on a worksheet.
The added advantage is that when you refer to your variable object, you will see a list of all the variable names held in the object sorted into ascending order.
To create a repository, you need to insert a new class module. You do this by using Insert | Class Module from the VB Editor menu
Change the name to ‘MyVariables’ using the same methodology as previously discussed in this article.
Enter the following code:
Private mV As Variant
Public Property Get Variable1() As Variant
Variable1 = mV
End Property

Public Property Let Variable1(ByVal vNewValue As Variant)
mV = vNewValue
End Property

Public Property Get Variable2() As Variant
Variable1 = mV
End Property

Public Property Let Variable2(ByVal vNewValue As Variant)
mV = vNewValue
End Property
This code sets up ‘Let’ and ‘Get’ properties for two variables (‘Variable1’ and ‘Variable2’). The Let and Get properties are required for each of your variables so that they are read / write
You can use your own names for the variables instead of the sample ones in this code, and you can add further variables, making sure that each new variable has a ‘Let’ and ‘Get’ statement.
The private declaration of the variable ‘mV’ is to create a working variable that is only used within the class module to transfer values.
To use the variable repository, enter the following code into a standard module:
Global VarRepo As New MyVariables
Sub TestVariableRepository()
MsgBox VarRepo.Variable1
VarRepo.Variable1 = 10
MsgBox VarRepo.Variable1
End Sub
This code creates a global instance of your ‘MyVariables’ object that you created. You only need to do this declaration once from anywhere within your code.
The code first displays the value of ‘Variable1’ to show that it is empty.
A value of 10 is assigned to ‘Variable1’ and the new value within the object is then displayed to show that this property now holds this value.
Because the instance of the ‘MyVariables’ object has been defined globally, you can refer to any of the defined variables within the object from anywhere within your code.
This has a huge advantage in that if you want to use your variables anywhere in your code, you only need to define one global variable, and from that instance, all the variables can be freely accessed and modified throughout your code.
Turning Your Object into an Add-In
So far, the code for the object creation is within your workbook application. However, if you want to be able to share your object with other developers or in other Excel applications of your own, you can turn it into an Add-In
To do this, all that needs to happen is to save the file as an Add-In. Select File | Save As and a browser window will appear
Select the file type as Add-In (.xlam) from the file type drop down and click OK. The file will be saved to the Add-In folder by default, but you can change the location.
You can then incorporate the add-in file into your Excel applications, giving you the flexibility to make use of your new object
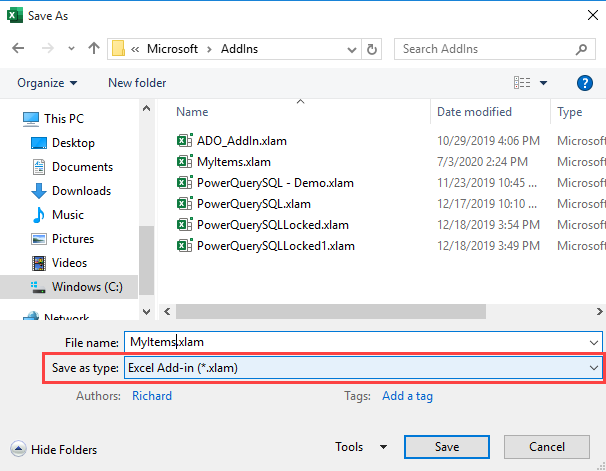
To include your new Add-In into Excel, click on File on the Excel ribbon, and then click on Options at the bottom of the left-hand pane
Click on ‘Add-Ins’ in the left-hand pane in the pop-up window that appears. At the bottom of the window is a button marked ‘Go’
Click on this and an ‘Add-In’ pop-up window will appear. Click on ‘Browse’ and then locate your Add-In file. You will then be able to refer to your object in your code.
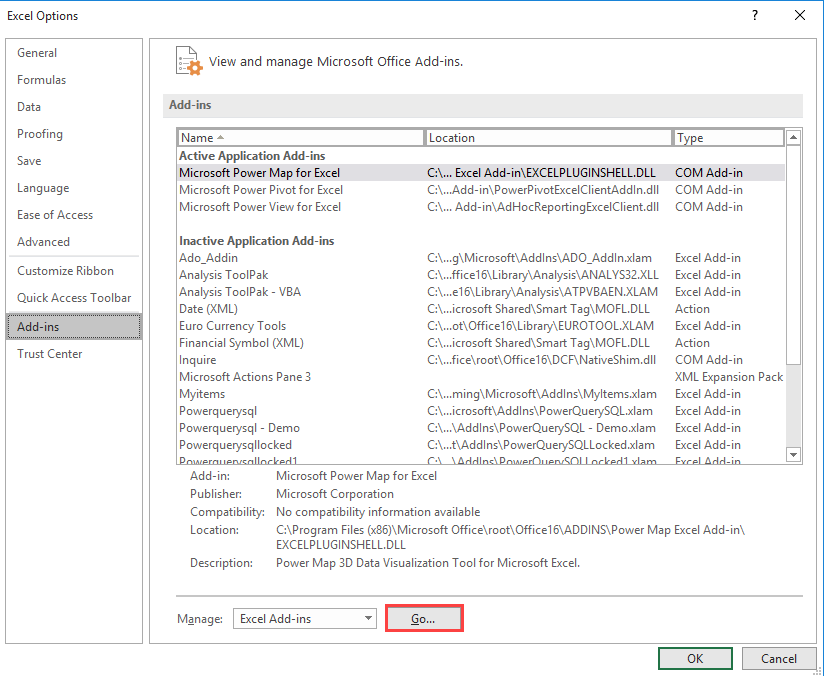
В Excel есть множество формул и операторов, облегчающих расчеты. Одной из востребованных функций является вычисление модуля числа в Экселе.
Причины применения функции
В математике модуль числа показывает его абсолютное значение, знак величины не учитывается. С помощью формулы определение записывается так: I-aI = IaI = a. Все значения по модулю являются положительными.
Программа Excel оперирует числами, под которыми часто «скрываются» не абстрактные математические действия, а реальные предметы или бухгалтерские расчеты. Поэтому полученные результаты не могут быть отрицательными.
Например, какие-то товары были проданы сверх плана, другие, наоборот, остались на складе. Тогда реализованные изделия будут иметь положительное значения, а не проданные — отрицательные. Если понадобится сложить все отклонения от плана, то результатом может стать отрицательное значение или ноль. Применение модуля покажет абсолютную сумму отклонений.
Оператор также находит применение при подсчете векторных величин, которые могут иметь отрицательное значение, сравнении двух элементов таблицы, расчете процентов по кредиту.
Поставить модуль числа в Excel можно функцией ABS, аббревиатура образовалась от английского слова Absolute, что означает «абсолютный».
Стандартный вариант
Правильное написание выглядит так: «ABS(X)» или «ABS(адрес_ячейки_с_числом)». Здесь «X» — число, модуль которого нужно найти, «адрес ячейки с числом» — элемент таблицы, в котором будет указано абсолютное значение. Вставить формулу можно двумя способами. Простой вариант:
- Вписать в ячейку или в строку формул значение, для которого нужно найти модуль. Пусть это будет -8. Тогда надпись будет такова: «=ABS(-8)».

- Нажать ввод и получить результат.


Второй вариант:
- Выделить необходимую ячейку и кликнуть по опции «Вставить формулу», обозначенной символом fx.
- В появившемся списке найти надпись «ABS», выделить ее и подтвердить.
- Откроется меню «Аргументы функции». Здесь нужно ввести необходимую цифру в функцию модуля. Можно указать адрес ячейки, в которой находится необходимое значение. Для этого нажать на иконку, находящуюся справа от строки «Число».

- Окно аргументов свернется, в рабочей таблице нужно будет кликнуть по нужному элементу и снова нажать на иконку.
- Опять появится меню с аргументами, где в строке значений будет стоять адрес выбранной ячейки. Подтвердить операцию.

- Функция сработает в указанном месте.
- Можно распространить действие формулы на другие ячейки. Для этого в ячейке с примененной функцией ABS нажать на правый нижний угол мышкой и не отпуская кнопку «потянуть» мышку вниз, выделяя нужные элементы. К ним будет применена функция.


ABS в формулах
Наряду с простым приведением к модулю, функция может использоваться в связке с формулами и решать комплексные задачи. Например, определить на сколько минимальное отрицательное число меньше минимального положительного можно так:
- Имеется массив, в котором нужно решить поставленную задачу.

- В строку формул нужно вписать следующую композицию: {МИН(ABS(B3:B12))}.Здесь фигурные скобки показывают, что расчеты ведутся с массивом данных. Вводятся такие скобки не с клавиатуры, а нажатием клавиш Ctrl+Shift+Enter в конце написания формулы.
Программа в этом случае рассчитывает модуль в каждой из ячеек между B3 и B12. Без применения массивов ABS выдала бы сообщение об ошибке при такой записи. - Результат применения:


Примеры расчетов
Ниже приведены возможные случаи использования функции модуля ABS, как отдельно, так и в составе формулы.
Задача по математике на определение проекции отрезка на ось абсцисс (X) и ось ординат(Y). По условиям задания отрезок имеет координаты начала A(-17; -14) и конца B(-39;-56). Решение в Excel:
- Ввести в таблицу известные данные.

- Рассчитывается проекция на ось X с помощью ABS.

- Аналогично находится проекция на ось ординат. В строке «Число» нужно указать B5-B3.
- Результат появится в таблице.


Подсчет расходов компании — здесь нужно сложить отрицательные значения по модулю.
Имеется набор финансовых операции компании за отчетный период. Нужно определить сумму трат предприятия. По условию расходы указываются со знаком минус:
- Составить массив в Excel.

- Написать формулу: {=СУММ(ЕСЛИ(В3:В12<0;ABS(В3:В12);0))}
В конце нажать Ctrl+Shift+Enter для указания того, что используются массивы данных. - Программа анализирует данные ячеек B3-B12 и если имеются отрицательные числа, то берется их модуль. После проверки всех элементов, отрицательные значения складываются. Положительные данные не учитываются в расчетах. Итоговый результат имеет следующий вид:


Другие варианты получения абсолютного значения
Кроме ABS возможны и другие способы получения модуля числа в Эксель при помощи альтернативных функций.
ЗНАК
Принцип основан на том, что отрицательные числа умножаются на -1, а положительные на 1. Выглядит это так:
На картинке действие производится над ячейкой A4.
КОРЕНЬ
Квадратный корень величины не может быть отрицательным. Поэтому исходное число возводится в квадрат, а потом извлекается корень.
ЕСЛИ
Удобный способ. Если значение отрицательное, то оно умножается на -1, в противном случае ничего не происходит. Вот как это выглядит для ячейки A1:
Язык VBA
Во многих языках программирования модуль находится через ABS. В VBA команда будет выглядеть следующим образом: A=Abs(-7). Здесь Abs — команда для получения абсолютного значения. В данном случае объекту A будет присвоено число 7.
ABS и альтернативные варианты просты в исполнении. Умение применять их, облегчит работу и сэкономит время.
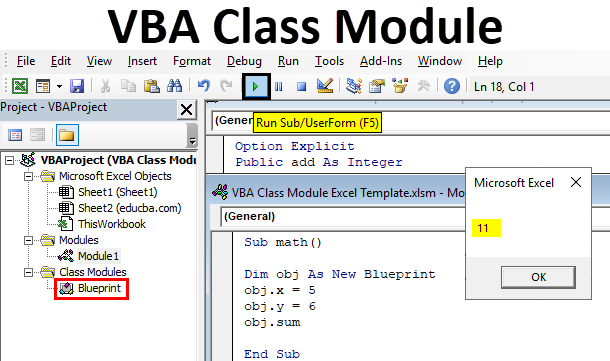
Excel VBA Class Module
Class module in VBA can be defined as the module that helps to create your own objects with your own properties and methods like worksheets and range objectives of excel.
In simple terms with the help VBA class module, we can create objects with own properties. Before going to create a class module and its objects in VBA it is advisable to understand the concept of class and object. Consider a real-world example to understand what is a class and what is an object and its relation.
For example, if we take a building plan or blueprint of a building, with the help of a building plan we can construct not only one building but we can use the same plan and can construct multiple buildings in different places. They may vary in size of rooms or height of roof etc. but the actual properties of the building remain the same as there should be a basement, doors, pillars, ceiling, etc.
Similarly, if you take a car blueprint or model we can produce multiple duplicates to it. A car will have properties like a number of wheels, color, power, etc. some of the properties may vary from car to car, but the main configuration will remain the same.
To make it clearer we can define like:
- Class: It is a blueprint of a thing which helps to create an object.
- Object: Actual existence of a thing.
How to Insert a Class Module in Excel VBA?
Below are the different examples to insert a class module in excel using VBA code.
You can download this VBA Class Module Excel Template here – VBA Class Module Excel Template
Excel VBA Class Module – Example #1
Below are the different steps to insert the class module using VBA code in excel.
Step 1: Go to the “Developer” menu on the top and click on the Visual Basic in the left-hand side.
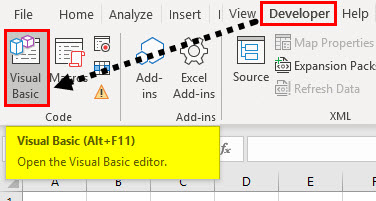
Step 2: To create a class module we need to insert a class module in VBA. Click on the Insert drop-down on the top. From that choose a Class Module.
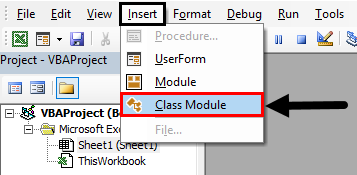
Now a class module is inserted on the left side in VBA as shown in the below screenshot.
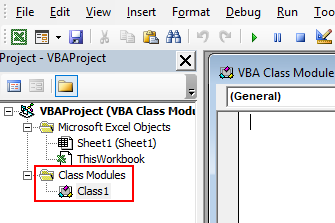
As discussed earlier a class module is a blueprint with which we will create objects. So, we need to define a few variables and methods which will be accessible to all objects.
Step 3: Change the class module name as per your requirement, here I changed as Blueprint

Step 4: Now we need to define the variables and methods.
Code:
Option Explicit

Public add As Integer
Public pro As Integer
Public x As Integer
Public y As Integer
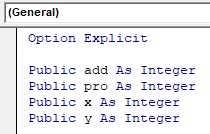
As shown in the above screenshot first start with the option explicit. Why option explicit? It will throw an error if we use any variable in the program that is not defined so, we should define all variables explicitly. Here we define four variables add, pro, x, and y. All variables are defined as public because then only these variables can be accessed by other modules.
Step 5: Up to now, we defined variables now need to define methods or functions.
Code:
Option Explicit

Public add As Integer
Public pro As Integer
Public x As Integer
Public y As Integer

Sub sum()

add = x + y
MsgBox (add)

End Sub
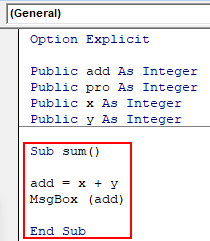
I defined one simple method sum(), you can define complex subprograms as per requirement. In sum() sub-method we defined how to perform addition operation and where to store that value and then finally display the result in a message box.
Step 6: A class module has been created now it’s time to create a normal module to use the class blueprint. Hence insert a module in the same way how we inserted a class module.
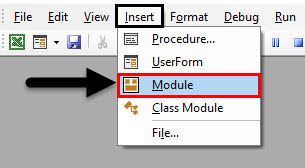
Step 7: By default, the module name will be module1 we can change if we want. Write the code in module1.
Code:
Sub math()

Dim obj As New Blueprint
obj.x = 5
obj.y = 6
obj.sum

End Sub
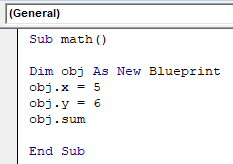
Here we are writing a subprogram math(). In that, we created an object with name obj as same as a class blueprint. That is the reason we have defined in such a way “obj as new blueprint” which means duplication of blueprint and the name is obj.
In this program, we did not define x and y but directly assigning the values to x and y because these are already defined in a class module and the obj is duplication of it. Hence it will have those variables, but to call them we should use an object.variable name.
Obj.x = 5 mean, value 5 will be stored in x variable.
Obj.y =6 mean value 6 will be stored in y variable.
Now call the methods that defined in the class module by using object name obj.
Obj.sum() will perform the addition operation as defined in the class module. In the class module, we defined as x+y and an object, we defined the values for x and y hence it will take the values and will perform the calculation and store the result in add which is an integer type. In the last step, it will display the result in the message box.
Step 8: Run the module1 by pressing the F5 key or by clicking on Play Button.
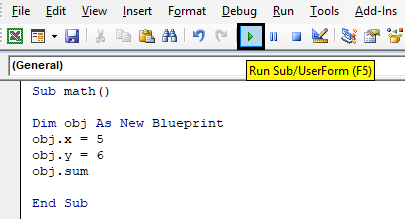
Step 9: Select the macro name and click on the Run option.
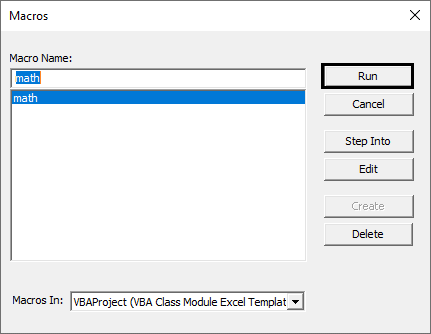
Results will be displayed as below.
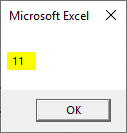
Excel VBA Class Module – Example #2
Follow the below steps:
Step 1: Now add another method called “mul” to perform multiplication operation. The result should be stored in the cells(5,5) of sheet1.
Code:
Sub mul()

pro = x * y
Sheet1.Cells(5, 5) = pro

End Sub
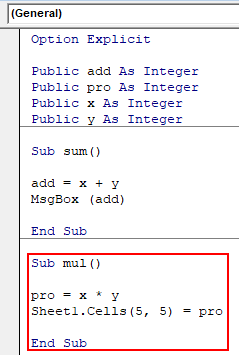
In the above mul() method we multiplied x and y, and the result is stored in “pro” which is an integer data type.
Step 2: Now, go to module1 and call this mul method using the object obj as below.
Code:
Sub math1()

Dim obj As New Blueprint
obj.x = 5
obj.y = 6
obj.mul

End Sub
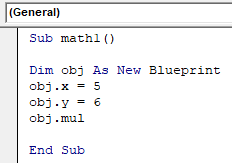
Step 3: Press F5 Key to run the module. Go to sheet1 and check the result will be displayed as below.
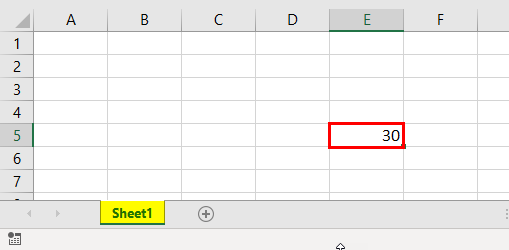
In the previous example, we displayed results in the message box but in the second method, we displayed in excel. So, if we declare the variables and methods in the class module we can use it in other modules with the help of an object without repeating the code. Hope you have understood how to insert the class module in Excel VBA and how to create an object for it.
Things to Remember
- It is always suggestible to use option explicit while preparing a class module because there may be typo error while using variables in VBA.
- If we do not mention sheet number for displaying results it will pick the active sheet automatically.
- Use Public Keyword while initiating the variables so that the variables can access by other modules.
- You can call the variables or methods only after creating the object. hence, create an object for class then call the variables and methods.
Recommended Articles
This is a guide to VBA Class Module. Here we discuss how to Insert Class Module in Excel using VBA code along with some practical examples and downloadable excel template. You can also go through our other suggested articles –
- VBA Find and Replace
- VBA Check File Exists
- VBA Code
- VBA RGB
Skip to content
![]()
If you often work with Microsoft Excel you might come to the point when standard functions won’t solve your problems any longer. In such case, you might have to start working with VBA macros. Of course, you can record steps in VBA, but usually you start from the opposite direction: You google a solution for your problem and find some VBA code snippets. Also, many of my articles contain short VBA codes. But how to use them? This article summarizes how to insert a new VBA module and paste some code in Excel.
At first, you have to insert a new VBA module.
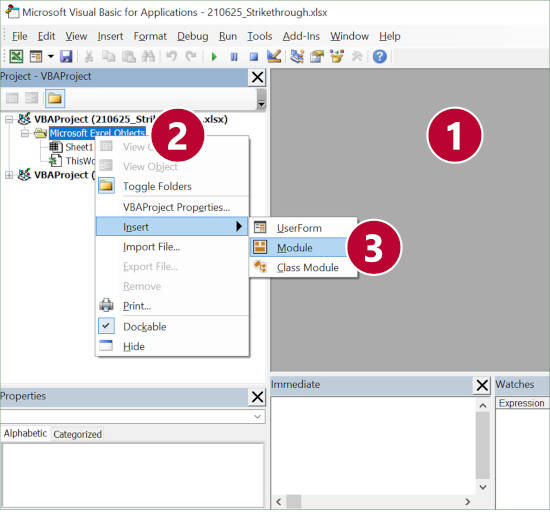
Start, as usual, in Excel.
- Open the VBA editor. The fastest way to do this would be to press Alt + F11 on the keyboard.
Alternatively, go to the Developer ribbon (if you don’t see the developer ribbon, you must activate it first) and click on Editor. - Right-click on the Excel file VBA name (or any other item below, for example the “Microsoft Excel Objects” folder icon as in the screenshot).
- Go to “Insert” and click on “Module”.
Next: Paste your code and run it
After you have inserted a new VBA module, you can paste and run your macro:
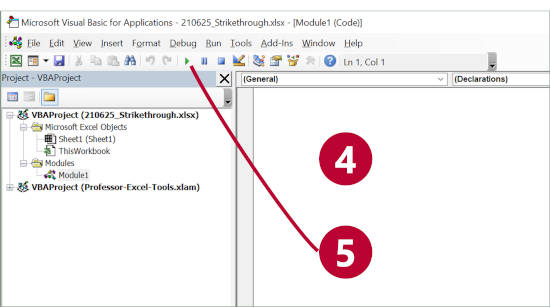
- Now it should look similar to number 4 and you see the white code area in which you can paste the VBA source codes from below.
- Make sure that your cursor is located within your pasted code. Then, click on the green Start button to run the macro. Alternatively, press F5 on the keyboard.
More help on VBA macros
You need more help with VBA macros? Please refer to this article. It provides an overview of the first steps.
Image by Meine Reise geht hier leider zu Ende. Märchen beginnen mit from Pixabay

Henrik Schiffner is a freelance business consultant and software developer. He lives and works in Hamburg, Germany. Besides being an Excel enthusiast he loves photography and sports.
We use cookies on our website to give you the most relevant experience by remembering your preferences and repeat visits. By clicking “Accept”, you consent to the use of ALL the cookies.
.