
A multiple-selection list box is list of choices that looks like a scrollable list of check boxes instead of a typical list box. Users can select as many check boxes as necessary from the list. Depending on how you design the multiple-selection list box, users may also be able to type their own list item next to one of the check boxes.
In this article
-
When to use a multiple-selection list box
-
The user experience
-
Compatibility considerations
-
Insert a multiple-selection list box
-
Layout tips
When to use a multiple-selection list box
Use a multiple-selection list box when you want to:
-
Enable users to select multiple items in a list.
-
Enable users to type their own value in a list.
-
Show most or all of the items in a list on the form by default.
-
Display values retrieved from a fixed list, from the form template’s data source, or from an external data source, such as a database or Microsoft Windows SharePoint Services list.
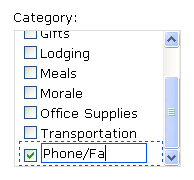
In the following illustration, users can assign expenses in an expense report form to multiple categories by selecting check boxes in a multiple-selection list box. The form designer has chosen to permit custom categories. Consequently, users can enter a value in an empty box next to the last check box in the list.
After you insert a multiple-selection list box on your form template, you must specify the values that you want to appear in it. Otherwise, users will see an empty box when they open a form that is based on your form template. In the Multiple Selection List Box Properties dialog box, you can type the entries yourself or configure the multiple-selection list box to retrieve entries from a database or other data source.
Related controls
Microsoft Office InfoPath includes controls that are similar to multiple-selection list boxes but that serve different purposes. To decide which of these controls works best on your form template, refer to the following list:
List box Like a multiple-selection list box, a standard list box allows users to select values in a list. However, with a list box, users can select only one item in the list. Like a multiple-selection list box, a list box displays all of the items in the list by default.
Drop-down list box Like any other list, a drop-down list box offers users a list of choices. However, with drop-down list boxes, the list entries are hidden until the user clicks the control. Users can select only one item from a drop-down list.
Combo box If you want your users to be able to type their own list entry or choose a value from a predefined list, use a combo box instead of a multiple-selection list box. Users can select only one item from a combo box.
Option buttons Like a multiple-selection list box, a group of option buttons enables users to select from a list of choices. Unlike multiple-selection list boxes, users can select only one option from a group of option buttons. In addition, with option buttons, users click a small circle to make a choice instead of clicking an item in a list box.
Top of Page
The user experience
With multiple-selection list boxes, users make choices by selecting or clearing check boxes in a box on the form. If the number of check boxes exceeds the height of the control, a scroll bar appears on the right side of the box so that users can see the remaining choices.
You can design your form template so that users can type their own entry in the list, if necessary. In this case, a check box with an edit box appears as the last item in the list.
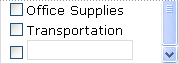
To enter a custom value, users select the check box next to the edit box and then type their entry in the area next to the check box. For this to be possible, you must select the Allow users to enter custom values check box in the Multiple-Selection List Box Properties dialog box when you insert the multiple-selection list box onto your form template.
Top of Page
Compatibility considerations
When you design a form template in InfoPath, you can choose to design a browser-compatible form template. When you design a browser-compatible form template, multiple-selection list box controls are unavailable in the Controls task pane because they cannot be displayed in a Web browser.
Top of Page
Insert a multiple-selection list box
The procedure for inserting a multiple-selection list box differs slightly depending on whether you are designing a new, blank form template or basing the design of your form template on a database or other external data source.
The following illustration shows how a multiple-selection list box looks when it is selected in design mode, before the form template designer has manually added the list box entries.
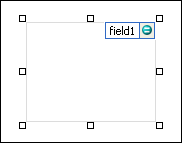
Controls can be bound or unbound. When a control is bound, it is connected to a field or group in the data source so that data entered into the control is saved in the underlying form (.xml) file. When a control is unbound, it is not connected to a field or group, and data entered into the control is not saved. When you select or move your pointer over a control, text and a binding icon appear in the upper-right corner of the control. The text indicates the group or field to which the control is bound in the data source. The icon indicates whether the control is correctly bound to that group or field. When the binding is correct, a green icon appears. If there’s something wrong with the binding, you’ll see a blue or red icon instead.
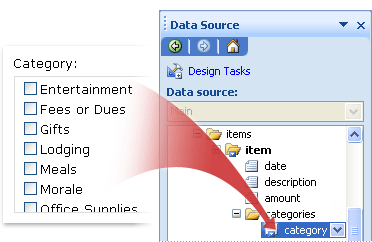
The data source for the form template consists of fields and groups that appear in a hierarchical view in the Data Source task pane. Multiple-selection list boxes are always bound to repeating fields inside a group. Repeating fields allow you to store more than one value in the field. In the following example, the Category multiple-selection list box on the form template is bound to the category repeating field in the Data Source task pane.
When you design a new, blank form template, the Automatically create data source check box in the Controls task pane is selected by default. This enables InfoPath to automatically create fields and groups in the data source as you add controls to the form template. These fields and groups are represented by folder and file icons in the Data Source task pane.
If you base the design of your form template on an existing Extensible Markup Language (XML) file, database, or Web service, InfoPath derives the fields and groups in the Data Source task pane from that existing data source.
Insert a multiple-selection list box
-
On the form template, place the cursor where you want to insert the control.
-
If the Controls task pane is not visible, click More Controls on the Insert menu, or press ALT+I, C.
-
In the Controls task pane, do one of the following:
-
To automatically create a repeating field in the data source that is bound to the multiple-selection list box, select the Automatically create data source check box.
-
To bind the multiple-selection list box to an existing repeating field, clear the Automatically create data source check box.
Note: If the check box is unavailable, the data source is locked. For example, if you base the design of your form template on an XML Schema, you may not be able to add new fields or groups to the data source in InfoPath. This restriction helps to prevent you from inadvertently making changes to the schema that may render it invalid.
-
-
Under Insert controls, click Multiple-Selection List Box.
-
If you cleared the Automatically create data source check box in step 3, select a repeating field in the Multiple-Selection List Box Binding dialog box to which you want to bind the multiple-selection list box.
-
On the form template, type the label text above or to the left of the multiple-selection list box, followed by a colon (:).
-
To specify the values that you want to use as the entries in the list, double-click the multiple-selection list box.
-
Click the Data tab.
-
Do one of the following to populate the list box:
Type the list box values yourself
This option is useful when you have a predetermined, limited set of values, and you don’t expect those values to change in the future. If the values do happen to change, you must publish an updated version of your form template so that users can see and use the latest list entries.
-
Click Add.
-
In the Value box, type the text that you want to store if a user selects this entry.
-
In the Display name box, type the text that you want to display for this entry, and then click OK.
-
Repeat steps 1 through 3 for each entry that you want to add to the list box.
-
To test your changes, click Preview on the Standard toolbar, or press CTRL+SHIFT+B.
Use values from another part of the form
This option is useful when you want the values in your list to change, depending on other values that the users enter into their form.
-
Under List box entries, click Look up values in the form’s data source.
The entries in the list box must be associated with a particular repeating group or repeating field on your form template.
-
Click Select XPath
 next to the Entries box, and then in the Select a Field or Group dialog box, click the repeating field or repeating group that contains the fields that will provide the values for the list box, and then click OK.
 -
Click Select XPath
next to the Value box, click the field that contains the possible values for the items in the list box, and then click OK. One of these values will be saved in the underlying XML when a user clicks an item in the list box. -
Click Select XPath
next to the Display name box, click the field that contains the values that are displayed in the list box, and then click OK.Tip: To prevent display name values from appearing multiple times in the list box, select the Show only entries with unique display names check box.
Use values from a database, Web service, XML document, or SharePoint site
This option is useful when you want the values in a list box to be up-to-date or refreshed regularly. The values are typically stored in a database or other external data source and are retrieved every time the form is opened.
-
Click Look up values from an external data source.
-
Do one of the following:
-
If you already added a data connection, click it in the Data Connection box.
-
To add a new data connection, click Add, and then follow the instructions in the Data Connection Wizard.
The entries in the list box must be associated with a particular repeating field or repeating group.
-
-
Click Select XPath
next to the Entries box, and then in the Select a Field or Group dialog box, click the group or field that contains the fields that will provide the values for the list box, and then click OK. -
Click Select XPath
next to the Value box, click the field that contains the possible values for the items in the list box, and then click OK. One of these values will be saved in the underlying XML when a user clicks an item in the list box. -
Click Select XPath
next to the Display name box, click the field that contains the values that are displayed in the list box, and then click OK.Tip: To prevent display name values from appearing multiple times in the list box, select the Show only entries with unique display names check box.
-
-
If you want users to be able to type their own value at the bottom of the multiple-selection list box, select the Allow users to enter custom values check box.
 next to the Entries box, and then in the Select a Field or Group dialog box, click the repeating field or repeating group that contains the fields that will provide the values for the list box, and then click OK.
Top of Page
Layout tips
Use the following tips to help you refine the appearance, size, and other aspects of a multiple-selection list box:
-
To change the width of several multiple-selection list boxes at once, select the multiple-selection list boxes whose size you want to change, press ALT+ENTER, click the Size tab, and then in the Width box, type a new number.
-
To change the background color for several multiple-selection list boxes at once, select the multiple-selection list boxes that you want to change, on the Format menu, click Borders and Shading, and then on the Shading tab, make the necessary adjustments.
-
To customize the font that appears next to the check boxes in a multiple-selection list box, use the Font and Font Size boxes on the Formatting toolbar. To change the font and font size for all of the multiple-selection list boxes on your form template at once, click the multiple-selection list box that contains the formatting that you want, and then on the Format menu, click Apply Font to All Multiple-Selection List Box Controls.
-
To adjust the spacing between a multiple-selection list box and the objects that surround it on the form template, experiment with margin settings on the Size tab in the Multiple-Selection List Box Properties dialog box. Using margins to increase the spacing offers a finer degree of control than using paragraph breaks to increase the spacing.
Top of Page
INTELLIGENT WORK FORUMS
FOR COMPUTER PROFESSIONALS
Contact US
Thanks. We have received your request and will respond promptly.
Log In
Come Join Us!
Are you a
Computer / IT professional?
Join Tek-Tips Forums!
- Talk With Other Members
- Be Notified Of Responses
To Your Posts - Keyword Search
- One-Click Access To Your
Favorite Forums - Automated Signatures
On Your Posts - Best Of All, It’s Free!
*Tek-Tips’s functionality depends on members receiving e-mail. By joining you are opting in to receive e-mail.
Posting Guidelines
Promoting, selling, recruiting, coursework and thesis posting is forbidden.
Students Click Here
ListBox in MS WordListBox in MS Word(OP) 24 Apr 01 14:53 I guess I’m spoiled by Access, but I can’t figure out how to insert a listbox into a Word macro to enable the user to select text to be inserted into a document. Everything I’ve read leaves me very confused. Can anyone help a senile old man do this?? Thanks. Red Flag SubmittedThank you for helping keep Tek-Tips Forums free from inappropriate posts. |
Join Tek-Tips® Today!
Join your peers on the Internet’s largest technical computer professional community.
It’s easy to join and it’s free.
Here’s Why Members Love Tek-Tips Forums:
- Talk To Other Members
- Notification Of Responses To Questions
- Favorite Forums One Click Access
- Keyword Search Of All Posts, And More…
 Talk To Other Members
Register now while it’s still free!
Already a member? Close this window and log in.
Join Us Close
Kevin Tang said:
Hello,
I have a ListBox in my VBA Form, named ListBox1
In UserForm_Initialize(), I have two statements to enable List Column Head:
ListBox1.ColumnCount = 2
ListBox1.ColumnHeads = TrueMy questions are:
1) how to set the Column Head’s name? such as «ID», «Name»….
You can’t. There is a bug in VBA and Microsoft never got round to fixing it.
Instead, set ColumnHeads to False, and position a couple of labels
immediately above the listbox whose captions will show the column headings.
2) how to add item into ListBox1 in both columns?? (e.g. Add (00001,
Kevin) )
Two possible approaches to this.
1. If you want to load the entire listbox in one go, put all your items into
a 2-dimensional array, and then assign the array to the List property of the
Listbox.
2. If you just want to add a single new row, use AddItem to add the new row
and assign text to the cell pointed to by the BoundCOlumn property (column 0
by default), Then add the text to the second column by using
ListBox1.List(n, 1) = «My new text», where n is the row number you want.
But this is a program that over time has not stopped evolving and growing. Thus, it has been receiving new updates and functions in order to meet the expectations and needs of its millions of users. Therefore and due to all this, at the moment we can find a multitude of functions, more or less useful or extended, but which try to cover all environments. At the same time we must bear in mind that here we are not only going to work with texts , but also that the application supports all kinds of additional elements. Here we find graphics, tables, images , videos, etc; many of them from the Insert menu.

To all that we have mentioned so far, another very interesting element as well as useful that we can add, are those called lists. In fact, in these we are going to focus on these same lines , a type of object as used and versatile as lists.
Surely, over the years, many of you have used these elements to add a plus to your documents. Well, that is why here we are going to focus on showing you in detail what these objects can offer us. We will also see the types of lists that we can use in Word , as well as the utility that they will offer us separately.
What is a Word list and what is it for?
First of all and as its own name lets us glimpse, the Word lists function allows us to carry out an accumulation of similar elements, and ordered properly. Thus, what we achieve is to generate our own personal lists that in the end will come in handy to show a set of elements, but in a structured way.
Of course, we must bear in mind that the advanced program of the Redmond , presents us with several ways, both to create those lists, and formats for them. For example, initially we have the possibility of accessing this type of elements directly from the Start menu option of Word itself. Thus, at the top of the section called Paragraph, we see the formats of the same that we can access and use below.

As we mentioned, a program of the potential of this Microsoft , presents us with several alternatives to choose from when dealing with its additional elements. Here come into play, as it could not be otherwise, the lists that concern us in these lines. That is why below we are going to talk about each of the types of lists that we are going to find here and that we can use. Each will be best suited for a type of use, or work environment.
Numbered lists
It is evident that the numbered lists are perhaps one of the most common ones that are often used when the time comes to make use of these elements. They could be considered as the most basic of the exposed formats, but perhaps they are also the most useful. These are represented, in the section discussed above, by a button with a series of numbers vertically. Therefore, to see what this format offers us, we will only have to click on it.
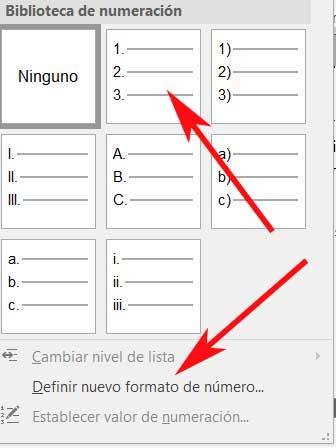
It is worth mentioning that despite being called Numbering Lists, here we can use other elements in the form of separators for the elements of the same. We will see these on the screen by clicking on the drop-down list to the right of the mentioned button. In this way, we can opt to use simple numbers , upper or lower case letters, numbers with a separator, etc. Say that when you click on the button directly, the list will begin to be classified by simple numbers.
But that’s not all, but at the same time we can specify our own custom classifier, all through the link Define new number format.
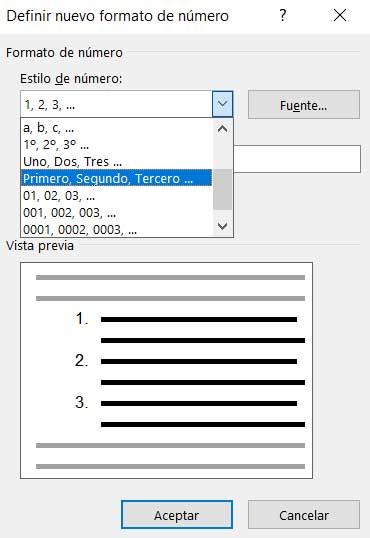
Here the program itself proposes a wide range of formats that will serve as classification elements for the list that we will create. Similarly, we will have the possibility to create a custom one by adding characters to the Number format field. Say that in this same window we have a preview to visualize how the numerical list that we are going to create will look like. As you can imagine, this function opens up a wide range of possibilities when creating basic and original lists in Word.
Before we finish this type, we will tell you that a shortcut to creating numerical lists here is, for example, writing a 1 followed by a -. Thus, when pressing the space bar, Word will directly create a list of this type for us to fill in and customize.
Bullet lists
On the other hand, a little more original than those previously reviewed, we find the Bullet lists. These we will find in the same section of the main interface of the program that we discussed earlier. But in this case, if we choose to use this specific format, say that it is represented by a button with a series of small squares. As in the previous case, when you click on the small arrow on the right of it, the corresponding drop-down list appears.
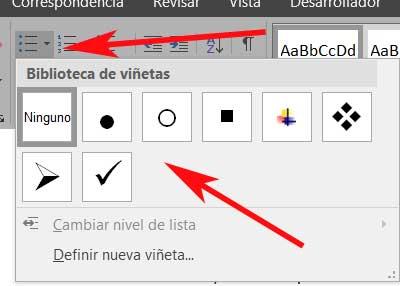
Here, as before, we are going to find a series of slightly more graphic elements or objects that will serve as cataloguers or separators for this new list. In this section, what we are going to find are a series of elements in the form of symbols that can act as separators for the elements of the new list. Thus, we find circles, squares, arrows, etc. But of course, as in the previous case, we can also define new ones. For this we click on Define new bullet from the mentioned drop-down list.
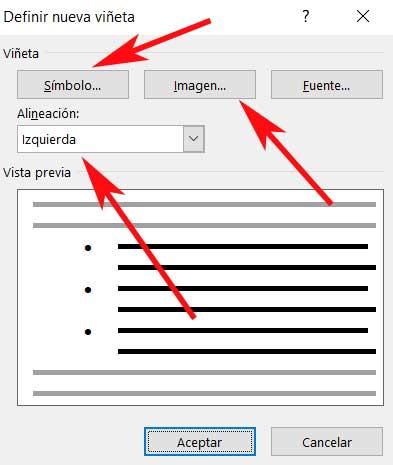
The most interesting thing about this is that here we can specify that we want to use some of the multiple symbols that we usually use throughout the operating system. But that is not all, we will also have the possibility to select an image that we have stored in the disk drives . Of course, we should be a little cautious, since this image will be repeated over and over again for each item on the list.
As in the previous case, we also have the possibility to shorten the process of creating a custom list. For this, it is enough that we write an asterisk on a new line, so that the bullet list starts automatically by pressing the space bar .
Multilevel lists
So far we have been able to see the main objective and how we can create both numerical and bulleted lists. Each format can serve us in an environment or type of independent use, we can also create both lists made up of generic classifiers, as well as more personalized and therefore original.
However, it is also worth taking a look at the so-called Multilevel lists. We will find these in the same section of the Word interface of the previous two. Of course, in this case they are represented by the levels of which they will be composed, in miniature. So, to start we will tell you these Multilevel are elements of this same type that we have seen, but they allow you to create a list within another. It is evident that for this the container must already exist, so within the primary list, we can create others. Say that these will keep the indentations that we added initially, as well as the numbering indicated in their design.

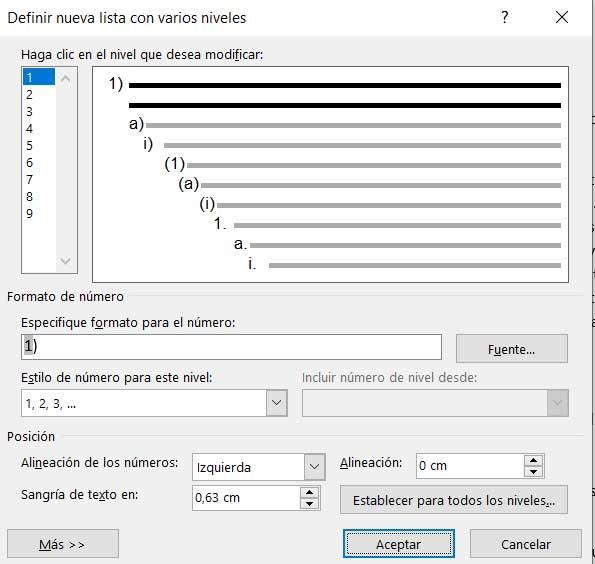
That is why it could be said that the use of these elements is like taking the use of the simple lists previously reviewed, one step further. In fact, if we deploy the corresponding drop-down menu on its button , we find designs similar to those we saw in the previous formats, but in this case, nested. In the same way we can create the design of our new multilevel list from the link Define new list style.
At the same time, we find another link in the same window that allows us to define a new, multilevel, personalized list. Here we will have the opportunity to specify various parameters of this nested list element. Among these we find the possibility of customizing the types of separators of the different lists, including the level number, the alignment of the elements, the distance of the indentation , etc.
How to sort a Word list
First, it must be clear that in order to sort the components of a Word list, we must first create an element of this type. For this we can use any of the types that we talked about previously, to later mark the list in its entirety.
Well, once we have marked it with the mouse, we return to look at the Paragraph section, but in this case we opted for the button called Order. This is represented by the letters A and Z with an arrow, where we can directly click. There are no drop-down lists here, as before. But of course, by clicking on the mentioned button that we discussed, we find a new window that will give us the opportunity to customize the order to use in the marked list, depending on the needs of each case.
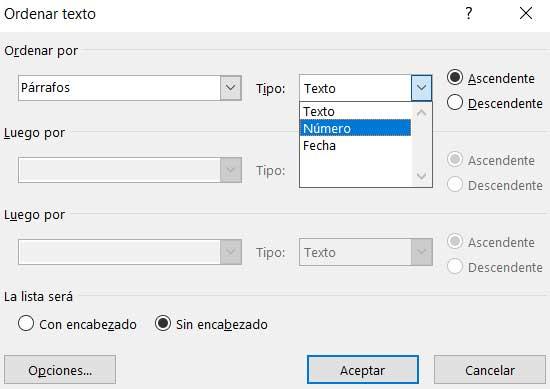
In this way, the program offers us the possibility of sorting the lists marked by paragraphs or titles on the one hand. When it comes to placing the elements that are part of it, Word offers us to order them by alphabetical, numerical order, or by date. Thus, if we are a little tricky and create the source lists in a structured way, this function will allow us to order their elements in a few seconds. And it is that the correct use of these elements will help to better understand our created documents.
You can tell Word to start from any number you prefer, restart numbering from 1, or continue numbering.
On the Home tab, in the Paragraph group, click Numbering or from the popup menu
(for more details see Creating numbered
lists) and then choose Set Numbering Value…:

When you open the box while the list is selected, these option buttons are enabled and one is selected:

- Start new list: Starts the numbering sequence over from 1. You might use this to place two
numbered lists one after the other. Word will want to continue the second list with the next number
in sequence from the previous list; this option tells it not to. - Continue from previous list: Tells Word you want to begin your list where the last one left
off. For instance, you may want to create a very long procedural description, with paragraphs of
unnumbered text within the list. This allows you to create lots of individual numbered lists, but
link them all together. - Set value to: You can start or continue list this any value that you want.
Another way to use these commands is to right-click on the first entry in the list and select from the
pop-up menu Restart at 1 or Continue Numbering:

Note: More details are available
in the Numbered lists section
in the Work with bulleted, numbered and multi-level lists lesson
of the Create basic documents free course.
See also this tip in French:
Comment créer une liste en redémarrant et en continuant la numérotation.
Please, disable AdBlock and reload the page to continue
Today, 30% of our visitors use Ad-Block to block ads.We understand your pain with ads, but without ads, we won’t be able to provide you with free content soon. If you need our content for work or study, please support our efforts and disable AdBlock for our site. As you will see, we have a lot of helpful information to share.