
To insert an object, click Object on the Insert tab.
Contents
- 1 Where is the Insert Object tool in Word?
- 2 How do you insert an object in Word?
- 3 Where is the insert object in Word o365?
- 4 What is insert in MS Word?
- 5 How do I open an OLE file in Word?
- 6 How do you insert an object?
- 7 How do I insert multiple objects in Word?
- 8 What are objects in MS Word?
- 9 Which tab is used to insert action button?
- 10 What are the 2 options when inserting an object?
- 11 Why can’t I see insert object in Powerpoint?
- 12 How do I insert an object in Word 2016?
- 13 What object Cannot be insert in a Word document from Insert tab?
- 14 How do I insert an attachment into an icon in Word?
- 15 Where is the Insert tab on the ribbon bar?
- 16 Where on the Insert tab could you add a symbol?
- 17 Where can I find OLE objects in Word?
- 18 How do I fix Ole action in Word?
- 19 Which of the following object can be inserted in your document?
- 20 How do I insert multiple boxes in Word?
You can insert an existing file into a Word document and insert text in Word around it.
- Open Document and Click “Insert”
- Open the Word document and click the “Insert” tab on the ribbon menu at the top of the screen.
- Click the “Object” Button.
- Click the “Object” button in the Text group to open the Object dialog box.
How do you insert an object in Word?
Link or Embed a file
- Go to Insert > Object.
- Select Create from File.
- Select Browse and choose the file you want to use.
- Select Insert.
- Choose Display as icon to embed, or Link to file for a link.
- Select OK.
Where is the insert object in Word o365?
Make sure you have the file you want to attach present on your system. Once the document is open, go to the Insert tab on the ribbon and on the Text toolbox, select the Object button. From the menu that opens, select ‘Object’. A new window will open.
What is insert in MS Word?
Insert is a file menu and Ribbon section in software that allows the user to add something (e.g., picture) into a document or file. For example, in Microsoft Word, the user may use the Insert tab in the Ribbon to insert a picture of themselves into their document. Tip.
How do I open an OLE file in Word?
You have an Excel embedded OLE object inserted into a formal module as an icon.
- Then, export the module to Word using File -> Export -> Microsoft Office -> Word.
- Then, open the Excel OLE.
- It opens on the same Microsoft Word document instead of opening into a ‘new’ window.
How do you insert an object?
Embed an object in a worksheet
- Click inside the cell of the spreadsheet where you want to insert the object.
- On the Insert tab, in the Text group, click Object .
- In the Object dialog box, click the Create from File tab.
- Click Browse, and select the file you want to insert.
How do I insert multiple objects in Word?
2 Answers
- Copy all your files to clipboard (Ctrl + C)
- Open the word document you would like to embed your files and click the keyboard combinatin Ctrl + Alt + V [Paste Special] and choose files option and click OK.
What are objects in MS Word?
An object is a combination of data and the application needed to modify that data. You can thus embed objects in or link them to documents created with a different application. For instance, an Excel spreadsheet can be embedded within a Microsoft Word document using OLE.
Which tab is used to insert action button?
Put an action button on your slide
On the Insert tab, click Shapes, and then under Action Buttons at the bottom of the menu, click the button shape that you want to add.
What are the 2 options when inserting an object?
There are two options to insert objects: Create New: Insert object directly. Select the type of the object you want to insert in the Object type roll-down list. WPS Spreadsheets supports a variety of object types, such as WPS Spreadsheets Workbook, WordPad document, and Microsoft Excel among others.
Why can’t I see insert object in Powerpoint?
When you see only the frames of the object but not the icon, it’s probably because you have turned on the “Show picture placeholders” option. Click “File” tab then “Options” to open the “Word Options” dialog box. Then click “Advanced” on the left pane.
How do I insert an object in Word 2016?
Microsoft Word 2016
- Open the first document.
- Place the cursor where you want the second document to be inserted.
- From the Insert tab, Text group, click on the down arrow next to Object and choose Text from file.
- Select the file to be inserted.
- Click on Insert.
What object Cannot be insert in a Word document from Insert tab?
Discussion Forum
| Que. | Which type of file cannot be inserted in a word document via Insert Object option |
|---|---|
| b. | Bitmap Image |
| c. | MP3 file |
| d. | Video Clip |
| Answer:MP3 file |
How do I insert an attachment into an icon in Word?
On the Insert tab, click the Object button near the right end. In the dialog that opens, click the Create From File tab. Click the Browse button and locate the document file to insert. Check the box for Display As Icon, and click OK.
Where is the Insert tab on the ribbon bar?
second tab
Insert tab:
Insert Tab is the second tab in the Ribbon.
Where on the Insert tab could you add a symbol?
From the Insert command tab, in the Symbols group, click SYMBOL » select More Symbols… The Symbol dialog box appears. The special character appears in your document.
Where can I find OLE objects in Word?
The Document Inspector detects OLE Objects or packages that have been inserted from the Object dialog box (click Insert > Object in your Office application), or by using copy and paste commands.
How do I fix Ole action in Word?
Solution. The solution is generally simple — switch to MathType and close the dialog box. Sometimes it’s not that simple though. What if you see MathType’s icon in the Windows Taskbar, but clicking it doesn’t bring the window up so you can close the dialog?
Which of the following object can be inserted in your document?
The Insert tab contains various items that you may want to insert into a document. These items include such things as tables, word art, hyperlinks, symbols, charts, signature line, date & time, shapes, header, footer, text boxes, links, boxes, equations and so on.
How do I insert multiple boxes in Word?
Go to Insert > Text Box, and then select one of the pre-formatted text boxes from the list, select More Text Boxes from Office.com, or select Draw Text Box.
 Please Note:
This article is written for users of the following Microsoft Word versions: 97, 2000, 2002, and 2003. If you are using a later version (Word 2007 or later), this tip may not work for you. For a version of this tip written specifically for later versions of Word, click here: Using the Insert Key to Insert Text.
![]()
Written by Allen Wyatt (last updated February 13, 2021)
This tip applies to Word 97, 2000, 2002, and 2003
When you first install Word, the Insert key is used to turn overtype mode on and off. To some people this is very awkward, particularly if they are used to working with other word processors that use the Insert key differently. In some word processors the Delete key is used to delete text, and the Insert key is used to place the text at the current cursor position.
Word can work in this way, as well. You can set the Insert key to function the same as the Ctrl+V key combination—it will insert the contents of the Clipboard. To control the way the Insert key works, use the following steps:
- Select Options from the Tools menu. Word displays the Options dialog box.
- Click on the Edit tab. (See Figure 1.)
- Make sure the Use INS Key for Paste check box is selected.
- Click OK.
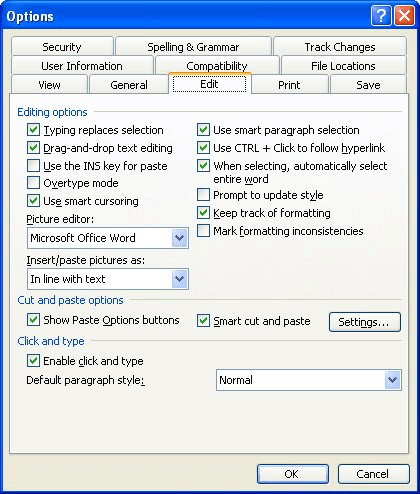
Figure 1. The Edit tab of the Options dialog box.
WordTips is your source for cost-effective Microsoft Word training.
(Microsoft Word is the most popular word processing software in the world.)
This tip (1079) applies to Microsoft Word 97, 2000, 2002, and 2003. You can find a version of this tip for the ribbon interface of Word (Word 2007 and later) here: Using the Insert Key to Insert Text.
Author Bio
With more than 50 non-fiction books and numerous magazine articles to his credit, Allen Wyatt is an internationally recognized author. He is president of Sharon Parq Associates, a computer and publishing services company. Learn more about Allen…
MORE FROM ALLEN
Can’t Merge Alphanumeric Data Correctly
When you merge data from Excel into a Word document, you may need to do some conditional processing based on the data you …
Discover More
Understanding Single Line Spacing
Single line spacing, the default spacing used in a paragraph, allows Word to adjust the spacing of individual lines in a …
Discover More
Performing Complex Sorts
One way you can easily work with data in a worksheet is to sort it into whatever order you find most helpful. Excel …
Discover More
More WordTips (menu)
Resetting a Single Shortcut Key
Need to get rid of a keyboard shortcut key you previously defined? It’s easy to do if you follow these steps.
Discover More
Applying Bullets from the Keyboard
Most people use the toolbars to apply bullets to paragraphs. If you want to apply them using the keyboard, then you can …
Discover More
Potential Shortcut Key Problems
When configuring Word so that it matches your preference in shortcut keys, you need to be careful about what shortcut …
Discover More
Замена текста при вводе в Word для Windows
Нажав клавишу INSERT, вы можете начать вводить новый текст на месте старого. Вы можете настроить функцию в Word Параметры.
Включение режима замены
При редактировании текста в режиме overtype введите текст справа от точки вставки.
В Word откройте меню Файл и выберите пункт Параметры.
В диалоговом окне Параметры Word выберите пункт Дополнительно.
В разделе Параметры правки выполните требуемое действие.
Чтобы использовать клавишу INSERT для управления режимом замены, установите флажок Использовать клавишу INS для переключения режимов вставки и замены.
Чтобы включить режим замены на постоянной основе, установите флажок Использовать режим замены.
Как включить Insert в Word 2010?
В диалоговом окне Параметры Word выберите пункт Дополнительно. В разделе Параметры правки выполните требуемое действие. Чтобы использовать клавишу INSERT для управления режимом замены, установите флажок Использовать клавишу INS для переключения режимов вставки и замены.
Как включить кнопку Insert?
Как активировать кнопку insert на ноутбуке
- В верхнем левом углу окна программы щелкните по кнопке
- В меню типичных команд щелкните по кнопке «Параметры
- В окне «Параметры Word» перейдите к вкладке «Дополни тельно» и группе «Вырезание, копирование и вставка» вклю чите пункт «Использовать клавишу Ins для вставки».
- Закройте окно кнопкой «ОК».
Как сделать так чтобы буквы не удалялись?
Отключение режима «Замены»
Если вы вдруг столкнулись с подобной ситуацией, когда при наборе текста выделяется следующая буква и удаляется, то все что необходимо сделать чтобы убрать это – повторно нажать кнопку Insert, что позволит отключить режим «Замены» и буквы перестанут съедаться.
Как отключить Insert в ворде?
Как “отключить” случайное нажатие клавиши INSERT
- Выбираем в меню Сервис (Tools) => Макросы (Macros) => Начать запись (Record New Macro), далее указываем имя макроса (например, DisableInsertButton), жмём ОК.
- Теперь сразу же нажимаем «Остановить запись» на появившейся небольшой панельке.
Как сделать замену текста в ворде?
Поиск и замена текста
- Выберите Главная > Заменить или нажмите клавиши CTRL+H.
- В поле Найти введите искомое слово или фразу.
- В поле Заменить введите новый текст.
- Нажимайте кнопку Найти далее, пока не перейдете к слову, которое нужно изменить.
- Нажмите кнопку Заменить. Чтобы обновить все вхождения одновременно, нажмите кнопку Заменить все.
Как настроить кнопку Insert?
Чтобы использовать клавишу INSERT для управления режимом замены, установите флажок Использовать клавишу INS для переключения режимов вставки и замены. Чтобы включить режим замены на постоянной основе, установите флажок Использовать режим замены.
Где находится кнопка Insert?
Клавиша Insert (Ins) – это клавиша, которая переключает режим «вставки» (когда текст вводиться по правую сторону от курсора) на режим «замены» (когда вводимый текст будет заменять напечатанный до того текст). Эта клавиша находится в блоке клавиш управления курсором и расположена слева от Home и выше Delete.
Как отменить замену символов?
Чтобы отключить этот режим, достаточно еще раз нажать клавишу Insert. Когда режим включен, в строке состояния отображается индикатор ЗАМ (OVR). А если мышкой дважды щелкнуть по этому индикатору, то режим замены символов будет выключен.
Что делать если в ворде при нажатии пробела стираются буквы?
Если вы вдруг столкнулись с подобной ситуацией, когда при наборе текста выделяется следующая буква и удаляется, то все что необходимо сделать чтобы убрать это – повторно нажать кнопку Insert, что позволит отключить режим «Замены» и буквы перестанут съедаться.
Что делать если в ворде пробел стирает буквы?
Все дело во включенном режиме замены (не путать с автозаменой), именно из-за него Ворд и съедает буквы. Как вы могли включить этот режим? Случайно, не иначе, так как включается он нажатием клавиши «INSERT» , которая на большинстве клавиатур находится около клавиши «BACKSPACE» .
Как убрать автоматическую замену букв?
Как отключить автоматическую замену строчной буквы на заглавную в таблицах Word? «Файл» — «Параметры» — «Правописание» -«Параметры автозамены» — «Автозамена». Снимаете галочку «Делать первые буквы ячеек таблиц прописными».
Как отключить функцию замены на клавиатуре?
Откройте раздел «Язык и ввод».
- Нажмите на кнопку настроек напротив вашей клавиатуры.
- Найдите пункт «Автоисправление». Он также может называться «Автозамена». Нажмите на него.
- Поставьте галочку напротив «Отключить».
- Всё, теперь автозамена текста будет отключена. Автор статьи:
Как отключить автозамену в ворде?
Включение и отключение автозамены в Word
- Перейдите в раздел > Параметры > Правописание и нажмите кнопку Параметры автозамены.
- На вкладке Автозамена установите или снимите флажок заменять текст при вводе.
Как изменить одно слово во всем документе?
Для замены слов в тексте используется функция «Найти и заменить», которая во всех версиях программы вызывается с помощью горячих клавиш «Ctrl+H».
Как сделать многоуровневый список в ворде?
Определение нового многоуровневого списка
- Выделите текст или нумерованный список, который вы хотите изменить.
- На вкладке Главная в группе Абзац щелкните стрелку рядом с кнопкой Многоуровневый список …
- Разверните диалоговое окно «Многоуровневый список», щелкнув Дополнительно в левом нижнем углу.
Как в ворде изменить вид кавычек?
Парные кавычки в Word
- На вкладке Файл нажмите кнопку Параметры.
- Выберите пункт Правописание и нажмите кнопку Параметры автозамены.
- В диалоговом окне Параметры автозамены выполните указанные ниже действия. На вкладке Автоформат при вводе в разделе Заменять при вводе установите или снимите флажок «Прямые» кавычки «парными». …
- Нажмите кнопку ОК.
При наборе текста удаляется следующая буква (а раньше она просто добавлялась к уже имеющимся). Что делать?
Доброго времени суток!
В офисной работе некоторые пользователи случайно включают спец. режим печати — при наборе текста удаляется следующая буква (т.е. каждый новый символ заменяет старый). Разумеется, при редактировании обычных документов — это очень не удобно и сильно раздражает! 👀
Собственно, после очередного случая, когда меня побеспокоили по «этому» вопросу — решил подобную статью с «лечением» проблемы выложить не только в локальной сети, но и здесь, у себя в «офисных» заметках. Думаю, она будет весьма полезна всем неискушенным пользователям!
👉 ШАГ 1: включаем режим «обычной» печати
Дело в том, что в Windows есть два режима набора текста:
- «вставка» — самый обычный режим, к которому все привыкли (текст при печати появляется сразу после курсора, а всё, что было справа автоматически смещается);
- «замена» — спец. режим, при котором новый добавленный символ появляется вместо старого, который был перед курсором (этим удобно пользоваться только в определенных случаях).
👉 Важно!
1) Для переключения между режимами «вставка» и «замена» в Windows используется клавиша Insert (или «ins» на ноутбуках). Обратите внимание, что на тех же ноутбуках её нужно нажимать вместе с клавишей Fn!
2) Чтобы вернуть в первоначальный вид стёртые символы и слова — нужно нажать сочетание Ctrl+Z (можно несколько раз. ).
Разумеется, пользователи чаще всего задействуют этот режим при нажатии кнопки «0» на цифровой клавиатуре (при выключенном режиме «num lock») .

Клавиша «Insert» (или «ins» на ноутбуках)
Собственно, как только вы столкнулись с неправильным режимом печати — просто используйте эту клавишу, и смените его. 👌
Однако, тем, кто хочет вообще отключить подобный режим — порекомендую ниже пару способов.
👉 ШАГ 2: как программе MS Word запретить переводить редактор в режим «замена»
Если вы сравнительно часто «натыкаетесь» на этот не очень удобный режим работы редактора (и стираете нужные слова ☝) — то, как один из вариантов решения, можно предложить вообще отключить эту «замену» (т.е. при нажатии на клавишу Insert — в Word ничего происходить не будет!).
Делается это достаточно просто: сначала нужно открыть меню «Файл/параметры» , а после во вкладке «Дополнительно» снять галочку с пункта «Использовать клавишу INS для переключения режимов вставки и замена» (см. скриншот ниже 👇) .

Использовать клавишу INS для переключения режимов вставки и замена
👉 ШАГ 3: еще один радикальный вариант решения — отключение клавиши Insert
Этот вариант больше подойдет пользователям с классической клавиатурой (на ноутбуках такой «фокус» проходит реже).
Суть метода заключается в том, чтобы ОС Windows «указать», что при нажатии кнопки Insert ничего не происходило (т.е. «обнулить» ее). Сделать это можно 👉 через редактор реестра, всего три действия:
- сначала открыть ветку: HKEY_LOCAL_MACHINESystemCurrentControlSetControlKeyboard Layout ;
- создать в этой ветке параметр (Binary) с именем «Value Scancode Map» (без кавычек) ;
- ну и задать в значение параметра нижеприведенную строку (см. скрин ниже 👇, более подробно об этом тут).

👉 Кстати!
Для более простого отключения клавиши Insert — можно воспользоваться спец. утилитой MapKeyboard . Пользоваться ей очень просто: достаточно один раз запустить и установить вместо Insert что-нибудь «безобидное» (Shift, например, см. скрин ниже 👇).

MapKeyboard: всего три действия для замены клавиши.
👉 В помощь!
Как переназначить одну клавишу на другую (тем, у кого не срабатывает нажатие кнопки на клавиатуре)
Using Overtype and Insert Modes in Microsoft Word
What’s the difference? We’ll explain
Updated on November 4, 2019
Annette Stoffregen / EyeEm / Getty Images
Microsoft Word has two text entry modes: Insert and Overtype. These modes each describe how text behaves as it’s added to a document with pre-existing text. Here’s how these two modes work and how to use them.
Instructions in this article apply to Word for Microsoft 365, Word 2019, Word 2016, Word 2013, and Word 2010.
Insert Mode Definition
While in Insert mode, the new text that is added to a document moves the current text forward, to the right of the cursor, to accommodate the new text as it’s typed or pasted into the document. It’s the default mode for text entry in Microsoft Word.
Overtype Mode Definition
In Overtype mode, when text is added to a document where there is existing text, the existing text is replaced by the newly added text as it’s entered, character by character.
If you want to turn off the default Insert mode in Microsoft Word so you can type over the current text, there are two ways to do this. The simplest way is to press the Insert key, which toggles the mode on and off. Another way is to set the Insert key to toggle Overtype mode on and off.
To change the settings for Overtype mode:
-
Go to File > Options.
-
In the Word Options dialog box, choose Advanced.
-
In the Editing options section, choose one of the following:
- To use the Insert key to control Overtype mode, select the Use Insert key to control overtype check box.
- To permanently enable Overtype mode, select the Use overtype mode check box.
-
Select OK.
Thanks for letting us know!
Get the Latest Tech News Delivered Every Day
Subscribe
In this chapter, we will discuss how to insert text in Word 2010. Many times it is required to go back and insert additional text in an existing line. Microsoft Word provides two ways to insert text in existing text and we will show how to use both the methods of inserting text −
Insert and Add Text
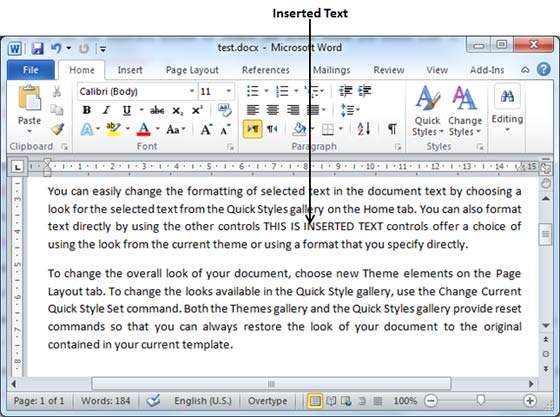
First we will see how inserted text will be added into the existing content without replacing any existing content.
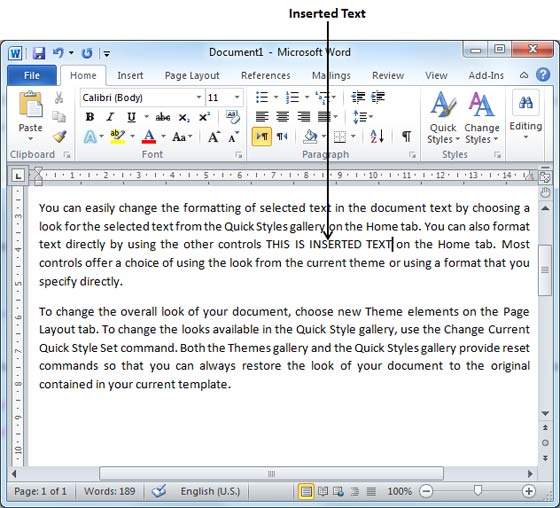
Step 1 − Click the location where you wish to insert text; you can also use the keyboard arrows to locate the place where the text needs to be inserted.
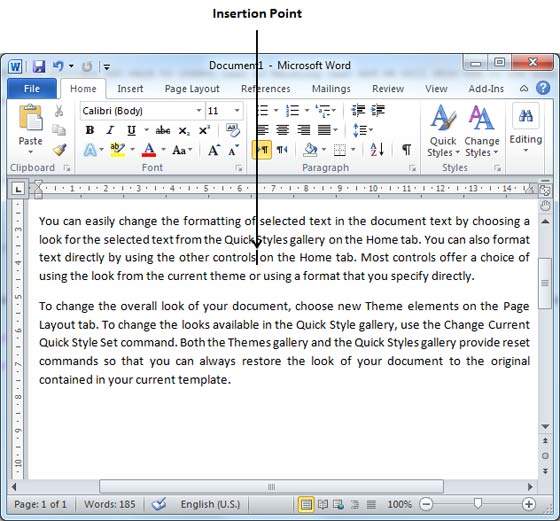
Step 2 − Start typing the text that needs to be inserted. Word inserts the text to the left of the insertion point, moving the existing text to the right
Insert and Replace Text
In the Insertion mode, text will be added into the existing content but same time it will over write all the content which comes in its way.
Step 1 − Right-click the status bar and select the Overtype option from the displayed menu.
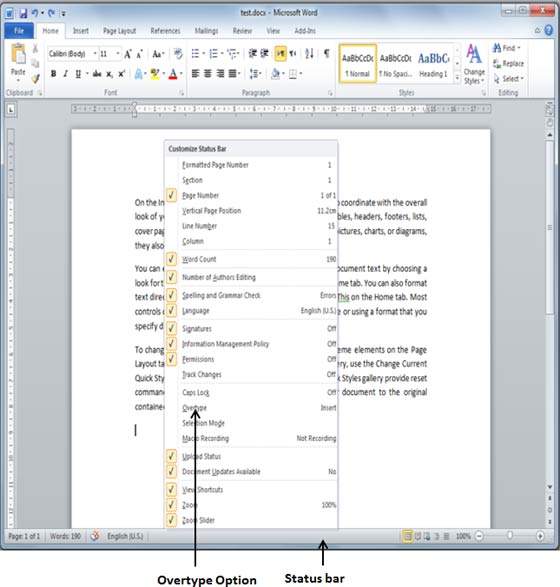
When you select the Overtype option, the status bar will show the insert mode as shown below −
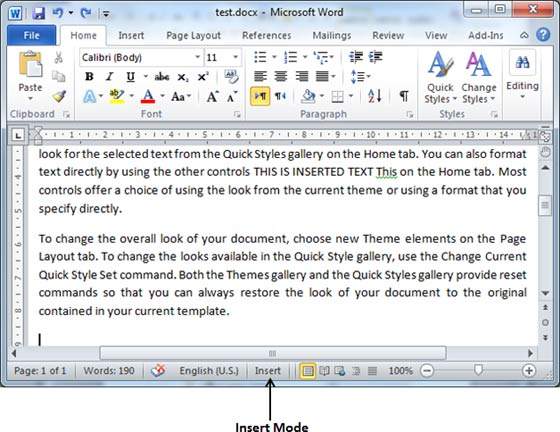
Step 2 − Click on the Insert text available at the status bar and it will switch to the Overtype mode as shown below −
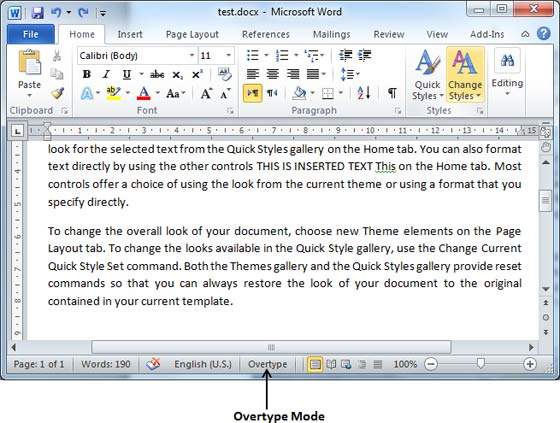
Step 3 − Now click the location where the text needs to be inserted or you can use the keyboard arrows to locate the place where the text needs to be inserted.
Step 4 − Start typing the text that needs to be inserted. Word will replace the existing text with the newly typed text without moving the position of the exiting test.
Note − Microsoft Word 2010 disabled the functionality of the Insert key and it does nothing, so you will have to follow-up with the above mentioned procedure to turn-on or turn-off the Insert mode.