
To create a form in Word that others can fill out, start with a template or document and add content controls. Content controls include things like check boxes, text boxes, date pickers, and drop-down lists. If you’re familiar with databases, these content controls can even be linked to data.
Show the Developer tab
If the developer tab isn’t displayed in the ribbon, see Show the Developer tab.
Open a template or a blank document on which to base the form
To save time, start with a form template or start from scratch with a blank template.
-
Go to File > New.
-
In Search online templates, type Forms or the type of form you want and press ENTER.
-
Choose a form template, and then select Create or Download.
-
Go to File > New.
-
Select Blank document.
Add content to the form
Go to Developer, and then choose the controls that you want to add to the document or form. To remove a content control, select the control and press Delete. You can set properties on controls once inserted.
Note: You can print a form that was created using content controls, but the boxes around the content controls will not print.
In a rich text content control, users can format text as bold or italic, and they can type multiple paragraphs. If you want to limit what users add, insert the plain text content control.
-
Click or tap where you want to insert the control.
-
Select Developer > Rich Text Content Control
 or Plain Text Content Control .
 or Plain Text Content Control
  .
.To set specific properties on the control, see Set or change properties for content controls.
A picture control is often used for templates, but you can also add a picture control to a form.
-
Click or tap where you want to insert the control.
-
Select Developer > Picture Content Control
.
 .
.To set specific properties on the control, see Set or change properties for content controls.
Use building block controls when you want people to choose a specific block of text. For example, building block controls are helpful when you need to add different boilerplate text depending on the contract’s specific requirements. You can create rich text content controls for each version of the boilerplate text, and then you can use a building block control as the container for the rich text content controls.
-
Click or tap where you want to insert the control.
-
Go to DeveloperBuilding Block Gallery Content Control
(or Building Block Content Control). -
Select Developer and content controls for the building block.
 (or Building Block Content Control).
-
Click or tap where you want to insert the control.
To set specific properties on the control, see Set or change properties for content controls.
In a combo box, users can select from a list of choices that you provide or they can type in their own information. In a drop-down list, users can only select from the list of choices.
-
Go to Developer > Combo Box Content Control
or Drop-Down List Content Control . -
Select the content control, and then select Properties.
-
To create a list of choices, select Add under Drop-Down List Properties.
-
Type a choice in Display Name, such as Yes, No, or Maybe.
Repeat this step until all of the choices are in the drop-down list.
-
Fill in any other properties that you want.
Note: If you select the Contents cannot be edited check box, users won’t be able to click a choice.
 or Drop-Down List Content Control
  .
.-
Click or tap where you want to insert the date picker control.
-
Select Developer > Date Picker Content Control
.
 .
.To set specific properties on the control, see Set or change properties for content controls.
-
Click or tap where you want to insert the check box control.
-
Select Developer > Check Box Content Control
.
 .
.To set specific properties on the control, see Set or change properties for content controls.
Legacy form controls are for compatibility with older versions of Word and consist of legacy form and Active X controls.
-
Click or tap where you want to insert a legacy control.
-
Go to Developer > Legacy Forms
drop-down. -
Select the Legacy Form control or Active X Control that you want to include.
 drop-down.
Set or change properties for content controls
Each content control has properties that you can set or change. For example, the Date Picker control offers options for the format you want to use to display the date.
-
Select the content control that you want to change.
-
Go to Developer > Properties.
-
Change the properties that you want.

Add protection to a form
If you want to limit how much others can edit or format a form, use the Restrict Editing command:
-
Open the form that you want to lock or protect.
-
Select Developer > Restrict Editing.
-
After selecting restrictions, select Yes, Start Enforcing Protection.


Advanced Tip:
If you want to protect only parts of the document, separate the document into sections and only protect the sections you want.
To do this, choose Select Sections in the Restrict Editing panel. For more info on sections, see Insert a section break.

Show the Developer tab
If the developer tab isn’t displayed in the ribbon, see Show the Developer tab.
Open a template or use a blank document
To create a form in Word that others can fill out, start with a template or document and add content controls. Content controls include things like check boxes, text boxes, and drop-down lists. If you’re familiar with databases, these content controls can even be linked to data.
-
Go to File > New from Template.
-
In Search, type form.
-
Double-click the template you want to use.
-
Select File > Save As, and pick a location to save the form.
-
In Save As, type a file name and then select Save.

-
Go to File > New Document.
-
Go to File > Save As.
-
In Save As, type a file name and then select Save.

Add content to the form
Go to Developer, and then choose the controls that you want to add to the document or form. To remove a content control, select the control and press Delete. You can set Options on controls once inserted. From Options, you can add entry and exit macros to run when users interact with the controls, as well as list items for combo boxes, .
-
In the document, click or tap where you want to add a content control.
-
On Developer, select Text Box, Check Box, or Combo Box.
-
To set specific properties for the control, select Options, and set .
-
Repeat steps 1 through 3 for each control that you want to add.

Options let you set common settings, as well as control specific settings. Select a control and then select Options to set up or make changes.
-
Set common properties.
-
Select Macro to Run on lets you choose a recorded or custom macro to run on Entry or Exit from the field.
-
Bookmark Set a unique name or bookmark for each control.
-
Calculate on exit This forces Word to run or refresh any calculations, such as total price when the user exits the field.
-
Add Help Text Give hints or instructions for each field.
-
OK Saves settings and exits the panel.
-
Cancel Forgets changes and exits the panel.
-
-
Set specific properties for a Text box
-
Type Select form Regular text, Number, Date, Current Date, Current Time, or Calculation.
-
Default text sets optional instructional text that’s displayed in the text box before the user types in the field. Set Text box enabled to allow the user to enter text into the field.
-
Maximum length sets the length of text that a user can enter. The default is Unlimited.
-
Text format can set whether text automatically formats to Uppercase, Lowercase, First capital, or Title case.
-
Text box enabled Lets the user enter text into a field. If there is default text, user text replaces it.
-
-
Set specific properties for a Check box.
-
Default Value Choose between Not checked or checked as default.
-
Checkbox size Set a size Exactly or Auto to change size as needed.
-
Check box enabled Lets the user check or clear the text box.
-
-
Set specific properties for a Combo box
-
Drop-down item Type in strings for the list box items. Press + or Enter to add an item to the list.
-
Items in drop-down list Shows your current list. Select an item and use the up or down arrows to change the order, Press — to remove a selected item.
-
Drop-down enabled Lets the user open the combo box and make selections.
-
-
Go to Developer > Protect Form.
Note: To unprotect the form and continue editing, select Protect Form again.
-
Save and close the form.

If you want, you can test the form before you distribute it.
-
Protect the form.
-
Reopen the form, fill it out as the user would, and then save a copy.
Show the Developer tab
-
On the right side of the ribbon, select
, and then select Ribbon Preferences. -
Under Customize, select Developer .
 , and then select Ribbon Preferences.
Open a template or a document on which to base the form
You can start with a blank document and create your own form. Or, to save time, you can start with a form template.
-
Go to File > New from Template.
-
In the left pane, expand Online Templates, and then select Forms.
-
Double-click the form template that you want to use.
Add content controls to the form
-
In the document, click where you want to add the control.
-
On the Developer tab, under Form Controls, select Text Box, Check Box, or Combo Box.
-
To set specific properties for the control, select Options, and then configure the properties that you want.
Note: To create a list of drop-down items in a combo box, select the combo box placeholder, click Options, and then add the items that you want to appear in the drop-down list.
-
Repeat steps 1 through 3 for each control that you want to add.
Add instructional text (optional)
Instructional text (for example, «Type First Name») in a text box can make your form easier to use. By default, no text appears in a text box, but you can add it.
-
Select the text box control that you want to add instructional text to.
-
On the Developer tab, under Form Controls, select Options.
-
In Default Text, type the instructional text.
-
Make sure that Fill-in enabled is selected, and then select OK.
Protect the form
-
On the Developer tab, under Form Controls, select Protect Form.
Note: To unprotect the form and continue editing, click Protect Form again.
-
Save and close the form.
Test the form (optional)
If you want, you can test the form before you distribute it.
-
Protect the form.
-
Reopen the form, fill it out as the user would, and then save a copy.
Creating fillable forms isn’t available in Word for the web.
You can create the form with the desktop version of Word with the instructions in Create a fillable form.
When you save the document and reopen it in Word for the web, you’ll see the changes you made.
Did you know that Microsoft Word has a variety of automatic form controls that you can insert in your document? What are these exactly? What’s included in these form controls are a checkbox, a date drop-down, a custom word drop-down, among others. Using these forms are a way to make your document more user friendly. These forms also reduce the amount of errors that can be caused by manual entry.
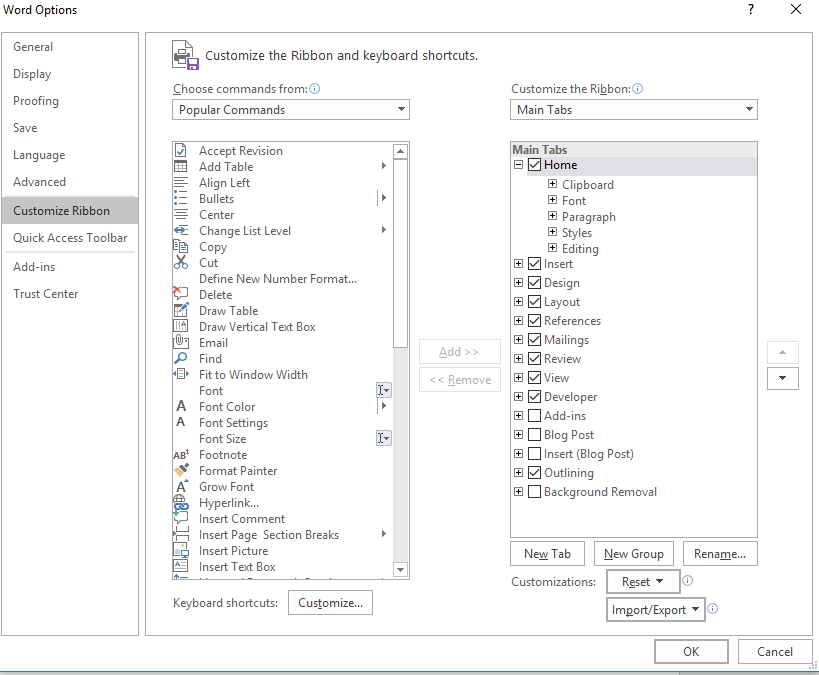
First you will need to ensure you have the Developer tab enabled in the Ribbon, or menu at the top of your Word document. Depending on what version you are using, this menu can be found under File > Options > Customize Ribbon. Simply check the box for Developer and click OK. Now your developer tab should appear.
Insert a Checkbox
In Word, place your cursor where you would like the checkbox to go.
On the Developer tab, in the Controls group, click the box with a check mark in it.

A checkbox will appear next to your list item.

You will notice the other controls items will be greyed out; click anywhere in your word document and they will reappear.
Repeat this step for the other items in your list.
This function will allow your user to put an X in the box.

Insert a Date Drop-down
Simply place your cursor where you would like the Date drop-down form control to go.
Go to the Developer tab in the Ribbon and select the Calendar form control.

Microsoft Word will insert the calendar date form picker into your document.

Your user can now select the calendar date from this drop-down and it will appear in the document. There is also a button for Today’s date should they want to select it.

You can further customize the text and format of your date, if you go into the Properties button in the Controls group in your Ribbon.
Insert a Drop-Down Option
Once again in your Word document, place your cursor where you would like the drop-down to go.
Click on the Combo Box Content Control button in the Controls group of the Developer tab. This will insert a drop-down form without any drop-down options into your Word document.

Click on the Properties button in the Controls group.
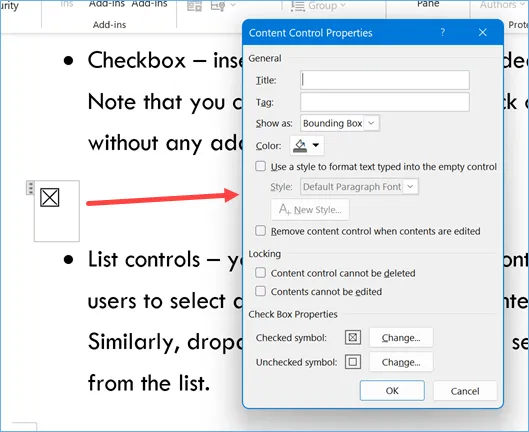
In the Content Control Properties pop-up menu, give your drop-down box a Title. Additionally give it a Tag name that will appear in Design Mode.
You can adjust the color, the way the box appears among other settings.
I click the Add button to add text to appear as drop-down options. I do this for every choice.

Here is a picture of my final drop-down menu;

The ability to create customized, interactive forms to collect data is a powerful, but often underutilized feature of Word. In this blog, we will discuss how to create electronic forms using form controls such as text content, drop-down list, and check box. In addition, you will learn how to protect the form and collect data.
Getting Started
In order to work with Forms you must first enable the Developer tab. To do this:
- Click File, then Options.
- Next, choose the Customize Ribbon category.
- Then, check Developer in the right pane.
- Click OK to apply the change.


Creating a Basic Form
First, create a table and layout the basic structure of your form – merge and split cells as necessary and apply desired styles. Be sure to save the file as a template. An example is below:
Inserting Form Controls
Next, you will add some form field controls that will allow the users to interact with the form in an electronic format. Controls are objects that make it easier for users to enter data or make a selection.
You can locate basic form controls in the Controls group of the Developer tab. You will notice that there are different categories of controls: Content controls, Legacy controls, and Active X controls (the latter two accessed by clicking the briefcase icon).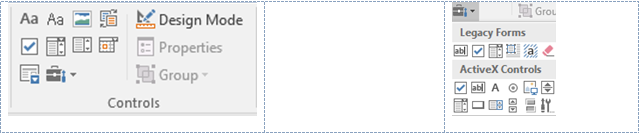
Each category type has its advantages and disadvantages and you should choose the category type depending on your purpose for using the form. Microsoft added Content Controls in 2007 but there remains much to praise about the old Legacy Form fields.
- Content controls are best if you only intend to print or save the entire form. There are several types of controls available in this category allowing your form to be the most dynamic and robust.
- Legacy controls are best if you intend to collect data from the form in a text-delimited file. They work only when you protect the document. Other advantages include easy tabbing between fields and shading of editable fields.
- ActiveX controls are best for webpages and they require macros in order to operate.
Let us take a quick look a few common and popular controls:
![]() Inserts a text box control, where users can enter data.
Inserts a text box control, where users can enter data.
![]() Inserts a checkbox, where users can specify one or more conditions.
Inserts a checkbox, where users can specify one or more conditions.
![]() Inserts a drop-down list, where users can pick from a drop-down menu.
Inserts a drop-down list, where users can pick from a drop-down menu.
NOTE: We will be using Legacy form controls for the remainder of this blog article.
To insert a control:
- First, place your cursor where you want the control to appear.
- Then, click the desired icon in the Controls group of the Developer tab. The control will appear in the form.
The Legacy Tools menu contains a command to toggle shading on or off for all fields.
To remove a control, select it and then press the Delete key on your keyboard.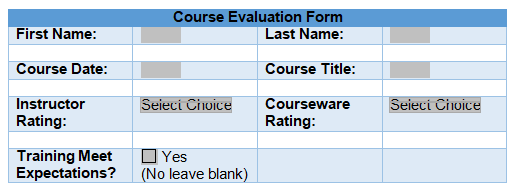
Form Field Options
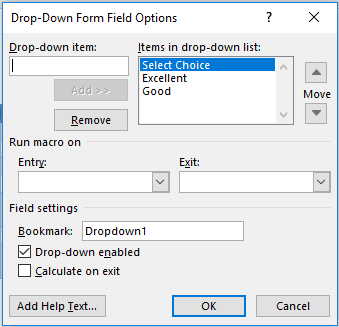
In the case of many controls, the control is ready to go. However, if you insert a customizable item such as a drop-down list for example, you will need to tell Word what sort of content it will contain.
To set field options:
- Click the control to select it and click Developer, then Properties.
- The appropriate Properties dialog box will open and you can modify various aspects of the control as needed.
- For example, adding desired values for a drop-down list (as shown below).
- Dialog options may differ depending on what category and type of control you selected.
- Click OK to save your changes.
Protecting a Form
It is recommend that you protect the form from editing by users and limit them only to the portions that need to be completed. This is also required for Legacy forms in order for them to work.To protect a form:
- Click Developer, and then Restrict Editing.
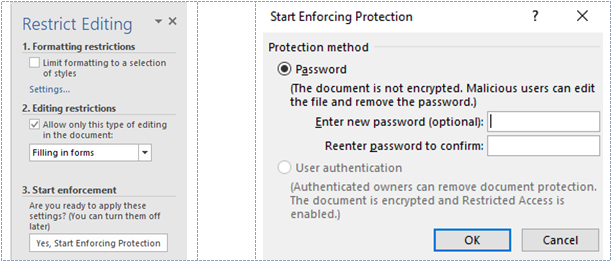
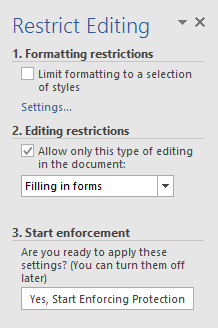
- From the Restrict Editing task pane, check the second box and choose “Filling in forms” from the drop-down menu.
- Then click Yes, Start Enforcing Protection.
- From the dialog box that appears, you can choose to protect the form using a password, which is highly recommended. However, passwords are not required; simply leave the password fields blank.
- Click OK.
To stop protecting the form, click Stop Protection. Then, enter the password (if applicable).
An alternative option (especially for Content controls) is to select a text range and then click the Group button. This locks the text range, except in regions that contain editable content controls.
Saving Form Data
After a user completes the form, it is important to determine how the form data will be stored. There are several options to consider:
- Resave the Template File as a Word Document
- Save Form Data as a Text File
- Open/Import in Excel
- Link to a Database
Of course, people can use Word to fill out the form on their computer and then just print it too!
To resave the template file as a word document:
- Click File-Save As-Browse.
- Change the file type to .docx.
- Add the user’s initials in the file name.
To save form data as plain text:
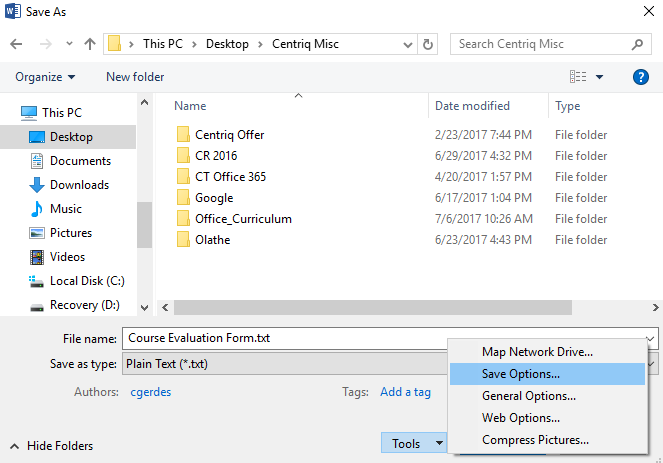
- Click File-Save As-Browse.
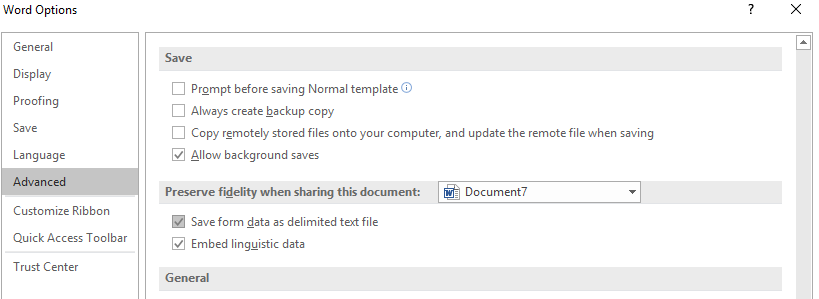
- Then, in the Save As dialog, click Tools and then Save Options.

- Click the Advanced category and check “Save form data as delimited text file.”
- Click OK.

- At the Save As dialog, choose the file name, location, and file type (if not done in
Step #2). Ensure that the file type is set to plain text and click Save. - At the File Conversion dialog box, confirm that the data preview looks correct and set any advanced options.
- Click OK.
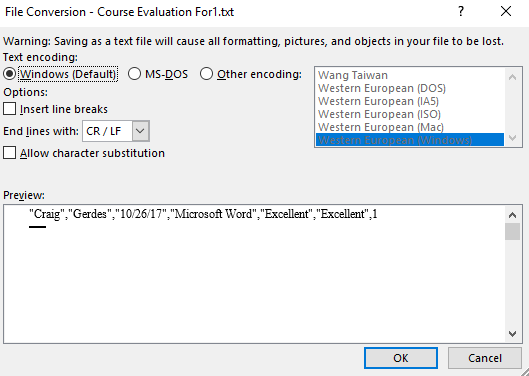
When you open the plain text file that contains your form data, the information is in fields separated by a delimiter such as a comma. Most of the data should be quite readable. You will see checkboxes indicated as “1” for Yes and “0” for no.
To Open/Import in Excel:
Word extracts the form data typed into the form and saves the data as a .txt file as described in the above steps. Word inserts commas between the fields and Excel uses the commas to separate the data into cells.
- Open Excel and browse for the .txt file. You may have to change the file type to All Files.
- In Step 1 of the Text Import Wizard, select Delimited. Click Next.
- In Step 2, choose comma as the delimiter type. Click Next.
- In Step 3, click Finish.
To import several .txt files into a master Excel file, go to Data “Get External Data” From Text. Complete Steps 1-3 above. Finally, choose what cell should be the destination cell for the imported data.
To link to a database:
To automatically transfer data, after the form is completed, you can link the form to a database. The process for doing this requires advanced Access and Visual Basic knowledge and is beyond the scope of this blog article. Please work with your Database Administrator to setup.
—————————————————————————————————————————-
For more information about these and similar features, take a Word Class from Centriq. For course descriptions and dates, see our website at https://centriq.com/corporate/class-schedule/?q=Word.
This is the first blog article in a four-part Word series. Be sure to watch for future blog articles in this Word series. The next topic will feature Terrific Tips and then Awesome Add-ins and finally Outstanding Options. Also plan to attend a free Word Lunch and Learn on Wednesday, January 10. We will feature live demonstrations of all of the items covered during this Word blog series. If you would like to attend, CLICK HERE to register.
In addition, if you would like more information about Word or other training classes available, contact a Centriq Training Advisor online or at 913.322.7062 for assistance.
You can use Word to create interactive digital forms that other people can fill out on their computers before printing or sending them back to you. It takes a little preparation but keeps you from having to decipher messy handwriting! Some of the tools you will use when creating a form include:
- Templates: Forms are normally saved as templates so that they can be used again and again.
- Content controls: The areas where users input information in a form.
- Tables: Tables are often used in forms to align text and form fields, and to create borders and boxes.
- Protection: Users can complete the form fields without being able to change the form’s text and/or design.
Show the Developer Tab
Before you can create a form, you’ll need to turn on the Developer tab to get access to the advanced tools.
- Click the File tab.

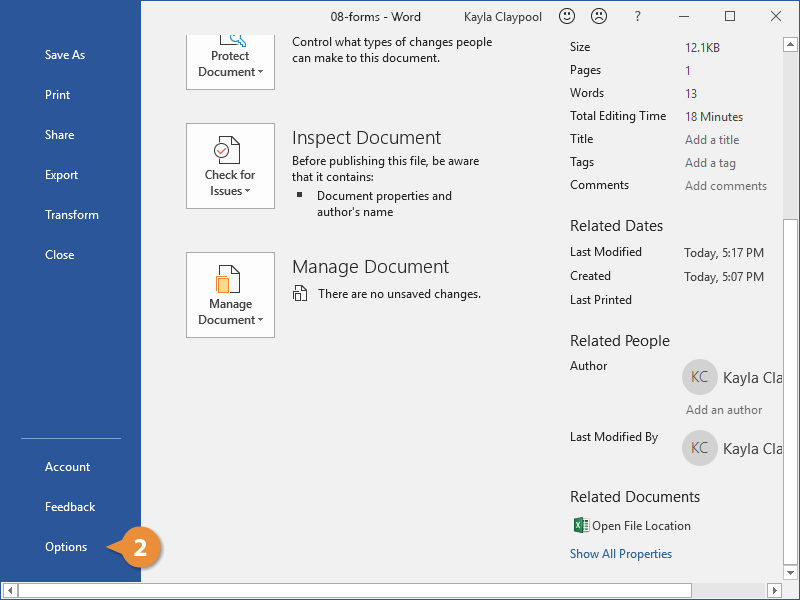
- Select Options.

The Word Options window opens.
- Click the Customize Ribbon tab on the left.
The column on the right controls which ribbon tabs are enabled.
- Check the Developer check box.
- Click OK.
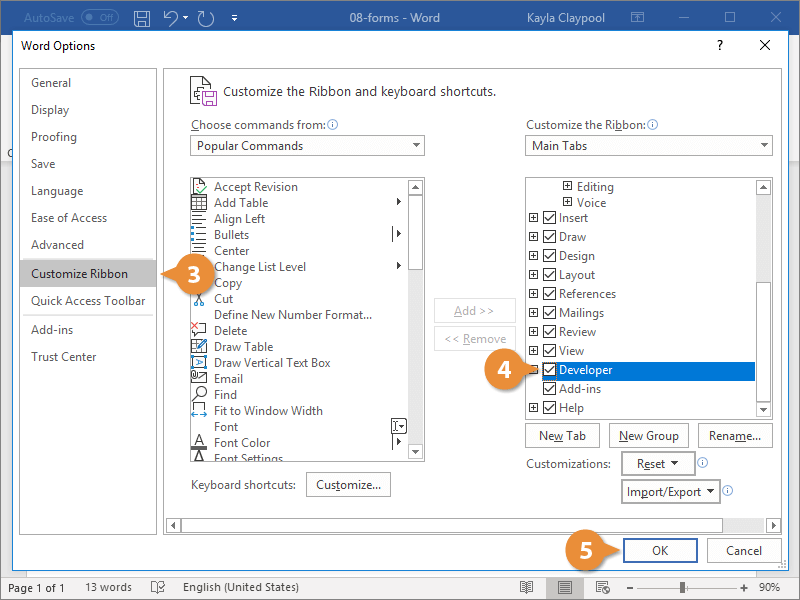
The Developer tab now appears on the ribbon. In addition to advanced tools for macro recording, add-ins, and document protection, we now have access to form controls.
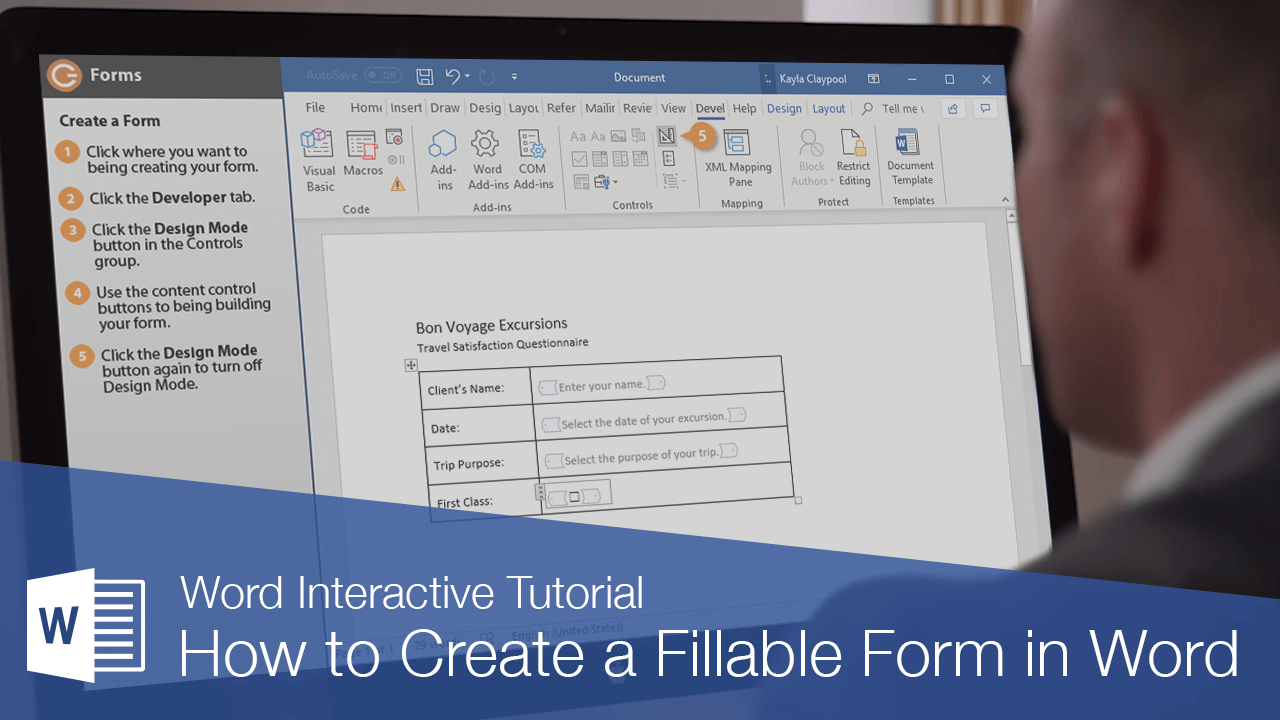
Create a Form
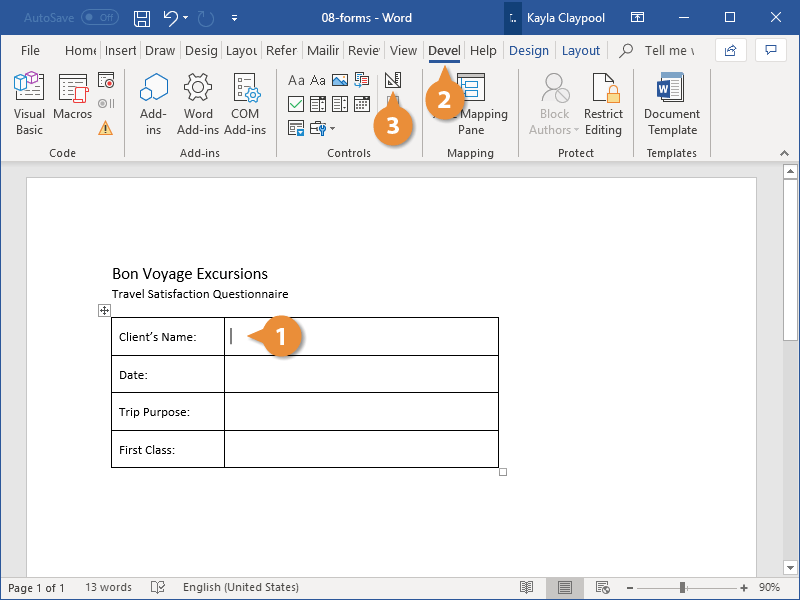
Once you’ve enabled the Developer tab, and created the layout and structure of the form, you can start adding form fields to your document with Content Controls.
- Place the text cursor where you want to insert the form field.
- Click the Developer tab on the ribbon.
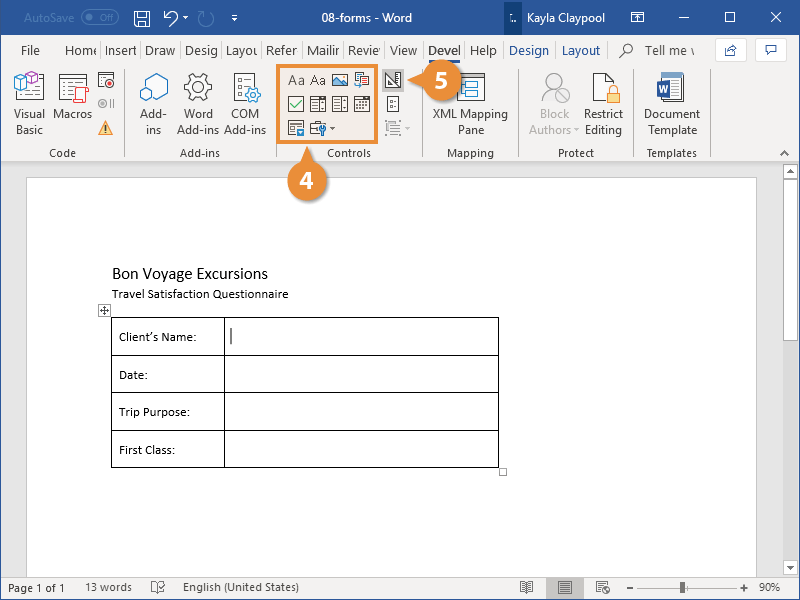
The Controls group contains the different kinds of content controls you can add to a form, as well as the toggle button for Design Mode.
- Click the Design Mode button in the controls group.
While Design Mode is active, controls you insert won’t be active, so clicking a check box to move it around won’t also check it. You can also customize placeholder text for some controls.
- Click a Content Control buttons to insert the selected type of control.
The content control is inserted.
Select a form field and click the Properties button on the ribbon to edit a control’s options. Depending on the type of control you’ve inserted, you can change its appearance, set up the options in a list, or lock the control once edited.
- When you’re done, click the Design Mode button again to exit Design Mode.
You leave Design Mode, and the content controls that you’ve inserted can now be used.
Types of Form Controls
There are many different types of form controls you can add to a form that will allow people to add different types of responses.
Finalize a Form
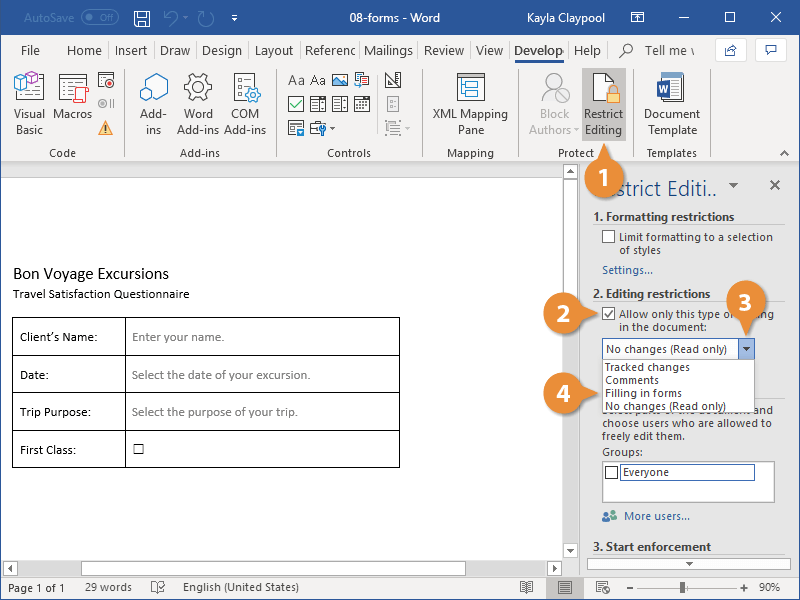
When you’re ready to distribute a form so others can fill it out, you can restrict the form so that content controls cannot be removed or changed by those filling it out.
- Click the Restrict Editing button on the Developer tab.
The Restrict Editing pane appears on the right.
- Check the Editing restrictions check box.
- Click the Editing restriction list arrow.
- Select Filling in forms.
When this option is enabled, the only change that anyone else can make to this document is the filling in of form fields. They won’t be able to move, delete, or edit the fields themselves until protection is turned off.
- Click the Yes, Start Enforcing Protection button.
A password is not required to start enforcing protection, but you can add one if you’d like to prevent just anyone from turning this protection off.
- Enter a password (optional), then click OK.
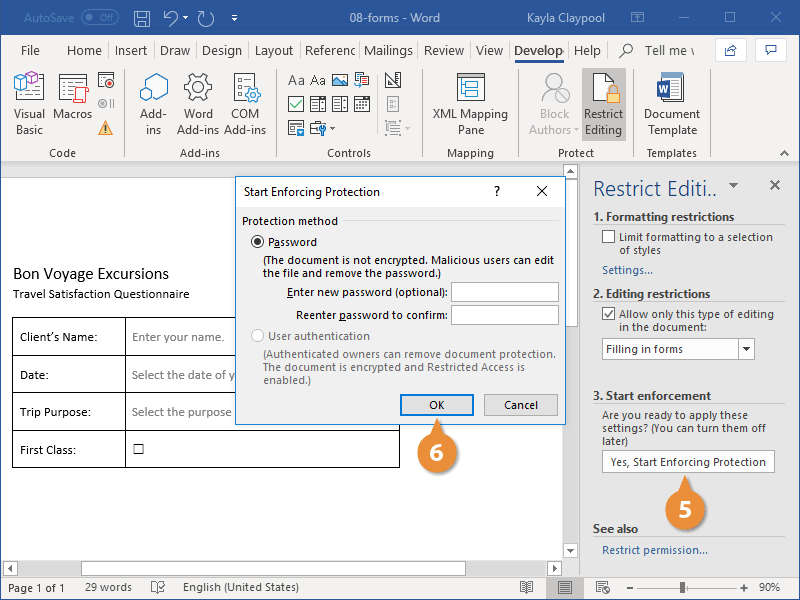
The document is now restricted, and anyone you send it to will only be able to fill in the forms.

FREE Quick Reference
Click to Download
Free to distribute with our compliments; we hope you will consider our paid training.
Microsoft Word is the one of the important apps most of us use on daily basis for creating documents. However, do you know that it is easy to create editable forms in Microsoft Word? You can use the forms for various purposes like applications or information collection purposes. In this article, we will explain how to create fillable forms in Microsoft Word with Microsoft 365 version.
Usage of Word Forms
There are numerous ways you can make use of the forms in Word. The best example includes an application form that you receive in emails to fill and send back. In this case, the form controls are applied to control what the receiver can edit or select in the form. It is also important the user should not delete the content of the fillable form or change the formatting.
On other hand, there are pre-printed forms like the applications you can see in banks. These forms are first created in Word and pre-printed with necessary details. Users can fill other personal details manually and submit for processing. It is just matter of few minutes to reprint the form when required. It is also easy to modify some fields in the form to create a variation before printing.
Creating Forms in Microsoft Word
There are two straightforward ways to create a form in Word.
- Download the form template from Office library and modify the content as per your need.
- Create a custom form from scratch.
1. Creating Form from Template Library
This is the easy option to save your time. However, it may not always work as the pre-defined templates may not match your requirements.
- Open Word app and when you are in the backstage view, you will see default templates next to “Blank document” template.
- Click “More templates” link to explore all free templates available for you to download from Microsoft.
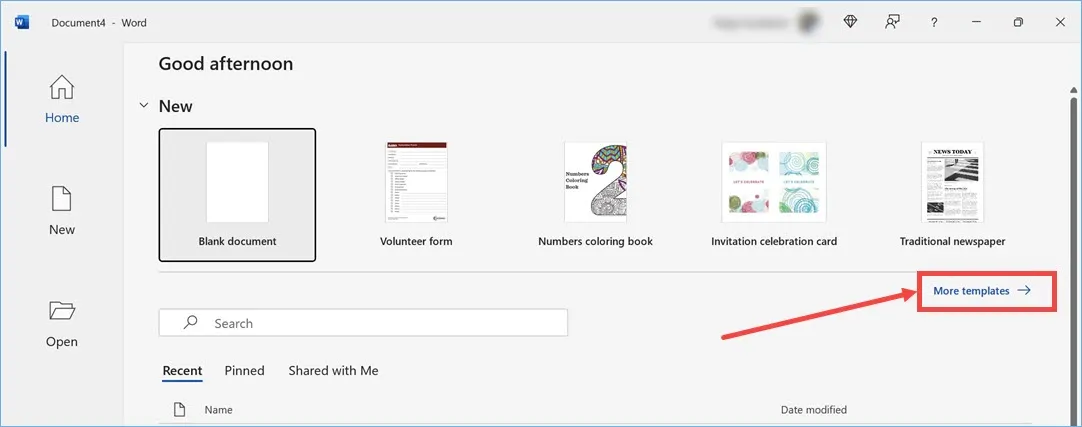
- Use the search box to enter the keywords like form or volunteer form to filter the relevant templates.
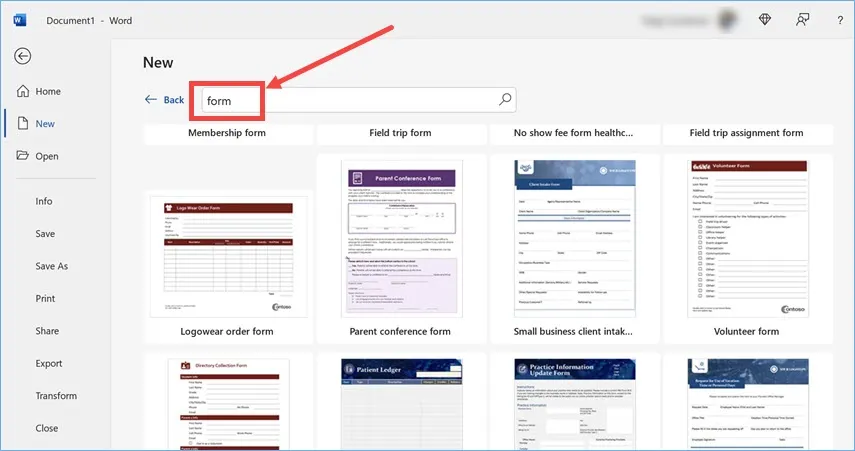
- When you find the template, click on it and then click “Create” button to start downloading the template.

- After downloading the template will be applied in your document. You can start modifying the content and print after finishing the work.

This method has lot of problems that most of the templates do not actually use the form controls. For example, all the checkboxes you see in the above “Volunteer Form” are simply square symbols. This means you cannot check or uncheck the items Word. The primary usage in this case will be to print out the form physically and the users need to manually fill out the details like the bank applications.
2. Creating Editable Forms in Word from Scratch
This is the correct approach when you want to have an editable form in Word. However, you will not see any form elements like checkbox or list in the default Word menu. you have to enable “Developer” menu to make them visible. When you are in Word app, go to “Files > Options”. Navigate to “Customize Ribbon” section and enable “Developer” option under “Main Tabs”. Now you will see a “Developer” menu in the ribbon showing form control icons.

The “Design Mode” will show additional instructional text which you can use if needed. Otherwise, you can simply click on the required form elements and start creating your form. After adding an element, you can click on the “Properties” to set needed controls. For example, after adding a list or combo box, you can setup the options in the properties section. You can also lock the filed, apply colors and protect it from deletion in the properties section.
Form Controls
Here are the form controls you can use with Word:
- Text controls – there are two text controls available – rich text and plain text. While both controls allow you to add text boxes, you can format the text like bold and italic with rich text option.
- Picture control – though there are not much use of pictures in the form, you can insert your logo and lock the item from deletion.
- Building block gallery content control – you can use this control to insert any building blocks from Quick Parts and other gallery of blocks.
- Checkbox – insert a checkbox where needed on your form. Note that you can click on the box to check or uncheck without any additional formatting.
- List controls – you can insert combo box control allowing users to select an option from the list or enter own value. Similarly, dropdown list will force users to select a value from the list.

- Date picker – insert a date picker for selecting a date.
- Repeating control – clicking on this icon will add a + icon to the selected control. You can click the + icon to duplicate the control easily.
- Legacy tools – it contains legacy form controls and ActiveX controls. These controls are useful to insert radio button or apply shading on form elements.
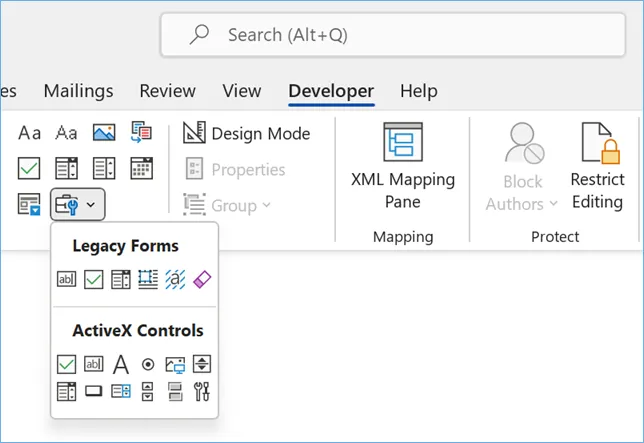
Note that the legacy and other controls will work differently on the form. For example, you can insert a “Check box content control” and enable the checked option by simply clicking on the icon. However, if you insert the “Check Box Form Field” from legacy tools, you need to double click on the icon and select “Checked” as your default value.
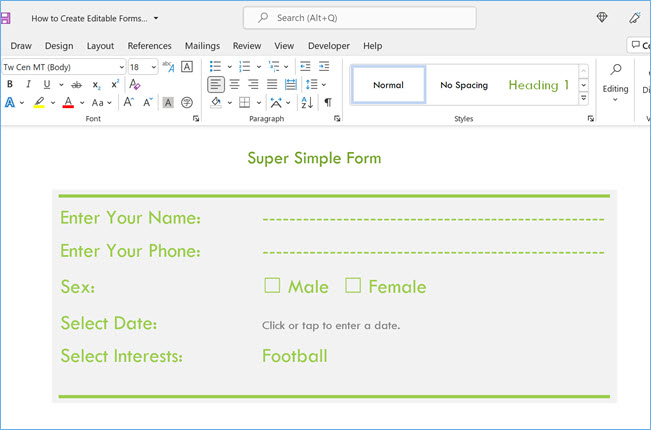
Let Us Create a Simple Form
To make the appearance of the form looks beautiful, first go to “Insert” menu and add a text box. You can also choose one of the built-in text box templates. This will help you to easily add background to your form and move all form fields easily.

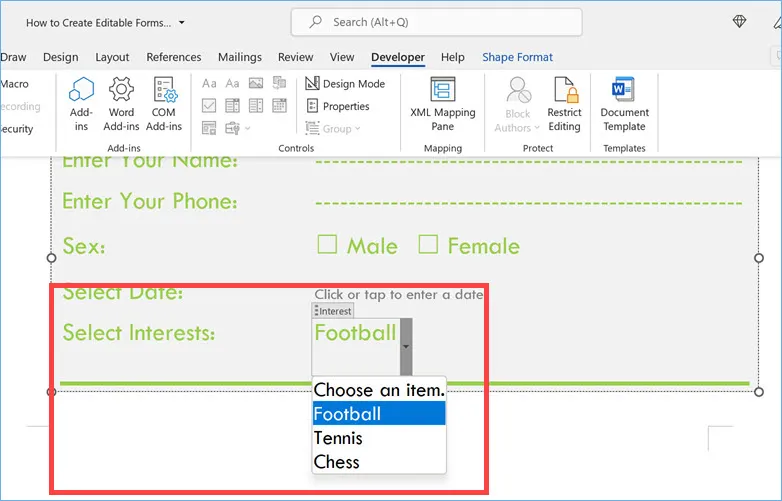
After adding a text box, go to developer menu and start adding your fields inside the text box. Let us add the name and phone number which are plain text controls. Then a “Sex” field with Male and Female as two checkboxes both unchecked. A date picker for selecting the date and finally a combo box for selecting multiple interests. The form will look like below on your document:
As you can see, we have applied background and some text formatting to the text box to make the form looks appealing. When clicking on the interests field, it will show options for users to select as shown below. Since it is a combo field, users can also enter values on their own.
Protecting Your Form in Word
It is necessary to protect your form or fields so that users will not edit or modify the content. In addition, the formatting also needs to be protected to keep the form readable. Word offers multiple options to protect your form. As you can see in the properties screenshot above, you can choose the following options for each field.
- Content control cannot be deleted
- Contents cannot be edited
To protect the entire form, click on the “Restrict Editing” option. You have the possibilities to set two types of restrictions:
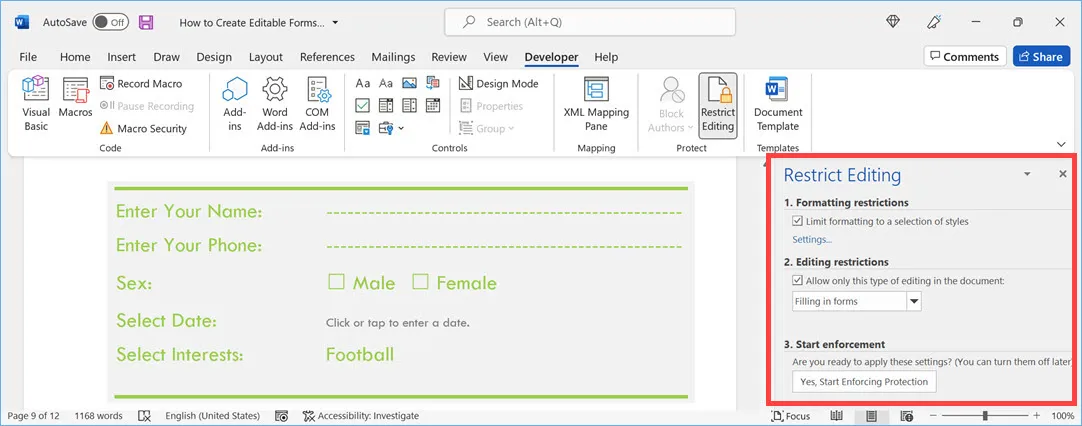
- Formatting restrictions – enable “Limit formatting to a selection of styles” option and click on “Settings…” link just below that. On the pop-up that appears you can select the styles that you want to apply the restrictions.

- Editing Restrictions – first select “Allow only this type of editing in the document” option. Then select the option to allow from the list. You can allow commenting, tracking changes, filling in forms or do not allow any changes by making the document as read only.
After selecting the restrictions, click on “Yes, Start Enforcing Protection” button and apply the password to protect your document. Remember, setting restrictions will apply throughout the document and is useful if you only have a form in the document. In case, if your form is part of a long document then you can create sections and apply protection for the section that contains the form.
Creating Forms in Microsoft Word
Using a form for data entry is an excellent way to control what you allow a user to select and where you want them to type. Forms look professional, and have the ability to save the entered data as a text file. This data can then be easily imported into excel for data analysis.
This blog will take you through the basics of creating a form.
The Design Tab
Form Controls
Adding a Form Control to a Word Document
Restrict Editing to Filling in Forms
Test your form
The Design Tab
Before you start creating your form, you will need to add the Design Tab to your Ribbon.
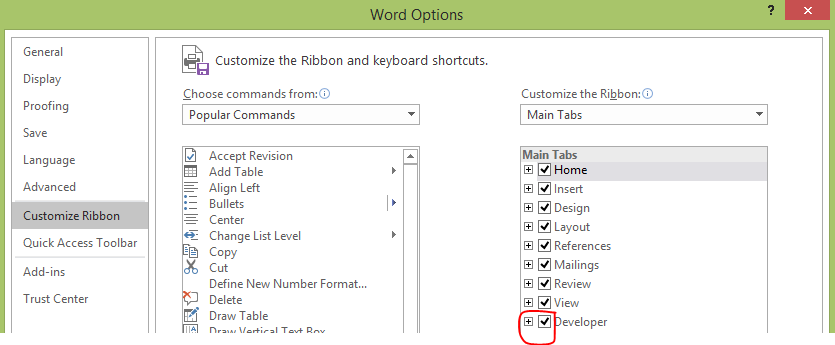
- Right click on any existing tab e.g. HOME, select Customize the Ribbon…
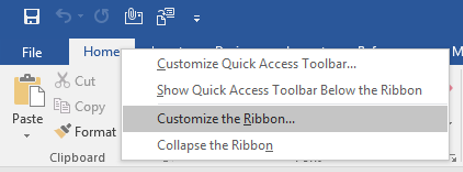
- This will open up Word Options. Look to the right under Main Tabs, tick Developer.
- Select Ok, and observe the new Developer Tab.

Form Controls
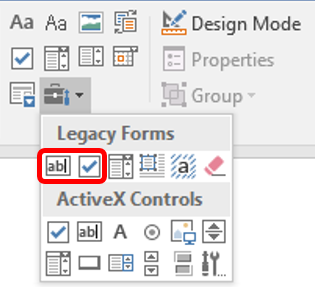
The Controls we will be focusing on are:
1) Legacy Forms Text Form Field – This will allow the form user to add text 
2) Legacy Forms Check Box Form Field – This will allow the form user to make selections using a tick box 
Adding a Form Control to a Word Document
Before adding form fields to your document, you will want to build the layout of your form. The following example is based around a Membership Form.
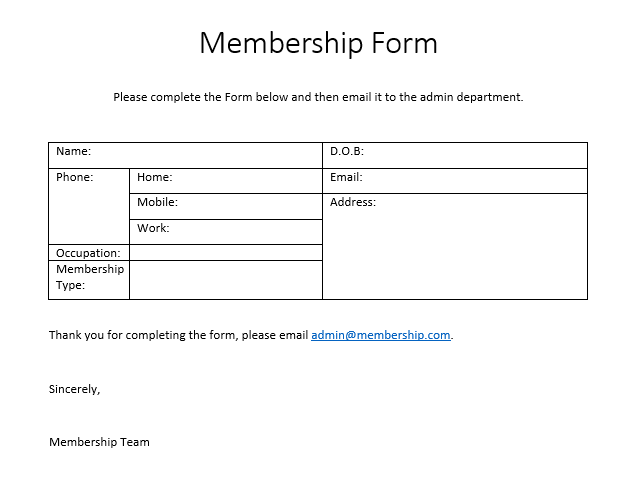
Once you’ve designed your form, you can start adding the form fields.
- Place your cursor where you want the field to be
- Select the field you want to use
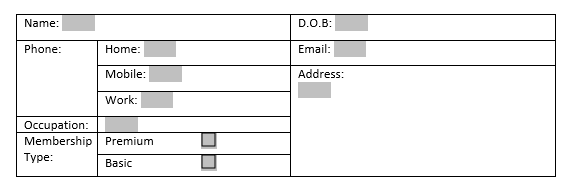
When all of the fields have added to the membership form it will look like this:
Restrict Editing to Filling in Forms
Now that the form is complete, the final stage is to restrict editing of the document so that we are able to fill in the form.
Select the Review Tab, go to the Protect group, and select the Restrict Editing command.

In selecting this command, the Restrict Editing Side Bar will appear.
You will need to select option 2, and from the dropdown list choose Filling in Forms, followed by Yes, Start Enforcing Protection.
Test your form
Your form is ready to use, try selecting a field and type/tick.
Tips:
- You can use the Tab key to navigate through your form
- You can use the space bar to tick a box
To learn more about Word forms keep your eyes out for Creating Advanced Word Forms, or book on to any of our Word Level 3 courses.
It’s a lot easier to create custom forms in Word than you might think and, certainly, much easier than it was many years ago. Under the Developer tab, Microsoft provides nine Content Controls, 12 ActiveX Controls, three Legacy Controls, and three Legacy Form features.
In Microsoft Word, Controls are pre-programmed tools that allow you to add and customize interactive content to your Word forms, templates, documents, and webpages. This article covers six of these Content Controls: Check Box, Combo Box, Drop-Down List Box, Rich Text and Plain Text Controls, and Date Picker. We’ll add more controls in updates to this story.
A. Creating a custom form: First steps
Start with a new file, and ensure the Developer tab is available.
1. Select File > New > Document
2. Once open, ensure that the Developer tab is available on the Ribbon menu.
3. If not, select File > Options > Customize Ribbon.
4. When the Customize Ribbon & Keyboard Shortcuts dialog menu appears, navigate to the right side of the screen under Customize the Ribbon > Main Tabs. Click the Developer check box to add the Developer tab to the Ribbon, then click OK.
Now let’s create some custom forms. For this exercise, we are creating a customer survey form for the residents of the Scottsdale, AZ community to fill out regarding the new Commercial Park and mall. Once complete and distributed, you can capture or export the residents’ responses into a database (MS Access) or spreadsheet (Excel).
We’ve created the document so you can follow along and try all the features. Download it here:
download
Sample survey form document to try custom forms features JD Sartain
B. Next, insert a Check Box
1. Enter a survey question.
2. Press the Tab key (or press Return) to enter the optional answers.
3. Type in three or four options.
4. Select the Developer tab.
5. At the end of the first option, press the space bar, then click once to position the cursor for the insertion of a Check Box Control.
6. On the Developer tab, select the Check Box Content Control.
7. When the Check Box appears, notice that Design Mode is activated (under the Controls group).
8. Click the Properties button (also under the Controls group) instead.
9. The Content Control Properties dialog box opens.
10. Enter the text for this Check Box in the Tag field, but not the Title field (for this one), unless you want duplicate titles (the one you entered on the form and this one).
11. From the Show As drop-down list box, select Bounding Box, Start/End Tag, or None. Try all three, then choose the one you like best.
12. Select a color from the Color field box, then click Use a Style to Format Text Typed Into an Empty Control and select a style from the list (or not).
Check Box Properties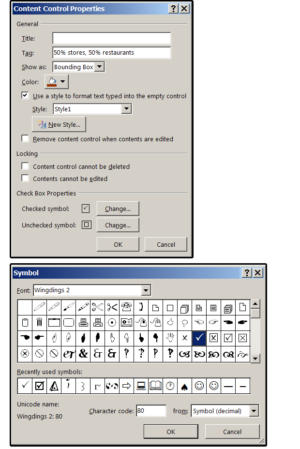 JD Sartain / IDG Worldwide
13. I advise against checking the box that says: Remove content control when contents are edited; however, try it both ways, then decide which option works best for your project.
14. Under Locking, decide whether you want the content to be edited or deleted. Again, it depends on your project. Sometimes it’s good to allow users to change their minds and edit or delete an option, while some projects should prohibit this action.
15. Under Check Box Properties, click the Change button and notice that you have, literally, thousands of options for the symbol that’s placed inside the checkbox. You can also choose a symbol for the Unchecked Box.
16. Click OK when finished, then click Save As to save the form. Notice the file type Microsoft automatically adds to the form file (see section F, number 7).
C. The Combo Box and the Drop-Down List Box
With both the Combo Box and the Drop-Down List Box, you must select from a list of mutually exclusive values, which means you may choose only one option. The difference is that with the Drop-Down List Box, your selection is limited to the items on the list. With the Combo Box, you can enter a custom item that is not on the list, but not without custom-coding this option. Therefore, the following instructions are the same for both Combo Boxes and Drop-Down List Boxes.
D. Combo Box & Drop-Down List Box
1. Enter the following statement for number 2: Please select your favorite type of restaurant.
2. At the end of this sentence, tab over to 4.5 on the ruler, then select the Combo Box Content Control button from the Controls group under the Developer tab.
3. With the Control still selected, click the Properties button under Developer > Controls.
4. When the Content Control Properties dialog menu opens, enter a Title in the first field box under General (and a Tag, if you like).
5. Under Show As, select Bounding Box, Start/End Tag, or None.
Note: The default is Bounding Box, which means that the items in the List/Combo Box do not appear until you click the shaded rectangle.
6. As explained under Check Box above, choose a color, a style, and whether you want to allow the content to be edited or deleted.
7. After that, click the Add button and enter your list of items.
8. Once entered, you can rearrange the order by pressing the Move Up or Move Down buttons, and edit or delete an item using the Modify or Remove buttons.
9. Follow the instructions above to create a Drop-Down List box for number 3, but substitute the favorite restaurant statement with this statement instead: Select the type of store where you most frequently shop.
Combo Box and Drop-Down List Box Properties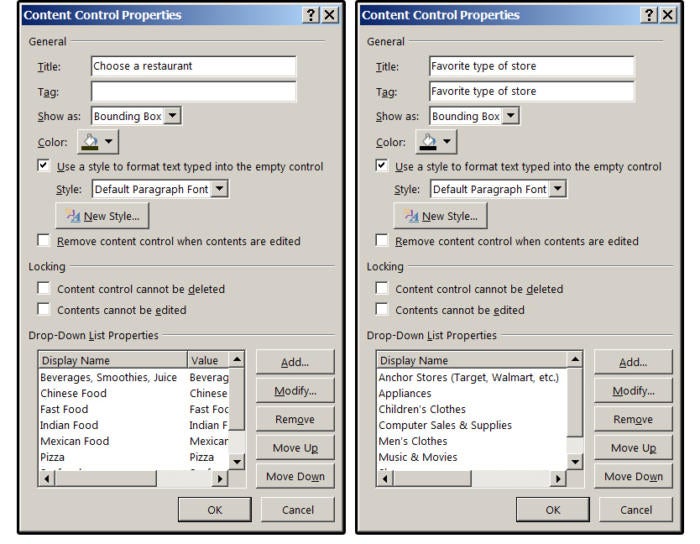 JD Sartain / IDG Worldwide
E. Rich Text and Plain Text Content Controls
There’s an important difference between Rich Text Format (RTF) Content Controls and Plain Text Content Controls. Rich Text Format (RTF) Content Controls support graphics, tables, objects, annotations, custom fonts, and font attributes. The Plain Text Content Control is just that: plain ASCII text that looks like Courier. It does not support any of the items that RTF supports, except it does allow some attributes such as Italics, Bold, etc. The catch: if you select bold, the entire text turns bold; that is, you cannot bold, italic, etc. a single word or group of words. If you want your forms to look nice, we recommend that you use the RTF Content Control.
1. Enter the following survey statements: Please describe why you support (or do not support) this project. Note: You may use format features such as Bold, Italic, etc. You can also change the font, insert photos/graphics, objects, tables, and/or annotations.
2. Tab over to 4.5 on the ruler. Select the Controls group under the Developer tab, then click the Rich Text Format Content Control button.
3. With the Control still selected, click the Properties button, and a slightly different Content Control Properties dialog window opens (not as many options).
4. Follow the instructions above, then click OK.
F. Date Picker Content Control
1. This one is simple. Enter the following statement for number 5: Please enter your birthdate (for demographic purposes).
2. Tab over to 4.5, select the Controls group under the Developer tab, and then click the Date Picker Content Control button.
3. With the Control still selected, click the Properties button and another slightly different Content Control Properties dialog window opens (with more options).
4. Follow the instructions above for similar fields such as Title, Tag, Colors, etc.
Rich Text Content Control properties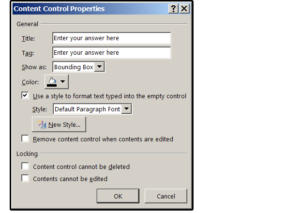 JD Sartain / IDG Worldwide
5. Select a date format from the Display Date Like This List Box. We selected M/D/YYYY (a numeric month, two-digit day, and four-digit year); however, you may choose whichever format you prefer.
6. Choose the target Location, Calendar Type, and the format for the XML contents when mapped; (the default answers are generally correct unless your location is outside of the United States).
7. When finished click OK. Save your form with the filename New Business Survey (and note that Word saves it with a Macro format; that is .docm), then exit the form.
Date Picker Content Control properties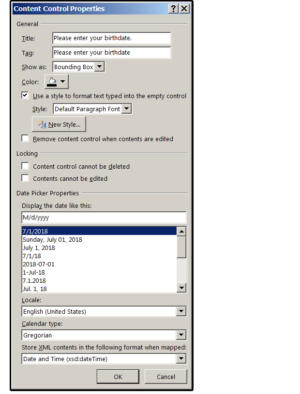 JD Sartain / IDG Worldwide
G. Restrict Editing
If you want to limit others from editing or formatting your form, and you did not specify this on each individual Content Control, use the Restrict Editing commands under the Developer tab.
1. Open the form.
2. Click Home > Select > Select All (or press CTRL+ A).
3. Click Developer > Restrict Editing (from the Protect group), and then choose your restrictions from the Restrict Editing panel on the screen right.
4. After selecting the restrictions you require, under number 3: Start Enforcing Protection, click Yes. Now your form is protected.
Restrict Editing on forms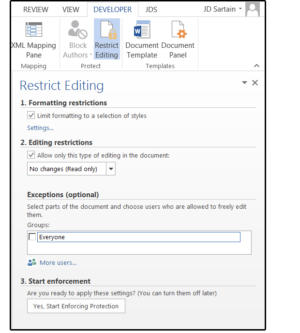 JD Sartain / IDG Worldwide
H. Test your work
Open the form again, fill it out, and then save a copy to a new location. If any of the Content Controls fail, delete them, and then follow the applicable instructions above to enter the Content Control again. If something still fails, download the New Business Survey form at the link below. Good luck and have fun!
I. Next Time
When we next update this story, we’ll add instructions for how to create and use Building Block Gallery Content Controls. Then catch us later for a detailed tutorial about ActiveX Controls.
There is a difference between Content Controls and ActiveX Controls. ActiveX Controls were initially developed for web pages; however, they can be used in other documents. They require macros to function and must be used cautiously. Content Controls do not need forms protection and do not require macros to work; however, macros can enhance their performance.
New business survey form filled out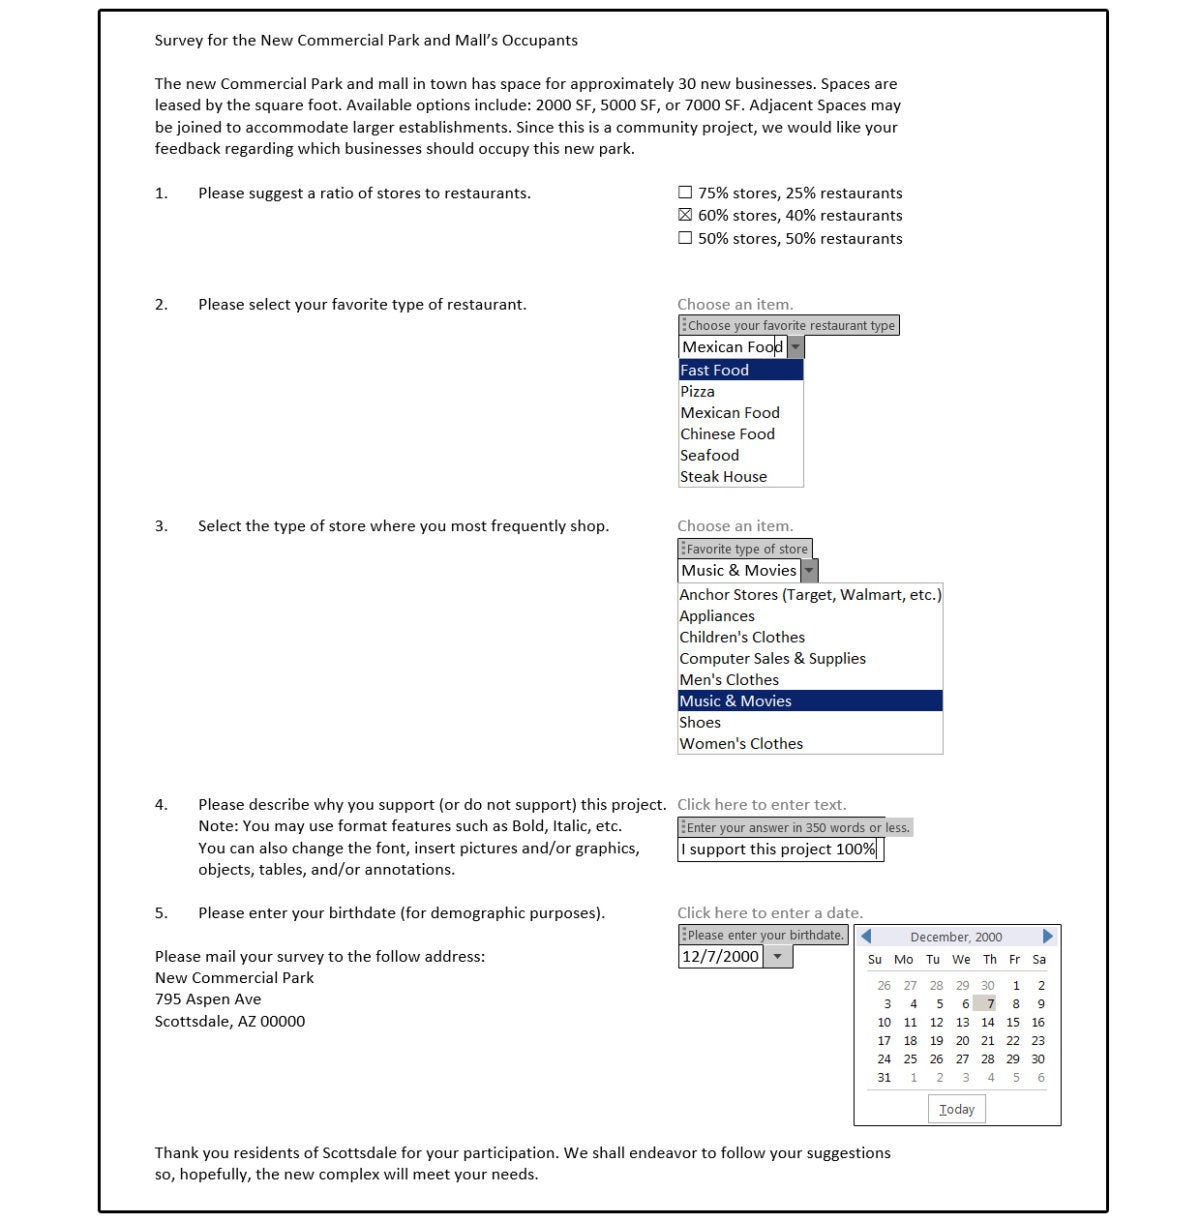 JD Sartain / IDG Worldwide
- Start
- Newsblog
- Android / iOS / Microsoft Windows
- Data Protection / ecommerce / finance
- Microsoft Excel – Office 365
- Microsoft Office / Office 365
- Microsoft Outlook – Office 365
- Microsoft Word – Office 365
- WordPress, Google, SEO & Affiliate
- Downloads
- Word & Excel Templates
- CV-Templates
- Contact
- Imprint
- Donate
Insert controls and form fields in Microsoft Word
With Microsoft Word you can not only comfortably create letters, lists and articles with tables of contents, but also go one step further, and Set up your own forms using controls.
But where are these controls, and how can you put them into your document?

Topic Overview
Topic Overview
Unfortunately, they are hidden by default and need to be unlocked first.
You can read in our article how to use controls in Word 2016 without frustration.
Content:
- Enable controls in Word
- Control check box in Word
- Insert drop-down box in Word
- Activate processing protection
Insert controls and form fields in Microsoft Word
With Microsoft Word you can not only comfortably create letters, lists and articles with tables of contents, but also go one step further, and Set up your own forms using controls.
But where are these controls, and how can you put them into your document?
Topic Overview
Topic Overview
Unfortunately, they are hidden by default and need to be unlocked first.
You can read in our article how to use controls in Word 2016 without frustration.
Content:
- Enable controls in Word
- Control check box in Word
- Insert drop-down box in Word
- Activate processing protection
1. Enable controls in Word
1. Enable controls in Word
In the default installation of Word 2016, you will not initially have access to the controls, so we’ll need to enable their visibility first.
To do this, click on the tab in an open Word document:
- “File” – “Options” – “Tap Ribbon”.
- And put the hook there in “developer tools”.
See picture (click to enlarge)
From now on, every Word document has the new Developer Tools tab, which gives you access to various controls.
2. Add control check box in Word
2. Add control check box in Word
In our first example we would like to insert the classic “checkbox” in our document to create a form.
To do this, we first position the cursor at the desired position in the document, and then select the check box in the Developer tab.
See picture (click to enlarge)

After we have positioned our check boxes, we can also adjust them a bit by clicking the right mouse button over the checkbox in the context menu on “Properties”, and there can make various settings, such as:
“activated by default”, “the size”, or even a “help text”,
which is automatically displayed as a completion help to the future user when pressing F1.
See picture (click to enlarge)
In our first example we would like to insert the classic “checkbox” in our document to create a form.
To do this, we first position the cursor at the desired position in the document, and then select the check box in the Developer tab.
See picture (click to enlarge)
After we have positioned our check boxes, we can also adjust them a bit by clicking the right mouse button over the checkbox in the context menu on “Properties”, and there can make various settings, such as:
“activated by default”, “the size”, or even a “help text”,
which is automatically displayed as a completion help to the future user when pressing F1.
See picture (click to enlarge)
3. Insert dropdown box in Word
3. Insert dropdown box in Word
In our 2nd example we make it even more comfortable for the later user and offer a drop-down list to choose from.
This is especially useful when there are many selection points available, and you do not want to obstruct your document with check boxes.
To do this, reposition the cursor at the desired position and select the “Drop-down list control” under the Developer tools.
See picture (click to enlarge)

In order to populate our dropdown list with content from which to later select a user, we have to switch to “Design Mode”, and then right-click over the element in the context menu “Properties”.
See picture: (click to enlarge)

Here we can customize our dropdown box, and provide various choices as you wish.
Simply click on “Add” in the properties and enter the options you want to include later.
Finally, all you have to do is confirm with “Ok” and quit “Draft mode”.
See picture: (click to enlarge)
In our 2nd example we make it even more comfortable for the later user and offer a drop-down list to choose from.
This is especially useful when there are many selection points available, and you do not want to obstruct your document with check boxes.
To do this, reposition the cursor at the desired position and select the “Drop-down list control” under the Developer tools.
See picture (click to enlarge)
In order to populate our dropdown list with content from which to later select a user, we have to switch to “Design Mode”, and then right-click over the element in the context menu “Properties”.
See picture: (click to enlarge)
Here we can customize our dropdown box, and provide various choices as you wish.
Simply click on “Add” in the properties and enter the options you want to include later.
Finally, all you have to do is confirm with “Ok” and quit “Draft mode”.
See picture: (click to enlarge)
4. Activate Word processing protection
4. Activate Word processing protection
In order to finally receive a document in which our controls can take over their function (for example as a form), we have to activate processing protection as the final step.
Click on the tab:
- “Review” – “Restrict Editing”
- And there on “Processing restrictions (filling in forms)” – Apply protection now.
Note:
It is best to assign a password to prevent unauthorized editing of the form.
See picture:
Then simply save the document as a normal Word file (docx).
When opening the file later, you can only fill in the form fields that you have set up for it.
![]()
Popular Posts:

Enable developer tools in Office 365
Michael2023-04-12T09:11:59+02:00April 12th, 2023|Categories: Microsoft Excel, Microsoft Office, Microsoft Outlook, Microsoft PowerPoint, Microsoft Teams, Microsoft Word, Office 365, Short News, Uncategorized|Tags: form fields, MS-Office, Office 365, Short News|
Schalten Sie die Entwicklertools in Excel, Word und Outlook frei. Erweitern Sie die Möglichkeiten mit zusätzlichen Funktionen in Office 365.

Hide folders in Windows – Protect folders with password
Michael2023-04-04T07:05:14+02:00April 4th, 2023|Categories: Data Protection, Homeoffice, Microsoft Office, Microsoft Windows, Office 365, Short News, Uncategorized|Tags: Data Protection, Datenschutz, MS-Windows, password, Passwort, Short News|
Cyber security is also becoming increasingly important in the home. Encrypt files | Hiding folders | Password protection of folders in Windows.


Special Offers: Word & Excel Templates
Special Offers: Design CV Templates
Monatliche Technik Bestseller:
Popular Posts:
Enable developer tools in Office 365
Michael2023-04-12T09:11:59+02:00April 12th, 2023|Categories: Microsoft Excel, Microsoft Office, Microsoft Outlook, Microsoft PowerPoint, Microsoft Teams, Microsoft Word, Office 365, Short News, Uncategorized|Tags: form fields, MS-Office, Office 365, Short News|
Schalten Sie die Entwicklertools in Excel, Word und Outlook frei. Erweitern Sie die Möglichkeiten mit zusätzlichen Funktionen in Office 365.
Hide folders in Windows – Protect folders with password
Michael2023-04-04T07:05:14+02:00April 4th, 2023|Categories: Data Protection, Homeoffice, Microsoft Office, Microsoft Windows, Office 365, Short News, Uncategorized|Tags: Data Protection, Datenschutz, MS-Windows, password, Passwort, Short News|
Cyber security is also becoming increasingly important in the home. Encrypt files | Hiding folders | Password protection of folders in Windows.
Special Offers: Word & Excel Templates
Special Offers: Design CV Templates
Monatliche Technik Bestseller:
Related Posts
Title
Page load link
Go to Top