
Excel 2021 for Mac allows you to collaboratively work with others and analyze data easily with new Excel capabilities including co-authoring, Dynamic Arrays, XLOOKUP, and LET functions.
Note: Some features listed below are not included in Excel LTSC for Mac 2021 for commercial customers. Each of those features is noted if it does not apply to Excel LTSC for Mac 2021 for commercial customers.
Co-authoring
You and your colleagues can open and work on the same Excel workbook. This is called co-authoring. When you co-author, you can see each other’s changes quickly — in a matter of seconds.
LEARN MORE
Note: Co-authoring is not available in Excel LTSC 2021 for Mac.

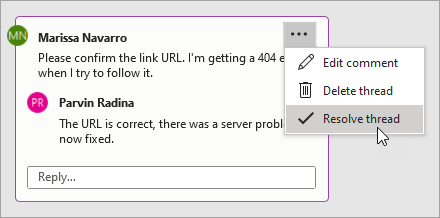
Better collaboration with modern comments
Have control of when you send comments to your co-authors and be productive with a consistent commenting experience in your workbooks and other Office apps.
LEARN MORE
Note: Modern comments is not available in Excel LTSC 2021 for Mac.
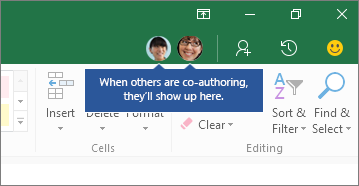
Know who’s in your workbook
See who else is working along with you and where they are in the workbook.
Note: This feature is not available in Excel LTSC 2021 for Mac.
Save your changes as they happen
Upload your files to OneDrive, OneDrive for Business, or SharePoint Online to make sure all your updates are saved automatically.
LEARN MORE
Note: This feature is not available in Excel LTSC 2021 for Mac.
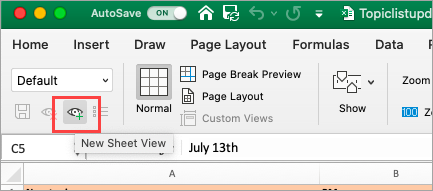
Sheet views
Create customized views in an Excel worksheet without disrupting others.
LEARN MORE
Note: Sheet views are not available in Excel LTSC 2021 for Mac.
Look left, look right… XLOOKUP is here!
Row by row, find anything you need in a table or range with XLOOKUP.
Return exact matches by default—there’s no need to specify.
LEARN MORE
LET function
The LET function assigns names to calculation results. This allows storing intermediate calculations, values, or defining names inside a formula. These names only apply within the scope of the LET function.
Similar to variables in programming, LET is accomplished through Excel’s native formula syntax.
LEARN MORE
Dynamic arrays

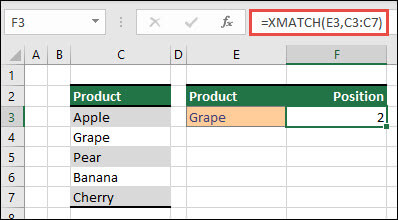
XMATCH function
The XMATCH function searches for a specified item in an array or range of cells, and then returns the item’s relative position.
You can also use XMATCH to return a value in an array.
LEARN MORE
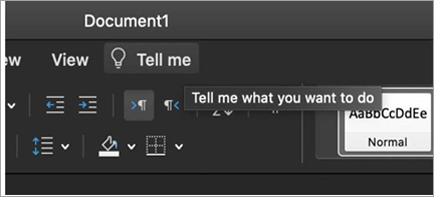
Find what you’re looking for
Use the search box to find text, commands, help, and more.
Tell me is a text field where you can enter words and phrases about what you want to do next, and quickly get to features you want to use or actions you want to perform.
LEARN MORE
Visual refresh
Work with a modernized Start experience and newly refreshed tabs in the ribbon.
Experience a clean, clear style with monoline iconography that communicates action and features with simple visuals.
Performance improvements
Experience improved performance, stability, and speed across Excel.
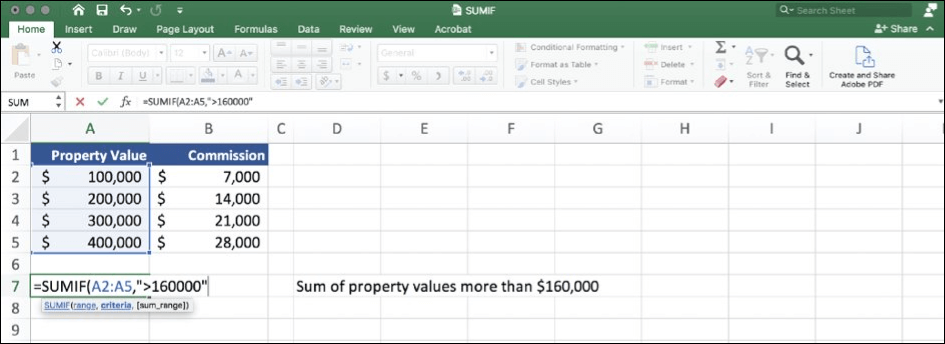
Get faster calculations from common Excel functions like SUMIF, COUNTIF, and AVERAGEIF.
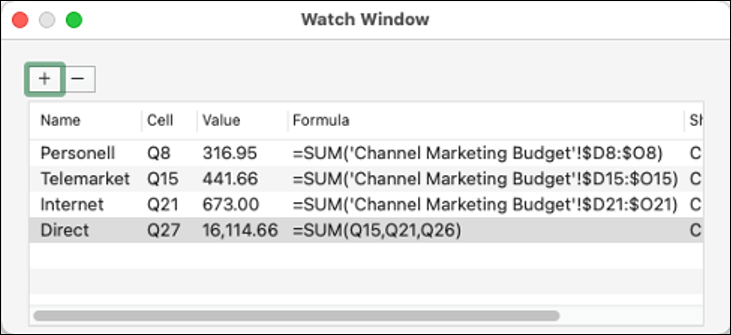
Watch your formulas
Watch cells across multiple sheets and books in a single pane or window.
The Watch Window makes it convenient to inspect, audit, or confirm formula calculations and results in large worksheets.
LEARN MORE
See what’s new in stock media
We’re constantly adding more rich media content to the Office Premium Creative Content collection, a curated library of stock images, icons, and more that helps you express yourself.
LEARN MORE
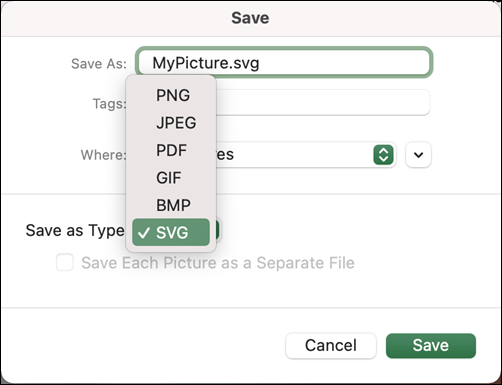
Save as SVG for your pictures and charts
We now support saving pictures, charts, and other graphics from your workbook as SVG (Scalable Vector Graphic).
Your saved images can be resized with no loss of image quality.
LEARN MORE
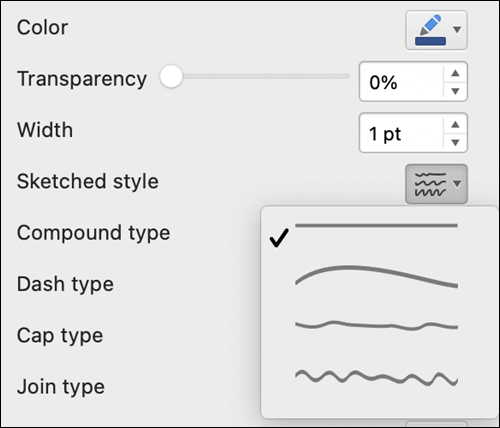
Try the Sketched style outline
You can give a casual, hand-drawn look to shapes in your workbook with the Sketched style outline.
Try out the Curved, Freehand, or Scribble options under Format Shape > Line > Sketched style.
LEARN MORE
Grow your Office skills
Need more help?
Apple and Microsoft have always been competitors in the technology sector. However, the founders of both of the companies go way back and have been partners in business and also friends for many many years.
Steve Jobs and Bill Gates had always helped each other, even to the point that they had actually invested in each other’s companies. But one of the most important moves that Bill Gates took in order to help Apple develop, was in the 1980s.
First version of Excel for the Macintosh:
Apple had just introduced the first Macintosh in 1984.
It instantly became one of the most popular and successful personal computers. But it still had unpopular features such as a box-shaped mouse, graphical user interface (UI) and the lack of software in the personal computer. Although Apple had its MacWrite and MacPaint programs installed in the device, the customers craved for more options and more ‘things’ to do with the computer.
So, Steve Jobs turned to his friend Bill Gates who was trying to launch his own operating system and accompanied software with it. Gates delivered programs such as Chart and File. And mostly for companies and businesses to use, he programmed a spreadsheet program called Excel.
Yes, you read it correctly.
Excel was first introduced in Mac devices in 1985 and then, later on, it was integrated into the Windows operating system in 1987 with Excel 2.0.
Can You Use Excel on a Mac? Yes!
Of course! As it is mentioned above with the history of the Excel program, the first version was installed in Mac devices. And it is still going strong while supporting both operating systems.
Not only Excel, but you can use all of the Microsoft Office programs on almost all of your Apple devices.
There are two ways you can get Microsoft Office on your macOS. The first one is a simple and obvious one:
Purchase Microsoft Office package (Microsoft 365):
There are three options: For home, for business and for the enterprise.
Choose the section that satisfies your needs and subscribe with the plan you chose. Your subscription can be monthly or yearly.
On the other hand, you can also choose to pay only once. With the one-time purchase option, you can use the programs included in the Microsoft 365 only on one device. That means a PC or a Mac.
You would get the ‘Classic’ versions of the programs and be excluded from additional security and features you would get from the subscription method.
Download and install the Windows operating system on your Mac:
With the multi-boot utility tool called Boot Camp which is developed by Apple itself, you can install Windows on your Mac while also still keeping the macOS as well.
First, download your copy of the Windows operating system (preferably Windows 10). Keep in mind that Boot Camp requires an ISO image of the Windows system.
After downloading it, open up the Boot Camp Assistant program already installed on your Mac device.
By following the instructional installation steps, you can start to use Windows on your Mac device and the best part about it is, you can switch between the operating systems!
What is the difference between Microsoft Excel and Excel for Mac?
The download, installation and the utilization processes of the Excel program might look exactly the same for both of the operating systems on the outside.
However, that is not the case.
Although it works just about the same, Excel for Mac lacks a few features compared to Excel for Windows.
Below, you will find some key features and some minor customizations which lack in Excel for Mac, but come very handy in the Windows version of the program:
Default save location
The Windows version of Excel allows you to select a location for saving any Excel file. With only clicking the ‘Save’ button on the upper left corner, your Excel file would be saved in the default location on your computer.
However, in the Mac version, this setting is not there. You would always be selecting every file location you would want to save your Excel to.
Autosave
Have you ever accidentally closed your computer or your computer shutdown while working on Excel?
Everyone at some point in their life has experienced how awful this situation is. But the Windows version of Excel has an Autosave option, saving your draft automatically for you even if you did not.
So, when you open up your computer again, your last autosaved Excel draft would open and you can continue to work on it.
Unfortunately, macOS Excel program does not support this autosave feature. Even if it is a very small detail for a program to have, it can save you more time and more energy you can imagine.
Customization
Apple devices and especially Macs always lack customization in other company products.
Excel is also one of them.
These customization limitations range from the quick access toolbar (which they later added in an update) to customize the color and font sets.
If you use Excel for Mac and if you want to create your own theme with font and colors selected by yourself, you, unfortunately, cannot do that.
Small details with big impacts
This lack of small details shows itself in the absence of the mini toolbar as well.
If you used Excel (or any other Microsoft Office program) on Windows, you know that when you select a text, a mini toolbar appears right beside your mouse cursor. And without moving your hand up to the bigger toolbar, you can change the size, color and the font type right on your text.
The Mac version of Excel also lacks this feature. Imagine your work consists only in Excel, from 9 AM to 6 PM, six days, every week. The movement of the cursor to the upper side of the screen can seem as a very small gesture; however, if you do this move every day, only a little helpful shortcut would help you a lot.
Security
Do you know why when you download a Microsoft Office file from the Internet and it opens up in the program in Protected View?
The answer is security.
This protected view feature shows you what is inside the file but does not let you edit or change anything in it before you confirm that you trust this file.
This warning is there to protect your computer from viruses and corrupt files. Excel for Mac does not support this feature, therefore, opening up the potential download of viruses and possible corrupt files.
What Products Are You Missing from the Microsoft Office Mac Suite?
Regardless of your purchase method of Microsoft 365, you would be getting Word, Excel, PowerPoint and OneNote with your package. Also, depending on the premium or basic version of Microsoft 365, you would get Outlook, Publisher and Access.
However, there are four Microsoft programs, no matter what you do, cannot download or install in a Mac device:
Publisher: Microsoft Publisher is used to creating publications such as calendars, business cards, newsletters, websites, etc. Think of it as the text composition, proofing and text review tools focused version of Microsoft Word. It cannot be used on Mac devices.
Access: Microsoft Access is used mostly by software developers, data miners and web designers. It is a database management system and with it, you can store the data in its own format or import and link to other data storages in other programs. It is also not supported in a Mac.
Visio: Microsoft Visio is a graphic creator program. You can create diagrams, charts, timelines, Venn diagrams, architectural designs, etc. Think of it as the more expansive and visually comprehensive version of Microsoft Excel.
Project: Microsoft Project is a project management program used mostly by -unsurprisingly- project managers in various departments in different companies. It allows you to track the progress of employees and projects, assign employees and resources for projects and develop and maintain a work schedule.
What Features Are You Missing from Excel for Mac?
Apart from minor yet impactful differences in the versions for Windows and Mac, Excel also has some features that are key elements on Windows and not present on Mac. These are:
VBA limitations
Visual Basic for Applications (VBA) is the ‘language’ of Excel.
By programming and creating equations in Excel with VBA, you can automate tasks and let the program do complicated task itself.
Before the 2016 update on Microsoft Office, any VBA ‘macros’ were unavailable for Mac devices. Yet, even after the 2016 version of Excel for Mac, it is still very much weak compared to the Windows version which allows thousands of easy ways for you to work.
VBA’s macros allow you to accomplish a task only with the click of a button. Otherwise, it can become a chore which can take hours of your time and attention to complete.
Different keyboards and different shortcuts
A PC and a Mac have different keyboards.
That is why the hotkeys and the shortcuts used in programs change from operating system to system as well.
The Ctrl button has its equivalent in Mac as Command. However, there are some buttons in PC keyboards which do not exist on Mac devices.
Excel add-ins: Power Pivot and Pivot Charts
You might have heard of these extensions which you can get in Excel: Power Pivot and Pivot Charts.
While handling a large amount of data, performing powerful and thorough analyses can take time… a lot of time.
Data experts and IT departments of large companies and conglomerates use these two add-in features of Excel. Power Pivot helps with large data analyses and creation of detailed data models.
Pivot Charts (and Pivot Table) is utilized interactively to summarize and gather a huge quantity of data. However, it is not usable in Mac versions of Excel.
Apple’s Numbers vs Microsoft’s Excel
Even though Excel is compatible with both Windows and Mac devices; Apple also has its own spreadsheet program exclusively for Apple devices called Numbers. Let’s compare the two with their pros and cons.
Microsoft Excel
+ Excel is the spreadsheet program. It is the most popular, most downloaded and most used spreadsheet tool around the world. If you deal with computers, as it is inescapable in the technology age which we are in right now, you have seen, used and worked in Microsoft Excel.
+ From a beginner in middle school to an expert working in a giant technology brand, it has every function to suit its users’ needs.
+ Excel is not complicated. If you do not already know how it functions, you could easily learn in a couple of minutes. That is why it is also taught and used in schools and universities all around the globe.
+ Large tech companies deal with a large amount of data. Imagine the data that Google, Apple or Microsoft has to process. Excel is also perfect for this data management, not crashing and carrying out important and hard tasks.
+ Charts, charts, charts. With Excel’s excessive visual representation of data, you can choose and customize from the many numbers of charts and graph templates.
– Although visually it satisfies the needs of everyone who used it, these charts and tables can sometimes seem ‘too basic’ especially for presentations done in professional settings.
– If you are new to inserting data and putting numerical information in a program, Excel can be confusing at first.
Apple Numbers
+ The new program compared to Excel utilizes a more modern interface. Clean, professional and minimalistic. Apart from its functions, it does not hurt that it is also beautiful to the eyes as well.
+ As it is mentioned while talking about the cons of Excel, visually Numbers offers more ‘stunning’ graphic options.
+ In addition to its artistically gratifying visual representations, it is also more useful to use with personal projects than Excel.
– If you transition from Excel to Numbers, you would find it a little bit limited to say the least. It operates in a completely different concept compared to Excel, using only one big endless scrolling page as its spreadsheet.
– Numbers has almost half of the functions Excel has in its arsenal.
– As it is mentioned at the start of this chapter, Numbers is exclusive to Apple devices. Even if you want to try the spreadsheet program, if you do not have a Mac computer or an iPhone, you cannot use Numbers.
– Numbers is not quite suitable for large and heavy data. So, that means large businesses and companies would not be using it since it slows down notably or just crashes when a large quantity of data is put in.
How You Can Convert a Numbers File to an Excel File?
The answer is actually quite simple.
You can open an Excel file with a .xls or .xlsx format in Numbers; however, since Apple’s closed-circuit motto, you have to convert a Numbers file in order to open it in other programs.
In the Numbers application, choose File and then Export To. In there you would select the format you want to convert your Numbers file to in the window that opens up: PDF, CSV, TSV or Excel.
Choose your desired settings in Excel Worksheets and then click Next. Additionally, you can require a password to access the converted file.
Do Not Worry, All Someka Templates Work on Mac Too!
Every Someka template, from chart makers to accounting sheets, is compatible with Mac devices. Due to the fact that it is integrated and used in Excel, all of the templates Someka provides you can buy and download and immediately start using it in Excel on your Mac device.
For example, you want to create your own flowcharts. However, the renowned program of Visio is not supported on Mac. Do not worry! Because Someka has its own Flowchart Maker Excel Template!
Unlike Visio, Someka’s flowchart maker is compatible with both Windows and Mac operating systems.
Microsoft Excel is arguably the number one spreadsheet software industry in the world, boasting powerful data visualization and analysis tools. As such, most people favor Microsoft Excel as opposed to Numbers, the default spreadsheet software for Mac. When compared to Excel, Mac’s interface is not as user-friendly. It also works best for small businesses.
It’s therefore no surprise that there is a rising demand for Microsoft Excel for Mac. As it stands, you can install the program to your Mac using different techniques. The main difference between these approaches mainly boils down to your personal preferences. Let’s take a look.
Why you might want Excel on your Mac
Developed in 2007, Numbers came with its share of shortcomings. Generally, it is less efficient than Microsoft Excel, which was developed back in 1987. With decades of development backing it up, Excel has grown to become the preferred software for many businesses, while the more recently developed Numbers, is focused on small businesses or personal use.
The only advantage of using Numbers is that it does not lose its semantic values with functions being automatically performed. On the other hand, with Microsoft Excel, the functions have to be performed manually because it loses its semantic values. But that is the only disadvantage Excel has over Numbers. Here are some benefits of using Microsoft instead of Numbers.
- More In-built functions – Numbers has 262 inbuilt functions divided into ten categories. This is far lower than Microsoft Excel’s 400 inbuilt functions, which are separated into 11 categories.
- Supports enormous data – Microsoft Excel is compatible with massive data sets which are used in MNC’s and large corporations with its powerful analysis tools.
- Different languages – Numbers officially supports 31 languages. In contrast, Microsoft Excel supports nearly triple that with 91 languages.
- Easy-to-use – Excel has a concept of multiple tabs within a single spreadsheet that makes it easy to work on different tables. The function is not available in Numbers which makes work messy, having to open individual tables.
- Data visualization – Microsoft Excel presents charts based on data plotting, whereas, in Numbers, charts are presented from an artistic point of view.
How to get Microsoft Excel on your Mac
You can install Microsoft Excel on your Mac by downloading Microsoft 365, which has a compatible version of Excel for Mac. You can download the software for either the Microsoft Store or the Apple store but a qualified Microsoft 365 subscription is required.
However, this process only limits you to Microsoft productivity tools, and you have to install third-party software (Microsoft 365) to access them. The good thing is, you can use virtualization software like Parallels Desktop for Mac to achieve the same result without having to use third-party software. Virtualization software enables you to install Windows operating system on your Mac without having to reboot.
Installing Microsoft Excel using Parallels
Parallels has a ton of benefits. For example, it allows you to use programs that were designed for Windows platforms, such as Microsoft Excel. Let’s see how to get Microsoft Excel on your Mac using Parallels Desktop virtualization software.
- Step one: Download and install the virtualization software from Parallels official website. If you don’t want to buy one at first, you can start with the free trial download.
- Step two: If you have a Windows ISO file already downloaded on your Mac, open Parallels Desktop. After creating an account or logging in, an Installation Assistant will pop up. That will guide you through the Windows installation process.
- Step Three: After Windows installation, you can configure the Windows operating system environment according to what works for you best.
- Step Four: Before installing Microsoft Excel, ensure that Windows is running perfectly. If you already downloaded the Excel setup, install it as you would on Windows and follow the prompts shared to avoid any issues.
- Step Five: Once the installation process is complete, you can access Microsoft Excel by double-clicking its icon from the desktop shortcut/the Windows start menu.
Takeaway
Just because you are using a Mac doesn’t mean you have to restrict yourself to its default Numbers spreadsheet software. Using the procedures given in this post, you can just as easily get Windows and the advanced Microsoft Excel along with it, without interfering with the normal workings of your computer.
Either way, whichever option you pick, either Microsoft 365 from the official store or virtualization software, you will have a superior spreadsheet software at your disposal.
Таблицы Excel – незаменимый инструмент для студентов и специалистов в различных областях, позволяющий им отслеживать любые типы данных. Всякий раз, когда вам не хватает времени, в Excel обычно есть удобный ярлык, чтобы ускорить процесс и сделать работу более эффективной. Неудивительно, что вы не хотите отказываться от этих ценных файлов даже при использовании Mac. Но как открыть файл XLSX на Mac? Давайте выясним.
< p>Использование Mac не обязательно означает, что вы должны попрощаться с Microsoft Office. Фактически, вы можете загрузить весь пакет Microsoft Office для Mac. Таким образом, вы сможете совместить знакомство с Office с уникальными функциями Mac, которые привлекли вас к этому продукту Apple.
Открытие файла .XLSX с помощью Microsoft Excel
Вы можете загрузить Microsoft Excel отдельно, если вам не нужен весь набор приложений Office для работы на Mac.
Microsoft Office — это приложение для открытия файлов XLSX на Windows и Mac. Если вы привыкли к интерфейсу приложения в Windows, вам будет приятно узнать, что версия для Mac практически ничем не отличается.
После установки приложения на Mac дважды щелкните нужный XLSX, чтобы открыть его.
Этот вариант идеален, так как вам не нужно учиться пользоваться новым программным обеспечением. Имейте в виду, что изначально приложение можно загрузить бесплатно, но для его использования по-прежнему требуется соответствующая подписка на Microsoft 365.
Если вам не хочется платить за подписку, есть другие бесплатные способы открытия файлов XLSX на вашем Mac.
Как открыть файл XLSX на Mac без Excel
Возможно, вы решили принять образ жизни Mac и попрощаться с Microsoft Office. Если это так, не беспокойтесь; вы по-прежнему можете открывать файлы XLSX на Mac даже без приложения Microsoft Excel.
Открытие файла .XLSX с помощью чисел
Numbers — это встроенное программное обеспечение Apple для работы с электронными таблицами. Обычно он предустанавливается на все новые устройства Mac. Если по какой-либо причине приложение не установлено на вашем компьютере, вы можете легко загрузить его из App Store.
Приложение Numbers позволяет без проблем открывать и редактировать файлы XLSX. Все, что вам нужно сделать, это перетащить файл Excel, который вы хотите открыть, на значок Numbers в Dock или в папке Applications. Если вы уже используете приложение, вы можете легко найти нужный файл Excel на своем Mac, выполнив следующие действия.
- Нажмите значок “ Файл” в строке меню в верхней части экрана.

- Выбрать “Откройте”
- Найдите файл XLSX, который вы хотите открыть.


Предположим, что таблица Excel хранится где-то за пределами вашего Mac, например на iCloud Drive. В этом случае вам нужно будет выбрать расположение файла на левой боковой панели. Кроме того, вы можете щелкнуть всплывающее меню в верхней части диалогового окна и выбрать место, где хранится ваш файл. Чтобы открыть файл в Numbers, просто дважды щелкните его.
Электронная таблица Excel может содержать шрифт, не установленный на вашем Mac. В этом случае вы получите уведомление об отсутствующем шрифте в верхней части электронной таблицы после ее открытия. Чтобы решить эту проблему, нажмите кнопку «Показать» в уведомлении и выберите шрифт для замены из книги шрифтов.
Открыть файл .XLSX с помощью Google Таблиц
Есть возможность откройте файл XLSX в Интернете, не используя какие-либо установленные приложения, и все это благодаря Google Таблицам.
Хотя этот метод может быть наиболее удобным, стоит отметить, что это онлайн-программное обеспечение для работы с электронными таблицами не поставляется с такими же расширенными инструментами, как Microsoft Office. В результате некоторые форматы и формулы могут быть потеряны. Если все, что вам нужно, — это быстро просмотреть некоторые данные, эта потенциальная потеря не должна быть проблемой.
Для этого пути вам потребуется загрузить файл в облачную онлайн-службу Google, прежде чем вы получите к нему доступ. .
Если вас устраивает и то, и другое, вот как открыть файл XLSX с помощью Google Таблиц.
- Перейдите на веб-сайт Google Диска.
- При необходимости войдите в систему, используя свою учетную запись Google.
- Перетащите файл Excel на Google Диск.
- После загрузки файла нажмите на него и выберите “Открыть с помощью”
- Выберите “Google Sheets” option.


Файл XLSX будет преобразован в файл Google Таблиц и откроется в новом окне. Если вы внесете какие-либо изменения в файл, вы можете сохранить его следующим образом.
- Перейдите к “Файл” вкладка.
- Нажмите “Скачать как”
- Выберите “Microsoft Excel” option.


Открытие файла .XLSX с помощью стороннего приложения< /h3>
Хотя файлы XLSX создаются и сохраняются с помощью приложения Microsoft Excel, они также совместимы с несколькими сторонними приложениями для работы с электронными таблицами в macOS.
OpenOffice
OpenOffice — это бесплатный программный пакет, совместимый с другими основными офисными пакетами, включая Microsoft Office. В пакете есть большинство тех же приложений, что и в его аналоге от Microsoft, с приложением Calc, заменяющим Excel. Это приложение для работы с электронными таблицами имеет интуитивно понятный интерфейс и широкий набор расширенных функций, что делает его идеальным для работы с цифрами.
Чтобы открыть файл XLSX с помощью приложения OpenOffice Calc, выполните следующие действия.
- Загрузите и установите пакет OpenOffice.
- Запустите приложение Calc.
- Нажмите кнопку “Открыть” на панели инструментов.
- Выберите “Файл”
- Нажмите “Открыть” вариант.
- Найдите файл Excel, который хотите просмотреть.
- Нажмите “Открыть”
LibreOffice
LibreOffice — это бесплатный и мощный офисный пакет, которым пользуются миллионы людей по всему миру. Пакет фактически основан на OpenOffice и полностью совместим с пакетом Microsoft Office. В его многофункциональном приложении Calc легко ориентироваться, и оно станет отличной заменой Microsoft Excel.
Выполните следующие действия, чтобы открыть файл XLSX с помощью LibreOffice.
- Загрузите и установите пакет LibreOffice.
- Откройте приложение Calc.
- Перейдите к “Открыть” вкладка
- Выберите “Файл”
- Выберите “Открыть” option.
- Найдите нужный файл XLSX.
- Нажмите “Открыть”


WPS Office
< p>WPS Office — это комплексный офисный пакет, полностью совместимый с программным пакетом Microsoft Office. Это профессиональное программное обеспечение позволяет открывать и редактировать файлы Excel с помощью удобного приложения для работы с электронными таблицами.
Вот как открыть файл XLSX с помощью пакета WPS Office.
- Загрузите и установите пакет WPS Office.
- Запустите приложение “Электронные таблицы”.
- Нажмите “Меню” в левом верхнем углу экрана.
- Выберите “Открыть” из раскрывающегося меню.
- Найдите файл, который хотите открыть, в разделе “Открыть файл” всплывающее окно.
- Нажмите “Открыть” br>


Excel в электронных таблицах на Mac
Таблицы Excel очень наглядны и достаточно просты в использовании, что делает их бесценным инструментом для бизнес-анализа, отчетов о производительности и решения многих административных задач. Эти электронные таблицы также совместимы с несколькими приложениями, доступными для Mac, что позволяет использовать их даже без компьютера с Windows. Используете ли вы встроенный инструмент Mac, онлайн-маршрут или стороннее приложение, открытие файла XLSX займет у вас всего несколько кликов.
Приходилось ли вам когда-нибудь открыть файл XLSX на Mac? Какой метод вы использовали? Дайте нам знать в разделе комментариев ниже.

Collaborating on documents can be difficult when you have a Mac, and everyone else owns a Windows PC.
Microsoft Office may be available for macOS, but Microsoft’s suite of document-editing software is nowhere near as popular with Mac users, as it is with the Windows crowd.
If you don’t have Microsoft Office installed on your Mac, and you’ve just received a Word, Excel or PowerPoint document, then in this article I’m going to show you how to open that document, without having to fork out for any expensive proprietary software.
Does your heart sink every time you receive a PowerPoint file from one of your PC-based colleagues? Don’t despair: there’s several ways that you can open .pptx files on your Mac.
Using the Keynote app
Apple have their own presentation software, and unlike Microsoft PowerPoint, Apple’s ‘Keynote’ app is completely free. If you have a newer Mac, then Keynote may already be pre-installed, but even if your Mac is an older model, you can download the latest version of Keynote for free, from the App Store.
Once Keynote is installed on your machine, simply Control-click the PowerPoint file and select ‘Open with… > Keynote.’
Depending on the presentation that you’re trying to access, you may encounter a warning that some fonts are unavailable, but Keynote is smart enough to substitute any missing fonts automatically, so this won’t prevent you from opening and editing the presentation.
If you make any changes to the presentation, you can either save it as a Keynote file, or export it in .pptx format, which is handy if you’re planning to share the amended presentation with PowerPoint users. If you opt for the latter, then select ‘File > Export To’ from the Keynote menu bar, followed by ‘PowerPoint.’
Using Keynote for iCloud
If your Mac didn’t come with Keynote pre-installed, and you don’t fancy the idea of downloading yet another application, then you can access Keynote online, via your iCloud account:
- Head over to iCloud.com and log in using your Apple ID.
- Select ‘Keynote.’
- In the Keynote toolbar, select the little ‘Upload’ button (it’s the one that looks like a cloud).
- In the subsequent window, select the PowerPoint presentation that you want to open. Keynote will then upload, convert and display this presentation as a .keynote file.
If you do make some changes to the presentation, then there’s several ways that you can share the modified presentation with PowerPoint users:
1. Share as an iCloud for Keynote document
If the recipient has an iCloud account, then you can invite them to view and edit the presentation in their web browser, via Keynote for iCloud, similar to how you invite people to collaborate on Google docs.
- Click the little ‘Collaborate on this presentation with others’ icon in the Keynote for iCloud toolbar (where the cursor is positioned in the following screenshot).
- Select ‘Email.’
- Click ‘Share.’
- This launches a popup where you can create your email. When you’re happy with the information you’ve entered, click ‘Send.’ The recipient will then be able to access the Keynote for iCloud document, by following the instructions in the email they just received.
Alternatively, you can share the document via a link:
- Click the ‘Collaborate on this presentation with others’ icon.
- Select ‘Copy link.’
- Enter the email address or the phone number of the person you’re sharing this document with, and then click ‘Share.’
This creates a link that you can share over any channel that supports text, such as Facebook, Messages or even as an SMS.
2. Export the document as a PowerPoint file
If you’d prefer to export the document as a PowerPoint file, then:
- Select the ‘View Keynote tools’ icon from the iCloud toolbar.
- Choose ‘Download a Copy…’
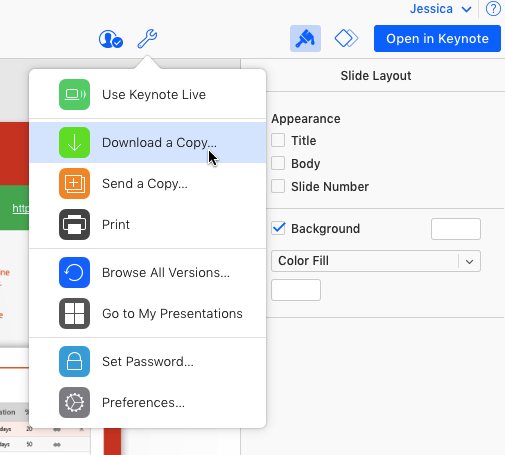
- Select ‘PowerPoint.’
Using Google Slides
If you have a Google Drive account, then you can open and share any PowerPoint file as a Google Slides document.
- Head over to Google Drive.
- Click the big blue ‘New’ button, followed by ‘File Upload.’
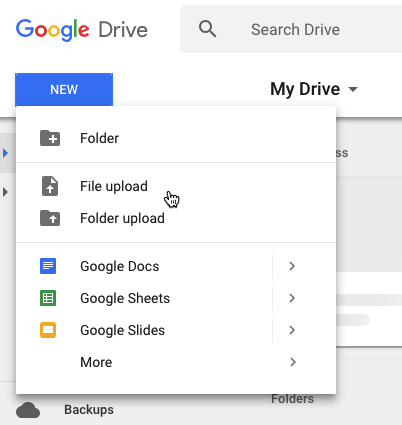
- Select the file that you want to open.
Google Drive will automatically convert the PowerPoint presentation into a Google Slides document, and add it to your Drive. You can then open and edit this presentation, in exactly the same way as any other Google Drive document.
- Share the presentation as a Google doc
Once you’ve finished working on your presentation, you can share it as a Google Slides document with anyone who has a Google account:
- Select ‘File > Share…’ from the toolbar.
- Enter the email address of the person you want to share this document with.
- Click ‘Send.’
Alternatively, you can generate a link that you can then copy/paste into any channel that supports text. Anyone who has this link, will then be able to access your presentation, regardless of their operating system, or what software they have installed on their machine:
- Select ‘File > Share…’ from the toolbar.
- Click ‘Get shareable link.’
- Using the dropdown, specify whether this link should allow the person to view, comment or edit this document, and then click ‘Copy.’
You can now paste this link anywhere that supports text, such as emails, your blog, or share it over Twitter as a tweet or a direct message.
2. Share the presentation as a PowerPoint file
If you’d prefer to export the Google Slides document as a PowerPoint file that you can then send to other people, for example over email, then select ‘File > Download as…’ from the toolbar, and choose ‘Microsoft PowerPoint.’
How to open, edit and share any .docx file on your Mac
If you regularly collaborate with PC-based colleagues, then it can be handy to know how to open and edit Microsoft Word files on your Mac.
There’s several ways that you can open Word documents without installing any specialist software, and then share the amended document in a PC-friendly format.
Use Pages
Pages is the Apple equivalent of Microsoft Word, making it one of the quickest and easiest ways to open Word documents on your Mac. Pages comes pre-installed on newer Macs, but if you have an older model then you can download Pages for free from the App Store.
To open a .docx file in Pages, simply Control-click the file and select ‘Open with… > Pages.’ Once you’ve finished working on the document, you can save it in a PC-friendly format, by selecting ‘File > Export To > Microsoft Word’ from the menu bar.
Using Pages for iCloud
Apple have also released an online version of Pages that you can access via your iCloud account. Using this service, you can convert Microsoft Word documents to Pages documents, edit them online, and then share them via a link that can be accessed in any web browser, and on any operating system.
To open a Microsoft Word document in iCloud:
- Log into your iCloud.com account.
- Select ‘Pages.’
- Click the little ‘Upload’ button and select the document that you want to open. Once the upload is complete, you’ll be able to open and edit the document, from inside your iCloud account.
If at any point you want to share this document, click the little ‘Collaborate on this document with others’ icon in the toolbar and choose whether you want to share the link via email, or use copy/paste to share it with the recipient yourself.
The drawback is that this document is only accessible online, as a Pages for iCloud document. If you’d prefer to download a copy as a Microsoft Word document, then select ‘View Pages tools > Download a Copy… > Word’ from the menu bar.
Using Google Docs
If you have a Google account, then you can upload Microsoft Word documents to your Google Drive account, where you can access, edit and share them as a Google Doc.
- Head over to your Google Drive account.
- Click the big blue ‘New’ button, followed by ‘File Upload.’
- Select the file that you want to open.
You can now edit this document as a normal Google Doc, and share it as either a Google Doc, or by exporting it as a Microsoft Word document.
To share as a Google Doc:
- Select ‘File > Share…’ from the toolbar.
- Choose whether you want to send the invite over email, or generate a link that you can then share yourself.

To export as a Microsoft Word document, select ‘File > Download as… > Microsoft Word’ from the toolbar.
How to open, edit and share .xlsx Excel documents on your Mac
So, some thoughtless Windows user has just sent you a Microsoft Excel document, and you’re wondering how to open it on your Mac, without shelling out for Microsoft Office?
Once again, you have three options, and all of them are free!
Using Numbers
Similar to Pages and Keynote, you can think of Numbers as Apple’s “version” of Microsoft Excel.
If you recently purchased a Mac, then Numbers should already be installed, but if you’ve checked your ‘Applications’ folder and Numbers is nowhere to be found, then you can download it for free, from the App Store.
To open an .xlsx file in Numbers, Control-click it and select ‘Open with… > Numbers.’
Once you’ve finished editing the spreadsheet in Numbers, you can export it as an Excel file, ready to share with your PC colleagues, by selecting ‘File > Export To > Microsoft Excel.’
Using Numbers for iCloud
Just like Pages and Keynote, Apple have released a version of Numbers that you can access in your web browser. Since Numbers for iCloud is accessible via the web browser, anyone can view and edit documents that are hosted in Numbers for iCloud, making it perfect for working on spreadsheets with Windows users.
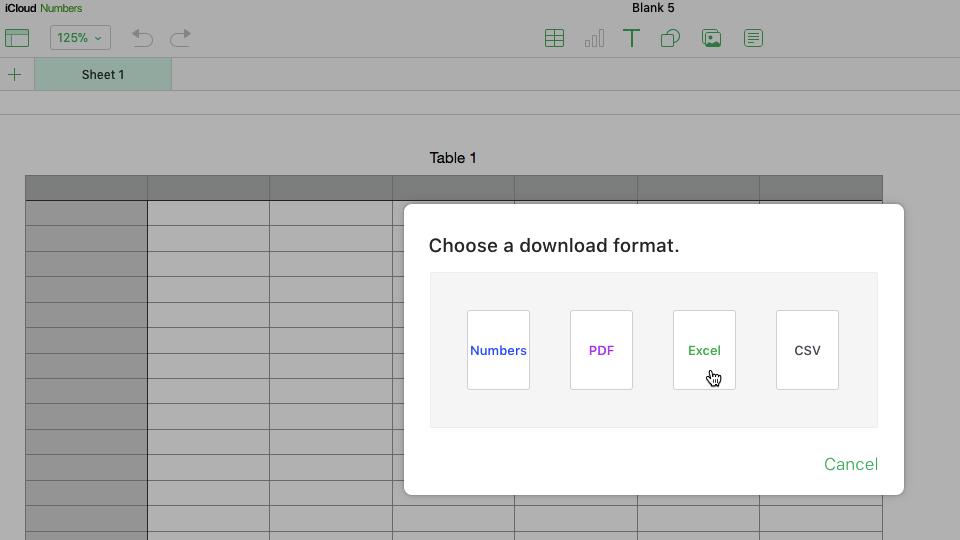
To open an Excel document in iCloud:
- Log into your iCloud.com account.
- Select ‘Numbers.’
- Click the ‘Upload’ button and select the document that you want to open.
When it’s time to share this spreadsheet, click the ‘Collaborate on this spreadsheet with others’ icon in the iCloud toolbar. You can then choose to share the link to this spreadsheet via email, or generate a link that you can share with recipients using copy/paste.
If you’d prefer to share this document outside of the web browser, then you can download a copy as a Microsoft Excel document, by selecting ‘View Numbers tools > Download a Copy… > Excel.’
Using Google Sheets
If you have a Gmail account, then you can upload Microsoft Excel spreadsheets to your Google Drive account, where you can then access and share them as a Google Sheet:
- Log into your Google Drive account.
- Click ‘New > File Upload.’
- Select the file that you want to open.
Once you’ve finished editing the spreadsheet, you can share it with anyone else who has a Google account, by selecting ‘File > Share…’ from the toolbar, and then choosing whether to send the collaboration invite via email, or generate a URL that you can then share with others using copy/paste.
If you’d prefer to export the Google Sheet document as an .xlsx file, then select ‘File > Download as… > Microsoft Excel’ from the toolbar.
Before you go
After spending over 20 years working with Macs, both old and new, theres a tool I think would be useful to every Mac owner who is experiencing performance issues.
CleanMyMac is highest rated all-round cleaning app for the Mac, it can quickly diagnose and solve a whole plethora of common (but sometimes tedious to fix) issues at the click of a button. It also just happens to resolve many of the issues covered in the speed up section of this site, so Download CleanMyMac to get your Mac back up to speed today.

About the author

Jessica Thornsby is a technical writer based in Sheffield. She writes about Android, Java, Kotlin and all things Apple. She is the co-author of O’Reilly’s «iWork: The Missing Manual,» and the author of «Android UI Design,» from Packt Publishing.