
In this Article
- VBA If Statement
- If Then
- ElseIF – Multiple Conditions
- Else
- If-Else
- Nested IFs
- IF – Or, And, Xor, Not
- If Or
- If And
- If Xor
- If Not
- If Comparisons
- If – Boolean Function
- Comparing Text
- VBA If Like
- If Loops
- If Else Examples
- Check if Cell is Empty
- Check if Cell Contains Specific Text
- Check if cell contains text
- If Goto
- Delete Row if Cell is Blank
- If MessageBox Yes / No
- VBA If, ElseIf, Else in Access VBA
VBA If Statement
If Then
VBA If Statements allow you to test if expressions are TRUE or FALSE, running different code based on the results.
Let’s look at a simple example:
If Range("a2").Value > 0 Then Range("b2").Value = "Positive"This tests if the value in Range A2 is greater than 0. If so, setting Range B2 equal to “Positive”

Note: When testing conditions we will use the =, >, <, <>, <=, >= comparison operators. We will discuss them in more detail later in the article.
Here is the syntax for a simple one-line If statement:
If [test_expression] then [action]To make it easier to read, you can use a Line Continuation character (underscore) to expand the If Statements to two lines (as we did in the above picture):
If [test_expression] then _
    [action]
If Range("a2").Value > 0 Then _
Range("b2").Value = "Positive"End If
The above “single-line” if statement works well when you are testing one condition. But as your IF Statements become more complicated with multiple conditions, you will need to add an “End If” to the end of the if statement:
If Range("a2").Value > 0 Then
  Range("b2").Value = "Positive"
End If
Here the syntax is:
If [test_expression] then
  [action]
End If
The End If signifies the end of the if statement.
Now let’s add in an ElseIF:
ElseIF – Multiple Conditions
The ElseIf is added to an existing If statement. ElseIf tests if a condition is met ONLY if the previous conditions have not been met.
In the previous example we tested if a cell value is positive. Now we will also test if the cell value is negative with an ElseIf:
If Range("a2").Value > 0 Then
    Range("b2").Value = "Positive"
ElseIf Range("a2").Value < 0 Then
    Range("b2").Value = "Negative"
End If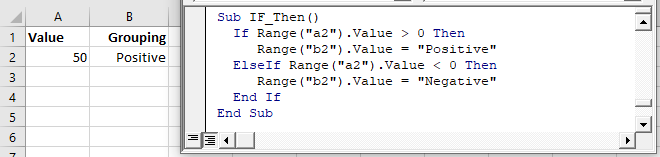
You can use multiple ElseIfs to test for multiple conditions:
Sub If_Multiple_Conditions()

    If Range("a2").Value = "Cat" Then
        Range("b2").Value = "Meow"
    ElseIf Range("a2").Value = "Dog" Then
        Range("b2").Value = "Woof"
    ElseIf Range("a2").Value = "Duck" Then
        Range("b2").Value = "Quack"
    End If

End Sub
Now we will add an Else:
Else
The Else will run if no other previous conditions have been met.
We will finish our example by using an Else to indicate that if the cell value is not positive or negative, then it must be zero:
If Range("a2").Value > 0 Then
    Range("b2").Value = "Positive"
ElseIf Range("a2").Value < 0 Then
    Range("b2").Value = "Negative"
Else
    Range("b2").Value = "Zero"
End If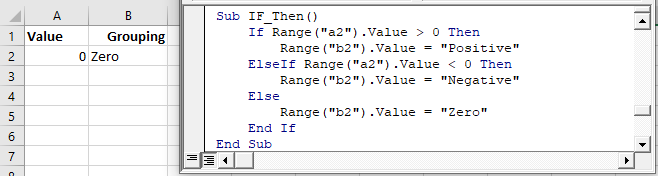
If-Else
The most common type of If statement is a simple If-Else:
Sub If_Else()
    If Range("a2").Value > 0 Then
        Range("b2").Value = "Positive"
    Else
        Range("b2").Value = "Not Positive"
    End If
End Sub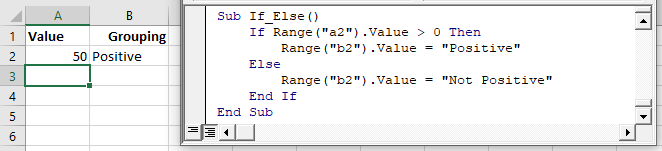
Nested IFs
You can also “nest” if statements inside of each other.
Sub Nested_Ifs()
    If Range("a2").Value > 0 Then
        Range("b2").Value = "Positive"
    Else
        If Range("a2").Value < 0 Then
            Range("b2").Value = "Negative"
        Else
            Range("b2").Value = "Zero"
        End If
    End If
End Sub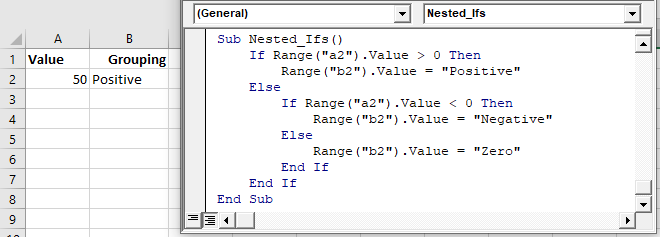
VBA Coding Made Easy
Stop searching for VBA code online. Learn more about AutoMacro — A VBA Code Builder that allows beginners to code procedures from scratch with minimal coding knowledge and with many time-saving features for all users!

Learn More
IF – Or, And, Xor, Not
Next we will discuss the logical operators: Or, And, Xor, Not.
If Or
The Or operator tests if at least one condition is met.
The following code will test if the value in Range A2 is less than 5,000 or greater than 10,000:
If Range("a2").Value < 5000 Or Range("a2").Value > 10000 Then
    Range("b2").Value = "Out of Range"
End If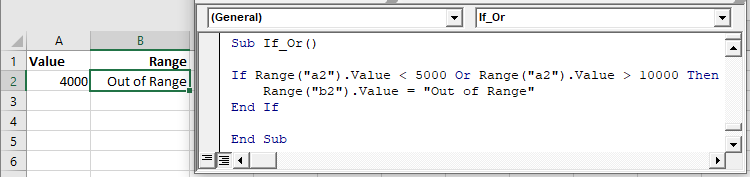
You can include multiple Ors in one line:
If Range("a2").Value < 5000 Or Range("a2").Value > 10000 Or Range("a2").Value = 9999 Then
    Range("b2").Value = "Out of Range"
End If
If you are going to use multiple Ors, it’s recommended to use a line continuation character to make your code easier to read:
If Range("a2").Value < 5000 Or _
   Range("a2").Value > 10000 Or _
   Range("a2").Value = 9999 Then

       Range("b2").Value = "Out of Range"
End If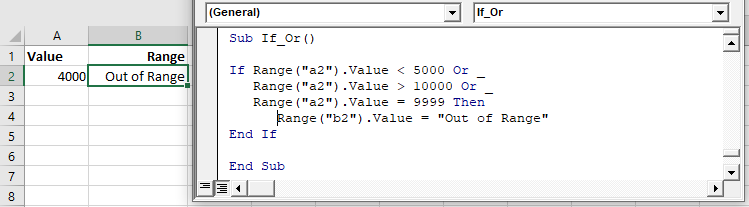
If And
The And operator allows you to test if ALL conditions are met.
If Range("a2").Value >= 5000 And Range("a2").Value <= 10000 Then
    Range("b2").Value = "In Range"
End If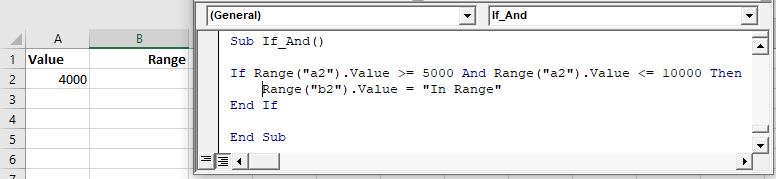
VBA Programming | Code Generator does work for you!
If Xor
The Xor operator allows you to test if exactly one condition is met. If zero conditions are met Xor will return FALSE, If two or more conditions are met, Xor will also return false.
I’ve rarely seen Xor used in VBA programming.
If Not
The Not operator is used to convert FALSE to TRUE or TRUE To FALSE:
Sub IF_Not()
    MsgBox Not (True)
End Sub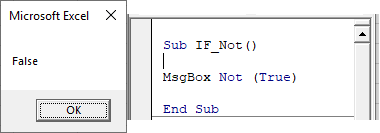
Notice that the Not operator requires parenthesis surrounding the expression to switch.
The Not operator can also be applied to If statements:
If Not (Range("a2").Value >= 5000 And Range("a2").Value <= 10000) Then
    Range("b2").Value = "Out of Range"
End If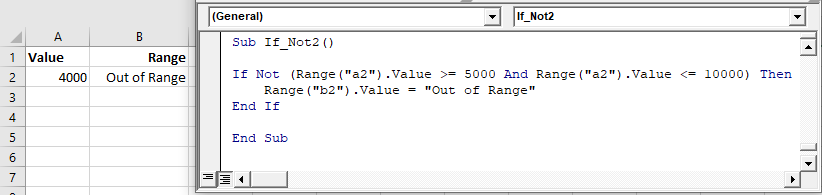
If Comparisons
When making comparisons, you will usually use one of the comparison operators:
| Comparison Operator | Explanation |
|---|---|
| = | Equal to |
| <> | Not Equal to |
| > | Greater than |
| >= | Greater than or Equal to |
| < | Less than |
| <= | Less than or Equal to |
However, you can also use any expression or function that results in TRUE or FALSE
If – Boolean Function
When build expressions for If Statements, you can also use any function that generates TRUE or False. VBA has a few of these functions:
| Function | Description |
|---|---|
| IsDate | Returns TRUE if expression is a valid date |
| IsEmpty | Check for blank cells or undefined variables |
| IsError | Check for error values |
| IsNull | Check for NULL Value |
| IsNumeric | Check for numeric value |
They can be called like this:
If IsEmpty(Range("A1").Value) Then MsgBox "Cell Empty"Excel also has many additional functions that can be called using WorksheetFunction. Here’s an example of the Excel IsText Function:
If Application.WorksheetFunction.IsText(Range("a2").Value) Then _
   MsgBox "Cell is Text"
You can also create your own User Defined Functions (UDFs). Below we will create a simple Boolean function that returns TRUE. Then we will call that function in our If statement:
Sub If_Function()

If TrueFunction Then
    MsgBox "True"
End If

End Sub

Function TrueFunction() As Boolean
    TrueFunction = True
End Function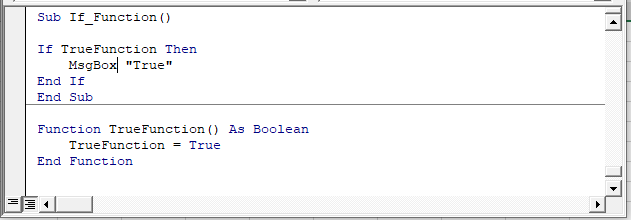
Comparing Text
You can also compare text similar to comparing numbers:
Msgbox "a" = "b"Msgbox "a" = "a"When comparing text, you must be mindful of the “Case” (upper or lower). By default, VBA considers letters with different cases as non-matching. In other words, “A” <> “a”.
If you’d like VBA to ignore case, you must add the Option Compare Text declaration to the top of your module:
Option Compare TextAfter making that declaration “A” = “a”:
Option Compare Text

Sub If_Text()
   MsgBox "a" = "A"
End Sub
AutoMacro | Ultimate VBA Add-in | Click for Free Trial!
VBA If Like
The VBA Like Operator allows you to make inexact comparisons of text. Click the “Like Operator” link to learn more, but we will show a basic example below:
Dim strName as String
strName = "Mr. Charles"

If strName Like "Mr*" Then
    MsgBox "True"
Else
    MsgBox "False"
End If
Here we’re using an asterisk “*” wildcard. The * stands for any number of any characters. So the above If statement will return TRUE. The Like operator is an extremely powerful, but often under-used tool for dealing with text.
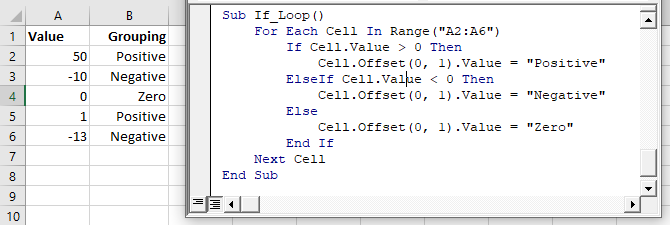
If Loops
VBA Loops allow you to repeat actions. Combining IF-ELSEs with Loops is a great way to quickly process many calculations.
Continuing with our Positive / Negative example, we will add a For Each Loop to loop through a range of cells:
Sub If_Loop()
Dim Cell as Range

  For Each Cell In Range("A2:A6")
    If Cell.Value > 0 Then
      Cell.Offset(0, 1).Value = "Positive"
    ElseIf Cell.Value < 0 Then
      Cell.Offset(0, 1).Value = "Negative"
    Else
      Cell.Offset(0, 1).Value = "Zero"
     End If
  Next Cell

End Sub
If Else Examples
Now we will go over some more specific examples.
Check if Cell is Empty
This code will check if a cell is empty. If it’s empty it will ignore the cell. If it’s not empty it will output the cell value to the cell to the right:
Sub If_Cell_Empty()

If Range("a2").Value <> "" Then
    Range("b2").Value = Range("a2").Value
End If

End Sub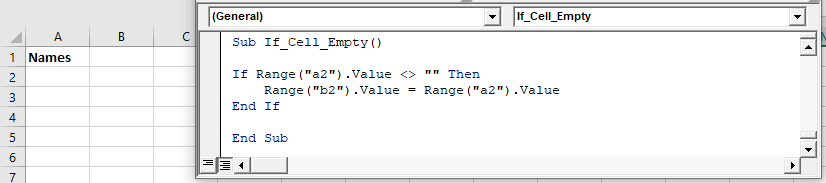
AutoMacro | Ultimate VBA Add-in | Click for Free Trial!
Check if Cell Contains Specific Text
The Instr Function tests if a string of text is found in another string. Use it with an If statement to check if a cell contains specific text:
If Instr(Range("A2").value,"text") > 0 Then
  Msgbox "Text Found"
End If
Check if cell contains text
This code will test if a cell is text:
Sub If_Cell_Is_Text()

If Application.WorksheetFunction.IsText(Range("a2").Value) Then
    MsgBox "Cell is Text"
End If

End Sub
If Goto
You can use the result of an If statement to “Go to” another section of code.
Sub IfGoTo ()

    If IsError(Cell.value) Then
        Goto Skip
    End If

    'Some Code

Skip:
End Sub
Delete Row if Cell is Blank
Using Ifs and loops you can test if a cell is blank and if so delete the entire row.
Sub DeleteRowIfCellBlank()

Dim Cell As Range

For Each Cell In Range("A2:A10")
    If Cell.Value = "" Then Cell.EntireRow.Delete
Next Cell

End Sub
AutoMacro | Ultimate VBA Add-in | Click for Free Trial!
If MessageBox Yes / No
With VBA Message Boxes you’re able to ask the user to select from several options. The Yes/No Message Box asks the user to select Yes or No. You can add a Yes / No Message Box to a procedure to ask the user if they would like to continue running the procedure or not. You handle the user’s input using an If statement.
Here is the Yes/No Message Box in practice:
Sub MsgBoxVariable()

Dim answer As Integer
answer = MsgBox("Do you want to Continue?", vbQuestion + vbYesNo)

  If answer = vbYes Then
    MsgBox "Yes"
  Else
    MsgBox "No"
  End If

End Sub
VBA If, ElseIf, Else in Access VBA
The If, ElseIf and Else functions work exactly the same in Access VBA as in Excel VBA.
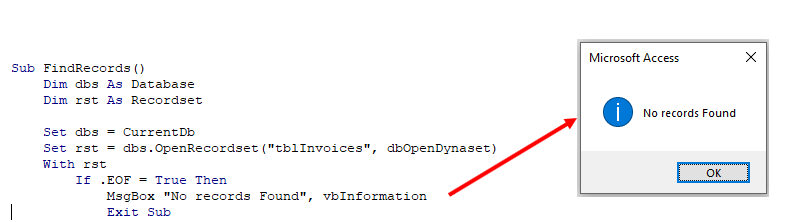
You can use an If statement to check if there are records in a Recordset.
This post provides a complete guide to the VBA If Statement in VBA. If you are looking for the syntax then check out the quick guide in the first section which includes some examples.
The table of contents below provides an overview of what is included in the post. You use this to navigate to the section you want or you can read the post from start to finish.
“Guess, if you can, and choose, if you dare.” – Pierre Corneille
Quick Guide to the VBA If Statement
| Description | Format | Example |
|---|---|---|
| If Then | If [condition is true] Then [do something] End If |
If score = 100 Then Debug.Print «Perfect» End If |
| If Else | If [condition is true] Then [do something] Else [do something] End If |
If score = 100 Then Debug.Print «Perfect» Else Debug.Print «Try again» End If |
| If ElseIf | If [condition 1 is true] Then [do something] ElseIf [condition 2 is true] Then [do something] End If |
If score = 100 Then Debug.Print «Perfect» ElseIf score > 50 Then Debug.Print «Passed» ElseIf score <= 50 Then Debug.Print «Try again» End If |
| Else and ElseIf (Else must come after ElseIf’s) |
If [condition 1 is true] Then [do something] ElseIf [condition 2 is true] Then [do something] Else [do something] End If |
If score = 100 Then Debug.Print «Perfect» ElseIf score > 50 Then Debug.Print «Passed» ElseIf score > 30 Then Debug.Print «Try again» Else Debug.Print «Yikes» End If |
| If without Endif (One line only) |
If [condition is true] Then [do something] | If value <= 0 Then value = 0 |
The following code shows a simple example of using the VBA If statement
If Sheet1.Range("A1").Value > 5 Then
    Debug.Print "Value is greater than five."
ElseIf Sheet1.Range("A1").Value < 5 Then
    Debug.Print "value is less than five."
Else
    Debug.Print "value is equal to five."
End If
The Webinar
Members of the Webinar Archives can access the webinar for this article by clicking on the image below.
(Note: Website members have access to the full webinar archive.)

What is the VBA If Statement
The VBA If statement is used to allow your code to make choices when it is running.
You will often want to make choices based on the data your macros reads.
For example, you may want to read only the students who have marks greater than 70. As you read through each student you would use the If Statement to check the marks of each student.
The important word in the last sentence is check. The If statement is used to check a value and then to perform a task based on the results of that check.
The Test Data and Source Code
We’re going to use the following test data for the code examples in this post:

You can download the test data with all the source code for post plus the solution to the exercise at the end:
Format of the VBA If-Then Statement
The format of the If Then statement is as follows
If [condition is true] Then
The If keyword is followed by a Condition and the keyword Then
Every time you use an If Then statement you must use a matching End If statement.
When the condition evaluates to true, all the lines between If Then and End If are processed.
If [condition is true] Then
    [lines of code]
    [lines of code]
    [lines of code]
End If
To make your code more readable it is good practice to indent the lines between the If Then and End If statements.
Indenting Between If and End If
Indenting simply means to move a line of code one tab to the right. The rule of thumb is to indent between start and end statements like
Sub … End Sub
If Then … End If
If Then… ElseIf … Else … Endif
For … Next
Do While … Loop
Select Case … End Case
To indent the code you can highlight the lines to indent and press the Tab key. Pressing Shift + Tab will Outdent the code i.e. move it one tab to the left.
You can also use the icons from the Visual Basic Toolbar to indent/outdent the code

Select code and click icons to indent/outdent
If you look at any code examples on this website you will see that the code is indented.
A Simple If Then Example
The following code prints out the names of all students with marks greater than 50 in French.
' https://excelmacromastery.com/
Sub ReadMarks()

    Dim i As Long
    ' Go through the marks columns
    For i = 2 To 11
        ' Check if marks greater than 50
        If Sheet1.Range("C" & i).Value > 50 Then
            ' Print student name to the Immediate Window(Ctrl + G)
            Debug.Print Sheet1.Range("A" & i).Value & " " & Sheet1.Range("B" & i).Value
        End If

    Next

End Sub
Results
Bryan Snyder
Juanita Moody
Douglas Blair
Leah Frank
Monica Banks
Play around with this example and check the value or the > sign and see how the results change.
Using Conditions with the VBA If Statement
The piece of code between the If and the Then keywords is called the condition. A condition is a statement that evaluates to true or false. They are mostly used with Loops and If statements. When you create a condition you use signs like >,<,<>,>=,<=,=.
The following are examples of conditions
| Condition | This is true when |
|---|---|
| x < 5 | x is less than 5 |
| x <= 5 | x is less than or equal to 5 |
| x > 5 | x is greater than 5 |
| x >= 5 | x is greater than or equal to 5 |
| x = 5 | x is equal to 5 |
| x <> 5 | x does not equal 5 |
| x > 5 And x < 10 | x is greater than 5 AND x is less than 10 |
| x = 2 Or x >10 | x is equal to 2 OR x is greater than 10 |
| Range(«A1») = «John» | Cell A1 contains text «John» |
| Range(«A1») <> «John» | Cell A1 does not contain text «John» |
You may have noticed x=5 as a condition. This should not be confused with x=5 when used as an assignment.
When equals is used in a condition it means “is the left side equal to the right side”.
The following table demonstrates how the equals sign is used in conditions and assignments
| Using Equals | Statement Type | Meaning |
|---|---|---|
| Loop Until x = 5 | Condition | Is x equal to 5 |
| Do While x = 5 | Condition | Is x equal to 5 |
| If x = 5 Then | Condition | Is x equal to 5 |
| For x = 1 To 5 | Assignment | Set the value of x to 1, then to 2 etc. |
| x = 5 | Assignment | Set the value of x to 5 |
| b = 6 = 5 | Assignment and Condition | Assign b to the result of condition 6 = 5 |
| x = MyFunc(5,6) | Assignment | Assign x to the value returned from the function |
The last entry in the above table shows a statement with two equals. The first equals sign is the assignment and any following equals signs are conditions.
This might seem confusing at first but think of it like this. Any statement that starts with a variable and an equals is in the following format
[variable] [=] [evaluate this part]
So whatever is on the right of the equals sign is evaluated and the result is placed in the variable. Taking the last three assignments again, you could look at them like this
[x] [=] [5]
[b] [=] [6 = 5]
[x] [=] [MyFunc(5,6)]
Using ElseIf with the VBA If Statement
The ElseIf statement allows you to choose from more than one option. In the following example we print for marks that are in the Distinction or High Distinction range.
' https://excelmacromastery.com/
Sub UseElseIf()

    If Marks >= 85 Then
        Debug.Print "High Destinction"
    ElseIf Marks >= 75 Then
        Debug.Print "Destinction"
    End If

End Sub
The important thing to understand is that order is important. The If condition is checked first.
If it is true then “High Distinction” is printed and the If statement ends.
If it is false then the code moves to the next ElseIf and checks it condition.
Let’s swap around the If and ElseIf from the last example. The code now look like this
' https://excelmacromastery.com/
Sub UseElseIfWrong()

    ' This code is incorrect as the ElseIf will never be true
    If Marks >= 75 Then
        Debug.Print "Destinction"
    ElseIf Marks >= 85 Then
        ' code will never reach here
        Debug.Print "High Destinction"
    End If

End Sub
In this case we check for a value being over 75 first. We will never print “High Distinction” because if a value is over 85 is will trigger the first if statement.
To avoid these kind of problems we should use two conditions. These help state exactly what you are looking for a remove any confusion. The example below shows how to use these. We will look at more multiple conditions in the section below.
If marks >= 75 And marks < 85 Then
    Debug.Print "Destinction"
ElseIf marks >= 85 And marks <= 100 Then
    Debug.Print "High Destinction"
End If
Let’s expand the original code. You can use as many ElseIf statements as you like. We will add some more to take into account all our mark classifications.
If you want to try out these examples you can download the code from the top of this post.
Using Else With the VBA If Statement
The VBA Else statement is used as a catch all. It basically means “if no conditions were true” or “everything else”. In the previous code example, we didn’t include a print statement for a fail mark. We can add this using Else.
' https://excelmacromastery.com/
Sub UseElse()

    If Marks >= 85 Then
        Debug.Print "High Destinction"
    ElseIf Marks >= 75 Then
        Debug.Print "Destinction"
    ElseIf Marks >= 55 Then
        Debug.Print "Credit"
    ElseIf Marks >= 40 Then
        Debug.Print "Pass"
    Else
        ' For all other marks
        Debug.Print "Fail"
    End If

End Sub
So if it is not one of the other types then it is a fail.
Let’s write some code to go through our sample data and print the student and their classification:
' https://excelmacromastery.com/
Sub AddClass()

    ' get the last row
    Dim startRow As Long, lastRow As Long
    startRow = 2
    lastRow = Sheet1.Cells(Sheet1.Rows.Count, 1).End(xlUp).Row

    Dim i As Long, Marks As Long
    Dim sClass As String

    ' Go through the marks columns
    For i = startRow To lastRow
        Marks = Sheet1.Range("C" & i).Value
        ' Check marks and classify accordingly
        If Marks >= 85 Then
            sClass = "High Destinction"
        ElseIf Marks >= 75 Then
            sClass = "Destinction"
        ElseIf Marks >= 55 Then
            sClass = "Credit"
        ElseIf Marks >= 40 Then
            sClass = "Pass"
        Else
            ' For all other marks
            sClass = "Fail"
        End If

        ' Write out the class to column E
        Sheet1.Range("E" & i).Value = sClass
    Next

End Sub
The results look like this with column E containing the classification of the marks

Results
Remember that you can try these examples for yourself with the code download from the top of this post.
Using Logical Operators with the VBA If Statement
You can have more than one condition in an If Statement. The VBA keywords And and Or allow use of multiple conditions.
These words work in a similar way to how you would use them in English.
Let’s look at our sample data again. We now want to print all the students that got over between 50 and 80 marks.
We use And to add an extra condition. The code is saying: if the mark is greater than or equal 50 and less than 75 then print the student name.
' https://excelmacromastery.com/
Sub CheckMarkRange()

    Dim i As Long, marks As Long
    For i = 2 To 11

        ' Store marks for current student
        marks = Sheet1.Range("C" & i).Value

        ' Check if marks greater than 50 and less than 75
        If marks >= 50 And marks < 80 Then
             ' Print first and last name to Immediate window(Ctrl G)
             Debug.Print Sheet1.Range("A" & i).Value & Sheet1.Range("B" & i).Value
        End If

    Next

End Sub
Results
Douglas Blair
Leah Frank
Monica Banks
In our next example we want the students who did History or French. So in this case we are saying if the student did History OR if the student did French:
' Description: Uses OR to check the study took History or French.
' Worksheet: Marks
' Output: Result are printed to the Immediate Windows(Ctrl + G)
' https://excelmacromastery.com/vba-if
Sub UseOr()

    ' Get the data range
    Dim rg As Range
    Set rg = shMarks.Range("A1").CurrentRegion

    Dim i As Long, subject As String

    ' Read through the data
    For i = 2 To rg.Rows.Count

        ' Get the subject
        subject = rg.Cells(i, 4).Value

        ' Check if subject greater than 50 and less than 80
        If subject = "History" Or subject = "French" Then
            ' Print first name and subject to Immediate window(Ctrl G)
            Debug.Print rg.Cells(i, 1).Value & " " & rg.Cells(i, 4).Value
        End If

    Next

End Sub
Results
Bryan History
Bradford French
Douglas History
Ken French
Leah French
Rosalie History
Jackie History
Using Multiple conditions like this is often a source of errors. The rule of thumb to remember is to keep them as simple as possible.
Using If And
The AND works as follows
| Condition 1 | Condition 2 | Result |
| TRUE | TRUE | TRUE |
| TRUE | FALSE | FALSE |
| FALSE | TRUE | FALSE |
| FALSE | FALSE | FALSE |
What you will notice is that AND is only true when all conditions are true
Using If Or
The OR keyword works as follows
| Condition 1 | Condition 2 | Result |
| TRUE | TRUE | TRUE |
| TRUE | FALSE | TRUE |
| FALSE | TRUE | TRUE |
| FALSE | FALSE | FALSE |
What you will notice is that OR is only false when all the conditions are false.
Mixing AND and OR together can make the code difficult to read and lead to errors. Using parenthesis can make the conditions clearer.
' https://excelmacromastery.com/
Sub OrWithAnd()

 Dim subject As String, marks As Long
 subject = "History"
 marks = 5

 If (subject = "French" Or subject = "History") And marks >= 6 Then
     Debug.Print "True"
 Else
     Debug.Print "False"
 End If

End Sub
Using If Not
There is also a NOT operator. This returns the opposite result of the condition.
| Condition | Result |
| TRUE | FALSE |
| FALSE | TRUE |
The following two lines of code are equivalent.
If marks < 40 Then
If Not marks >= 40 Then
as are
If True Then
If Not False Then
and
If False Then
If Not True Then
Putting the condition in parenthesis makes the code easier to read
If Not (marks >= 40) Then
A common usage of Not when checking if an object has been set. Take a worksheet for example. Here we declare the worksheet
Dim mySheet As Worksheet
' Some code here
We want to check mySheet is valid before we use it. We can check if it is nothing.
If mySheet Is Nothing Then
There is no way to check if it is something as there is many different ways it could be something. Therefore we use Not with Nothing
If Not mySheet Is Nothing Then
If you find this a bit confusing you can use parenthesis like this
If Not (mySheet Is Nothing) Then
The IIF function
Note that you can download the IIF examples below and all source code from the top of this post.
VBA has an fuction similar to the Excel If function. In Excel you will often use the If function as follows:
=IF(F2=””,””,F1/F2)
The format is
=If(condition, action if true, action if false).
VBA has the IIf statement which works the same way. Let’s look at an example. In the following code we use IIf to check the value of the variable val. If the value is greater than 10 we print true otherwise we print false:
' Description: Using the IIF function to check a number.
' Worksheet: Marks
' Output: Result are printed to the Immediate Windows(Ctrl + G)
' https://excelmacromastery.com/vba-if
Sub CheckNumberIIF()

    Dim result As Boolean
    Dim number As Long

    ' Prints True
    number = 11
    result = IIf(number > 10, True, False)
    Debug.Print "Number " & number & " greater than 10 is " & result

    ' Prints false
    number = 5
    result = IIf(number > 10, True, False)
    Debug.Print "Number " & number & " greater than 10 is " & result

End Sub
In our next example we want to print out Pass or Fail beside each student depending on their marks. In the first piece of code we will use the normal VBA If statement to do this:
' https://excelmacromastery.com/
Sub CheckMarkRange()

    Dim i As Long, marks As Long
    For i = 2 To 11

        ' Store marks for current student
        marks = Sheet1.Range("C" & i).Value

        ' Check if student passes or fails
        If marks >= 40 Then
             ' Write out names to to Column F
             Sheet1.Range("E" & i) = "Pass"
        Else
             Sheet1.Range("E" & i) = "Fail"
        End If

    Next

End Sub
In the next piece of code we will use the IIf function. You can see that the code is much neater here:
' Description: Using the IIF function to check marks.
' Worksheet: Marks
' Output: Result are printed to the Immediate Windows(Ctrl + G)
' https://excelmacromastery.com/vba-if
Sub CheckMarkRange()

    ' Get the data range
    Dim rg As Range
    Set rg = shMarks.Range("A1").CurrentRegion

    Dim i As Long, marks As Long, result As String
    ' Go through the marks columns
    For i = 2 To rg.Rows.Count

        ' Store marks for current student
        marks = rg.Cells(i, 3).Value

        ' Check if student passes or fails
        result = IIf(marks >= 40, "Pass", "Fail")

        ' Print the name and result
        Debug.Print rg.Cells(i, 1).Value, result

    Next

End Sub
You can see the IIf function is very useful for simple cases where you are dealing with two possible options.
Using Nested IIf
You can also nest IIf statements like in Excel. This means using the result of one IIf with another. Let’s add another result type to our previous examples. Now we want to print Distinction, Pass or Fail for each student.
Using the normal VBA we would do it like this
' https://excelmacromastery.com/
Sub CheckResultType2()

    Dim i As Long, marks As Long
    For i = 2 To 11

        ' Store marks for current student
        marks = Sheet1.Range("C" & i).Value

        If marks >= 75 Then
             Sheet1.Range("E" & i).Value = "Distinction"
        ElseIf marks >= 40 Then
             ' Write out names to to Column F
             Sheet1.Range("E" & i).Value = "Pass"
        Else
             Sheet1.Range("E" & i).Value = "Fail"
        End If

    Next

End Sub
Using nested IIfs we could do it like this:
' Description: Using a nested IIF function to check marks.
' Worksheet: Marks
' Output: Result are printed to the Immediate Windows(Ctrl + G)
' https://excelmacromastery.com/vba-if
Sub UsingNestedIIF()

    ' Get the data range
    Dim rg As Range
    Set rg = shMarks.Range("A1").CurrentRegion

    Dim i As Long, marks As Long, result As String
    ' Go through the marks columns
    For i = 2 To rg.Rows.Count

        marks = rg.Cells(i, 3).Value
        result = IIf(marks >= 55, "Credit", IIf(marks >= 40, "Pass", "Fail"))

        Debug.Print marks, result

    Next i

End Sub
Using nested IIf is fine in simple cases like this. The code is simple to read and therefore not likely to have errors.
What to Watch Out For
It is important to understand that the IIf function always evaluates both the True and False parts of the statement regardless of the condition.
In the following example we want to divide by marks when it does not equal zero. If it equals zero we want to return zero.
marks = 0
total = IIf(marks = 0, 0, 60 / marks)
However, when marks is zero the code will give a “Divide by zero” error. This is because it evaluates both the True and False statements. The False statement here i.e. (60 / Marks) evaluates to an error because marks is zero.
If we use a normal IF statement it will only run the appropriate line.
marks = 0
If marks = 0 Then
    'Only executes this line when marks is zero
    total = 0
Else
    'Only executes this line when marks is Not zero
    total = 60 / marks
End If
What this also means is that if you have Functions for True and False then both will be executed. So IIF will run both Functions even though it only uses one return value. For example
'Both Functions will be executed every time
total = IIf(marks = 0, Func1, Func2)
(Thanks to David for pointing out this behaviour in the comments)
If Versus IIf
So which is better?
You can see for this case that IIf is shorter to write and neater. However if the conditions get complicated you are better off using the normal If statement. A disadvantage of IIf is that it is not well known so other users may not understand it as well as code written with a normal if statement.
Also as we discussed in the last section IIF always evaluates the True and False parts so if you are dealing with a lot of data the IF statement would be faster.
My rule of thumb is to use IIf when it will be simple to read and doesn’t require function calls. For more complex cases use the normal If statement.
Using Select Case
The Select Case statement is an alternative way to write an If statment with lots of ElseIf’s. You will find this type of statement in most popular programming languages where it is called the Switch statement. For example Java, C#, C++ and Javascript all have a switch statement.
The format is
Select Case [variable]
    Case [condition 1]
    Case [condition 2]
    Case [condition n]
    Case Else
End Select
Let’s take our AddClass example from above and rewrite it using a Select Case statement.
' https://excelmacromastery.com/
Sub AddClass()

    ' get the last row
    Dim startRow As Long, lastRow As Long
    startRow = 2
    lastRow = Sheet1.Cells(Sheet1.Rows.Count, 1).End(xlUp).Row

    Dim i As Long, Marks As Long
    Dim sClass As String

    ' Go through the marks columns
    For i = startRow To lastRow
        Marks = Sheet1.Range("C" & i).Value
        ' Check marks and classify accordingly
        If Marks >= 85 Then
            sClass = "High Destinction"
        ElseIf Marks >= 75 Then
            sClass = "Destinction"
        ElseIf Marks >= 55 Then
            sClass = "Credit"
        ElseIf Marks >= 40 Then
            sClass = "Pass"
        Else
            ' For all other marks
            sClass = "Fail"
        End If

        ' Write out the class to column E
        Sheet1.Range("E" & i).Value = sClass
    Next

End Sub
The following is the same code using a Select Case statement. The main thing you will notice is that we use “Case 85 to 100” rather than “marks >=85 And marks <=100”.
' https://excelmacromastery.com/
Sub AddClassWithSelect()

    ' get the first and last row
    Dim firstRow As Long, lastRow As Long
    firstRow = 2
    lastRow = Cells(Cells.Rows.Count, 1).End(xlUp).Row

    Dim i As Long, marks As Long
    Dim sClass As String

    ' Go through the marks columns
    For i = firstRow To lastRow
        marks = Sheet1.Range("C" & i).Value
        ' Check marks and classify accordingly
        Select Case marks
        Case 85 To 100
            sClass = "High Destinction"
        Case 75 To 84
            sClass = "Destinction"
        Case 55 To 74
            sClass = "Credit"
        Case 40 To 54
            sClass = "Pass"
        Case Else
            ' For all other marks
            sClass = "Fail"
        End Select
        ' Write out the class to column E
        Sheet1.Range("E" & i).Value = sClass
    Next

End Sub
Using Case Is
You could rewrite the select statement in the same format as the original ElseIf. You can use Is with Case.
' https://excelmacromastery.com/
Select Case marks
    Case Is >= 85
         sClass = "High Destinction"
    Case Is >= 75
        sClass = "Destinction"
    Case Is >= 55
        sClass = "Credit"
    Case Is >= 40
        sClass = "Pass"
    Case Else
        ' For all other marks
        sClass = "Fail"
End Select
You can use Is to check for multiple values. In the following code we are checking if marks equals 5, 7 or 9.
' https://excelmacromastery.com/
Sub TestMultiValues()

    Dim marks As Long
    marks = 7

    Select Case marks
        Case Is = 5, 7, 9
            Debug.Print True
        Case Else
            Debug.Print False
    End Select

End Sub
What’s Next?
Free VBA Tutorial If you are new to VBA or you want to sharpen your existing VBA skills then why not try out the The Ultimate VBA Tutorial.
Related Training: Get full access to the Excel VBA training webinars and all the tutorials.
(NOTE: Planning to build or manage a VBA Application? Learn how to build 10 Excel VBA applications from scratch.)
На чтение 19 мин. Просмотров 24.6k.

Пьер Корнель
Угадай, если сможешь, и выбери, если посмеешь
Содержание
- Краткое руководство по VBA If Statement
- Что такое IF и зачем оно тебе?
- Тестовые данные
- Формат операторов VBA If Then
- Простой пример If Then
- Условия IF
- Использование If ElseIf
- Использование If Else
- Используя If And/If Or
- Функция IIF
- Использование Select Case
- Попробуйте это упражнение
Краткое руководство по VBA If Statement
| Описание | Формат | Пример |
| If Then | If [условие верно] Then [действие] End If |
If score = 100 Then Debug.Print «Отлично» End If |
| If Else | If [условие верно] Then [действие] Else [действие] End If |
If score = 100 Then Debug.Print «Отлично» Else Debug.Print «Попробуй снова» End If |
| If ElseIf | If [1 условие верно] Then [действие] ElseIf [2 условие верно] Then [действие] End If |
If score = 100 Then Debug.Print «Отлично» ElseIf score > 50 Then Debug.Print «Пройдено» ElseIf score <= 50 Then Debug.Print «Попробуй снова» End If |
| Else и ElseIf (Else должно идти после ElseIf’s) |
If [1 условие верно] Then [действие] ElseIf [2 условие верно] Then [действие] Else [действие] End If |
If score = 100 Then Debug.Print «Отлично» ElseIf score > 50 Then Debug.Print «Пройдено» ElseIf score > 30 Then Debug.Print «Попробуй снова» Else Debug.Print «Ой» End If |
| If без Endif (Только одна строка) |
If [условие верно] Then [действие] |
If value <= 0 Then value = 0 |
В следующем коде показан простой пример использования
оператора VBA If
If Sheet1.Range("A1").Value > 5 Then
    Debug.Print "Значение больше 5."
ElseIf Sheet1.Range("A1").Value < 5 Then
    Debug.Print "Значение меньше 5."
Else
    Debug.Print "Значение равно 5."
End If
Что такое IF и зачем оно тебе?
Оператор VBA If используется, чтобы позволить вашему коду
делать выбор, когда он выполняется.
Вам часто захочется сделать выбор на основе данных, которые
читает ваш макрос.
Например, вы можете захотеть читать только тех учеников, у
которых оценки выше 70. Когда вы читаете каждого учащегося, вы можете
использовать инструкцию If для проверки отметок каждого учащегося.
Важным словом в последнем предложении является проверка. Оператор
If используется для проверки значения, а затем для выполнения задачи на основе
результатов этой проверки.
Тестовые данные
Мы собираемся использовать следующие тестовые данные для
примеров кода в этом посте.

Формат операторов VBA If Then
Формат оператора If Then следующий
За ключевым словом If следуют условие и ключевое слово Then
Каждый раз, когда вы используете оператор If Then, вы должны использовать соответствующий оператор End If.
Когда условие оценивается как истинное, обрабатываются все
строки между If Then и End If.
If [условие верно] Then
    [строки кода]
    [строки кода]
    [строки кода]
End If
Чтобы сделать ваш код более читабельным, рекомендуется
делать отступы между операторами If Then и End If.
Отступ между If и End If
Отступ означает просто переместить строку кода на одну вкладку вправо. Правило большого пальца состоит в том, чтобы сделать отступ между начальным и конечным операторами, такими как:
Sub … End Sub
If Then … End If
If Then… ElseIf … Else … Endif
For … Next
Do While … Loop
Select Case … End Case
Для отступа в коде вы можете выделить строки для отступа и нажать клавишу Tab. Нажатие клавиш Shift + Tab сделает отступ кода, т.е. переместит его на одну вкладку влево.
Вы также можете использовать значки на панели инструментов Visual Basic для отступа кода.

Если вы посмотрите на примеры кода на этом сайте, вы увидите, что код имеет отступ.
Простой пример If Then
Следующий код выводит имена всех студентов с баллами более 50.
Sub ChitatOcenki()

    Dim i As Long
    ' Пройдите столбцы отметок
    For i = 2 To 11
        ' Проверьте, больше ли баллов,чем 50
        If Sheet1.Range("C" & i).Value > 50 Then
            ' Напечатайте имя студента в «Immediate Window» (Ctrl + G)
            Debug.Print Sheet1.Range("A" & i).Value & " " & Sheet1.Range("B" & i).Value
        End If

    Next

End Sub
Результаты:
- Василий Кочин
- Максим Бородин
- Дмитрий Маренин
- Олеся Клюева
- Евгений Яшин
Поэкспериментируйте с этим примером и проверьте значение или знак > и посмотрите, как изменились результаты.
Условия IF
Часть кода между ключевыми словами If и Then называется условием. Условие — это утверждение, которое оценивается как истинное или ложное. Они в основном используются с операторами Loops и If. При создании условия вы используете такие знаки, как «>, <, <>,> =, <=, =».
Ниже приведены примеры условий:
| Условие | Это верно, когда |
| x < 5 | x меньше,чем 5 |
| x <= 5 | x меньше, либо равен 5 |
| x > 5 | x больше, чем 5 |
| x >= 5 | x больше, либо равен 5 |
| x = 5 | x равен 5 |
| x <> 5 | x не равен 5 |
| x > 5 And x < 10 | x больше, чем 5 И x меньше, чем 10 |
| x = 2 Or x >10 | x равен 2 ИЛИ x больше,чем 10 |
| Range(«A1») = «Иван» | Ячейка A1 содержит текст «Иван» |
| Range(«A1») <> «Иван» | Ячейка A1 не содержит текст «Иван» |
Вы могли заметить x = 5, как условие. Не стоит путать с х = 5, при использовании в качестве назначения.
Когда в условии используется «=», это означает, что «левая сторона равна правой стороне».
В следующей таблице показано, как знак равенства используется
в условиях и присваиваниях.
| Использование «=» | Тип | Значение |
| Loop Until x = 5 | Условие | Равен ли x пяти |
| Do While x = 5 | Условие | Равен ли x пяти |
| If x = 5 Then | Условие | Равен ли x пяти |
| For x = 1 To 5 | Присваивание | Установите значение х = 1, потом = 2 и т.д. |
| x = 5 | Присваивание | Установите х до 5 |
| b = 6 = 5 | Присваивание и условие |
Присвойте b результату условия 6 = 5 |
| x = MyFunc(5,6) | Присваивание | Присвойте х значение, возвращаемое функцией |
Последняя запись в приведенной выше таблице показывает
оператор с двумя равными. Первый знак равенства — это присвоение, а любые
последующие знаки равенства — это условия.
Поначалу это может показаться странным, но подумайте об этом
так. Любое утверждение, начинающееся с переменной и равно, имеет следующий
формат
[переменная] [=] [оценить эту часть]
Поэтому все, что находится справа от знака равенства, оценивается и результат помещается в переменную. Посмотрите на последние три строки таблицы, как:
[x] [=] [5]
[b] [=] [6 = 5]
[x] [=] [MyFunc (5,6)]
Использование If ElseIf
Инструкция ElseIf позволяет вам выбирать из нескольких вариантов. В следующем примере мы печатаем баллы, которые находятся в диапазоне.
Sub IspElseIf()

    If Marks >= 85 Then
        Debug.Print "Высший балл"
    ElseIf Marks >= 75 Then
        Debug.Print "Отлично"
    End If

End Sub
Важно понимать, что порядок важен. Условие If проверяется
первым.
Если это правда, то печатается «Высший балл», и оператор If заканчивается.
Если оно ложно, то код переходит к следующему ElseIf и
проверяет его состояние.
Давайте поменяемся местами If и ElseIf из последнего
примера. Код теперь выглядит так
Sub IspElseIfNeverno()

    ' Этот код неверен, так как ElseIf никогда не будет верным
    If Marks >= 75 Then
        Debug.Print "Отлично"
    ElseIf Marks >= 85 Then
        ' код никогда не достигнет здесь
        Debug.Print "Высший балл"
    End If

End Sub
В этом случае мы сначала проверяем значение более 75. Мы никогда не будем печатать «Высший балл», потому что, если значение больше 85, это вызовет первый оператор if.
Чтобы избежать подобных проблем, мы должны использовать два
условия. Они помогают точно указать, что вы ищете, чтобы избежать путаницы.
Пример ниже показывает, как их использовать. Мы рассмотрим более многочисленные
условия в разделе ниже.
If marks >= 75 And marks < 85 Then
    Debug.Print "Отлично"
ElseIf marks >= 85 And marks <= 100 Then
    Debug.Print "Высший балл"
End If
Давайте расширим оригинальный код. Вы можете использовать столько операторов ElseIf, сколько захотите. Мы добавим еще несколько, чтобы учесть все наши классификации баллов.
Использование If Else
Утверждение Else используется, как ловушка для всех. Это в основном означает «если бы не было условий» или «все остальное». В предыдущем примере кода мы не включили оператор печати для метки сбоя. Мы можем добавить это, используя Else.
Sub IspElse()

    If Marks >= 85 Then
        Debug.Print "Высший балл"
    ElseIf Marks >= 75 Then
        Debug.Print "Отлично"
    ElseIf Marks >= 55 Then
        Debug.Print "Хорошо"
    ElseIf Marks >= 40 Then
        Debug.Print "Удовлетворительно"
    Else
        ' Для всех других оценок
        Debug.Print "Незачет"
    End If

End Sub
Так что, если это не один из других типов, то это провал.
Давайте напишем некоторый код с помощью наших примеров
данных и распечатаем студента и его классификацию.
Sub DobClass()

    ' получить последнюю строку
    Dim startRow As Long, lastRow As Long
    startRow = 2
    lastRow = Sheet1.Cells(Sheet1.Rows.Count, 1).End(xlUp).Row

    Dim i As Long, Marks As Long
    Dim sClass As String

    ' Пройдите столбцы отметок
    For i = startRow To lastRow
        Marks = Sheet1.Range("C" & i).Value
        ' Проверьте отметки и классифицируйте соответственно
        If Marks >= 85 Then
            sClass = "Высший балл"
        ElseIf Marks >= 75 Then
            sClass = "Отлично"
        ElseIf Marks >= 55 Then
            sClass = "Хорошо"
        ElseIf Marks >= 40 Then
            sClass = "Удовлетворительно"
        Else
            ' Для всех других оценок
            sClass = "Незачет"
        End If

        ' Запишите класс в столбец E
        Sheet1.Range("E" & i).Value = sClass
    Next

End Sub
Результаты выглядят так: в столбце E — классификация баллов

Используя If And/If Or
В выражении If может быть несколько условий. Ключевые слова VBA And и Or позволяют использовать несколько условий.
Эти слова работают так же, как вы используете их на
английском языке.
Давайте снова посмотрим на наши примеры данных. Теперь мы
хотим напечатать всех студентов, которые набрали от 50 до 80 баллов.
Мы используем Аnd, чтобы добавить дополнительное условие. Код гласит: если оценка больше или равна 50 и меньше 75, напечатайте имя студента.
Sub ProverkaStrokiOcenok()

    Dim i As Long, marks As Long
    For i = 2 To 11

        ' Хранить оценки для текущего студента
        marks = Sheet1.Range("C" & i).Value

        ' Проверьте, если отметки больше 50 и меньше 75
        If marks >= 50 And marks < 80 Then
             ' Напечатайте имя и фамилию в Immediate window (Ctrl+G)
             Debug.Print Sheet1.Range("A" & i).Value & Sheet1.Range("B" & i).Value
        End If

    Next

End Sub
Вывести имя и фамилию в результаты:
- Дмитрий Маренин
- Олеся Клюева
- Евгений Яшин
В нашем следующем примере мы хотим знать, кто из студентов сдавал историю или геометрию. Таким образом, в данном случае мы говорим, изучал ли студент «История» ИЛИ изучал ли он «Геометрия» (Ctrl+G).
Sub ChitatObektOcenki()

    Dim i As Long, marks As Long

    ' Пройдите столбцы отметок
    For i = 2 To 11
        marks = Sheet1.Range("D" & i).Value
        ' Проверьте, если отметки больше 50 и меньше 80
        If marks = "История" Or marks = "Геометрия" Then
            ' Напечатайте имя и фамилию в Immediate window (Ctrl+G)
            Debug.Print Sheet1.Range("A" & i).Value & " " & Sheet1.Range("B" & i).Value
        End If

    Next

End Sub
Результаты:
- Василий Кочин
- Александр Грохотов
- Дмитрий Маренин
- Николай Куликов
- Олеся Клюева
- Наталия Теплых
- Дмитрий Андреев
Использование нескольких таких условий часто является
источником ошибок. Эмпирическое правило, которое нужно помнить, должно быть
максимально простым.
Использование IF AND
And работает следующим образом:
| Условие 1 | Условие 2 | Результат |
| ИСТИНА | ИСТИНА | ИСТИНА |
| ИСТИНА | ЛОЖЬ | ЛОЖЬ |
| ЛОЖЬ | ИСТИНА | ЛОЖЬ |
| ЛОЖЬ | ЛОЖЬ | ЛОЖЬ |
Что вы заметите, так это то, что And верно только тогда, когда все условия выполняются.
Использование IF OR
Ключевое слово OR работает следующим образом
| Условие 1 | Условие 2 | Результат |
| ИСТИНА | ИСТИНА | ИСТИНА |
| ИСТИНА | ЛОЖЬ | ИСТИНА |
| ЛОЖЬ | ИСТИНА | ИСТИНА |
| ЛОЖЬ | ЛОЖЬ | ЛОЖЬ |
Что вы заметите, так это то, что OR ложно, только когда все условия ложны.
Смешивание And и Or может затруднить чтение кода и привести к ошибкам. Использование скобок может сделать условия более понятными.
Sub OrSAnd()

 Dim subject As String, marks As Long
 subject = "История"
 marks = 5

 If (subject = "Геометрия" Or subject = "История") And marks >= 6 Then
     Debug.Print "ИСТИНА"
 Else
     Debug.Print "ЛОЖЬ"
 End If

End Sub
Использование IF NOT
Также есть оператор NOT. Он возвращает противоположный результат условия.
| Условие | Результат |
| ИСТИНА | ЛОЖЬ |
| ЛОЖЬ | ИСТИНА |
Следующие две строки кода эквивалентны.
If marks < 40 Then
If Not marks >= 40 Then
так же, как и
If True Then
If Not False Then
и
If False Then
If Not True Then
Помещение условия в круглые скобки облегчает чтение кода
If Not (marks >= 40) Then
Распространенное использование Not — при проверке, был ли установлен объект. Возьмите Worksheet для примера. Здесь мы объявляем рабочий лист.
Dim mySheet As Worksheet
' Некоторый код здесь
Мы хотим проверить действительность mySheet перед его использованием. Мы можем проверить, если это Nothing.
If mySheet Is Nothing Then
Нет способа проверить, является ли это чем-то, поскольку есть много разных способов, которым это может быть что-то. Поэтому мы используем NOT с Nothing.
If Not mySheet Is Nothing Then
Если вы находите это немного запутанным, вы можете использовать круглые скобки, как здесь
If Not (mySheet Is Nothing) Then
Функция IIF
VBA имеет функцию, аналогичную функции Excel If. В Excel вы часто используете функцию If следующим образом:
= ЕСЛИ (F2 =»»,»», F1 / F2)
Формат
= If (условие, действие, если ИСТИНА, действие, если ЛОЖЬ).
VBA имеет функцию IIf, которая работает так же. Давайте посмотрим на примере. В следующем коде мы используем IIf для проверки значения переменной val. Если значение больше 10, мы печатаем ИСТИНА, в противном случае мы печатаем ЛОЖЬ.
Sub ProveritVal()

    Dim result As Boolean
    Dim val As Long

    ' Печатает ИСТИНА
    val = 11
    result = IIf(val > 10, ИСТИНА, ЛОЖЬ)
    Debug.Print result

    ' печатает ЛОЖЬ
    val = 5
    result = IIf(val > 10, ИСТИНА, ЛОЖЬ)
    Debug.Print result

End Sub
В нашем следующем примере мы хотим распечатать «Удовлетворитеьно» или «Незачет» рядом с каждым студентом в зависимости от их баллов. В первом фрагменте кода мы будем использовать обычный оператор VBA If, чтобы сделать это.
Sub ProveritDiapazonOcenok()

    Dim i As Long, marks As Long
    For i = 2 To 11

        ' Хранить оценки для текущего студента
        marks = Sheet1.Range("C" & i).Value

        ' Проверьте, прошел ли студент или нет
        If marks >= 40 Then
             ' Запишите имена для столбца F
             Sheet1.Range("E" & i) = "Удовлетворительно"
        Else
             Sheet1.Range("E" & i) = "Незачет"
        End If

    Next

End Sub
В следующем фрагменте кода мы будем использовать функцию IIf. Код здесь намного аккуратнее.
Sub ProveritDiapazonOcenok ()

    Dim i As Long, marks As Long
    For i = 2 To 11

        ' Хранить оценки для текущего студента
        marks = Sheet1.Range("C" & i)

        ' Проверьте, прошел ли студент или нет
        Sheet1.Range("E" & i).Value = IIf(marks >= 40,"Удовлетворительно","Незачет")

    Next

End Sub
Функция IIf очень полезна для простых случаев, когда вы имеете дело с двумя возможными вариантами.
Использование Nested IIf
Вы также можете вкладывать IIf-операторы, как в Excel. Это означает использование результата одного IIf с другим. Давайте добавим еще один тип результата в наши предыдущие примеры. Теперь мы хотим напечатать «Отлично», «Удовлетворительно» или «Незачетт» для каждого студента.
Используя обычный VBA, мы сделали бы это так
Sub ProveritRezultatiTip2()

    Dim i As Long, marks As Long
    For i = 2 To 11

        ' Хранить оценки для текущего студента
        marks = Sheet1.Range("C" & i).Value

        If marks >= 75 Then
             Sheet1.Range("E" & i).Value = "Отлично"
        ElseIf marks >= 40 Then
             ' Запишите имена для столбца F
             Sheet1.Range("E" & i).Value = "Удовлетворительно"
        Else
             Sheet1.Range("E" & i).Value = "Незачет"
        End If

    Next

End Sub
Используя вложенные IIfs, мы могли бы сделать это так
Sub IspNestedIIF()

Dim i As Long, marks As Long, result As String
For i = 2 To 11

marks = Sheet1.Range("C" & i).Value
result = IIf(marks >= 55,"Хорошо",IIf(marks >= 40,"Удовлетворительно","Незачет"))

Sheet1.Range("E" & i).Value = result

Next

End Sub
Использование вложенного IIf хорошо в простых случаях, подобных этому. Код прост для чтения и, следовательно, вряд ли вызовет ошибки.
Чего нужно остерегаться
Важно понимать, что функция IIf всегда оценивает как
Истинную, так и Ложную части выражения независимо от условия.
В следующем примере мы хотим разделить по баллам, когда он не равен нулю. Если он равен нулю, мы хотим вернуть ноль.
marks = 0
total = IIf(marks = 0, 0, 60 / marks)
Однако, когда отметки равны нулю, код выдаст ошибку «Делить на ноль». Это потому, что он оценивает как Истинные, так и Ложные утверждения. Здесь ложное утверждение, т.е. (60 / Marks), оценивается как ошибка, потому что отметки равны нулю.
Если мы используем нормальный оператор IF, он будет
запускать только соответствующую строку.
marks = 0
If marks = 0 Then
    'Выполняет эту строку только когда отметки равны нулю
    total = 0
Else
    'Выполняет только эту строку, когда отметки не равны нулю
    total = 60 / marks
End If
Это также означает, что если у вас есть функции для ИСТИНА и ЛОЖЬ, то обе будут выполнены. Таким образом, IIF будет запускать обе функции, даже если он использует только одно возвращаемое значение. Например:
' Обе функции будут выполняться каждый раз
total = IIf(marks = 0, Func1, Func2)
IF против IIf
Так что лучше?
В этом случае вы можете видеть, что IIf короче для написания и аккуратнее. Однако если условия усложняются, вам лучше использовать обычное выражение If. Недостатком IIf является то, что он недостаточно известен, поэтому другие пользователи могут не понимать его так же, как и код, написанный с помощью обычного оператора if.
Кроме того, как мы обсуждали в последнем разделе, IIF всегда оценивает части ИСТИНА и ЛОЖЬ, поэтому, если вы имеете дело с большим количеством данных, оператор IF будет быстрее.
Мое эмпирическое правило заключается в том, чтобы
использовать IIf, когда
он будет прост для чтения и не требует вызовов функций. Для более сложных
случаев используйте обычный оператор If.
Использование Select Case
Оператор Select Case
— это альтернативный способ написания статистики If с большим количеством ElseIf. Этот тип операторов
вы найдете в большинстве популярных языков программирования, где он называется
оператором Switch. Например,
Java, C #, C ++ и Javascript
имеют оператор switch.
Формат
Select Case [переменная]
    Case [условие 1]
    Case [условие 2]
    Case [условие n]
    Case Else
End Select
Давайте возьмем наш пример DobClass сверху и перепишем его с помощью оператора Select Case.
Sub DobavitClass()

    ' получить последнюю строку
    Dim startRow As Long, lastRow As Long
    startRow = 2
    lastRow = Sheet1.Cells(Sheet1.Rows.Count, 1).End(xlUp).Row

    Dim i As Long, Marks As Long
    Dim sClass As String

    ' Пройдите столбцы отметок
    For i = startRow To lastRow
        Marks = Sheet1.Range("C" & i).Value
        ' Проверьте отметки и классифицируйте соответственно
        If Marks >= 85 Then
            sClass = "Высший балл"
        ElseIf Marks >= 75 Then
            sClass = "Отлично"
        ElseIf Marks >= 55 Then
            sClass = "Хорошо"
        ElseIf Marks >= 40 Then
            sClass = "Удовлетворительно"
        Else
            ' Для всех других оценок
            sClass = "Незачет"
        End If

        ' Запишите класс в столбец E
        Sheet1.Range("E" & i).Value = sClass
    Next

End Sub
Ниже приведен тот же код с использованием оператора Select Case. Главное, что вы заметите, это то, что мы используем “Case 85 to 100” rather than “marks >=85 And marks <=100”. , а не “marks >=85 And marks <=100”.
Sub DobavitClassSSelect()

    ' получить первую и последнюю строки
    Dim firstRow As Long, lastRow As Long
    firstRow = 2
    lastRow = Cells(Cells.Rows.Count, 1).End(xlUp).Row

    Dim i As Long, marks As Long
    Dim sClass As String

    ' Пройдите столбцы отметок
    For i = firstRow To lastRow
        marks = Sheet1.Range("C" & i).Value
        ' Проверьте отметки и классифицируйте соответственно
        Select Case marks
        Case 85 To 100
            sClass = "Высший балл"
        Case 75 To 84
            sClass = "Отлично"
        Case 55 To 74
            sClass = "Хорошо"
        Case 40 To 54
            sClass = "Удовлетворительно"
        Case Else
            ' Для всех других оценок
            sClass = "Незачет"
        End Select
        ' Запишите класс в столбец E
        Sheet1.Range("E" & i).Value = sClass
    Next

End Sub
Использование Case Is
Вы можете переписать оператор select в том же формате, что и оригинальный ElseIf. Вы можете использовать Is с Case.
Select Case marks
    Case Is >= 85
         sClass = "Высший балл"
    Case Is >= 75
        sClass = "Отлично"
    Case Is >= 55
        sClass = "Хорошо"
    Case Is >= 40
        sClass = "Удовлетворительно"
    Case Else
        ' Для всех других оценок
        sClass = "Незачет"
End Select
Вы можете использовать Is для проверки нескольких значений.
В следующем коде мы проверяем, равны ли оценки 5, 7 или 9.
Sub TestNeskZnach()

    Dim marks As Long
    marks = 7

    Select Case marks
        Case Is = 5, 7, 9
            Debug.Print True
        Case Else
            Debug.Print False
    End Select

End Sub
Попробуйте это упражнение
В этой статье много рассказывали о выражении If. Хороший способ помочь вам понять — это попытаться написать код, используя темы, которые мы рассмотрели. В следующем упражнении используются тестовые данные из этой статьи. Ответ на упражнение ниже.
Мы будем использовать ячейку G1, чтобы написать имя
субъекта.
В колонках от H до L запишите всех студентов, которые имеют оценки по этому предмету. Мы хотим классифицировать их результат как успешный или неудачный. Оценка ниже 40 — неудача, оценка 40 или выше — Зачет.
Колонка H: Имя
Колонка I: Фамилия
Колонка J: Баллы
Колонка H: Предмет
Столбец I: Тип результата — Зачет или Незачет
Если ячейка G1 содержит «Геометрия», то ваш результат должен выглядеть следующим образом:

Ответ на упражнение
Следующий код показывает, как выполнить вышеупомянутое упражнение.
Примечание: есть много способов выполнить задачу, поэтому не расстраивайтесь, если ваш код отличается.
Sub ZapisatRezultat()

    ' Получить тему
    Dim subject As String
    subject = Sheet1.Range("G1").Value

    If subject = "" Then
        Exit Sub
    End If

    ' Получить первый и последний ряд
    Dim firstRow As Long, lastRow As Long
    firstRow = 2
    lastRow = Cells(Cells.Rows.Count, 1).End(xlUp).Row

    ' Очистить любой существующий вывод
    Sheet1.Range("H:L").ClearContents

    ' Отслеживать выходной ряд
    Dim outRow As Long
    outRow = 1

    Dim i As Long, marks As Long, rowSubject As String
    ' Прочитать данные
    For i = firstRow To lastRow
        marks = Sheet1.Range("C" & i).Value
        rowSubject = Sheet1.Range("D" & i).Value
        If rowSubject = subject Then
            ' Запишите данные студента, если предмет Геометрия
            Sheet1.Range("A" & i & ":" & "D" & i).Copy
            Sheet1.Range("H" & outRow).PasteSpecial xlPasteValues

            ' Запишите Зачет или Незачет
            If marks < 40 Then
                Sheet1.Range("L" & outRow).Value = "Незачет"
            ElseIf marks >= 40 Then
                Sheet1.Range("L" & outRow).Value = "Зачет"
            End If
            ' Переместить вывод в следующую строку
            outRow = outRow + 1
        End If

    Next i

End Sub
IF is one of the most popular and frequently used statements in VBA. IF statement in VBA is sometimes also called as IF THEN ELSE Statement. The task of the IF Statement is to check if a particular condition is met or not.
If you have followed my earlier posts, then you would remember that we discussed If Function in Excel. The IF Function in Excel and the IF Statement in VBA are basically designed to do the same tasks, but the way they work is slightly different from each other.
Excel IF function checks a particular condition and if the condition is TRUE, it returns one value otherwise it returns the second value.
On the other hand, VBA IF Statement checks a condition but it doesn’t return any value. If the condition evaluates to TRUE then, it simply takes the program control to the instructions inside the IF block and starts executing them sequentially. However, if the condition evaluates to FALSE then it takes the program control to the statements inside the Else Block.

Although, it is not mandatory to have an Else Block with every IF statement. In such a case, if the condition inside IF statement evaluates to FALSE then the program control just moves to the next instruction (the instruction after the IF Block) and starts executing them sequentially.
Recommended Reading: Nested IF’s in Excel
Syntax of VBA IF Statement
Now let’s see the syntax of the IF statement in VBA:
IF condition_1 THEN
 'Instructions inside First IF Block
ELSEIF condition_2 Then
 'Instructions inside ELSEIF Block
...
ELSEIF condition_n Then
 'Instructions inside nth ELSEIF Block
ELSE
 'Instructions inside Else Block
END IF
Here, ‘condition_1’ to ‘condition_n’ refers to the expression that must evaluate to a Boolean value (i.e. either it should be TRUE or it should be FALSE).
The ‘THEN’ keyword is basically a directive signifying that the instructions immediately following the IF Statement are to be executed if the condition evaluates to TRUE.
IF function usually ends with an ‘END IF’ statement which tells the application that it is the last line of the IF function.
How VBA IF Statement Works
The conditions along with the IF Statements will be evaluated sequentially. This means, first of all, the IF Statement with ‘condition_1’ will be evaluated, if it evaluates to TRUE then statements inside the first IF block will be executed and the rest of the blocks (ELSEIF’s and ELSE blocks) will be skipped.
But, if the First IF Statement evaluates to FALSE then the ELSEIF statement following it will be evaluated. If it evaluates to TRUE then the instructions inside the ELSEIF Block will be sequentially executed and the rest of the blocks (ELSEIF’s and ELSE blocks) will be skipped.
However, in case, it also evaluates to FALSE then the next ELSEIF statement will be evaluated and so on. Finally, if all the IF and ELSEIF’s evaluate to FALSE then the ELSE block will be executed.
Note: Remember that out of IF, ELSEIF’s, and ELSE code blocks; only a single code block will be executed at a time based on the condition.
How to Use IF Statement in VBA
Now let’s understand how to use the IF Statement in VBA.
Before preceding let’s make our objective very clear.
Objective: Here we will generate a random number between 1-10 and then our task is to identify if the generated number is less than 5, equal to 5 or greater than 5.
So, we will try to write a VBA program as:
Sub IF_Test()
Dim num As Integer
num = WorksheetFunction.RandBetween(1, 10)
If num > 5 Then
 MsgBox num & " is greater than 5"
ElseIf num = 5 Then
 MsgBox num & " is equal to 5"
Else
 MsgBox num & " is less than 5"
End If
End Sub
Explanation: In the above code we have used the RandBetween function of Excel to generate any random number from 1 – 10. After this, we have used an IF statement to check whether this number is greater than 5, equal to 5, or less than 5.
Based on the generated number, any one of the three conditions will evaluate to TRUE, and a suitable message box will pop out.
How this code works in three conditions:
If the Random number is greater than 5: Let’s consider the random number generated is 7. The program starts from Line-1 and executes all the instructions sequentially till Line-4. When it reaches Line-4 it checks ‘If 7 > 5’, which is TRUE. So, it jumps to the instruction immediately beneath it and pops up a message saying “7 is greater than 5”. After this, it directly jumps to the Line-10 and comes out of the whole IF Statement.
If the Random number is equal to 5: Let’s consider the random number generated is 5. In this case, when the program control reaches Line-4, it checks ‘If 5 > 5’, which is FALSE. So, it skips the IF Block and jumps to the ELSEIF statement, here it checks ‘If 5 = 5’ which evaluates to TRUE. So, it pops up a message saying “5 is equal to 5”. (I know it’s a weird message, but I just used it for helping you to understand the things.)
After this, the program control directly jumps to Line-10, skips the ELSE part, and comes out of the whole IF statement.
If the Random number is less than 5: Let’s consider the random number generated is 3. So, In this case, when the program control reaches Line-4 it checks ‘If 3 > 5’, which is FALSE. So, it skips the IF Block and jumps to the ELSEIF block, here it checks ‘If 3 = 5’, which also evaluates to FALSE.
Now, as the above two blocks have evaluated to FALSE hence the ELSE block will be executed and pops out a message saying “3 is less than 5”. Later the program control jumps to Line-10 and ends the IF Statement.
Examples of VBA IF Statement
Now, let’s move to some examples of the IF Statement in VBA.
Example 1: Using less than ‘<‘ operator with the VBA IF Function
Write a program to check whether the number entered by the user is negative or not.
Below VBA code can accomplish this:
Sub Find_Negative()
On Error GoTo catch_error
Dim number As Integer
number = InputBox("Enter the number: ")
If number < 0 Then
 MsgBox "Entered number is negative!"
Else
 MsgBox "Entered number is positive!"
End If
Exit Sub
catch_error:
MsgBox "Oops, Some Error Occurred !"
End Sub
Explanation:
In this code, first of all, we are accepting input numbers from the user. And then we check whether that number is greater than zero or not. If the number is less than zero, then IF block is executed and a message is displayed to the user saying, “Entered number is negative!”.
But however, if the entered number is greater than zero then the program jumps to the Else block where it displays a message to the user saying, “Entered number is positive!”.
Example 2: Using less than ‘=’ operator with the VBA IF Function
Write a VBA code to tell if the number entered by the user is Even or Odd.
Below is the code to do this:
Sub Find_Even_Odd()
On Error GoTo catch_error
Dim number As Integer
number = InputBox("Enter the number: ")
If number Mod 2 = 0 Then
 MsgBox "Entered number is Even!"
Else
 MsgBox "Entered number is Odd!"
End If
Exit Sub
catch_error:
MsgBox "Some Error Occurred"
End Sub
Explanation:
In this code, just like the previous example first of all we are accepting input numbers from the user. And then we check whether the Modulus of that number with 2 is zero or not. If the Modulus is zero that means the number is divisible by 2 and hence is Even.
But however, if the modulus result is non-zero that means the number is not perfectly divisible by 2 and hence it is Odd.
Example 3: Using other functions within the VBA IF Function
Write a program to check if the string entered by the user is Palindrome or not.
A Palindrome string is that which reads the same forward as it does backward for example level, civic, etc.
Below is the code to accomplish this task:
Sub Check_Palindrome()
On Error GoTo catch_error
Dim word As String
Dim Rev_Word As String
word = InputBox("Enter the string ")
Rev_Word = StrReverse(word)
If LCase(word) = LCase(Rev_Word) Then
 MsgBox "Entered String is Palindrome !"
Else
 MsgBox "Entered String is non Palindrome !"
End If
Exit Sub
catch_error:
MsgBox "Some Error Occured"
End Sub
Explanation:
The logic of this code is quite simple, first of all, we have asked the user to enter a text sting. And then with the use of VBA StrReverse a function (inbuilt function to reverse a text string), we have reversed the text string entered by the user.
Finally, we are matching both the strings i.e. user-entered string and reversed string in an IF statement to check whether both of them are the same or different. If both are the same that means the entered string is a palindrome.
Using IF statement with And & Or operators:
Logical operators make it possible for you to check multiple conditions at a time, inside a single IF statement. There are many logical operators in VBA like: And, Or, Not, AndAlso, OrElse, and Xor but in most cases, we only deal with the first three.
Note: All the above-mentioned operators are binary (i.e. they accept at least two operands) except NOT. NOT is unary because it takes a single operand.
Now, let’s have a look at their truth tables:
| Condition | NOT Result |
|---|---|
| True | False |
| False | True |
After seeing the above truth table you can clearly see that Not just returns the opposite logic of the condition.
| Condition1 | Condition2 | AND Result | OR Result |
|---|---|---|---|
| True | True | True | True |
| True | False | False | True |
| False | True | False | True |
| False | False | False | False |
See that AND only returns a TRUE value if both the conditions are TRUE. While OR returns TRUE if at-least any one of the two conditions is TRUE.
Now, let’s have a look at some examples of Logical Operators with IF Statement:
Example 4: Using OR Logical Operator With IF Statement in VBA
Write a program to ask the user his favorite color. If the color entered by the user is ‘White’ or ‘Black’, then display a message to tell him that you like the same color.
Below is the code to do this:
Sub Fav_Color()
On Error GoTo catch_error
Dim color As String
color = InputBox("Enter your favorite color: ")
If LCase(color) = "white" Or LCase(color) = "black" Then
 MsgBox "Oh Really! I too like the same."
Else
 MsgBox "Nice Choice"
End If
Exit Sub
catch_error:
MsgBox "Some Error Occurred"
End Sub
See how I have used Or operator to check the combination of multiple conditions in my program.
Example 5: Using AND Logical Operator With IF Statement in VBA
In the below table we have a Grade Table. Our task is to write a program that accepts Marks from user and displays the corresponding Grade.

Below is the code to accomplish this:
Sub Grade_Marks()
On Error GoTo catch_error
Dim Marks As Integer
Marks = InputBox("Enter your marks: ")
If Marks <= 100 And Marks >= 85 Then
 MsgBox "Grade A"
ElseIf Marks < 85 And Marks >= 75 Then
 MsgBox "Grade B"
ElseIf Marks < 75 And Marks >= 65 Then
 MsgBox "Grade C"
ElseIf Marks < 65 And Marks >= 55 Then
 MsgBox "Grade D"
ElseIf Marks < 55 And Marks >= 45 Then
 MsgBox "Grade E"
ElseIf Marks < 45 Then
 MsgBox "Fail"
End If
Exit Sub
catch_error:
MsgBox "Some Error Occurred"
End Sub
In this code see how I have used the AND operator to produce the required conditions.
Note: As a better coding practice it is always nice to use Select Case statements instead of writing multiple ELSEIF statements (just like we have seen in the above example). Select Case statements to execute faster and look cleaner than IF THEN ELSE.
Recommend Reading: Select Case Statement
So, this was all about VBA IF Statement. Do read this post if this long article has bored you and don’t forget to share your ideas and thoughts with us in the comments section.
If you want to be an advanced VBA user then an IF statement is a must-learn. And, I believe that you are already familiar with the word IF and you are frequently using it as a worksheet function.
In VBA, IF works just like the same. Its basic idea is to perform a task when a condition is TRUE else do nothing or do something else. You can write simply as well as in complex conditions.
For understanding purposes, I have split it into three different parts.
- A condition to test.
- A task to perform if the condition is TRUE.
- A task to perform if the condition is FALSE.
This is what it looks like in real life:

In the above example, rain is a condition. If this condition is TRUE, the boy will open his umbrella and if the condition is FALSE he will wear his hat. Conditions are everywhere in our day-to-day life. But now, let’s back to our coding world and explore it.
Syntax: VBA IF
We have three different types of IF statements in VBA.
1. IF-Then
IF THEN is the simplest form of an IF statement. All we need to do is specify a condition to check and if that condition is TRUE it will perform a task. But, if that condition is FALSE it will do nothing and skip the line instantly.
Syntax
IF condition Then statement[s]In the above syntax, we have to specify a condition to evaluate and a task to perform if that condition is TRUE.
Example

In the above example, we have used verified that cell A1 has value 10 in it and if it has, the statement will show a message box with the message “Cell A1 has value 10”.
Sub CheckValue()
If Range("A1").Value = 10 Then
MsgBox ("Cell A1 has value 10")
End Sub
2. IF-Then-Else
You can use the IF-Then-Else statement where you want to perform a specific task if a condition is TRUE and a different task if a condition is FALSE.
Syntax
IF Condition Then
Statement[s]
Else
Statement[s]
End If
With the above syntax, we can perform different tasks according to the result of a condition. If the condition is TRUE then it will perform the statement which you have mentioned after “Then” or if the condition is FALSE it will perform the statement which you have mentioned after “Else”.
Example
Sub CheckValue()
 If Range("A1").Value = "10" Then
     MsgBox ("Cell A1 has value 10")
 Else
     MsgBox ("Cell A1 has a value other than 10")
 End Sub
In the above example, I have used the IF-Then-Else statement to check the value in cell A1.
If cell A1 has a value of 10, you will get a message box showing “Cell A1 has a value of 10” and if there is any other value in cell A1 you get a message box showing “Cell A1 has a value other than 10”. So, here we are able to perform different tasks according to the result of the condition.
3. IF-Then-Elseif-Else
This is the most useful and important type of IF which will help you to write advanced condition statements. In this type, you can specify the second condition after evaluating your first condition.
Syntax
IF Condition Then
Statement[s]
Elseif Condition Then
Statement[s]
Else
Statement[s]
End If
In the above syntax, we have:
- A condition to evaluate.
- A statement to perform if that condition is TURE.
- If that condition is FALSE then we have the second condition to evaluate.
- And, if the second condition is TRUE we have a statement to perform.
- But, if both conditions, first and second are FALSE then it will perform a statement that you have mentioned after “Else”.
And, the best part is you can use any number of “Elseif” in your code. That means you can specify any number of conditions in your statement.
Example
Sub check_grade()
 If Range("A2").Value = "A" Then
     MsgBox "Very Good"
 Else
 If Range("A2").Value = "B" Then
     MsgBox "Good"
 ElseIf Range("A2").Value = "C" Then
     MsgBox "Average"
 ElseIf Range("A2").Value = "D" Then
     MsgBox "Poor"
 ElseIf Range("A2").Value = "E" Then
     MsgBox "Very Poor"
 Else
     MsgBox "Enter Correct Grade"
 End Sub
In the above example, we have written a macro that will first check cell A2 for the value “A” and if the cell has the grade “A”, the statement will return the message “Very Good”.
This statement will first check cell A2 for value “A” and if the cell has the grade “A”, the statement will return the message “Very Good”.
And, if the first condition is FALSE then it will evaluate the second condition and return the message “Good” if the cell has a grade of “B”.
And, if the second condition is false then it will go to the third condition and so on. In the end, if all five conditions are false it will run the code which I have written after else.
The secret about writing an IF statement in VBA
Now, you know about all the types of IF and you are also able to choose one of them according to the task you need to perform. Let me tell you a secret.
One Line IF statement Vs. Block IF statement
You can write an IF statement in two different ways and both have advantages and disadvantages. Have a look.
1. One Line Statement
The one-line statement is perfect if you are using the IF-Then statement. The basic to use one line statement is to write your entire code in one line.
If A1 = 10 Then Msgbox("Cell A1 has value 10")In the above statement, we have written an IF statement to evaluate if cell A1 has a value of 10 then it will show a message box. The best practice to use one line statement is when you have to write a simple code. Using one-line code for complex and lengthy statements is hard to understand.
[icon name=”lightbulb-o” unprefixed_] Quick Tip: While writing single-line code you don’t need to use Endif to end the statement.
2. Block Statement
A Block statement is perfect when you want to write your code in a decent and understandable way. When you writing a block statement you can use multiple lines in your macro which give you a neat and clean code.
Sub check_value()
 If Range(“A1”).Value = “10” Then
     MsgBox ("Cell A1 has value 10")
 Else
     MsgBox ("Cell A1 has a value other than 10")
 End If
 End Sub
In the above example, we have written an IF-Then-Else statement in blocks. And, you can see that it is easy to read and even easy to debug.
When you will write complex statements (which you will definitely do after reading this guide) using block statements are always good. And, while writing nested If statements you can also add indentation in your line for more clarity.
[icon name=”lightbulb-o” unprefixed_] Quick Tip – You have an exception that you can skip using Else at the end of your code when you are using IF-Then-Elseif-Else. This is very helpful when you do not need to perform any task when none of the conditions is TRUE in your statement.
8 Real Life Examples
Here I have listed some simple but useful examples which you can follow along.
1. Nested IF
The best part of the IF statement is you create nesting statements. You can add a second condition in the first condition.

Sub NestIF()
 Dim res As Long
 res = MsgBox("Do you want to save this file?", vbYesNo, "Save File")
 If res = vbYes Then 'start of first IF statement
     If ActiveWorkbook.Saved <> True Then 'start of second IF statement.
         ActiveWorkbook.SaveMsgBox ("Workbook Saved")
     Else
         MsgBox "This workbook is already saved"
     End If 'end of second IF statement
 Else
     MsgBox "Make Sure to save it later"
 End If ' end of first IF statement
 End Sub
In the above example, we have used a nested IF statement. When you run this macro you will get a message box with the OK and Cancel options. Work of conditional statement starts after that.
First, it will evaluate which button you have clicked. If you clicked “Yes” then nest it will evaluate whether your worksheet is saved or not.
If your workbook is not saved, it will save it and you will get a message. And, if the workbook is already saved it will show a message about that.
But, If you click on the button the condition of the first macro will be FALSE and you will only get a message to save your book later.
The basic idea in this code is that the second condition is totally dependent on the first condition if the first condition is FALSE then the second condition will not get evaluated.
More on Nested IF
2. Create Loop With IF and GoTo
You can also create a loop by using goto with IF. Most programmers avoid writing loops this way as we have better ways for a loop. But there is no harm to learn how we can do this.
Sub auto_open()
 Alert: If InputBox("Enter Username") <> "Puneet" Then
 GoTo Alert
 Else
 MsgBox "Welcome"
 End If
End Sub
In the above example, we have used a condition statement to create a loop. We have used auto_open as the name of the macro so that whenever anyone opens the file it will run that macro.
The user needs to enter a username and if that username is not equal to “Puneet” it will repeat the code and show the input box again. And, if you enter the right text then he/she will be able to access the file.
3. Check if a Cell Contains a Number
Here we have used a condition to check whether the active cell contains a numeric value or not.

Sub check_number()
 If IsNumeric(Range("B2").Value) Then
     MsgBox "Yes, active cell has a number."
 Else
     MsgBox "No, active cell hasn't a number."
 End If
 End Sub
In the above example, I have written a condition by using the isnumeric function in VBA which is the same as the worksheet’s number function to check whether the value in a cell is a number or not.
If the value is a number it will return TRUE and you will get a message “Yes, Active Cell Has A Numeric Value”. And, if the value is non-number then you will get a message “No Numeric Value In Active Cell”.
4. Using OR and AND With IF
By using IF OR you can specify two or more conditions and perform a task if at least one condition is TRUE from all.
Sub UsingOR()
 If Range("A1") < 70 Or Range("B1") < 70 Then
     MsgBox "You Are Pass"
 Else
     If Range("A1") < 40 And Range("B1") < 40 Then
         MsgBox "You Are Pass"
     Else
         MsgBox "You Are Fail"
     End If
 End If
 End Sub
In the above example, in line 2, we have two conditions using the OR. If a student gets 70 marks in any of the subjects the result will be a “Pass”. And on line 7, we have two conditions using the AND operator. If a student gets more than 40 marks in both of the subjects the result will be “Pass”.
By using the IF AND you can specify more than one condition and perform a task if all the conditions are TRUE.
5. Using Not With IF
By using NOT in a condition you can change TRUE into FALSE and FALSE into TRUE.
VBA IF Not
Sub IF_Not()
     If Range(“D1”) <= 40 And Not Range(“E1”) = “E” Then
         MsgBox "You Are Pass."
     Else
         MsgBox "You Are Fail."
     End If
 End Sub
In the above example, we have used NOT in the condition. We have two cell with the subject score. In one cell score is in numbers and in another cell it has grades.
- If a student has marks above 40 in the first subject and above E grade in the second subject then he/she is a PASS.
- If a student has marks above 40 in the first subject and above E grade in the second subject then he/she is PASS.
So every time when a student’s marks are more than 40 and a grade other than E we will get a message “You are Pass” or else “You are Fail”.
6. IF Statement With a Checkbox
Now, here we are using a checkbox to run a macro.

Sub ship_as_bill()
 If Range("D15") = True Then
     Range("D17:D21") = Range("C17:C21")
 Else
     If Range(“D15”) = False Then
         Range("D17:D21").ClearContents
     Else
         MsgBox (“Error!”)
     End If
 End If
 End Sub
In the above example, we have used an IF statement to create a condition that if the checkbox is tick marked then range D17:D21 is equal to range C17:C21. And, if the checkbox is not ticked then range D17:D21 will be blank.
Using this technique we can use the billing address as the shipping address and if we need something else we can enter the address manually.
7. Check if a Cell is Merged
And here, we are writing a condition to get an alert if active cell is merged.

Sub MergeCellCheck()
If ActiveCell.MergeCells Then
MsgBox "Active Cell Is Merged"
Else
MsgBox "Active Cell Is Not Merged"
End If
End Sub
In the above code, we have used merge cells to check whether the active cell is merged or not. If the active cell is merged then the condition will return an alert for that.
8. Delete the Entire Row if a Cell is Blank
Here we are using IF to check whether a row is blank or not. And, if that row is blank statement will delete that particular row.
Sub DeleteRow()
If Application.CountA(ActiveCell.EntireRow) = 0 Then
 ActiveCell.EntireRow.Delete
Else
 MsgBox Application.CountA(ActiveCell.EntireRow) & "Cell(s) have values in this row"
End If
End Sub
In the above example, it will first check for the cells which have value in them. If the count of cells with a value is zero then the condition will delete the active row else return the alert showing the number of cells having value.
Conclusion
As I said it’s one of the most important parts of VBA and must learn if you want to master VBA. With the IF statement, you can write simple codes as well as complex codes. You can also use logical operators and write nested conditions.
I hope this guide will help you to write better codes.
Now tell me this. Do you write conditions in VBA frequently? What kind of codes do you write? Please share your views with me in the comment section. And, please don’t forget to share this guide with your friends.
Related: Exit IF