
In this article, you’re going to learn 2 easy ways to perform one of the most useful data management tasks: how to insert data from Excel to SQL Server.
Table of contents
- 1. Background
- 2. How to import data from Excel to SQL Server – Copy and Paste method
- a. Step-by-step instructions
- b. How to insert data from Excel to SQL Server with an identity column
- c. Copy and paste data from Excel to SQL Server Views
- d. Excel to SQL Server import on a remote machine
- e. Tips when copying and pasting data from Excel to SQL server
- f. Excel to SQL Server performance
- g. Copy and paste – a quick reference
- 3. How to import data from Excel to SQL Server – SQL Spreads method
- a. Install the SQL Spreads Add-In for Excel
- b. Connect to your database and insert data from Excel
- c. Inserting new rows into SQL Server
- d. Updating existing data in SQL Server
- 4. Other tools and techniques
- 5. Summary – insert data from Excel to SQL Server
Background
Before I founded SQL Spreads (an Excel Add-In to Import and Update SQL Server data from within Excel), I worked as a Business Intelligence consultant for many years using Microsoft’s BI-tools, such as SQL Server, SSIS, Reporting Services, Excel, etc.
I’ve found that when working on different projects, I tend to snap up a number of great-to-know things that I can re-use over and over again. One of these things that I re-use in almost every project is the ability to copy and paste data from Excel into a table in SQL Server.
It’s a really simple and convenient way to quickly import data into a table via SQL Server Management Studio. For example, populating a new dimension table, adding some test data, or inputting any other data that you need to quickly get into a table in SQL Server.
But what if you want to insert data from Excel to SQL without using Management Studio? What if there was a way to do this directly from Excel? This is where the SQL Spreads Excel Add-In that I’ve been working with over the last few years comes in. It makes your Excel to SQL Server import tasks much easier to do!
In this article, I’m therefore going to explain how to insert data from Excel to SQL Server using these 2 easy methods:
- Copy and paste from Excel to SQL tables via SQL Server Management Studio
- Insert directly from Excel to SQL tables using SQL Spreads
How to import data from Excel to SQL Server – Copy and Paste method
Step-by-step Instructions
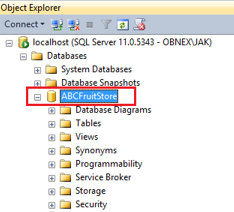
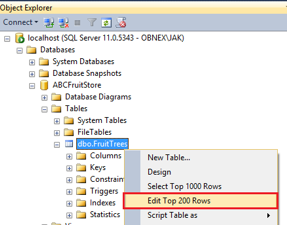
- Open SQL Server Management Studio and connect to your SQL Server database.
- Expand the Databases and the Tables folders for the table where you would like to insert your data from Excel.

- Right-click the table and select the fourth option – Edit Top 200 Rows.

- The data will be loaded and you will see the first 200 rows of data in the table.

- Switch to Excel and select the rows and columns to insert from Excel to SQL Server.
Right-click the selected cells and select Copy.

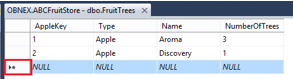
- Switch back to SQL Server Management Studio and scroll down to the last row at the bottom and locate the row with a star in the left-most column.

- Right click the star in the column header and select Paste.

- You have now completed your SQL Server import, and your data from Excel is now in a table in SQL Server!


Remember: Always start with copying and pasting a single row of data from Excel to SQL Server. This is to check that there are no mismatches between your data from Excel and the SQL Server table (such as the number of columns) and that your data in Excel validates with the data types in the SQL Server table. See the section “Tips and tricks” below for more details.
How to insert data from Excel to SQL Server with an identity column
The same technique can also be used to copy and paste data into tables that have an auto-incrementing ID column (identity column).
The thing to keep in mind here is to also include an extra left-most blank column in Excel when copying the data from Excel to SQL Server.
Follow these steps to copy and paste the data from Excel to SQL Server using a table with an auto-incrementing ID column:
- Open SQL Server Management Studio and connect to your SQL Server database.
- Expand the Databases and the Tables folders for the table where you would like to paste the Excel data.
- Right-click the table name and select Edit Top 200 Rows, the fourth option from the top.
- This will bring up a grid with the first 200 rows of data in the table.
- Switch to Excel and select the rows and columns to copy. Do not include the header row.
Now, also remember to include an extra blank left-most column in your selection.

Then, right-click the selected cells and select Copy. - Switch back to SQL Server Management Studio, and select the tab with the 200 rows from your table.
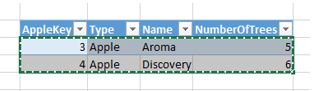
Go to the last row at the bottom and locate the row with a star in the left-most column.
- Right-click on the star and select Paste.
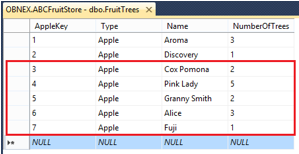
- Your data from Excel is now pasted into your table in SQL Server, and SQL Server will automatically create the values in the ID/key column for you:


Copy and paste data from Excel to SQL Server Views
The copy and paste method also works when your Excel to SQL Server import is to a View as opposed to a Table. The only requirement is that the View should only contain data from one table.
In a View in SQL Server that contains data from several joined tables you cannot insert new rows, but you can update the data, as long as you only update columns that originate from the same base table.
Excel to SQL Server import on a remote machine
When working with SQL Server databases on a remote machine, where you connect to the remote machine using a Remote Desktop Connection, you can still use the same copy and paste technique to move the data from your local machine’s Excel to the SQL Server database on your remote machine.
If you are not able to copy and paste the data into your SQL Server when connected using a Remote Desktop Connection, first check that copy and paste is enabled for the Remote Desktop Connection:
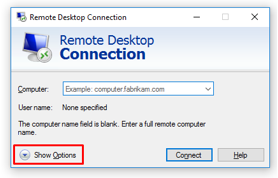
- Open the Remote Desktop Connection.
- Click the Show Options…

- Select the Local Resources tab, and then check that the Clipboard property is checked:

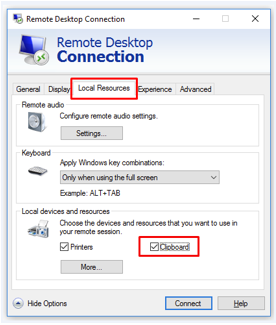
If you still cannot copy and paste data between Excel on your local machine and SQL Server on your remote database server, verify with your server administrator that the copy and paste feature is enabled for the Remote Desktop Connection on the server.
Tips when copying and pasting data from Excel to SQL server
Validating your data – start with one row of data
If the data that you copy from your Excel document does not match the data types of the columns in your SQL Server table, the inserting of the data will be canceled and you will get a warning message. This will happen for every row you paste from Excel to SQL Server. If you paste 500 rows from Excel with the wrong number of columns, you will get one warning message for each and every row that you paste.
To avoid this, the trick is to start to copy only a single row of data and paste it into the SQL Server table. If you get a warning message for incorrect data types, you can correct the mismatch and repeat the copy and paste procedure until all your Excel columns fit into the table in SQL Server. When all columns match, select the remaining rows and paste them all into the SQL Server table in one step.
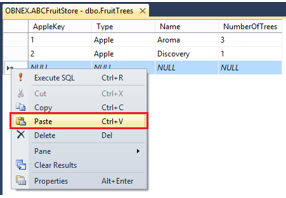
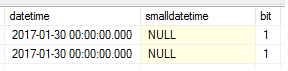
Inserting NULL values from Excel into a SQL Server table
When you have columns in your SQL Server table that allow NULL values, and you want to insert a NULL value into the table, just enter the text NULL into the cell in Excel, and then copy and paste the data from Excel into SQL Server:
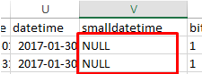
The NULL values will be inserted into the table in SQL Server:
Tables with computed columns
For SQL Server tables containing computed columns, you can paste data from Excel into that table simply by leaving the data for the computed column blank in Excel, and then copying and pasting the data from Excel into the SQL Server table.
How to get the column names from the table in SQL Server to Excel
When you prepare the data in Excel for import into an existing SQL Server table, it is useful to have the column headings and a few rows of sample data as a reference in Excel.
There is a technique where you can copy existing data in SQL Server to Excel and include the table column names as header names.
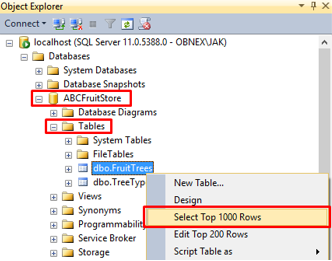
Follow these steps to also include the column names when copying a few rows of data from a SQL Server table into Excel:
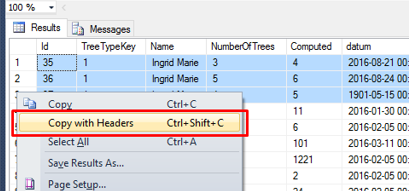
- In SQL Server Management Studio, locate your database and expand the Tables folder.
- Right-click your table name and select the third option – Select Top 1000 rows.

- Select the rows to copy to Excel by holding down the CTRL button and clicking the row numbers on the left side.
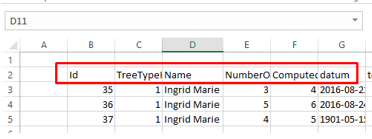
- When your rows are selected, right-click one row and select the Copy with Headers option:

- Go to Excel and paste the data into a cell. The headers from the table in SQL Server will now be added as the first row:

Excel to SQL Server performance
Copying and pasting data from Excel to SQL Server is a really simple method to import data from Excel into your SQL Server database. One of the drawbacks is that it is not the fastest method if you need to insert larger amounts of data, such as several hundred thousand rows of data or more.
To get a reference to the performance limits, I have run a few tests on my local i7 machine with 8 GB of RAM with Microsoft Excel and SQL Server installed on the same machine.
I had the following results: copy data in Excel with 10 columns of mixed data types to SQL Server took about 2 seconds for 100 rows, about 30 seconds for 1000 rows, and about 10 minutes for 20,000 rows.
So, I would say that the limit to use the copy and paste feature is around a few thousand up to a few tens of thousands of rows of data. If you need to perform an Excel to SQL Server import with more data, then you should use the SQL Server Import and Export Wizard.
Copy and paste – a quick reference
- First, copy the data from Excel, and then paste it into the SQL Server table using the Database > Table > Edit top 200 rows menu option.
- Always start by copying and pasting a single row of data to validate the data types.
- For SQL Server tables with an identity column, add an extra blank left-most column before copying from Excel.
- Copy and paste from Excel to SQL Server can be used to insert up to a few tens of thousands of rows of data.
- To get the SQL Server column headers into Excel, right-click the table in SQL Server and select Copy with headers.
- Don’t forget that the technique also works great over Remote Desktop Connections!
How to import data from Excel to SQL Server – SQL Spreads method
This method is ideal for users that don’t want to insert data using SQL Server Management Studio.
Install the SQL Spreads Add-In for Excel
You can download a free trial of SQL Spreads from here.
- Run the SQLSpreadsSetup.exe file and follow the instructions.
- Restart Excel and accept the Add-In confirmation.
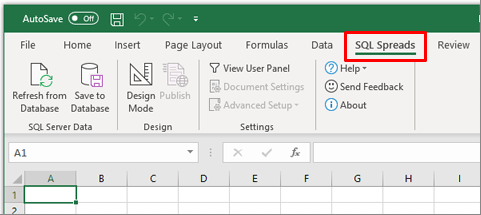
- You will find SQL Spreads in the tab menu in Excel:

For more details about installation, check out the Installing SQL Spreads section of our Knowledgebase.
Connect to your SQL Server database
Once SQL Spreads is installed, you’ll see that it has been added as a new ribbon tab.
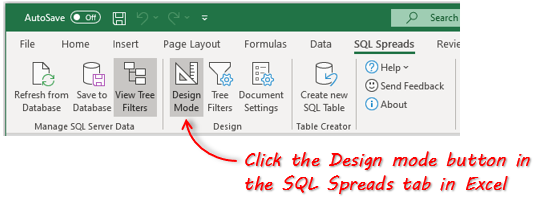
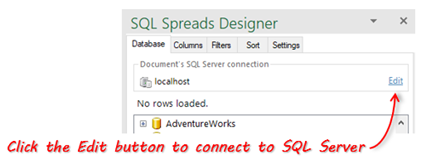
- Click on SQL Spreads and then click the Design Mode button

- In the SQL Spreads Designer panel on the right side, click the Edit button to open the SQL Server connection dialog.

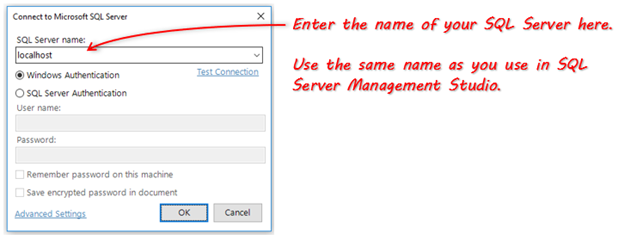
- Enter the name of your SQL Server into the SQL Server name field:

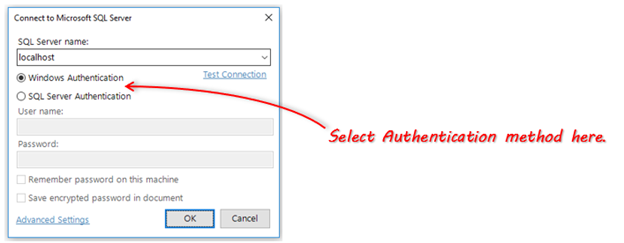
- Select if you should connect using your Windows-login (Windows Authentication) or enter a user name and password (SQL Server Authentication). Windows authentication is the more secure of the two options.

- Click OK. SQL Spreads will try to connect to the database. If the connection is successful, your databases will show up in the SQL Spreads Designer panel.

- Now that we’ve created the connection from Excel to SQL Server, we can select which table of data we want to use in Excel. In the SQL Spreads Designer, click on the database and then select your table.


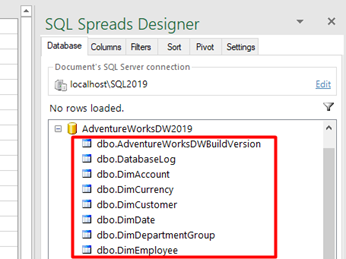
As soon as you select a table, the data in the table is populated in the Excel sheet. You can now see all the data in your SQL Server table and use it in your Excel workbook. The real power with SQL Spreads is the ability to update or add to the data in SQL Server direct from Excel.
Inserting new rows into SQL Server
To import new data into SQL Server, scroll down to the first empty row and either type in your new data or paste a set of rows copied from another Excel workbook:
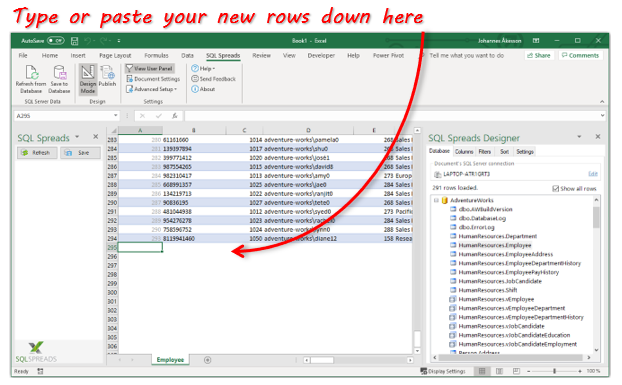
Once you’ve added or pasted the new rows, click the ‘Save to Database’ button to get the changes written to the table in SQL Server.
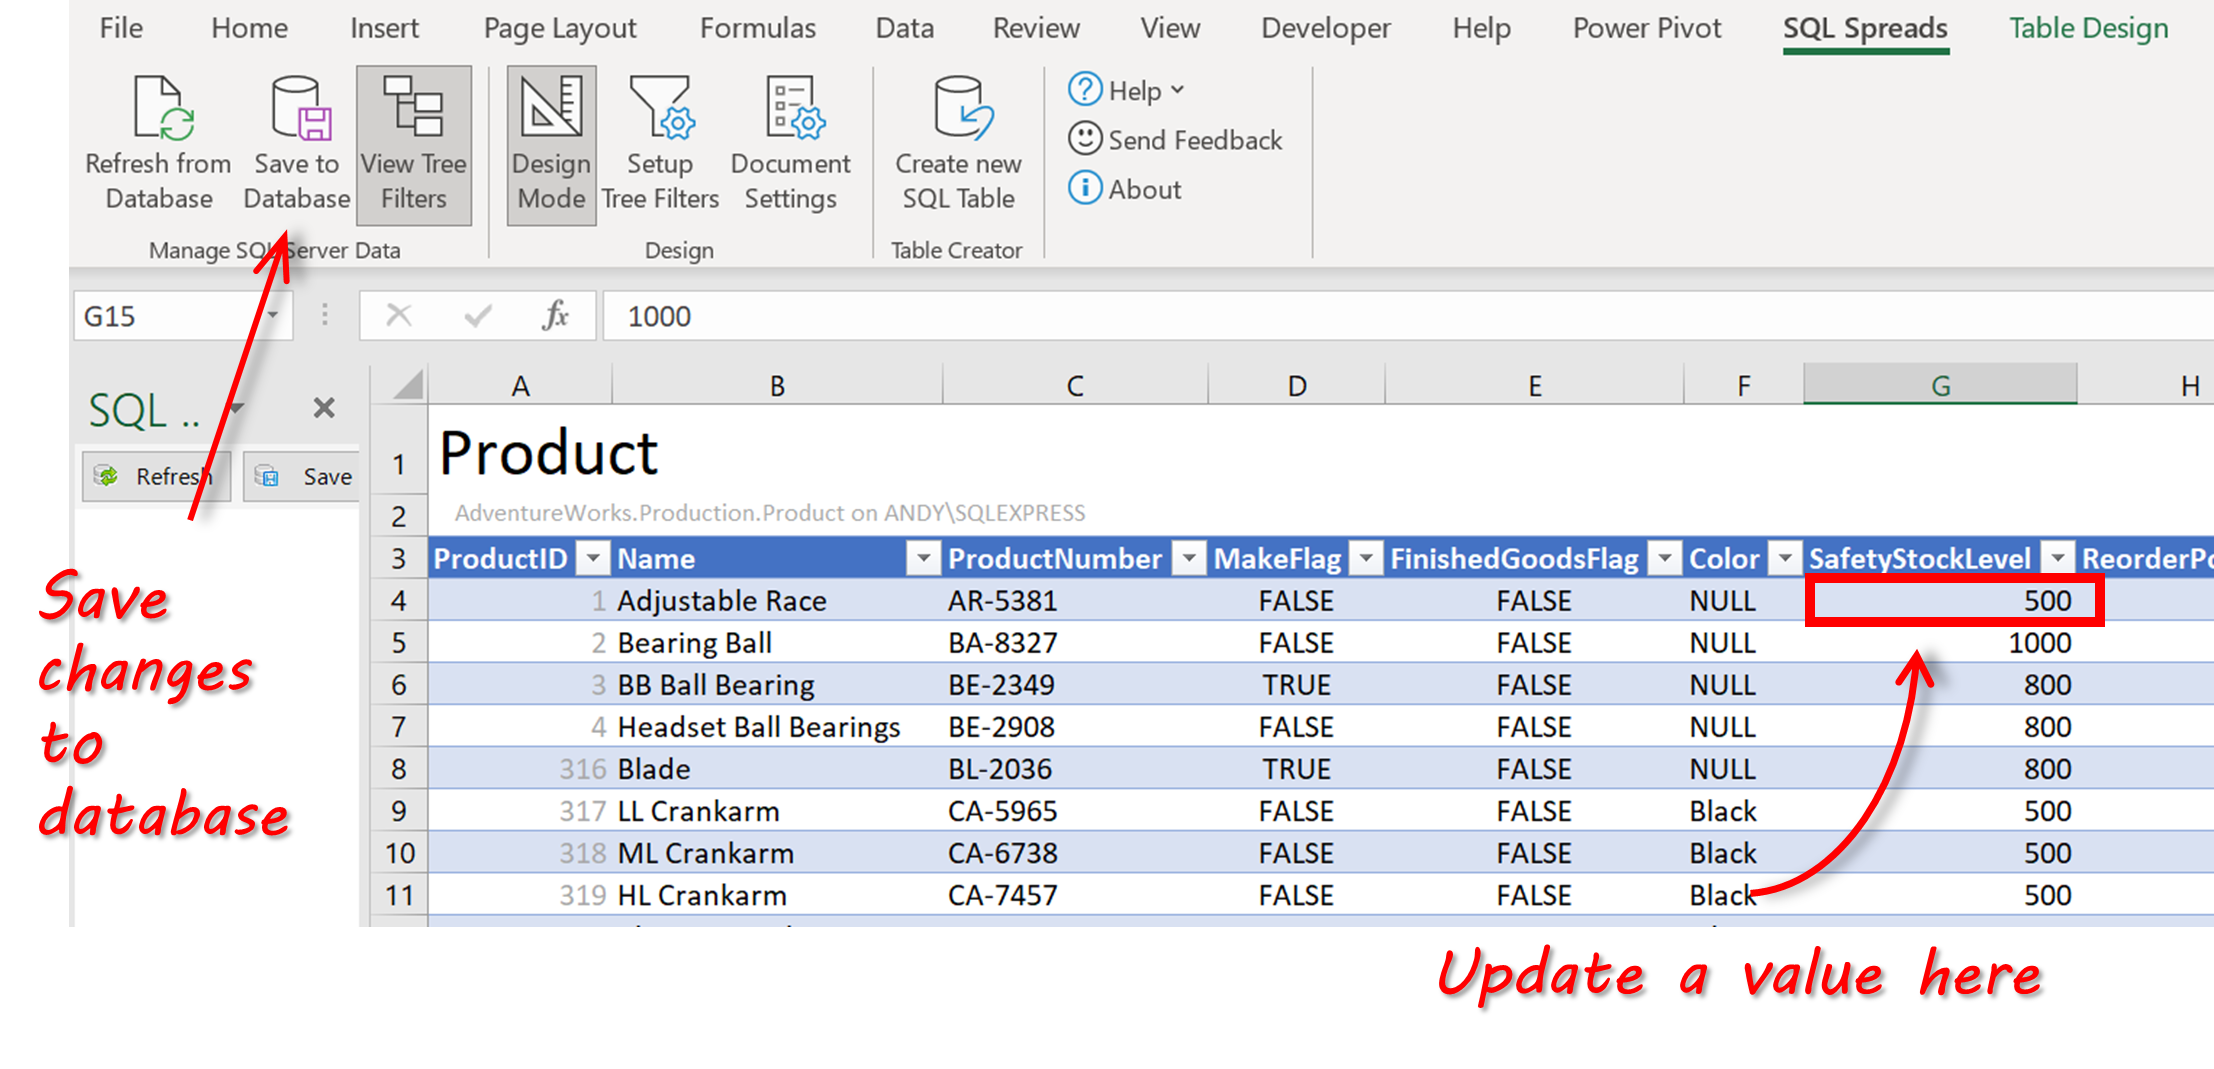
Updating existing data in SQL Server
You can also update the prices in the product table directly in Excel, and save the changes back to SQL Server. To do this you simply make the edits in the table in Excel and then click on the ‘Save to Database’ button to get the changes written to the table in SQL Server.
Other tools and techniques
There are some other ways to import an Excel file to a table in SQL Server. Here are some of the other methods.
- SQL Server Import Wizard – a wizard-based import tool inside SQL Server Management Studio. Ideal for one-time imports when you have an Excel document that you need to import into a table in SQL Server. The pros include flexibility and lots of settings to finetune the import. The biggest drawback is that you need to run through a dozen Wizard dialogs with lots of settings each time you need to import the data. More info about the SQL Server Import Wizard is available here.
- SSIS – this is the oil tanker for moving data between different sources. You can do almost any task you like, but you will need to put in lots of time to get started, and it will take still more time to maintain and change the solution down the line. The pros include good versatility and plenty of available features; the main con is the time you will have to put in to learn the tool. More info about SSIS is available here.
- The BCP utility – a command line-based tool that offers a huge number of settings – if you are a coder, this is the tool to use. More info about the BCP utility is available here.
Summary – insert data from Excel to SQL Server
In this article, we’ve looked at 2 easy ways to insert data from Excel to SQL Server.
If you know how to use SQL Server Management Studio, the copy and paste feature is a great option when you need to quickly and easily import data from Excel to SQL Server. The process is simple and doesn’t require any special knowledge or tools, and can be used in tables with up to a few tens of thousands of rows of data. It can also cater for scenarios such as tables with an auto-incrementing identity key, or if you need to connect to SQL Server on a remote machine using a Remote Desktop Connection.
If you don’t have access to SQL Server Management Studio, you can use the SQL Spreads Excel Add-In to insert data from Excel to SQL. It’s quick and easy to use for non-technical users. For more advanced users, there are some cool features such as lookup columns, pivot options, and data validation which allow you to create robust data management solutions.
Download your free trial of SQL Spreads and get in touch with us if you have any questions.

Johannes Åkesson
Worked in the Business Intelligence industry for the last 15+ years.
Founder of SQL Spreads – the data management
solution to import, update and manage
SQL Server data from within Excel.
With ODBC, you can summarise, and select just the data you need, in an Excel workbook before importing it into SQL Server. You can join data from different areas or worksheets. You can even get data from the result of a SQL Server SELECT statement into an Excel spreadsheet. Phil Factor shows how, and warns of some of the pitfalls.
Why Use ODBC?
It is reasonably easy to insert data from Excel into SQL Server, or the reverse, from any other ODBC database to any other, using PowerShell. The most important direction is from Excel to SQL Server, of course. It is quicker than automating Excel and you can do it without requiring a copy of Excel. It is neater than SSIS too, and more versatile. The most important thing, though, is that you can aggregate before you send the data. It is possible to do a lot of filtering and aggregation of data before it ever gets to SQL Server, since you can turn an existing Excel Workbook into a poor-man’s relational database, or even create one. This article will aim to show how this is done.
I always feel slightly awkward in talking about ODBC. It is a Once and Future technology, developed before its time, but now showing its value for processing large volumes of data, despite its quirks, poor documentation and lackluster support. If you use the ODBC driver, then your Excel workbook becomes a little SQL-based relational database. Worksheets, or areas within worksheets, become tables. There are some features missing, of course, but you can do joins between tables, filter rows to taste, do aggregations and some string manipulations. This means that you need pull far less data into SQL because you can do a lot of selection and pre-processing before the data gets anywhere near SQL server. If, for example, you only need the total, count, and variance of a day’s readings, then why on earth would you want to import more than those aggregated figures? Even if you do, these aggregations, performed on the original data, can be used as a ‘reconciliation’ check that you’ve gulped all the data into their final destination without error.
I also prefer to use ODBC and the sequential data reader to read data from Excel, or any other ODBC source, because it is fast; and I like to use the bulk copy library to insert ODBC ‘reader’ data into a SQL Server table because it is extremely fast, so we’ll use that. When you have a large number of big spreadsheets to insert as a chore, then speed matters.
The ODBC Excel driver (ACE)
ODBC was conceived as a way of making it as easy to connect to a particular datasource such a relational database, text file, data document (e.g. XML), web-based data or spreadsheet
Currently, the state of the art in ODBC for Access and Excel is the Microsoft Access Database Engine 2010 Redistributable which can be downloaded here. This includes the more popular OLEDB drivers which run well in PowerShell too. These drivers enable you to access a range of data files via SQL as if they were a relational database. Formats include Access, CSV, delimited, DBase and Excel
For developing on a general-purpose 64-bit desktop computer, you’re likely to hit a very silly Microsoft muddle. Microsoft recommends that you install the 32-bit version of Office 2010, even on 64-bit machines, since many of the common Office Add-ins did not run in the 64-bit Office environment. This advice has become baked-in ‘best practice’. If you are using 64-bit PowerShell, as most of us are, then you need to use the 64-bit version of the drivers. If you only have the 32-bit Office on your machine, then it will already have the 32-bit drivers, which won’t be visible to 64-bit PowerShell, and won’t work. You can’t install the 64 bit drivers when you already have the 32-bit drivers and I don’t think you can get anything good to happen by uninstalling the 32-bit drivers. Nope. All three (or four if you include Visual Studio) must be 64 bit. I gather that one way out of this Catch 22 is to first install the 64-bit Office 2010 ODBC/OleDB drivers and after that the (32-bit) Office, but there is a better fix that involves tweaking the registry. See this for the full frustrating story.
The ODBC Excel driver in ACE works with the latest Excel spreadsheet format up to 2010 as well as the old ones. I suspect that the latest version will work with Office 2013, though I haven’t yet tried it.
This driver is valuable because of the flexibility it gives. It actually executes ODBC SQL, which is a subset of SQL92, so you can put in column aliases, change the column order, and filter out rows that you don’t want to import. In effect, it presents you with a SQL tables which can be named ranges, if it is an existing worksheet that you’ve added named ranges to.
|
Select * from MyNamedRange |
More commonly, you can specify with a delimited worksheet name followed by a range, the range being a specification of the area of the worksheet just sufficient to enable the driver to find the data you want. If you leave out the range spec entirely, the entire worksheet becomes the table.
|
Select * from [MyWorksheet$] |
If, for example, you wanted the data in the range from C3 to L8, you’d use the statement
|
Select * from [MyWorksheet$C3:M8] |
In ODBC, if you specified, say, row 8 as the end of the table, you can only select rows up to row 8, even if you have inserted more rows beyond that limit, as ODBC allows. If you use some flavours, such as the old MDAC ‘JET’ database engine, then you cannot add new rows beyond the defined limits of a range, otherwise you will get the Exception: "Cannot expand named range" message
If you wanted to define your table as being between the columns C and L, starting at row 3 you’d use
|
Select * from [NameOfExcelSheet$C3:M] |
If you do this, then there is no limit to the length of the table so you can insert as many rows as you like. The ODBC provider adds new rows to the existing rows in the defined area as space allows
The dreaded connection string
Now, before we start doing interesting things with the ACE drivers, I ought to explain a bit about their connection strings. These contain the specification of the ODBC driver you wish to use, and the settings that you wish to transmit to the driver.
Ignoring, for the time being, the extended property settings, For Microsoft Office Access data, set the Connection String to
|
«Driver={Microsoft Access Driver (*.mdb, *.accdb)};DBQ= MyPath/MyFile« |
For Excel data, use
|
«Driver={Microsoft Excel Driver (*.xls, *.xlsx, *.xlsm, *.xlsb)};DBQ=MyPath/MyFile« |
For dBASE data, use
|
«Driver={Microsoft Access dBASE Driver {*.dbf, *.ndx, *.mdx)};DBQ=MyPath/MyFile« |
For text data, use
|
«Driver={Microsoft Access Text Driver {*.txt, *.csv);DBQ=MyPath« |
But you’re likely to want some extended properties for the settings to add a few details about the way that the ODBC provider should tackle this particular connection. Because the defaults can be changed globally in the registry, it is rather better to specify these extended properties rather than to rely on the defaults.
These extended properties are only relevant for the driver that you’re using. They are not always reliable and are poorly documented by Microsoft. I’ll only mention the essentials.
The driver needs to know if the first row of the table holds the name of the column. “HDR=Yes;” indicates that the first row contains column names, not data. It will actually just use the first 64 characters of the header. “HDR=No;” treats the first row as data, but then the columns are named F1 onwards and you’d want to alias them in your SQL statements to give them meaningful column names.
The Excel ODBC doesn’t keep a detailed schema definition of the tables. (the Text and Access drivers by contrast do) The ODBC Excel driver will try to make sense of the data it finds by testing it to see what datatype it can use for the result. It does so by testing a number of rows before doing the import, and you can specify how many rows it tests before deciding the data type of the column by using MaxScanRows in the extended properties. By default the value of this is 8. You can specify any value from 1 – 16 for 1 to 16 rows. You can also make the value to 0 so that it searches all existing rows before deciding the data type, but this slows things down.
This is fine for a relational table but Excel often has mixed types in a column The ODBC Provider will try to return the data of the majority type, but return NULL values for the rest that won’t convert. If the two types are equally mixed in the column, the provider chooses numeric over text, and you lose all the text. Also, it will judge the length of the character datatype in the column from the first rows and if the first rows are less than 255 characters long it will truncate all the subsequent data to 255 characters even if cell values below are longer.
By setting the Import Mode (IMEX=1). You can force mixed data to be converted to text, but only when it finds mixed values on the rows that it checks.
You can also open the Excel workbook in read-only mode by specifying ReadOnly=true; By Default Readonly attribute is false, so you can modify data within your workbook. However, this will lock the entire workbook from access until you close the connection.
Let’s try it out.
Just so you can prove all this to yourself, I’ve supplied an Excel workbook that represents the old PUBS database that used to be distributed with SQL Server and Sybase. This means that you can use SQL from old examples that use PUBS and see what works. All you need to do is to convert the SQL Server version slightly by altering the names of the tables slightly to tell the driver that you want the entire worksheet of that name (the $ is the separator between the worksheet name and the range specification)
So let’s pop together a very simple test-rig to try things out in PowerShell. Be warned, I’ve set this up in read-write mode so it will update your spreadsheet in some circumstances (CUD). To play along, you’ll need to download my Excel version of the PUBS database and alter the path to the excel file.
|
1 2 3 4 5 6 7 8 9 10 11 12 13 14 15 16 17 18 19 20 21 22 23 24 25 26 27 28 29 30 31 32 33 34 35 36 37 38 39 40 41 42 43 44 45 46 47 48 49 50 51 52 53 54 55 56 57 58 59 60 61 62 63 64 65 66 67 68 69 70 |
set-psdebug -strict $ErrorActionPreference = «stop» $ExcelFilePath=‘MyPathpubs.xlsx’ #the full path of the excel workbook if (!(Test-Path $ExcelFilePath)) { Write-Error «Can’t find ‘$($ExcelFilePath)’. Sorry, can’t proceed because of this» exit } try { $Connection = New-Object system.data.odbc.odbcconnection $Connection.ConnectionString = ‘Driver={Microsoft Excel Driver (*.xls, *.xlsx, *.xlsm, *.xlsb)};DBQ=’+$ExcelFilePath+‘; Extended Properties=»Mode=ReadWrite;ReadOnly=false; HDR=YES»‘ $Connection.Open() } catch { $ex = $_.Exception Write-Error «whilst opening connection to $ExcelFilePath : Sorry, can’t proceed because of this» exit } try { $Query = New-Object system.data.odbc.odbccommand $Query.Connection = $connection $Query.CommandText = @’ SELECT title, SUM(qty) AS sales, COUNT(*) AS orders FROM [titles$] t INNER JOIN [sales$] s ON t.title_id=s.title_id WHERE title like ‘%?’ GROUP BY title ORDER BY SUM(qty) DESC ‘@ $Reader = $Query.ExecuteReader([System.Data.CommandBehavior]::SequentialAccess) #get the datareader and just get the result in one gulp } catch { $ex = $_.Exception Write-Error «whilst executing the query ‘$($Query.CommandText)’ $ex.Message Sorry, but we can’t proceed because of this!» $Reader.Close() $Connection.Close() Exit; } Try { $Counter = $Reader.FieldCount #get it just once $result=@() #initialise the empty array of rows while ($Reader.Read()) { $Tuple = New-Object -TypeName ‘System.Management.Automation.PSObject’ foreach ($i in (0..($Counter — 1))) { Add-Member ` -InputObject $Tuple ` -MemberType NoteProperty ` -Name $Reader.GetName($i) ` -Value $Reader.GetValue($i).ToString() } $Result+=$Tuple } $result | Format-Table } catch { $ex = $_.Exceptio Write-Error «whilst reading the data from the datatable. $ex.Message» } $Reader.Close() $Connection.Close() |
All these work
Inner joins
|
SELECT logo, pr_info, pub_name, city, state, country FROM [pub_info$] pif INNER JOIN [publishers$] p ON p.pub_id=pif.pub_id |
Left or right outer joins
|
SELECT title, stor_id, ord_num, qty,ord_date FROM [titles$] t LEFT OUTER JOIN [sales$] s ON t.title_id=s.title_id |
Expressions using columns
|
SELECT fname+‘ ‘+ minit+‘ ‘+lname AS name, job_desc FROM [jobs$] d INNER JOIN [employee$] e ON d.job_id=e.job_id |
Simple GROUP BY expression
|
SELECT COUNT(*) FROM [sales$] GROUP BY stor_ID |
More complex aggregation with ORDER BY clause and a WHERE clause
|
SELECT title, SUM(qty) AS sales, COUNT(*) AS orders FROM [titles$] t INNER JOIN [sales$] s ON t.title_id=s.title_id WHERE title like ‘%?’ GROUP BY title ORDER BY SUM(qty) DESC |
String functions
|
SELECT title, left(notes,20)+‘…’ as [note] FROM [titles$] |
UNION and UNION ALL
|
SELECT au_fname FROM [authors$] UNION ALL SELECT lname FROM [employee$] |
One could go on and on; even subqueries work, but I think I’ve made the point that there is far more power in this ODBC Excel driver than just the facility for pulling out raw data. The same is true of the TEXT driver for OLEDB. It will do all this as well. To conform with the minimum syntax for ODBC, a driver must be able to execute CREATE TABLE, DELETE FROM (searched), DROP TABLE, INSERT INTO, SELECT, SELECT DISTINCT, and UPDATE (searched). SELECT statements can have WHERE and ORDER BY clauses. ACE does a bit better than this, since even the text driver allows SELECT INTO, and SELECT statements allow GROUP BY and HAVING.
Creating a spreadsheet
You can, of course use the ODBC driver to create an Excel spreadsheet and write data into it. Here is the simplest working demo I can write without blushing. Be careful to ensure that the spreadsheet doesn’t exist as the whole point of the demo is to prove to you that it can create an entire spreadsheet workbook with several worksheets.
|
1 2 3 4 5 6 7 8 9 10 11 12 13 14 15 16 17 18 19 20 21 22 23 |
$ExcelFilePath=‘MyPathNew.xlsx’ #the full path of the excel workbook $Header= $true # we want your first row to be column headers try { $Connection = New-Object system.data.odbc.odbcconnection $TheConnectionString = ‘Driver={Microsoft Excel Driver (*.xls, *.xlsx, *.xlsm, *.xlsb)};DBQ=’+$ExcelFilePath+‘;Mode=ReadWrite;ReadOnly=false;Extended Properties=»HDR=’+«$(if ($Header){‘YES’}else{‘NO’})»+‘»‘ $Connection.ConnectionString=$TheConnectionString $Connection.Open() } catch { $ex = $_.Exception Write-Error «whilst opening connection to $ExcelFilePath using ‘$($TheConnectionString)’ : $ex.Message» } $Mycommand=$connection.CreateCommand() $MyCommand.CommandText=«create table MyTable (MyColumn varchar, MyOtherColumn varchar)» if ($Mycommand.ExecuteNonQuery() -eq -1) { $MyCommand.CommandText=«insert into MyTable (MyColumn, MyOtherColumn) select ‘myfirstRowCol’,’myFirstRowCol2′» $rows=$Mycommand.ExecuteNonQuery() «$rows rows inserted into worksheet MyTable» } $connection.Close() |
Notice that I can’t create the table and do the insert in one batch as a command. One statement only can be used in the commandText.
Exploring your Excel metadata
You can find out what datatypes are available for any ODBC source, by using the OdbcConnection.GetSchema(string) method.
|
$Datatypes=$connection.GetSchema(‘DATATYPES’).TypeName |
Which with my connection gives only the LOGICAL, CURRENCY, NUMBER, VARCHAR and DATETIME datatypes. More useful is..
|
$tables=$connection.GetSchema(‘TABLES’).Table_Name |
… that gives you a list of the available worksheets . The complete list, if you wish to peep at them, is
|
$connection.GetSchema(‘TABLES’) $connection.GetSchema(‘DATATYPES’) $connection.GetSchema(‘DataSourceInformation’) $connection.GetSchema(‘Restrictions’) $connection.GetSchema(‘ReservedWords’) $connection.GetSchema(‘Columns’) $connection.GetSchema(‘Indexes’) $connection.GetSchema(‘Views’) |
Hmm. This is beginning to look a bit more like a database. With the Columns MetadataCollection, you can find out as much as you’d ever want to know about the data that is available in the spreadsheet so if you want to read all the worksheets straight into SQL Server, this is a wide-open goal.
Creating Worksheets
Going back to the PUBS Excel database, let’s create a peoples table and populate it with both authors and salespeople. This has to be done in three gulps since the driver seems to dislike the idea of doing a batch, and it kicks when I try to UNION the two results.
|
1 2 3 4 5 6 7 8 9 10 11 12 13 14 15 16 17 18 19 20 21 22 23 24 25 26 27 28 29 30 31 32 33 34 35 36 37 38 |
$ExcelFilePath=‘C:UsersAdministratorDocumentsPOSHScriptsPubs.xlsx’ #the full path of the excel workbook $Header= $true # true if you want your first row to be read as column headers if (!(Test-Path $ExcelFilePath)) { Write-Error «Can’t find ‘$($ExcelFilePath)’. Sorry, can’t proceed because of this» exit } try { $Connection = New-Object system.data.odbc.odbcconnection $TheConnectionString = ‘Driver={Microsoft Excel Driver (*.xls, *.xlsx, *.xlsm, *.xlsb)};DBQ=’+$ExcelFilePath+‘;Mode=ReadWrite;ReadOnly=false;Extended Properties=»HDR=’+«$(if ($Header){‘YES’}else{‘NO’})»+‘»‘ $Connection.ConnectionString=$TheConnectionString $Connection.Open() } catch { $ex = $_.Exception Write-Error «whilst opening connection to $ExcelFilePath using ‘$($TheConnectionString)’ : $ex.Message» } $Mycommand=$connection.CreateCommand() $MyCommand.CommandText=@» CREATE TABLE people (Person varchar) «@ if ($Mycommand.ExecuteNonQuery() -eq -1) {$MyCommand.CommandText=@» INSERT into [people$](person) SELECT lname FROM [employee$] «@ $rows=$Mycommand.ExecuteNonQuery() $MyCommand.CommandText=@» INSERT into [people$](person) SELECT au_fname FROM [authors$] «@ $rows=$rows+$Mycommand.ExecuteNonQuery() } «$rows rows inserted into table» $connection.Close() |
You’ll find you can UPDATE, INSERT and DELETE data perfectly happily this way. If you connect up a spreadsheet to a SQL Server database, then you can have a lot of fun copying entire databases into spreadsheets, and back again. Robyn and I show how to do this here.
The problem is in the Workbook you create. Whether you name it XLS or XSLX it produces an XLSX spreadsheet, in the latest zipped Office Open XML form. The trouble is that, with my version of the driver, I can only get Excel to read it with the XLS filetype, since it says that there is an error if you try to open it as an .XLSX file. I suspect that the ODBC driver hasn’t been that well tested by Microsoft.
Getting data into SQL Server from Excel using PowerShell
Now, what about using PowerShell to copy the data, maybe filtered, sorted and aggregated, into SQL Server, using PowerShell and ODBC. In this direction we can save a lot of time by using the BCP library. We’ll now describe the routine.
We’ll keep this unpacked, as a script rather than a function, since this is designed to illustrate the process.
We’ll start by defining our credentials, preferences, sources and destinations. We’ll read in the data from and excel spreadsheet and then spit it out into SQL Server, creating a table if necessary. To create the destination table (some of these spreadsheets are rather wide and therefore easier to import automatically), we’ll need to examine the metadata, and to interpret this to the SQL Server equivalent, so we’ll do that. To use the BCP library, it is good to have an indication of progress so I’ll show how you do that.
I’ve provided the sample data so that you don’t have to scramble around to find something suitable. This is some climate data, which is handy for checking things like date conversion.
You will notice that although you can render numbers in a variety of ways, there is only one way of storing numbers in Excel, in the ‘NUMBER‘ datatype (the other datatypes in Excel are LOGICAL, CURRENCY, VARCHAR and DATETIME). I’ve therefore had to specify the precision of numeric data, which is tough if you have some columns with integers and others with real decimal data with numbers after the decimal point (scale). Remember that this routine is just creating a staging table, not the final destination. All you need to do is to add your own statements to transfer the data to their final table with the CAST to the correct internal data type!
|
1 2 3 4 5 6 7 8 9 10 11 12 13 14 15 16 17 18 19 20 21 22 23 24 25 26 27 28 29 30 31 32 33 34 35 36 37 38 39 40 41 42 43 44 45 46 47 48 49 50 51 52 53 54 55 56 57 58 59 60 61 62 63 64 65 66 67 68 69 70 71 72 73 74 75 76 77 78 79 80 81 82 83 84 85 86 87 88 89 90 91 92 93 94 95 96 97 98 99 100 101 |
set-psdebug -strict $ErrorActionPreference = «stop» $ExcelFilePath = ‘MyPathCambridgeWeatherData.xlsx’ #the full path of the excel workbook $Worksheet = ‘cambridgedata’ #this is the actual worksheet where the data is $DataRange = » #e.g. ‘A2:M33’ this is the range of the cells that make up the table. leave blank to read the whole worksheet # leave out the second row number to read all rows from the column range $Header = $true # true if you want your first row to be read as column headers # If you aren’t reading columns they are labelled F1..n. You can easily specify them #$ColumnNames=»’2011» as year,[F1] as Day’ $ColumnNames = ‘*’ #If you dont have fieldnames in the header of your worksheet, you can specify $Header= $false and use F1..Fn instead. $DestinationTable = ‘CambridgeClimateData’ #the name of the SQL Server table where you want to put the data $Destinationinstance = ‘MyInstance’ #the name of the server or instance $Destinationdatabase = ‘MyDataBase’ #the name of the datatabase where you want to put the data $DestinationWindowsSecurity = $true #or $False if you aren’t using Windows security $DestinationUserID = » #the name of the SQL Server user if not integrated security $DeleteContentsOfTableBeforeCopy = $false $PrecisionForNumericData = 1 if (!(Test-Path $ExcelFilePath)) { Write-Error «Can’t find ‘$($ExcelFilePath)’. Sorry, can’t proceed because of this» exit } try { $Connection = New-Object system.data.odbc.odbcconnection $TheConnectionString = ‘Driver={Microsoft Excel Driver (*.xls, *.xlsx, *.xlsm, *.xlsb)};DBQ=’ + $ExcelFilePath + ‘; Extended Properties=»READONLY=TRUE; HDR=’ + «$(if ($Header) { ‘YES’ } else { ‘NO’ })» + ‘»‘ $Connection.ConnectionString = $TheConnectionString $Connection.Open() } catch { $ex = $_.Exception Write-Error «whilst opening connection to $ExcelFilePath using ‘$($TheConnectionString)’ : $($ex.Message). Sorry, can’t proceed because of this» exit } # get the types via $Connection.GetSchema(‘DataTypes’)|select TypeName, DataType,SQLType try { $Query = New-Object system.data.odbc.odbccommand $Query.Connection = $connection $Query.CommandText = ‘Select’ + $columnNames + ‘ from [‘ + $Worksheet + ‘$’ + $DataRange + ‘]’ $Reader = $Query.ExecuteReader([System.Data.CommandBehavior]::SequentialAccess) #get the datareader and just get the result in one gulp } catch { $ex = $_.Exception Write-Error «whilst making the query ‘$($Query.CommandText)’ $ex.Message Sorry, but we can’t proceed because of this!» Exit; } $columns = $reader.GetSchemaTable() | select columnName, datatype if ($DeleteContentsOfTableBeforeCopy) { $deletionScript = «ELSE DELETE from $DestinationTable « } else { $deletionScript = » } $CreateScript =@» IF NOT EXISTS (select TABLE_NAME from information_schema.tables where TABLE_NAME like ‘$DestinationTable’) CREATE TABLE $DestinationTable ( «@ $CreateScript += $columns | foreach-object{ $datatype = «$($_.dataType)»; «`n`t[$($_.columnName.Trim())] $(switch ($dataType) { ‘double'{ «numeric(18,$PrecisionForNumericData)» } ‘boolean'{ ‘int’ } ‘decimal'{ ‘Money’ } ‘datetime'{ ‘DateTime’ } default { ‘NVARCHAR(MAX)’ } }),» } $CreateScript = $CreateScript.Substring(0, $CreateScript.Length — 1) + «`n`t)`n $deletionScript» $DestinationConnectionString = «Data Source=$Destinationinstance;Initial Catalog=$Destinationdatabase;$( if ($DestinationWindowsSecurity) { ‘integrated security=true’ } else { ‘User Id=’ + $DestinationUserID + ‘;Password=’ + «$(((Get-Credential $DestinationUserID).GetNetworkCredential()).Password)» + ‘;integrated security=false’ } )» try { #test to see if the table is there. If it isn’t, then create it. If it is, then delete the contents $SqlCommand = new-object (‘Data.SqlClient.SqlCommand’) $CreateScript, $DestinationConnectionString; $SqlCommand.Connection.Open(); $handler = [System.Data.SqlClient.SqlInfoMessageEventHandler] { param ($sender, $event) Write-Host «Message: $($event.Message)» }; $SqlCommand.Connection.add_InfoMessage($handler); $success = $SqlCommand.ExecuteNonQuery(); #now squirt the data in using the bulk copy library. $bulkCopy = new-object («Data.SqlClient.SqlBulkCopy») $DestinationConnectionString $bulkCopy.DestinationTableName = $DestinationTable $bulkCopy.BatchSize = 5000 #The number of rows in each batch sent to the server $bulkcopy.NotifyAfter = 200 #The number of rows to copy before firing a notification $bulkCopy.BulkCopyTimeout = 0 #the number of seconds before a time-out $objectEvent = Register-ObjectEvent $bulkcopy SqlRowsCopied -Action { write-host «Copied $($eventArgs.RowsCopied) rows « } $bulkCopy.WriteToServer($reader) #copy all rows to the server } catch { $ex = $_.Exception Write-Error «Whilst doing the bulk copy ‘$($Query.CommandText)’ $ex.Message Sorry, but we can’t proceed because of this!» } $Reader.Close() $SqlCommand.Connection.Close() $Connection.Close() |
OK, but does it work with real data? Off to the Health and Social Care Information Centre for some realistic data in spreadsheet form. I’ve included some data just so you don’t have to go to the site to play along, but it is far better to use the latest version of this data from the site. I’m sure I don’t have to tell you how easy this is to do in a script via PowerShell.
|
$ExcelFilePath=‘MyPathhosp-epis-stat-admi-tot-ops-11-12-tab.xlsx’ #the full path of the excel workbook $Worksheet=‘Total procedures’ #this is the actual worksheet where the data is $DataRange= ‘A16:J1509’ #e.g. ‘A2:M33’ this is the range of the cells that make up the table. leave blank to read the whole worksheet |
Also
|
$DestinationTable=‘Hosp’ # or whatever you want. The name of the SQL Server table where you want to put the data |
…and
|
$PrecisionForNumericData=0 |
Try it. Whoosh. In it goes. If you were doing this as a routine, you’d be wanting to wrap this script into a function with parameters by now, but you know how to do this already, I’m sure. I’m trying to give you the ‘workbench’ narrative here.
Writing to Excel from SQL Server.
The process of going from SQL Server to excel via ODBC is, I think, needlessly complicated, especially if you use parameterised queries (excellent for SQL Server but they add very little for writing to Excel).In this example, I’ll do the old and horrible approach of using insert statements. There are other ways, including even using a dataset, but this is the most obvious.
I’m not particularly happy with this sample because Excel whines a bit when it opens it, saying that it is in the wrong format, (which it is, but you try naming it XLSX) but it deigns to open it.
“The file you are trying to open, ‘MyExcelFile.xls’, is in a different format than specified by the file extension. Verify that the file is not corrupted and is from a trusted source before opening the file. Do you want to open the file now?”
More seriously, it complains that the numbers in the columns are ‘formatted as text’. It turns out that the data is saved in the correct format, but the next time the file is opened, all columns revert to varchar. Seasoned users of ODBC gets used to the bugs, but if anyone knows of a workaround to this, I’d be grateful.
|
1 2 3 4 5 6 7 8 9 10 11 12 13 14 15 16 17 18 19 20 21 22 23 24 25 26 27 28 29 30 31 32 33 34 35 36 37 38 39 40 41 42 43 44 45 46 47 48 49 50 51 52 53 54 55 56 57 58 59 60 61 62 63 64 65 66 67 68 69 70 71 72 73 74 75 76 77 78 79 80 81 82 83 84 85 86 87 88 89 90 91 92 93 94 95 96 97 98 99 100 101 102 103 104 105 106 107 108 109 110 111 112 113 114 115 116 117 118 119 120 121 122 123 124 125 |
set-psdebug -strict $ErrorActionPreference = «stop» $Sourceinstance = ‘MyServerOrInstance’ #the name of the server or instance $Sourcedatabase = ‘AdventureWorks’ #the name of the datatabase where you want to get the data #here is where we put the SQL command to get the result from the database $SelectStatementForDatabase =@» SELECT ProductNumber, p.Name AS ProductName, color, SafetyStockLevel, ReorderPoint, StandardCost, ListPrice, NonDiscountSales = (OrderQty * UnitPrice), Discounts = ((OrderQty * UnitPrice) * UnitPriceDiscount) FROM Production.Product AS p INNER JOIN Sales.SalesOrderDetail AS sod ON p.ProductID = sod.ProductID where ((OrderQty * UnitPrice) * UnitPriceDiscount)>0 ORDER BY ProductName DESC; «@ $SourceWindowsSecurity = $false #or $True if you are using Windows security $SourceUserID = ‘SA’ #the name of the SQL Server user if not integrated security $DestinationTable = ‘ProductWithDiscounts’ $DestinationExcelFilePath = ‘MyPathMyName.xls’ #the full path of the excel workbook $DestinationHeader = $true # true if you want your first row to be read as column headers #firstly, we create a connection string ‘on the fly’ #connect to the datanbase #…and get the DataReader object $SourceConnectionString = «Data Source=$Sourceinstance;Initial Catalog=$Sourcedatabase;$( if ($SourceWindowsSecurity) { ‘integrated security=true’ } else { ‘User Id=’ + $SourceUserID + ‘;Password=’ + «$(((Get-Credential $SourceUserID).GetNetworkCredential()).Password)» + ‘;integrated security=false’ })» try { #here we open a connection to the SQL Server source database $SqlCommand = new-object (‘Data.SqlClient.SqlCommand’) $SelectStatementForDatabase, $SourceConnectionString; $SqlCommand.Connection.Open(); #we open the connection $handler = [System.Data.SqlClient.SqlInfoMessageEventHandler] { param ($sender, $event) Write-Host «Message: $($event.Message)» }; $SqlCommand.Connection.add_InfoMessage($handler); $Reader = $SqlCommand.ExecuteReader([System.Data.CommandBehavior]::SequentialAccess) #get the datareader and just get the result in one gulp } catch { $ex = $_.Exception Write-Error «whilst getting data from $Sourceinstance $Sourcedatabase ‘ : $ex.Message» exit } # excel has only the LOGICAL,CURRENCY,NUMBER,VARCHAR,DATETIME datatypes # according to $connection.GetSchema(‘DATATYPES’).TypeName # lets work out what the Excel datatype would be… $columns = $reader.GetSchemaTable() | select columnName, datatype, @{ name = ‘ExcelDatatype’; expression = { switch ($_.datatype) { { @(‘float’, ‘decimal’, ‘Numeric’) -contains $_ } { ‘Number’ } ‘bit’ { ‘logical’ } ‘int16’{ ‘Int’ } { @(‘smallmoney’, ‘money’) -contains $_ } { ‘currency’ } ‘DateTime’{ ‘datetime’ } default { ‘VarChar’ } } } } # now we need to create an equivalent worksheet in the Workbook. #If there is no workbook, it will create it $CreateScript =@» CREATE TABLE $DestinationTable ( «@ $CreateScript += $columns | foreach-object{ «`n`t$($_.ColumnName.Trim()) $($_.ExcelDataType),» } $CreateScript = $CreateScript.Substring(0, $CreateScript.Length — 1) + «`n`t)» # and make a columnlist for the insert statement. $columnList = ‘[‘ + $columns[0].ColumnName + ‘]’ for ($ii = 1; $ii -le $columns.Length — 1; $ii++) { $params += ‘,?’; $columnList += ‘ ,[‘ + $columns[$ii].ColumnName + ‘]’ } try { #to open the destination workbook or create it if not exist $Connection = New-Object system.data.odbc.odbcconnection $TheConnectionString = ‘Driver={Microsoft Excel Driver (*.xls, *.xlsx, *.xlsm, *.xlsb)};DBQ=’ + $DestinationExcelFilePath + ‘;Mode=ReadWrite;ReadOnly=false;Extended Properties=»HDR=’ + «$(if ($DestinationHeader) { ‘YES’ } else { ‘NO’ })» + ‘»‘ $Connection.ConnectionString = $TheConnectionString $Connection.Open() $insertionCommand = $Connection.CreateCommand() } catch { $ex = $_.Exception Write-Error «whilst opening connection to $DestinationExcelFilePath using ‘$($TheConnectionString)’ : $ex.Message» exit } try { #if the table doesn’t exist we create it. $CreateTableCommand = $Connection.CreateCommand() $CreateTableCommand.CommandText = $CreateScript if ($connection.GetSchema(‘TABLES’).Table_Name -notcontains $DestinationTable) { if ($CreateTableCommand.ExecuteNonQuery() -eq -1) { write-host «created table (worksheet) $DestinationTable» } } } catch { $ex = $_.Exception Write-Error «couldn’t create table with command $CreateScript : $ex.Message» exit } $rows = 0 try { #now we create each insert statement on the fly! Developers look away, please while ($Reader.Read()) { $insertcommand = «INSERT INTO [$destinationTable» + ‘$] (‘ + «$columnList) VALUES(« for ($i = 0; $i -lt $Reader.FieldCount; $i++) { $insertcommand += «$(if ($i -eq 0) { » } else { ‘,’ }) $(if ($columns[$i].ExcelDataType -eq ‘VarChar’) { «‘$($reader.GetValue($i) -replace «‘«, «»«)'» } else { «$($reader.GetValue($i))» }) « } $insertioncommand.CommandText = $insertcommand + ‘)’ $rows += $insertionCommand.ExecuteNonQuery() } } catch { $ex = $_.Exception Write-Error «whilst writing to column $i of file $DestinationExcelFilePath ‘ : $ex.Message» } #we report what we’ve done. write-host «Wrote $rows rows of $($columns.count) columns to worksheet $destinationTable» $Reader.Close() $SqlCommand.Connection.Close() $connection.Close() |
CSV and Delimited ODBC Sources: Text AdventureWorks.
Although the ACE drivers are used more by people reading Excel files, I must emphasize that there are drivers for a number of other formats. It is pretty easy, for example, to turn a bunch of CSV files into a relational database. Just to prove it, I’ve created a CSV/Text version of AdventureWorks, together with its schema.ini. This was originally created in this article The TSQL of CSV: Comma-Delimited of Errors. With this text-based database, you can do a lot of the sample AdventureWorks SQL examples with only a minor modification.
Once you’ve installed the ACE drivers, you’ll can use a modified version of the routine I showed you or exploring the PUBS Excel database to play along.
All you have to do is to unzip Text Adventureworks into a new directory with the name of your database (AdventureWorks) and point your connection string at the directory by giving it the full path to the directory. I just altered two lines
|
#set the directory in which your database should go. $TextFilePath=‘MyPathToTheDirectoryTextAdventureWorks’ #the path to the database |
… and
|
$Connection.ConnectionString=‘Driver={Microsoft Access Text Driver (*.txt, *.csv)};DBQ=’+$TextFilePath+» |
Now you should be ready with your text-based relational database.
You can, of course, create tables and write to them using the INSERT statement.
|
create table [Log#csv] (MyInteger int,TheDate date TheMessage char(125)) |
…and do insert statements into it. You can SELECT INTO as well, which is new to me. I didn’t notice this in previous incarnations of this driver.
With CREATE statements, you can use ‘BIT, BYTE , LONGCHAR, CURRENCY, INTEGER, SMALLINT, REAL, FLOAT, CHAR or DATETIME
(Out of curiosity, the OLEDB driver allows Long, Single, Double, Currency, DateTime , Bit, Byte, GUID, BigBinary, LongBinary, VarBinary, LongText, VarChar char and Decimal)
|
# You can list out the tables $Connection.GetSchema(«tables»)|select table_name |
And the schema
|
$Connection.GetSchema(«columns»)|select tableName, ColumnName, cardinalPosition |
Here are a few of the SQL Statements that work
|
SELECT * into [gloves#csv] FROM [Production_ProductModel#csv] WHERE ProductModelID IN (3, 4) |
|
SELECT count(*) as [discounted] FROM [Production_Product#csv] AS p INNER JOIN [Sales_SalesOrderDetail#csv] AS sod ON p.ProductID = sod.ProductID where ((OrderQty * UnitPrice) * UnitPriceDiscount)>0 |
|
SELECT Name, ProductNumber, ListPrice AS Price FROM [Production_Product#csv] WHERE ProductLine = ‘R’ AND DaysToManufacture < 4 ORDER BY Name DESC |
|
SELECT p1.ProductModelID FROM [Production_Product#csv] AS p1 GROUP BY p1.ProductModelID having p1.ProductModelID >100 |
|
SELECT p1.ProductModelID FROM [Production_Product#csv] AS p1 GROUP BY p1.ProductModelID HAVING MAX(p1.ListPrice) >= ALL (SELECT AVG(p2.ListPrice) FROM [Production_Product#csv] AS p2 WHERE p1.ProductModelID = p2.ProductModelID) |
|
SELECT top 50 SalesOrderID, SUM(LineTotal) AS SubTotal FROM [Sales_SalesOrderDetail#csv] GROUP BY SalesOrderID ORDER BY SalesOrderID; |
|
SELECT ProductModelID, Name FROM [Production_ProductModel#csv] WHERE ProductModelID IN (3, 4) union all |
|
SELECT ProductModelID, Name FROM [Production_ProductModel#csv] WHERE ProductModelID NOT IN (3, 4) |
Conclusions
If only Microsoft put some energy into their whole range of ODBC drivers, including all the possible datastores that can be mapped to relational databases, they’d be the obvious way of transferring data, and would put Microsoft in great shape for providing ‘big data’ solutions.. As it is, they are extraordinarily useful, but marred by quirks and oddities.
For me, ODBC is the obvious way to script data from Excel or Access into SQL Server, for doing data imports.
Представьте себе ситуацию, Вы получили целевую выборку из одной базы данных, но для полноты картины, как всегда, нужны дополнительные данные. Проблема может быть в том, что нужная информация хранится в другой базе данных и возможности создать на ней свою таблицу нет, подключиться используя link тоже нельзя, да и количество элементов, по которым нужно получить данные, несколько больше, чем допустимое на данном источнике. Вот и получается, что возможность написать SQL запрос и получить нужные данные есть, но написать придется не один запрос, а потом потратить время на объединение полученных данных.
Выйти из подобной ситуации поможет Excel.
Уверен, что ни для кого не секрет, что MS Excel имеет встроенный модуль VBA и надстройки, позволяющие подключаться к внешним источникам данных, то есть по сути является мощным инструментом для аналитики, а значит идеально подходит для решения подобных задач.
Для того чтобы обойти проблему, нам потребуется таблица с целевой выборкой, в которой содержатся идентификаторы, по которым можно достаточно корректно получить недостающую информацию (это может быть уникальный идентификатор, назовем его ID, или набор из данных, находящихся в разных столбцах), ПК с установленным MS Excel, и доступом к БД с недостающей информацией и, конечно, желание получить ту самую информацию.
Создаем в MS Excel книгу, на листе которой размещаем таблицу с идентификаторами, по которым будем в дальнейшем формировать запрос (если у нас есть уникальный идентификатор, для обеспечения максимальной скорости обработки таблицу лучше представить в виде одного столбца), сохраняем книгу в формате *.xlsm, после чего приступаем к созданию макроса.
Через меню «Разработчик» открываем встроенный VBA редактор и начинаем творить.
Sub job_sql() — Пусть наш макрос называется job_sql.
Пропишем переменные для подключения к БД, записи данных и запроса:
Dim cn As ADODB.Connection
Dim rs As ADODB.Recordset
Dim sql As String
Опишем параметры подключения:
sql = «Provider=SQLOLEDB.1;Integrated Security=SSPI;Persist Security Info=True;Data Source=Storoge.company.ru Storoge.»
Объявим процедуру свойства, для присвоения значения:
Set cn = New ADODB.Connection
cn.Provider = » SQLOLEDB.1″
cn.ConnectionString = sql
cn.ConnectionTimeout = 0
cn.Open
Вот теперь можно приступать непосредственно к делу.
Организуем цикл:
For i = 2 To 1000
Как вы уже поняли конечное значение i=1000 здесь только для примера, а в реальности конечное значение соответствует количеству строк в Вашей таблице. В целях унификации можно использовать автоматический способ подсчета количества строк, например, вот такую конструкцию:
Dim LastRow As Long
LastRow = ActiveSheet.UsedRange.Row — 1 + ActiveSheet.UsedRange.Rows.Count
Тогда открытие цикла будет выглядеть так:
For i = 2 To LastRow
Как я уже говорил выше MS Excel является мощным инструментом для аналитики, и возможности Excel VBA не заканчиваются на простом переборе значений или комбинаций значений. При наличии известных Вам закономерностей можно ограничить объем выгружаемой из БД информации путем добавления в макрос простых условий, например:
If Cells(i, 2) = «Ваше условие» Then
Итак, мы определились с объемом и условиями выборки, организовали подключение к БД и готовы формировать запрос. Предположим, что нам нужно получить информацию о размере ежемесячного платежа [Ежемесячный платеж] из таблицы [payments].[refinans_credit], но только по тем случаям, когда размер ежемесячного платежа больше 0
sql = «select [Ежемесячный платеж] from [PAYMENTS].[refinans_credit] » & _
«where [Ежемесячный платеж]>0 and [Номер заявки] ='» & Cells(i, 1) & «‘ «
Если значений для формирования запроса несколько, соответственно прописываем их в запросе:
«where [Ежемесячный платеж]>0 and [Номер заявки] = ‘» & Cells(i, 1) & «‘ » & _
» and [Дата платежа]='» & Cells(i, 2) & «‘»
В целях самоконтроля я обычно записываю сформированный макросом запрос, чтобы иметь возможность проверить его корректность и работоспособность, для этого добавим вот такую строчку:
Cells(i, 3) = sql
в третьем столбце записываются запросы.
Выполняем SQL запрос:
Set rs = cn.Execute(sql)
А чтобы хоть как-то наблюдать за выполнением макроса выведем изменение i в статус-бар
Application.StatusBar = «Execute script …» & i
Application.ScreenUpdating = False
Теперь нам нужно записать полученные результаты. Для этого будем использовать оператор Do While:
j = 0
Do While Not rs.EOF
For ii = 0 To rs.Fields.Count — 1
Cells(i, 4 + j + ii) = rs.Fields(0 + ii) ‘& «;»
Указываем ячейки для вставки полученных данных (4 в примере это номер столбца с которого начинаем запись результатов)
Next ii
j = j + rs.Fields.Count
s.MoveNext
Loop
rs.Close
End If
— закрываем цикл If, если вводили дополнительные условия
Next i
cn.Close
Application.StatusBar = «Готово»
End Sub
— закрываем макрос.
В дополнение хочу отметить, что данный макрос позволяет обращаться как к БД на MS SQL так и к БД Oracle, разница будет только в параметрах подключения и собственно в синтаксисе SQL запроса.
В приведенном примере для авторизации при подключении к БД используется доменная аутентификация.
А как быть если для аутентификации необходимо ввести логин и пароль? Ничего невозможного нет. Изменим часть макроса, которая отвечает за подключение к БД следующим образом:
sql = «Provider= SQLOLEDB.1;Password=********;User ID=********;Data Source= Storoge.company.ru Storoge;APP=SFM»
Но в этом случае при использовании макроса возникает риск компрометации Ваших учетных данных. Поэтому лучше программно удалять учетные данные после выполнения макроса. Разместим поля для ввода пароля и логина на листе и изменим макрос следующим образом:
sql = «Provider= SQLOLEDB.1;Password=» & Sheets(«Лист аутентификации»).TextBox1.Value & «;User ID=» & Sheets(«Лист аутентификации «).TextBox2.Value & «;Data Source= Storoge.company.ru Storoge;APP=SFM»
Место для расположения текстовых полей не принципиально, можно расположить их на листе с таблицей в первых строках, но мне удобней размещать поля на отдельном листе. Чтобы введенные учетные данные не сохранялись вместе с результатом выполнения макроса в конце исполняемого кода дописываем:
Sheets(«Выгрузка»).TextBox1.Value = «« Sheets(»Выгрузка«).TextBox2.Value = »»
То есть просто присваиваем текстовым полям пустые значения, таким образом после выполнения макроса поля для ввода пароля и логина окажутся пустыми.
Вот такое вполне жизнеспособное решение, позволяющее сократить трудозатраты при получении и обработке данных, я использую. Надеюсь мой опыт применения SQL запросов в Excel будет полезен и вам в решении текущих задач.
Содержание
- Создание SQL запроса в Excel
- Способ 1: использование надстройки
- Способ 2: использование встроенных инструментов Excel
- Способ 3: подключение к серверу SQL Server
- Вопросы и ответы
SQL – популярный язык программирования, который применяется при работе с базами данных (БД). Хотя для операций с базами данных в пакете Microsoft Office имеется отдельное приложение — Access, но программа Excel тоже может работать с БД, делая SQL запросы. Давайте узнаем, как различными способами можно сформировать подобный запрос.
Читайте также: Как создать базу данных в Экселе
Язык запросов SQL отличается от аналогов тем, что с ним работают практически все современные системы управления БД. Поэтому вовсе не удивительно, что такой продвинутый табличный процессор, как Эксель, обладающий многими дополнительными функциями, тоже умеет работать с этим языком. Пользователи, владеющие языком SQL, используя Excel, могут упорядочить множество различных разрозненных табличных данных.
Способ 1: использование надстройки
Но для начала давайте рассмотрим вариант, когда из Экселя можно создать SQL запрос не с помощью стандартного инструментария, а воспользовавшись сторонней надстройкой. Одной из лучших надстроек, выполняющих эту задачу, является комплекс инструментов XLTools, который кроме указанной возможности, предоставляет массу других функций. Правда, нужно заметить, что бесплатный период пользования инструментом составляет всего 14 дней, а потом придется покупать лицензию.
Скачать надстройку XLTools
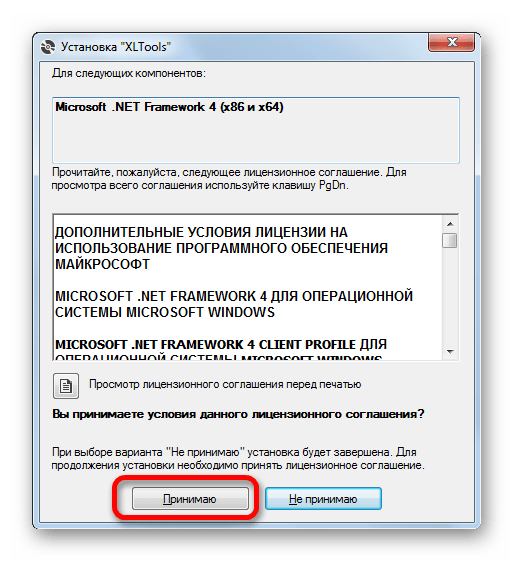
- После того, как вы скачали файл надстройки xltools.exe, следует приступить к его установке. Для запуска инсталлятора нужно произвести двойной щелчок левой кнопки мыши по установочному файлу. После этого запустится окно, в котором нужно будет подтвердить согласие с лицензионным соглашением на использование продукции компании Microsoft — NET Framework 4. Для этого всего лишь нужно кликнуть по кнопке «Принимаю» внизу окошка.
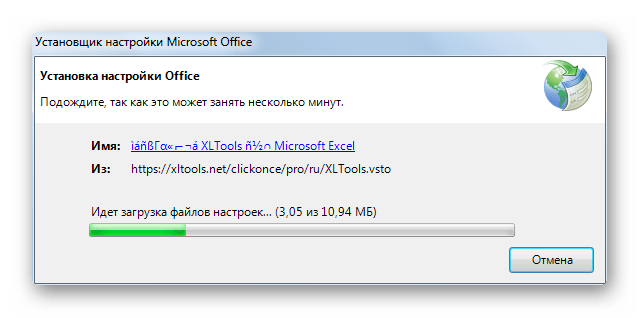
- После этого установщик производит загрузку обязательных файлов и начинает процесс их установки.
- Далее откроется окно, в котором вы должны подтвердить свое согласие на установку этой надстройки. Для этого нужно щелкнуть по кнопке «Установить».
- Затем начинается процедура установки непосредственно самой надстройки.
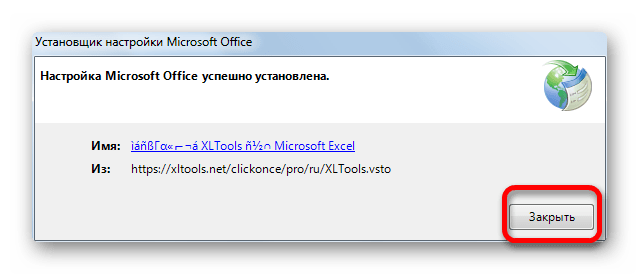
- После её завершения откроется окно, в котором будет сообщаться, что инсталляция успешно выполнена. В указанном окне достаточно нажать на кнопку «Закрыть».
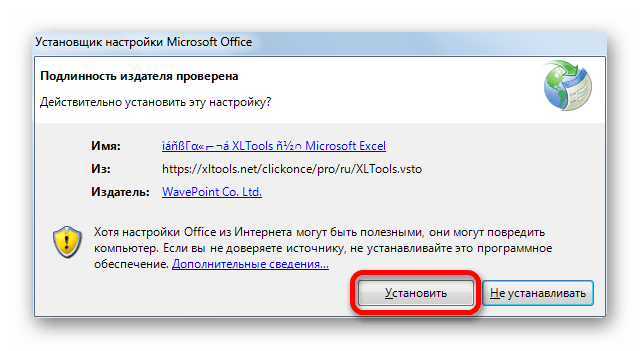
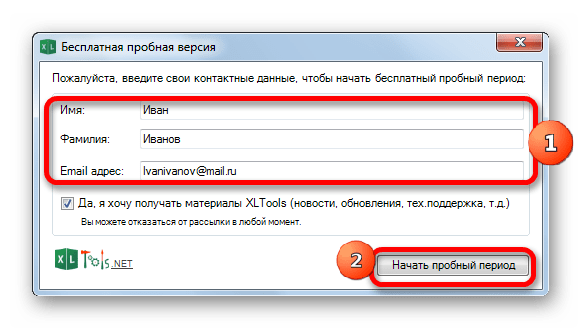
- Надстройка установлена и теперь можно запускать файл Excel, в котором нужно организовать SQL запрос. Вместе с листом Эксель открывается окно для ввода кода лицензии XLTools. Если у вас имеется код, то нужно ввести его в соответствующее поле и нажать на кнопку «OK». Если вы желаете использовать бесплатную версию на 14 дней, то следует просто нажать на кнопку «Пробная лицензия».
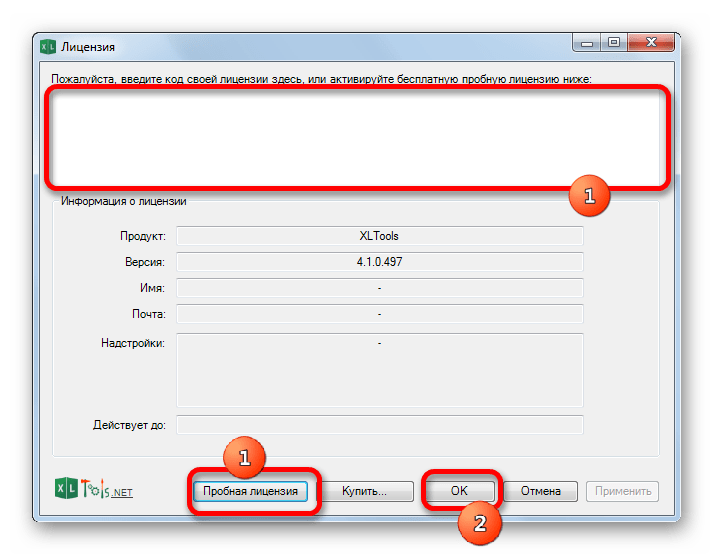
- При выборе пробной лицензии открывается ещё одно небольшое окошко, где нужно указать своё имя и фамилию (можно псевдоним) и электронную почту. После этого жмите на кнопку «Начать пробный период».
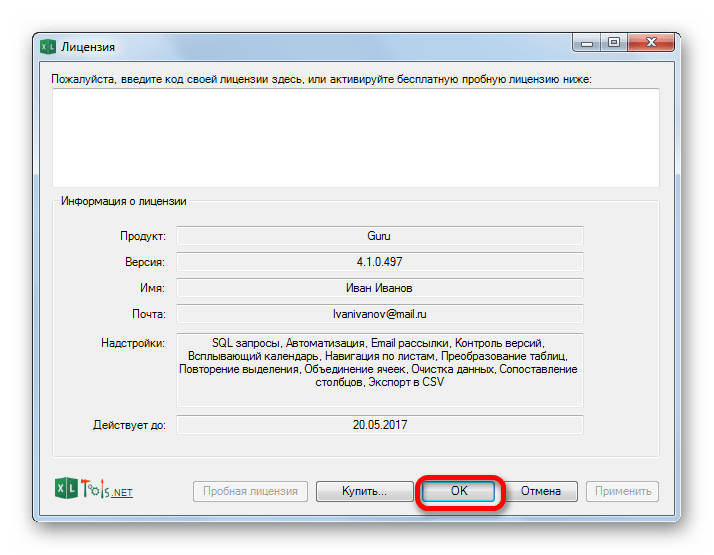
- Далее мы возвращаемся к окну лицензии. Как видим, введенные вами значения уже отображаются. Теперь нужно просто нажать на кнопку «OK».
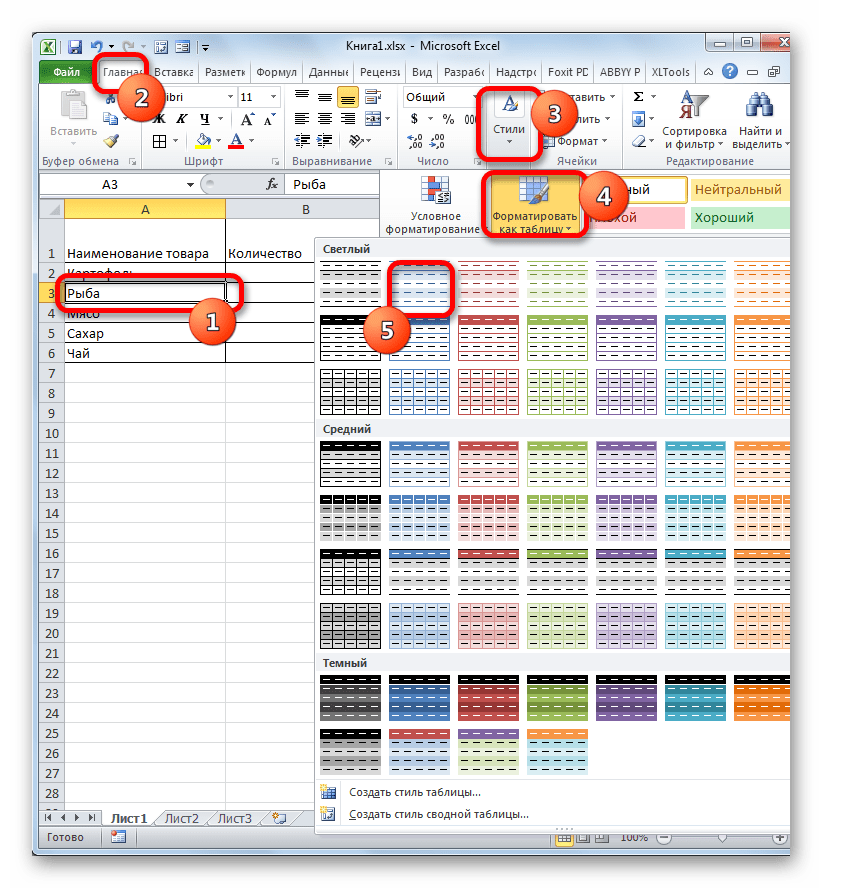
- После того, как вы проделаете вышеуказанные манипуляции, в вашем экземпляре Эксель появится новая вкладка – «XLTools». Но не спешим переходить в неё. Прежде, чем создавать запрос, нужно преобразовать табличный массив, с которым мы будем работать, в так называемую, «умную» таблицу и присвоить ей имя.
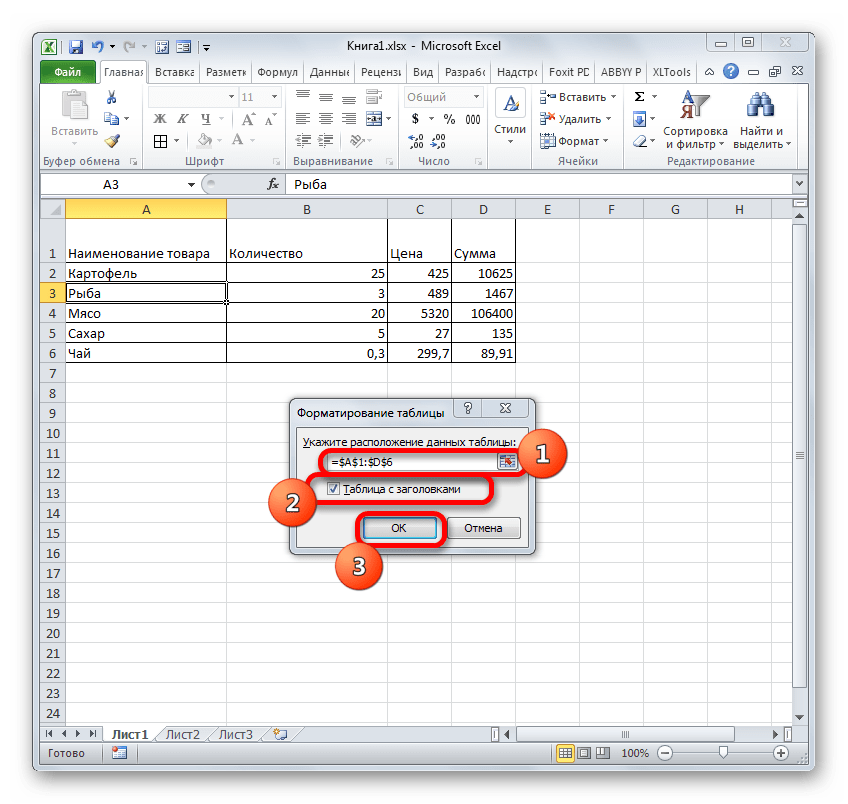
Для этого выделяем указанный массив или любой его элемент. Находясь во вкладке «Главная» щелкаем по значку «Форматировать как таблицу». Он размещен на ленте в блоке инструментов «Стили». После этого открывается список выбора различных стилей. Выбираем тот стиль, который вы считаете нужным. На функциональность таблицы указанный выбор никак не повлияет, так что основывайте свой выбор исключительно на основе предпочтений визуального отображения. - Вслед за этим запускается небольшое окошко. В нем указываются координаты таблицы. Как правило, программа сама «подхватывает» полный адрес массива, даже если вы выделили только одну ячейку в нем. Но на всякий случай не мешает проверить ту информацию, которая находится в поле «Укажите расположение данных таблицы». Также нужно обратить внимание, чтобы около пункта «Таблица с заголовками», стояла галочка, если заголовки в вашем массиве действительно присутствуют. Затем жмите на кнопку «OK».
- После этого весь указанный диапазон будет отформатирован, как таблица, что повлияет как на его свойства (например, растягивание), так и на визуальное отображение. Указанной таблице будет присвоено имя. Чтобы его узнать и по желанию изменить, клацаем по любому элементу массива. На ленте появляется дополнительная группа вкладок – «Работа с таблицами». Перемещаемся во вкладку «Конструктор», размещенную в ней. На ленте в блоке инструментов «Свойства» в поле «Имя таблицы» будет указано наименование массива, которое ему присвоила программа автоматически.
- При желании это наименование пользователь может изменить на более информативное, просто вписав в поле с клавиатуры желаемый вариант и нажав на клавишу Enter.
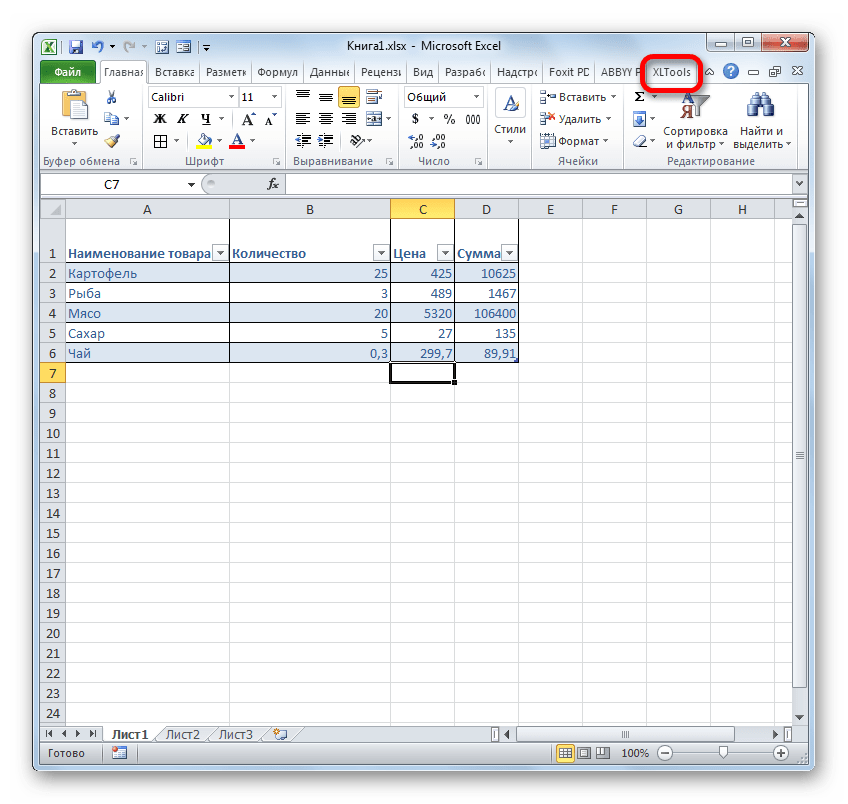
- После этого таблица готова и можно переходить непосредственно к организации запроса. Перемещаемся во вкладку «XLTools».
- После перехода на ленте в блоке инструментов «SQL запросы» щелкаем по значку «Выполнить SQL».
- Запускается окно выполнения SQL запроса. В левой его области следует указать лист документа и таблицу на древе данных, к которой будет формироваться запрос.
В правой области окна, которая занимает его большую часть, располагается сам редактор SQL запросов. В нем нужно писать программный код. Наименования столбцов выбранной таблицы там уже будут отображаться автоматически. Выбор столбцов для обработки производится с помощью команды SELECT. Нужно оставить в перечне только те колонки, которые вы желаете, чтобы указанная команда обрабатывала.
Далее пишется текст команды, которую вы хотите применить к выбранным объектам. Команды составляются при помощи специальных операторов. Вот основные операторы SQL:
- ORDER BY – сортировка значений;
- JOIN – объединение таблиц;
- GROUP BY – группировка значений;
- SUM – суммирование значений;
- DISTINCT – удаление дубликатов.
Кроме того, в построении запроса можно использовать операторы MAX, MIN, AVG, COUNT, LEFT и др.
В нижней части окна следует указать, куда именно будет выводиться результат обработки. Это может быть новый лист книги (по умолчанию) или определенный диапазон на текущем листе. В последнем случае нужно переставить переключатель в соответствующую позицию и указать координаты этого диапазона.
После того, как запрос составлен и соответствующие настройки произведены, жмем на кнопку «Выполнить» в нижней части окна. После этого введенная операция будет произведена.


Урок: «Умные» таблицы в Экселе
Способ 2: использование встроенных инструментов Excel
Существует также способ создать SQL запрос к выбранному источнику данных с помощью встроенных инструментов Эксель.
- Запускаем программу Excel. После этого перемещаемся во вкладку «Данные».
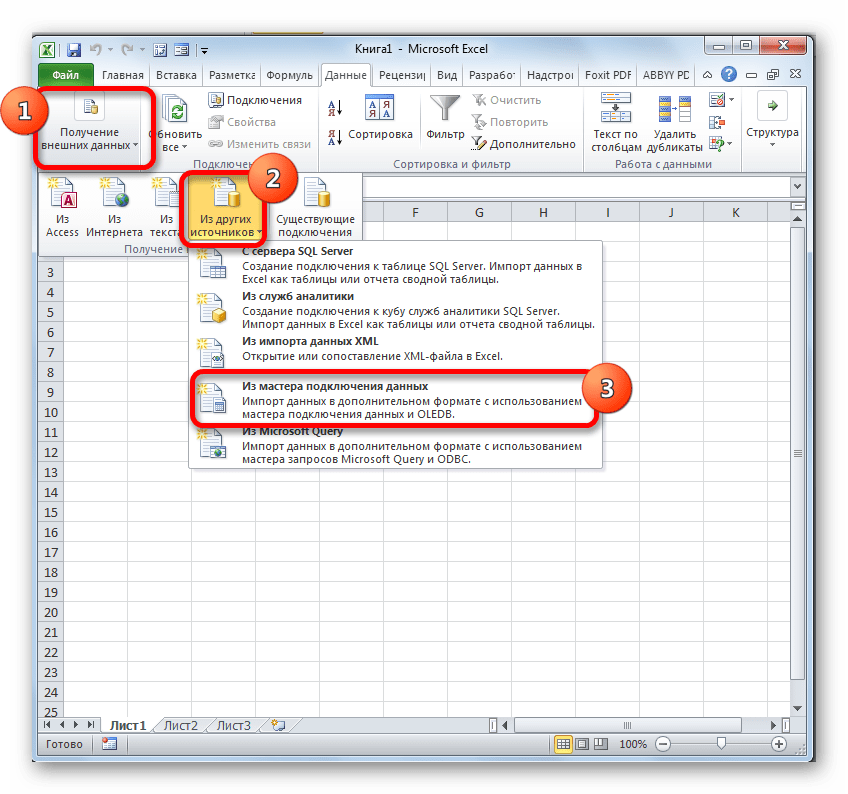
- В блоке инструментов «Получение внешних данных», который расположен на ленте, жмем на значок «Из других источников». Открывается список дальнейших вариантов действий. Выбираем в нем пункт «Из мастера подключения данных».
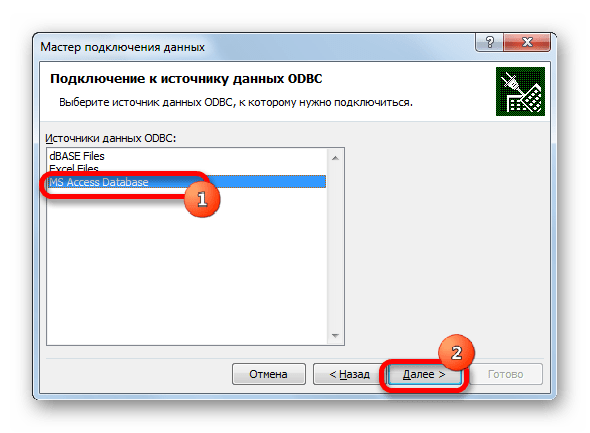
- Запускается Мастер подключения данных. В перечне типов источников данных выбираем «ODBC DSN». После этого щелкаем по кнопке «Далее».
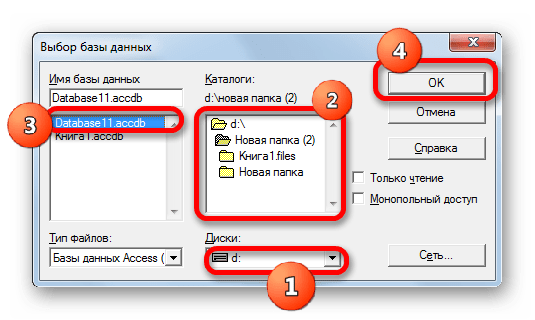
- Открывается окно Мастера подключения данных, в котором нужно выбрать тип источника. Выбираем наименование «MS Access Database». Затем щелкаем по кнопке «Далее».
- Открывается небольшое окошко навигации, в котором следует перейти в директорию расположения базы данных в формате mdb или accdb и выбрать нужный файл БД. Навигация между логическими дисками при этом производится в специальном поле «Диски». Между каталогами производится переход в центральной области окна под названием «Каталоги». В левой области окна отображаются файлы, расположенные в текущем каталоге, если они имеют расширение mdb или accdb. Именно в этой области нужно выбрать наименование файла, после чего кликнуть на кнопку «OK».
- Вслед за этим запускается окно выбора таблицы в указанной базе данных. В центральной области следует выбрать наименование нужной таблицы (если их несколько), а потом нажать на кнопку «Далее».
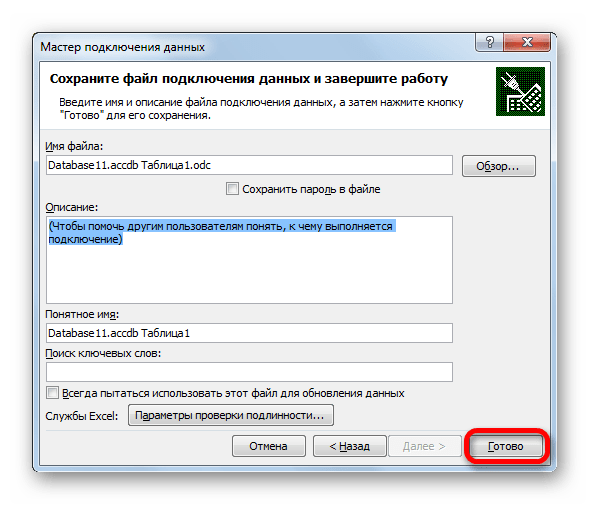
- После этого открывается окно сохранения файла подключения данных. Тут указаны основные сведения о подключении, которое мы настроили. В данном окне достаточно нажать на кнопку «Готово».
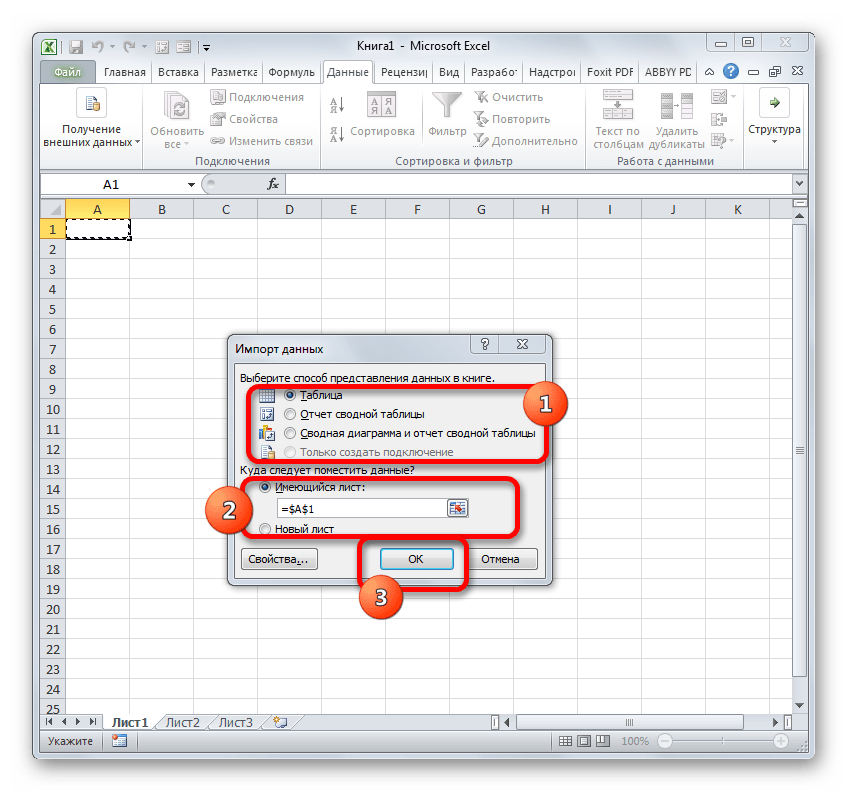
- На листе Excel запускается окошко импорта данных. В нем можно указать, в каком именно виде вы хотите, чтобы данные были представлены:
- Таблица;
- Отчёт сводной таблицы;
- Сводная диаграмма.
Выбираем нужный вариант. Чуть ниже требуется указать, куда именно следует поместить данные: на новый лист или на текущем листе. В последнем случае предоставляется также возможность выбора координат размещения. По умолчанию данные размещаются на текущем листе. Левый верхний угол импортируемого объекта размещается в ячейке A1.
После того, как все настройки импорта указаны, жмем на кнопку «OK».
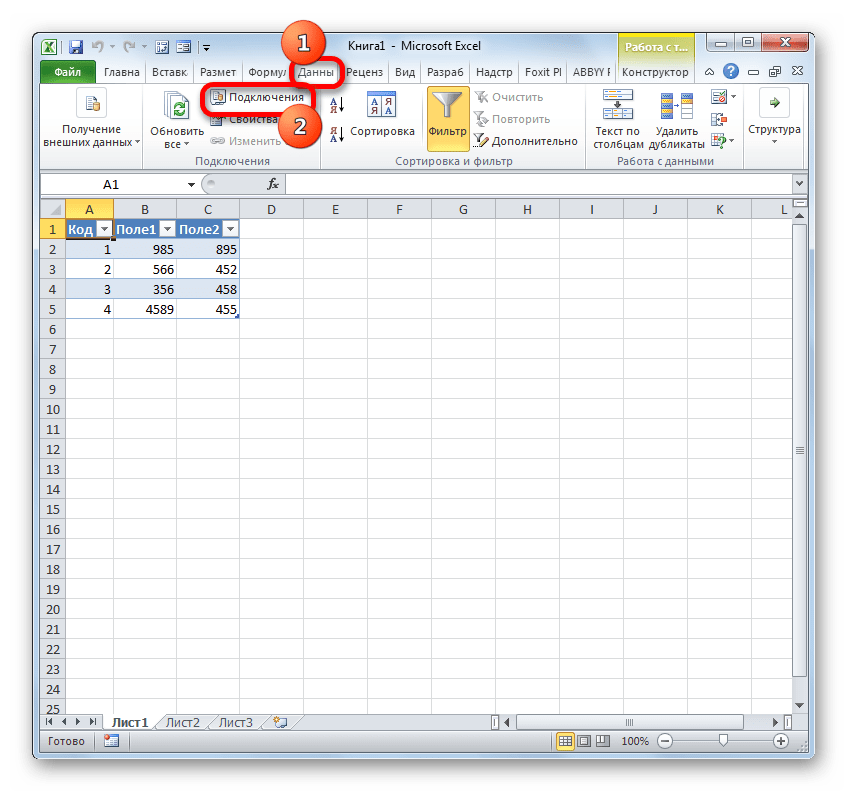
- Как видим, таблица из базы данных перемещена на лист. Затем перемещаемся во вкладку «Данные» и щелкаем по кнопке «Подключения», которая размещена на ленте в блоке инструментов с одноименным названием.
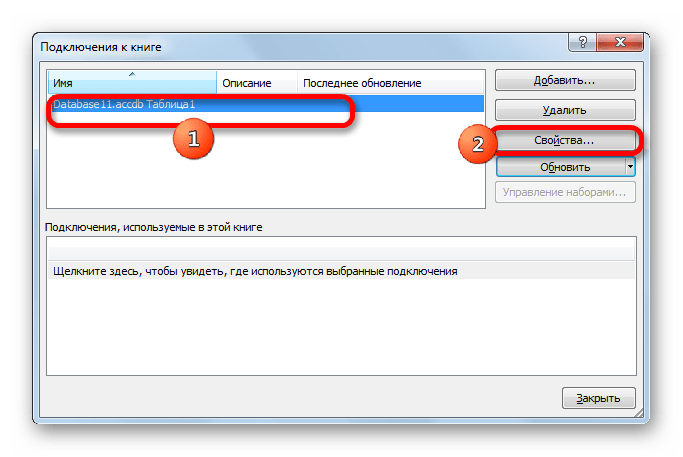
- После этого запускается окно подключения к книге. В нем мы видим наименование ранее подключенной нами базы данных. Если подключенных БД несколько, то выбираем нужную и выделяем её. После этого щелкаем по кнопке «Свойства…» в правой части окна.
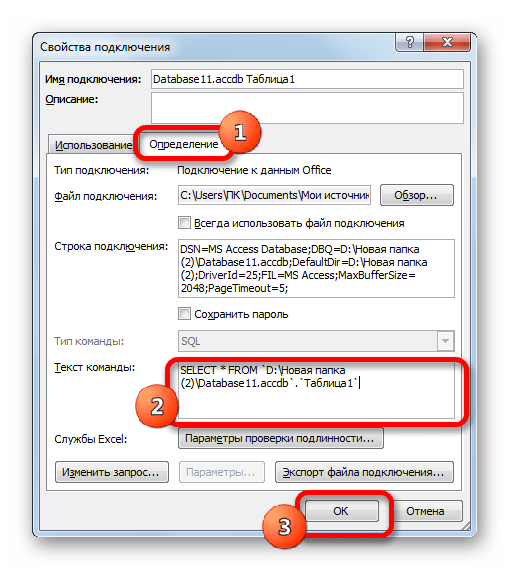
- Запускается окно свойств подключения. Перемещаемся в нем во вкладку «Определение». В поле «Текст команды», находящееся внизу текущего окна, записываем SQL команду в соответствии с синтаксисом данного языка, о котором мы вкратце говорили при рассмотрении Способа 1. Затем жмем на кнопку «OK».
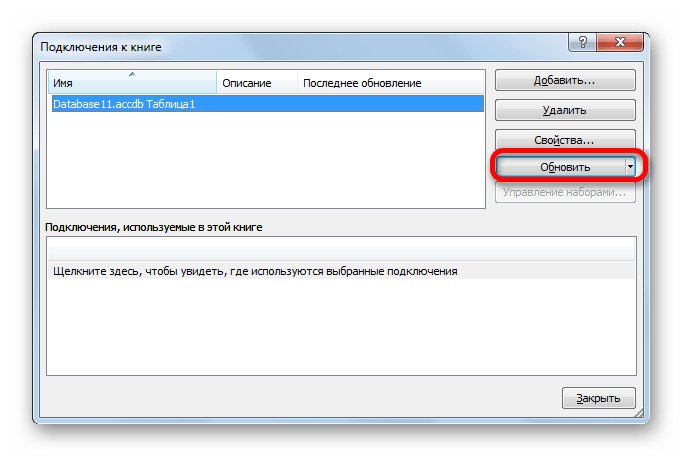
- После этого производится автоматический возврат к окну подключения к книге. Нам остается только кликнуть по кнопке «Обновить» в нем. Происходит обращение к базе данных с запросом, после чего БД возвращает результаты его обработки назад на лист Excel, в ранее перенесенную нами таблицу.


Способ 3: подключение к серверу SQL Server
Кроме того, посредством инструментов Excel существует возможность соединения с сервером SQL Server и посыла к нему запросов. Построение запроса не отличается от предыдущего варианта, но прежде всего, нужно установить само подключение. Посмотрим, как это сделать.
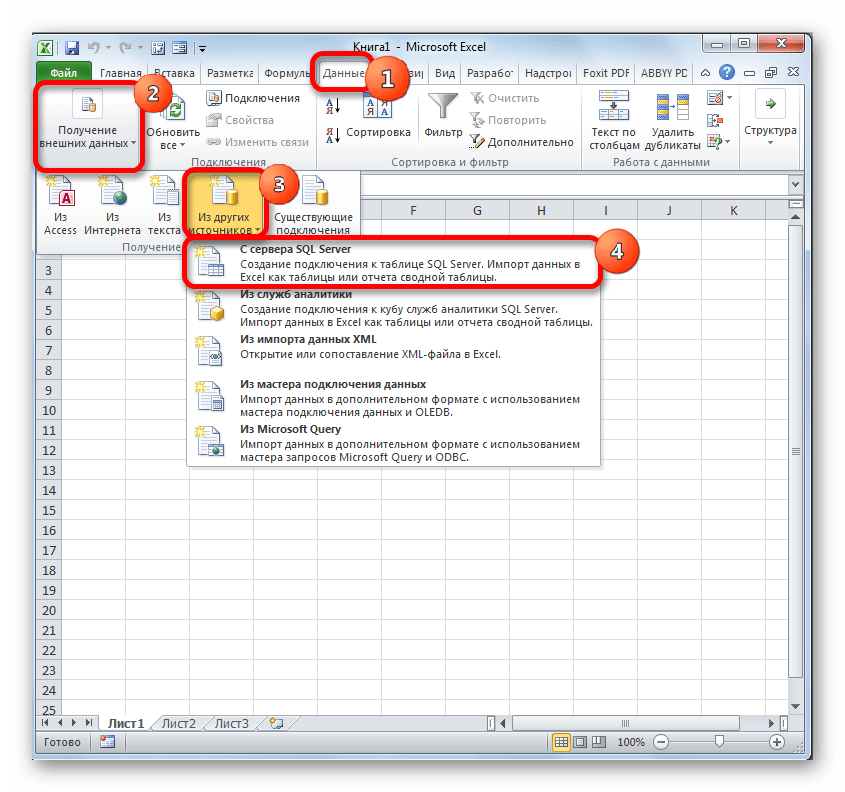
- Запускаем программу Excel и переходим во вкладку «Данные». После этого щелкаем по кнопке «Из других источников», которая размещается на ленте в блоке инструментов «Получение внешних данных». На этот раз из раскрывшегося списка выбираем вариант «С сервера SQL Server».
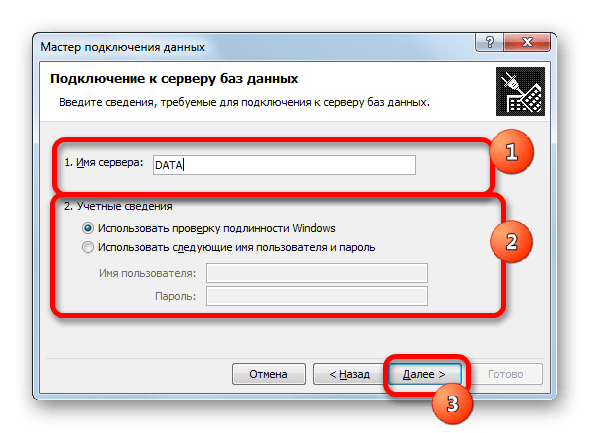
- Происходит открытие окна подключения к серверу баз данных. В поле «Имя сервера» указываем наименование того сервера, к которому выполняем подключение. В группе параметров «Учетные сведения» нужно определиться, как именно будет происходить подключение: с использованием проверки подлинности Windows или путем введения имени пользователя и пароля. Выставляем переключатель согласно принятому решению. Если вы выбрали второй вариант, то кроме того в соответствующие поля придется ввести имя пользователя и пароль. После того, как все настройки проведены, жмем на кнопку «Далее». После выполнения этого действия происходит подключение к указанному серверу. Дальнейшие действия по организации запроса к базе данных аналогичны тем, которые мы описывали в предыдущем способе.
Как видим, в Экселе SQL запрос можно организовать, как встроенными инструментами программы, так и при помощи сторонних надстроек. Каждый пользователь может выбрать тот вариант, который удобнее для него и является более подходящим для решения конкретно поставленной задачи. Хотя, возможности надстройки XLTools, в целом, все-таки несколько более продвинутые, чем у встроенных инструментов Excel. Главный же недостаток XLTools заключается в том, что срок бесплатного пользования надстройкой ограничен всего двумя календарными неделями.
Еще статьи по данной теме:
Помогла ли Вам статья?
| title | description | author | ms.author | ms.date | ms.service | ms.subservice | ms.topic | monikerRange |
|---|---|---|---|---|---|---|---|---|
|
Import data from Excel to SQL Server or Azure SQL Database |
This article describes methods to import data from Excel to SQL Server or Azure SQL Database. Some use a single step, others require an intermediate text file. |
rwestMSFT |
randolphwest |
03/30/2023 |
sql |
data-movement |
conceptual |
=azuresqldb-current||>=sql-server-2016||>=sql-server-linux-2017||=azuresqldb-mi-current |
Import data from Excel to SQL Server or Azure SQL Database
[!INCLUDE SQL Server Azure SQL Database]
There are several ways to import data from Excel files to [!INCLUDE ssnoversion-md] or to Azure SQL Database. Some methods let you import data in a single step directly from Excel files; other methods require you to export your Excel data as text (CSV file) before you can import it.
This article summarizes the frequently used methods and provides links for more detailed information. A complete description of complex tools and services like SSIS or Azure Data Factory is beyond the scope of this article. To learn more about the solution that interests you, follow the provided links.
List of methods
There are several ways to import data from Excel. You may need to install SQL Server Management Studio (SSMS) to use some of these tools.
You can use the following tools to import data from Excel:
| Export to text first ([!INCLUDE ssnoversion-md] and SQL Database) | Directly from Excel ([!INCLUDE ssnoversion-md] on-premises only) |
|---|---|
| Import Flat File Wizard | SQL Server Import and Export Wizard |
| BULK INSERT statement | SQL Server Integration Services (SSIS) |
| BCP | OPENROWSET function |
| Copy Wizard (Azure Data Factory) | |
| Azure Data Factory |
If you want to import multiple worksheets from an Excel workbook, you typically have to run any of these tools once for each sheet.
[!IMPORTANT]
To learn more, see limitations and known issues for loading data to or from Excel files.
Import and Export Wizard
Import data directly from Excel files by using the [!INCLUDE ssnoversion-md] Import and Export Wizard. You also can save the settings as a SQL Server Integration Services (SSIS) package that you can customize and reuse later.
-
In [!INCLUDEssManStudioFull], connect to an instance of the [!INCLUDEssNoVersion] [!INCLUDEssDE].
-
Expand Databases.
-
Right-click a database.
-
Select Tasks.
-
Choose to Import Data or Export Data:
:::image type=»content» source=»../../integration-services/import-export-data/media/start-wizard-ssms.jpg» alt-text=»Start wizard SSMS»:::
This launches the wizard:
:::image type=»content» source=»media/excel-connection.png» alt-text=»Connect to an Excel data source»:::
To learn more, review:
- Start the SQL Server Import and Export Wizard
- Get started with this simple example of the Import and Export Wizard
Integration Services (SSIS)
If you’re familiar with SQL Server Integration Services (SSIS) and don’t want to run the [!INCLUDE ssnoversion-md] Import and Export Wizard, create an SSIS package that uses the Excel Source and the [!INCLUDE ssnoversion-md] Destination in the data flow.
To learn more, review:
- Excel Source
- SQL Server Destination
To start learning how to build SSIS packages, see the tutorial How to Create an ETL Package.
:::image type=»content» source=»media/excel-to-sql-data-flow.png» alt-text=»Components in the data flow»:::
OPENROWSET and linked servers
[!IMPORTANT]
In Azure SQL Database, you cannot import directly from Excel. You must first export the data to a text (CSV) file.
[!NOTE]
The ACE provider (formerly the Jet provider) that connects to Excel data sources is intended for interactive client-side use. If you use the ACE provider on [!INCLUDE ssnoversion-md], especially in automated processes or processes running in parallel, you may see unexpected results.
Distributed queries
Import data directly into [!INCLUDE ssnoversion-md] from Excel files by using the Transact-SQL OPENROWSET or OPENDATASOURCE function. This usage is called a distributed query.
[!IMPORTANT]
In Azure SQL Database, you cannot import directly from Excel. You must first export the data to a text (CSV) file.
Before you can run a distributed query, you have to enable the ad hoc distributed queries server configuration option, as shown in the following example. For more info, see ad hoc distributed queries Server Configuration Option.
sp_configure 'show advanced options', 1;
RECONFIGURE;
GO
sp_configure 'ad hoc distributed queries', 1;
RECONFIGURE;
GO
The following code sample uses OPENROWSET to import the data from the Excel Sheet1 worksheet into a new database table.
USE ImportFromExcel;
GO
SELECT * INTO Data_dq
FROM OPENROWSET('Microsoft.ACE.OLEDB.12.0',
    'Excel 12.0; Database=C:TempData.xlsx', [Sheet1$]);
GO
Here’s the same example with OPENDATASOURCE.
USE ImportFromExcel;
GO
SELECT * INTO Data_dq
FROM OPENDATASOURCE('Microsoft.ACE.OLEDB.12.0',
    'Data Source=C:TempData.xlsx;Extended Properties=Excel 12.0')...[Sheet1$];
GO
To append the imported data to an existing table instead of creating a new table, use the INSERT INTO ... SELECT ... FROM ... syntax instead of the SELECT ... INTO ... FROM ... syntax used in the preceding examples.
To query the Excel data without importing it, just use the standard SELECT ... FROM ... syntax.
For more info about distributed queries, see the following articles:
- Distributed Queries (Distributed queries are still supported in [!INCLUDE sssql19-md], but the documentation for this feature hasn’t been updated.)
- OPENROWSET
- OPENDATASOURCE
Linked servers
You can also configure a persistent connection from [!INCLUDE ssnoversion-md] to the Excel file as a linked server. The following example imports the data from the Data worksheet on the existing Excel linked server EXCELLINK into a new [!INCLUDE ssnoversion-md] database table named Data_ls.
USE ImportFromExcel;
GO
SELECT * INTO Data_ls FROM EXCELLINK...[Data$];
GO
You can create a linked server from SQL Server Management Studio (SSMS), or by running the system stored procedure sp_addlinkedserver, as shown in the following example.
DECLARE @RC INT;
DECLARE @server NVARCHAR(128);
DECLARE @srvproduct NVARCHAR(128);
DECLARE @provider NVARCHAR(128);
DECLARE @datasrc NVARCHAR(4000);
DECLARE @location NVARCHAR(4000);
DECLARE @provstr NVARCHAR(4000);
DECLARE @catalog NVARCHAR(128);

-- Set parameter values
SET @server = 'EXCELLINK';
SET @srvproduct = 'Excel';
SET @provider = 'Microsoft.ACE.OLEDB.12.0';
SET @datasrc = 'C:TempData.xlsx';
SET @provstr = 'Excel 12.0';

EXEC @RC = [master].[dbo].[sp_addlinkedserver] @server,
    @srvproduct,
    @provider,
    @datasrc,
    @location,
    @provstr,
    @catalog;
For more info about linked servers, see the following articles:
- Create Linked Servers
- OPENQUERY
For more examples and info about both linked servers and distributed queries, see the following article:
- How to use Excel with SQL Server linked servers and distributed queries
Prerequisite — Save Excel data as text
To use the rest of the methods described on this page — the BULK INSERT statement, the BCP tool, or Azure Data Factory — first you have to export your Excel data to a text file.
In Excel, select File | Save As and then select Text (Tab-delimited) (*.txt) or CSV (Comma-delimited) (*.csv) as the destination file type.
If you want to export multiple worksheets from the workbook, select each sheet, and then repeat this procedure. The Save as command exports only the active sheet.
[!TIP]
For best results with data importing tools, save sheets that contain only the column headers and the rows of data. If the saved data contains page titles, blank lines, notes, and so forth, you may see unexpected results later when you import the data.
The Import Flat File Wizard
Import data saved as text files by stepping through the pages of the Import Flat File Wizard.
As described previously in the Prerequisite section, you have to export your Excel data as text before you can use the Import Flat File Wizard to import it.
For more info about the Import Flat File Wizard, see Import Flat File to SQL Wizard.
BULK INSERT command
BULK INSERT is a Transact-SQL command that you can run from SQL Server Management Studio. The following example loads the data from the Data.csv comma-delimited file into an existing database table.
As described previously in the Prerequisite section, you have to export your Excel data as text before you can use BULK INSERT to import it. BULK INSERT can’t read Excel files directly. With the BULK INSERT command, you can import a CSV file that is stored locally or in Azure Blob storage.
USE ImportFromExcel;
GO
BULK INSERT Data_bi FROM 'C:Tempdata.csv'
   WITH (
      FIELDTERMINATOR = ',',
      ROWTERMINATOR = 'n'
);
GO
For more info and examples for [!INCLUDE ssnoversion-md] and SQL Database, see the following articles:
- Import Bulk Data by Using BULK INSERT or OPENROWSET(BULK…)
- BULK INSERT
BCP tool
BCP is a program that you run from the command prompt. The following example loads the data from the Data.csv comma-delimited file into the existing Data_bcp database table.
As described previously in the Prerequisite section, you have to export your Excel data as text before you can use BCP to import it. BCP can’t read Excel files directly. Use to import into [!INCLUDE ssnoversion-md] or SQL Database from a test (CSV) file saved to local storage.
[!IMPORTANT]
For a text (CSV) file stored in Azure Blob storage, use BULK INSERT or OPENROWSET. For an examples, see Example.
bcp.exe ImportFromExcel..Data_bcp in "C:Tempdata.csv" -T -c -t ,
For more info about BCP, see the following articles:
- Import and Export Bulk Data by Using the bcp Utility
- bcp Utility
- Prepare Data for Bulk Export or Import
Copy Wizard (ADF)
Import data saved as text files by stepping through the pages of the Azure Data Factory (ADF) Copy Wizard.
As described previously in the Prerequisite section, you have to export your Excel data as text before you can use Azure Data Factory to import it. Data Factory can’t read Excel files directly.
For more info about the Copy Wizard, see the following articles:
- Data Factory Copy Wizard
- Tutorial: Create a pipeline with Copy Activity using Data Factory Copy Wizard.
Azure Data Factory
If you’re familiar with Azure Data Factory and don’t want to run the Copy Wizard, create a pipeline with a Copy activity that copies from the text file to [!INCLUDE ssnoversion-md] or to Azure SQL Database.
As described previously in the Prerequisite section, you have to export your Excel data as text before you can use Azure Data Factory to import it. Data Factory can’t read Excel files directly.
For more info about using these Data Factory sources and sinks, see the following articles:
- File system
- SQL Server
- Azure SQL Database
To start learning how to copy data with Azure data factory, see the following articles:
- Move data by using Copy Activity
- Tutorial: Create a pipeline with Copy Activity using Azure portal
Common errors
Microsoft.ACE.OLEDB.12.0″ hasn’t been registered
This error occurs because the OLEDB provider isn’t installed. Install it from Microsoft Access Database Engine 2010 Redistributable. Be sure to install the 64-bit version if Windows and [!INCLUDE ssnoversion-md] are both 64-bit.
The full error is:
Msg 7403, Level 16, State 1, Line 3
The OLE DB provider "Microsoft.ACE.OLEDB.12.0" has not been registered.
Cannot create an instance of OLE DB provider «Microsoft.ACE.OLEDB.12.0» for linked server «(null)»
This indicates that the Microsoft OLEDB hasn’t been configured properly. Run the following Transact-SQL code to resolve this:
EXEC sp_MSset_oledb_prop N'Microsoft.ACE.OLEDB.12.0', N'AllowInProcess', 1;
EXEC sp_MSset_oledb_prop N'Microsoft.ACE.OLEDB.12.0', N'DynamicParameters', 1;
The full error is:
Msg 7302, Level 16, State 1, Line 3
Cannot create an instance of OLE DB provider "Microsoft.ACE.OLEDB.12.0" for linked server "(null)".
The 32-bit OLE DB provider «Microsoft.ACE.OLEDB.12.0» cannot be loaded in-process on a 64-bit SQL Server
This occurs when a 32-bit version of the OLD DB provider is installed with a 64-bit [!INCLUDE ssnoversion-md]. To resolve this issue, uninstall the 32-bit version and install the 64-bit version of the OLE DB provider instead.
The full error is:
Msg 7438, Level 16, State 1, Line 3
The 32-bit OLE DB provider "Microsoft.ACE.OLEDB.12.0" cannot be loaded in-process on a 64-bit SQL Server.
The OLE DB provider «Microsoft.ACE.OLEDB.12.0» for linked server «(null)» reported an error.
Cannot initialize the data source object of OLE DB provider «Microsoft.ACE.OLEDB.12.0» for linked server «(null)»
Both of these errors typically indicate a permissions issue between the [!INCLUDE ssnoversion-md] process and the file. Ensure that the account that is running the [!INCLUDE ssnoversion-md] service has full access permission to the file. We recommend against trying to import files from the desktop.
The full errors are:
Msg 7399, Level 16, State 1, Line 3
The OLE DB provider "Microsoft.ACE.OLEDB.12.0" for linked server "(null)" reported an error. The provider did not give any information about the error.
Msg 7303, Level 16, State 1, Line 3
Cannot initialize the data source object of OLE DB provider "Microsoft.ACE.OLEDB.12.0" for linked server "(null)".
Next steps
- Get started with this simple example of the Import and Export Wizard
- Import data from Excel or export data to Excel with SQL Server Integration Services (SSIS)
- bcp Utility
- Move data by using Copy Activity