
Word for Microsoft 365 Outlook for Microsoft 365 Word 2021 Outlook 2021 Word 2019 Outlook 2019 Word 2016 Outlook 2016 Word 2013 Outlook 2013 More…Less
You can add captions to figures, equations, or other objects. A caption is a numbered label, such as «Figure 1», that you can add to a figure, a table, an equation, or another object. It’s comprised of customizable text («Figure», «Table», «Equation» or something else that you type) followed by an ordered number or letter («1, 2, 3…» or «a, b, c…» typically) which can be optionally followed by some additional, descriptive, text if you like.
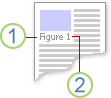
1. Text that you select or create.
2. Number that Word inserts for you
If you later add, delete, or move captions, you can easily update the caption numbers all at once.
You can also use those captions to create a table of the captioned items for example, a table of figures or a table of equations.
What do you want to do?
Click the topic, or topics, below that interest you.
Tip: If you want to be able to move the figure and caption as one object, or wrap text around the figure and caption, follow the instructions for adding captions to floating objects below.
-
Select the object (table, equation, figure, or another object) that you want to add a caption to.
-
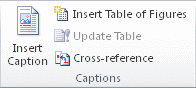
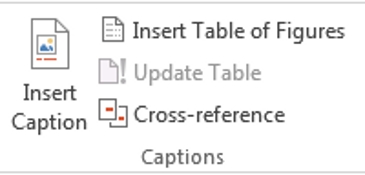
On the References tab, in the Captions group, click Insert Caption.

-
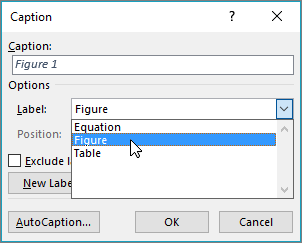
In the Label list, select the label that best describes the object, such as a figure or equation. If the list doesn’t provide the label you want, click New Label, type the new label in the Label box, and then click OK.
-
Type any text, including punctuation, that you want to appear after the label.
-
Click OK.

Note:
Word inserts the sequential caption number as a field. If your caption looks similar to «Figure {SEQ Table * ARABIC}», Word is displaying field codes instead of field results. To see the caption normally, press ALT+F9.
Add captions automatically
Word can add captions automatically as you insert tables or other objects.
-
Select the object (table, equation, figure, or another object) that you want to add a caption to.
-
On the References tab, in the Captions group, click Insert Caption.
-
On the Captions dialog box, click AutoCaption, and then select the check boxes for the items that you want Word to automatically add captions to. You can also choose which position to add captions to in the Position drop-down list.
If you want to be able to wrap text around the object and caption, or you want to be able to move the object and the caption as one unit, you need to group the object and the caption together.
-
Insert your figure.
-
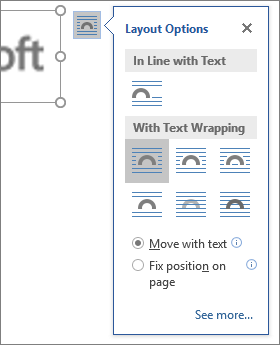
Choose Layout Options and select one of the With Text Wrapping choices.
Important: You should do this step before you insert your caption. If you’ve already inserted the caption, delete it, do this step, then re-add your caption.
-
Add your caption using the steps listed in «Add captions» above.
-
Select your caption then hold down the shift key and select your figure.
-
Right click on either item and choose Group > Group.
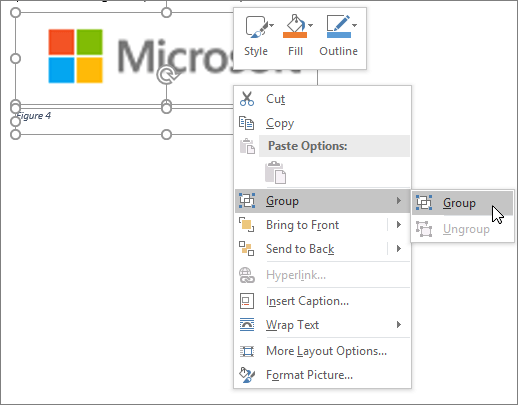
Now text should flow around your figure and caption as expected, and the figure and caption will stay together if you move them somewhere else on the page or in the document.
Note: If you move your figure it’s a good idea to update your caption numbers (see below) just to make sure your numbering is still in the correct order.
If you insert a new caption, Word automatically updates the caption numbers. However, if you delete or move a caption, you must manually start a caption update.
-
Click anywhere in the document and press CTRL+A to select the entire document.
-
Right-click, and then choose Update Field on the shortcut menu. All of the captions in the document should now be updated.
Tip: You can also update captions by selecting the entire document and then pressing F9.
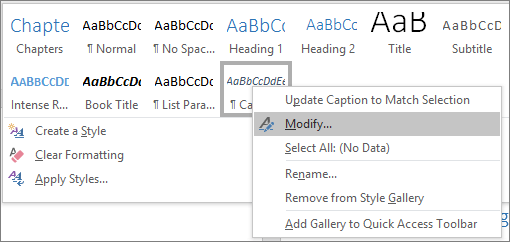
Once you’ve added at least one caption to your document you should see a new style displayed on the style gallery called «Caption». To change the formatting of your captions throughout your document simply right-click that style on the gallery and choose Modify. Here you can set font size, color, type and other options that will apply to your captions.
For more information about modifying styles in Word see Customize styles in Word
To delete a caption select it with your mouse and press Delete. If you have additional captions in your document when you’re finished deleting the ones you want to remove, you should update them. Press CTRL+A to select all of the text in your document and then press F9 to update all. That will ensure that your caption numbers are correct after you’ve removed the ones you didn’t want.
See also
-
Add chapter numbers to captions in Word
-
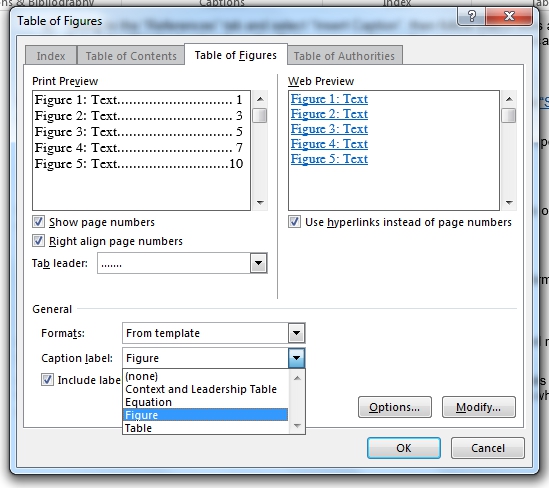
Insert a table of figures
Do you have a question about captions in Word that we didn’t answer here?
Post a question in the Word Answers forum.
Help us improve Word
Do you have suggestions about how we can improve captions (or any other feature) of Word? If so, let us know by providing us feedback. See How do I give feedback on Microsoft Office? for more information.
Need more help?
Want more options?
Explore subscription benefits, browse training courses, learn how to secure your device, and more.
Communities help you ask and answer questions, give feedback, and hear from experts with rich knowledge.

The “Caption” options in Microsoft Word allow you to label images, diagrams, charts, illustrations and figures so your reader can quickly identify what they mean, as well as enabling use of the “dynamic” list functions offered by Microsoft Word.
As such, using captions can help make sure your written work is clear, professionally presented and easy to follow. None of this is much good unless you know how to use captions, though, so strap in and we’ll run you through the basics.
Adding Captions
Adding a basic caption to an existing image/chart in your document is pleasingly straightforward:
- Right click on your image and select “Insert Caption…” from the menu.

- In the pop-up window, choose how you want to label the image (e.g., Figure, Table, etc.) and whether you want it to appear above or below the image.

- Add text that describes the image (e.g., “Figure 1: Experimental Apparatus”) and click “OK.”
This will make a caption appear in the chosen position.
If you want to add a caption to something in the document other than an embedded image, position the cursor where you want to caption to appear and either:
- Go to the “References” tab and select “Insert Caption,” then follow the instructions above.
- Select the “Caption” option from the Styles menu and type; this creates captions without a “Label,” giving you more control over how they’re presented.
Setting Caption Style
Microsoft Word comes with a default “Caption” style, but you can modify this through the “Styles” menu. If you want to set your own caption style, simply:
Find this useful?
Subscribe to our newsletter and get writing tips from our editors straight to your inbox.
- Click on the arrow in the bottom right of the “Styles” menu on the “Home” tab to open the “Styles” sidebar.
- Right click on “Caption” and select “Modify…” to open a new window.
- In the pop up window, select the font/formatting options you require for your captions.
If you want to use different caption styles for different captions or in different parts of your document, you can do this by:
- Clicking on the “New Style” button on the “Styles” sidebar.
- Selecting “Caption” under the “Style Based On” option.
- Choosing a name for your new style (e.g., “Caption 2”) and selecting the font/formatting options required.
Using Captions
As well as labeling your charts and images, using the “Caption” options in Microsoft Word means you can add a dynamic list of charts/figures to your document.
This is quicker than creating a list manually, and you can update dynamic lists at the touch of a button, thereby ensuring they remain accurate even if you amend captions later on. To use this function:
- Position the cursor where you want the list to appear.
- Go to the “References” tab and select “Insert Table of Figures”.
- Choose the caption label type (e.g., Figure, Table, None).

- Click “OK.”
If you’re using more than one caption style, you can even create separate lists for different label types.

If you’re using visuals like tables, figures, or equations, you can add captions in Word to reference or explain items to your audience, here’s how.
Microsoft Word is a wonderful application for creating documents for business and pleasure. And if you happen to use Word for business documents, you may want to include tables, diagrams, images, or other types of visuals. To reference those objects in your content, you can simply add captions.
With captions, you can label various figures and even include a small line of text to describe each. Here, we’ll show you how easy it is to use captions in Microsoft Word along with options to have them fit your document style.
Insert a Caption in Microsoft Word
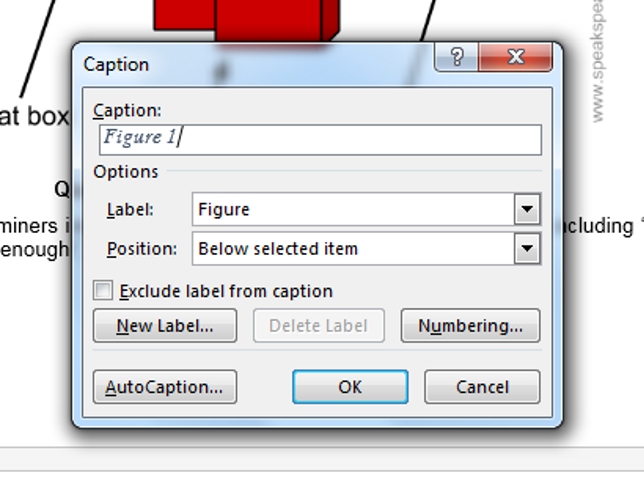
Once you have your object placed where you want it in your Word document, select it, and click the References tab. You’ll see a section for Captions in the ribbon. Click the Insert Caption button and you’ll receive a pop-up window for the caption details.
Caption
By default, the text in the Caption box displays the label followed by a number. This is helpful if you plan to simply number the objects throughout your document. So, you can have Figure 1, Figure 2, and so on, and Word will automatically number these in order each time you insert a caption for that label in the document.
You can also add other text to the caption if you would like to describe the visual differently. Just enter that text into the Caption box after the label and number.
Note: You cannot remove the number from the caption. Any text you would like to include can be added after the number.

Label
To select a different label, click the Label drop-down box and select Figure, Table, or Equation.
Create a New Label
If you like the idea of using labels for your visuals, but those in the list don’t apply, you can create your own. Click New Label, enter the label text, and click OK. Your new label will then appear in the Label drop-down list with the others.

Exclude the Label
Another option you might prefer is to keep the numbering for each object but remove the label from the caption completely. To do this, check the box for Exclude label from caption.
Position
You can choose whether you want the caption displayed above or below the object using the Position drop-down box. If that box is grayed out, it means you did not have the object selected when you clicked the Insert Caption button. You can hit Close in the caption pop-up, select the object, and then click the Insert Caption button if you would like to start again and use Position.

Additional Caption Options
Along with the settings above for your captions in Word are a couple of others you might find useful. You can access each of them at the bottom of the Insert Captions pop-up window.
Numbering
As mentioned, Word will automatically number your captions in order for you. But you have the flexibility to change the format of those numbers. For example, you might prefer to use letters. Click Numbering and then choose your style from the Format drop-down list.

Chapter Styling
If you use Multilevel List styling for your document, you can apply this to the captions. Click Numbering and below Format check the box for Include chapter number. Then make your selections the Chapter starts with style and the Use separator boxes.

Take Advantage of AutoCaption
One more feature of captions in Word you can check out is AutoCaption. This is a useful time-saver if you plan to include captions often from the same source or type of visual. For instance, you may plan to insert many Microsoft Excel pie charts into a report you’re creating in Word. With AutoCaption, you can automatically caption each chart you add.
- Click AutoCaption.
- At the top, check the boxes for the applications or visuals you want to AutoCaption.
- Choose the label you want to use from the Use label Alternatively, you can create your own in this area too by clicking New Label.
- Pick the Position for the caption from that drop-down list.
- Optionally, you can select a different number format with the Numbering button.
- Click OK.

Now, each time you insert the visual that you selected, you should see a caption automatically appear for it.
Format Your Captions
Once you have a caption in your document, you can change the style of it if you like. Simply select the text for the caption on the page. Then use the formatting toolbar that appears or the Font section of the Home tab. You can change the font style, size, color, or format.

If you would rather change the formatting for all captions in your Word document, you can do this by changing the Caption style. Just make sure that you have added at least one caption to the document.
Then, head to the Home tab and click the arrow in the Styles section of the ribbon. You should see a Caption style; right-click it and pick Modify.

Then make your changes in the pop-up window. Your adjusted Caption style should apply to all new captions you add.

Use Captions in Word for Tables, Figures, and More
Captions are very useful if you are creating documents like a report, proposal, manual, or booklet in Microsoft Word. You can reference the captioned visual in your content or describe an object in a subtle way.
And for doing more with graphics, take a look at how you can easily create a flowchart in Word.
You can stay up to date on our new tutorials and articles by following us on Twitter!
![]()
A caption is a numbered label, such as “Figure 1”, that you can add to a figure, a table, an equation, or another object.
Contents
- 1 How do you use captions in Word?
- 2 What is the use of insert caption?
- 3 How do you caption a document?
- 4 How do you figure captions?
- 5 How do I edit captions in Word?
- 6 How do I center a caption in Word?
- 7 How do you keep a figure and caption together in Word?
- 8 How do you caption in LaTeX?
- 9 What is an example of a caption?
- 10 Where do you put figure captions?
- 11 Where should captions be placed?
- 12 How do I remove captions in Word?
- 13 How do you align a picture caption in Word?
- 14 How do I move a caption in Word table?
- 15 How do you caption TikZpicture?
- 16 How do you add a caption to a table in LaTeX?
- 17 How do you put a caption under a picture in LaTeX?
- 18 What is the difference between a caption and a sentence?
- 19 What is the caption of a table?
- 20 Are figure captions italicized?
How do you use captions in Word?
Word
- Click the picture you want to add a caption to.
- Click References > Insert Caption.
- To use the default label (Figure), type your caption in the Caption box.
What is the use of insert caption?
Number, title, and short description are added to pictures, tables, text boxes, drawing objects, and equations inserted in the body text, if needed. The title added to an object is called caption. References > Insert Caption is a function that inserts or modifies captions.
How do you caption a document?
Elements of a Great Caption
- A Label. For most visuals, this will be Figure or Fig.
- A Title. This is usually a fragment/phrasal piece.
- A good, interpretive, informative Caption.
- A Citation (if appropriate).
How do you figure captions?
Here are some tips on using captions:
- A figure caption is centered under the figure; a table caption is centered above the table (if a caption is more than one line, make it left justified).
- A Figure and its caption should appear on the same page.
- All captions should start with a capitalized word and end with a period.
How do I edit captions in Word?
Editing Caption Style
- Go to the “Styles” section of the “Home” tab and find “Caption”
- Right click “Caption” and select “Modify” to open a new window. The “Styles” menu.
- Pick the font and formatting options required.
- Click “OK” to apply the new style. Modifying the “Caption” style.
How do I center a caption in Word?
Firstly, you need to display the Advanced Caption Option dialog by clicking Enterprise > Options button. 2. When the Advanced Caption Option dialog popping up, you should customize the caption settings for the table and figure. Select the Center option from the Horizontal drop-down list box.
How do you keep a figure and caption together in Word?
Option 1: Use a Text Box
- Make sure the figure is in-line (not floating).
- Make sure the title or caption is not in a text box. That is, it has to be ordinary text.
- Select both the figure and the title or caption.
- Insert the Text Box.
- Note: The Text Box will stay on the same page as the paragraph to which it is anchored.
How do you caption in LaTeX?
It is always good practice to add a caption to any figure or table. Fortunately, this is very simple in LaTeX. All you need to do is use the caption{”text”} command within the float environment.
What is an example of a caption?
An example of a caption is a descriptive title under a photograph. An example of a caption are the words at the bottom of a television or movie screen to translate the dialogue into another language or to provide the dialogue to the hard of hearing.A title or heading, as of a document or article.
Where do you put figure captions?
Figure captions are generally placed below the figures, while table captions must be placed above the tables. This is because we generally read tables from the top down, and therefore want to see the caption at the top. Figures are not always read top down.
Where should captions be placed?
Captions are the “audio” for deaf and hard of hearing people. “Captions” is basically another word for “words,” and they are usually placed at the bottom portion of the screen. Captions enable deaf and hard of hearing people to understand and enjoy the dialogue the same way as hearing people do.
How do I remove captions in Word?
To remove a caption label, follow these steps:
- Display the References tab of the ribbon.
- Click the Insert Caption tool, in the Captions group.
- Using the Label drop-down list, choose the caption label you want to delete.
- Click on Delete Label.
- Click on Cancel to dismiss the Caption dialog box.
How do you align a picture caption in Word?
So, if you center your graphics, your captions should show up centered. I have tried this and confirmed that if a picture is left-aligned, selecting Insert | Caption from the right-click menu left-aligns the caption. If the picture is centered, the caption is centered.
How do I move a caption in Word table?
Written Instructions:
- Right-click the object you wish to caption and select Insert Caption… from the shortcut menu.
- In the Caption dialog box, select the label that applies to the object you have selected (e.g. “Figure” or “Table”) and select the positioning of the caption (e.g. above or below the object).
How do you caption TikZpicture?
To add a caption to a TikZpicture illustration, we can put it inside a figure environment and use caption before or after the illustration depending on the desired position.
How do you add a caption to a table in LaTeX?
Add the caption macro before or after the tabular environment to place the caption above or below the table. To reference the table in the text, use label . To get the correct reference number, the label has to be placed either right after the caption or into the caption macro. caption {Caption above table.}
How do you put a caption under a picture in LaTeX?
Caption. It is usually beneficial to include caption to your images. To do so, simply use the command caption{‘text’} either below or above your figure (usually below for images and above for tables).
What is the difference between a caption and a sentence?
A sentence is not the same as a line of writing, even though it might take up a complete line. A sentence needs a capital letter to start and a full stop to end.When captions are written as complete sentences, the present tense needs to be used.
What is the caption of a table?
A caption functions like a heading for a table. Most screen readers announce the content of captions. Captions help users to find a table and understand what it’s about and decide if they want to read it. If the user uses “Tables Mode”, captions are the primary mechanism to identify tables.
Are figure captions italicized?
Figure Captions include the figure number (which is italicized), a brief descriptive phrase (which substitutes for a title), and any brief explanation necessary for understanding the figure.
It is a good practice to caption all the tables, images, maps, etc… added to your report. You can refer to these objects precisely in your text using captions. Captions in Microsoft Word are used to generate the list of tables, figures, etc… in the preface of the report. In this post, I will show you how easily you can add Captions in Microsoft Word.
A caption is a numbered label such as “Table 1.1” or “Figure 1.1” that you can add to a figure, table, or any other object. In a caption, the text part (“Table”, “Figure”, etc…) is customizable and followed by an ordered number which is automatically added to it.
When numbering captions, it is recommended to include the chapter number. For example, if you are numbering a table located in Chapter 1 of the report, you should number the table as “Table 1.1”. So, users can easily find the table.
Add Caption to Tables, Figures, and Equations
Usually, tables are captioned above the table, while other objects are captioned below. To add a caption;
- Select the object to be captioned (table, figure, or equation)
- Go to the References tab
- Click “Insert Caption” in the Caption Group
- Type your object title in the “Caption text box” of the Caption dialog box
- Select your object type (table, figure, or equation) from the “Label” dropdown box.
- Select the “Position” of your title (Above or Below the selected item)
- Change the numbering format (optional)
- Click “Numbering” in the caption dialog box
- Then click the Include chapter number checkbox to add the chapter number
- You can also select up to what heading level is included in the numbering and the separation character between the chapter number and object number.
- Click Ok.
Watch the following short video that demonstrates the above steps.
Add Captions to custom objects
Default Microsoft Word settings contain “Table”, “Figure”, and “Equation” object types. You can also add captions in Microsoft Word for your own object types. For example, if you have included “Maps” in your report, you can create an object type as “Maps” and have separate numbers for maps. Then you can generate a list of Maps in the preface of your document.
To add captions to a custom object type;
- Select the object to be captioned
- Go to the References tab
- Click “Insert Caption” in the Caption Group
- Click the “New Label…” button
- Type your object name in the New Label dialog box and click OK
- Change the numbering as explained above (optional)
- Select the placement (above or below the selected item) of the caption from the Position dropdown list.
- Click OK
Watch the following video that demonstrates the above steps.
Next time when you add a caption, you will see your new object type is available in the Label dropdown list.
Formatting Captions in Microsoft Word
The default caption style of Microsoft Word may not suitable for every document you created. You can find the default caption style in the Styles group of the Home tab.
To format the Captions.
- Place the cursor inside of a caption
- Go to the Home tab
- Expand the Styles group using the dropdown arrow
- Right-click on the Caption style and click on Modify…
- Make the necessary modifications in the Modify Style dialog box and click OK
The modification you made using the above steps will apply to all your captions. And also you do not need to apply styles to every individual caption you added in the future.
Watch the following short video that demonstrates the above steps.
Wrapping Up
Captions in Microsoft Word let you organize the tables, figures, and other types of objects in your document. With that, you can generate the List of Tables, List of Figures, and list of other types of objects like Maps, Equations, etc…
You may also be interested in How to Create Professional Reports with Microsoft Word.