
Create a booklet or book
-
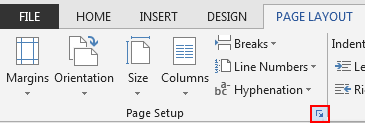
Go to Layout and select the Page Setup dialog launch icon at the bottom-right corner.

-
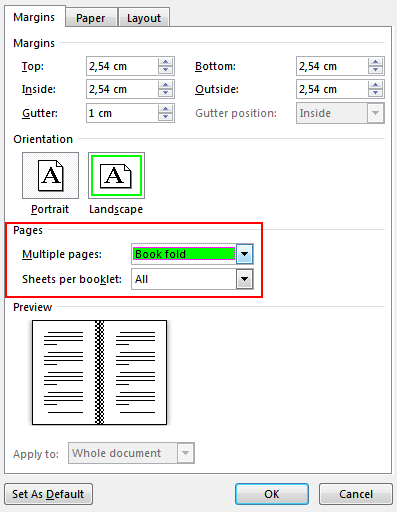
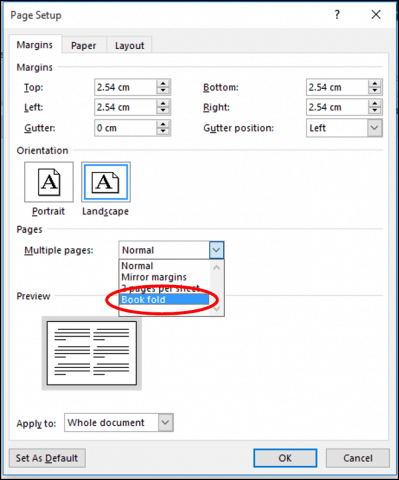
On the Margins tab, change the setting for Multiple pages to Book fold. The orientation automatically changes to Landscape.
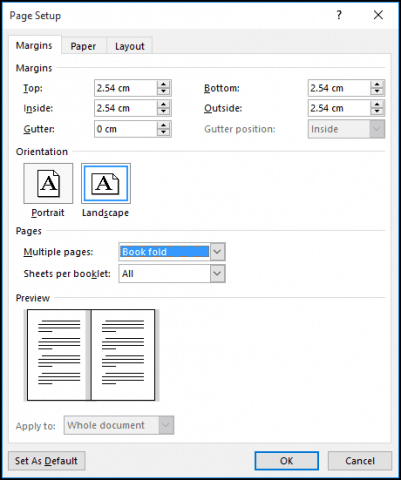
Tip: If you have a long document, you might want to split it into multiple booklets, which you can then bind into one book. Under Sheets per booklet, choose how many pages to print per booklet.
-
Select and increase the value of Gutter to reserve space on the inside fold for binding.
-
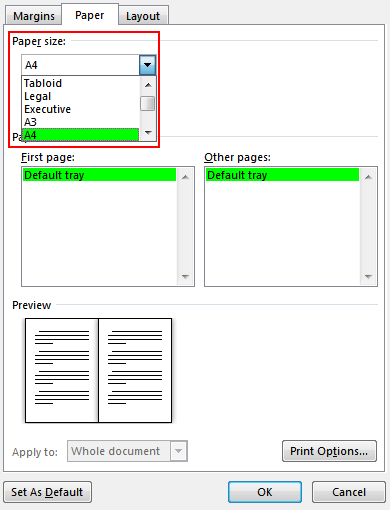
Go to the Paper tab and select the Paper size. The final size of the booklet is one half width of the paper size.
Tip: You can add many embellishments to your booklet’s appearance. For example, to add borders to every page, on the Layout tab of the Page Setup window, click Borders.
-
Click OK. If your document already has content, the text is formatted automatically, but you might need to adjust objects like images and tables manually.
Print settings for booklets
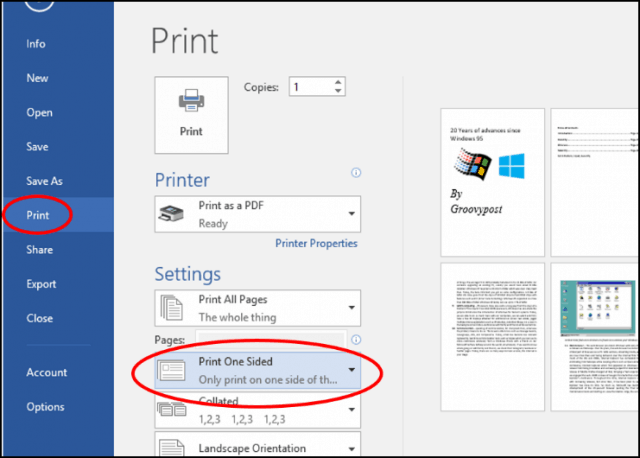
When you print the booklet, check the print settings to make sure you print on both sides of the paper and flip the papers correctly for the printing to work as intended.
-
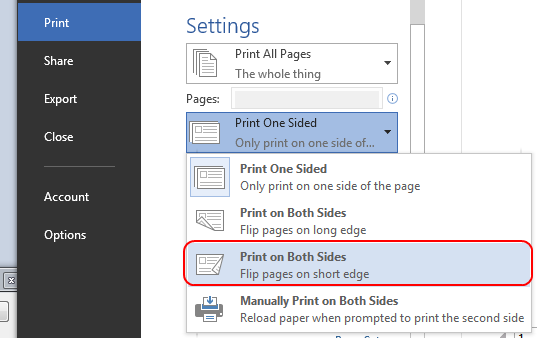
Go to File > Print.
-
If your printer supports automatic printing on both sides, change Print One Sidedto Print on Both Sides. Choose the option Flip pages on short edge to avoid printing the second side of each sheet upside down.
-
If your printer doesn’t support automatic printing on both sides, select Manually Print on Both Sides, and feed the pages back to the printer when prompted. To avoid pages from printing upside down, flip the sheets on the short edge of the paper according to your printer’s instructions.
Tip: For a professional touch, consider adding page numbers in the header or the footer. For more info, see Add page numbers.
See Also
Create a booklet using a Word template
Booklet: Page numbering tips.
Create different headers or footers for odd and even pages
Get Microsoft publishing templates
Create a booklet or book
-
Go to Layout > Margins > Custom Margins.
-
Change the setting for Multiple pages to Book fold. The orientation automatically changes to Landscape.
Tip: If you have a long document, you might want to split it into multiple booklets, which you can then bind into one book. Under Sheets per booklet, choose how many pages to print per booklet.
-
To reserve space on the inside fold for binding, increase the width of the Gutter.
-
You can add many embellishments to your booklet’s appearance. For example, to add borders to every page, on the Layout tab of the Custom Margins window, select Borders.
-
Select OK.
If your document already has content, the text is formatted automatically, but you might need to adjust objects like images and tables manually.
-
Go to File > Page Setup and check the paper size. Keep in mind that the final size of the booklet is one half of the paper size. Make sure your printer is stocked with paper of the right size.
Print settings for booklets
When you print the booklet, check the print settings to make sure you print on both sides of the paper and flip the papers correctly for the printing to work as intended. If your printer supports automatic printing on both sides, follow these steps.
-
Click File > Print.
-
Under Two-sided, select Booklet.
Tip: For a professional touch, consider adding page numbers in the header or the footer. For more info, see Add page numbers.
Note: If your printer doesn’t support automatic printing on both sides, you’ll need to print each page manually.
See Also
Create a booklet using a Word template
Booklet: Page numbering tips.
Create different headers or footers for odd and even pages
Get Microsoft publishing templates
Бумажные книги постепенно отходят на второй план и, если современный человек что-то и читает, то делает это, чаше всего, со смартфона или планшета. Дома для аналогичных целей можно использовать компьютер или ноутбук.
Существуют специальные форматы файлов и программы-читалки для удобного чтения электронных книг, но многие из них также распространяются в форматах DOC и DOCX. Оформление таких файлов зачастую оставляет желать лучшего, поэтому в данной статье мы расскажем, как сделать книгу в Ворде хорошо читабельной и пригодной для печати именно в книжном формате.
Создание электронной версии книги
1. Откройте текстовый документ Word, содержащий книгу.

Примечание: Если вы скачали файл DOC и DOCX из интернета, вероятнее всего, после открытия он будет работать в режиме ограниченной функциональности. Чтобы его отключить, воспользуйтесь нашей инструкцией, описанной в статье по ссылке ниже.
Урок: Как убрать режим ограниченной функциональности в Ворде
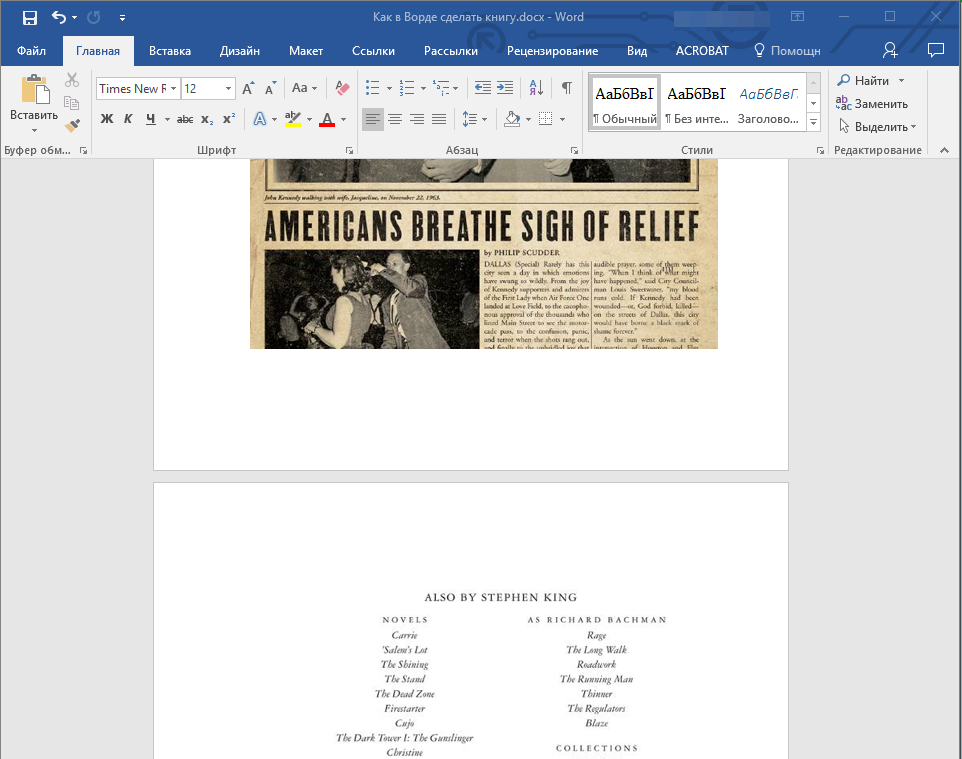
2. Пройдитесь по документу, вполне возможно, что в нем содержится много лишнего, информации и данных, которые вам не нужны, пустые страницы и т.д. Так, в нашем примере это газетная вырезка в начале книги и список того, к чему Стивен Кинг приложил свою руку к моменту написания новеллы “11/22/63”, которая и открыта в нашем файле.
3. Выделите весь текст, нажав “Ctrl+A”.

4. Откройте диалоговое окно “Параметры страницы” (вкладка “Макет” в Word 2012 — 2016, “Разметка страницы” в версиях 2007 — 2010 и “Формат” в 2003).

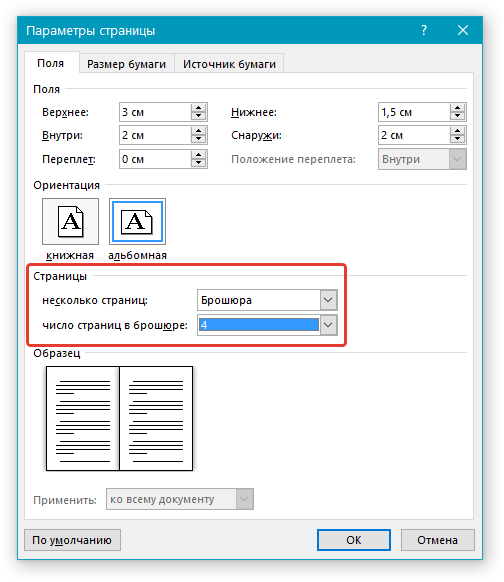
5. В разделе “Страницы” разверните меню пункта “Несколько страниц” и выберите “Брошюра”. Это автоматически изменит ориентацию на альбомную.
Уроки: Как сделать буклет в Ворде
Как сделать альбомный лист

6. Под пунктом “Несколько страниц” появится новый пункт “Число страниц в брошюре”. Выберите 4 (по две страницы с каждой стороны листа), в разделе “Образец” вы можете увидеть, как это будет выглядеть.
7. С выбором пункта “Брошюра” настройки полей (их название) изменились. Теперь в документе есть не левое и правое поле, а “Внутри” и “Снаружи”, что логично для книжного формата. В зависимости от того, как вы будете скреплять свою будущую книгу после печати, выберите подходящий размер полей, не забыв о размере переплета.

-
Совет: Если вы планируете склеивать листы книги, размера переплета в 2 см будет достаточно, если же вы хотите ее сшить или скрепить каким-нибудь другим образом, проделывая отверстия в листах, лучше сделать “Переплет” немного больше.
Примечание: Поле “Внутри” отвечает за отступ текста от переплета, “Снаружи” — от внешнего края листа.
Уроки: Как сделать отступ в Ворде
Как изменить поля страницы
8. Проверьте документ, нормально ли он выглядит. Если текст “разъехался”, возможно, виной этому являются колонтитулы, которые необходимо подкорректировать. Для этого в окне “Параметры страницы” перейдите во вкладку “Источник бумаги” и задайте необходимый размер колонтитулов.

9. Снова просмотрите текст. Возможно, вас не устраивает размер шрифта или сам шрифт. Если это необходимо, изменить его, воспользовавшись нашей инструкцией.

Урок: Как изменить шрифт в Word
10. Вероятнее всего, с изменением ориентации страницы, полей, шрифта и его размера, текст сместился по документу. Для кого-то это не имеет значения, но кто-то явно пожелает сделать так, чтобы каждая глава, а то и каждый раздел книги начинался с новой страницы. Для этого в тех местах, где заканчивается глава (раздел), нужно добавить разрыв страницы.

Урок: Как добавить разрыв страницы в Ворде
Проделав все вышеописанные манипуляции, вы придадите своей книге “правильный”, хорошо читабельный вид. Так что можно смело переходить к следующему этапу.
Примечание: Если в книге по каким-то причинам отсутствует нумерация страниц, вы можете сделать ее вручную, воспользовавшись инструкцией, описанной в нашей статье.
Урок: Как пронумеровать страницы в Word
Печать созданной книги
Завершив работу с электронной версией книги, ее необходимо распечатать, предварительно убедившись в работоспособности способности принтера и достаточных запасах бумаги и краски.
1. Откройте меню “Файл” (кнопка “MS Office” в ранних версиях программы).
2. Выберите пункт “Печать”.

-
Совет: Открыть параметры печати можно и с помощью клавиш — просто нажмите в текстовом документе “Ctrl+P”.
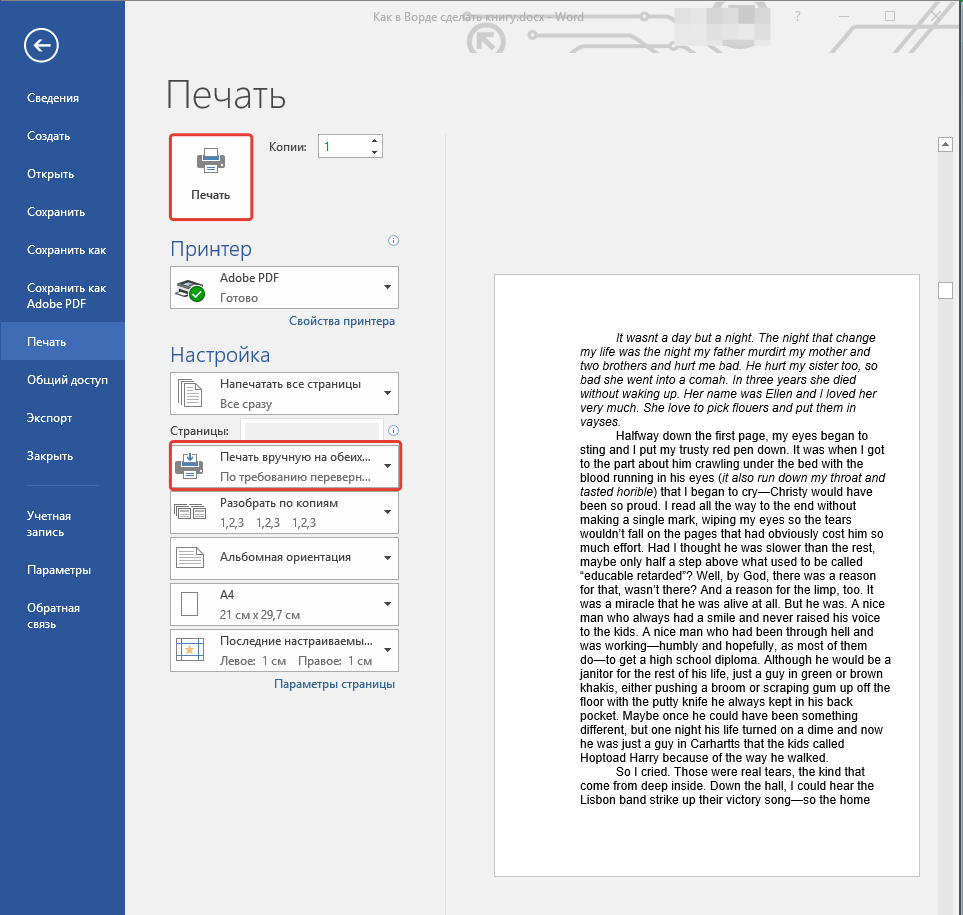
3. Выберите пункт “Печать на обоих сторонах” или “Двусторонняя печать”, в зависимости от версии программы. Поместите бумагу в лоток и нажмите “Печать”.
После того, как будет напечатана первая половина книги, Ворд выдаст следующее уведомление:
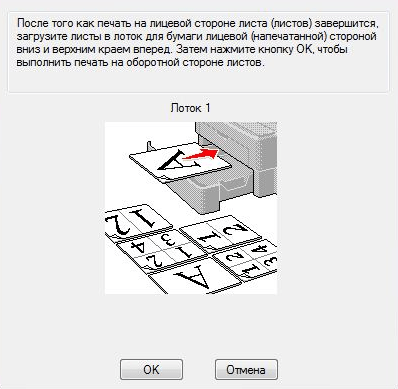
Примечание: Инструкция, которая отображается в данном окне, является стандартной. Следовательно, представленный в ней совет подойдет не для всех принтеров. Ваша задача — понять, как и на какой стороне листа печатает ваш принтер, как он выдает бумагу с распечатанным текстом, после чего ее нужно зеркально перевернуть и поместить в лоток. Нажмите кнопку “ОК”.
-
Совет: Если боитесь допустить ошибку непосредственно на этапе печати, для начала попробуйте распечатать четыре страницы книги, то есть, один лист с текстом с двух сторон.
После того, как печать будет завершена, вы можете скрепить, сшить или склеить свою книгу. Листы при этом нужно складывать не так, как в тетрадке, а сгибать каждый из них посередине (место для переплета), а затем складывать друг за другом, согласно нумерации страниц.
На этом мы закончим, из этой статьи вы узнали, как в MS Word сделать книжный формат страницы, самостоятельно сделать электронную версию книги, а затем распечатать ее на принтере, создав физическую копию. Читайте только хорошие книги, осваивайте правильные и полезные программы, коей является и текстовый редактор из пакета Microsoft Office.
Click File > Print. Under Two-sided, select Booklet. Tip: For a professional touch, consider adding page numbers in the header or the footer.
Contents
- 1 Can you format a book in Word?
- 2 How do you make a book on the computer?
- 3 How do you layout a book for printing?
- 4 How do you format a book?
- 5 How do you print a booklet in Word 2010?
- 6 How do I turn a PDF into a booklet?
- 7 How do I print a booklet in Word for Mac?
- 8 How do I write a book on my laptop?
- 9 Do authors use Word?
- 10 How do you create a leaflet on word?
- 11 What font size are books written in?
- 12 What format are books printed in?
- 13 What is the outline of a book?
- 14 What is eBook format?
- 15 What font do books use?
- 16 How do you print a book front and back?
- 17 How do I print a booklet on a Mac?
- 18 How do I Print a booklet in Word 2013?
- 19 How do I Print a double sided booklet?
- 20 How do I Print a booklet in Windows 10?
Can you format a book in Word?
Formatting a book in Microsoft Word is very similar to Adobe InDesign and other typesetting software. We are now going to work on the paragraph styles. You can bring up the paragraph options under the layout tab and click the little arrow underneath.
How do you make a book on the computer?
Create a Booklet or Book using Word
Launch ‘Microsoft Word‘. Then, on the PAGE LAYOUT tab, click the icon at the bottom-right corner of the Page Setup group to bring up the Page Setup window. Next, on the Margins tab, under Pages, change the setting for ‘Multiple pages’ into Book fold.
How do you layout a book for printing?
Your book should always start on page one on the right-hand side page and will leave all blank pages throughout the book with no page numbers on. The style of the page numbers should be in line with the main body of your book. They are normally in a small font and centred at the bottom of the page.
How do you format a book?
How To Format Your Book: Tips for Nailing Your Book Format
- Use black, 12-point, Times New Roman as the font.
- Use the U.S. standard page size of 8.5×11 inches and set your margins to 1 inch on all sides.
- Set alignment to left justified.
- Use a single space after periods.
- Use double-spaced line spacing.
How do you print a booklet in Word 2010?
In the document that you want to print as a booklet, click the Page Layout tab and then click the Page Setup Dialog Box Launcher. In the dialog box, in the Multiple pages list, click Book fold.
How do I turn a PDF into a booklet?
– Open the PDF that you wish to print as a booklet in Acrobat Reader 9. – In the top left-most corner, select File and then Print. – Alternatively, you could press “Ctrl” + “P” or simply click on the icon to launch the print window. – In the Page Scaling section of the print window, select Booklet Printing.
How do I print a booklet in Word for Mac?
How to Make a Booklet in Word for a Mac
- Download and install Create Booklet 1.1 from the Apple Downloads Site:
- Create a new blank document in Word.
- Click “View” and select “Print Layout.”
- Write your booklet the same way you would any word document.
- From Word, click on “File” and then “Print” from the menu that appears.
How do I write a book on my laptop?
15 Book Writing Software Programs That Can Make Your Life Easier
- Scrivener. Scrivener is the ultimate book-organization tool.
- Google Docs. Google Docs is a great collaborative tool.
- Freedom.
- ProWritingAid.
- Grammarly.
- Novel Factory.
- Hemingway Editor.
- Evernote.
Absolutely, many (most) authors use Microsoft Word, if not while writing the book, then in the editing process. Every editor I’ve ever worked with has sent me a Word file back with Track Changes and Comments for me to work on. I usually write in Word, too, but recently I started using Scrivener to write and outline in.
How do you create a leaflet on word?
Answer
- Open Word 2016 and create a new Blank Document.
- Select File > Page Setup.
- Ensure that the page is set to be A4 and Landscape and press Ok.
- In the Layout tab select Margins and choose Narrow Margins.
- In the Layout tab select Columns and select 3 Columns.
- Add your content to the brochure and you are ready to go!
What font size are books written in?
Font: Your font should generally be 12 point Times New Roman. Though some agents and editors may prefer different serif or sans serif fonts like Arial or Courier New, Times New Roman with a 12 point font size is the industry standard.
What format are books printed in?
PDF for Print Books
Portable Document Format (PDF) is the standard format for creating a print book and documents.
What is the outline of a book?
An outline is the skeleton of your book. Once you put all the bones in place, you have a solid framework for adding your ideas, thoughts, stories, anecdotes, facts, and figures. Like a skeleton, every bone of your book fits into a certain location. When it’s in the right spot, you’ll know.
What is eBook format?
eBook formatting is a standard design process that turns your eBook’s text and images into an attractive layout for readers to enjoy. It’s similar to printed book interior design and formatting, but focuses solely on your book in the digital space.
What font do books use?
The most widely used typefaces for book body text include Baskerville, Bembo, Garamond, Janson, Palatino, and Times Roman (although this more of a newspaper font). Sans serif fonts may be difficult to read for an entire book. 3.
How do you print a book front and back?
Print a booklet
- Choose File > Print and select the printer.
- Specify which pages to print: To print pages from front to back, select All.
- Click Booklet.
- To print certain pages on a different paper or paper stock, specify those pages using the Sheets From/To option.
- Choose additional page handling options.
How do I print a booklet on a Mac?
Printing a booklet on a Mac
- Go into the Layout section of the Print dialog.
- Select Two-Sided Printing.
- Set Pages per Sheet to ‘2’
- Set the ‘Two-Sided’ option to ‘Short-Edge Binding’
How do I Print a booklet in Word 2013?
Go to Page Setup – it’s at the bottom of the list of printer options. A small window will appear, just like the one below. In the Pages section, select Book fold in the Multiple pages section. Underneath it, have Sheets per booklet set to All.
How do I Print a double sided booklet?
Print a booklet on a double-sided printer
- Open the print dialog.
- Click the Properties…
- Under Range and Copies, choose Pages.
- Type the numbers of the pages in this order (n is the total number of pages, and a multiple of 4):
- Choose the Page Layout tab.
- Click Print.
How do I Print a booklet in Windows 10?
Print the booklet or newsletter
- On the File menu, click Print, and then click the Publication and Paper Settings tab.
- In the Print dialog box, under Printing options, verify that Booklet, side-fold is selected.
- Select any other options that you want, and then click OK to print the publication.

Microsoft Word is primarily known for its word processing features, but it has some surprisingly decent desktop publishing functions, too.
A couple of years ago, I was tasked with revising the rulebook for students at a local high school. I had two choices, Microsoft Publisher or Microsoft Word. Knowing I would be collaborating with colleagues on the project, Microsoft Word turned out to be the best choice; since everybody had it installed. Microsoft Word is primarily known for its word processing features, but it has some surprisingly decent desktop publishing functions. You can create flyers, newsletters, and of course, booklets. This article shows you how to prepare one using the latest version, Microsoft Word 2016.
Prepare a Document as a Booklet in Microsoft Word 2016
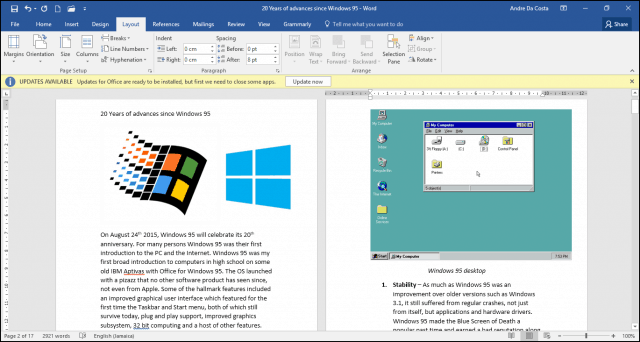
Before you can start entering content into your booklet, you need to set up Microsoft Word first. Click the Layout tab, then click the Page formatting options button. This will bring up the Page Setup modal dialog.

Click in the Multiple pages list box, then select Book fold; you will notice your options have changed.
A preview of what a booklet will look like is generated. You can make further adjustments for the Gutter, which is a fancy name for the margins within the middle of the page. You can decide how close to the center you want the text to be.
If you enable the ruler View tab > Ruler within the show group, you can manually adjust it to your satisfaction. After setting up the page, proceed to enter your text and graphics.
When you are done, you can preview what your booklet looks like and make appropriate adjustments for printing. To do that, click File > Print. You will get a visual idea of what your booklet looks like; if you want to make further adjustments, click the Back button, then make your changes.
When you are ready to print the document, click in the Pages list box under Settings and select Manually Print on Both Sides. If you have a printer with duplex support (print on both sides), click Print, and it should take care of it automatically.
Have any questions, drop a line in the comments.
![]()
You have read and put into practice the instructions in my tutorial on how to write a book in Word and, now that you have finished the work on your new work, you think it is finally time to print it. Since, until now, you have always used the printing function of the popular Microsoft word processing program without paying too much attention to the layout of the documents, now that you are aiming to obtain a hard copy of the work that has cost you so much effort, you would like the quality final of the same corresponds to your expectations.
In short: you would need some advice and indications to obtain a perfectly legible paper document that is similar to the volumes you can buy in the bookstore, is that it? Very well then, if you want, I would be happy to help you once again by showing you in detail how to print a book with Word . I’ll tell you how to set the binding, margins, orientation, and other pagination settings.
c
Secondly, I will also show you the procedures for setting up booklet printing, the small booklets usually printed in A5 format. I assure you that by following my advice to the letter you will completely avoid the risk of wasting paper, ink and time. Having said that, I just have to wish you a good reading and a good job!
Index
- How to print a book with Word
- From computer
- From smartphones and tablets
- How do you print a booklet with Word
In the next chapters we will see how to print a book with Word by first carrying out all the necessary procedures on a computer (Windows and macOS) and, secondly, on smartphones and tablets . Before moving on to the printing phase, be sure to put into practice all the information you find in the guide that I linked to you at the beginning. To obtain a perfectly legible paper version of a book written in Word, it is necessary to scrupulously check and set all the parameters relating to the layout of the document from the appropriate program panels. Find everything explained below.
From computer
To access the layout settings of the file you intend to print, simply open it with Word (on Windows , macOS or via browser ), click on the Layout item at the top. Then, click on the Margins icon you see at the top left and, from the menu that opens, choose the Custom Margins… item .
At this point, you can manually set the values in the boxes for the Top , Left , Bottom , Right and Binding items . These items refer to the position of the “empty” border that frames the text on each page. The word binding, on the other hand, refers to the space reserved for the binding that will hold the various sheets of the book together; it is, therefore, a kind of additional margin that you will have to consider.
My advice, if the publisher you intend to present the book to has not specified anything about it, is to set the margins to make them rather “narrow” to save paper; you could therefore consider using the parameters listed below.
- Top40 cm;
- Left27 cm;
- Less than40 cm;
- Right27 cm.
As for the Binding item , in the latter case I suggest you type a value equal to at least 1.50 cm (to replace the values, just click on the boxes that contain the latter, delete the figures you see and type those that you deem appropriate). Now click on the button next to the Multiple Pages item and, from here, click on the Book Format item (the latter is the most suitable format for printing your document, unfortunately, the option is not available on Word Online).
At this point, make sure the correct size is set for printing. The default is the A4 format , which is the standard used by the vast majority of printers for home use, whose dimensions are 21 cm for the short side and 29.7 cm for the long one. It is a decidedly “large” format and little used for the vast majority of books on the market, so consider whether to use a smaller format such as A5 .
To do this, click on the Dimensions tab at the top and choose the option you deem appropriate (depending on the dimensions shown for each format) from the list of items that is shown to you. As you may have noticed, in the screen where the document pages are displayed, the formatting has changed and the various images, graphics, diagrams and other similar content, if any, should have moved. Provide, therefore, to reposition them by dragging them with the mouse to the most appropriate points.
Then make sure that all the text is justified (so that it is distributed evenly in the final document). Therefore, press the key combination Ctrl + A on Windows and then the combination Ctrl + F ; while on Mac first use the combination cmd + a su and then press cmd + j on the keyboard.
Now set automatic hyphenation to avoid “wide lines” and then go to Layout> Hyphenation> Automatic . Also make sure you have set the appropriate value for the line spacing , that is the spacing between one line and the other of the text; then press on the Home item and, in the Paragraph section , click on the icon of two blue arrows with some black lines. Then choose the value you think is suitable (for an optimal visual rendering I suggest you choose the 1.15 option and not higher values).
In addition, scroll through the text and also correct any spelling errors that are reported to you with a red underline under the words (if you need other tips to make the shape of your text optimal, also consult my guide on how to layout in Word ).
Now you should be ready to print the book: to do this, click on the File item and then on the Print item (the layout options I’m about to tell you about, at the time of writing, are not available on the Web version of Word) . Now you will need to make sure that the two-sided printing option is set . In this case, on Windows , click on the button with the default setting Print on one side and select from the menu that appears Manual print on both sides .
The latter is the setting you have to choose if the printer you have at your disposal does not automatically turn the page during printing. By selecting this option you will have to change the direction of the sheets inserted in the paper compartment of your printer.
Basically, once printing starts, the front of all the sheets in the book will be printed. Subsequently, once this phase is completed, you will have to extract the block of printed sheets from the appropriate compartment, reinsert them in the same direction in the correct printing direction to print the back as well and start printing again (to carry out this operation correctly, help with the instructions or with the appropriate icon that you should find in the paper drawer in the printer).
Otherwise, if your printer supports auto flipping, in the previous step, instead of the Manual print on both sides option, choose the Print on both sides option to flip the pages on the short edge . Once you have gone through these preliminary steps and are sure that the document shown in the preview is exactly as you would like it to be, click the Print button .
To repeat these same steps on the macOS version of the program go to File> Print …> Copies and pages> Layout and, at this point, press the button next to the Duplex item and select the item Long-side binding and then on the item Print . Otherwise, if this button is grayed out, it means the feature is not available on your printer.
In this case, go to File> Print…> Copies and pages> Microsoft Word and, finally, click on the item Only odd pages and then on the Print button . Once the printing has been completed, repeat this last step by selecting the item Even pages only (I recommend: before starting printing, always check the document shown in the preview to be sure that it is perfectly in line with your needs; for more details, take a look at my tutorial where I explained how to print on both sides ).
How do you say? Have you started the print process but for some reason the pages coming out of the printer are different from how you set them up? In this case, check immediately what I have explained to you in my guide on how to cancel a print in progress .
From smartphones and tablets
L ‘ app for smartphones to Word (available for Android , even on devices without access to Google services , and iOS / iPadOS ) offers fewer options for page layout than the PC counterparts: just for that reason, if you plan to print a book and you have the opportunity, I do not recommend using it; or at least use the tablet application , which has an interface very similar to that of the program on a PC (if you intend, therefore, to print a book from a tablet, you can refer directly to the instructions in the previous chapter ).
In any case, to access the pagination settings on the aforementioned app, start it and select the document to print by pressing its name (you can find the file from the home page of the application by pressing on the Recent or Open items at the bottom) . Once the document is located and opened, press the pencil icon at the top.
At this point, press the ▼ icon on the right, on the text formatting toolbar, and tap on the Home item shown on the left. Then select the Layout item and then click on the Margins item ; at this point, you can press on the Narrow item or, if your editor has specified precise parameters, scroll down the list in front of you and press on the Custom Margins… item .
Now, in the boxes you see next to the items Top , Left , Right and Bottom you can type the values you prefer or those I recommended in the chapter on computer . Once you have finished changing the default values, go back to the previous menu by pressing the Size button (found in the Layout tab ) and choose an option from those listed.
At this point, press the Layout item , select the word Home and scroll down the list of buttons until you find the icon relating to the Justify function (the one with 5 lines of the same size placed one above the other) and make sure that is shown on a gray background and, if not, press on the same icon . Remaining in the Home tab , press on the Paragraph item and, pressing on the value placed under the Leading item : select the spacing that best suits your needs (I suggest you select the 1.15 option ).
Once these steps have been completed, you should be ready to print the document you have paginated; to do this, press the ⁝ button located at the top right, then scroll through the list of available options and choose the Print item . Then press on the item All printers … at the top and choose the printer you prefer (or leave the default one selected; if you cannot find yours, make sure that it is enabled for the Wi-Fi printing function and, possibly, read my tutorial on how to connect the phone to the printer ).
Now, to make the printer print on both sides and if the printer supports automatic page flip, press the None button under the heading With dual function and choose the Short Edge option . Finally, tap on the printer icon to start the printing process (check first, however, that the document appears paginated correctly in the print preview screen).
How do you print a booklet with Word
How do you say? Would you like to print a booklet in Word ? In this case, the instructions to follow are very similar to those I explained to you in the chapter on computer (in this case, I suggest you to act from the computer or tablet version of the program, taking into account that the browser version of Word and the smartphone apps do not have the print function for book format ).
Do you also want to know how to print an A5 booklet with Word ? No problem – go to Layout> Size> A5 . Once this is done, click on the Margins icon located in the Layout tab and select the Narrow option . Next, go to Layout> Margins> Custom Margins… and click on the button next to the Multiple Pages item , then selecting the Book Format option .
At this point, to proceed with printing and set the double-sided option, the instructions to follow are the same as I gave you previously . For other doubts about this procedure and to discover alternatives to Word for printing brochures, I refer you to my tutorial on how to print a booklet